
Timing Belt DIY 2

Registered!!
Joined: Nov 2013
Posts: 380
Likes: 3
From: Raleigh, NC
Rep Power: 156 
Re: Timing Belt DIY 2

yeah I had two 1/2" break bars. I tried it with a 3/8" ratchet and extension and it blew the ratchet apart but it was a craftsman so I just got another under warranty while I was at Sears getting the breaker bars.
Registered!!
Joined: Nov 2013
Posts: 380
Likes: 3
From: Raleigh, NC
Rep Power: 156 Re: Timing Belt DIY 2
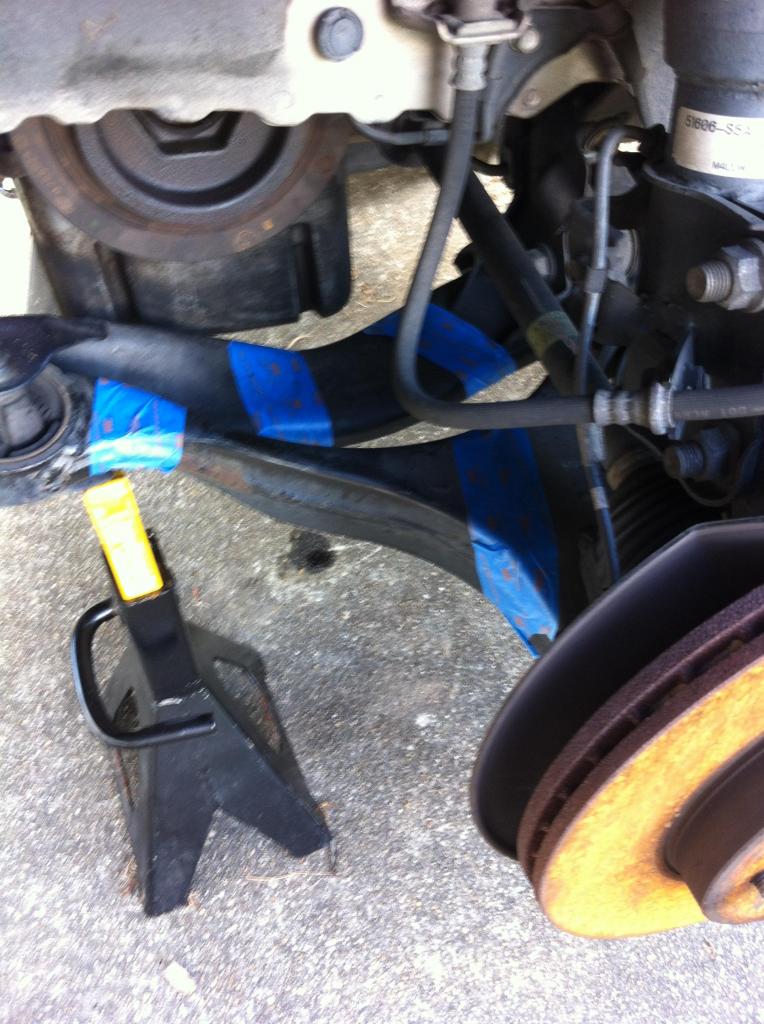
finally finished the timing belt change today. Had to wait for a new lower timing cover and woodruff piece. As I was taking the harmonic balancer off I think the key feel into one of the holes in the control arm. So I'd recommend taping off the holes to avoid this bit of bad luck.
Other than that everything seemed to go back together twice as fast as it did coming apart. Car cranked up fine and seemed to to stay at the normal temp once it heated up. I guess we'll see over time if the workman ship holds up. Seems like a good idea to take the top cover off a few hundred miles to make sure the belt is wearing properly, which I guess would be no wear at all.
Excellent DIY!
Registered!!
Joined: Mar 2011
Posts: 2,499
Likes: 5
Rep Power: 210 
Re: Timing Belt DIY 2
finally finished the timing belt change today. Had to wait for a new lower timing cover and woodruff piece. As I was taking the harmonic balancer off I think the key feel into one of the holes in the control arm. So I'd recommend taping off the holes to avoid this bit of bad luck.

Registered!!
Joined: Nov 2013
Posts: 380
Likes: 3
From: Raleigh, NC
Rep Power: 156 Re: Timing Belt DIY 2
Registered!!
Joined: Jun 2007
Posts: 20
Likes: 0
From: Havana, FL
Rep Power: 0 Re: Timing Belt DIY 2
I'm about seven years behind the curve on this -- and I haven't read all the messages in the meantime -- but I have a couple of things to add to the basic procedure described. First, it's important to note that, as opposed to earlier Honda models, the tensioner bearing has a built-in swivel so tightening the bolt down does NOT lock it in place. You can forget all the tightening-and-loosening steps that applied to earlier cars and are still carried over in the Haynes and Chiltons. Here's some better instructions for dealing with that tensioner:
* To get the old timing belt off, just reach in with a pair of needlenose pliers and pop that tensioner spring off its post. The belt will immediately go slack and can be removed.
* With the belt off and the spring off, install the new tensioner bearing, with locking pin in position, with the locking pin around the 4 o'clock position. With the bolt loose, rotate the assembly CCW until it hits something. Tighten the bolt down. Now, install the tensioner spring, being sure that the side of the plastic thing that says "Up" is up. Slide the belt on, making sure that the timing marks remain lined up at both crank and cam sprockets. Then just yank the pin, and belt tension is immediately applied. You're done. Time to start putting ancillaries back on.
Obviously, if you're reusing the old tensioner bearing, you'll need to fake that locking pin. A nail or stout piece of wire will do.
Registered!!
Joined: Jun 2007
Posts: 20
Likes: 0
From: Havana, FL
Rep Power: 0 Re: Timing Belt DIY 2
As shown clearly in one of the photos in the original sticky post, the pivot bolt for the alternator CANNOT be removed. It runs into the structure of the car. It can be backed out far enough, though, that the alternator can be removed. Obviously, you need to remember to leave that bolt in the bracket as you remove the bracket from the engine, change the timing belt, and then put the bracket back in. If the bolt isn't in the bracket when it's reinstalled, it'll have to come back out!
Registered!!
Joined: Jun 2007
Posts: 20
Likes: 0
From: Havana, FL
Rep Power: 0 Re: Timing Belt DIY 2
The procedure presented indicates that the alternator mount bracket should be removed before the upper and lower timing covers. This is incorrect, as the lower timing cover actually goes over the alternator mount bracket. The lower timing cover should come off first, then the alternator mount bracket.
Registered!!
Joined: Mar 2011
Posts: 2,499
Likes: 5
Rep Power: 210 Re: Timing Belt DIY 2
sorry but this is horrible advice,
the tensioner bolt should not be tightened/torqued down until AFTER the belt is installed,
with the timing belt removed, and the grenade pin installed in the tensioner, you should tighten the tensioner bolt hand tight,
install the timing belt, then attach the tensioner spring to the post on the engine block (the tensioner bolt should still be loose at this point),
rotate the crank at least 2 revolutions and inspect the timing marks, if the marks line up this is the point when you torque down the tensioner bolt,

Registered!!
Joined: Nov 2014
Posts: 4
Likes: 0
Rep Power: 0 
Re: Timing Belt DIY 2
Great DIY! I followed this sticky while changing the timing belt on my 2005 Civic EX. For the most part, the procedure went quite easily. A couple of things that I did differently than the article was to install the motor mount bracket (5 mounting bolts) before installing the top timing belt cover. This bracket couldn't be installed if both the top cover and the bottom cover were installed. Also, before starting to remove the old belt, I marked a line with a silver Sharpee marker with a corresponding mark on the camshaft pulley itself.I did this on the crank pulley also. After removing the old belt, I transferred the marks from the old belt on to the new belt. When I went to install the new belt, it was obvious that the belt was in the exact same spot that the old one was. I double checked the timing marks on the pulleys were in the same spot as a sanity check.
Up to this point, everything went well. When I had the new timing belt on, I rotated the engine a few times counterclockwise back to TDC. The belt was tracking just fine and the timing marks lined up as expected. I was now at the step to torque the tensioner bolt to 33lb/ft. As soon as the bolt got to around 15lb/ft, I could feel the torque fall off. I kept tightening, and my suspicion was correct. The bolt had stripped! I pulled the bolt out and with it came the aluminum threads from the block. After researching on this site, it became apparent that this is a common problem with these motors. The engine has never been apart (109K miles), so I know that the bolt has never been over torqued, or cross threaded. I ordered the Timesert kit #1012 and waited the four days for it to arrive at my door. I followed the directions that came with the kit, and the insert went in without a hitch. I saw a lot of comments that blamed the last mechanic for incorrectly installing the tensioner bolt, but I'm thinking that this is a design flaw in the motor. A fastener that will be taken out a few times during the life of the motor, and it only lasts for one install of the bolt? I fault Honda for this design oversight. Looking at the history of the problem, Honda knew this was a problem long ago. There should of been an insert installed in this location from the start!
Up to this point, everything went well. When I had the new timing belt on, I rotated the engine a few times counterclockwise back to TDC. The belt was tracking just fine and the timing marks lined up as expected. I was now at the step to torque the tensioner bolt to 33lb/ft. As soon as the bolt got to around 15lb/ft, I could feel the torque fall off. I kept tightening, and my suspicion was correct. The bolt had stripped! I pulled the bolt out and with it came the aluminum threads from the block. After researching on this site, it became apparent that this is a common problem with these motors. The engine has never been apart (109K miles), so I know that the bolt has never been over torqued, or cross threaded. I ordered the Timesert kit #1012 and waited the four days for it to arrive at my door. I followed the directions that came with the kit, and the insert went in without a hitch. I saw a lot of comments that blamed the last mechanic for incorrectly installing the tensioner bolt, but I'm thinking that this is a design flaw in the motor. A fastener that will be taken out a few times during the life of the motor, and it only lasts for one install of the bolt? I fault Honda for this design oversight. Looking at the history of the problem, Honda knew this was a problem long ago. There should of been an insert installed in this location from the start!
Registered!!
Joined: Mar 2011
Posts: 2,499
Likes: 5
Rep Power: 210 Re: Timing Belt DIY 2
Registered!!
Joined: Nov 2014
Posts: 4
Likes: 0
Rep Power: 0 Re: Timing Belt DIY 2
I initially installed the bolt hand tight and then used the torque wrench to get to the final torque. It was barely starting to tighten before I felt it give away and loosen again. This was way before I was even close to 33 ft/lbs. I removed the bolt and the pulled aluminum threads were on the bolt threads.

Registered!!
Joined: Apr 2022
Posts: 5
Likes: 0
Rep Power: 0 Re: Timing Belt DIY 2
this is why you NEVER TURN the timing belt using the cam, you should always turn it using the drive pulley which is the crank,
if you have the crank pulley removed and need to turn it, just temporarily install the pulley with the key and use the crank holding tool to turn the crank,
just re torque the cam bolt to spec, and throw a bit of locktite on there while your at it
if you have the crank pulley removed and need to turn it, just temporarily install the pulley with the key and use the crank holding tool to turn the crank,
just re torque the cam bolt to spec, and throw a bit of locktite on there while your at it
Joined: Dec 2008
Posts: 15,179
Likes: 1,606
From: TN
Rep Power: 367 Re: Timing Belt Tensioner Bolt upgrade...
what type of torque wrench are you using?
I twisted my water pump bolts because I was using a higher end torque wrench, click type. The ones that uses the click, they need to be chosen by torque range. The regular bigger ones does not have enough sensitivity for low torque.
I had to use a needle beam type for lower torque bolts.
https://www.homedepot.com/p/GEARWREN...957N/313870121
Don't use a gun to shoot down a mosquito

Thread
Thread Starter
Honda Civic Forum
Replies
Last Post
EdGasket
6th Generation Civic 1996 - 2000
4
May 25, 2015 01:06 PM
dosmastr
Mechanical Problems/Vehicle Issues and Fix-it Forum
0
May 5, 2015 12:19 PM
04145plc315, 2001, 2003, belt, bolt, civic, crankshaft, diy, gauge, honda, mechanical, physics, rotation, tension, timing

