
Timing Belt DIY 2


Registered!!
Joined: Dec 2010
Posts: 1
Likes: 0
Rep Power: 0 
Re: Timing Belt DIY 2
Re: 2003 Civic Timing Belt DIY by Creaker2
I tried to post this on the above thread but it wouldn't let me, so I'm sharing my experience here.
After I replacing the timing belt, tensioner, and water pump in my wife's car I decided to double check my work via google and came to this site.... then I read this comment on Creaker2's write-up:
"11. .......... Tighten the tension bolt to 33 ft lb. This will release the internal spring of the tensioner and tighten the belt. It will also tighten grenade pin (aka allen wrench)."
I hadn't noticed any indication of an internal spring in the tensioner, nor had I accounted for one in the installation, so I took every thing back apart to install it 'correctly'.
After getting the new tensioner off and inspecting it's operation I found no evidence of an internal spring. So it turns out I installed it correctly to begin with. I actually see no purpose for the grenade pin at all unless you're planning to REMOVE a timing belt without detaching the external tension spring. Unless I'm missing something big, there is absolutely no purpose for the grenade pin during installation.

Registered!!
Joined: Jan 2011
Posts: 1
Likes: 0
Rep Power: 0 Re: Timing Belt DIY 2
I wanted to add for the wing nut on the alternator that if you have a 27mm socket it fits over the wing and helps a GREAT deal in tightening it ... I'm still trying to figure out if we messed up the engine or something tho with our job cause i cant get it to start. but wanted to throw that tid bit of info out there for ppl cause the wing nut is a PITA

Registered!!
Joined: Jan 2009
Posts: 15
Likes: 0
Rep Power: 0 Re: Timing Belt DIY 2
I wanted to add for the wing nut on the alternator that if you have a 27mm socket it fits over the wing and helps a GREAT deal in tightening it ... I'm still trying to figure out if we messed up the engine or something tho with our job cause i cant get it to start. but wanted to throw that tid bit of info out there for ppl cause the wing nut is a PITA

Re: Timing Belt DIY 2
Getting ready to do this cant find a few part #'s from Majestic.
This is what I have so far I am trying to find the part #'s for the Harmonic balancer, crankshaft & camshaft oil seals, also is there anything else I am missing that I should order up thanks in advance.
91212-PLM-A01 OIL SEAL (38X50X7) (ARAI) $3.79 $3.79
14400-PMM-A02 BELT, TIMING (104RU22 GB-333) $16.14 $16.14
91213-P2F-A01 OIL SEAL (29X45X8) (ARAI) $3.12 $3.12
04145-PLC-315 TENSIONER SET, TIMING BELT $69.84 $69.84
19200-PLM-A01 WATER PUMP $53.29 $53.29
56992-PLM-003 BELT, POWER STEERING PUMP (BANDO) $11.04 $11.04
38920-PLR-003 BELT, COMPRESSOR (BANDO) $14.53 $14.53
12030-PLC-010 GASKET SET, HEAD COVER
Last edited by sam68; Feb 7, 2011 at 05:01 PM.

Registered!!
Joined: Feb 2011
Posts: 1
Likes: 0
Rep Power: 0 Re: Timing Belt DIY 2
Excellent work from the original post. This is the best I've ever found of explaining the procedure for replacing Honda Civic timing belt.
My wife's 2003 civic is almost due for replacement of a new timing belt (and a water pump as recommended). I just wonder if it is possible to remove the crank pulley bolt without using the special tool specified in the post by using a hammer, a 19mm socket, a breaker bar, and keeping all the belts on the pulley? The reason for this idea comes from the common understanding after reading the posts that it seems the bolt is "stuck" on the pulley and the hammer impact to the breaker bar would make it easier to loosen the "glue" effect between the bolt and the pulley. Keeping all belts on the pulley adds some extra resistance to "lock" the pulley when hammering the breaker bar in CCW direction. Has anyone tried this method?
My another hypothesis is that it may not be necessary to line-up the crank and camshaft pulleys to their corresponding marker provided that the original installation is correct (e.g. was running smoothly before the replacement, and it is the 1st time for the car to replace the timing belt), the pulleys did not move during the installation (including taking the old timing belt off the pulleys), and the new timing belt is aligned correctly by keeping the left side (the long side) of the belt straight when inserting the belt teeth into the grooves of both pulleys. The reason for this idea is that both pulleys are not that easy to turn by hand and the car would have not run smothly if the pulleys were out of alighnment by even only one tooth. Any comment?
Last edited by oz123; Feb 27, 2011 at 06:56 PM.

Registered!!
Joined: Mar 2011
Posts: 1
Likes: 0
Rep Power: 0 I'm new to this forum, but have some good experience with timing belts having changed my 90 Plymouth Lasers twin cam 3 times in the 90's and my BMW 325I twice in 1999 & 2008.
My Major point, and I can't believe nobody has mentioned it yet, is getting a white paint pen and match marking the belt itself to the Cam & Crank pulleys. If you mark a tooth on the belt to a groove on the 2 pulleys, while everything is together, then transfer those marks to the new belt, you have just 100% Moron proofed your way into making sure you will reinstall the timing belt on the right teeth on the pulleys. You just gotta be super careful when you transfer the marks. Check and double check to be sure you transferred correctly. Just lay the old belt on top of the new one. It doesn't matter which teeth/grooves you mark before removing the old belt.
As long as you have the white teeth in the white grooves, You pwn it!
This should be a huge "don't miss this step", step.
Great DIY RedDawn!!!! Thanks for the effort!!! And thanks to all those who have put in other tidbits of knowledge.
It should go without saying, but, By Law....the old belt and new one are identical size with the same number of teeth, that's what makes this tip possible.
My Major point, and I can't believe nobody has mentioned it yet, is getting a white paint pen and match marking the belt itself to the Cam & Crank pulleys. If you mark a tooth on the belt to a groove on the 2 pulleys, while everything is together, then transfer those marks to the new belt, you have just 100% Moron proofed
As long as you have the white teeth in the white grooves, You pwn it!
This should be a huge "don't miss this step", step.
Great DIY RedDawn!!!!
Thanks for the effort!!! And thanks to all those who have put in other tidbits of knowledge.It should go without saying, but, By Law....the old belt and new one are identical size with the same number of teeth, that's what makes this tip possible.


Registered!!
Joined: Nov 2006
Posts: 3
Likes: 0
Rep Power: 0 Re: Timing Belt DIY 2
i'd like to give a big thank you to the OP.
i do a lot of DIY work on my car but never engine work. i decided to take on this challenge and succeeded with not 1 error. everything came out perfectly and everything went back in perfectly.
car started right up and never skipped a beat. now all i need is an upper O2 sensor.
i do a lot of DIY work on my car but never engine work. i decided to take on this challenge and succeeded with not 1 error. everything came out perfectly and everything went back in perfectly.
car started right up and never skipped a beat. now all i need is an upper O2 sensor.

Registered!!
Joined: Apr 2011
Posts: 6
Likes: 0
Rep Power: 0 Re: Timing Belt DIY 2
I know this write-up has been here for a long time, and its a good reference too. When putting it all back together, I recommend you re-install the alternator bracket BEFORE the timing covers. That procedure is reversed here, and I had to stop and backpedal on that one.


Registered!!
Joined: Mar 2004
Posts: 103
Likes: 0
Rep Power: 0 

Registered!!
Joined: Jun 2011
Posts: 2
Likes: 0
Rep Power: 0 Re: Timing Belt DIY 2
This is a great DIY. Thank you for going through the trouble of taking all the pictures and doing all the write-up.
I need to change a timing belt on 2003 Civic EX. The engine is D17A2. It looks similar to the pictures on the DIY, but it has something like a fuel distributor or a fuel pump right on the way. (Not sure why it needs it - I thought the pump is near the tank and the flow is controlled by injectors.)
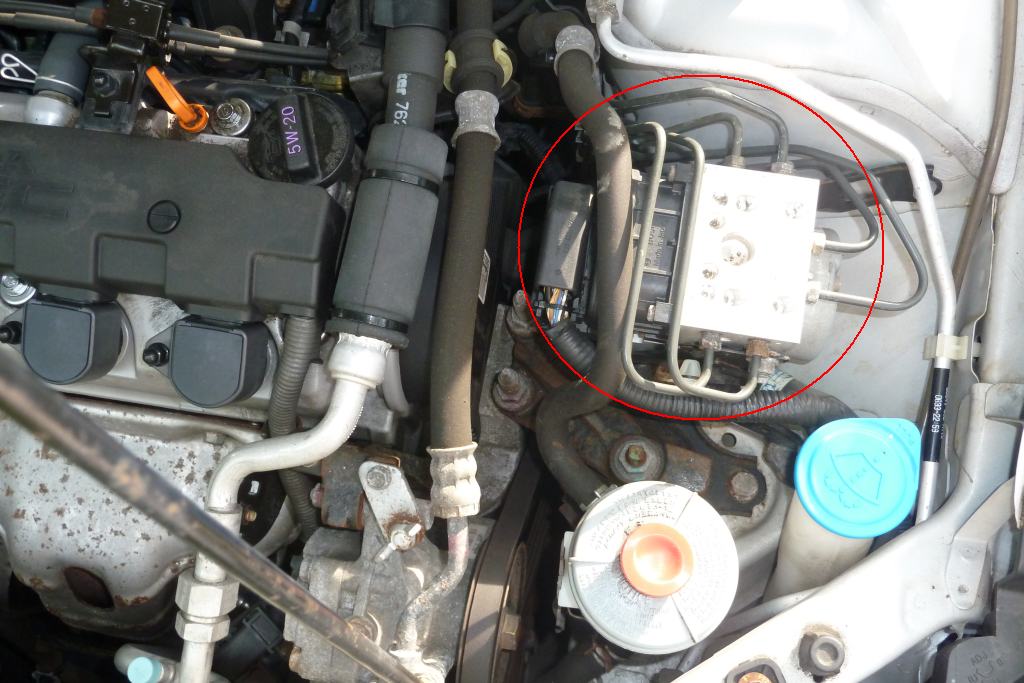
As you can see, it is right on the way.
Do you know how it should be done? Taking it off would likely require disconnecting all the fuel lines. And even then, the fuel lines would still be on the way since they are not flexible.
So I am expected just to somehow squeese between the engine and this thing?
I need to change a timing belt on 2003 Civic EX. The engine is D17A2. It looks similar to the pictures on the DIY, but it has something like a fuel distributor or a fuel pump right on the way. (Not sure why it needs it - I thought the pump is near the tank and the flow is controlled by injectors.)
As you can see, it is right on the way.
Do you know how it should be done? Taking it off would likely require disconnecting all the fuel lines. And even then, the fuel lines would still be on the way since they are not flexible.
So I am expected just to somehow squeese between the engine and this thing?
Re: Timing Belt DIY 2
This is a great DIY. Thank you for going through the trouble of taking all the pictures and doing all the write-up.
I need to change a timing belt on 2003 Civic EX. The engine is D17A2. It looks similar to the pictures on the DIY, but it has something like a fuel distributor or a fuel pump right on the way. (Not sure why it needs it - I thought the pump is near the tank and the flow is controlled by injectors.)

As you can see, it is right on the way.
Do you know how it should be done? Taking it off would likely require disconnecting all the fuel lines. And even then, the fuel lines would still be on the way since they are not flexible.
So I am expected just to somehow squeese between the engine and this thing?
I need to change a timing belt on 2003 Civic EX. The engine is D17A2. It looks similar to the pictures on the DIY, but it has something like a fuel distributor or a fuel pump right on the way. (Not sure why it needs it - I thought the pump is near the tank and the flow is controlled by injectors.)
As you can see, it is right on the way.
Do you know how it should be done? Taking it off would likely require disconnecting all the fuel lines. And even then, the fuel lines would still be on the way since they are not flexible.
So I am expected just to somehow squeese between the engine and this thing?


Registered!!
Joined: Jul 2011
Posts: 3
Likes: 0
Rep Power: 0 Re: Timing Belt DIY 2
Thanks for the work you put into this!! I'm gonna attempt it in a couple of weeks when my oil is due. I've got a couple of questions if anyone could help....
Is it allright to cake the crankshaft bolt with PB Blaster before trying to break it free?
Do I need a complete coolant flush or can I just drain the radiator?
Do I have to replace the head gasket?
Thanks for the help!!!
Is it allright to cake the crankshaft bolt with PB Blaster before trying to break it free?
Do I need a complete coolant flush or can I just drain the radiator?
Do I have to replace the head gasket?
Thanks for the help!!!
Registered!!
Joined: Mar 2004
Posts: 103
Likes: 0
Rep Power: 0 Re: Timing Belt DIY 2
Thanks for the work you put into this!! I'm gonna attempt it in a couple of weeks when my oil is due. I've got a couple of questions if anyone could help....
Is it allright to cake the crankshaft bolt with PB Blaster before trying to break it free?
Do I need a complete coolant flush or can I just drain the radiator?
Do I have to replace the head gasket?
Thanks for the help!!!
Is it allright to cake the crankshaft bolt with PB Blaster before trying to break it free?
Do I need a complete coolant flush or can I just drain the radiator?
Do I have to replace the head gasket?
Thanks for the help!!!
Drain, and re-fill.
No.

Judging from you last question, are you sure this is something you want to try?
If so, make sure you have some sort of repair manual to look at as you go.
Re: Timing Belt DIY 2
Ahh the good ol' ABS Modulator mwahahaha.. Always makes the job fun.. Don't replace your head gasket unless you have head gasket issues. I stress this because if your head gasket is okay it might not be after changing it 
Registered!!
Joined: Jul 2011
Posts: 3
Likes: 0
Rep Power: 0 Re: Timing Belt DIY 2
I was talking with a mechanic who had someone bring in their civic last week. This person attempted to change a timing belt themselves, however, did not tighten the harmonic ballancer bolt enough. The woodruff key bore into the balancer, resulting in damage to the belt, valves and pistons.
Can you guys let me know what type of force you used when tightening the pulley's bolt once the belt is on? The book says 18ft/lbs then 90 degrees, Haynes says something like 181 ft lbs. The mechanic I spoke with said take an impact wrench to it. I have a 650 ft lb wrench, but the manual says "do not use an impact wrench." Any suggestions and/or experiences?
...oh, and if you are the guy i mentioned, sorry to set you out but "your pain, is our gain!"
Thanks!
Last edited by jonshepherd; Jul 13, 2011 at 04:47 PM.
Joined: Aug 2003
Posts: 21,620
Likes: 1,252
From: Las Vegas, NV
Rep Power: 513 
Re: Timing Belt DIY 2
What the manual says gets you to approximately 180 ft-lbs. I think the manual I have states 14 ft-lbs plus 90 degrees. What I did was take the sucker to 150, then get a little more rotation with a breaker bar. I did it that way because my torque wrench isn't rated for 180 ft-lbs.
I've been going for a while with that torque spec with zero problems. Also, don't listen to the dude that said "take an impact wrench to it." You're bound to do more harm than good, especially if you decide to tkae 650ft-lbs to it
I've been going for a while with that torque spec with zero problems. Also, don't listen to the dude that said "take an impact wrench to it." You're bound to do more harm than good, especially if you decide to tkae 650ft-lbs to it
Registered!!
Joined: Jul 2011
Posts: 3
Likes: 0
Rep Power: 0 Re: Timing Belt DIY 2
Thanks for everyone's help and input! Successfully changed belt this weekend....nearly had a tragic incident. I left the engine jacked up overnight to finish the next day. When I came out the next morning, the jack hydraulics had released and the only thing support the engine was the front motor mount.
The only problem I now have a lot of vibration while the car is in park or while I'm stopped at a light. Do you think the weight of the engine bent the front mount and is causing this problem?
The only problem I now have a lot of vibration while the car is in park or while I'm stopped at a light. Do you think the weight of the engine bent the front mount and is causing this problem?
Last edited by jonshepherd; Jul 28, 2011 at 04:22 PM.


Registered!!
Joined: Aug 2011
Posts: 2
Likes: 0
Rep Power: 0 Re: Timing Belt DIY 2
This may be a stupid question because it's probably described somewhere on this forum but is this a DIY to change the timing belt for a 2001 Honda Civic Sedan Automatic? If so thank you very much. If not is there a forum for that?
Also, if this is the correct one I was going to do an oil change and the first few steps says something about that, do I do the whole oil change first or during or after the whole project??? Thank you in advance.
Also, if this is the correct one I was going to do an oil change and the first few steps says something about that, do I do the whole oil change first or during or after the whole project??? Thank you in advance.
Registered!!
Joined: Oct 2009
Posts: 5
Likes: 0
From: Northeastern Illinois
Rep Power: 0 Re: Timing Belt DIY 2
I changed the timing belt this weekend. It took me a day and a half, combined with performing the valve clearance adjustment, changing the manual transmission fluid, and swapping out a broken fog lamp. Everything went fairly smoothly thanks to this excellent DIY, the coolant DIY, the valve clearance DIY, and the Civic service manual. I ended up making my own combined lengthy DIY to follow beforehand.

Registered!!
Joined: Sep 2011
Posts: 5
Likes: 0
From: Qu�bec
Rep Power: 0 
Registered!!
Joined: Sep 2010
Posts: 293
Likes: 2
Rep Power: 194 Re: Timing Belt DIY 2
That's crappy luck man.
Could they figure out why the belt failed?
Honda really should make the top of the timing cover clear or have a way to access that is easy to remove so we can see how the belt looks without tearing everything apart. I'm sure if you would've been able to see the belt you could tell it was about to fail.
I just did mine 500 miles ago and plan on pulling the top cover off this week just to verify everything is still tidy.
Last edited by anibis; Sep 26, 2011 at 08:00 PM.

Registered!!
Joined: Dec 2009
Posts: 8
Likes: 0
Rep Power: 0 Re: Timing Belt DIY 2
Great DIY, a couple of issues I experience were:
When I was rotating the bolt on the camshaft pulley counter-clockwise to get it to TDC, the bolt kept breaking loose. I ended up have to reinstall the bolt to the crankshaft and rotate both bolts counter-clockwise to acheive TDC.
The wingnut adjustment bolt for the Power Steering pump sheared off in the head of the other adjustment bolt(which it screws into) Honda does not stock them and I cant find them anywhere else(except online - where I would still have to wait for delivery). Looks like I will be kicking it old school for a couple days until the bolts come in, no power steering for me.
When I was rotating the bolt on the camshaft pulley counter-clockwise to get it to TDC, the bolt kept breaking loose. I ended up have to reinstall the bolt to the crankshaft and rotate both bolts counter-clockwise to acheive TDC.
The wingnut adjustment bolt for the Power Steering pump sheared off in the head of the other adjustment bolt(which it screws into)
Honda does not stock them and I cant find them anywhere else(except online - where I would still have to wait for delivery). Looks like I will be kicking it old school for a couple days until the bolts come in, no power steering for me. Registered!!
Joined: Dec 2009
Posts: 8
Likes: 0
Rep Power: 0 Re: Timing Belt DIY 2
This may be a stupid question because it's probably described somewhere on this forum but is this a DIY to change the timing belt for a 2001 Honda Civic Sedan Automatic? If so thank you very much. If not is there a forum for that?
Also, if this is the correct one I was going to do an oil change and the first few steps says something about that, do I do the whole oil change first or during or after the whole project??? Thank you in advance.
Also, if this is the correct one I was going to do an oil change and the first few steps says something about that, do I do the whole oil change first or during or after the whole project??? Thank you in advance.

