
Timing Belt DIY 2


Thread Starter
Registered!!
Joined: Apr 2004
Posts: 338
Likes: 1
From: SoCal OC / LA / San Diego
Rep Power: 275 

Timing Belt DIY 2
***This post is definitely a work-in-progress. ***
I first want to thank the posters and maintainers of this forum for helping me to get to this point. My first car was a pile, and since I was completely ignorant in the area of cars, I found myself repeatedly getting screwed by local mechanics who saw a sucker. The car finally died with a blown headgasket and a bad tranny, and I vowed never to get hosed again. I Bought the civic and I started reading on the forum. I knew nothing, and within 1 month I took my first tiny step and changed my own oil. Fast forward a couple years, and I've graduated to brakes, bodywork, valve clearance, and then I turned 100K miles...
I think there are a bunch of people on the forum that have the same story. If you haven't done it yet, doing a timing belt is kind of a graduation of sorts. Give yourself a good 2 days if you haven't done this before, not because it is difficult, but because you should be thorough and be observant of what you are doing.
The timing belt DIY in the DIY section is helpful, but is basically copy-paste verbatim from the service manual. It doesn't explain some of the little snags you'll hit. It is also clear that the writer didn't actually do the work before writing the DIY, though I'm sure he has taken care of it since.
Here we go...
Parts and Supplies:
Depending on how **** you are, what you'll need is variable. Considering what a pain in the *** it is to get into the area, you are best off replacing anything as preventative maintenance, and Majestic's prices are tough to beat:
Parts you absolutely should replace:
Timing Belt
Water Pump
Auto-Tensioner
Valve cover gasket
Things to replace because you are in the neighborhood anyways:
All supplies needed for an Engine Coolant flush.
New PS Belt
New Alternator / AC belt
New Spark plug tube seals (Mine were OK but better to have and not need)
Crankshaft oil seal - Have one on hand because you won't know if you'll need it until you open up the timing covers. Better to have and not need.
Camshaft oil seal (Ditto above)
Parts you might possibly need:
Harmonic balancer - forum denizen gearbox is a big proponent of replacing it because the rubber inside tends to wear out. I left mine as it was because I was too cheap to pay the $51 for a new one and the rubber on mine looked allright.
Bunch of those little black body panel clip holders - when you take off your splash skirt, you'll notice that invariably that time you went too far in whilst parking and bottomed out ripped the heck out of the body clips. Getting them out basically means destroying them, so it is nice to have extras.
(Other suggestions welcome)
Tools:
By far the hardest part of this job is the Crank pulley bolt. It has been discussed in numerous threads, and after you get this stupid thing off the job is cake. Check out This video to see what I mean.
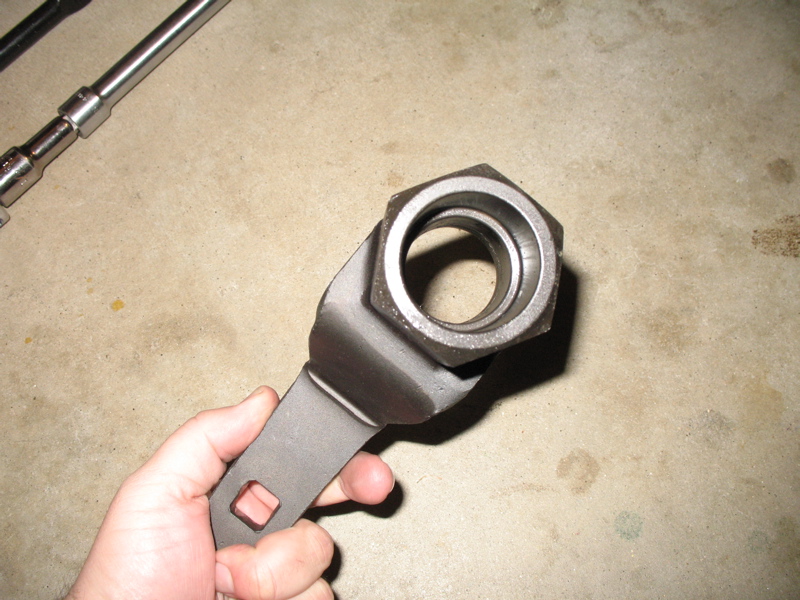
Crank pulley holder tool. Yes, get it. If you hardcore dudes want to take off the starter and stick a screwdriver in the flywheel, be my guest. This job is long enough as is for me.
The biggest breaker bar you can find (1/2 inch or even 3/4)
The biggest cheater pipe you can find (To get my crank bolt off, I actually had to call a mobile mech, who had to use a 6 foot cheater pipe on the already 18 inch breaker bar after air tools wouldn't work)
Extensions for the breaker / cheater bar to get the socket outside the fenderwell.
extra jack to lay extensions on to get maximum torque out of the whole assembly.
V-belt tension gauge ($10 at napa / kragen / wherever)
Sockets
Wrenches
Torque wrench
Allen Key to hold off the tensioner
jackstands
jack (support the engine)
wood block (support engine)
Special Service Tool 001A (Straightened Coathanger)
Not required, but helpful:
Set of deep well sockets for getting the motor mount screws off quickly
Air tools: Well, they may help, but they wouldn't budge the crank nut on my car, so ymmv. It is helpful to have some air to get the motor mount bolts off.
**********************************************
Procedure:
Mine will differ from the service manual's instructions, because I wanted to be thorough and if you are replacing the water pump (like you should be) it is less messy this way.
1: Do the first portion of my coolant flush DIY up to step 15. Take off the lower splash guard while you are down under the car, and obviously don't lower the car off the jacks.
2: Drain the oil and remove the oil filter if you haven't already in the coolant flush. This step isn't absolutely necessary, but if you need to replace the crankshaft oil seal it will be. Besides, what engine doesn't love an oil change?
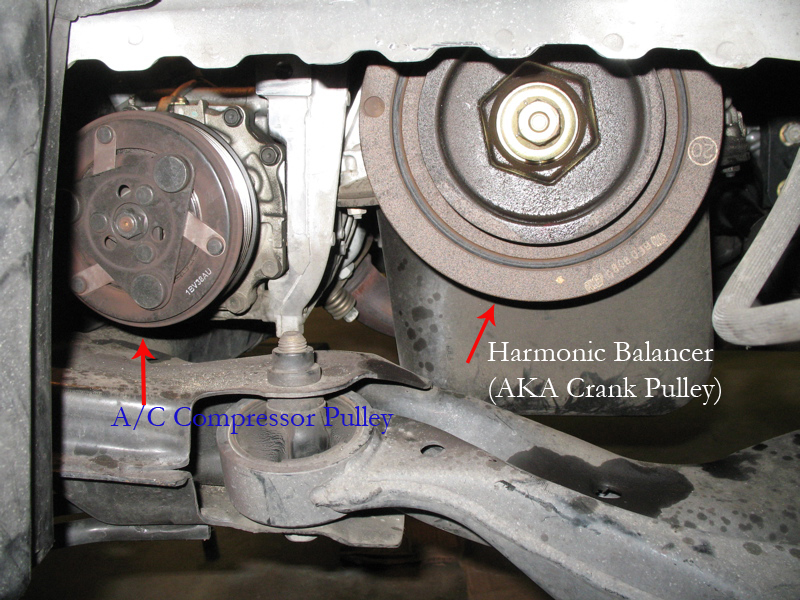
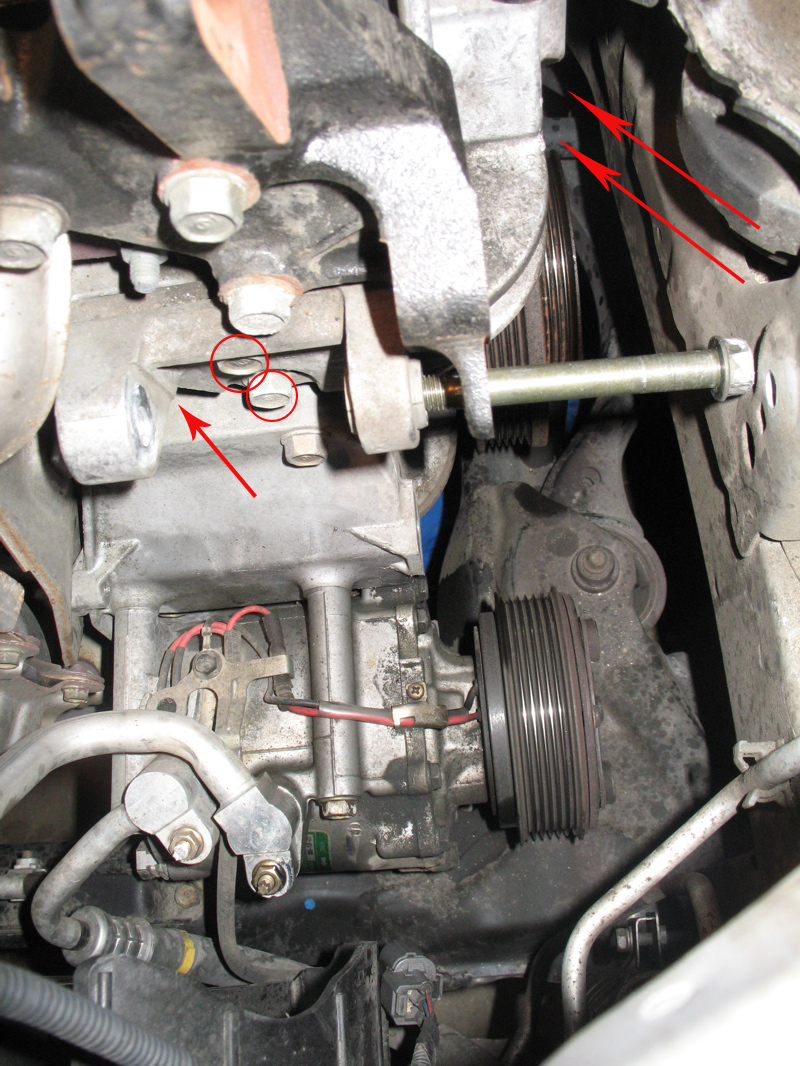
3: Remove the left front tire. With the skirt off inside the fenderwell should look like this, only with some belts running around the harmonic balancer:
The next steps are basically about removing the Power Steering pump and Alternator so that we can remove the motor mount they hang off of.
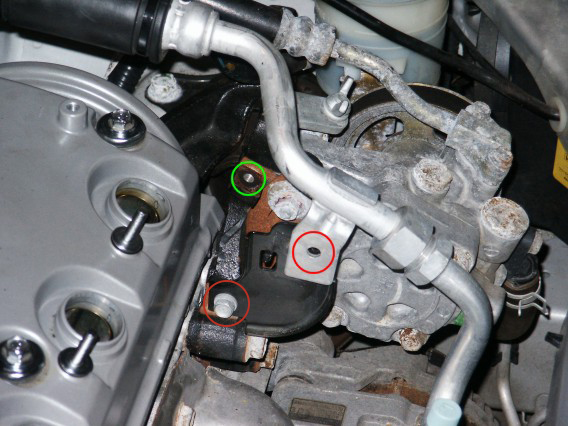
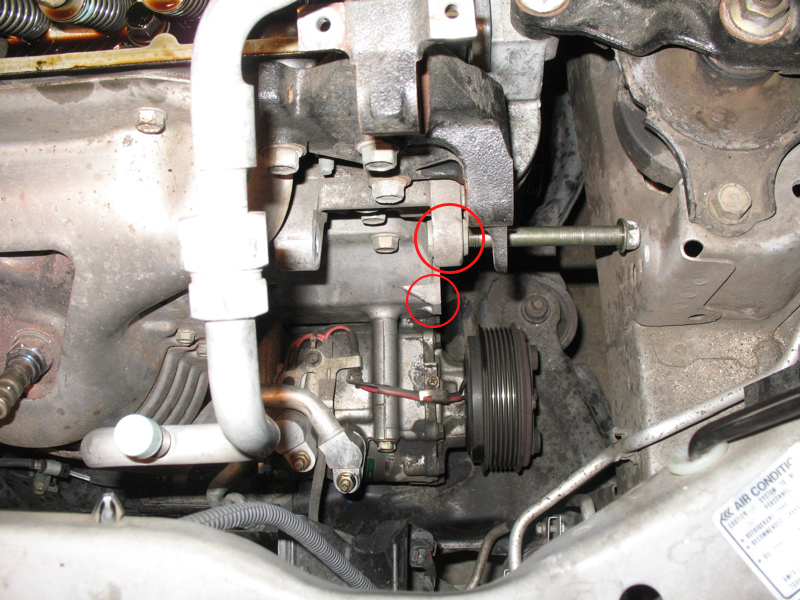
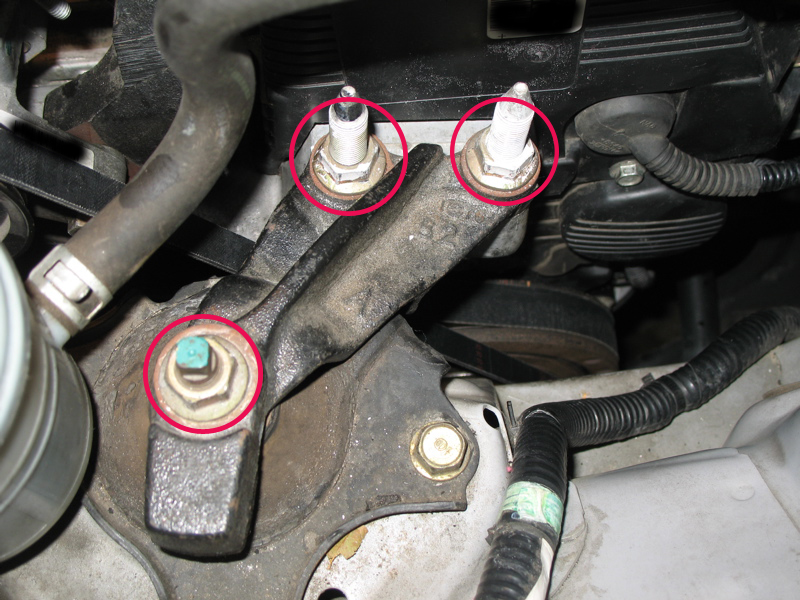
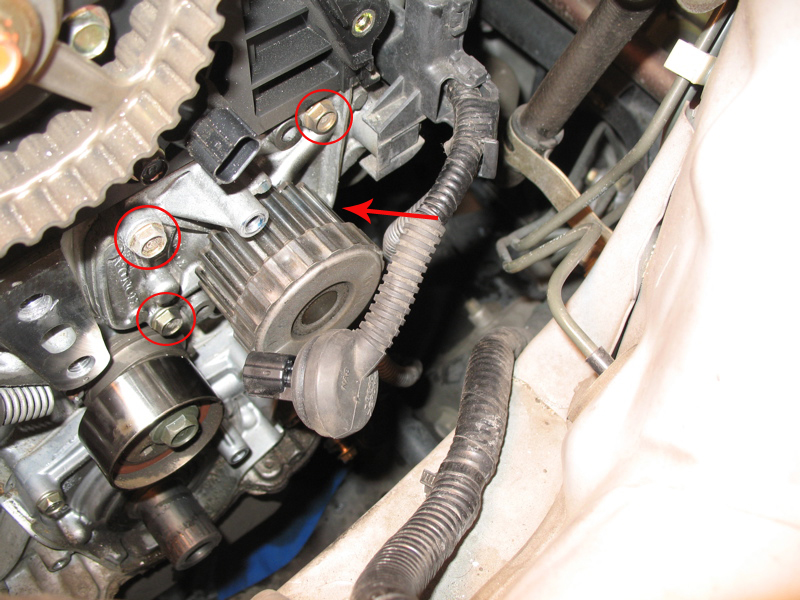
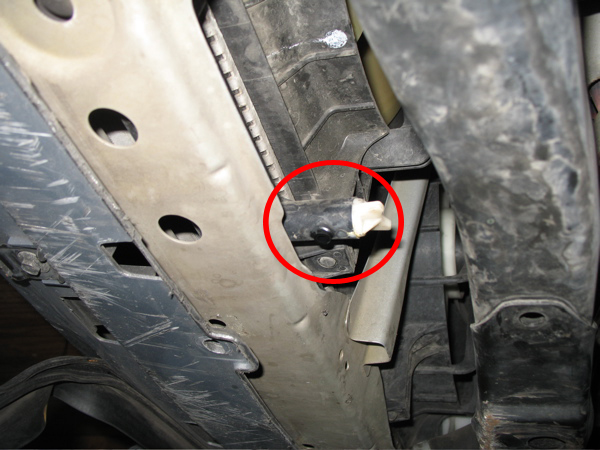
4a: Make your life easier and take out the 2 bolts circled in red here to get the black bracket out of the way. It makes it a lot easier to get to a bolt you need to remove (In this picture its at the 10'oclock position relative to the top red circle). Stole this pic off grey's diy - props to him.
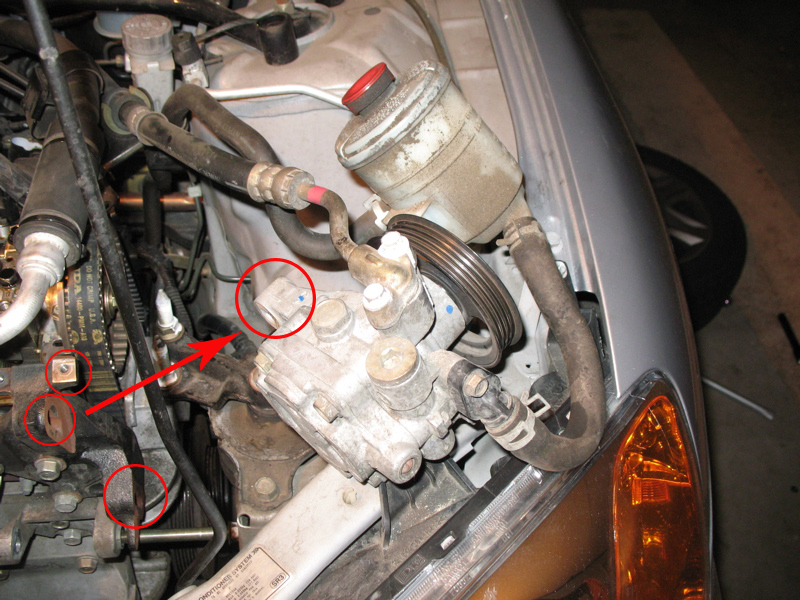
4: Remove the P/S pump without disconnecting the P/S lines. The pump hangs by 3 bolts. The pump is already out in the picture, the three circles are where the screws are, and the arrow represents the holes that line up together on the pump and housing. The P/S Reservoir sits in a bracket, to take it out simply pull it up and out. Remove the 3 pump bolts, remove the belt, and set the P/S pump out of the way.
5: Remove the bracket that the P/S reservoir sits in. It needs to come out to get the alternator screw all the way out.
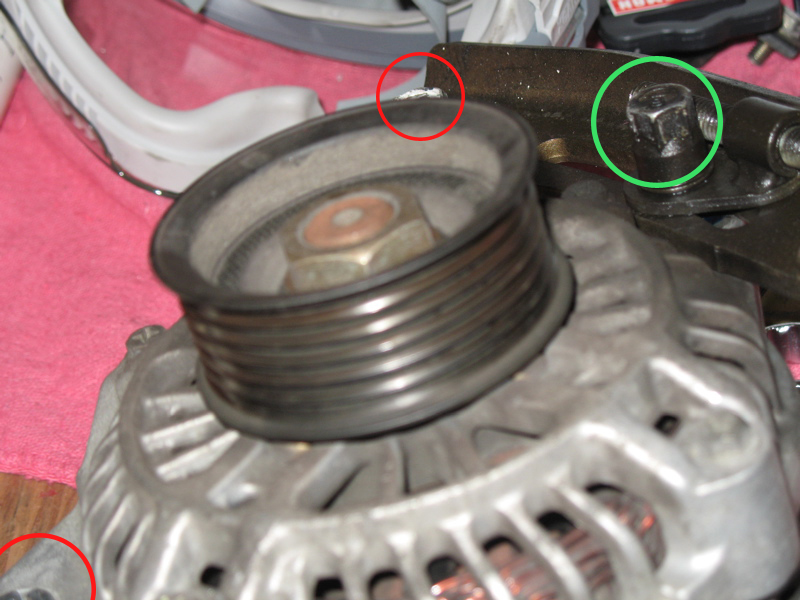
6: Remove the alternator and belt. This is your first PITA bolt and nut. There are 2 bolts that have to come completely out, and one that must be loosened to move the alternator down to take the belt off. Additionally, you have to disconnect the 4P electrical connector and unscrew the nut holding a wire on the side of the alternator. The bolt to be just loosened is circled in green, and the two locations on the alternator and where they are in the bracket are in red. Try going through the wheel well if you are having trouble reaching bolts. If you have trouble getting the alternator to move down, loosen the wingnut after you get the bolts loose and push down on the alternator to get enough slack in the belt.
OK. At this point we've got most of the preliminary work out of the way, and we are getting to the part that, well, sucks major ***.
The official honda manual says to remove the valvecover before doing this next step, but I say try to remove the crank bolt first. Why? Because if you are doing this at home and you can't get the damn thing to come off, you only have to re-install the alternator and P/S pump to drive the car to a mechanic who can pop the nut, then retighten it to maybe 70% of the original torque so you can get it off at home. Alternatively, take advantage of undocumented immigrant labor in the form of a mobile mechanic to bring a bigger breaker bar or stronger muscles...
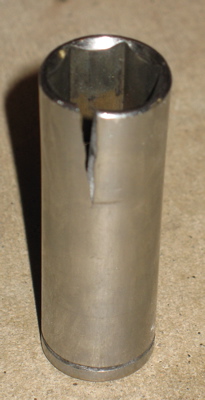
7: Time to remove the crank pulley bolt. I cannot emphasize enough how much of a bitch it is to get this thing off. It is made worse if you drive fast and have over 90-100K miles on it, as our crankshafts rotate counterclockwise - meaning that they actually tighten this bolt the longer / faster you drive. Be prepared for an all out war. You need either impact sockets or high quality regular ones. no-name sockets will be devoured in the belly of the beast:
I also busted a craftsman socket my mom has had since the 70's. guess its time to go to sears for a warranty claim.
Install the special tool on the end of a 1/2 inch breaker bar and wedge the breaker bar against the floor:
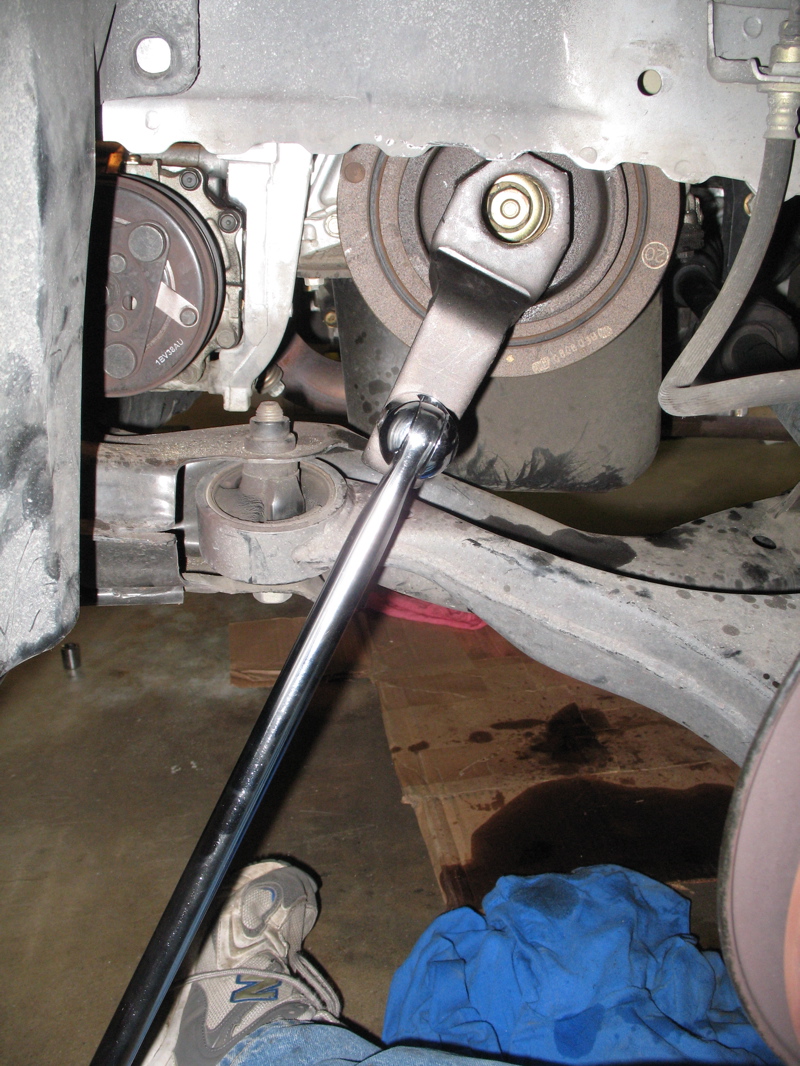
Check out This video which shows a visual of the way everything should be set up. Don't underestimate the importance of a jack to rest the extensions on. You can't beat the laws of physics, and it does help significantly in getting the full amount of torque force directed in the right way.
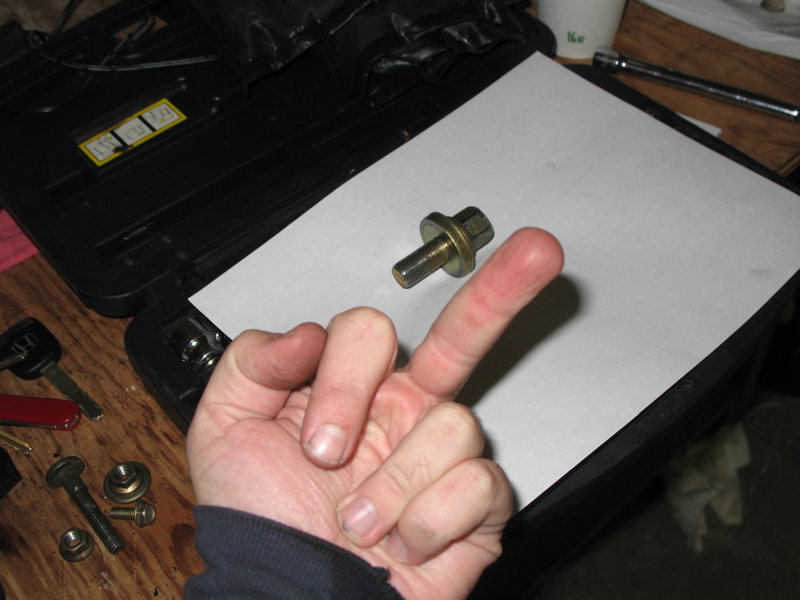
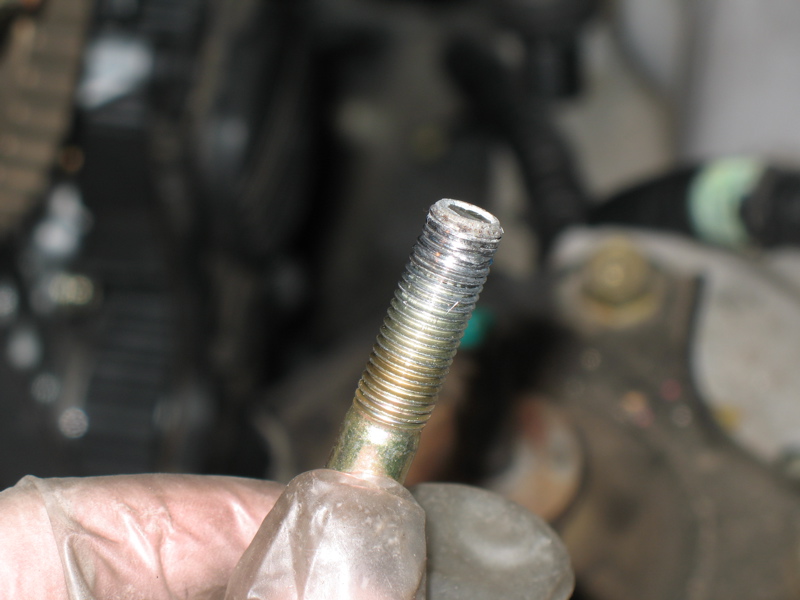
8: Get the bolt off? Good. Take off the harmonic balancer like it is a war trophy... BUT DON'T BE SO HAPPY CELEBRATING THAT YOU LOSE THIS WOODRUFF KEY:
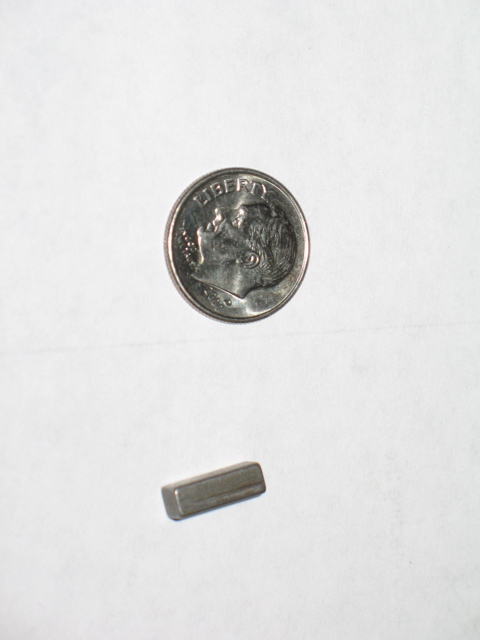
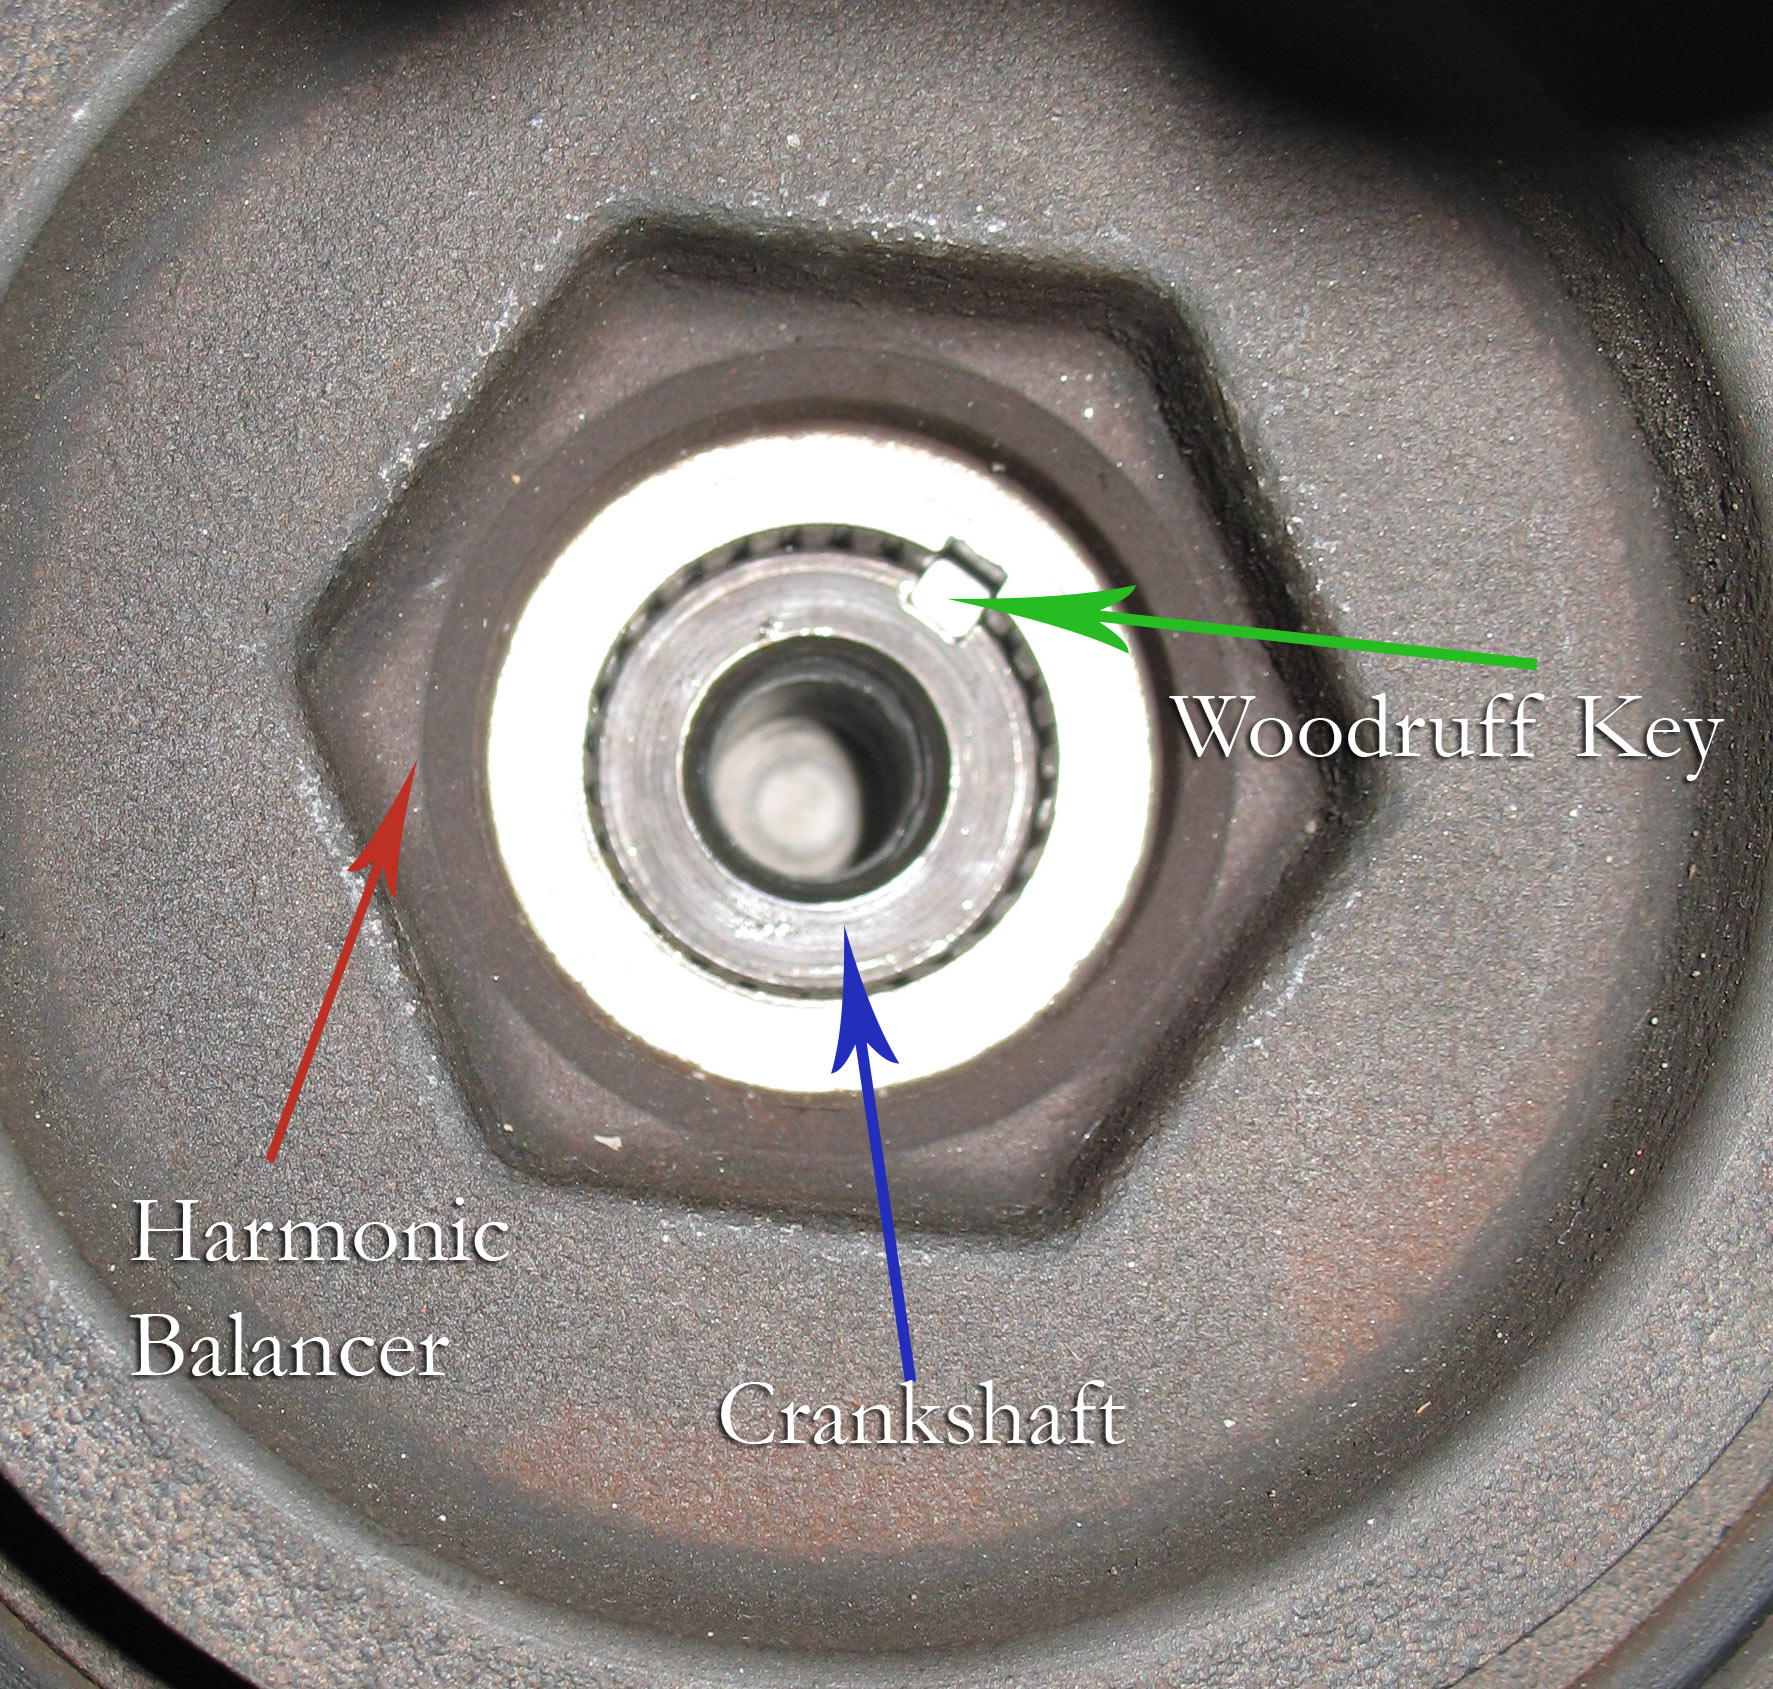
This is the key that goes into the crankshaft slot and keeps the harmonic balancer's timing marks correct. Installed, it looks like this:
VERY easy to lose, and the manual makes no mention of it. So, if you - like me - didn't see or hear it drop out after the hour-long fight with the crank nut - and put EVERYTHING BACK TOGETHER after you finish and then find it on the floor... you'll be sorry. In my case, i wasnt' sure if it was actually from the timing belt drive pulley or the harmonic balancer so I actually removed the lower timing cover and tried putting the key in the timing pulley, thereby moving the timing of the camshaft off by one tooth. Dumbass.
yes, i speak with woe and shame, but I learned from the mistake. hopefully nobody else will do that.
8: NOW we can remove the the valve cover. Honestly, grey's DIY is far better than mine ever will be on this topic, so go visit the Valve Clearance DIY and take all the steps needed to get the valvecover off. It is slightly easier to take off the upper timing cover a little later after we take some more stuff out, but its your call.
9: Support the engine by placing a jack with a piece of wood on it under the oil pan. The jack needs to be raised enough for it to feel snug against the oil pan. Next step is the removal of a motor mount, so we need to support the weight from the bottom.
10: Remove the driver side engine mount. 3 bolts, air tools and deep sockets help, but you could probably do it with wrenches. Be sure you remove one, check to make sure the engine is being supported by the jack correctly, then remove another.
11: Remove the Alternator bracket. The big silver thing the alternator was mounted on that has the studs that the motor mount was connected to needs to come out. 5 bolts, red circles and and arrows for the ones you can't see in the pic. Interestingly enough, one of mine (top one of the 2 side bolts) came out stripped, and this is the first time it has ever been out. Thanks for that, dude on the factory floor...
12: Excellent. Now we can remove the upper and lower timing covers. You may have removed the upper timing cover when you did the valve cover removal, but the lower cover needs to be removed after the upper one. Total of 6 bolts, with one bolt common to both pieces. Didn't get pics of the locations, but they aren't too hard to find. Before removing the top cover, you need to pop out the little rubber grommet and disconect the TDC sensor underneath.
Congratulations - this is why it costs so much to have this done at the shop. Not necessarily hard, just time consuming to get in here. We now have removed all our obstacles to world domination. Grant yourself an evil mad scientist "Mwuhahahahaha!!!" and lets keep going.
You should basically see this:
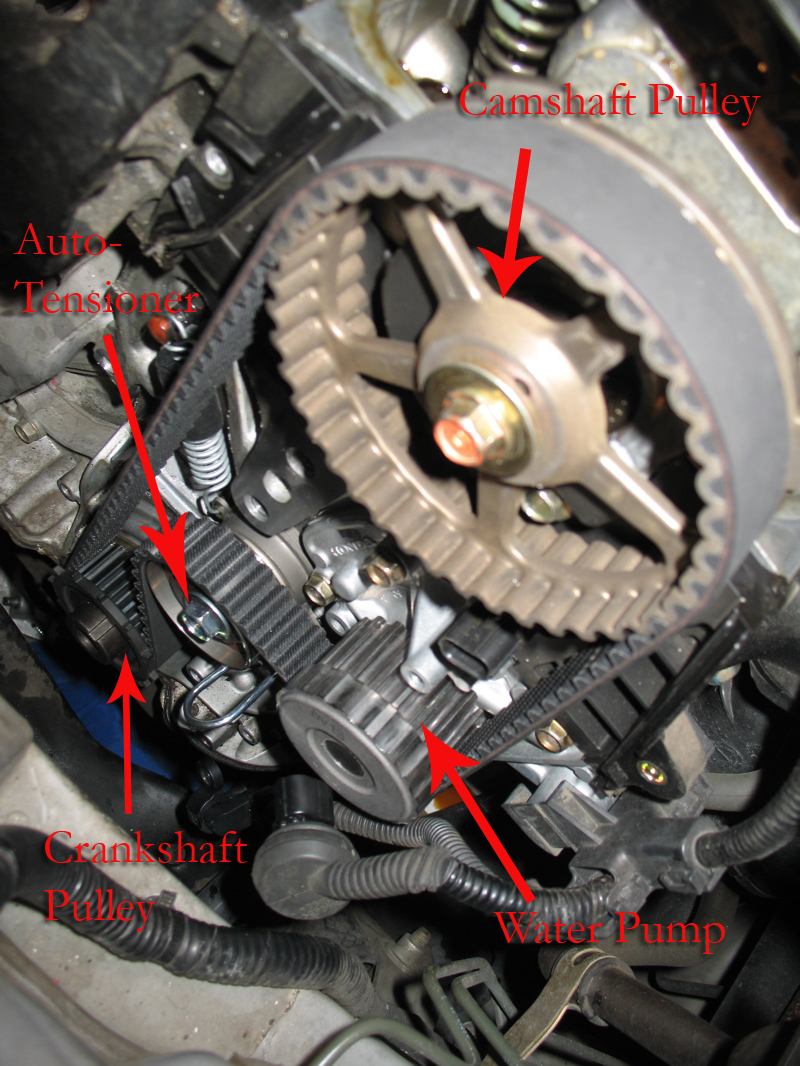
13: Lets make sure we're at TDC BEFORE we remove the timing belt :-) On the camshaft pulley, there are 5 spokes, one of them marked "up." Get a socket wrench and turn this pulley counter-clockwise until the spoke marked "up" is pointing directly up. Look on the passenger side, and you'll see 2 score marks on the edge of the pulley 180 degrees opposite of one another. These should be dead even with the deck of the cylinder head. Once you have verified this, look through the fenderwell at the crank pulley. The little keyway of the crank pulley should be pointing straight up, and you'll see a notch on the face (not one of the fingerlike protrusions, an actual scored notch) of the crank pulley at about the 2'o clock position that will line up exactly with an arrow on the metal behind the pulley. Once the cam and crank are both EXACTLY at these TDC marks, we can go on.
**Idiot check. If you screw this up....
An idiot mistake I made was pulling the timing belt without making sure that the crank pulley was at TDC. It is possible to bend valves during a timing belt install if you are stupid and force the camshaft to do things it doesn't want to do! (I didn't, but have heard of it happening) If you are stupid and don't pay attention, remove your spark plugs and use the straightened coathanger through the spark plug holes to determine which pistons are high, and which are low. if you are clueless as to where the camshaft cycle is, a safe bet is to move the crank (CAREFULLY - if you have to force beyond the inertia of the pistons, something is wrong, go the other way) so that all the pistons are more or less halfway up the cylinders on the way to the crank pointing to #1 TDC. Then you can move the camshaft (again, carefully, you shouldn't have to force much) to catch up with the crank. Set both to TDC, and kick your own *** for being a retard and not following instructions.
14a: Remove the CKP Sensor, but DON'T disconnect it from the wiring Its the little black thing to the right of the crank pulley. It actually reads the little protrusions on the crank pulley via magnetic field changes (Might be optical, not sure). Anyhow, DON'T unhook the clip cable - physically unscrew the bolt and carefully remove the sensor keeping it connected to the wiring but out of the way of what we're going to do next...
14: Remove the timing belt. The Auto-Tensioner puts (duh) tension on the timing belt. we don't want that right now. You'll see a hole on the right side of the tensioner (Ignore the pin - it won't be there in the old one):
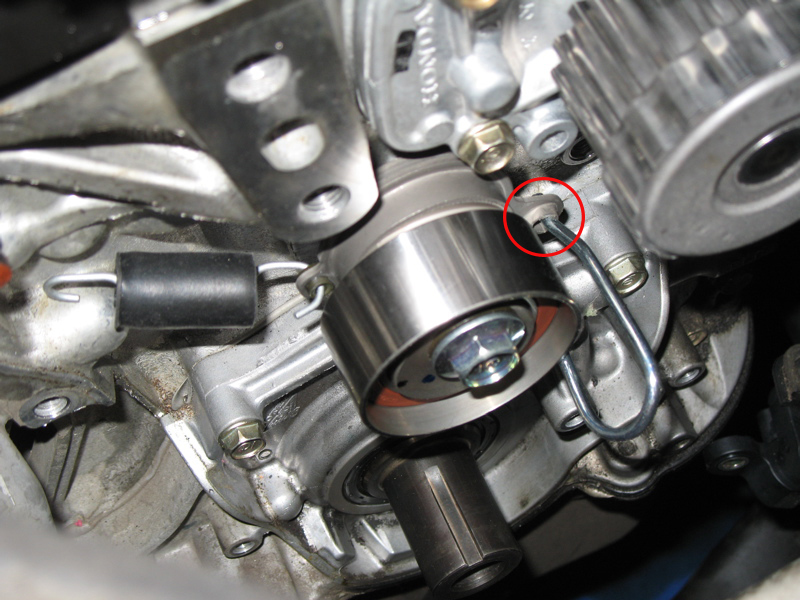
Stick an allen key in there and turn counter-clockwise. The tensioner will retract a bit, giving you enough slack to pull off the crank pulley and then remove the timing belt from around the water pump and camshaft pulley.
15a: Check the crankshaft oil seal while the crankshaft timing pulley is off. if you see obvious signs of oil seepage, grease, etc you'll want to replace the seals. I DID NOT DO MINE, so this procedure is hearsay. Basically, you want to CAREFULLY take a dental pick or a hooked instrument and grab the seal and pull. You don't want to gouge the mating surface on the back, so be very gentle with the pick. Place the new oil seal in, then drive it home with a hammer (gently!) using a piece of about 1 1/2 inch pipe covered in tape. It is easy to screw up the new seals, so be gentle here.
Any input on this procedure is welcome.
15b: Check the camshaft oil seal. If it is leaking, you'll have to take off the camshaft pulley, loosening the rocker arm nuts slightly, and using the same dental-pick and pipe driver procedure. Tighten the cam pulley up to 33 lbf (I think) and re-torque the rocker arm nuts to what they were.
15c: Idiot check: Put the crank pulley back on, and make sure the crank is still at TDC! Make sure that the camshaft pulley is still at TDC! As long as you started the belt removal at TDC they couldn't have turned more than a couple teeth, so it is OK to turn the cam OR crank clockwise or counterclockwise - whichever way gets you to TDC on both with the least movement.
16: Remove the water pump. 4 bolts, and they all need to come off. A small amount of coolant (or Distilled H2O if you follow my DIY) will splash out. Clean it up.
17: Remove the auto-tensioner if you are replacing it. Theoretically they last for 2 timing belts, but I don't want to do this again early if the tensioner fails. First disconnect the little spring from the post, then unscrew the bolt.
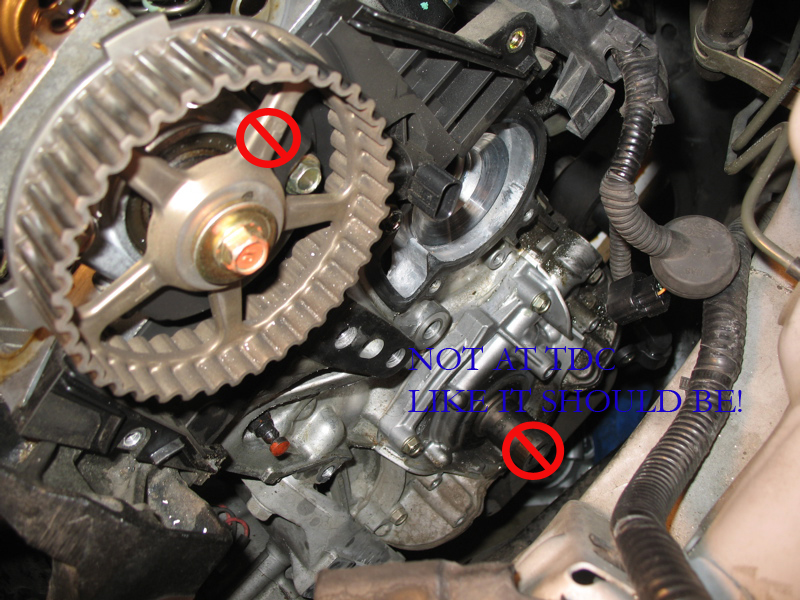
Pic of what mine looked like with everything out. Note my idiot mistake and that the crank pulley is NOT at TDC while the camshaft is close to that position, but we're not exactly sure where. DON"T let that happen to you ;-)
Allright. Now that everything is out, time to do some detail work.
18: Clean things up. The timing belt drive pulley needs to be clean and free of oil and dirt. Ditto the camshaft pulley. The mounting spot where the tensioner will go needs to be clean and free of oil, and the water pump mount needs to be pretty spotless. The water pump has a rubber o-ring that needs to be seated properly, and any dirt or oil on the seat surface will compromise it. Additionally, clean up any dirt on the timing belt covers.
19: Install the new water pump. Optionally, I had some O-ring grease i use for scuba diving o-rings. It is a silicone-based lube used for rubber o-rings on tanks, and I smeared it on the new water pump o-ring to lubricate it. Install the water pump, and tighten the bolts in an x pattern to 8.7 lbf of torque, then turn the pump a couple turns to make sure it moves smoothly.
20a: Time to do the tensioner. Installing the tensioner is kind of weird, as you need to torque the bolt to 2 different specs. Check out the picture for how it should look when you go to screw in the bolt:
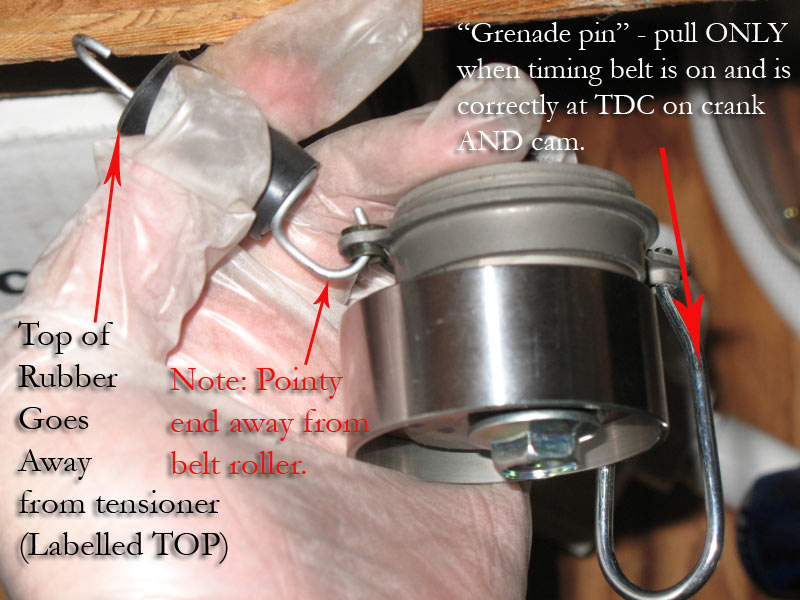
Note the fact that the spring is attached to the tensioner, but it doesn't get hooked up to the peg on the block until you thread the timing belt on. Also note the u-shaped pin inside the holes. This should NOT be pulled until you are absolutely sure you've got the timing belt threaded right. it's not death if you accidentally pull it, but you will have to go through the rigamarole of using the allen key to un-tension the belt. Think of it as a "Remove-before-flight" pin... just don't forget to take it out when you are done :-)
20b: Install the tensioner, spring on the left, pin on the right, bolt on the top. Tighten the bolt to 7.2 lbf, then loosen 180 degrees.
21: Idiot check! Make sure that the crank pulley is at TDC, exactly! The score on the pulley needs to line up with the arrow on the metal behind it - then make sure that the cam pulley is at TDC - the spoke points straight up, and the score marks on the passenger side of the cam pulley are even with the cylinder head deck.
22: Time to install the timing belt. Install it in a counter-clockwise sequence from bottom-up. So, first it goes around the bottom of the timing belt pulley. Then it loops OVER the belt tensioner. Then UNDER and around the right side of the water pump. Then UP over the TOP of the cam pulley, before finally coming down. A, to B, to C, to D.
IMPORTANT (UPDATE - 7/16/08): Had someone bend valves. He was re-using the original tensioner, and said that there wasn't enough slack in the timing belt to get it on, so he had to "walk it back" over the cam pulley, causing the cam to turn like 3/4 of a turn. He bent valves. YOU SHOULD HAVE SLACK ENOUGH TO DO THIS WITHOUT MOVING THE CAM OR CRANK!! If you don't have slack, make sure that your tensioner is installed correctly and all tension is off of te belt. My suggestion is to get a short ( like 4" length max) piece of coat hanger or other thick gauge wire and "re-create" the U-clip that comes in teh new tensioners. that way, you can be sure that you have the max slack possible.
IF YOU HAVE TO TURN ANYTHING OR STRAIN HARD TO GET THE BELT ON, SOMETHING IS WRONG! It might be a bit tight, but it shouldn't require turning of pulleys and such.

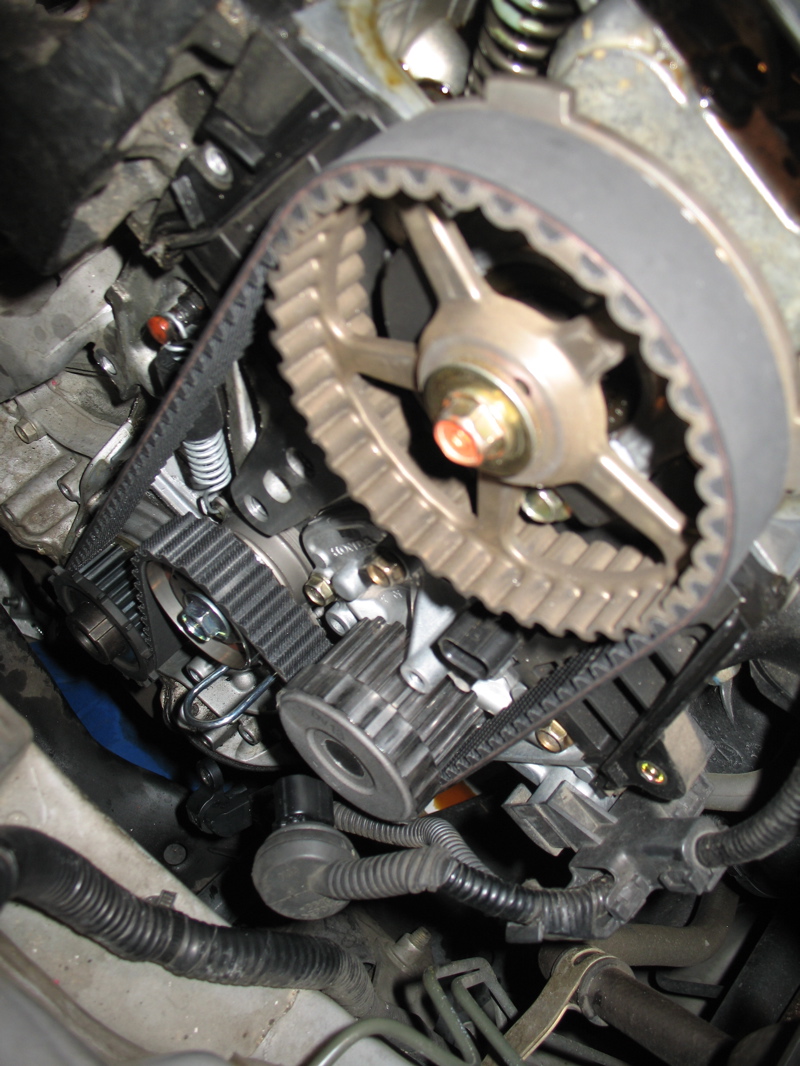
When you are finished, it should look like this:
23: Make sure that the crank and cam are STILL at TDC. if not, repeat the previous step and rethread the belt.
24: Attatch the spring on the auto-tensioner to the post to make it springy.
25: Turn the crank or cam pulleys with a socket counterclockwise a few times to position the timing belt on the rollers.
26: Set the crank and cam to TDC, and RE-VERIFY that they are both at the same place - matchmarks and arrows lined up with the cynder head deck and / or arrow behind the crank pulley. If they don't, repeat steps 24-25.
27: If the crank and cam are both at TDC and you've turned the engine a couple times with the belt staying correct, torque the bolt on the auto-tensioner to 33 lbf, and remove the "grenade pin."
28: Huzzah! you've done it. Now... be sure, one last time, that the timing of the cam and crankshafts is locked up correctly - turn the engine a couple times counterclockwise and re-verify timing is correct.
29: Reinstall the CKP sensor (The one by the timing belt drive pulley), and torque to 8.7 lbf.
30: Reinstall the timing covers. I cleaned them and put a little silicone grease on the ruber seals. 7.2 lbf is spec.
31: Reinstall the TDC sensor and grommet.
32: Reinstall the upper bracket (the one with 5 bolts.) Torque to 33 lbf.
33: Reinstall the motor mount (the one with 3 bolts) Torque to 40 lbs.
34: Reinstall the harmonic balancer. Clean it and the crankshaft. DON'T FORGET THE WOODRUFF KEY! Should look like this:
35: Time to reinstall the crank bolt. Before you do this, clean it up and lubricate the bolt threads and the outside of the thick washer. Using the holder tool, install the bolt, then torque to 14 lbf. Then turn an ADDITIONAL 90 DEGREES. This is hard... lots of torque needed.
36: Reinstall the valvecover... Now might be a good time to do the valve clearance since you are in the area with the valvecover off. Check out grey's DIY for the procedure. This needs to be done with the engine dead cold.
At this point, it is time to do drive belts. Tensioning the drive belts is kind of a pain in the neck, made harder when you are installing new belts because you have to tension them very tight, then run the engine for 5 mins, the re tension them looser. A good set of pliers will help you turn the adjustment wingnut. be sure to use your belt tension gauge in the center of the longest space between the pulleys. in the Alternator / AC belt that is the very bottom straight run between the balancer and the AC compressor. In the P/S belt it is the top side of the belt between the P/S pulley and the harmonic balancer. If installing new belts, I'd actually recommend installing the alternator belt first WITHOUT re-installing the PS pulley, so that you don't have to mount / dismount the P/S pump to keep re-adjusting the alternator belt.
37: Reinstall the alternator and new alternator belt. I suggest lubing the wingnut and adjustment screw with wd-40 or something to make your life a touch easier. You need to have the top bolt installed and threaded but loose when adjusting tension. ditto for the "green" circled bolt in the alternator picture. Install the new belt, then tension to 85-100 kg, 830-980N, or 190-220 lbf - whatever units you prefer. It equates to "Really dang tight" and you'll need pliers or really strong fingers to get the wingnut that tight. Tighten the bolts and adjustment bolt. If putting the old belt back on, refer to the used specs in step 40. If putting the old belt back on, you can go ahead and do step 41 as well, tensioning the used belt specs there as well.
38: Idiot Check:
Engine oil refilled?
Coolant flush DIY resumed and coolant refilled, ready for engine start?
All bolts torqued correctly?
All sensors reconnected?
Battery reconnected?
Valvecover gasket seated?
Crank pulley bolt on, torqued, woodruff key inserted correctly?
39: Start the engine and pray you didn't screw up. If the engine catches and starts, finish the coolant diy by topping off the engine coolant through the radiator. Stop the engine after 5 minutes.
If the engine starts but then dies, your timing is probably off. Disconnect the TDC sensor and try to start the engine. If it starts and stays on, stop it immediately and then kick your own ***, because the timing belt is off by a tooth or two. You'll have to reopen everything and re-thread the belt. You can get away with just taking off the valvecover, harmonic balancer, and timing covers without removing the motor mount, then restringing the belt.
40: Re-tension the alternator belt to the used belt specs - 390 - 540 N (40 - 55 kgf, 88 - 120 lbf).
41: Install the PS pump with the nuts threaded but loose. Use the wingnut to tighten the belt to spec. If you are putting in a new belt, tension it to 740 - 880 N (75 - 90 kgf, 165 – 198 lbf). Measure tension in the center of the longest run of the belt. Run the engine for 5 minutes, then tension the belt to the used belt spec of 390 - 540 N (40 - 55 kgf, 88 - 121 lbf).
42: Reinstall the botom splash shield.
43: Reinstall the battery if you haven't already
44: Put the tires back on and lower the car.
45: Thats about it!
Congratulations - you've just done a procedure they usually charge $600 for. As long as you don't have parts left over and the crank bolt is tight, you should be good. You might want to do the idle learn procedure by letting the engine idle with no accessories on for 10 minutes. Make sure your temperature stays within normal levels if you did a coolant flush. It would be good to have the radiator cap off a bit to flush more air out of the system.
I first want to thank the posters and maintainers of this forum for helping me to get to this point. My first car was a pile, and since I was completely ignorant in the area of cars, I found myself repeatedly getting screwed by local mechanics who saw a sucker. The car finally died with a blown headgasket and a bad tranny, and I vowed never to get hosed again. I Bought the civic and I started reading on the forum. I knew nothing, and within 1 month I took my first tiny step and changed my own oil. Fast forward a couple years, and I've graduated to brakes, bodywork, valve clearance, and then I turned 100K miles...
I think there are a bunch of people on the forum that have the same story. If you haven't done it yet, doing a timing belt is kind of a graduation of sorts. Give yourself a good 2 days if you haven't done this before, not because it is difficult, but because you should be thorough and be observant of what you are doing.
The timing belt DIY in the DIY section is helpful, but is basically copy-paste verbatim from the service manual. It doesn't explain some of the little snags you'll hit. It is also clear that the writer didn't actually do the work before writing the DIY, though I'm sure he has taken care of it since.
Here we go...
Parts and Supplies:
Depending on how **** you are, what you'll need is variable. Considering what a pain in the *** it is to get into the area, you are best off replacing anything as preventative maintenance, and Majestic's prices are tough to beat:
Parts you absolutely should replace:
Timing Belt
Water Pump
Auto-Tensioner
Valve cover gasket
Things to replace because you are in the neighborhood anyways:
All supplies needed for an Engine Coolant flush.
New PS Belt
New Alternator / AC belt
New Spark plug tube seals (Mine were OK but better to have and not need)
Crankshaft oil seal - Have one on hand because you won't know if you'll need it until you open up the timing covers. Better to have and not need.
Camshaft oil seal (Ditto above)
Parts you might possibly need:
Harmonic balancer - forum denizen gearbox is a big proponent of replacing it because the rubber inside tends to wear out. I left mine as it was because I was too cheap to pay the $51 for a new one and the rubber on mine looked allright.
Bunch of those little black body panel clip holders - when you take off your splash skirt, you'll notice that invariably that time you went too far in whilst parking and bottomed out ripped the heck out of the body clips. Getting them out basically means destroying them, so it is nice to have extras.
(Other suggestions welcome)
Tools:
By far the hardest part of this job is the Crank pulley bolt. It has been discussed in numerous threads, and after you get this stupid thing off the job is cake. Check out This video to see what I mean.
Crank pulley holder tool. Yes, get it. If you hardcore dudes want to take off the starter and stick a screwdriver in the flywheel, be my guest. This job is long enough as is for me.
The biggest breaker bar you can find (1/2 inch or even 3/4)
The biggest cheater pipe you can find (To get my crank bolt off, I actually had to call a mobile mech, who had to use a 6 foot cheater pipe on the already 18 inch breaker bar after air tools wouldn't work)
Extensions for the breaker / cheater bar to get the socket outside the fenderwell.
extra jack to lay extensions on to get maximum torque out of the whole assembly.
V-belt tension gauge ($10 at napa / kragen / wherever)
Sockets
Wrenches
Torque wrench
Allen Key to hold off the tensioner
jackstands
jack (support the engine)
wood block (support engine)
Special Service Tool 001A (Straightened Coathanger)
Not required, but helpful:
Set of deep well sockets for getting the motor mount screws off quickly
Air tools: Well, they may help, but they wouldn't budge the crank nut on my car, so ymmv. It is helpful to have some air to get the motor mount bolts off.
**********************************************
Procedure:
Mine will differ from the service manual's instructions, because I wanted to be thorough and if you are replacing the water pump (like you should be) it is less messy this way.
1: Do the first portion of my coolant flush DIY up to step 15. Take off the lower splash guard while you are down under the car, and obviously don't lower the car off the jacks.
2: Drain the oil and remove the oil filter if you haven't already in the coolant flush. This step isn't absolutely necessary, but if you need to replace the crankshaft oil seal it will be. Besides, what engine doesn't love an oil change?
3: Remove the left front tire. With the skirt off inside the fenderwell should look like this, only with some belts running around the harmonic balancer:
The next steps are basically about removing the Power Steering pump and Alternator so that we can remove the motor mount they hang off of.
4a: Make your life easier and take out the 2 bolts circled in red here to get the black bracket out of the way. It makes it a lot easier to get to a bolt you need to remove (In this picture its at the 10'oclock position relative to the top red circle). Stole this pic off grey's diy - props to him.
4: Remove the P/S pump without disconnecting the P/S lines. The pump hangs by 3 bolts. The pump is already out in the picture, the three circles are where the screws are, and the arrow represents the holes that line up together on the pump and housing. The P/S Reservoir sits in a bracket, to take it out simply pull it up and out. Remove the 3 pump bolts, remove the belt, and set the P/S pump out of the way.
5: Remove the bracket that the P/S reservoir sits in. It needs to come out to get the alternator screw all the way out.
6: Remove the alternator and belt. This is your first PITA bolt and nut. There are 2 bolts that have to come completely out, and one that must be loosened to move the alternator down to take the belt off. Additionally, you have to disconnect the 4P electrical connector and unscrew the nut holding a wire on the side of the alternator. The bolt to be just loosened is circled in green, and the two locations on the alternator and where they are in the bracket are in red. Try going through the wheel well if you are having trouble reaching bolts. If you have trouble getting the alternator to move down, loosen the wingnut after you get the bolts loose and push down on the alternator to get enough slack in the belt.
OK. At this point we've got most of the preliminary work out of the way, and we are getting to the part that, well, sucks major ***.
The official honda manual says to remove the valvecover before doing this next step, but I say try to remove the crank bolt first. Why? Because if you are doing this at home and you can't get the damn thing to come off, you only have to re-install the alternator and P/S pump to drive the car to a mechanic who can pop the nut, then retighten it to maybe 70% of the original torque so you can get it off at home. Alternatively, take advantage of undocumented immigrant labor in the form of a mobile mechanic to bring a bigger breaker bar or stronger muscles...
7: Time to remove the crank pulley bolt. I cannot emphasize enough how much of a bitch it is to get this thing off. It is made worse if you drive fast and have over 90-100K miles on it, as our crankshafts rotate counterclockwise - meaning that they actually tighten this bolt the longer / faster you drive. Be prepared for an all out war. You need either impact sockets or high quality regular ones. no-name sockets will be devoured in the belly of the beast:
I also busted a craftsman socket my mom has had since the 70's. guess its time to go to sears for a warranty claim.
Install the special tool on the end of a 1/2 inch breaker bar and wedge the breaker bar against the floor:
Check out This video which shows a visual of the way everything should be set up. Don't underestimate the importance of a jack to rest the extensions on. You can't beat the laws of physics, and it does help significantly in getting the full amount of torque force directed in the right way.
8: Get the bolt off? Good. Take off the harmonic balancer like it is a war trophy... BUT DON'T BE SO HAPPY CELEBRATING THAT YOU LOSE THIS WOODRUFF KEY:
This is the key that goes into the crankshaft slot and keeps the harmonic balancer's timing marks correct. Installed, it looks like this:
VERY easy to lose, and the manual makes no mention of it. So, if you - like me - didn't see or hear it drop out after the hour-long fight with the crank nut - and put EVERYTHING BACK TOGETHER after you finish and then find it on the floor... you'll be sorry. In my case, i wasnt' sure if it was actually from the timing belt drive pulley or the harmonic balancer so I actually removed the lower timing cover and tried putting the key in the timing pulley, thereby moving the timing of the camshaft off by one tooth. Dumbass.
yes, i speak with woe and shame, but I learned from the mistake. hopefully nobody else will do that.
8: NOW we can remove the the valve cover. Honestly, grey's DIY is far better than mine ever will be on this topic, so go visit the Valve Clearance DIY and take all the steps needed to get the valvecover off. It is slightly easier to take off the upper timing cover a little later after we take some more stuff out, but its your call.
9: Support the engine by placing a jack with a piece of wood on it under the oil pan. The jack needs to be raised enough for it to feel snug against the oil pan. Next step is the removal of a motor mount, so we need to support the weight from the bottom.
10: Remove the driver side engine mount. 3 bolts, air tools and deep sockets help, but you could probably do it with wrenches. Be sure you remove one, check to make sure the engine is being supported by the jack correctly, then remove another.
11: Remove the Alternator bracket. The big silver thing the alternator was mounted on that has the studs that the motor mount was connected to needs to come out. 5 bolts, red circles and and arrows for the ones you can't see in the pic. Interestingly enough, one of mine (top one of the 2 side bolts) came out stripped, and this is the first time it has ever been out. Thanks for that, dude on the factory floor...
12: Excellent. Now we can remove the upper and lower timing covers. You may have removed the upper timing cover when you did the valve cover removal, but the lower cover needs to be removed after the upper one. Total of 6 bolts, with one bolt common to both pieces. Didn't get pics of the locations, but they aren't too hard to find. Before removing the top cover, you need to pop out the little rubber grommet and disconect the TDC sensor underneath.
Congratulations - this is why it costs so much to have this done at the shop. Not necessarily hard, just time consuming to get in here. We now have removed all our obstacles to world domination. Grant yourself an evil mad scientist "Mwuhahahahaha!!!" and lets keep going.
You should basically see this:
13: Lets make sure we're at TDC BEFORE we remove the timing belt :-) On the camshaft pulley, there are 5 spokes, one of them marked "up." Get a socket wrench and turn this pulley counter-clockwise until the spoke marked "up" is pointing directly up. Look on the passenger side, and you'll see 2 score marks on the edge of the pulley 180 degrees opposite of one another. These should be dead even with the deck of the cylinder head. Once you have verified this, look through the fenderwell at the crank pulley. The little keyway of the crank pulley should be pointing straight up, and you'll see a notch on the face (not one of the fingerlike protrusions, an actual scored notch) of the crank pulley at about the 2'o clock position that will line up exactly with an arrow on the metal behind the pulley. Once the cam and crank are both EXACTLY at these TDC marks, we can go on.
**Idiot check. If you screw this up....
An idiot mistake I made was pulling the timing belt without making sure that the crank pulley was at TDC. It is possible to bend valves during a timing belt install if you are stupid and force the camshaft to do things it doesn't want to do! (I didn't, but have heard of it happening) If you are stupid and don't pay attention, remove your spark plugs and use the straightened coathanger through the spark plug holes to determine which pistons are high, and which are low. if you are clueless as to where the camshaft cycle is, a safe bet is to move the crank (CAREFULLY - if you have to force beyond the inertia of the pistons, something is wrong, go the other way) so that all the pistons are more or less halfway up the cylinders on the way to the crank pointing to #1 TDC. Then you can move the camshaft (again, carefully, you shouldn't have to force much) to catch up with the crank. Set both to TDC, and kick your own *** for being a retard and not following instructions.
14a: Remove the CKP Sensor, but DON'T disconnect it from the wiring Its the little black thing to the right of the crank pulley. It actually reads the little protrusions on the crank pulley via magnetic field changes (Might be optical, not sure). Anyhow, DON'T unhook the clip cable - physically unscrew the bolt and carefully remove the sensor keeping it connected to the wiring but out of the way of what we're going to do next...
14: Remove the timing belt. The Auto-Tensioner puts (duh) tension on the timing belt. we don't want that right now. You'll see a hole on the right side of the tensioner (Ignore the pin - it won't be there in the old one):
Stick an allen key in there and turn counter-clockwise. The tensioner will retract a bit, giving you enough slack to pull off the crank pulley and then remove the timing belt from around the water pump and camshaft pulley.
15a: Check the crankshaft oil seal while the crankshaft timing pulley is off. if you see obvious signs of oil seepage, grease, etc you'll want to replace the seals. I DID NOT DO MINE, so this procedure is hearsay. Basically, you want to CAREFULLY take a dental pick or a hooked instrument and grab the seal and pull. You don't want to gouge the mating surface on the back, so be very gentle with the pick. Place the new oil seal in, then drive it home with a hammer (gently!) using a piece of about 1 1/2 inch pipe covered in tape. It is easy to screw up the new seals, so be gentle here.
Any input on this procedure is welcome.
15b: Check the camshaft oil seal. If it is leaking, you'll have to take off the camshaft pulley, loosening the rocker arm nuts slightly, and using the same dental-pick and pipe driver procedure. Tighten the cam pulley up to 33 lbf (I think) and re-torque the rocker arm nuts to what they were.
15c: Idiot check: Put the crank pulley back on, and make sure the crank is still at TDC! Make sure that the camshaft pulley is still at TDC! As long as you started the belt removal at TDC they couldn't have turned more than a couple teeth, so it is OK to turn the cam OR crank clockwise or counterclockwise - whichever way gets you to TDC on both with the least movement.
16: Remove the water pump. 4 bolts, and they all need to come off. A small amount of coolant (or Distilled H2O if you follow my DIY) will splash out. Clean it up.
17: Remove the auto-tensioner if you are replacing it. Theoretically they last for 2 timing belts, but I don't want to do this again early if the tensioner fails. First disconnect the little spring from the post, then unscrew the bolt.
Pic of what mine looked like with everything out. Note my idiot mistake and that the crank pulley is NOT at TDC while the camshaft is close to that position, but we're not exactly sure where. DON"T let that happen to you ;-)
Allright. Now that everything is out, time to do some detail work.
18: Clean things up. The timing belt drive pulley needs to be clean and free of oil and dirt. Ditto the camshaft pulley. The mounting spot where the tensioner will go needs to be clean and free of oil, and the water pump mount needs to be pretty spotless. The water pump has a rubber o-ring that needs to be seated properly, and any dirt or oil on the seat surface will compromise it. Additionally, clean up any dirt on the timing belt covers.
19: Install the new water pump. Optionally, I had some O-ring grease i use for scuba diving o-rings. It is a silicone-based lube used for rubber o-rings on tanks, and I smeared it on the new water pump o-ring to lubricate it. Install the water pump, and tighten the bolts in an x pattern to 8.7 lbf of torque, then turn the pump a couple turns to make sure it moves smoothly.
20a: Time to do the tensioner. Installing the tensioner is kind of weird, as you need to torque the bolt to 2 different specs. Check out the picture for how it should look when you go to screw in the bolt:
Note the fact that the spring is attached to the tensioner, but it doesn't get hooked up to the peg on the block until you thread the timing belt on. Also note the u-shaped pin inside the holes. This should NOT be pulled until you are absolutely sure you've got the timing belt threaded right. it's not death if you accidentally pull it, but you will have to go through the rigamarole of using the allen key to un-tension the belt. Think of it as a "Remove-before-flight" pin... just don't forget to take it out when you are done :-)
20b: Install the tensioner, spring on the left, pin on the right, bolt on the top. Tighten the bolt to 7.2 lbf, then loosen 180 degrees.
21: Idiot check! Make sure that the crank pulley is at TDC, exactly! The score on the pulley needs to line up with the arrow on the metal behind it - then make sure that the cam pulley is at TDC - the spoke points straight up, and the score marks on the passenger side of the cam pulley are even with the cylinder head deck.
22: Time to install the timing belt. Install it in a counter-clockwise sequence from bottom-up. So, first it goes around the bottom of the timing belt pulley. Then it loops OVER the belt tensioner. Then UNDER and around the right side of the water pump. Then UP over the TOP of the cam pulley, before finally coming down. A, to B, to C, to D.
IMPORTANT (UPDATE - 7/16/08): Had someone bend valves. He was re-using the original tensioner, and said that there wasn't enough slack in the timing belt to get it on, so he had to "walk it back" over the cam pulley, causing the cam to turn like 3/4 of a turn. He bent valves. YOU SHOULD HAVE SLACK ENOUGH TO DO THIS WITHOUT MOVING THE CAM OR CRANK!! If you don't have slack, make sure that your tensioner is installed correctly and all tension is off of te belt. My suggestion is to get a short ( like 4" length max) piece of coat hanger or other thick gauge wire and "re-create" the U-clip that comes in teh new tensioners. that way, you can be sure that you have the max slack possible.
IF YOU HAVE TO TURN ANYTHING OR STRAIN HARD TO GET THE BELT ON, SOMETHING IS WRONG! It might be a bit tight, but it shouldn't require turning of pulleys and such.
When you are finished, it should look like this:
23: Make sure that the crank and cam are STILL at TDC. if not, repeat the previous step and rethread the belt.
24: Attatch the spring on the auto-tensioner to the post to make it springy.
25: Turn the crank or cam pulleys with a socket counterclockwise a few times to position the timing belt on the rollers.
26: Set the crank and cam to TDC, and RE-VERIFY that they are both at the same place - matchmarks and arrows lined up with the cynder head deck and / or arrow behind the crank pulley. If they don't, repeat steps 24-25.
27: If the crank and cam are both at TDC and you've turned the engine a couple times with the belt staying correct, torque the bolt on the auto-tensioner to 33 lbf, and remove the "grenade pin."
28: Huzzah! you've done it. Now... be sure, one last time, that the timing of the cam and crankshafts is locked up correctly - turn the engine a couple times counterclockwise and re-verify timing is correct.
29: Reinstall the CKP sensor (The one by the timing belt drive pulley), and torque to 8.7 lbf.
30: Reinstall the timing covers. I cleaned them and put a little silicone grease on the ruber seals. 7.2 lbf is spec.
31: Reinstall the TDC sensor and grommet.
32: Reinstall the upper bracket (the one with 5 bolts.) Torque to 33 lbf.
33: Reinstall the motor mount (the one with 3 bolts) Torque to 40 lbs.
34: Reinstall the harmonic balancer. Clean it and the crankshaft. DON'T FORGET THE WOODRUFF KEY! Should look like this:
35: Time to reinstall the crank bolt. Before you do this, clean it up and lubricate the bolt threads and the outside of the thick washer. Using the holder tool, install the bolt, then torque to 14 lbf. Then turn an ADDITIONAL 90 DEGREES. This is hard... lots of torque needed.
36: Reinstall the valvecover... Now might be a good time to do the valve clearance since you are in the area with the valvecover off. Check out grey's DIY for the procedure. This needs to be done with the engine dead cold.
At this point, it is time to do drive belts. Tensioning the drive belts is kind of a pain in the neck, made harder when you are installing new belts because you have to tension them very tight, then run the engine for 5 mins, the re tension them looser. A good set of pliers will help you turn the adjustment wingnut. be sure to use your belt tension gauge in the center of the longest space between the pulleys. in the Alternator / AC belt that is the very bottom straight run between the balancer and the AC compressor. In the P/S belt it is the top side of the belt between the P/S pulley and the harmonic balancer. If installing new belts, I'd actually recommend installing the alternator belt first WITHOUT re-installing the PS pulley, so that you don't have to mount / dismount the P/S pump to keep re-adjusting the alternator belt.
37: Reinstall the alternator and new alternator belt. I suggest lubing the wingnut and adjustment screw with wd-40 or something to make your life a touch easier. You need to have the top bolt installed and threaded but loose when adjusting tension. ditto for the "green" circled bolt in the alternator picture. Install the new belt, then tension to 85-100 kg, 830-980N, or 190-220 lbf - whatever units you prefer. It equates to "Really dang tight" and you'll need pliers or really strong fingers to get the wingnut that tight. Tighten the bolts and adjustment bolt. If putting the old belt back on, refer to the used specs in step 40. If putting the old belt back on, you can go ahead and do step 41 as well, tensioning the used belt specs there as well.
38: Idiot Check:
Engine oil refilled?
Coolant flush DIY resumed and coolant refilled, ready for engine start?
All bolts torqued correctly?
All sensors reconnected?
Battery reconnected?
Valvecover gasket seated?
Crank pulley bolt on, torqued, woodruff key inserted correctly?
39: Start the engine and pray you didn't screw up. If the engine catches and starts, finish the coolant diy by topping off the engine coolant through the radiator. Stop the engine after 5 minutes.
If the engine starts but then dies, your timing is probably off. Disconnect the TDC sensor and try to start the engine. If it starts and stays on, stop it immediately and then kick your own ***, because the timing belt is off by a tooth or two. You'll have to reopen everything and re-thread the belt. You can get away with just taking off the valvecover, harmonic balancer, and timing covers without removing the motor mount, then restringing the belt.
40: Re-tension the alternator belt to the used belt specs - 390 - 540 N (40 - 55 kgf, 88 - 120 lbf).
41: Install the PS pump with the nuts threaded but loose. Use the wingnut to tighten the belt to spec. If you are putting in a new belt, tension it to 740 - 880 N (75 - 90 kgf, 165 – 198 lbf). Measure tension in the center of the longest run of the belt. Run the engine for 5 minutes, then tension the belt to the used belt spec of 390 - 540 N (40 - 55 kgf, 88 - 121 lbf).
42: Reinstall the botom splash shield.
43: Reinstall the battery if you haven't already
44: Put the tires back on and lower the car.
45: Thats about it!
Congratulations - you've just done a procedure they usually charge $600 for. As long as you don't have parts left over and the crank bolt is tight, you should be good. You might want to do the idle learn procedure by letting the engine idle with no accessories on for 10 minutes. Make sure your temperature stays within normal levels if you did a coolant flush. It would be good to have the radiator cap off a bit to flush more air out of the system.
Last edited by reddawnman; Jul 26, 2008 at 12:39 AM.

Thread Starter
Registered!!
Joined: Apr 2004
Posts: 338
Likes: 1
From: SoCal OC / LA / San Diego
Rep Power: 275 Coolant Flush DIY
OK, so here's the coolant flush DIY portion of the festivities. You should flush your coolant every 100K miles according to the manual's service schedule. However, on the front of the antifreeze jugs, it says good for 60K miles. Split the difference, I guess...
Materials needed:
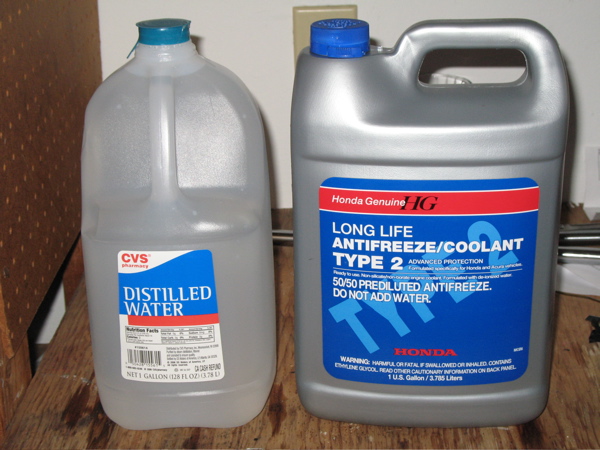
2 gallons DISTILLED WATER, and 2 gallons of 50/50 diluted HONDA COOLANT. USE HONDA COOLANT! - most other coolants will tear up your water pump seals. The honda stuff is specially formulated not to have silicates (sand / abrasive / bad stuff) in it. It is good stuff and worth the extra expense - handaaccessories has it for $10 a gallon, but after shipping it is probably the same price as the stealership.
Eye protection
Funnel
Jack + stands
Pan to catch coolant in. 7 gal capacity is good. You'll want it big.
Socket set
dab of Hondabond or equivalent hi-temp gasket seal.
1 new engine block coolant drain plug washer (28mm majestic part #18349)
Torque wrench (well, not really, but I'm ****)
DON'T USE TAP WATER!
Tap water and your local garden hose have dirt, sand, Ca+, Mg+ and other trace minerals in it - it is what makes water taste the way it does. However, precipitated buildup in your coolant passages (a.k.a. green disgusting gunk) starts as these ions, and over time they react with the metals in your engine block and cooling system to form scale and gunk that will affect engine cooling. Additionally and more commonly, sand and silicates eat at your water pump seals, contaminating your timing belt and causing random coolant leaks that can be hard to pinpoint.
Don't give the ions a chance - use distilled water. Only 99 cents a gallon at the same place you buy your beer...
Procedure:
1: Jack up the front of the car - you want it pretty high up. The objective is to get the top of the radiator at a higher level than the heater core which is about at cylinder-head height. Reason is that air bubbles form in the heater core when we drain it, and we want to give them a higher path out of the radiator neck so they don't get trapped back in the system. If you finish the DIY and hear gurgling when you turn on the heater for more than a couple days, you might have some air trapped in there.
2: Start the car and turn the heater controls full hot. Run the car for about a minute, then turn off.
3: MAKE SURE THE RADIATOR AND BLOCK ARE COOL TO THE TOUCH BEFORE GOING ON! The cooling system is under pressure, and if you go on while the engine is still hot, you WILL get a nasty steam burn. I take no responsibility for your actions. This material is for educational purposes only, yadda yadda yadda.
4: Remove the battery
5: Remove the radiator cap (slowly!)
6: Drain the coolant from the radiator.
** If you are doing your timing belt, now would be a good time to take off the bottom splash skirt since you'll be needing to do it. If you aren't doing the timing belt, nothing more to see here. moving on...
Turn the plastic petcock a few turns and be sure you have your catch pan underneath it. This is about 70% of the coolant capacity
7: Now for the other 25% of the coolant (5% is locked up in the hoses, etc)
Get under the car and find your oil filter. To the right of it is a large 17mm plug bolthead:
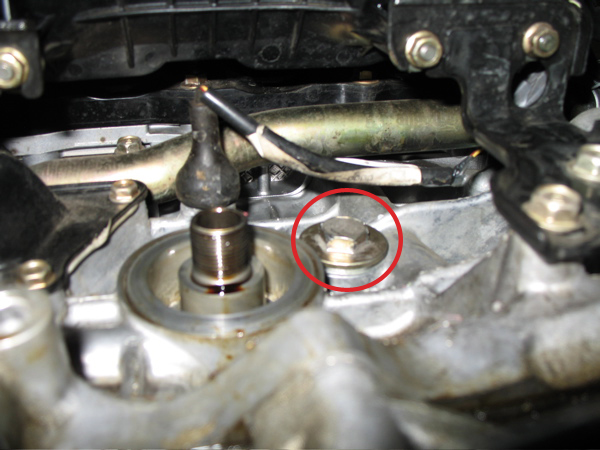
This screw is under 58 lbs torque, so it is a bit of a pain to get off, particularly with the oil filter in the way, made worse when you use the oversize s2000 oil filters like I do... however, we have to leave the oil filter on for now because we will run the engine shortly.

WARNING - you will feel like a fetish **** starlet when you remove this bolt. Coolant will splash everywhere, so have your eye protection on and try not to swallow, no matter how much the producer says he'll pay you... Antifreeze is POISONOUS. Lethal dose for an average size adult is 4-6 oz, so don't sweat it if you taste a little (Dilute with H2O and spit) but try to keep it away from you. Antifreeze is also usually very sweet, so if you have dogs, cats or kids be very, very careful where you store it. Closed containers are good. You have been warned.
8: After the coolant has drained, reinstall the block drain bolt and the old washer - tighten it down enough so it doesn't leak, we will be removing it again shortly.
9: Be sure you've closed the radiator petcock you opened in step 6.
10: clear out the coolant reserve tank. There is a bolt on the front radiator support to the right of the battery where the white tank is mounted:
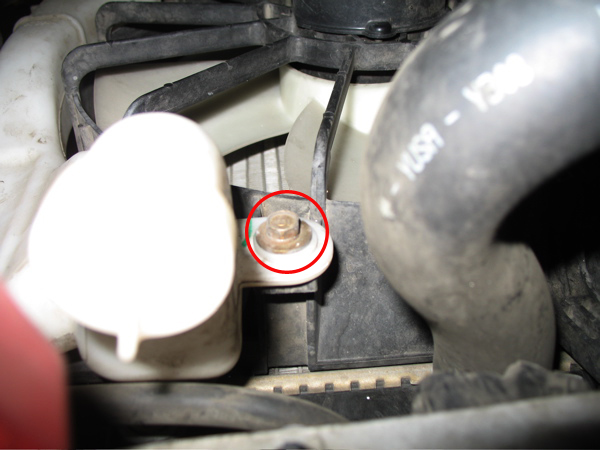
unscrew that bolt, pull the tank out, drain. Rinse inside the tank with some distilled H2O, and be sure to unhook the little hose and get the coolant out of that. Hey, never hurts to be thorough. Replace the tank.
11: Idiot check:
Engine drain bolt replaced?
Radiator petcock closed on the bottom?
12: Get a funnel and fill the radiator through the radiator cap with distilled water until it is full all the way up to the filler neck - I think it takes a little more than a gallon.
13: Hook up the battery. (Don't bother reinstalling the case, we're removing it soon again) Start the car, make sure the heater is on full heat. While the car is running, look into the radiator cap (flashlight is helpful) and notice the water is going somewhere - into the block. Keep adding water to the radiator until no more air bubbles bubble out and the radiator is full again. Keep checking the temp gauge in the dash - something is wrong if it gets hotter than normal operating temp - shut down immediately if that happens. Check and make sure the heater is on and that you didn't forget to tighten / install the block plug.
Run the engine about 10 minutes or until you can't stick a pinky in the radiator neck without it being uncomfortably hot but not boiling - about the temperature of just-poured coffee that is way too hot to drink. The goal is to make sure the thermostat opens and circulates the H2O all throughout the block and heater core. Shut the engine off after you think the water has had a chance to circulate a bit at temperature WITHOUT boiling.
14: WAIT for the engine block to cool down! The block and radiator should be cool to the touch before going on, because we're going to drain it again and the block stores a lot of residual heat - it would be very bad times if that heat didn't have anywhere to go. This is usually what causes a blown head gasket in the case of cooling system failure.
15: Repeat steps 6,7, and 9.
**For you timing belt folks, you probably want to drain the oil anyways, so go ahead and remove the oil filter to make life easier.
** If you are doing your timing belt, don't go on. put your pencil down. do not go onto the next section of the test until you are instructed to do so... AFTER you finish doing the timing belt / water pump install.
16: Time to replace the block drain bolt and put the new washer on. This time it goes on there for good, and tight. Clean the threads, put the new washer on, and smear a dab of hondabond on the threads. Screw it in place, then torque to 58 lbf.
17: Repeat idiot check:
Block Drain bolt tightened, gasketed, washered?
Radiator petcock closed and tight?
Oil filter / engine oil reinstalled / refilled?
18: Repeat step 10. This time reinstall the overflow tank and then fill with new honda coolant up to the MAX line. You don't need to add water to honda coolant, it is sold as premix.
19: Fill the radiator up to the filler neck with new honda coolant.
20: Reinstall the battery + case permanently.
21: Start the car with the radiator cap off. Again, coolant will flow into the block and you need to add a bit of coolant to the radiator to keep the level topped off. Keep running the engine until the engine reaches normal operating temperature and the radiator fan comes on twice. Be sure to have the heater on to drain any air bubbles out to the radiator neck, which should be the highest point in the system.
22: Shut off the engine, install the radiator cap tightly, and lower the car. You are almost there...
23: Go online and to your city's waste management website and find out where the household hazardous waste drop-off point is. The city will usually take it in for free. Pour the used coolant into suitable closed containers marked POISONOUS - DO NOT DRINK, then dispose of the coolant properly. ANTIFREEZE IS POISONOUS AND TOXIC - ABOUT 10,000 DOGS AND CATS DIE EACH YEAR FROM INGESTING IT! DON'T JUST THROW USED COOLANT IN THE DRAIN / GUTTER / STREET! Coolant is HAZMAT and it is illegal to throw it down the drain.
Drive around a while, and check the levels for the next few weeks to make sure you aren't leaking coolant somewhere. People always do good jobs on changing the oil, but coolant should not be neglected... a blown water pump seal or corroded hose can spell major warpage to your block and a bunch of engine damage, so when you change your coolant, do it right!
Bonus points to anyone who can tell me where I got the picture of the girl (shame on you if you know... lol)
Materials needed:
2 gallons DISTILLED WATER, and 2 gallons of 50/50 diluted HONDA COOLANT. USE HONDA COOLANT! - most other coolants will tear up your water pump seals. The honda stuff is specially formulated not to have silicates (sand / abrasive / bad stuff) in it. It is good stuff and worth the extra expense - handaaccessories has it for $10 a gallon, but after shipping it is probably the same price as the stealership.
Eye protection
Funnel
Jack + stands
Pan to catch coolant in. 7 gal capacity is good. You'll want it big.
Socket set
dab of Hondabond or equivalent hi-temp gasket seal.
1 new engine block coolant drain plug washer (28mm majestic part #18349)
Torque wrench (well, not really, but I'm ****)
DON'T USE TAP WATER!
Tap water and your local garden hose have dirt, sand, Ca+, Mg+ and other trace minerals in it - it is what makes water taste the way it does. However, precipitated buildup in your coolant passages (a.k.a. green disgusting gunk) starts as these ions, and over time they react with the metals in your engine block and cooling system to form scale and gunk that will affect engine cooling. Additionally and more commonly, sand and silicates eat at your water pump seals, contaminating your timing belt and causing random coolant leaks that can be hard to pinpoint.
Don't give the ions a chance - use distilled water. Only 99 cents a gallon at the same place you buy your beer...
Procedure:
1: Jack up the front of the car - you want it pretty high up. The objective is to get the top of the radiator at a higher level than the heater core which is about at cylinder-head height. Reason is that air bubbles form in the heater core when we drain it, and we want to give them a higher path out of the radiator neck so they don't get trapped back in the system. If you finish the DIY and hear gurgling when you turn on the heater for more than a couple days, you might have some air trapped in there.
2: Start the car and turn the heater controls full hot. Run the car for about a minute, then turn off.
3: MAKE SURE THE RADIATOR AND BLOCK ARE COOL TO THE TOUCH BEFORE GOING ON! The cooling system is under pressure, and if you go on while the engine is still hot, you WILL get a nasty steam burn. I take no responsibility for your actions. This material is for educational purposes only, yadda yadda yadda.
4: Remove the battery
5: Remove the radiator cap (slowly!)
6: Drain the coolant from the radiator.
** If you are doing your timing belt, now would be a good time to take off the bottom splash skirt since you'll be needing to do it. If you aren't doing the timing belt, nothing more to see here. moving on...
Turn the plastic petcock a few turns and be sure you have your catch pan underneath it. This is about 70% of the coolant capacity
7: Now for the other 25% of the coolant (5% is locked up in the hoses, etc)
Get under the car and find your oil filter. To the right of it is a large 17mm plug bolthead:
This screw is under 58 lbs torque, so it is a bit of a pain to get off, particularly with the oil filter in the way, made worse when you use the oversize s2000 oil filters like I do... however, we have to leave the oil filter on for now because we will run the engine shortly.
WARNING - you will feel like a fetish **** starlet when you remove this bolt. Coolant will splash everywhere, so have your eye protection on and try not to swallow, no matter how much the producer says he'll pay you... Antifreeze is POISONOUS. Lethal dose for an average size adult is 4-6 oz, so don't sweat it if you taste a little (Dilute with H2O and spit) but try to keep it away from you. Antifreeze is also usually very sweet, so if you have dogs, cats or kids be very, very careful where you store it. Closed containers are good. You have been warned.
8: After the coolant has drained, reinstall the block drain bolt and the old washer - tighten it down enough so it doesn't leak, we will be removing it again shortly.
9: Be sure you've closed the radiator petcock you opened in step 6.
10: clear out the coolant reserve tank. There is a bolt on the front radiator support to the right of the battery where the white tank is mounted:
unscrew that bolt, pull the tank out, drain. Rinse inside the tank with some distilled H2O, and be sure to unhook the little hose and get the coolant out of that. Hey, never hurts to be thorough. Replace the tank.
11: Idiot check:
Engine drain bolt replaced?
Radiator petcock closed on the bottom?
12: Get a funnel and fill the radiator through the radiator cap with distilled water until it is full all the way up to the filler neck - I think it takes a little more than a gallon.
13: Hook up the battery. (Don't bother reinstalling the case, we're removing it soon again) Start the car, make sure the heater is on full heat. While the car is running, look into the radiator cap (flashlight is helpful) and notice the water is going somewhere - into the block. Keep adding water to the radiator until no more air bubbles bubble out and the radiator is full again. Keep checking the temp gauge in the dash - something is wrong if it gets hotter than normal operating temp - shut down immediately if that happens. Check and make sure the heater is on and that you didn't forget to tighten / install the block plug.
Run the engine about 10 minutes or until you can't stick a pinky in the radiator neck without it being uncomfortably hot but not boiling - about the temperature of just-poured coffee that is way too hot to drink. The goal is to make sure the thermostat opens and circulates the H2O all throughout the block and heater core. Shut the engine off after you think the water has had a chance to circulate a bit at temperature WITHOUT boiling.
14: WAIT for the engine block to cool down! The block and radiator should be cool to the touch before going on, because we're going to drain it again and the block stores a lot of residual heat - it would be very bad times if that heat didn't have anywhere to go. This is usually what causes a blown head gasket in the case of cooling system failure.
15: Repeat steps 6,7, and 9.
**For you timing belt folks, you probably want to drain the oil anyways, so go ahead and remove the oil filter to make life easier.
** If you are doing your timing belt, don't go on. put your pencil down. do not go onto the next section of the test until you are instructed to do so... AFTER you finish doing the timing belt / water pump install.
16: Time to replace the block drain bolt and put the new washer on. This time it goes on there for good, and tight. Clean the threads, put the new washer on, and smear a dab of hondabond on the threads. Screw it in place, then torque to 58 lbf.
17: Repeat idiot check:
Block Drain bolt tightened, gasketed, washered?
Radiator petcock closed and tight?
Oil filter / engine oil reinstalled / refilled?
18: Repeat step 10. This time reinstall the overflow tank and then fill with new honda coolant up to the MAX line. You don't need to add water to honda coolant, it is sold as premix.
19: Fill the radiator up to the filler neck with new honda coolant.
20: Reinstall the battery + case permanently.
21: Start the car with the radiator cap off. Again, coolant will flow into the block and you need to add a bit of coolant to the radiator to keep the level topped off. Keep running the engine until the engine reaches normal operating temperature and the radiator fan comes on twice. Be sure to have the heater on to drain any air bubbles out to the radiator neck, which should be the highest point in the system.
22: Shut off the engine, install the radiator cap tightly, and lower the car. You are almost there...
23: Go online and to your city's waste management website and find out where the household hazardous waste drop-off point is. The city will usually take it in for free. Pour the used coolant into suitable closed containers marked POISONOUS - DO NOT DRINK, then dispose of the coolant properly. ANTIFREEZE IS POISONOUS AND TOXIC - ABOUT 10,000 DOGS AND CATS DIE EACH YEAR FROM INGESTING IT! DON'T JUST THROW USED COOLANT IN THE DRAIN / GUTTER / STREET! Coolant is HAZMAT and it is illegal to throw it down the drain.
Drive around a while, and check the levels for the next few weeks to make sure you aren't leaking coolant somewhere. People always do good jobs on changing the oil, but coolant should not be neglected... a blown water pump seal or corroded hose can spell major warpage to your block and a bunch of engine damage, so when you change your coolant, do it right!
Bonus points to anyone who can tell me where I got the picture of the girl (shame on you if you know... lol)
Last edited by reddawnman; Jan 13, 2008 at 07:23 AM.

My Pony Princess is the inspiration for my ride.
iTrader: (17)
Joined: Apr 2006
Posts: 5,217
Likes: 0
Rep Power: 0 
Re: Timing Belt DIY 2
Great stuff man! Really excellent DIY with the personal "Oh and I ****ed up on this part" things that folks need when they undertake this stuff for the first time. Rep for you.
This is my favorite:
This is my favorite:
Originally Posted by reddawnman
So, if you - like me - didn't see or hear it drop out after the hour-long fight with the crank nut - and put EVERYTHING BACK TOGETHER after you finish and then find it on the floor... you'll be sorry.
Thread Starter
Registered!!
Joined: Apr 2004
Posts: 338
Likes: 1
From: SoCal OC / LA / San Diego
Rep Power: 275 Re: Timing Belt DIY 2

Bump because I added pics and have procedures done for the removal phase of everything. Installation will be up by monday.
If you like it, rep is gladly accepted :-)
Mods, if you want the coolant flush DIY post can be split to a separate thread in the DIY section... as can the timing belt part if enough people like, but I obviously have to finish it. suggestions and comments welcome.
Last edited by reddawnman; Dec 15, 2007 at 10:55 AM.
Thread Starter
Registered!!
Joined: Apr 2004
Posts: 338
Likes: 1
From: SoCal OC / LA / San Diego
Rep Power: 275 Re: Timing Belt DIY 2
Bump because the DIY is DONE!
If you like it, rep is gladly accepted :-)
One thing - my procedures for the Crank and Cam oil seals are iffy because I did not do them myself. If ANYONE has ever done those seals, feel free to call me on my BS.
Those of you who think you need to do your seals, get a factory manual and verify that my instructions are correct. Above all, you don't want to gouge the mating surface on the back of the seals.
Suggestions and comments welcome.
MODS: This post should be in the DIY section, split into separate threads for the coolant flush and timing belt. When that happens, I'll edit the timing belt one to link to the coolant flush one.


Re: Timing Belt DIY 2
very extensive DIY! awesome write up man. my only comment is that you really don't need to fill the coolant overflow, because it's meant to be just that, an overflow jug. won't hurt doing it or anything though. hopefully this DIY saves a lot of people on this site some mad moolah!
Thread Starter
Registered!!
Joined: Apr 2004
Posts: 338
Likes: 1
From: SoCal OC / LA / San Diego
Rep Power: 275 Re: Timing Belt DIY 2
very extensive DIY! awesome write up man. my only comment is that you really don't need to fill the coolant overflow, because it's meant to be just that, an overflow jug. won't hurt doing it or anything though. hopefully this DIY saves a lot of people on this site some mad moolah!
Normally when the system heats up and pressurizes, the excess coolant is directed into the overflow tank. However, on first run usually you have some air in the radiator that is forced out. In my case there was no fluid expelled into the overflow tank, so if I hadn't have put at least a little in there the air would have been sucked back in. YMMV, of course.
Re: Timing Belt DIY 2
On some level I agree, but as the system cools down a vacuum is formed, and unless you have the overflow tank at least a little filled, you get air sucked into the cooling system.
Normally when the system heats up and pressurizes, the excess coolant is directed into the overflow tank. However, on first run usually you have some air in the radiator that is forced out. In my case there was no fluid expelled into the overflow tank, so if I hadn't have put at least a little in there the air would have been sucked back in. YMMV, of course.
Normally when the system heats up and pressurizes, the excess coolant is directed into the overflow tank. However, on first run usually you have some air in the radiator that is forced out. In my case there was no fluid expelled into the overflow tank, so if I hadn't have put at least a little in there the air would have been sucked back in. YMMV, of course.

Thread Starter
Registered!!
Joined: Apr 2004
Posts: 338
Likes: 1
From: SoCal OC / LA / San Diego
Rep Power: 275 Re: Timing Belt DIY 2
I do agree, if I had a kickass impact it probably would have worked.
Re: Timing Belt DIY 2
The Impact does take it off fast and easy. But I don't recommend using it to put it back on.
So you still need the orther tool.
The polly needs to be correctlly torqued.
You don't want to brake the bolt, stripe it out, or have the polly fall off.

If anyone in the 310- or 424- area codes (Cali) needs to borrow the Crank pulley holder tool. Let me know.
So you still need the orther tool.
The polly needs to be correctlly torqued.
You don't want to brake the bolt, stripe it out, or have the polly fall off.
If anyone in the 310- or 424- area codes (Cali) needs to borrow the Crank pulley holder tool. Let me know.
Re: Timing Belt DIY 2
oh crap.
Think I have a problem.
My friend and I were looking at my car. I was showing him my cam gear.
I noticed that on the firewall side the timing belt felt tight. on the other side it seems loose. humm..
Can it be loose on one side? Is it normal?
Is it posable?
Think I have a problem.
My friend and I were looking at my car. I was showing him my cam gear.
I noticed that on the firewall side the timing belt felt tight. on the other side it seems loose. humm..
Can it be loose on one side? Is it normal?
Is it posable?
Thread Starter
Registered!!
Joined: Apr 2004
Posts: 338
Likes: 1
From: SoCal OC / LA / San Diego
Rep Power: 275 Re: Timing Belt DIY 2
2: What you describe is most likely normal, but how loose is "loose?" On the firewall side, the belt is wrapped around the tensioner and the water pump pulleys, so there is less of a slack run for it - it is definitely normal for that side to be tighter. The front side of the belt is one big long span between the crank and cam pulleys, so it will have a little bit of play, maybe 1/2" or so. However, if you push on the belt and you can get it to move so far as to touch the side of the belt on the tensioner (1" or more), it probably is a bit loose and you may have either installed the tensioner wrong (didn't pull pin, forgot to torque tensioner nut to 33 lbf, forgot to spring tensioner spring up) or you didn't replace the tensioner and it is going bad.
Thread Starter
Registered!!
Joined: Apr 2004
Posts: 338
Likes: 1
From: SoCal OC / LA / San Diego
Rep Power: 275 Re: Timing Belt DIY 2
It isn't that hard to do, but it is time consuming. Again, the hardest part is getting the damn crank pulley bolt off - after that it is pretty easy.
Joined: Nov 2003
Posts: 3,318
Likes: 0
From: Boise, Idaho
Rep Power: 329 Re: Timing Belt DIY 2
For some additional info here is how Alldata says it should be done....
Timing belt replacement on an D17
Timing belt replacement on an D17
Thread Starter
Registered!!
Joined: Apr 2004
Posts: 338
Likes: 1
From: SoCal OC / LA / San Diego
Rep Power: 275 Re: Timing Belt DIY 2
For some additional info here is how Alldata says it should be done....
Timing belt replacement on an D17
Timing belt replacement on an D17
Do they pay royalties to the manufacturers? How much does an alldata subscription cost?

Registered!!
Joined: Feb 2008
Posts: 3
Likes: 0
Rep Power: 0 Re: Timing Belt DIY 2
Quick question I am going to do this soon on my civic , do you need to buy a auto tension, or can you reuse the other one, if so how do you re tighten the timing belt to what level of Lbs ( using the Alan key)
Thread Starter
Registered!!
Joined: Apr 2004
Posts: 338
Likes: 1
From: SoCal OC / LA / San Diego
Rep Power: 275 Re: Timing Belt DIY 2
If you aren't taking off the tensioner, there's no need to torque or do anything to it. The allen key just rotates the tensioner away from the belt so it doesn't give any tension whilst you are threading the belt around the camshaft, water pump, etc. Release the allen key, and the tensioner will automatically tension the belt properly. Hence the name auto-tensioner...
The torquing procedure on the tensioner is only if you are taking it off and installing a new one.
Joined: Nov 2003
Posts: 3,318
Likes: 0
From: Boise, Idaho
Rep Power: 329 Re: Timing Belt DIY 2
Good stuff - Those pics / instructions are interesting because they are straight from the computerized honda factory service manual someone posted on rapidshare a while ago. I didn't know alldata was allowed to straight up copy the honda manual and sell subscriptions.
Do they pay royalties to the manufacturers? How much does an alldata subscription cost?
Do they pay royalties to the manufacturers? How much does an alldata subscription cost?
Registered!!
Joined: Feb 2008
Posts: 3
Likes: 0
Rep Power: 0 Re: Timing Belt DIY 2
Did you use honda parts or another company , i was thinking of geting a kit on ebay.
What do you think or what about autozone or honda deller
http://cgi.ebay.com/ebaymotors/HONDA...spagenameZWD1V
http://cgi.ebay.com/ebaymotors/HONDA...spagenameZWD1V
What do you think or what about autozone or honda deller
http://cgi.ebay.com/ebaymotors/HONDA...spagenameZWD1V
http://cgi.ebay.com/ebaymotors/HONDA...spagenameZWD1V
Thread Starter
Registered!!
Joined: Apr 2004
Posts: 338
Likes: 1
From: SoCal OC / LA / San Diego
Rep Power: 275 Re: Timing Belt DIY 2
I used OEM Honda Parts from Majestic. I think the total for everything was something around $170, including the tensioner set which is not included in the links on eBay that you posted. I didn't buy spark plug seals, tough so that would probably push the price up a little bit.
I can't speak for the reliability of non-oem parts as I haven't used them. I think some people on the forum have said they use them, and I'm sure they'll chime in.
Good luck.
I can't speak for the reliability of non-oem parts as I haven't used them. I think some people on the forum have said they use them, and I'm sure they'll chime in.
Good luck.

