Timing Belt DIY 2
 04-01-2013
#181
03 Civic EX

Join Date: May 2012
Location: MN
Posts: 32
Likes: 0
Received 0 Likes
on
0 Posts
Rep Power: 0 

 04-30-2013
#182
Registered!!

Join Date: Apr 2013
Posts: 3
Likes: 0
Received 0 Likes
on
0 Posts
Rep Power: 0 Re: Timing Belt DIY 2
So I put a 1.6 v-tech out of a 95 del sol in my 97 civic. Got it running everything seemed fine except the power steering pump making noise. its out of balance at an idle. after about 10 miles of driving I noticed that there were burn marks coming through the timing cover. I took off the top and the belt is walking.
While doing the motor swap I put on a new water pump, timing tensioner and belt. it all looked good but something is wrong. The only thing out of the ordinary I have seen it there is a bit to much oil in it. like 1/2 a quart.
And the motor leaks under the distributor for some reason. I just noticed this last night so I have done very little investigating.
05-16-2013
#183
Registered!!

Join Date: May 2013
Posts: 41
Likes: 0
Received 0 Likes
on
0 Posts
Rep Power: 0 Re: Timing Belt DIY 2
Engine on the bench... you would think it would help with that crank belt... however the lack of ummm car to hold the motor in place can be a serious pain.
Heat + breaker bar + 170lbs sitting on the 2 foot extension + 40 minutes of sweat = me dancing around the barn looking like a fool because the dang bolt finally came out.
Probably could have used a longer extension, but it was just me, so I had to hold onto the valve cover to keep the motor upright as well as apply pressure. Fun!...
05-16-2013
#184
Re: Timing Belt DIY 2
Engine on the bench... you would think it would help with that crank belt... however the lack of ummm car to hold the motor in place can be a serious pain.
Heat + breaker bar + 170lbs sitting on the 2 foot extension + 40 minutes of sweat = me dancing around the barn looking like a fool because the dang bolt finally came out.
Probably could have used a longer extension, but it was just me, so I had to hold onto the valve cover to keep the motor upright as well as apply pressure. Fun!...
Heat + breaker bar + 170lbs sitting on the 2 foot extension + 40 minutes of sweat = me dancing around the barn looking like a fool because the dang bolt finally came out.
Probably could have used a longer extension, but it was just me, so I had to hold onto the valve cover to keep the motor upright as well as apply pressure. Fun!...
05-16-2013
#185
If you think a good mechanic is expensive, try hiring a bad one
Re: Timing Belt DIY 2
Handle from a floor jack....
Fence post from the neighbors yard.
---------
You can BUY the crank pulley holder for like 25 McDoubles. http://www.ebay.com/bhp/honda-crank-...p2045573.m2388
Use this with a couple breaker bars and a cheater pipe.
Fence post from the neighbors yard.
---------
You can BUY the crank pulley holder for like 25 McDoubles. http://www.ebay.com/bhp/honda-crank-...p2045573.m2388
Use this with a couple breaker bars and a cheater pipe.
05-17-2013
#186
Registered!!
Join Date: May 2013
Posts: 41
Likes: 0
Received 0 Likes
on
0 Posts
Rep Power: 0 Re: Timing Belt DIY 2
It was as comical as you are probably thinking... Put torque on bar, watch engine dance like a stripper. curse, stop, ponder actions, more heat, more rattle gun, more leverage on breaker bar.
Oh well. its out now. Water pump is replaced. Oil pump will get replaced on Sunday. New tensioner, New Timing belt. Valve adjustment. Maybe if I'm lucky I'll start pulling the "Holy" motor out of the 02 civic that is currently a glorified rolling chassie.
Oh well. its out now. Water pump is replaced. Oil pump will get replaced on Sunday. New tensioner, New Timing belt. Valve adjustment. Maybe if I'm lucky I'll start pulling the "Holy" motor out of the 02 civic that is currently a glorified rolling chassie.
05-17-2013
#187
Re: Timing Belt DIY 2
Handle from a floor jack....
Fence post from the neighbors yard.
---------
You can BUY the crank pulley holder for like 25 McDoubles. http://www.ebay.com/bhp/honda-crank-...p2045573.m2388
Use this with a couple breaker bars and a cheater pipe.
Fence post from the neighbors yard.
---------
You can BUY the crank pulley holder for like 25 McDoubles. http://www.ebay.com/bhp/honda-crank-...p2045573.m2388
Use this with a couple breaker bars and a cheater pipe.
06-02-2013
#188
2001 Civic LX Sedan
Join Date: Apr 2008
Location: Florence, AL 35630
Age: 49
Posts: 178
Likes: 0
Received 0 Likes
on
0 Posts
Rep Power: 197 
Re: Timing Belt DIY 2
I'm doing the timing belt on my 2001 Civic LX D17A1 with 114,000 miles.
At some point before we bought it in 2008 an ignorant mechanic replaced the timing belt and broke two of the bolt mount locations on the lower timing cover and pinched the lower timing cover seal. There were also three timing cover bolts missing.
The result was that the cam bolt rubbed the upper cover and the crank pulley rubbed the lower cover. The tensioner spring was installed backwards.
I should have been done with this job two days ago but I am waiting for new Honda replacement parts to get here Tuesday.
I really hate ignorant mechanics!
While I'm in there I got a new crank sensor, 8 bumper clips, and another front engine mount that has failed after only two years.
Nathan
06-02-2013
#189
If you think a good mechanic is expensive, try hiring a bad one
Re: Timing Belt DIY 2
Just an FYI, that lower cover can have at least a couple of the bolt holes break out without human intervention.
The hole by the water pump that is recessed deep breaks out of the cover, always seems to be the first to go........ and random bottom holes can break out as the bolts grow with corrosion/rust, they swell and break the plastic. Usually on the bottom most bolts, they get hit with the most road spray I guess.
Nobody ever seems to want to pay for another timing cover, or they WANT to blame us for breaking it...... so it gets shoved back together.
HTH
06-05-2013
#190
2001 Civic LX Sedan
Join Date: Apr 2008
Location: Florence, AL 35630
Age: 49
Posts: 178
Likes: 0
Received 0 Likes
on
0 Posts
Rep Power: 197 Re: Timing Belt DIY 2
Just an FYI, that lower cover can have at least a couple of the bolt holes break out without human intervention.
The hole by the water pump that is recessed deep breaks out of the cover, always seems to be the first to go........ and random bottom holes can break out as the bolts grow with corrosion/rust, they swell and break the plastic. Usually on the bottom most bolts, they get hit with the most road spray I guess.
Nobody ever seems to want to pay for another timing cover, or they WANT to blame us for breaking it...... so it gets shoved back together.
HTH
The hole by the water pump that is recessed deep breaks out of the cover, always seems to be the first to go........ and random bottom holes can break out as the bolts grow with corrosion/rust, they swell and break the plastic. Usually on the bottom most bolts, they get hit with the most road spray I guess.
Nobody ever seems to want to pay for another timing cover, or they WANT to blame us for breaking it...... so it gets shoved back together.
HTH
The timing belt was replaced by said mechanic but the tensioner and water pump were not. The tensioner spring was installed backwards at the factory.
Both shafts have clear movement.
Nathan
06-05-2013
#191
Whachya lookin at?
iTrader: (1)
Join Date: May 2009
Location: Canada
Age: 38
Posts: 6,388
Likes: 0
Received 12 Likes
on
7 Posts
Rep Power: 289 
Re: Timing Belt DIY 2
My cover was cracked when I did my head gasket. Not totally sure how... I don't really care though so I just jammed it back together. If it fails I'll just either get a new engine or a new car lol.
06-07-2013
#192
Registered!!

Join Date: Aug 2012
Posts: 14
Likes: 0
Received 0 Likes
on
0 Posts
Rep Power: 0 Re: Timing Belt DIY 2
Thank you for a great DIY! This helped me do the work on my car about six weeks ago with relative success on my 2001 Civic LX with 123,000.
My only issue is it seems I have lost 3 mpg, from 30-31 avg to 27-28 avg. No other changes. If I am off one tooth, can it cause this? Car runs great, smooth and good power.
Thank you for any help.
Rusty
My only issue is it seems I have lost 3 mpg, from 30-31 avg to 27-28 avg. No other changes. If I am off one tooth, can it cause this? Car runs great, smooth and good power.
Thank you for any help.
Rusty
06-16-2013
#193
2001 Civic LX Sedan
Join Date: Apr 2008
Location: Florence, AL 35630
Age: 49
Posts: 178
Likes: 0
Received 0 Likes
on
0 Posts
Rep Power: 197 Re: Timing Belt DIY 2
Thank you for a great DIY! This helped me do the work on my car about six weeks ago with relative success on my 2001 Civic LX with 123,000.
My only issue is it seems I have lost 3 mpg, from 30-31 avg to 27-28 avg. No other changes. If I am off one tooth, can it cause this? Car runs great, smooth and good power.
Thank you for any help.
Rusty
My only issue is it seems I have lost 3 mpg, from 30-31 avg to 27-28 avg. No other changes. If I am off one tooth, can it cause this? Car runs great, smooth and good power.
Thank you for any help.
Rusty
If you were off one tooth would know it.
Verify it by removing the timing cover and setting it to TDC on the #1 cyl.
07-17-2013
#194
Registered!!

Join Date: Jul 2013
Location: Clearwater, FL, USA
Posts: 2
Likes: 0
Received 0 Likes
on
0 Posts
Rep Power: 0 Greetings, just signed up to the forum after going through reddawnman's diy on the timing belt and almost done with the job. Kudos for a great diy and taking all the pics and being so thorough. I did do both crank and camshaft seals and they were a walk in the park. I will post details of that and other things I found as soon as I finish the job once I get the new camshaft cover I had to order (the finish on the old one was peeling and the metal was showing through and had corroded over time). Thanks again civicforums for allowing all this great info to be exchanged. Peace . . .
07-21-2013
#195
Registered!!
Join Date: Jul 2013
Location: Clearwater, FL, USA
Posts: 2
Likes: 0
Received 0 Likes
on
0 Posts
Rep Power: 0 Re: Timing Belt DIY 2
Here's the info on the oil seal installation for those interested:
For the camshaft oil seal I used a strap wrench to hold the pulley still while I removed the bolt. The wrench I got from Harbor Freight, Item 94119 or 69373, frayed when I used it so you may want to shop around for a different one. The old seal came out easily using the hook pick from their 4-piece set, item 66836, (no, I don't work for HF, they just happen to be where I got these). By the way, the hook pick is perfect for getting the belt tensioner spring hooked onto the pin that sticks out from the cylinder block. To drive the new seal in after cleaning the bore in the head and the diameter on the cam I used a 1-�" socket that just fit the OD of the seal. Make sure you dab some grease on the inside of the seal and on the cam surface first. I tapped it in with a hammer and went around the edge of the socket so the seal drove in straight. I went with a Felpro seal, p/n TCS 45620, from Advance Auto and drove it approximately 1/16" underflush like the old one was. If you loosened the two bolts on the bushing cap make sure you retorque them to 8.7 ft-lbs.
The crankshaft seal was just as easy, except I couldn't use a 36 mm socket I had around that fit the seal because it bottomed out on the end of the crank before the seal got close to the block. I used a short �" diameter steel rod as a drift instead and tapped the seal in by going around the edge until it was flush with the block face. I went with the OEM seal from Honda, however, because the Felpro one, p/n TCS 45904, had a steel collar on the inside that made the overall thickness of it about .340", instead of .270" for the original. I did not want possible interference with the oil pump rotor so I opted for the OEM one. The OEM seal already had grease on the ID so no need to pre-lube that one. Hope this helps!
09-13-2013
#196
Registered!!

Join Date: Sep 2013
Posts: 19
Likes: 0
Received 0 Likes
on
0 Posts
Rep Power: 0 Re: Timing Belt DIY 2
I think my water pump is leaking, I have a water leak coming from that general area and my car is getting hot. I ordered a water pump/timing belt kit off ebay but I question if it is all I need, it was very cheap. I am going to attempt this job this week, does this look to be all I need besides the extras listed here that I may want to change.
http://www.ebay.com/itm/251232984133...84.m1439.l2649
My Civic has 230k miles
http://www.ebay.com/itm/251232984133...84.m1439.l2649
My Civic has 230k miles
09-13-2013
#197
Registered!!

Re: Timing Belt DIY 2
I think my water pump is leaking, I have a water leak coming from that general area and my car is getting hot. I ordered a water pump/timing belt kit off ebay but I question if it is all I need, it was very cheap. I am going to attempt this job this week, does this look to be all I need besides the extras listed here that I may want to change.
http://www.ebay.com/itm/251232984133...84.m1439.l2649
My Civic has 230k miles
http://www.ebay.com/itm/251232984133...84.m1439.l2649
My Civic has 230k miles
Valve Cover Gasket & all the seals (not sure why the valve cover has to come off)
Do you have all the tools seen here?
do you need to change the V-belts too?
Looks like the cheapest parts available. Good Luck!
Last edited by alex_nyc; 09-13-2013 at 08:14 PM.
09-13-2013
#198
If you think a good mechanic is expensive, try hiring a bad one
09-13-2013
#199
Registered!!
09-13-2013
#200
If you think a good mechanic is expensive, try hiring a bad one
Re: Timing Belt DIY 2
If the parts are cheap enough.....it might grenade before the next oil change.
I'd be using a dealer tensioner set at the very least. Aftermarket counterfeit tensioner pulleys are known for incredibly premature bearing and spring failures.
Remember, these engines can bend valves when the timing belt lets go. That's why I don't "cheap out" on timing components.
I service a few of these Civics that are at or over 300k, and they didn't make it to that mileage on DangerZone type parts.
I almost bought an 04 with a quarter million miles on it a couple years back when the owner traded it for a new 10 Civic.
JMHO, YMMV.
 01-24-2014
#202
Registered!!

Join Date: Jun 2011
Posts: 8
Likes: 0
Received 0 Likes
on
0 Posts
Rep Power: 0 Re: Timing Belt DIY 2
I hope someone still reads this old thread. Is a valve cover seal and a head gasket the same thing? I believe a have a head gasket leak and need to do all this as same time.
01-24-2014
#203
If you think a good mechanic is expensive, try hiring a bad one
Re: Timing Belt DIY 2
Head gasket is between the cylinder head and the engine block. Much bigger job.
02-14-2014
#204
Registered!!

Join Date: Feb 2014
Posts: 17
Likes: 0
Received 0 Likes
on
0 Posts
Rep Power: 0 Re: Timing Belt DIY 2
Hi All,
Tackling this DIY!
I'm to the part where you get the pulley's to TDC. While doing that (using socket on the camshaft pulley and turning counter-clockwise), the bolt came loose and hence I couldn't keep turning the system. What is the torque spec on that bolt? Is it okay to just tighten it up and keep on?
Thanks
02-14-2014
#205
Re: Timing Belt DIY 2
Hi All,
Tackling this DIY!
I'm to the part where you get the pulley's to TDC. While doing that (using socket on the camshaft pulley and turning counter-clockwise), the bolt came loose and hence I couldn't keep turning the system. What is the torque spec on that bolt? Is it okay to just tighten it up and keep on?
Thanks
Tackling this DIY!
I'm to the part where you get the pulley's to TDC. While doing that (using socket on the camshaft pulley and turning counter-clockwise), the bolt came loose and hence I couldn't keep turning the system. What is the torque spec on that bolt? Is it okay to just tighten it up and keep on?
Thanks
if you have the crank pulley removed and need to turn it, just temporarily install the pulley with the key and use the crank holding tool to turn the crank,
just re torque the cam bolt to spec, and throw a bit of locktite on there while your at it
04-28-2014
#207
PITA Admin
Administrator
iTrader: (1)
Join Date: Dec 2008
Location: TN
Age: 52
Posts: 14,805
Received 1,456 Likes
on
1,207 Posts
Rep Power: 340 Re: Timing Belt DIY 2
I think my water pump is leaking, I have a water leak coming from that general area and my car is getting hot. I ordered a water pump/timing belt kit off ebay but I question if it is all I need, it was very cheap. I am going to attempt this job this week, does this look to be all I need besides the extras listed here that I may want to change.
http://www.ebay.com/itm/251232984133...84.m1439.l2649
My Civic has 230k miles
http://www.ebay.com/itm/251232984133...84.m1439.l2649
My Civic has 230k miles
may this be a warning to others...
https://www.civicforums.com/forums/3...-happened.html
seems it happened...
 06-21-2014
#208
Registered!!
Join Date: Nov 2013
Location: Raleigh, NC
Posts: 380
Likes: 0
Received 3 Likes
on
3 Posts
Rep Power: 131 Re: Timing Belt DIY 2
great write up, i actually kept referring between the different ones in the DIY section so I could have pics for everything.
I would recommend getting a 2ft piece of cast iron pipe from a hardware store to help with breaking some of the bolts loose. To get to the lower alternator bolt I tried using one of those elbow joints with a 20" extension and going through the wheel well but was unsuccessful. Finally had the idea to get a cast iron pipe and slip it over the handle on my 3/8" driver. I used a deep socket so the wrench stood straight up and then slid the pipe on and easily popped it loose from the top. You have to hold the hood with one hand so you can put the little hood stick down to make room to work but it's pretty easy.

Same thing works great with the engine bolts. Seems like there's a lot of places where you can only get a fingers on the ratchet or you can't get good leverage. So the pipe really helps.
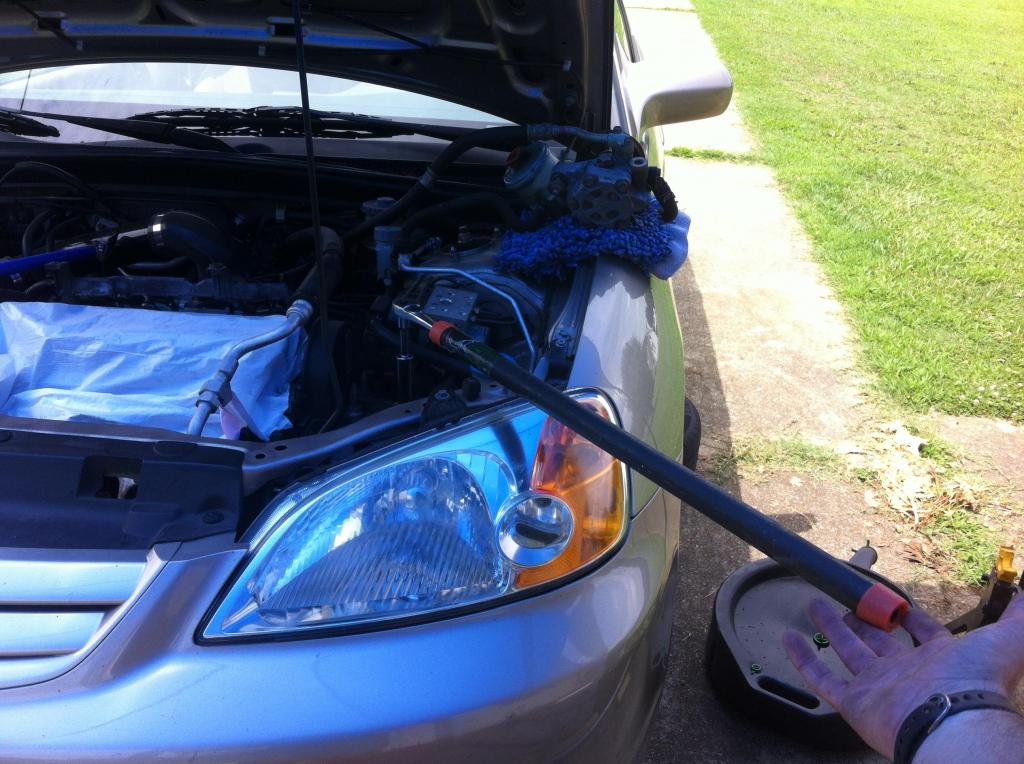
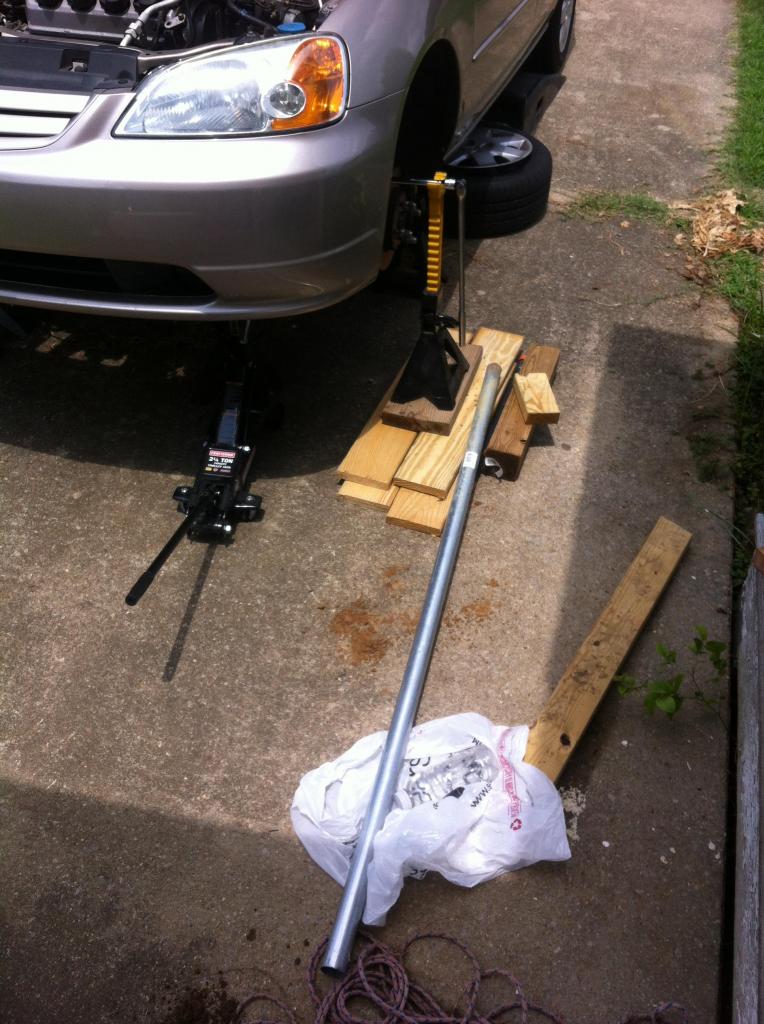
Also I used a fence post as a cheater bar for breaking the crankshaft nut loose. Definitely thought the pipe was going to crack and then TINK! the bolt broke loose. It's not really that hard with the right tools and a good amount of leverage. The car was up so high I had to use the jack to hold the specialty tool and put some wood under my jack stand to stay perpendicular to the bolt.
But now I snapped a bolt off trying to tighten the water pump so waiting til tomorrow to try and grab it with a vice grip and get it loose. Should of just tightened it by hand but wanted to use a torque wrench to make sure it was right. I think my torque wrench is broken
I would recommend getting a 2ft piece of cast iron pipe from a hardware store to help with breaking some of the bolts loose. To get to the lower alternator bolt I tried using one of those elbow joints with a 20" extension and going through the wheel well but was unsuccessful. Finally had the idea to get a cast iron pipe and slip it over the handle on my 3/8" driver. I used a deep socket so the wrench stood straight up and then slid the pipe on and easily popped it loose from the top. You have to hold the hood with one hand so you can put the little hood stick down to make room to work but it's pretty easy.

Same thing works great with the engine bolts. Seems like there's a lot of places where you can only get a fingers on the ratchet or you can't get good leverage. So the pipe really helps.

Also I used a fence post as a cheater bar for breaking the crankshaft nut loose. Definitely thought the pipe was going to crack and then TINK! the bolt broke loose. It's not really that hard with the right tools and a good amount of leverage. The car was up so high I had to use the jack to hold the specialty tool and put some wood under my jack stand to stay perpendicular to the bolt.

But now I snapped a bolt off trying to tighten the water pump so waiting til tomorrow to try and grab it with a vice grip and get it loose. Should of just tightened it by hand but wanted to use a torque wrench to make sure it was right. I think my torque wrench is broken
06-22-2014
#209
Re: Timing Belt DIY 2
But now I snapped a bolt off trying to tighten the water pump so waiting til tomorrow to try and grab it with a vice grip and get it loose. Should of just tightened it by hand but wanted to use a torque wrench to make sure it was right. I think my torque wrench is broken

i have said it a thousand times.....i will never understand why people use torque wrenches on bolts this small, just go by feel, all they need is tight by hand and then a little snug with a wrench,
on a side note.....i bought that exact same cast iron pipe you have except i got the 6 footer.....i agree its very handy, but i wouldnt recommend using a pipe extension like that with a ratchet, only with a breaker bar
06-22-2014
#210
If you think a good mechanic is expensive, try hiring a bad one
Re: Timing Belt DIY 2
Many people just have no sense of "feel" for this stuff, that's why the books give tightening specs for most fasteners.
It takes experience to "know" when enough is enough.
Experience is something you get just after you needed it.
.
.
A click type torque wrench that reads from 15-100 ft-lb is most accurate in the middle of its range (assuming it's even still in calibration). Error % is greater near the ends of the range.
One with a range of 15-100 ft-lb isn't accurate enough to do the 6mm water pump bolts at 8.7 foot-pounds.
If I need to do something like that, I convert to inch-pounds and use the appropriate inch-pound torque wrench.
And yes, I actually torque a lot of stuff the proper way.

