
DIY: TYC projector retrofit 2010


Thread Starter
Joined: Sep 2002
Posts: 51,241
Likes: 20
From: NV
Rep Power: 813 

Re: DIY: TYC projector retrofit 2010
well yeah the philips are noticably brighter. those higher K bulbs will never be at the same level. i may throw em in and see how they look, considering i paid 170 for the pair of osrams (very rare) and 70 for the philips lol. both new.
all i have left is to mount the projectors and the hardest part is trimming those brackets and putting all the hardware together while lining up the projector with the shroud hole and keeping good horizontal aim. lol. there was no way to use the stock mounting screws cause they were close but not in the right spot. and the projector would not be centered. so its gonna be a complete custom setup, hopefully with up.down adjuster screws. and if needed, may have to find a way to adjust rotation.
then the hella ballasts im most likely gonna mount under the headlamp and get new screws to hold it in place. that way its hidden and waterproof as much as possible (even tho the case has a foam gasket on both sides).
Thread Starter
Joined: Sep 2002
Posts: 51,241
Likes: 20
From: NV
Rep Power: 813 Re: DIY: TYC projector retrofit 2010
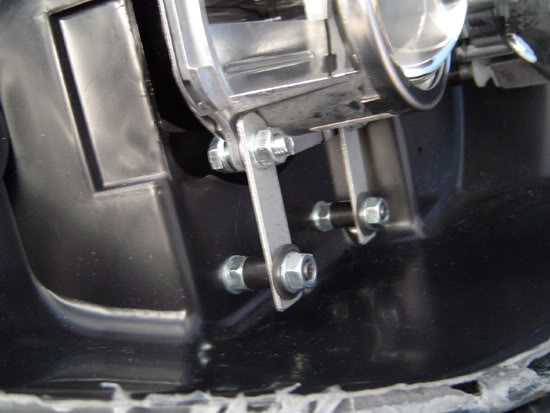
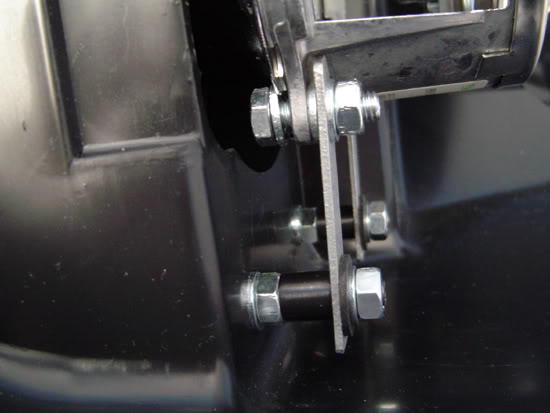
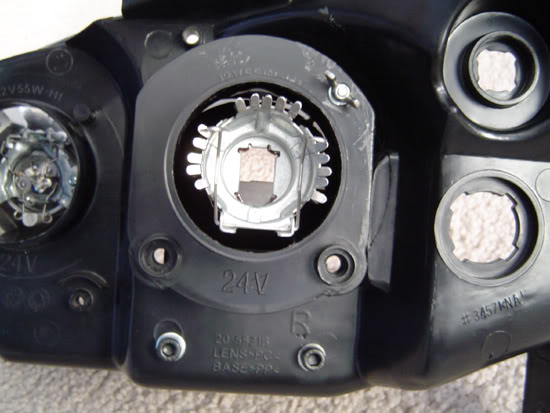
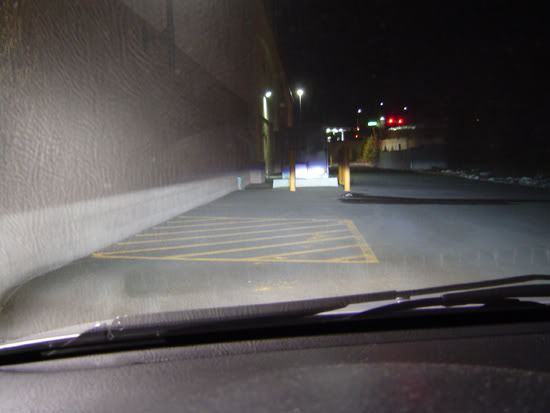
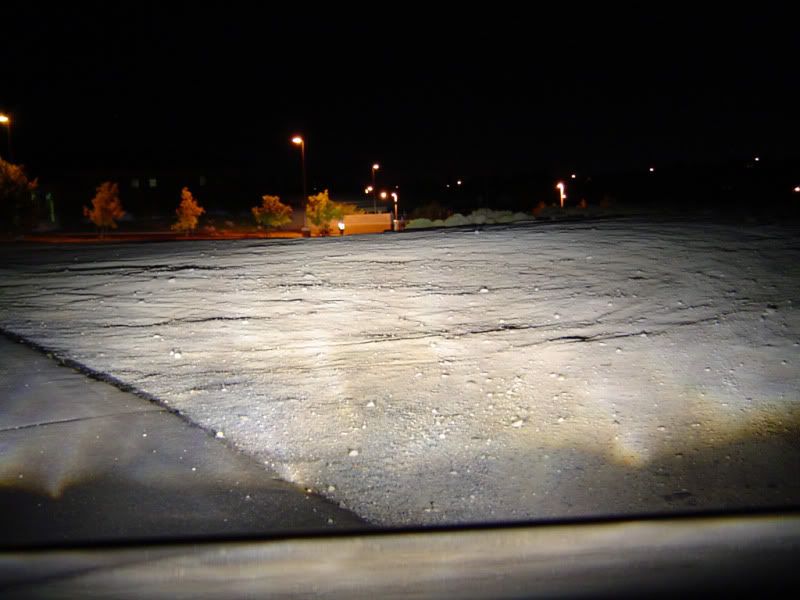
here is the basic idea. still may need adjustments once i test on the car. but at least the projector is not touching the housing at all and has a bit of wiggle room.
for the bottom, i made new mounting points lower than stock. those black spacers are tight fitting vacuum caps on the back, and a rubber washer on the front. its a floating mount that allows the projector to have a small range of motion back and forth.
front view
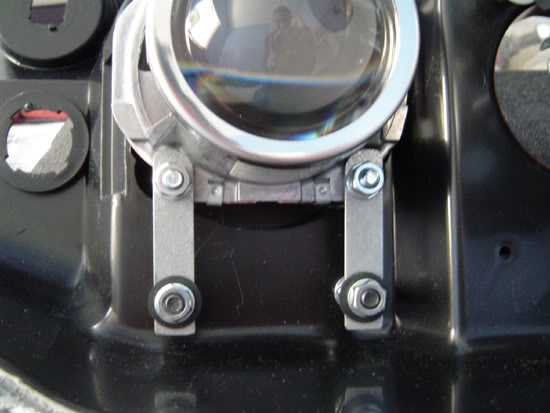
the upper mount was a pain because the biggest bolt they sell was too short. the nut in the middle is a lock nut, so i could use the short spring. it has a good tension and the projector is solid but adjustable. hopefully nothing breaks or bends too badly lol. it went right thru the original tyc mounting hole, which i had to cut off the inner and outer raised plastics so it was just a flat surface with hole.
from the outside, you can see the bottom mounts and also the aiming wingnut. i can prolly reach that from under the fender, like changing a bulb.
front view

for the bottom, i made new mounting points lower than stock. those black spacers are tight fitting vacuum caps on the back, and a rubber washer on the front. its a floating mount that allows the projector to have a small range of motion back and forth.
front view
the upper mount was a pain because the biggest bolt they sell was too short. the nut in the middle is a lock nut, so i could use the short spring. it has a good tension and the projector is solid but adjustable. hopefully nothing breaks or bends too badly lol. it went right thru the original tyc mounting hole, which i had to cut off the inner and outer raised plastics so it was just a flat surface with hole.
from the outside, you can see the bottom mounts and also the aiming wingnut. i can prolly reach that from under the fender, like changing a bulb.
front view
Thread Starter
Joined: Sep 2002
Posts: 51,241
Likes: 20
From: NV
Rep Power: 813 Re: DIY: TYC projector retrofit 2010
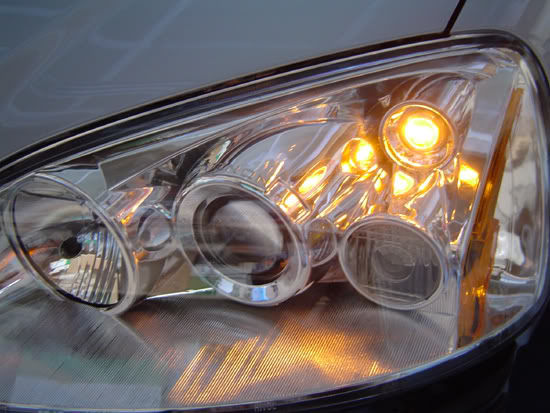
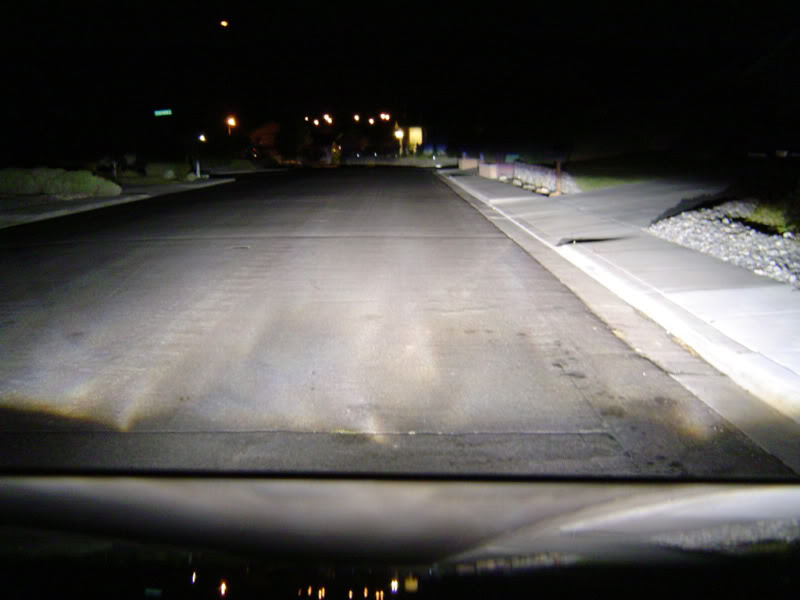
im done! pics coming tonight. these are awesome. the led park and turn are almost as good as the hids lol. turn signal leds are so bright. i got everything sealed and installed last night. there was some trouble with that stupid plastic nipple on the tyc housing so i chopped it off and the lights fit in place perfectly now. hid on its own harness, and hi beams on the stock harness so the lo beams stay on all the time even when using the hi beam. the rotation and vertical aim is near perfect, and the up/down angle can be adjusted in a few seconds by turning the wingnut on the back which is easily reachable with just the hood open. the horizontal aim has both sides angled inwards, but i like it better cause it puts more light directly in front of the car.
Joined: Aug 2006
Posts: 8,362
Likes: 1
From: Portland, Oregon
Rep Power: 389 Re: DIY: TYC projector retrofit 2010
Nice... Man, go ahead and put the bezels/lenses back on and ship them back to me and I'll refund your paypal 
In for final pics of them sealed up and mounted on the car!
In for final pics of them sealed up and mounted on the car!
Thread Starter
Joined: Sep 2002
Posts: 51,241
Likes: 20
From: NV
Rep Power: 813 Re: DIY: TYC projector retrofit 2010
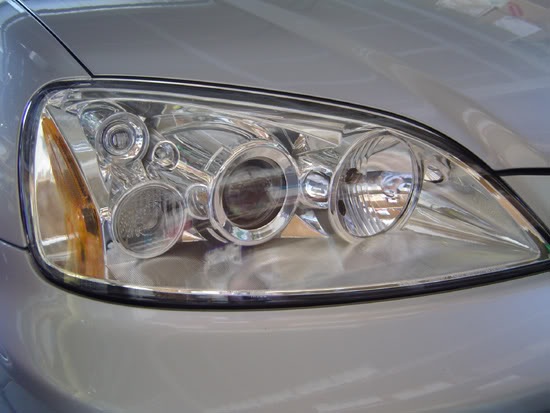
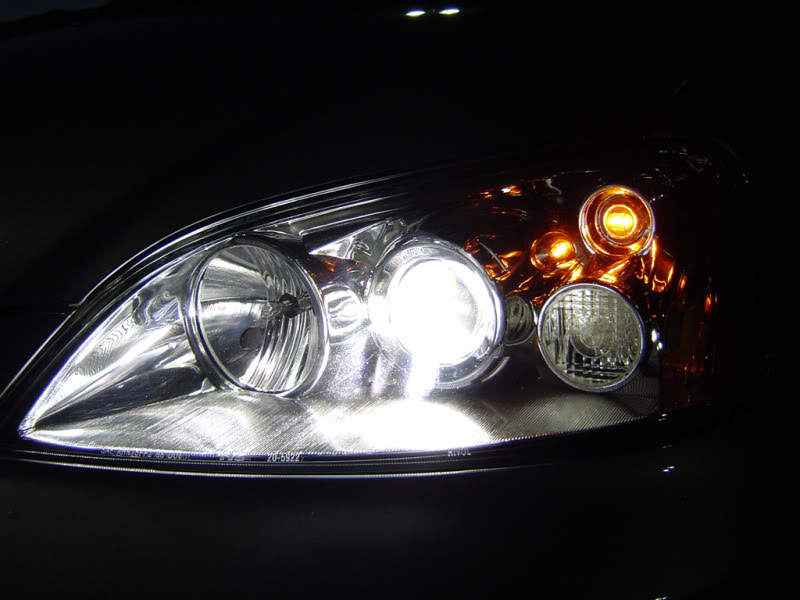
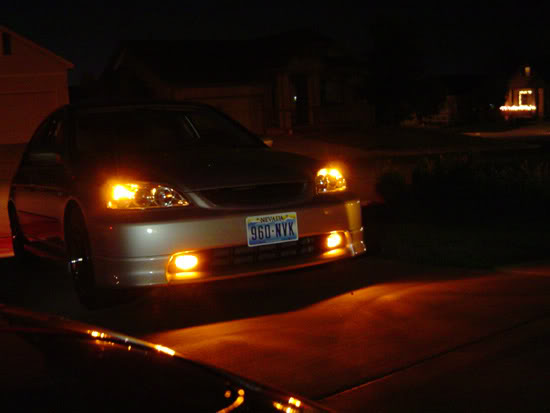
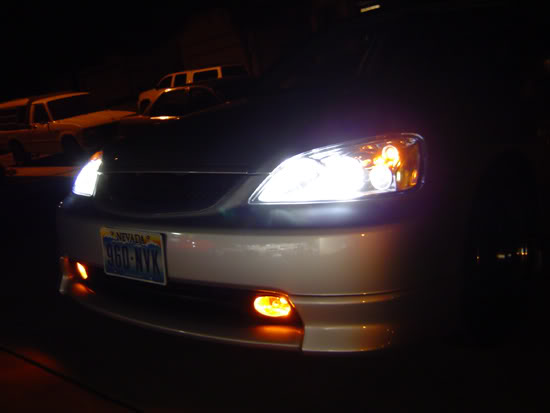
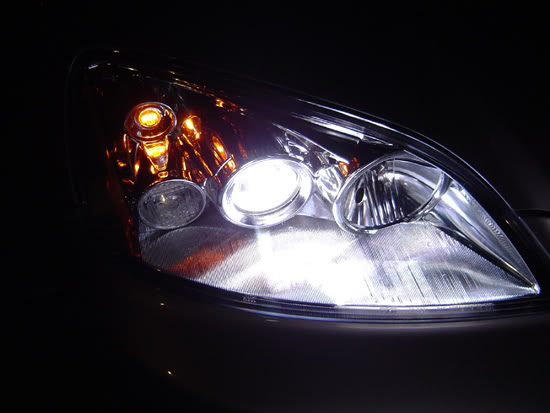
these look so good in person, pics dont do them justice. esp all the detail that went into park and turn signal leds. anyone spot the XENON sticker? i managed to get the projectors almost perfectly centered in the shroud, and both sides are exactly the same spacing and look. hi beams are also aimed properly but i may lower tham a tad. those are easy to adjust. night pics coming when it gets dark!

maxxima wide angle led parking light (0.15w power, 3 smt leds). the bottom signal was so intense that it just blurred the camera.
maxxima wide angle led parking light (0.15w power, 3 smt leds). the bottom signal was so intense that it just blurred the camera.
Thread Starter
Joined: Sep 2002
Posts: 51,241
Likes: 20
From: NV
Rep Power: 813 Re: DIY: TYC projector retrofit 2010
all parts for the final setup:
maxxima led parking lights
street magic 48-led genesis turn signal cluster (has dual intensity capability, but i did turn only to stand out)
valeo d2s hid projectors with clear lens swap (the new lenses really helped brightness and sharp blue cutoff color, the stock ones were fresnel and frosty)
osram xenstar 5400k specialty d2s bulbs, bought these barely used for $170
fairly new hella gen3 d2s ballasts, one mounted against battery box, the other on the small shelf next to power steering pump. all rubber boots fit back on like stock, and i used 3m windoweld to seal up the park/turn holes. everything is completely removable with the 3m stuff, in the unlikely event the leds go bad or i feel like changing the park led to white. hi beams are wired to stock harness and stay on with lo beams. they are just using regular $5 sylvania 55w H1 bulbs. i want philips XP, but those are such a pain to change and i dont feel like removing the lights anymore now that aim is set. and i can use my led drl for the turn signals on cloudy days to save hid bulb life
Last edited by gearbox; Feb 25, 2010 at 07:09 PM.
Thread Starter
Joined: Sep 2002
Posts: 51,241
Likes: 20
From: NV
Rep Power: 813 Re: DIY: TYC projector retrofit 2010
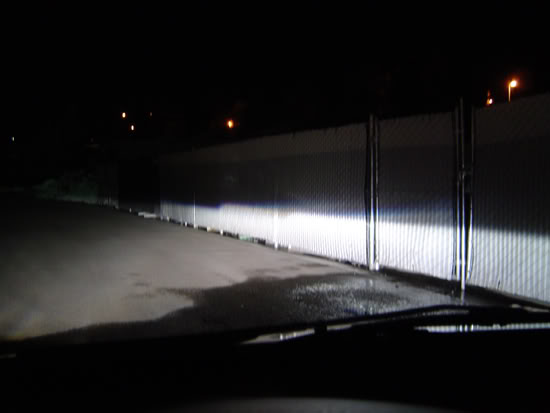
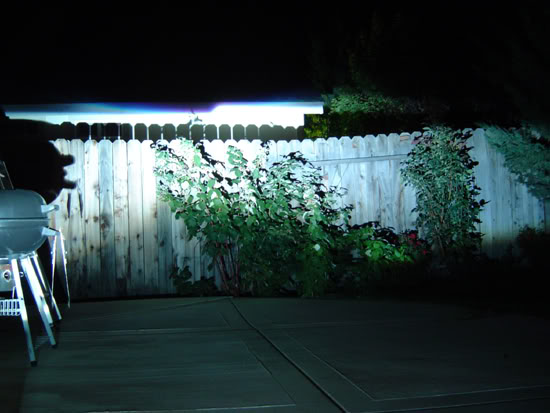
this should hold you guys over lol. will try and get some ground shots later.


Last edited by gearbox; Feb 25, 2010 at 10:20 PM.

Thread Starter
Joined: Sep 2002
Posts: 51,241
Likes: 20
From: NV
Rep Power: 813 Re: DIY: TYC projector retrofit 2010
Thread Starter
Joined: Sep 2002
Posts: 51,241
Likes: 20
From: NV
Rep Power: 813 Re: DIY: TYC projector retrofit 2010
thanks. i put back those projector driving lights tonight in the bumper with 35w H3 bulbs. adds a bit of extra light. i need to take some more pic once the rain stops.
Thread Starter
Joined: Sep 2002
Posts: 51,241
Likes: 20
From: NV
Rep Power: 813 Re: DIY: TYC projector retrofit 2010
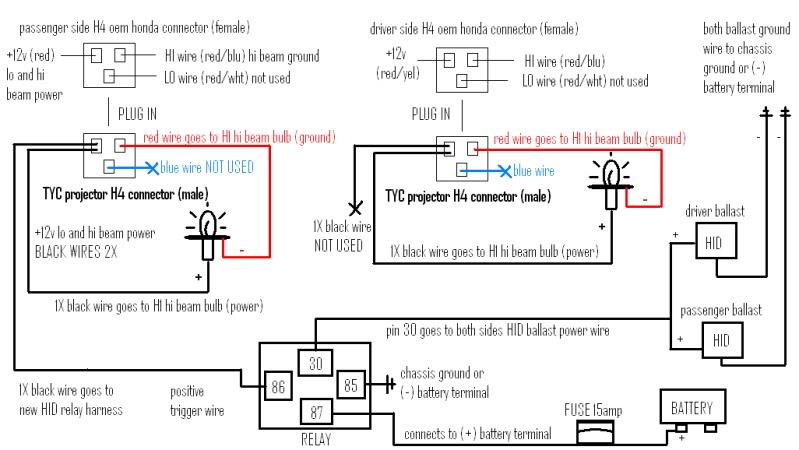
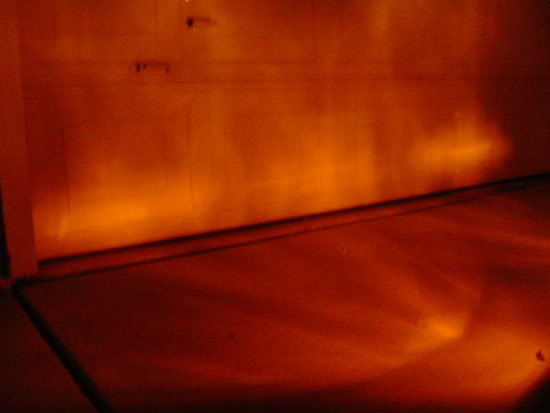
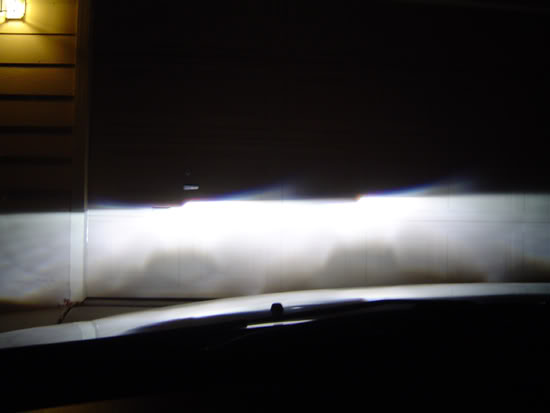
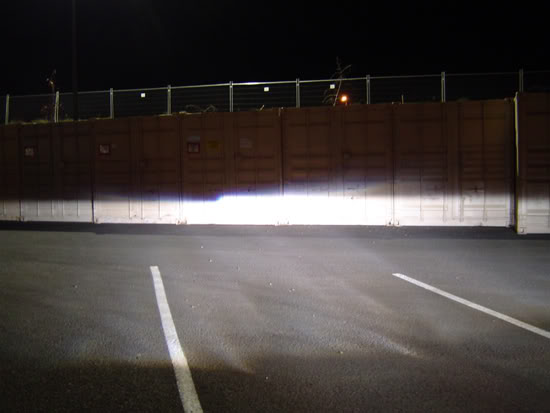
just thought i would update this, im switching back to reflector oem style fogs with yellow bulbs cause i think they look better with the tycs. i just opened the retro recently to fix some issues, nothing major and all the hardware was still holding. i just added some loctite to the nuts, cleaned the lens covers outside, put foil tape to cover one hole of the valeo projector to stop hid light from leaking to the led turn signal, adjusted the shields to give similar colors, and sealed the housings better with 3M windoweld ribbon (butyl). also soldered all the led connections so hopefully these dont have to come off again for a looog time lol. here is how i wired everything so the lo beam stays on with hi beam. I added catz zeta halogen ballasts to the H1 hi beam bulbs! crazy bright and you can even see the extra light over the hids
and some final pics...its not perfect, but overall im extremely happy with the looks and function of this retrofit.
valeo D2S HID projectors using new osram xenarc 66040 bulbs, hella gen3 oem ballasts, sylvania H1 hi beam halogens with catz zeta boost, 50mA (3-SMT) wide led park light, 300mA 1W 48-led street magic turn signal led cluster, custom wire harness.
my front turn signals only use about 1w of power which is crazy for how bright they are. my sidemarkers have 4 amber superflux leds (custom)


AND my rear signals are now led as well with 5w ELEF bulb and custom optics (osram diamond dragon red led at 200 lumens). FULL led turn signals to match the fronts!

from the rear straight back, its as bright as filament bulbs, maybe tad brighter.

from side angle (since bulb does not mount straight back), bulb is extremely bright and prolly illegal lol. but it gets attention when i change lanes.

even the ground gets lit up

compared to filament park lights in broad daylight (park lights have upgraded polarg and raybrig bulbs)

and some final pics...its not perfect, but overall im extremely happy with the looks and function of this retrofit.
valeo D2S HID projectors using new osram xenarc 66040 bulbs, hella gen3 oem ballasts, sylvania H1 hi beam halogens with catz zeta boost, 50mA (3-SMT) wide led park light, 300mA 1W 48-led street magic turn signal led cluster, custom wire harness.
my front turn signals only use about 1w of power which is crazy for how bright they are. my sidemarkers have 4 amber superflux leds (custom)
AND my rear signals are now led as well with 5w ELEF bulb and custom optics (osram diamond dragon red led at 200 lumens). FULL led turn signals to match the fronts!
from the rear straight back, its as bright as filament bulbs, maybe tad brighter.
from side angle (since bulb does not mount straight back), bulb is extremely bright and prolly illegal lol. but it gets attention when i change lanes.
even the ground gets lit up
compared to filament park lights in broad daylight (park lights have upgraded polarg and raybrig bulbs)
Last edited by gearbox; Sep 21, 2010 at 11:52 PM.
Joined: Aug 2006
Posts: 8,362
Likes: 1
From: Portland, Oregon
Rep Power: 389 Re: DIY: TYC projector retrofit 2010
Damn, thats how I wanted them to look when I first decided to buy those lights... Good work man.
Thread Starter
Joined: Sep 2002
Posts: 51,241
Likes: 20
From: NV
Rep Power: 813 Re: DIY: TYC projector retrofit 2010
thanks triz. i also swapped out one side projector so the foreground shapes matched, just never got around to posting i guess.
foreground cutoff
and upper cutoff

foreground cutoff
and upper cutoff
Thread Starter
Joined: Sep 2002
Posts: 51,241
Likes: 20
From: NV
Rep Power: 813 Re: DIY: TYC projector retrofit 2010
more updates. im extremely happy to say that this project started in february is officially over. i finished my led fogs that match the upper park lights, went for a drive, and everything is super nice. cutoffs slope down a bit but i can still see well enough without blinding anyone, i got the color mods for each side near perfectly matching, cleaned up the insides, soldered all the connections, and resealed with 3M windoweld. imo this is the best retro ive ever done (i think 4th one?) and wont be changing it anytime soon. also its fully adjustable by popping the hood and turning a wingnut in the rear of the housing with my finger. takes 10 seconds to adjust the aim. theres shaking only over big bumps and potholes. normally no shake at all. im just really happy how everything came together even with all the led stuff and the appearance of everything. my car really looks different at night and no way to ever tell its a civic from the front. the amber fog/park lights really set it off. okay on to the pics again! i can breathe a huge sigh of relief now that its over. altho im sure i will change stuff around here and there. im still using regular H1 halogens for the hi beam with catz zeta so i may switch to something even brighter. altho even now, the catz zeta makes the bulbs nearly a perfect match to the hid color (new hid bulbs). i was wanting the philips eco H1 for their longer life, but maybe i will go with something a bit better. they dont get much use anyway unless i feel like more light in the back streets.
these are the park lights. i have the fog switch wired to come on with the park lights and i just leave the switch pressed on. they are overexposed to show the ground patterns. in real life they look like normal park lights. not that bright but good enough to be noticed. colors of all 4 led modules are perfectly matching (same maxxima 3-smt module). super wide output, in fact the fogs look the same from every possible angle. with all four modules in the front, i am only using 200mA total, less than 1W of power. in the rear i have about 22w since most are still filaments.

again, way overexposed. but you can kinda see a fog beam lol. i still havent had a chance to actually aim the fogs. but they are pretty close to the same level and hard to tell anyway being park lights.
couple cutoff shots to show the colors

closeup showing all lights on (except hi beams)
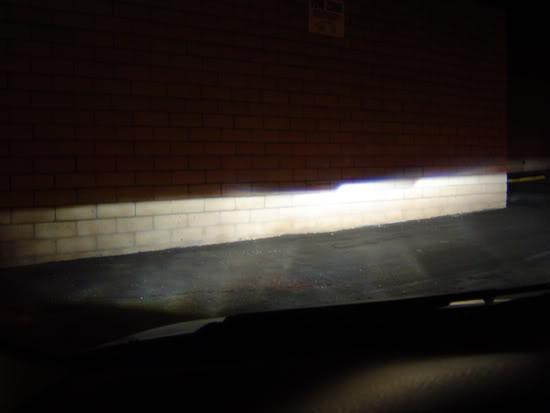
and another cutoff shot on some bricks to show the straight lines.
these are the park lights. i have the fog switch wired to come on with the park lights and i just leave the switch pressed on. they are overexposed to show the ground patterns. in real life they look like normal park lights. not that bright but good enough to be noticed. colors of all 4 led modules are perfectly matching (same maxxima 3-smt module). super wide output, in fact the fogs look the same from every possible angle. with all four modules in the front, i am only using 200mA total, less than 1W of power. in the rear i have about 22w since most are still filaments.
again, way overexposed. but you can kinda see a fog beam lol. i still havent had a chance to actually aim the fogs. but they are pretty close to the same level and hard to tell anyway being park lights.
couple cutoff shots to show the colors
closeup showing all lights on (except hi beams)
and another cutoff shot on some bricks to show the straight lines.

Registered!!
Joined: Sep 2009
Posts: 24
Likes: 0
Rep Power: 0 
Re: DIY: TYC projector retrofit 2010
Gearbox, nice retro, I'm curious though, what's with all the striations in your hid beam? Is that just the Valeo's or are you getting reflections fro som other part of your light? 
Thread Starter
Joined: Sep 2002
Posts: 51,241
Likes: 20
From: NV
Rep Power: 813 Re: DIY: TYC projector retrofit 2010
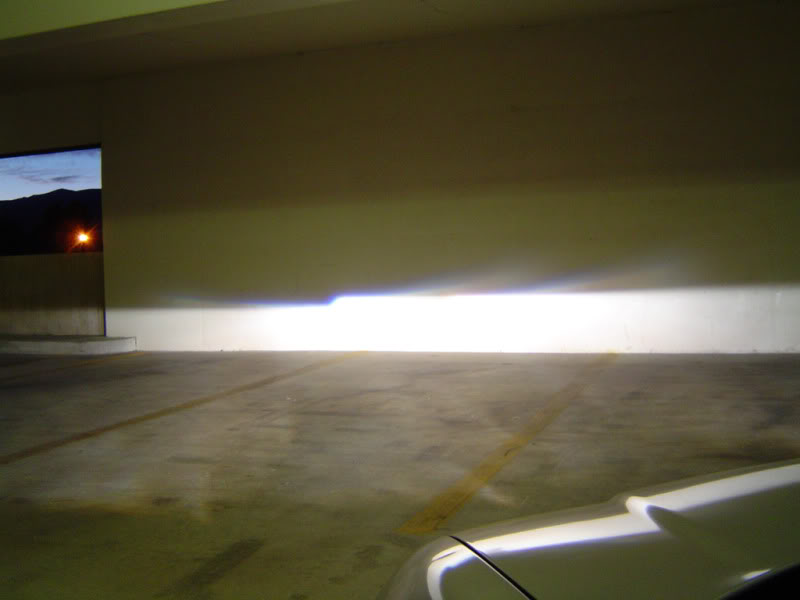
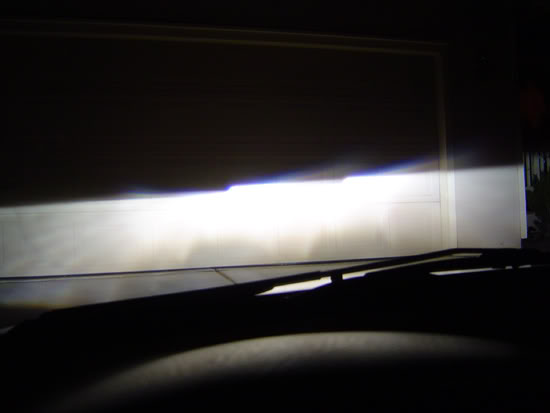
do you mean the lines in the actual beam pattern on the left or right sides? its from the clear lens swap. these are very old projector design and you see more of the lines with clear lens instead of fresnel/frosted. if you mean glare above cutoff, there isnt any. its just reflecting from the ground back to the garage door. the left and right flares are also normal and more noticable with clear lens. i really like the flares cause it lights up signs without blinding traffic. those square foreground shapes are a bowl design (indentations in the top) and are only on some valeo projectors. similar to some tsx.
Registered!!
Joined: Sep 2009
Posts: 24
Likes: 0
Rep Power: 0 Re: DIY: TYC projector retrofit 2010
do you mean the lines in the actual beam pattern on the left or right sides? its from the clear lens swap. these are very old projector design and you see more of the lines with clear lens instead of fresnel/frosted. if you mean glare above cutoff, there isnt any. its just reflecting from the ground back to the garage door. the left and right flares are also normal and more noticable with clear lens. i really like the flares cause it lights up signs without blinding traffic. those square foreground shapes are a bowl design (indentations in the top) and are only on some valeo projectors. similar to some tsx.
Thread Starter
Joined: Sep 2002
Posts: 51,241
Likes: 20
From: NV
Rep Power: 813 Re: DIY: TYC projector retrofit 2010
yeah its just a foreground limit shape formed from the bowl dents (not the shield like in some projectors). alot of valeos do not have the dents and in that case you would get a curved circle type shape instead of the box. but its extremely difficult to find a pair of valeos without haze and burn marks in the bowls, so this is all i could get. and i wish the flares went out further, cause they would be much better if they were not just above the center. i get lil bit of road sign reflection but not as much as halogen. if the road is bouncy then the right side cutoff is usually high enough to flicker the signs anyway.
Thread Starter
Joined: Sep 2002
Posts: 51,241
Likes: 20
From: NV
Rep Power: 813 Re: DIY: TYC projector retrofit 2010
i came across a pair of GE 10,000K oem bulbs in d2s and tried them out in my spare valeo projector. the light color is very white with a tiny blue tint (more like 6500k to be honest), but they are not as bright on the ground only having 1850 lumens instead of the oem 4300k with 3400 lumens. its pretty much halogen level brightness so decided not to use em. looks very cool tho.


heres a b/w comparison to really show the brightness difference. you can see the hotspot is much smaller using the GE bulbs, altho surprisingly the overall width remains the same.
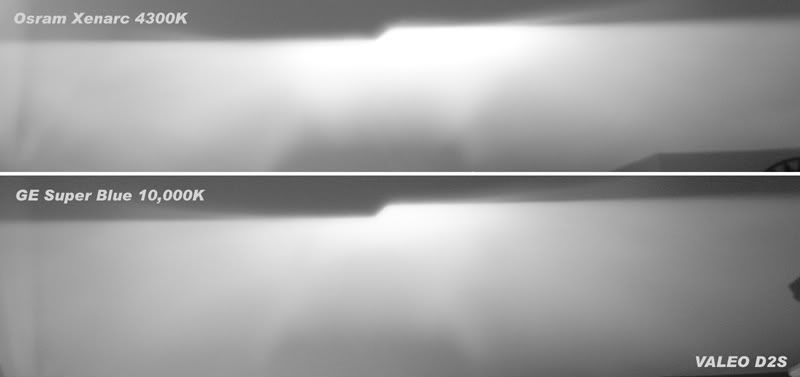
heres a b/w comparison to really show the brightness difference. you can see the hotspot is much smaller using the GE bulbs, altho surprisingly the overall width remains the same.
Thread Starter
Joined: Sep 2002
Posts: 51,241
Likes: 20
From: NV
Rep Power: 813 Re: DIY: TYC projector retrofit 2010
decided to go back to osram xenstar 5400k bulbs for the winter and will prolly just keep these. i paid a bundle so may as well enjoy em. whiter color is nice too. now to redo my license plate leds to match i need some new tyc lens covers too sometime next year maybe. these old ones are pretty beat up which is affecting the cutoff.
i need some new tyc lens covers too sometime next year maybe. these old ones are pretty beat up which is affecting the cutoff.Joined: Aug 2006
Posts: 2,978
Likes: 4
From: Charlotte
Rep Power: 292 Re: DIY: TYC projector retrofit 2010
very nice. where'd you get them from? are they D2S? i wouldn't mind some for my 330i. i think it has the original D2S bulbs in there from 2002. 
Thread Starter
Joined: Sep 2002
Posts: 51,241
Likes: 20
From: NV
Rep Power: 813 Re: DIY: TYC projector retrofit 2010
yeah they are d2s bulbs. i actually got a deal on em from a member on hidplanet for around $200, since he bought the wrong size by mistake. they come in the PIAA 6000k package. its osram bulb but piaa just puts their sticker on the bulb base lol. they used to be all over ebay but i havent seen any lately. they could sell as much as $400 a pair sometimes. these bulbs have reddish salts similar to the philips 5800k ultinon, but the xenstars are brighter and whiter with no color tint. actually the only reason im using these is due to my valeos only working with old style osram bulbs. ive tried ge and philips and for some reason they never sit right in the projector and the beam is always messed. for your bmw, i would recommend getting some philips CM 4800k bulbs which are very similar and much easier to find usually $150-200 a pair. and they are brighter at 3100 lumens, almost like regular stock bulb at 3400 lumens. these osrams if i were to guess is more like 2800 lumens. its still very white and our lights looked almost the same color.
heres a pic of a friends s2k with the philips CM bulbs installed brand new (i helped him aim, these were pointing at the ground first time)


heres a pic of a friends s2k with the philips CM bulbs installed brand new (i helped him aim, these were pointing at the ground first time)

