
Commence Motorbuild... DYNO GRAPH (PAGE 12)

Thread Starter
Joined: Jul 2002
Posts: 13,151
Likes: 3
From: Washington DC
Rep Power: 424 

Commence Motorbuild... DYNO GRAPH (PAGE 12)
Hallo, my name Boiler, from great state of Virginia. This is my motor. It greatest motor in all of Virginia. In my state, we build our own motors...

These are my weapons.... they make boom time


This is my ECU... my neighbor Edwin has piggyback ECU. Everyone know piggyback ECU is for little girls!

Oh yeah.... and the teaser....

The standard deal...
75.5mm 9:1 Wisecos
Crower Rods
CP Rings
OE Bearings & Gaskets
Crower S2 Cam
Crower VS&R
Supertech Black Nitrided valves
3 angle valve job
Hondata Doom Box
GM boost solenoid
AEM 3.5 bar map sensor
For best results, add more boost.
These are my weapons.... they make boom time
This is my ECU... my neighbor Edwin has piggyback ECU. Everyone know piggyback ECU is for little girls!
Oh yeah.... and the teaser....
The standard deal...
75.5mm 9:1 Wisecos
Crower Rods
CP Rings
OE Bearings & Gaskets
Crower S2 Cam
Crower VS&R
Supertech Black Nitrided valves
3 angle valve job
Hondata Doom Box
GM boost solenoid
AEM 3.5 bar map sensor
For best results, add more boost.


Joined: Aug 2006
Posts: 8,362
Likes: 1
From: Portland, Oregon
Rep Power: 388 Re: Commence Motorbuild
Ha, very nice. Cant wait to see the dyno. Maybe that valve cover wont look so funky after all! Congrats man, time to get it in!

A long winded 7th genr
Joined: Jan 2006
Posts: 1,755
Likes: 0
From: Northern California Humboldt
Rep Power: 288 Re: Commence Motorbuild
Phat dude. I think it'll be bitchin with everything you've got runnin. I wish I could do an install like that. Only problem is I don't have anywhere to store the motor for a long period of time. Keep it up.

Registered!!
Joined: Jan 2003
Posts: 1,222
Likes: 0
From: Middleboro,MA
Rep Power: 297 Re: Commence Motorbuild
Neither does he, its in his closet. Hahaha. Once you are dead set on a mission, you find ways of making things happen no matter what. GL Boiler, its gonna be sweet. I am gonna try to weld up your stuff tomorrow btw.


Re: Commence Motorbuild
hey see you got the kpro too.can you take some close up pics from the front
and back.Do ya see special timing teath?
Nice work btw cant wait to see results.
thx
and back.Do ya see special timing teath?
Nice work btw cant wait to see results.
thx
Thread Starter
Joined: Jul 2002
Posts: 13,151
Likes: 3
From: Washington DC
Rep Power: 424 Re: Commence Motorbuild
Its not red. Its Hemi Orange... and its a personal trademark and a throwback to these


7thgen Power Maker
iTrader: (74)
Joined: Sep 2003
Posts: 9,048
Likes: 1
From: Buffalo, NY, US
Rep Power: 0 


Joined: Oct 2002
Posts: 4,248
Likes: 2
From: Rockville, Maryland
Rep Power: 331 Registered!!
Joined: Jan 2003
Posts: 1,222
Likes: 0
From: Middleboro,MA
Rep Power: 297 Re: Commence Motorbuild
I hate painting blocks black just for that reason. Leaks are harder to spot. Technically I think if you paint any aluminum block, you'd hinder heat dissipation seeing as the paint would insulate the block. If you have an adequate colling system it shouldnt even be an issue anyway. I actually think it will look cool.
7thgen Power Maker
iTrader: (74)
Joined: Sep 2003
Posts: 9,048
Likes: 1
From: Buffalo, NY, US
Rep Power: 0 Re: Commence Motorbuild
I hate painting blocks black just for that reason. Leaks are harder to spot. Technically I think if you paint any aluminum block, you'd hinder heat dissipation seeing as the paint would insulate the block. If you have an adequate colling system it shouldnt even be an issue anyway. I actually think it will look cool.
Thread Starter
Joined: Jul 2002
Posts: 13,151
Likes: 3
From: Washington DC
Rep Power: 424 Re: Commence Motorbuild
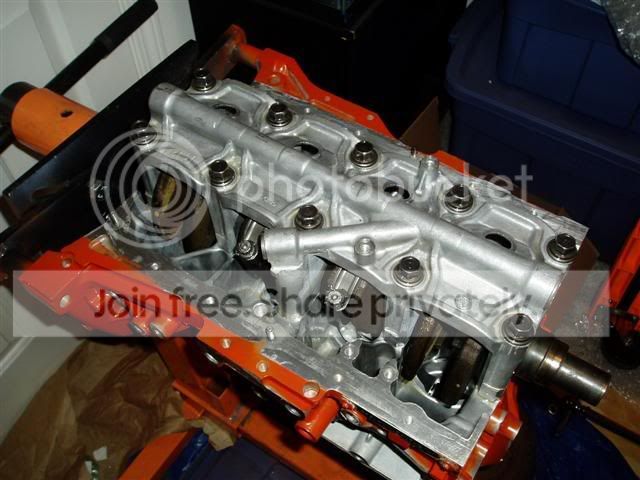
Well... I got head.


Then after curing a minor whoopsie that was a pain in the *** to fix (I realized when I got the head back the pistons were 180 degrees off.... had punch the rods and pistons back out, flip the piston over on the rod then put the bottom end back together. Major pain.) For future reference, the narrow valve reliefs are for the INTAKE, and the wide ones are for the EXHAUST.
Now its ready to rock

It got head

TDCed and Belted


Ladies and Gentlemen.... Its built. Just the minor things left to close up... the water block, the accessories, etc... then its ready to drop in the car and cause some serious surprises.
For anyone who asks.... I have absolutely no clue how much it cost me, I bought stuff over a period of time, and I have no idea exactly what it all cost, so I'm going to guess the head parts (cam, VS&R, valves and studs) was about $1000, the bottom end parts were another $1100, I do know I spent about $850 at Majestic Honda and it was another $713 in machining costs (bore/hone, deck, 3 angle VJ, new exhaust seals, head cleanup, install valvetrain). I think I spent about $250 on various specialty tools and ****. Beyond that, I dont remember.
For anyone who tries it, the nickel and diming is the same as turbocharging. The little stuff adds up. Honda bearings are around $6 for mains, of which you need 10, and around $5 for rods (of which you need 8), I think I bought almost $180 in gaskets and seals, then there's some sensors and **** you may as well pick up because they're a pain to install once its together, etc.... **** adds up. Make sure you account for this before you start and run out of money.
The thank yous.... (if I forget, I'll think of it later)
Andy ... for answering my stupid questions
Gerry ... for building me top notch **** and answering stupid questions
Edwin ... future thanks for letting me use the shop
Adam (who isn't on this forum) ... for D-series knowledge and building help
Visa ... for funding the whole thing
Then after curing a minor whoopsie that was a pain in the *** to fix (I realized when I got the head back the pistons were 180 degrees off.... had punch the rods and pistons back out, flip the piston over on the rod then put the bottom end back together. Major pain.) For future reference, the narrow valve reliefs are for the INTAKE, and the wide ones are for the EXHAUST.
Now its ready to rock
It got head
TDCed and Belted
Ladies and Gentlemen.... Its built. Just the minor things left to close up... the water block, the accessories, etc... then its ready to drop in the car and cause some serious surprises.
For anyone who asks.... I have absolutely no clue how much it cost me, I bought stuff over a period of time, and I have no idea exactly what it all cost, so I'm going to guess the head parts (cam, VS&R, valves and studs) was about $1000, the bottom end parts were another $1100, I do know I spent about $850 at Majestic Honda and it was another $713 in machining costs (bore/hone, deck, 3 angle VJ, new exhaust seals, head cleanup, install valvetrain). I think I spent about $250 on various specialty tools and ****. Beyond that, I dont remember.
For anyone who tries it, the nickel and diming is the same as turbocharging. The little stuff adds up. Honda bearings are around $6 for mains, of which you need 10, and around $5 for rods (of which you need 8), I think I bought almost $180 in gaskets and seals, then there's some sensors and **** you may as well pick up because they're a pain to install once its together, etc.... **** adds up. Make sure you account for this before you start and run out of money.
The thank yous.... (if I forget, I'll think of it later)
Andy ... for answering my stupid questions
Gerry ... for building me top notch **** and answering stupid questions
Edwin ... future thanks for letting me use the shop
Adam (who isn't on this forum) ... for D-series knowledge and building help
Visa ... for funding the whole thing
Re: Commence Motorbuild
Looks great, man. NP on the help, you know I'm around and you have my number. Again, glad you found that things weren't straight before you cranked it. You know, better to do a little more work at no cost now than to blow **** up and spend all that money over again. Congrats, can't wait to see how it performs. You may have mentioned, what cam are you running? Stage II, right?

