
Not sure which place to post this thread


Thread Starter
Registered!!
Joined: Mar 2018
Posts: 67
Likes: 0
Rep Power: 0 
Not sure which place to post this thread
Ok so, I have googled and watched countless 3D presentations on how a DOHC 16 valve engine works, I mainly only watched it because I�m about to do an engine rebuild on my 03 Civic Lx. But what has me confused and what most of my mechanic buddies and I can�t answer or find any video representation of is how a SOHC 4 cylinder 16 valve engine works (I.e like mine) I understand the loves of the camshaft control the valves and the timing belt is how the camshaft stays in time with the rest of the engine. But does anybody know how the camshaft is able to perform that work load? I know the lobes are what actually move the valves but I can�t wrap my head around how it�s able to move all of them (even though it isn�t all 16 at once) Anybody have any video or a way to give me a visual of how it does it? I just want to be able to understand my engine and how to does what it does before I crack it open for a big rebuild and general overhaul of the entire vehicle.
Joined: Aug 2003
Posts: 21,620
Likes: 1,252
From: Las Vegas, NV
Rep Power: 512 

Re: Not sure which place to post this thread
Honestly, if you wanna see how it works, pull your valve cover and have someone rotate the crank shaft (counter clockwise, via the crank pulley bolt -- you won't loosen it, that takes quite a bit of effort). It helps if you pull your spark plugs, so the person rotating the crank doesn't have to fight compression strokes. The only thing you won't be able to see is how VTEC works, but you'll get a good idea of how a single cam is able to sequentially open valves (spring pressure closes them) via rocker arms and different lobes on the cam.
It's been a minute, but if I remember correctly, the firing order is 1-3-4-2, cylinder 1 being closest to the timing belt
It's been a minute, but if I remember correctly, the firing order is 1-3-4-2, cylinder 1 being closest to the timing belt

Registered!!
Joined: Oct 2017
Posts: 1,267
Likes: 15
Rep Power: 119 Re: Not sure which place to post this thread
One cam, 16 lobes.
rocker arms are bent so that two in middle go together bending away from each other and two on outside bend inwards to keep it very compact.
rocker arms are bent so that two in middle go together bending away from each other and two on outside bend inwards to keep it very compact.
Thread Starter
Registered!!
Joined: Mar 2018
Posts: 67
Likes: 0
Rep Power: 0 Re: Not sure which place to post this thread
Honestly, if you wanna see how it works, pull your valve cover and have someone rotate the crank shaft (counter clockwise, via the crank pulley bolt -- you won't loosen it, that takes quite a bit of effort). It helps if you pull your spark plugs, so the person rotating the crank doesn't have to fight compression strokes. The only thing you won't be able to see is how VTEC works, but you'll get a good idea of how a single cam is able to sequentially open valves (spring pressure closes them) via rocker arms and different lobes on the cam.
It's been a minute, but if I remember correctly, the firing order is 1-3-4-2, cylinder 1 being closest to the timing belt
It's been a minute, but if I remember correctly, the firing order is 1-3-4-2, cylinder 1 being closest to the timing belt
Thread Starter
Registered!!
Joined: Mar 2018
Posts: 67
Likes: 0
Rep Power: 0 Re: Not sure which place to post this thread
Thanks man! I do appreciate the answer. I was actually really stumped trying to think it through on my own
Joined: Aug 2003
Posts: 21,620
Likes: 1,252
From: Las Vegas, NV
Rep Power: 512 Re: Not sure which place to post this thread
You don't have to disassemble much to see how it works. You don't even have to replace any gaskets.
-Remove plastic wire cover, unclip all 4 coil packs and remove (held down by a 10mm acorn nut)
-Unbolt wire brackets/holders from valve cover (IIRC, there's 3 10mm bolts holding wires and brackets down?)
-Use a pair of pliers to remove breather hose clamp from valve cover. Disconnect breather hose from valve cover.
-This step is optional, but it helps get everything out of the way: Unbolt wire from alternator (positive lug). At this point, entire wire harness should be able to pull away (towards the passenger side), completely out of the way of the top of the engine.
-Unscrew the 5 bolts holding the valve cover on. Pulls right off. If you didn't remove the wire from the alternator, you'll have to do a bit of tetris work to get that thing out while navigating around the wire harness.
At this point, like I mentioned above, remove the spark plugs and have someone rotate the crank manually, counter clockwise (19mm socket, helps if you remove driver's side wheel. There's a little hole in the fenderwell lining you can use to access that bolt).
Now, disassembly of the engine isn't really hard at all. Just time consuming and lots of parts. If you know how to turn a wrench, you can do it. In fact, I did it back in.. 2012 or so, and it was the first engine I had ever disassembled. I literally took the entire engine apart so I could being the block (by itself) to a machine shop to give it a once over. Don't rush, keep yourself organized.
Did this all in my dad's garage, no less.
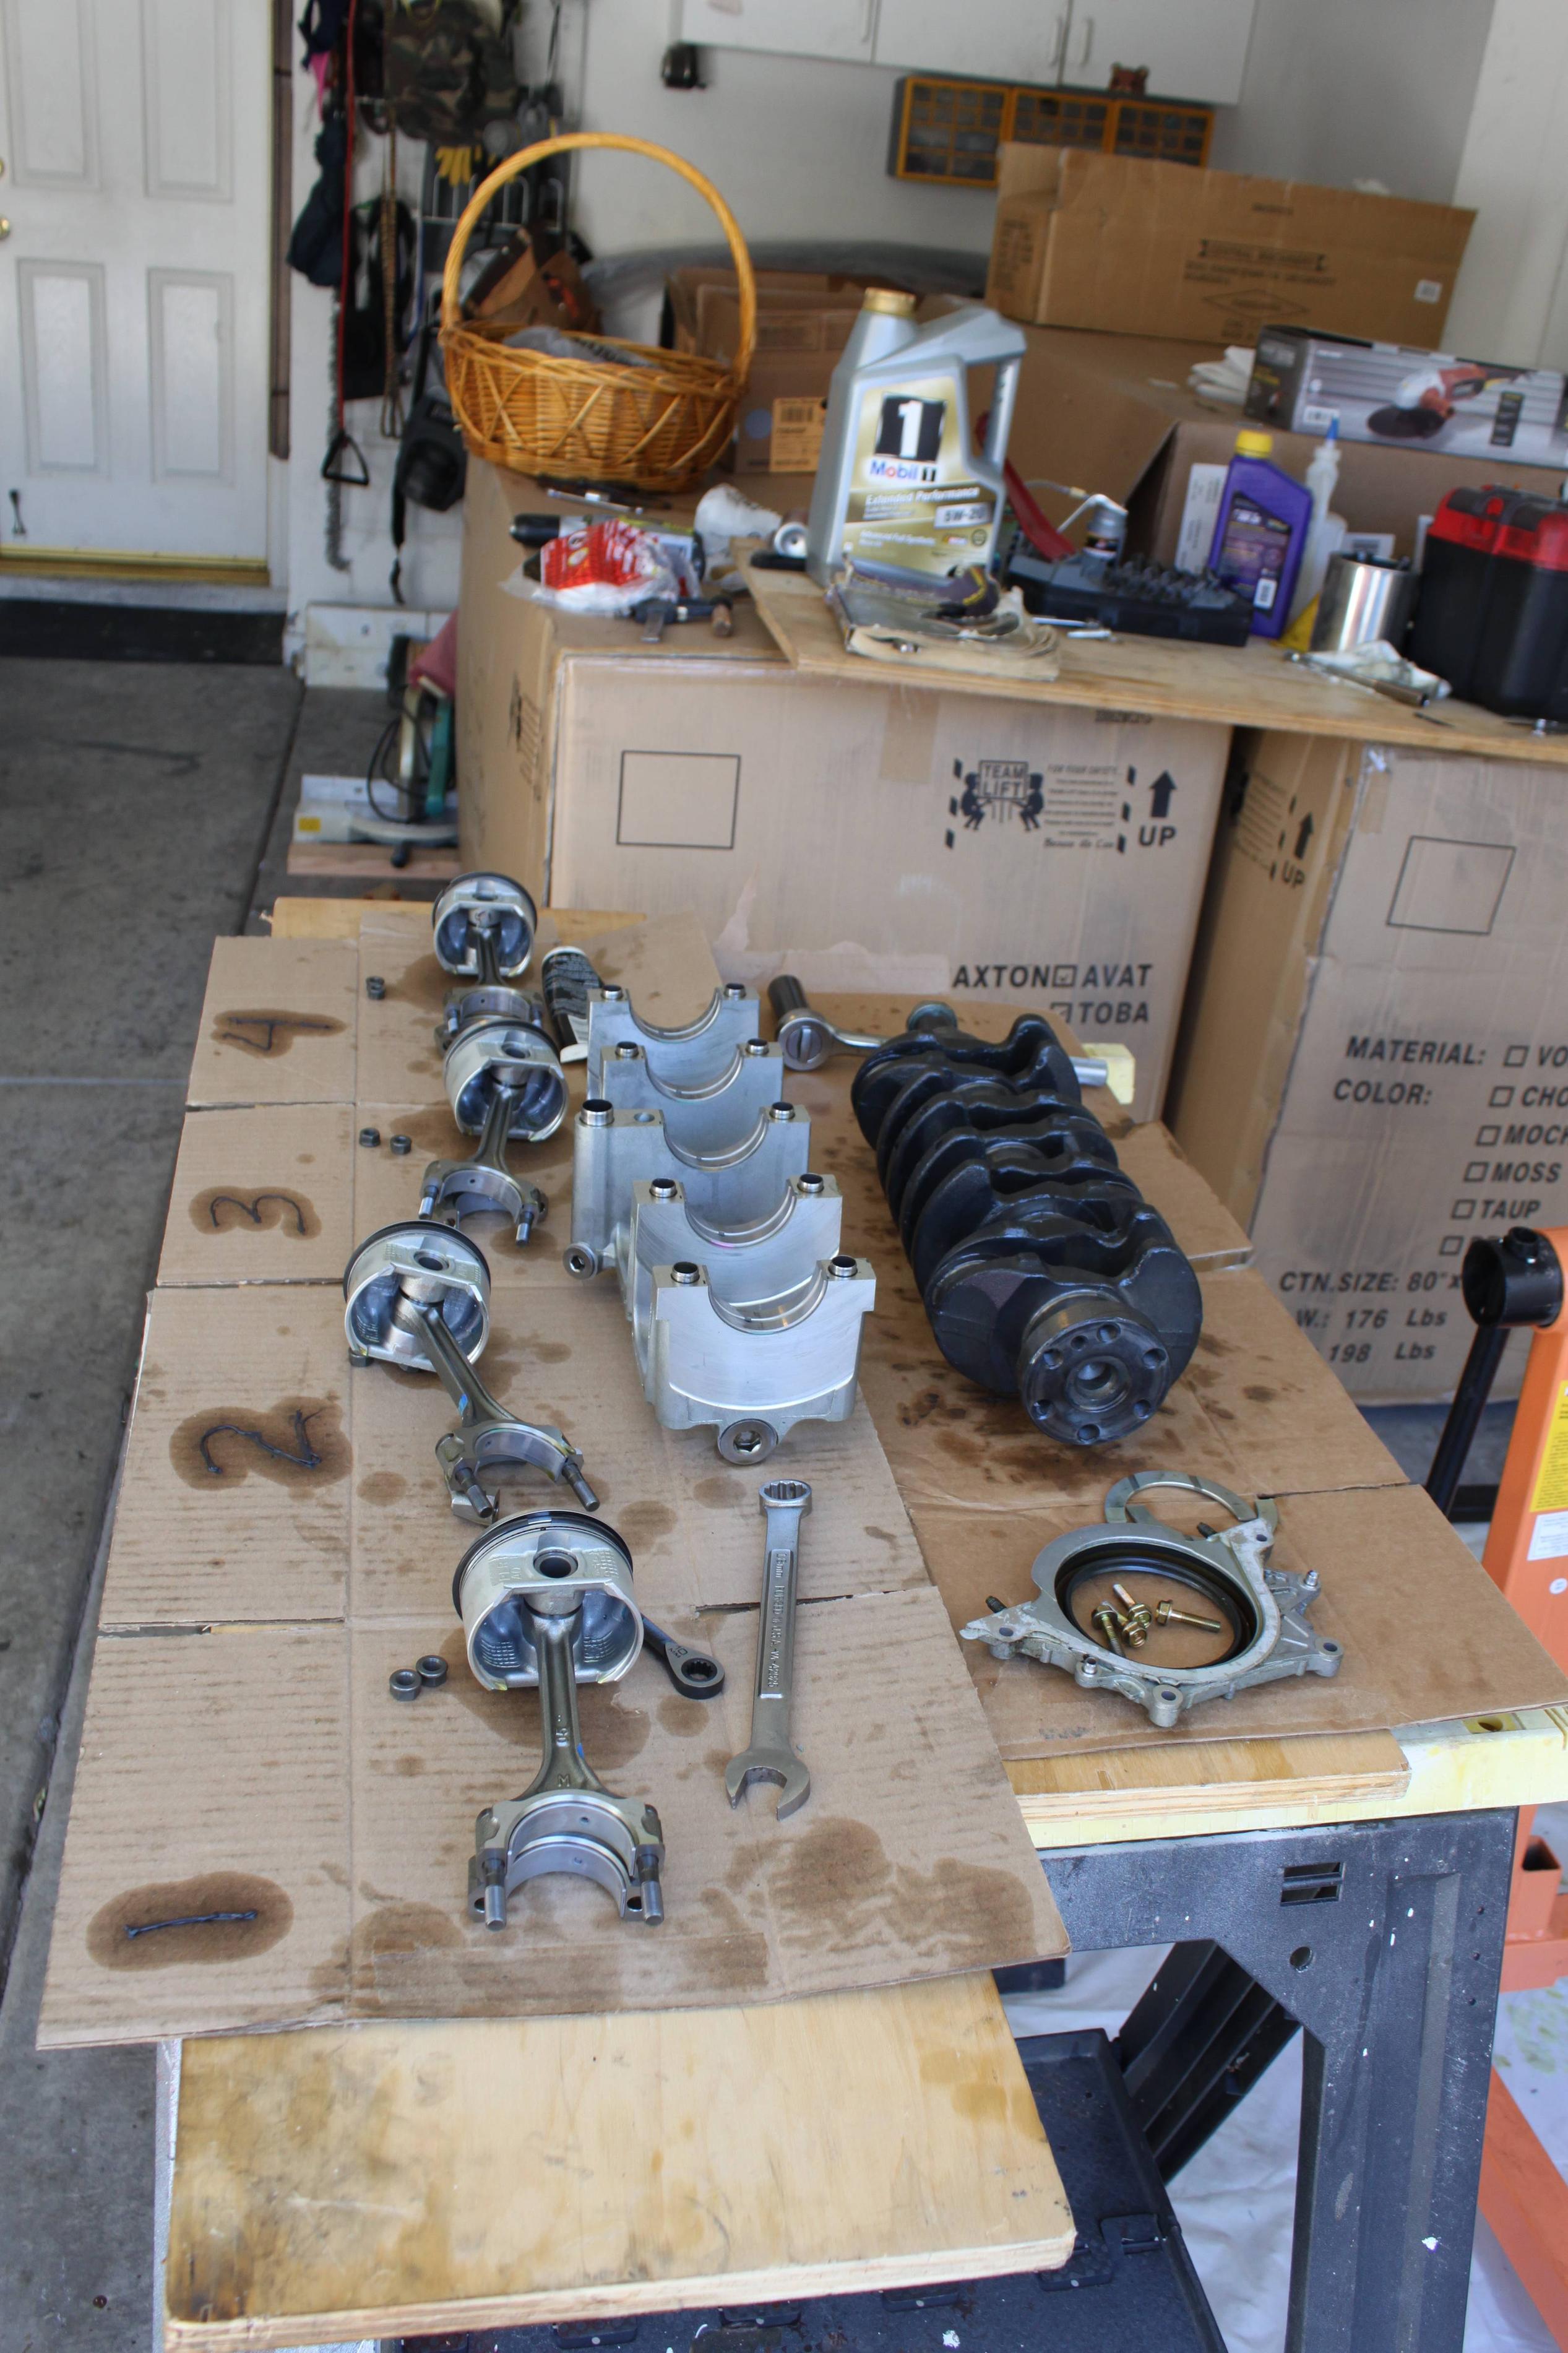
Crank shaft, pistons, oil seal
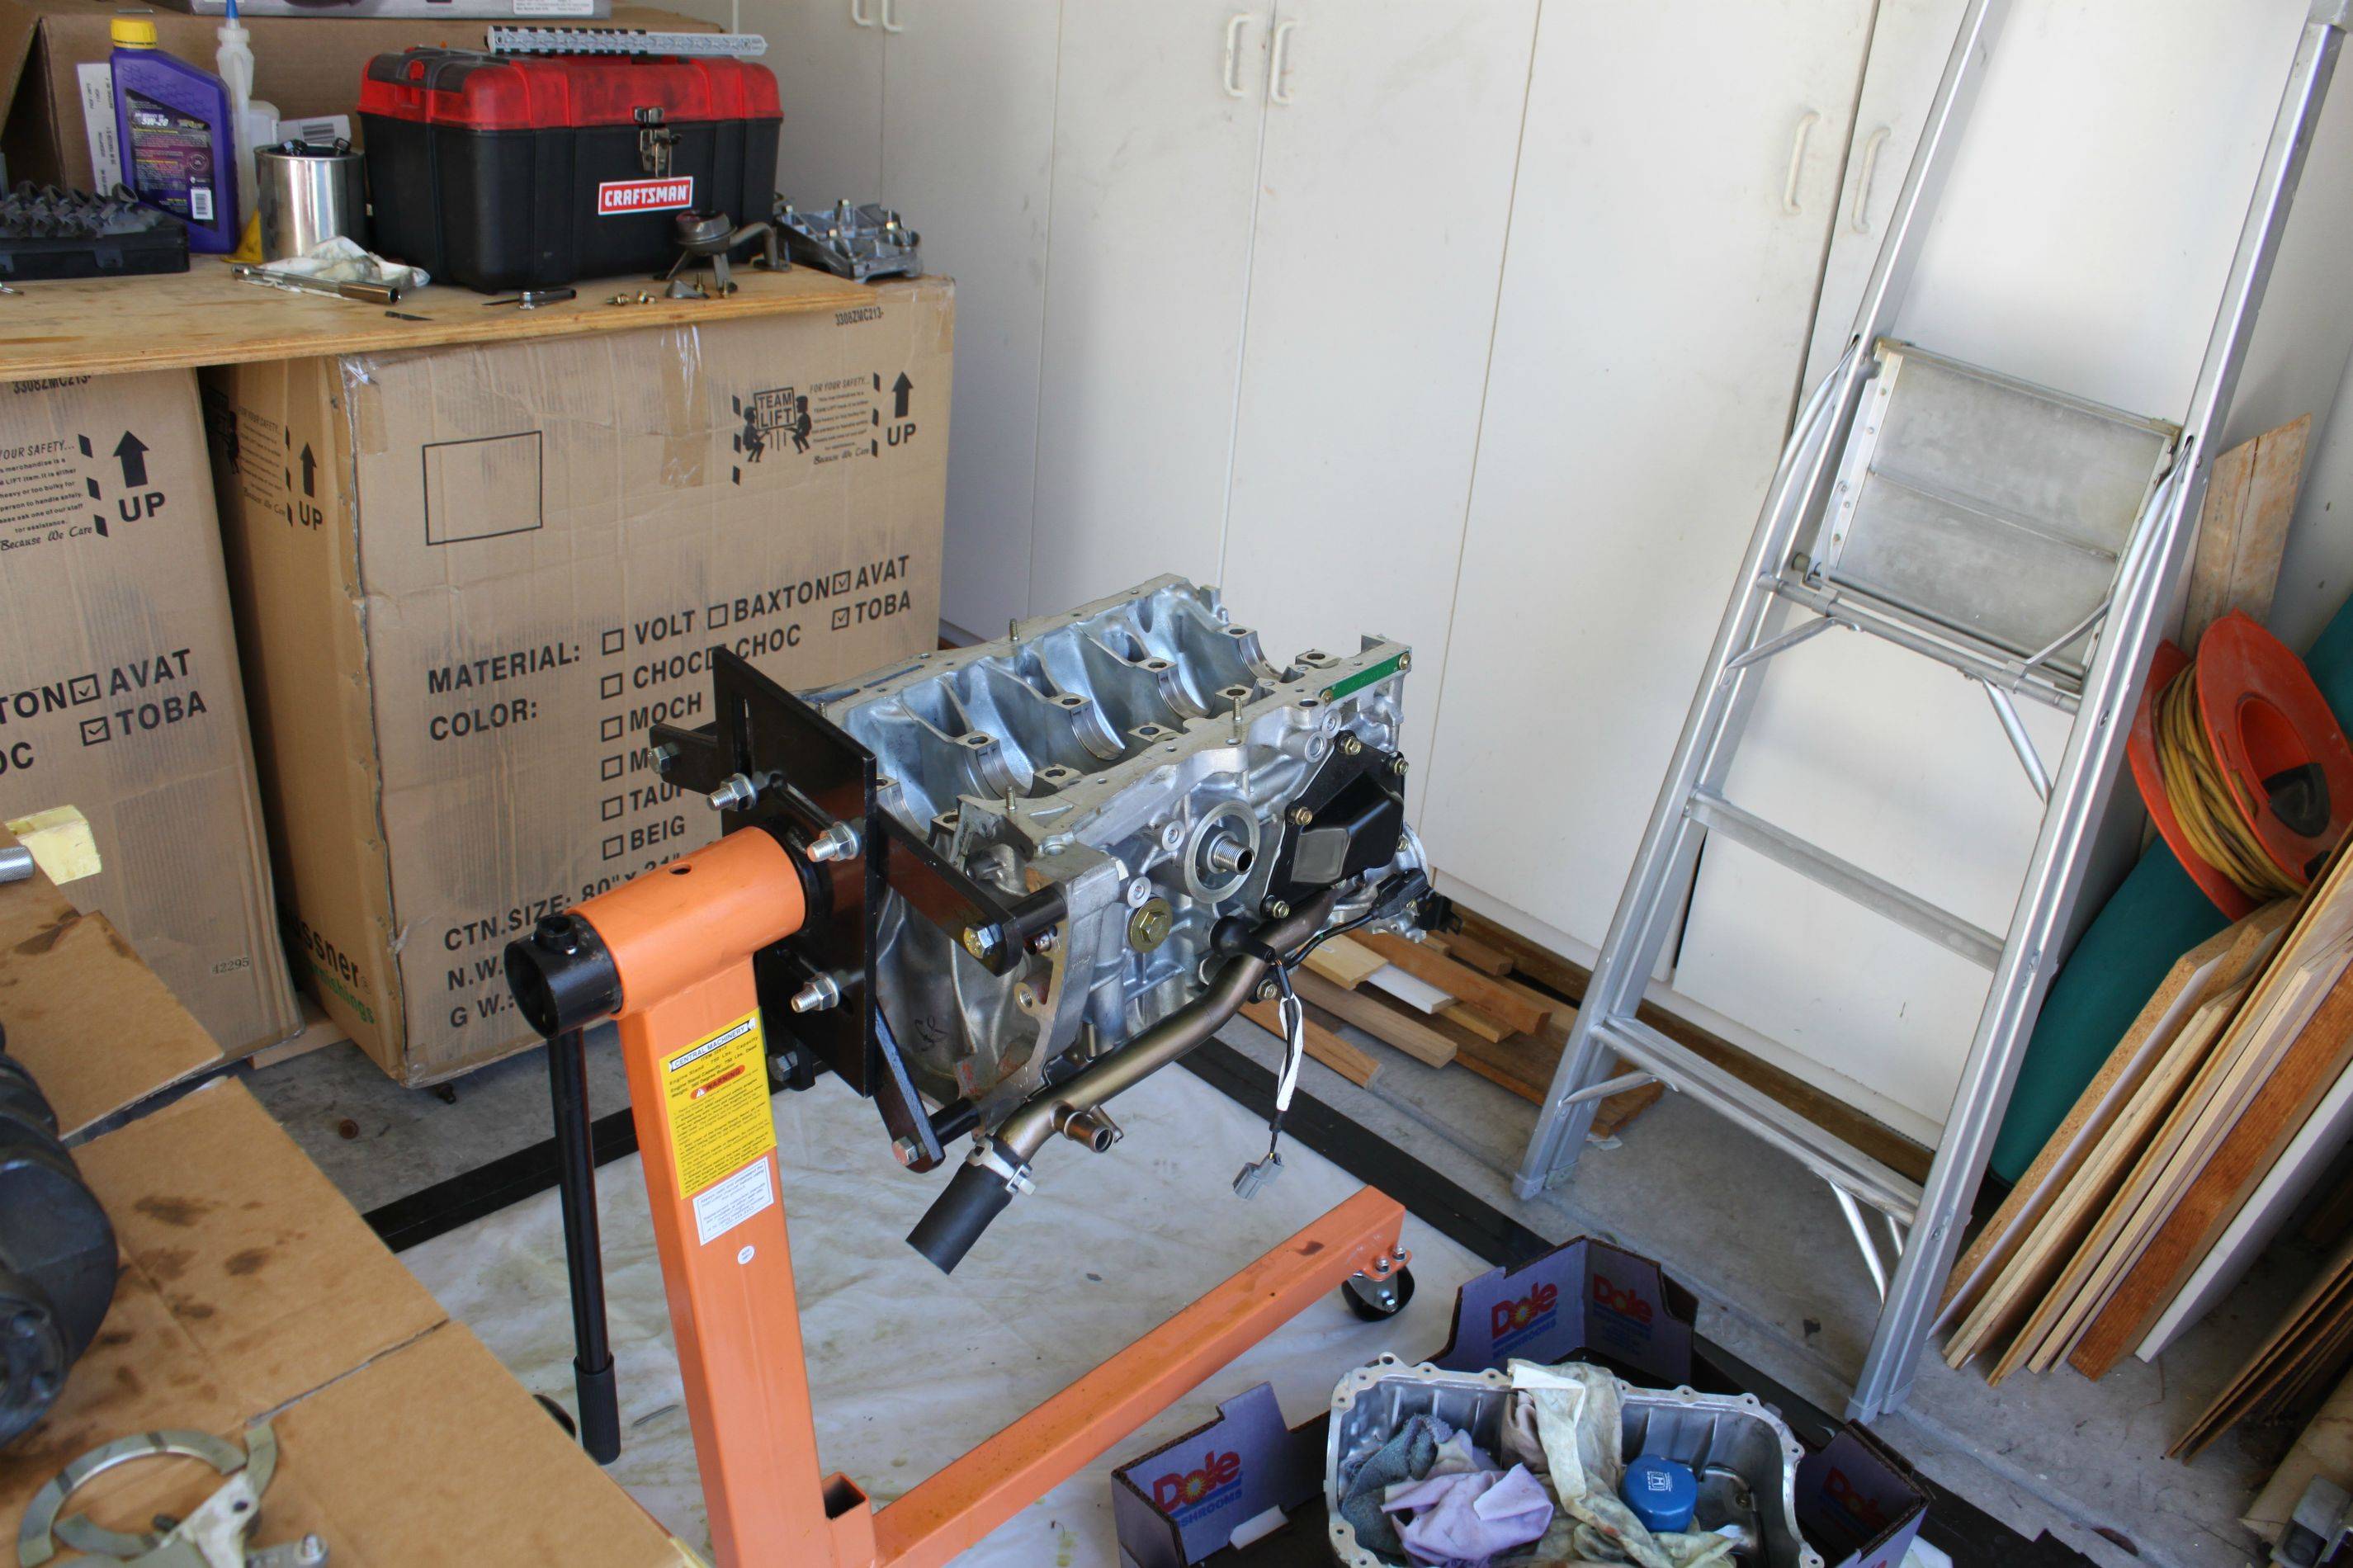
bare block, with the exception that I left the water pipe, PCV chamber attached
I labelled the crap out of everything, had about 3 or 4 tables for parts and tools. Haynes manual helped out a metric crap ton, especially with torque values
-Remove plastic wire cover, unclip all 4 coil packs and remove (held down by a 10mm acorn nut)
-Unbolt wire brackets/holders from valve cover (IIRC, there's 3 10mm bolts holding wires and brackets down?)
-Use a pair of pliers to remove breather hose clamp from valve cover. Disconnect breather hose from valve cover.
-This step is optional, but it helps get everything out of the way: Unbolt wire from alternator (positive lug). At this point, entire wire harness should be able to pull away (towards the passenger side), completely out of the way of the top of the engine.
-Unscrew the 5 bolts holding the valve cover on. Pulls right off. If you didn't remove the wire from the alternator, you'll have to do a bit of tetris work to get that thing out while navigating around the wire harness.
At this point, like I mentioned above, remove the spark plugs and have someone rotate the crank manually, counter clockwise (19mm socket, helps if you remove driver's side wheel. There's a little hole in the fenderwell lining you can use to access that bolt).
Now, disassembly of the engine isn't really hard at all. Just time consuming and lots of parts. If you know how to turn a wrench, you can do it. In fact, I did it back in.. 2012 or so, and it was the first engine I had ever disassembled. I literally took the entire engine apart so I could being the block (by itself) to a machine shop to give it a once over. Don't rush, keep yourself organized.
Did this all in my dad's garage, no less.
Crank shaft, pistons, oil seal
bare block, with the exception that I left the water pipe, PCV chamber attached
I labelled the crap out of everything, had about 3 or 4 tables for parts and tools. Haynes manual helped out a metric crap ton, especially with torque values
Thread Starter
Registered!!
Joined: Mar 2018
Posts: 67
Likes: 0
Rep Power: 0 Re: Not sure which place to post this thread
You don't have to disassemble much to see how it works. You don't even have to replace any gaskets.
-Remove plastic wire cover, unclip all 4 coil packs and remove (held down by a 10mm acorn nut)
-Unbolt wire brackets/holders from valve cover (IIRC, there's 3 10mm bolts holding wires and brackets down?)
-Use a pair of pliers to remove breather hose clamp from valve cover. Disconnect breather hose from valve cover.
-This step is optional, but it helps get everything out of the way: Unbolt wire from alternator (positive lug). At this point, entire wire harness should be able to pull away (towards the passenger side), completely out of the way of the top of the engine.
-Unscrew the 5 bolts holding the valve cover on. Pulls right off. If you didn't remove the wire from the alternator, you'll have to do a bit of tetris work to get that thing out while navigating around the wire harness.
At this point, like I mentioned above, remove the spark plugs and have someone rotate the crank manually, counter clockwise (19mm socket, helps if you remove driver's side wheel. There's a little hole in the fenderwell lining you can use to access that bolt).
Now, disassembly of the engine isn't really hard at all. Just time consuming and lots of parts. If you know how to turn a wrench, you can do it. In fact, I did it back in.. 2012 or so, and it was the first engine I had ever disassembled. I literally took the entire engine apart so I could being the block (by itself) to a machine shop to give it a once over. Don't rush, keep yourself organized.
Did this all in my dad's garage, no less.
Crank shaft, pistons, oil seal
[img]https://i.imgur.com/igldFlW.jpg[/img
bare block, with the exception that I left the water pipe, PCV chamber attached
[img]https://i.imgur.com/y9kGdq7.jpg[/img
I labelled the crap out of everything, had about 3 or 4 tables for parts and tools. Haynes manual helped out a metric crap ton, especially with torque values
Last edited by sdaidoji; Apr 1, 2018 at 07:01 PM. Reason: Didn’t finish
If you think a good mechanic is expensive, try hiring a bad one
Joined: Dec 2011
Posts: 32,017
Likes: 256
From: Midwest. Aiming about mid-chest
Rep Power: 519 Re: Not sure which place to post this thread
I know better than to ever flush a transmission and I’m not sure if I’m mentally able to rebuild it. But I know to put genuine Honda ATF in it, I’m just afraid that since it’s never been drained and changed that the new fluid might actually make 1 of the 40 bazillion clutch plates slip
Simple ATF drain and fill is basic routine service and should not cause problems regardless of mileage.
Simple drain and fill with proper fluid is always encouraged.
You can repeat the process a few times to get the majority of the old fluid exchanged out of there too.
Any problems that arise were probably already present before fluid service. With 300k+ original miles it could poop out at any time LOL
Thread Starter
Registered!!
Joined: Mar 2018
Posts: 67
Likes: 0
Rep Power: 0 Re: Not sure which place to post this thread
Flush with chemicals and machine is always strongly discouraged.
Simple ATF drain and fill is basic routine service and should not cause problems regardless of mileage.
Simple drain and fill with proper fluid is always encouraged.
You can repeat the process a few times to get the majority of the old fluid exchanged out of there too.
Any problems that arise were probably already present before fluid service. With 300k+ original miles it could poop out at any time LOL
If you think a good mechanic is expensive, try hiring a bad one
Joined: Dec 2011
Posts: 32,017
Likes: 256
From: Midwest. Aiming about mid-chest
Rep Power: 519 Thread Starter
Registered!!
Joined: Mar 2018
Posts: 67
Likes: 0
Rep Power: 0 Re: Not sure which place to post this thread
If you think a good mechanic is expensive, try hiring a bad one
Joined: Dec 2011
Posts: 32,017
Likes: 256
From: Midwest. Aiming about mid-chest
Rep Power: 519 Re: Not sure which place to post this thread
Overfilling the reservoir can make the coolant spew out as the engine warms up to operating temperature....because the antifreeze in the engine and radiator expands as it's heated.
Then as the engine cools down, the reservoir level should drop and return to its original starting point fluid level
If the reservoir overfills while the radiator level drops, then the system isn't working as intended.

Thread
Thread Starter
Honda Civic Forum
Replies
Last Post
xdee716
General Honda Civic Forum Archive.
9
Oct 2, 2006 09:36 AM
ImPulse
Suspension Performance Modifications
4
Feb 28, 2004 03:50 PM

