
A Little Project


Thread Starter
Registered!!
Joined: Mar 2013
Posts: 52
Likes: 0
Rep Power: 0 
A Little Project
Howdy All
Newbie here.., thought I would join and use this as a repository / archive for a little project I'm working on
It'll help me keep things straight, and possibly others looking for answers
I've, in my research on these planned upgrades found a lot of misinformation posted (I'm talking all over the web) I keep it factual and if I don't know I'll post that as well
Mods if I've posted this in the wrong place, my apologies
Background
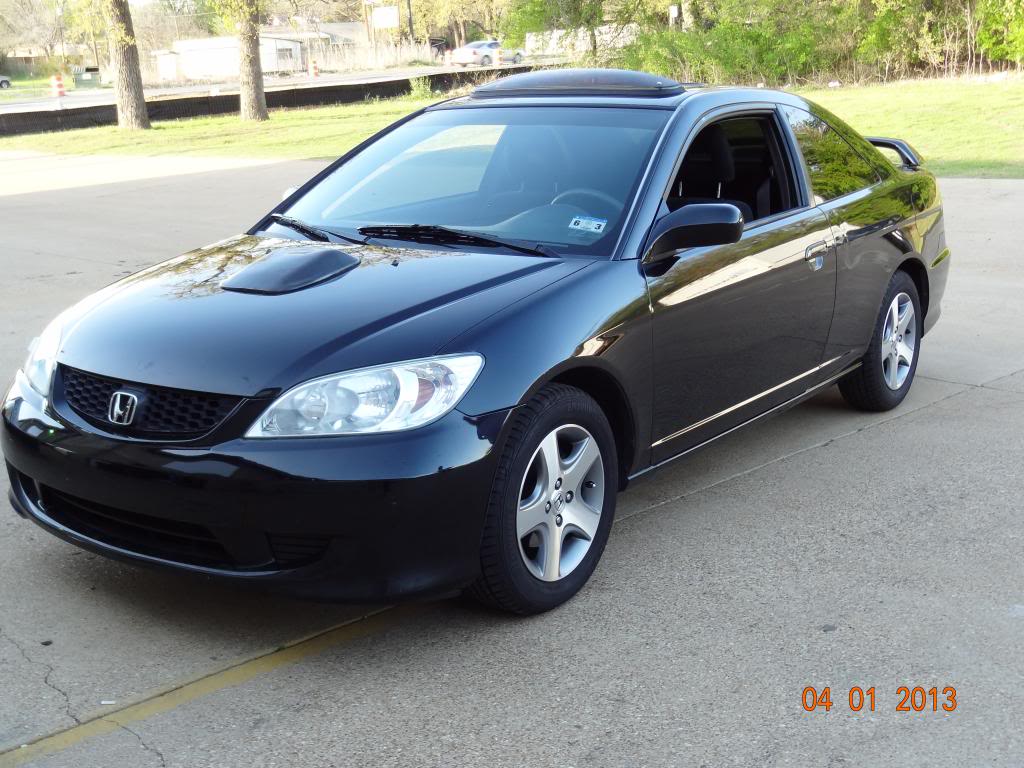
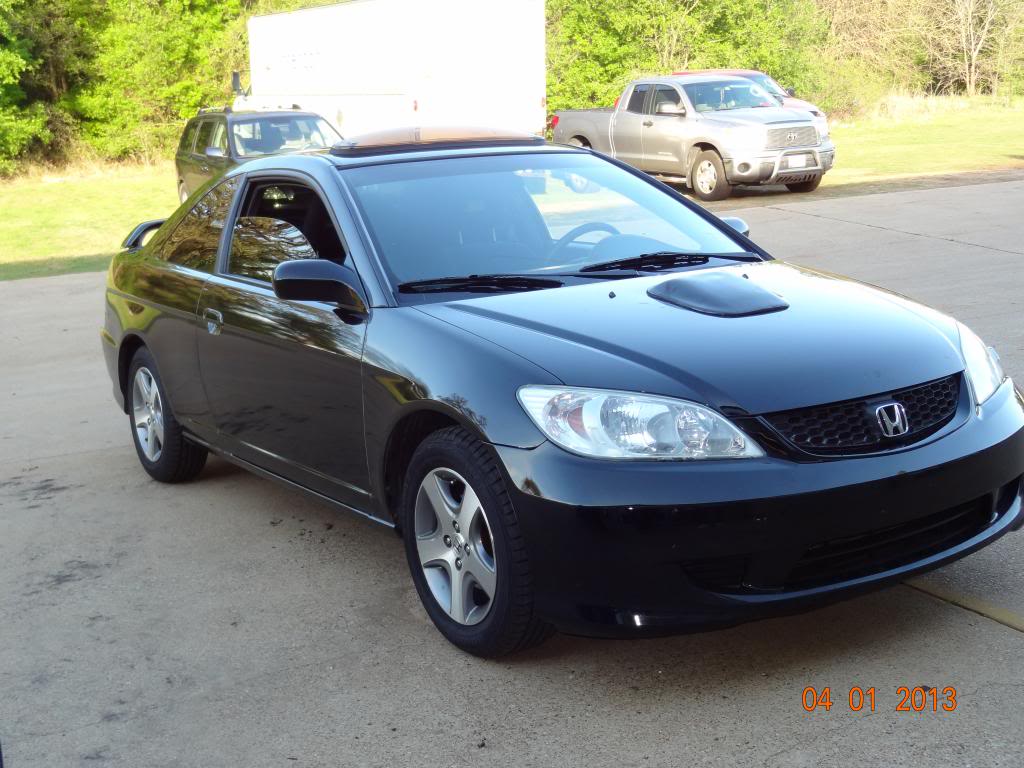
Purchased a Honda Civic coupe mid February, nothing special- a 5 speed w/ sun roof
The goal = 600 (reliable) HP (wife thinks I'm going through my 2nd childhood I told her I never left my first... besides I'm a gear head at heart)
=======================
In addition, purchased a DC5 Type R suspension.., and a wrecked donor 02 Honda civic (auto converted to manual) w/ a K20 6 speed
More on these two in a bit
=====================
Mods to the 04 so far;
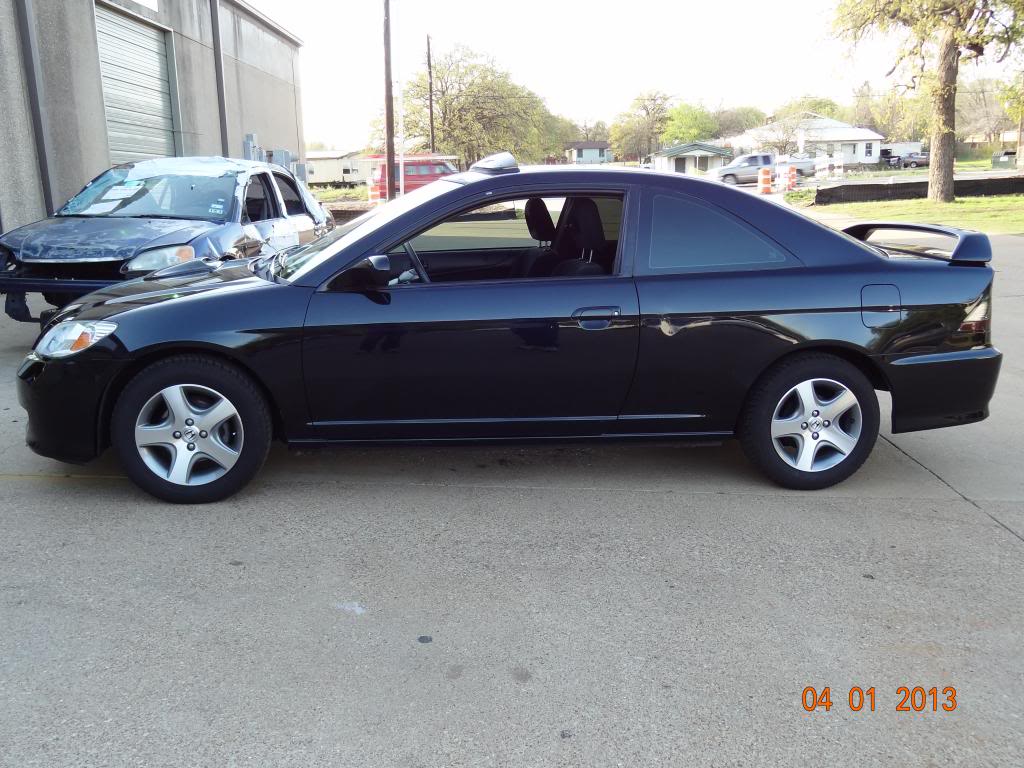
Sound system
Tinted windows
Rear wing
Sun roof deflector
Installed Peal N Seal and Jute beneath the carpet and Peal N Seal in the doors (this significantly cut down on the vibration / external noise, and the Peal N Seal does not stink)
LED tail lights
Moved the battery to the trunk (low and centered) had to fab up a mounting bracket for the battery
Upgraded to an optima battery
Upgraded the front and rear sway bars
Installed a K-Tuned shifter (I love this shifter) also have the K-Tune shift cables
btw; if you plan to do a swap you don't need a different shifter the one you have (assuming you're starting out with a manual) will work just fine (one, of the many, misinformed bits of information i ran across)
But the difference between the K-Tuned shifter and the stock plastic one is night and day
Installed a Hurst shift handle (I'm old school)
Removed the trunk carpet and sprayed in tuff liner (think pickup bed liner)
.................................
Car upgrades remaining;
Adding a hood scoop (not for additional air in, but to exhaust hot air out of the engine bay) have the scoop, just need to cut a hole in the hood and mount it (heat kills motors and HP)
Adding HID halo headlights (This one is being a real PITA)
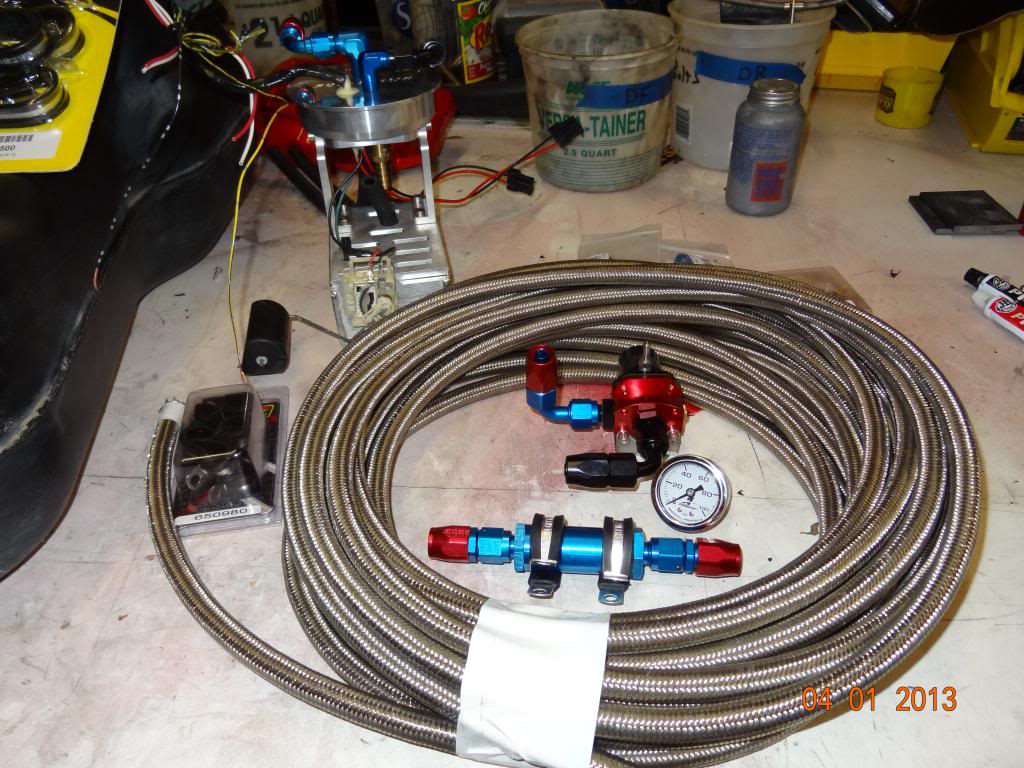
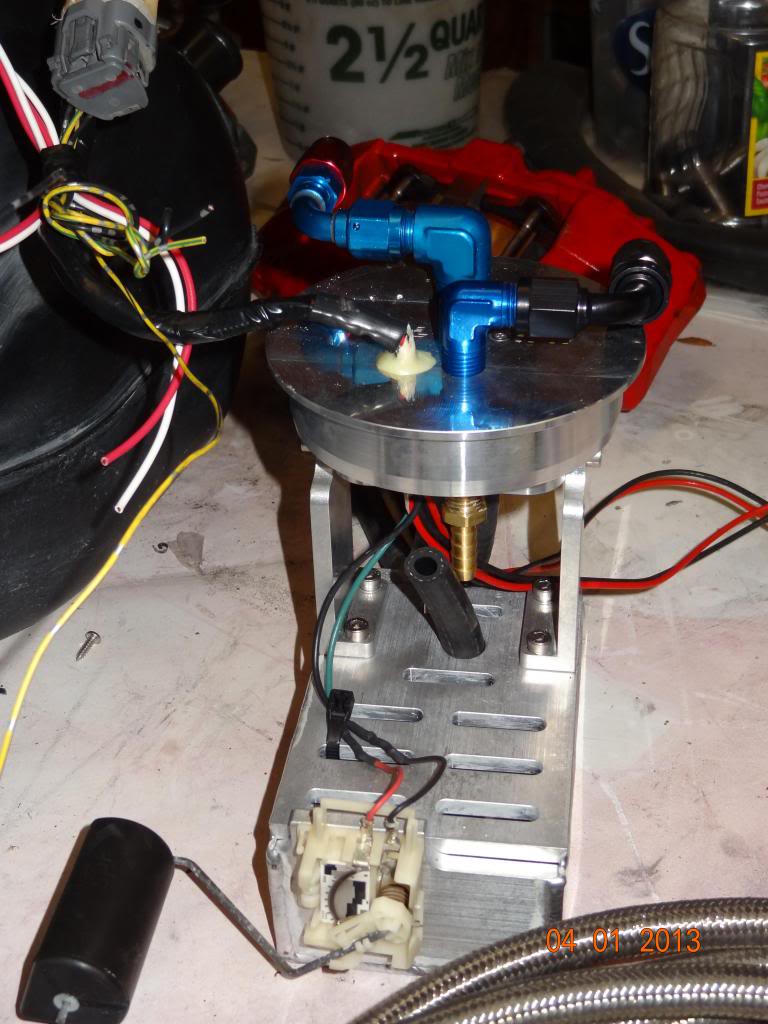
Fuel System; pulled the fuel tank from the donor car/ purchased a dual fuel pump hanger / and plumbing the 04 Honda w/ -6an SS feed and return lines.., full flow fuel filter/ regulator
Wiring up a dual relay harness to power the dual fuel pumps..., good news is, the stock fuel gauge sending unit bolts right up to the aftermarket hanger
The plan will be to drop the existing tank, bolt the modified one in then plug N play with the stock harness (the wires currently powering the existing fuel pump will power the relays feeding the aftermarket pumps)
===============
The DC 5 suspension
Came complete except for E Brake cables and Brake hoses
So far
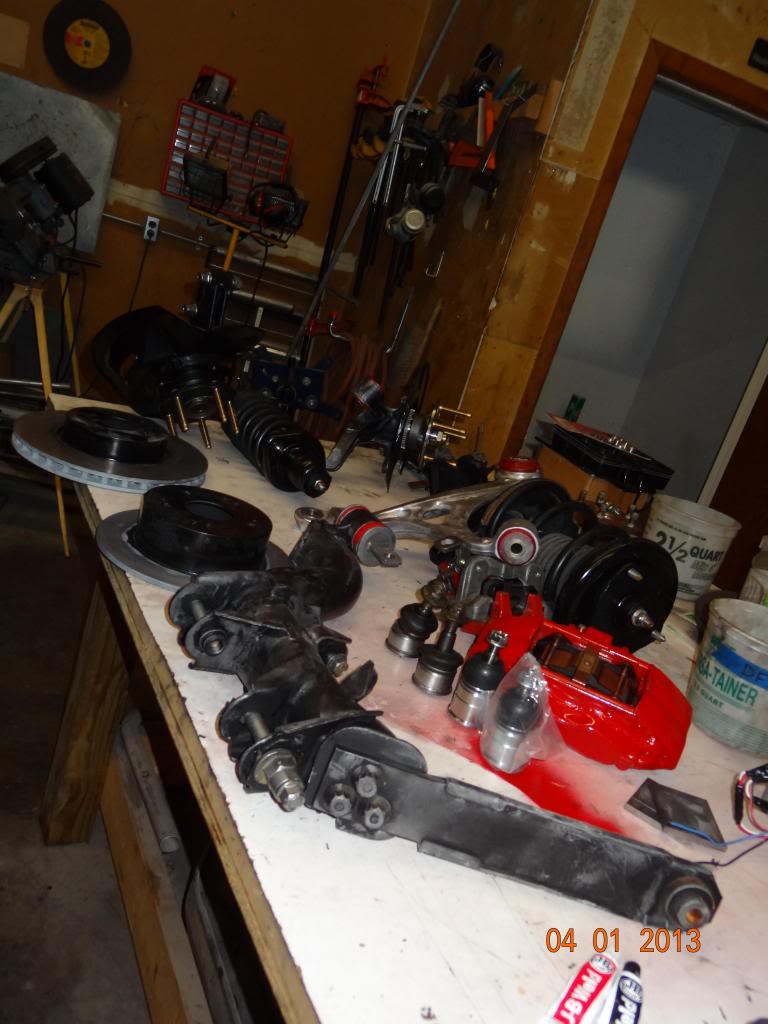
Completely disassembled, cleaned, and painted it
Replaced all bushing w/ energy suspension (when removing the bushings I found that burning them out w/ an acetylene torch worked best even better than a press) yup used anti-seize on the new bushings
New Brake pads (btw the fronts take one kind, the rears a different)
Resurfaced the rotors (I got lucky and had more than enough material to do so)
Replaced the ball joints (they are bigger than the stock ones yeah I bought the wrong one initially)
Purchased some Ebrake cables and SS bake cables (the brake cables are tricky to find)
Refurbished the calipers (brembos)
New front bearings
New rear hubs
New longer ARP wheel studs all around
............................
Suspension upgrades remaining;
Waiting on the rear upper (adjustable), and rear lower control arms they've been on back order for over two weeks
Need to find 5 lug wheels with the proper offset (what I want may not work)
Wider tires and probably 16 inch
Will I eventually lower this car only if I think it'll improve handling otherwise I couldn't care less
=========================
Donor car
Originally was a 01 Civic, 4 door automatic that the PO had converted to manual, added a K20/ 6 speed/ sub frame/ honddata ECU/ hasport mounts
Unfortunately he rolled it and totaled the car then sold it to me
I yanked the motor/ trans/ subframe (btw for a Kswap you'll need the proper subframe) and hauled them off to the engine builder
The builder is sleeving it/ adding a girdle/ bigger rods/ port/polishing basically making it bullet proof block to head
Once installed he%u2019ll add a turbo and inter cooler
Head is finished/ block is still being machined
............................................
Motor items I need to get;
Wiring harness
Throttle cable
Header/ full exhaust
Fuel Rail
Throttle body
Front clip
Radiator / inner-cooler
Who knows
==========================
Pretty sure there is more, but it's late and I'm tired
Anyone have any thing(s) I need to be thinking about, please let me know otherwise I'll update this as progress is made
Ghost
Newbie here.., thought I would join and use this as a repository / archive for a little project I'm working on
It'll help me keep things straight, and possibly others looking for answers
I've, in my research on these planned upgrades found a lot of misinformation posted (I'm talking all over the web) I keep it factual and if I don't know I'll post that as well
Mods if I've posted this in the wrong place, my apologies
Background
Purchased a Honda Civic coupe mid February, nothing special- a 5 speed w/ sun roof
The goal = 600 (reliable) HP (wife thinks I'm going through my 2nd childhood I told her I never left my first... besides I'm a gear head at heart)
=======================
In addition, purchased a DC5 Type R suspension.., and a wrecked donor 02 Honda civic (auto converted to manual) w/ a K20 6 speed
More on these two in a bit
=====================
Mods to the 04 so far;
Sound system
Tinted windows
Rear wing
Sun roof deflector
Installed Peal N Seal and Jute beneath the carpet and Peal N Seal in the doors (this significantly cut down on the vibration / external noise, and the Peal N Seal does not stink)
LED tail lights
Moved the battery to the trunk (low and centered) had to fab up a mounting bracket for the battery
Upgraded to an optima battery
Upgraded the front and rear sway bars
Installed a K-Tuned shifter (I love this shifter) also have the K-Tune shift cables
btw; if you plan to do a swap you don't need a different shifter the one you have (assuming you're starting out with a manual) will work just fine (one, of the many, misinformed bits of information i ran across)
But the difference between the K-Tuned shifter and the stock plastic one is night and day
Installed a Hurst shift handle (I'm old school)
Removed the trunk carpet and sprayed in tuff liner (think pickup bed liner)
.................................
Car upgrades remaining;
Adding a hood scoop (not for additional air in, but to exhaust hot air out of the engine bay) have the scoop, just need to cut a hole in the hood and mount it (heat kills motors and HP)
Adding HID halo headlights (This one is being a real PITA)
Fuel System; pulled the fuel tank from the donor car/ purchased a dual fuel pump hanger / and plumbing the 04 Honda w/ -6an SS feed and return lines.., full flow fuel filter/ regulator
Wiring up a dual relay harness to power the dual fuel pumps..., good news is, the stock fuel gauge sending unit bolts right up to the aftermarket hanger
The plan will be to drop the existing tank, bolt the modified one in then plug N play with the stock harness (the wires currently powering the existing fuel pump will power the relays feeding the aftermarket pumps)
===============
The DC 5 suspension
Came complete except for E Brake cables and Brake hoses
So far
Completely disassembled, cleaned, and painted it
Replaced all bushing w/ energy suspension (when removing the bushings I found that burning them out w/ an acetylene torch worked best even better than a press) yup used anti-seize on the new bushings
New Brake pads (btw the fronts take one kind, the rears a different)
Resurfaced the rotors (I got lucky and had more than enough material to do so)
Replaced the ball joints (they are bigger than the stock ones yeah I bought the wrong one initially)
Purchased some Ebrake cables and SS bake cables (the brake cables are tricky to find)
Refurbished the calipers (brembos)
New front bearings
New rear hubs
New longer ARP wheel studs all around
............................
Suspension upgrades remaining;
Waiting on the rear upper (adjustable), and rear lower control arms they've been on back order for over two weeks
Need to find 5 lug wheels with the proper offset (what I want may not work)
Wider tires and probably 16 inch
Will I eventually lower this car only if I think it'll improve handling otherwise I couldn't care less
=========================
Donor car
Originally was a 01 Civic, 4 door automatic that the PO had converted to manual, added a K20/ 6 speed/ sub frame/ honddata ECU/ hasport mounts
Unfortunately he rolled it and totaled the car then sold it to me
I yanked the motor/ trans/ subframe (btw for a Kswap you'll need the proper subframe) and hauled them off to the engine builder
The builder is sleeving it/ adding a girdle/ bigger rods/ port/polishing basically making it bullet proof block to head
Once installed he%u2019ll add a turbo and inter cooler
Head is finished/ block is still being machined
............................................
Motor items I need to get;
Wiring harness
Throttle cable
Header/ full exhaust
Fuel Rail
Throttle body
Front clip
Radiator / inner-cooler
Who knows
==========================
Pretty sure there is more, but it's late and I'm tired
Anyone have any thing(s) I need to be thinking about, please let me know otherwise I'll update this as progress is made
Ghost
Last edited by Ghost Rider; Mar 30, 2013 at 03:17 AM.
Thread Starter
Registered!!
Joined: Mar 2013
Posts: 52
Likes: 0
Rep Power: 0 Re: A Little Project
Car upgrades remaining;
Adding a hood scoop (not for additional air in, but to exhaust hot air out of the engine bay) have the scoop, just need to cut a hole in the hood and mount it (heat kills motors and HP)
Adding HID halo headlights (This one is being a real PITA)
Fuel System; pulled the fuel tank from the donor car/ purchased a dual fuel pump hanger / and plumbing the 04 Honda w/ -6an SS feed and return lines.., full flow fuel filter/ regulator
Wiring up a dual relay harness to power the dual fuel pumps..., good news is, the stock fuel gauge sending unit bolts right up to the aftermarket hanger
The plan will be to drop the existing tank, bolt the modified one in then plug N play with the stock harness (the wires currently powering the existing fuel pump will power the relays feeding the aftermarket pumps)
Added;
Rained last night � first time since buying the car � trunk leaks � needs fixed
Windshield cracked from P side to D side along the bottom � may or may not replace it
�����������������
Suspension upgrades remaining;
Waiting on the rear upper (adjustable), and rear lower control arms they've been on back order for over two weeks
Need to find 5 lug wheels with the proper offset (what I want may not work)
Wider tires and probably 16 inch
Will I eventually lower this car only if I think it'll improve handling otherwise I couldn't care less
RCAs � still not shipped
�����������������
Donor car;
Received the title in the mail today, now it can be hauled off to the junkyard
Any other parts I need off it??
�����������������
Motor items I need to get;
Wiring harness
Throttle cable
Header/ full exhaust
Fuel Rail
Throttle body
Front clip
Radiator / inner-cooler
Who knows
Added
SI axels
==========================================
Today
Taillights
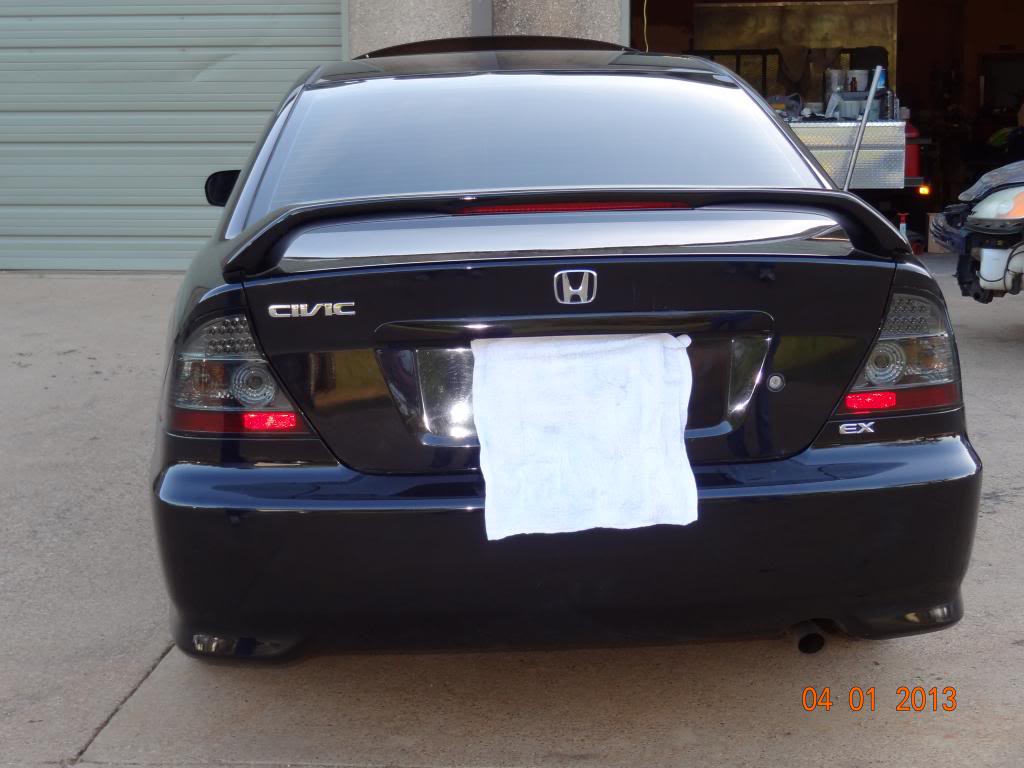
Earlier I had swapped the taillights to LEDs (brake / tail lights are actual LEDs, while the backup light and turn signals remained incandescent)
Which btw brings up a subject � when swapping the tail lights, my turn signals bulbs were white � behind a red lens..
After the swap � the turn signal lenses are white, and the bulb was white � illegal in the US
So I drove it for a day like that�, knowing � if I use my turn signals � I was breaking the law� if I didn�t use my turn signals � I was breaking the law � yippee
===========
The bulb in question is a 7440 single filament (not the 7443 dual filament) � and needs to be either red or amber
No auto parts store I know of carries it � called em all � every stinkin one of them
It can be had on line � but that takes time to ship
Found it at the Honda dealer (17.00 for a pair � appears I need to start a bulb business)
Anyway, back to the tail lights � I had this bright idea of swapping the above turn signal bulb out with an LED bulb � a 7440 should be a 7440
Nope � the LED bulb will not fit in the hole � thought about dermal-ing out the hole � but then decided no
Sometime � mods can go too far � this one has reached its limit
Another note;
If you swap to LEDs on the turn signals � you�ll need to add a resister in parallel to simulate the load of an incandescent filament
Other wise your turn signal will cycle (blink) quicker than the speed of sound
============
Hood scoop
Made a template from cardboard, positioned on the hood � and was about to cut a hole � then thought better of it
Didn�t have the mounting hardware (nuts/ bolts/ washers)� and wanted to install a rubber gasket � which upon thinking about it � believe I�ll just run a wide bead of black 5200, and not fab a rubber gasket
Now I have the hdrw, and plan for a gasket � tomorrow the hole gets cut
===============
Back to those PITA halo lights
So I purchased, what I �thought� � was a pair of quality HID Halo headlights �from a reputable supplier � boy was I ever wrong
Out of the package
Neither light worked (connected directly to a known charged battery)
The rubber cups (weatherproofing the bulbs) over the halos � fit like crap (the cups are too short for what they�re trying to cover and don�t fit at all)
When I went to remove one of the bulbs on the driver�s side H3 � the screws holding the retainer clip fell out (they were stripped) and the pot metal (comprising the area around the where the bulb fits into the reflector) was cracked
========
Contacted the supplier � may as well been talking to the wall � they�re maintaining I don�t know what the hell I�m doing � yeah okay�
I also attempted to find a replacement reflector � that ain�t happening so;
Today I tore into them, this is what I found/ came up with
Wiring was bassackwards � positive output of the ballasts were connected to the negative side of the bulb.., and vise versa � on every bulb�
Also a few of the spade lugs were poorly crimped (loose)
Fixed the wiring � all four lights work
As for the stripped out screws/ busted up reflector base � used some masking tape to make a form around where the hold down screws (on the reflector base) � screw in�
Mixed up some JB weld�, built up the area.., inserted the screws
Tomorrow I�ll know if it worked � initial indication is looking pretty damn good
����������
The rubber cups over the halos; If they were only 1/2 to 3/4 of an inch longer � they would fit perfect
Looked on line for replacements � that ain�t happening � so time to improvise�.
These boots are about 3 inched in diameter� hhhmmm they make rubber, pipe end covers, for 3 inch pipe�
Went to Lowe�s and found one � it would work� but they only had one � crap
Looked around some more and stumbled across a rubber 4 inch to 3 inch downspout connector.
The 3 inch end looks to be about a 1 1/2 inches long
Bought four, took them home� cut the 3 inch section off..., split the cup (cut the bottom off about 1 /4 of an inch above the end..., then inserting the 11/2 inch long 3 inch section between the cup ends � thus elongating the overall cup length by 3 / 4 on an inch
Used contact cement to glue in the mid section
So far � appears it's going to work (glue need to dry completely)
Lights should be installed tomorrow
And why contact cement instead of rubber glue � its all Lowe�s carried � it should work, and remain pliable � we shall see
Ghost
Adding a hood scoop (not for additional air in, but to exhaust hot air out of the engine bay) have the scoop, just need to cut a hole in the hood and mount it (heat kills motors and HP)
Adding HID halo headlights (This one is being a real PITA)
Fuel System; pulled the fuel tank from the donor car/ purchased a dual fuel pump hanger / and plumbing the 04 Honda w/ -6an SS feed and return lines.., full flow fuel filter/ regulator
Wiring up a dual relay harness to power the dual fuel pumps..., good news is, the stock fuel gauge sending unit bolts right up to the aftermarket hanger
The plan will be to drop the existing tank, bolt the modified one in then plug N play with the stock harness (the wires currently powering the existing fuel pump will power the relays feeding the aftermarket pumps)
Added;
Rained last night � first time since buying the car � trunk leaks � needs fixed
Windshield cracked from P side to D side along the bottom � may or may not replace it
�����������������
Suspension upgrades remaining;
Waiting on the rear upper (adjustable), and rear lower control arms they've been on back order for over two weeks
Need to find 5 lug wheels with the proper offset (what I want may not work)
Wider tires and probably 16 inch
Will I eventually lower this car only if I think it'll improve handling otherwise I couldn't care less
RCAs � still not shipped
�����������������
Donor car;
Received the title in the mail today, now it can be hauled off to the junkyard
Any other parts I need off it??
�����������������
Motor items I need to get;
Wiring harness
Throttle cable
Header/ full exhaust
Fuel Rail
Throttle body
Front clip
Radiator / inner-cooler
Who knows
Added
SI axels
==========================================
Today
Taillights
Earlier I had swapped the taillights to LEDs (brake / tail lights are actual LEDs, while the backup light and turn signals remained incandescent)
Which btw brings up a subject � when swapping the tail lights, my turn signals bulbs were white � behind a red lens..
After the swap � the turn signal lenses are white, and the bulb was white � illegal in the US
So I drove it for a day like that�, knowing � if I use my turn signals � I was breaking the law� if I didn�t use my turn signals � I was breaking the law � yippee
===========
The bulb in question is a 7440 single filament (not the 7443 dual filament) � and needs to be either red or amber
No auto parts store I know of carries it � called em all � every stinkin one of them
It can be had on line � but that takes time to ship
Found it at the Honda dealer (17.00 for a pair � appears I need to start a bulb business)
Anyway, back to the tail lights � I had this bright idea of swapping the above turn signal bulb out with an LED bulb � a 7440 should be a 7440
Nope � the LED bulb will not fit in the hole � thought about dermal-ing out the hole � but then decided no
Sometime � mods can go too far � this one has reached its limit
Another note;
If you swap to LEDs on the turn signals � you�ll need to add a resister in parallel to simulate the load of an incandescent filament
Other wise your turn signal will cycle (blink) quicker than the speed of sound
============
Hood scoop
Made a template from cardboard, positioned on the hood � and was about to cut a hole � then thought better of it
Didn�t have the mounting hardware (nuts/ bolts/ washers)� and wanted to install a rubber gasket � which upon thinking about it � believe I�ll just run a wide bead of black 5200, and not fab a rubber gasket
Now I have the hdrw, and plan for a gasket � tomorrow the hole gets cut
===============
Back to those PITA halo lights
So I purchased, what I �thought� � was a pair of quality HID Halo headlights �from a reputable supplier � boy was I ever wrong
Out of the package
Neither light worked (connected directly to a known charged battery)
The rubber cups (weatherproofing the bulbs) over the halos � fit like crap (the cups are too short for what they�re trying to cover and don�t fit at all)
When I went to remove one of the bulbs on the driver�s side H3 � the screws holding the retainer clip fell out (they were stripped) and the pot metal (comprising the area around the where the bulb fits into the reflector) was cracked
========
Contacted the supplier � may as well been talking to the wall � they�re maintaining I don�t know what the hell I�m doing � yeah okay�
I also attempted to find a replacement reflector � that ain�t happening so;
Today I tore into them, this is what I found/ came up with
Wiring was bassackwards � positive output of the ballasts were connected to the negative side of the bulb.., and vise versa � on every bulb�
Also a few of the spade lugs were poorly crimped (loose)
Fixed the wiring � all four lights work
As for the stripped out screws/ busted up reflector base � used some masking tape to make a form around where the hold down screws (on the reflector base) � screw in�
Mixed up some JB weld�, built up the area.., inserted the screws
Tomorrow I�ll know if it worked � initial indication is looking pretty damn good
����������
The rubber cups over the halos; If they were only 1/2 to 3/4 of an inch longer � they would fit perfect
Looked on line for replacements � that ain�t happening � so time to improvise�.
These boots are about 3 inched in diameter� hhhmmm they make rubber, pipe end covers, for 3 inch pipe�
Went to Lowe�s and found one � it would work� but they only had one � crap
Looked around some more and stumbled across a rubber 4 inch to 3 inch downspout connector.
The 3 inch end looks to be about a 1 1/2 inches long
Bought four, took them home� cut the 3 inch section off..., split the cup (cut the bottom off about 1 /4 of an inch above the end..., then inserting the 11/2 inch long 3 inch section between the cup ends � thus elongating the overall cup length by 3 / 4 on an inch
Used contact cement to glue in the mid section
So far � appears it's going to work (glue need to dry completely)
Lights should be installed tomorrow
And why contact cement instead of rubber glue � its all Lowe�s carried � it should work, and remain pliable � we shall see
Ghost
Re: A Little Project
Looks great. I think I saw your thread in another forum. Good luck fitting the type "R" suspension onto the EM2. Even with the K20 it's a pain in the ***.
Thread Starter
Registered!!
Joined: Mar 2013
Posts: 52
Likes: 0
Rep Power: 0 Re: A Little Project
Kenny/ Blue
Thank You Gents
As for pictures � teach me how and I�ll post away � whatever you�d like to see
The other forum/ thread � not me Sir � this is the only one I've joined
The suspension also came with the wishbones � hopin they will bolt right up � fingers crossed � we�ll see once I get the RCAs
===================
Today;
Scoop
There is a nice new hole in the hood, covered with a scoop � sweet (I�ll do a small dyi in later in this post)
Lights
Lengthened cups � worked
Jb weld � worked, bulb is installed and solid
Didn�t install them today though, but I did plug them into the car�s harness � they work
I wanted to let the contact glue dry/ set a bit more, also have some new front bumper clips arriving tomorrow � so later in the week they should be done
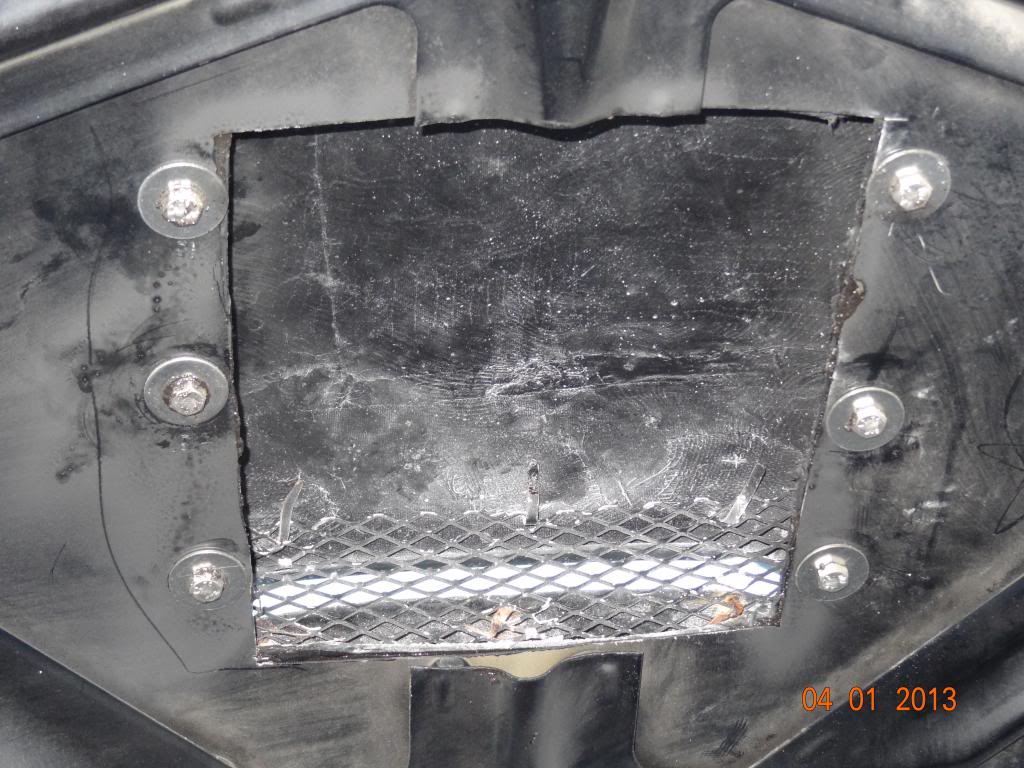
Trunk Leak
Climbed in the trunk (damn it is small) and had my better half spray water over the area � near as we can tell water is leaking at the very back end, where a seam is formed by adjoining sheet metal
This seam is behind a second piece of sheet metal making access a bear
Options � remove the trunk lid gasket and see if I can gain access that way (as the appears the water follows the gasket down, then goes underneath it somehow
Use the truck bed liner spray and see if I can maybe patch the hole with that
Calk/ RTV
Something else ??
Need to think and research on this a bit � in the meantime the leak remains
======================
Car upgrades remaining;
Fuel System; pulled the fuel tank from the donor car/ purchased a dual fuel pump hanger / and plumbing the 04 Honda w/ -6an SS feed and return lines.., full flow fuel filter/ regulator
Wiring up a dual relay harness to power the dual fuel pumps..., good news is, the stock fuel gauge sending unit bolts right up to the aftermarket hanger
The plan will be to drop the existing tank, bolt the modified one in then plug N play with the stock harness (the wires currently powering the existing fuel pump will power the relays feeding the aftermarket pumps)
Rained last night � first time since buying the car � trunk leaks � needs fixed
Windshield cracked from P side to D side along the bottom � may or may not replace it
Adding:
Thought about a roll cage today � one side of me says be safe and add one, other side says I don�t want to fool with it
Have the material and tools to do it� just not the want to
What I really need, is to figure out what I�m going to end up doing with this car
�����������������
Suspension upgrades remaining;
Waiting on the rear upper (adjustable), and rear lower control arms they've been on back order for over two weeks
Need to find 5 lug wheels with the proper offset (what I want may not work)
Wider tires and probably 16 inch
Will I eventually lower this car only if I think it'll improve handling otherwise I couldn't care less
RCAs � still not shipped
�����������������
Donor car;
Received the title in the mail today, now it can be hauled off to the junkyard
Any other parts I need off it � nope � time to get it gone
�����������������
Motor items;
Wiring harness
Throttle cable
Header/ full exhaust
Fuel Rail
Throttle body
Front clip
Radiator / inner-cooler
Who knows
SI axels
Removing these two;
Adding a hood scoop (not for additional air in, but to exhaust hot air out of the engine bay) have the scoop, just need to cut a hole in the hood and mount it (heat kills motors and HP)
Adding HID halo headlights (This one is being a real PITA)
=======================================
Okay the hood scoop dyi
Disclaimer;
Not saying this is the only, or best way � simply offering it up as assistance
Tools
Safety glasses
Gloves
SS � Bolts/ fender washers/ self locking nuts
Jig saw w/ metal cutting blade
Drill
3 drill bits � one for the jig saw pilot holes/ one for the mounting bolts pilot hole/ the last one big enough for the mounting bolts
Masking tape (I prefer the blue kind)
Large towel (preferably one from a hotel you um �borrowed� many/ many years ago )
Cardboard template of the scoop � with the center cut out the same size as the scoop�s hole � and it should be an inch or two bigger than the scoop
Silicone calk
Calk gun
Plastic putty knife
Dremel w/ carbide bit
Couple of short 2x4s
And of course the Scoop
============================
Put on the safety glasses and gloves
Mask a centerline down the hood
Mask the scoop to the cardboard template
Place both on hood and position
Mask (mark) the front and back edges of the scoop, onto the hood, where you want the scoop to sit on the hood
Measure/ look/ measure/ look/ measure/ look/ measure/ look/ measure/ look/ measure/ look/ measure/ look/ measure/ look/ measure/ look �from all angles � twice/ thrice/ how ever many times it takes to suit you/ get it right
Make sure you like where it is sitting
Let�s face it � easy to get impatient with this step � but if you screw up the placement � you�ll be staring, and reminded, till the day you sell the car
So take your time, and get it right, life will be good
Tape the template to the hood
Remove the scoop from the template � leaving the template taped to the hood
Again � verify you like the placement
Open the hood and place the towel over the engine, directly beneath where you�ll be cutting (to catch the metal filings)
Place the 2X4s on their edge, under the front of the hood � this�ll raise the hood up far enough so you not sawing into the engine
Lower hood down onto the 2X4s edges
Again � verify you like the placement
Drill a pilot hole near the corners of the template � where scoop hole is to be
Hope to hell you like the scoop placement because now you are committed
Cut out the scoop hole
Btw the cardboard will also give you a surface to run the jig saw over � thus NOT scratching your paint
Note � you will be cutting into the center brace of the hood � don�t worry about it � the hood is still solid and rigid after that section of brace is removed
Remove the towel, shake it out, and replace
Remove the template
Place the scoop on the hood and align it to the hole
Tape scoop in place
Drill one mounting bolt hole � in one of the corners of the scoop�s mating surface � through the hood, and through the scoop�s mounting surface
Caution � use the pilot drill bit first, then use the full size bit � and go at a slow drill speed as the bit is breaking through the metal, and starting to touch the carbon fiber�
Carbon fiber is easy to drill through, bit it also likes to grab the drill bit and then nasty things can happen
Drill slow
Next, drill the full size bolt hole
Install the bolt, two fender washers, and the self locking nut
Tighten slowly till snug � and only snug
You can then swivel the scoop for a perfect fit
Drill remaining holes and install the bolts/ washers/ nuts
Caution;
Always tighten the bolts slowly and equally so no undo stress is placed on the carbon fiber
Should the hood hole and scoop hole not match � either cut a bit more off the hood�s hole, with the jig saw�, or use the dremel and carbide bit to widen the scoop�s hole
May as well get em matched perfectly
Now close the hood and admire your work � for a minute or two � as there is still work to do
Next
Tape completely around, and butt up next to � the edge of the scoop � including the corners
Remove the scoop from the hood (yeah unbolt it)
Paint the edge of the hole you just cut in the hood, and the holes you drilled into the hood for the mounting bolts (protect from rust)
On the scoop, run a goodly amount of silicone completely around the lip of the scoop (mating surface with the hood), flatten and even out with the plastic putty knife
Reinstall the scoop
Slowly and equally tighten all the bolts
The tape you put around the scoop will keep the silicone off your paint, should you slip while reinstalling� and it�ll also catch whatever silicone oozes out as you�re tightening the bolts down
Remove the tape � you�re done (oh and don�t forget to remove the towel and 2X4 � else more of those nasty things could happen)
However if you�re like me � you�ll drop a nut/ washer down into the scoop � usually the last nut/ washer you�re installing � which with then require the removing of said scoop completely to get the damn thing out
Although this last step is optional�, doing it 4 or 5 times typically leads to a few choice words, and frustration � what the hell�, may as well join in the fun � SO JUST DO IT and enjoy
Ghost
Thank You Gents
As for pictures � teach me how and I�ll post away � whatever you�d like to see
The other forum/ thread � not me Sir � this is the only one I've joined
The suspension also came with the wishbones � hopin they will bolt right up � fingers crossed � we�ll see once I get the RCAs
===================
Today;
Scoop
There is a nice new hole in the hood, covered with a scoop � sweet (I�ll do a small dyi in later in this post)
Lights
Lengthened cups � worked
Jb weld � worked, bulb is installed and solid
Didn�t install them today though, but I did plug them into the car�s harness � they work
I wanted to let the contact glue dry/ set a bit more, also have some new front bumper clips arriving tomorrow � so later in the week they should be done
Trunk Leak
Climbed in the trunk (damn it is small) and had my better half spray water over the area � near as we can tell water is leaking at the very back end, where a seam is formed by adjoining sheet metal
This seam is behind a second piece of sheet metal making access a bear
Options � remove the trunk lid gasket and see if I can gain access that way (as the appears the water follows the gasket down, then goes underneath it somehow
Use the truck bed liner spray and see if I can maybe patch the hole with that
Calk/ RTV
Something else ??
Need to think and research on this a bit � in the meantime the leak remains
======================
Car upgrades remaining;
Fuel System; pulled the fuel tank from the donor car/ purchased a dual fuel pump hanger / and plumbing the 04 Honda w/ -6an SS feed and return lines.., full flow fuel filter/ regulator
Wiring up a dual relay harness to power the dual fuel pumps..., good news is, the stock fuel gauge sending unit bolts right up to the aftermarket hanger
The plan will be to drop the existing tank, bolt the modified one in then plug N play with the stock harness (the wires currently powering the existing fuel pump will power the relays feeding the aftermarket pumps)
Rained last night � first time since buying the car � trunk leaks � needs fixed
Windshield cracked from P side to D side along the bottom � may or may not replace it
Adding:
Thought about a roll cage today � one side of me says be safe and add one, other side says I don�t want to fool with it
Have the material and tools to do it� just not the want to
What I really need, is to figure out what I�m going to end up doing with this car
�����������������
Suspension upgrades remaining;
Waiting on the rear upper (adjustable), and rear lower control arms they've been on back order for over two weeks
Need to find 5 lug wheels with the proper offset (what I want may not work)
Wider tires and probably 16 inch
Will I eventually lower this car only if I think it'll improve handling otherwise I couldn't care less
RCAs � still not shipped
�����������������
Donor car;
Received the title in the mail today, now it can be hauled off to the junkyard
Any other parts I need off it � nope � time to get it gone
�����������������
Motor items;
Wiring harness
Throttle cable
Header/ full exhaust
Fuel Rail
Throttle body
Front clip
Radiator / inner-cooler
Who knows
SI axels
Removing these two;
Adding a hood scoop (not for additional air in, but to exhaust hot air out of the engine bay) have the scoop, just need to cut a hole in the hood and mount it (heat kills motors and HP)
Adding HID halo headlights (This one is being a real PITA)
=======================================
Okay the hood scoop dyi
Disclaimer;
Not saying this is the only, or best way � simply offering it up as assistance
Tools
Safety glasses
Gloves
SS � Bolts/ fender washers/ self locking nuts
Jig saw w/ metal cutting blade
Drill
3 drill bits � one for the jig saw pilot holes/ one for the mounting bolts pilot hole/ the last one big enough for the mounting bolts
Masking tape (I prefer the blue kind)
Large towel (preferably one from a hotel you um �borrowed� many/ many years ago )
Cardboard template of the scoop � with the center cut out the same size as the scoop�s hole � and it should be an inch or two bigger than the scoop
Silicone calk
Calk gun
Plastic putty knife
Dremel w/ carbide bit
Couple of short 2x4s
And of course the Scoop
============================
Put on the safety glasses and gloves
Mask a centerline down the hood
Mask the scoop to the cardboard template
Place both on hood and position
Mask (mark) the front and back edges of the scoop, onto the hood, where you want the scoop to sit on the hood
Measure/ look/ measure/ look/ measure/ look/ measure/ look/ measure/ look/ measure/ look/ measure/ look/ measure/ look/ measure/ look �from all angles � twice/ thrice/ how ever many times it takes to suit you/ get it right
Make sure you like where it is sitting
Let�s face it � easy to get impatient with this step � but if you screw up the placement � you�ll be staring, and reminded, till the day you sell the car
So take your time, and get it right, life will be good
Tape the template to the hood
Remove the scoop from the template � leaving the template taped to the hood
Again � verify you like the placement
Open the hood and place the towel over the engine, directly beneath where you�ll be cutting (to catch the metal filings)
Place the 2X4s on their edge, under the front of the hood � this�ll raise the hood up far enough so you not sawing into the engine
Lower hood down onto the 2X4s edges
Again � verify you like the placement
Drill a pilot hole near the corners of the template � where scoop hole is to be
Hope to hell you like the scoop placement because now you are committed
Cut out the scoop hole
Btw the cardboard will also give you a surface to run the jig saw over � thus NOT scratching your paint
Note � you will be cutting into the center brace of the hood � don�t worry about it � the hood is still solid and rigid after that section of brace is removed
Remove the towel, shake it out, and replace
Remove the template
Place the scoop on the hood and align it to the hole
Tape scoop in place
Drill one mounting bolt hole � in one of the corners of the scoop�s mating surface � through the hood, and through the scoop�s mounting surface
Caution � use the pilot drill bit first, then use the full size bit � and go at a slow drill speed as the bit is breaking through the metal, and starting to touch the carbon fiber�
Carbon fiber is easy to drill through, bit it also likes to grab the drill bit and then nasty things can happen
Drill slow
Next, drill the full size bolt hole
Install the bolt, two fender washers, and the self locking nut
Tighten slowly till snug � and only snug
You can then swivel the scoop for a perfect fit
Drill remaining holes and install the bolts/ washers/ nuts
Caution;
Always tighten the bolts slowly and equally so no undo stress is placed on the carbon fiber
Should the hood hole and scoop hole not match � either cut a bit more off the hood�s hole, with the jig saw�, or use the dremel and carbide bit to widen the scoop�s hole
May as well get em matched perfectly
Now close the hood and admire your work � for a minute or two � as there is still work to do
Next
Tape completely around, and butt up next to � the edge of the scoop � including the corners
Remove the scoop from the hood (yeah unbolt it)
Paint the edge of the hole you just cut in the hood, and the holes you drilled into the hood for the mounting bolts (protect from rust)
On the scoop, run a goodly amount of silicone completely around the lip of the scoop (mating surface with the hood), flatten and even out with the plastic putty knife
Reinstall the scoop
Slowly and equally tighten all the bolts
The tape you put around the scoop will keep the silicone off your paint, should you slip while reinstalling� and it�ll also catch whatever silicone oozes out as you�re tightening the bolts down
Remove the tape � you�re done (oh and don�t forget to remove the towel and 2X4 � else more of those nasty things could happen)
However if you�re like me � you�ll drop a nut/ washer down into the scoop � usually the last nut/ washer you�re installing � which with then require the removing of said scoop completely to get the damn thing out
Although this last step is optional�, doing it 4 or 5 times typically leads to a few choice words, and frustration � what the hell�, may as well join in the fun � SO JUST DO IT and enjoy
Ghost
Re: A Little Project
I am stupidly educated in the Type "R" swap for EM2s. Even if you run the K20A2 USDM engine you need JDM K20 Type "R" axles because they are slightly longer to fit the longer front hubs of the type "R" RSX. Hopefully it came with the aluminum control arms from the type "R" because they are 1. badass and 2. slightly more elongated so the ball joint lines up with the type "R" knuckle.
The rears arent too bad, just make sure you get the proper offset wheels (I Think it's 60). Also for the rears try to make sure you get the EP3 e-brake cables as all the brackets line up, whereas the RSX you need to omit 3 brackets and even then the cables are a little too short and don't go into the car properly. Unless you can somehow mock up holes for them to bolt up.
You need to add pictures to photobucket or something of the sort, then you just link them onto here. I'm very interested in seeing this
Kenny the Ricer
iTrader: (1)
Joined: Oct 2009
Posts: 5,580
Likes: 0
From: In your trunk
Rep Power: 291 
Re: A Little Project
Yep, we are very interested, especially so much work going into the car.
Just upload the photos onto imageshack, or photobucket, then just link them here.
If the links break, we can fix them.
Just upload the photos onto imageshack, or photobucket, then just link them here.
If the links break, we can fix them.
Thread Starter
Registered!!
Joined: Mar 2013
Posts: 52
Likes: 0
Rep Power: 0 Re: A Little Project
Blue,
I see you have an 05�., mine�s an 04 � so whatever one of us does should apply directly to the other
That is an important bit of information (that I need the JDM K20 Type �R� axles)
Thank You
======================
This isn't the exact suspension I bought.., but it is identical except for the axles and ebrake cable � they were not included with mine
http://www.ebay.com/itm/Acura-RSX-Type-R-K20A-Front-and-Rear-Brembo-5-Lug-Disc-Brake-Rotors-Calipers-JDM-/350754185391?pt=Motors_Car_Truck_Parts_Accessories&hash=item51aa9420af&vxp=mtr
Yup, came with the aluminum LCAs
===============================
Ebrake cables;
Crap, I need to check, but I�m almost certain I got the RSX ebake cables
If so, I�ll order the EP3�s
===========================
Please gimme me a day or two to take some� then I�ll bore y�all to death w/ pics
Many Thanks
Ghost
Re: A Little Project
Check my build thread if you want some input on the Rsx Type "R" swap. I didn't go type "R" in the front but it's all in there. You can see the type "R" rear end installed and rolling.
https://www.civicforums.com/forums/4...5-lug-em2.html
RSX cables WILL work. But they won't be perfect, to say the least I'm still running RSX cables until I can snag some EP3 ones up cheap.
https://www.civicforums.com/forums/4...5-lug-em2.html
RSX cables WILL work. But they won't be perfect, to say the least
I'm still running RSX cables until I can snag some EP3 ones up cheap. Thread Starter
Registered!!
Joined: Mar 2013
Posts: 52
Likes: 0
Rep Power: 0 Re: A Little Project
Let's see if this works
Notes
suspension;
What appears to be rust on the hub - isn't
The grey color on all over the suspension is anti seize - stuff gets everywhere
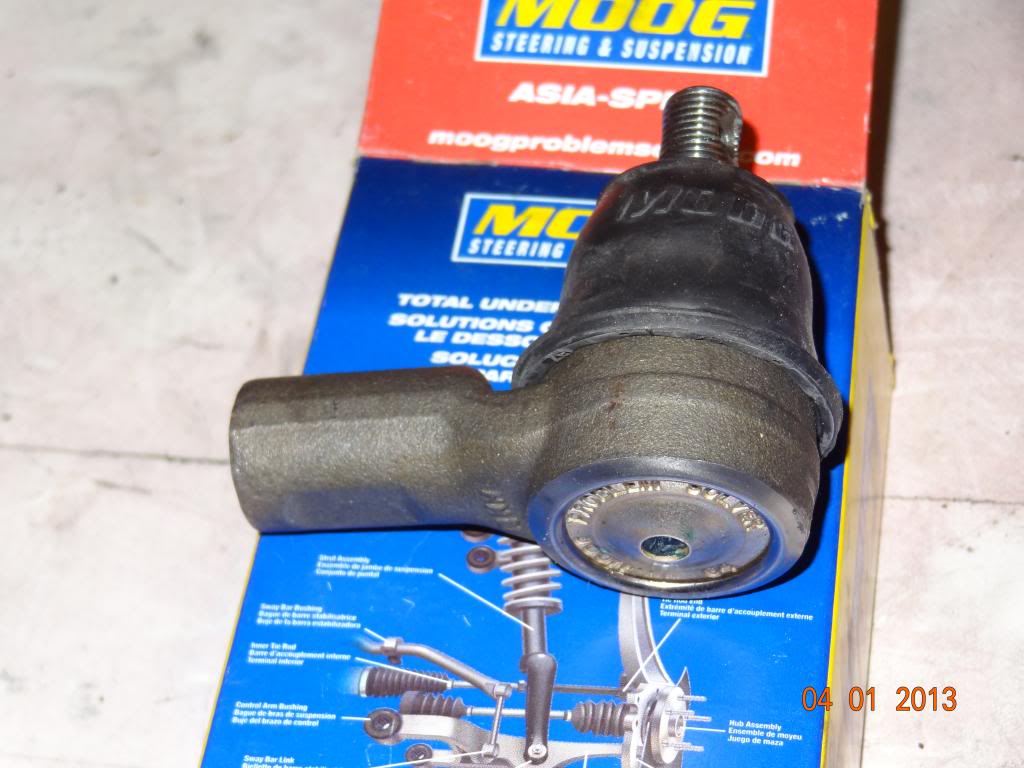
Tie rod ends are the bigger ones required for the DC5
Hope I didn't over do the pics
Ghost


Notes
suspension;
What appears to be rust on the hub - isn't
The grey color on all over the suspension is anti seize - stuff gets everywhere
Tie rod ends are the bigger ones required for the DC5
Hope I didn't over do the pics
Ghost
Last edited by Ghost Rider; Apr 1, 2013 at 09:01 PM.


Thread Starter
Registered!!
Joined: Mar 2013
Posts: 52
Likes: 0
Rep Power: 0 Re: A Little Project
Check my build thread if you want some input on the Rsx Type "R" swap. I didn't go type "R" in the front but it's all in there. You can see the type "R" rear end installed and rolling.
https://www.civicforums.com/forums/4...5-lug-em2.html
RSX cables WILL work. But they won't be perfect, to say the least I'm still running RSX cables until I can snag some EP3 ones up cheap.
https://www.civicforums.com/forums/4...5-lug-em2.html
RSX cables WILL work. But they won't be perfect, to say the least
I'm still running RSX cables until I can snag some EP3 ones up cheap.A great thread... and I really like the Blue Honda
Thanks
Thread Starter
Registered!!
Joined: Mar 2013
Posts: 52
Likes: 0
Rep Power: 0 Re: A Little Project
Car upgrades remaining;
Fuel System � complete wiring harness / install
Windshield cracked side to side, along the bottom � may or may not replace it
Roll cage??
Adding:
Gauge cluster � figure out which gauges
�����������������
Suspension upgrades remaining;
Waiting on the rear upper (adjustable), and rear lower control arms they've been on back order for over two weeks
Need to find 5 lug wheels with the proper offset (what I want may not work)
Wider tires and probably 16 inch
Will I eventually lower this car.., only if I think it'll improve handling�, otherwise no
RCAs � still not shipped
Adding;
JDM K20 Type �R� axles
EP3 e-brake cables
Will I need a different M/C for brakes
�����������������
Donor car;
Have title � get it hauled off
�����������������
Motor items;
Wiring harness
Throttle cable
Header/ full exhaust
Fuel Rail
Throttle body
Front clip
Radiator / inner-cooler
Thread Starter
Registered!!
Joined: Mar 2013
Posts: 52
Likes: 0
Rep Power: 0 Re: A Little Project
Thanks
Can�t say I like the scoop looks either�, but it�s more for function rather than form
Only item I've really installed for looks was the rear wing
Heck even the sun roof air deflector was to quiet wind noise/ stop things getting blown out at highway speeds � I really don�t like the looks of it either
Thread Starter
Registered!!
Joined: Mar 2013
Posts: 52
Likes: 0
Rep Power: 0 Re: A Little Project
Rained most of this past week � did a lot of bailing the trunk out
Donor car � gone (wrecker driver like to talk... and talk� and talk)
Ordered � JDM DC5 axles / EP3 Ebrake cables
RCAs came in � sans the 10 point socket � have one on order
Removed the sun roof deflector � between it/ the wing/ and scoop � there was too much going on for my liking
Headlights installed � need adjusting (I like em)
Tomorrow
Adjust headlights / fix the trunk leak
========================
Car upgrades remaining;
Fuel System � complete wiring harness / install in second fuel tank
Windshield cracked side to side, along the bottom � may or may not replace it
Roll cage??
Gauge cluster � figure out which gauges
�����������������
Suspension upgrades remaining;
Need to find 5 lug wheels with the proper offset (what I want may not work)
Wider, 16� tires
Long lug nuts
Will I eventually lower this car.., only if I think it'll improve handling�, otherwise no
RCAs � received
JDM K20 Type �R� axles � on order
EP3 e-brake cables � on order
Will I need a different M/C for brakes
�����������������
Motor items;
Wiring harness
Throttle cable
Header/ full exhaust
Fuel Rail
Throttle body
Front clip
Radiator / inner-cooler
�����������������
Removing
Donor car
=================================
Borrowed this from another post; credit goes to robbclark1
Torque specs
Front nuts and bolts that hold shock assembly to brake assembly(2 on each side):
116ft lbs. (includes oem replacement bolts)
Front end links:
29ft lbs
Front bolts that hold the bracket and bushings on front sway bar:
29ft lbs
Front nut that secures tie rod to shock assembly:
32ft lbs
Front and rear shock tower nut in center (on top of shock)
33ft lbs
Front three shock tower nuts (on top of shock around center bolt)
33ft lbs
Front brake hose and wheel sensor harness bracket bolts:
10mm one: 7.2ft lbs
12mm one: 16ft lbs
Rear bolts to rear upper arm or camber kit (all three):
43ft lbs
Rear nuts on end links:
top: 28ft lbs
bottom: 29ft lbs
Rear bolt that holds brackets and bushings on rear sway:
16ft lbs
Rear bolt that holds bottom of rear shock:
45ft lbs
Rear two shock tower nuts:
43ft lbs
Thread Starter
Registered!!
Joined: Mar 2013
Posts: 52
Likes: 0
Rep Power: 0 Re: A Little Project
Anyone done a DC5 swap onto a 7th Gen.., and can recommend wheel offsets, please?
(I've searched and came up with a lot of conflicting info)
Stock 7th Gen = 38 to 43 (best I came up with)
Stock JDM DC5 = +60
Like to go w/ 16" wheels/ tires - with the tires as wide as possible with out rolling the fenders
Plan "B" - buy a set of beater wheels and tires from a junk yard, install, then drive to discount tire
Thanks
Ghost
Thread Starter
Registered!!
Joined: Mar 2013
Posts: 52
Likes: 0
Rep Power: 0 Re: A Little Project
Car Upgrades
All ancillary upgrades complete, should find out tonight if the trunk leak is really fixed (according to the weather man)
Remaining;
Gauges
Install Fuel lines in/ under the car
Install pump hanger into spare fuel tank (harness is complete and verified)
Decide on roll cage
Suspension
Have all parts - need to assemble, then install onto car
Lug nuts - have
DC5 axles - have (more on these later)
Remaining;
eBrake cables - shipped
Wheels and tires (decide on offset)
(side note - damn Mugen M7 wheels are expensive..., I like em - but NOT for what they're asking)
Swap/ upgrade the M/C - ??
May install the suspension this weekend - maybe
Motor
Wiring harness
Throttle cable
Header/ full exhaust
Fuel Rail
Throttle body
Front clip
Radiator / inner-cooler
I'm dragging my feet on the motor items and will follow the motor guy's recommendations (that way there is no excuse for not meeting the targeted HP)
------------------------------------
Okay, some common sense deductive reasoning on axle lengths;
Stock motor / stock suspension = stock axles
K20 motor / stock suspension = SI axles (this is what was on the donor car, SI axles are longer than stock)
K20 motor / DC5 suspension = DC5 axles.., a reasonable assumption and makes sense (btw the DC5 axles are ~1" longer than the SI axles
Stock motor / DC5 suspension = I'm guessing SI axles..., or may need to mix and match
Various notes;
The motor guy will be swapping the motor
I'll be swapping the suspension
I need to decide if I'll swap the suspension first, or have him swap the motor first
Spline count on the DC 5 hubs/ axles = 28 (I counted and marked them 5 times)
Spline count on SI axles = don't know, I need to separate the hubs and axles and count them (I'll post once I find out)
Spline count on stock 04 Honda = don't know, but eventually I will (and I'll post it)
Ultimately the axles (I think it'll be the DC5s) installed for the K20/ DC5 configuration will be upgraded to aftermarket 800HP axles
Called two shops (supposedly both experts with these types of swaps), neither could answer which axles / or axle lengths I need for the different configurations
Although one told me to install the suspension, measure, then call them and they would build em
Bottom line;
Between now and Friday decide if I'll swap the suspension... or wait till after the motor is installed
Drive it like you stole it
Ghost
Last edited by Ghost Rider; Apr 9, 2013 at 09:58 PM.
Thread Starter
Registered!!
Joined: Mar 2013
Posts: 52
Likes: 0
Rep Power: 0 Re: A Little Project
Howdy Doo All,
Update (and apologies if this post comes off as spastic but there's lot of crap rolling round in my head)
Trunk leak;
Leak is down to a drizzle BUT there is still water coming in (iow my initial attempt failed)
Ordered a new gasket (though I don't think it is the gasket)
Plan is to rip the old gasket off, find where the water in coming in and weld it (okay I'm kidding about the welding part)
Once I find the gap, I'll fill it / plug it / calk it / glue it / whatever - but it will get fixed - then install the new gasket
====================
Swap the suspension or motor first?
Question was answered for me via an update
Motor will be back from Cali on Apr 23 rd... it'll take the motor guy about a week to prep... then it gets installed (~ 2nd week in May)
I'll do the suspension after that as I don't want anything impeding the motor install
======================
Fuel system;
Motor guy looked at everything I pieced together, and mostly liked it... the only change need to upgrade the feed line, from the pump to the rail, to -8AN (instead of the -6AN)
Parts on order (hose, connectors, fuel filter)
=================
Axles
DC5 = 28 spline into hub
SI/ Stock = 26 spline into hub
DC5 = ~ 5MM bigger round, than SI (end that fits into hub)... also DC5 is ~ 2 inches longer overall (I first incorrectly stated it was ~1 inch longer)
The ends that fit into the trans are identical (as one would suspect)
Had a bitch of a time separating the axle / hub on the donor car's passenger side / driver's side was butter
Recall, passenger side suffered the brunt of the impact... and it acted like it (all else fails get out the hammer/ chisel and angle grinder)
=====================================
Suspension
All but done, waiting on the ebrake cables and tires / wheels
Ebrake cables = in the mail
Tires = Will be Goodyear Eagle GTs either 215 or 225/ 50 x 16 (like as wide as will work without rubbing)
Wheels;
I've spent a goodly amount of time looking at wheels... and to me - the "classic tuner" style wheels all look the same... and I don't like any of them
Soooooo
Other than the really expensive M7s... below is the only other style of wheel I've found that I like
Would prefer a wider 8" rim... but this is all I could find in this offset
http://www.ebay.com/itm/16-inch-aero-wheels-rims-5x4-5-5x114-3-cl-rl-rsx-tl-tsx-legend-mdx-200-lhs-300m-/110955405273?pt=Motors_Car_Truck_Parts_Accessories&hash=item19d5751fd9&vxp=mtr
Anyone have any other wheel suggestions - I'll surely take a look at em
================
Very helpful link
https://www.civicforums.com/forums/7...-2001-em2.html
================
Finally got the license tags - had to drill holes in the front bumper - evidently the state where the car was initially bought/ registered didn't require front tags
Hdwr store sells those plastic inserts and bolts for mounting tags for ~ .25C ea - no biggie
==========
Items added/ deleted
Nothing really either way
I am jacked about the motor... but honestly... also a little nervous
Lot of power to be putting in a rolling beer can
Ghost
Last edited by Ghost Rider; Apr 15, 2013 at 02:27 AM.
Thread Starter
Registered!!
Joined: Mar 2013
Posts: 52
Likes: 0
Rep Power: 0 Re: A Little Project
Howdy All
Few things to cover this evening
Allow me to state/ restate the project
Take a 2004 Honda Civic Coupe; swap in a K20A motor..., and a complete JDM DC5 ITR suspension
I restate this so I'm clear..., and we all can keep this project separate from EP3 swaps - of any kind
=========================
Axles
As you view the pics
Bottom is the donor driver side
Next up is one of the SI axles I purchased for the K20 swap - with the stock suspension set up
Upper two are the DC5 axles specifically needed for the DC5 complete suspension swap
DC5 axles are longer..., bigger round at the hub end..., have 28 splines...., in stead of stock 26 at the hub end..., and the hub nut is 36MM - compared to the stock 32MM hub nut
Next
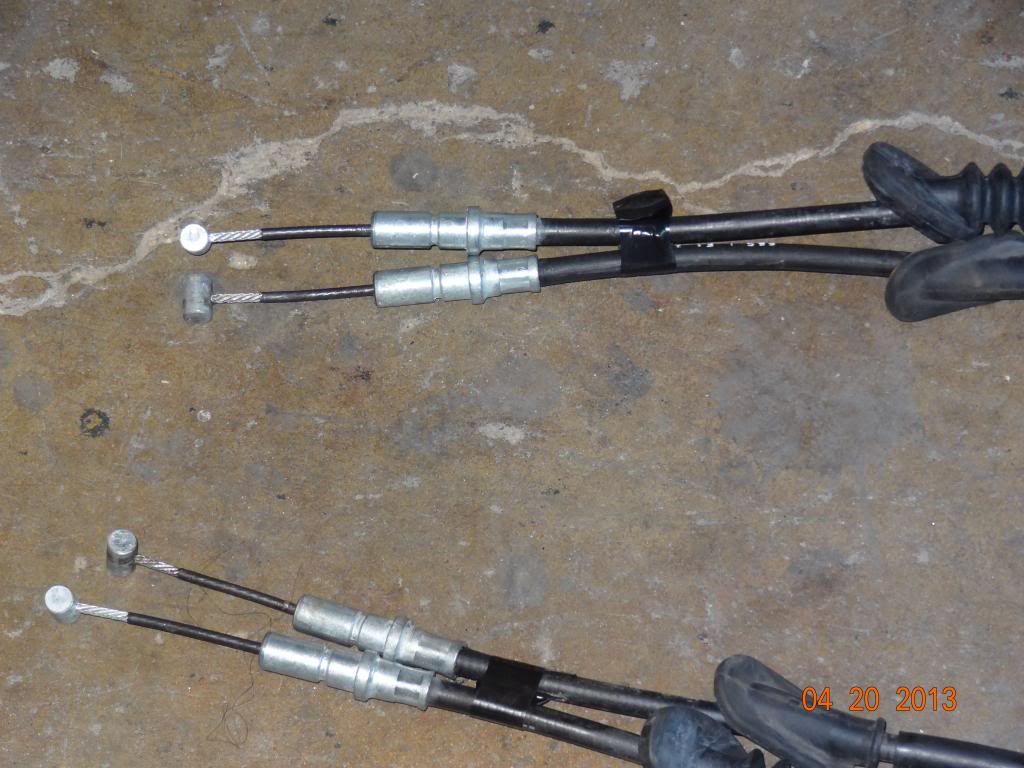
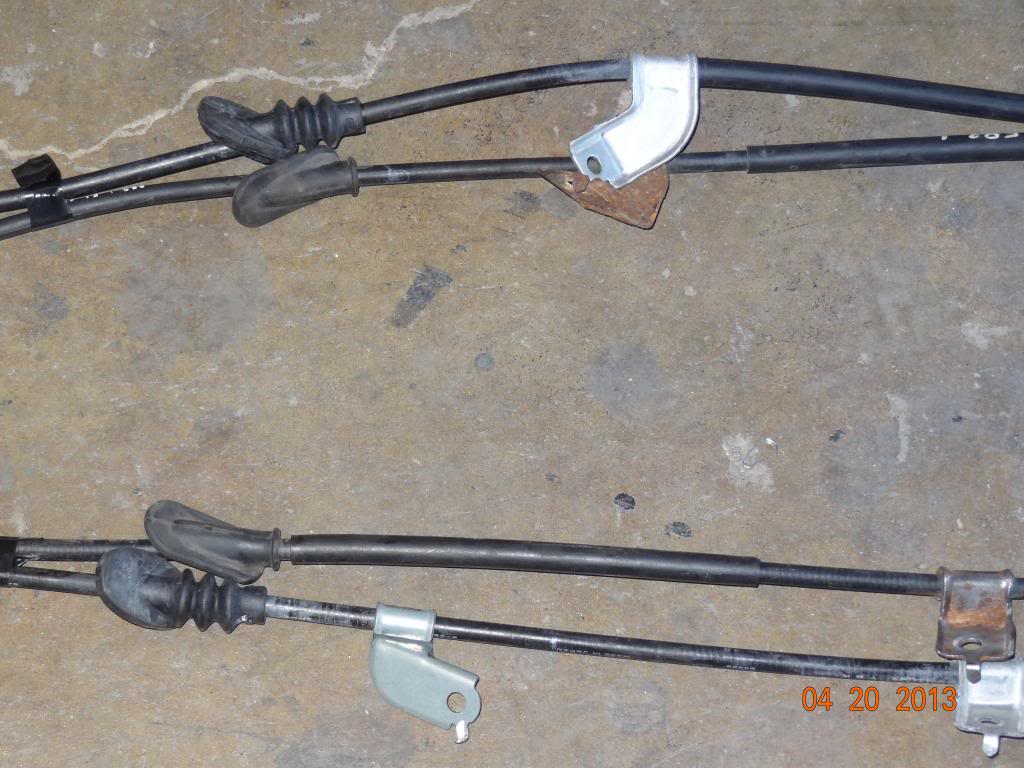
Ebrake cables
I have/ had a set of RSX cables (Dorman p/n C660730..., and C660833)
It was suggested I needed a set of EP3 cables
Following pics compare the two (I taped each side of the DC5 to its EP3 counterpart)
Length = exactly the same
Brackets = the same, with the following exceptions;
RSX has one extra bracket, on one cable, near the hand brake end - that can be easily removed
So essentially - they are the same
Trunk leak
Think I fixed it this time
It was a combination of;
Old gasket not properly sealing
Years of dirt accumulating under old gasket
A gap, at the very rear, where the inner and outer sheet metal connected
Cleaned the dirt..., filled the gap with silicone..., replaced the gasket
Ran water over the trunk - dry as a bone
Waiting till the next good rain before I stick a fork in it (and call it done)
Next set of pics is simply some eye candy
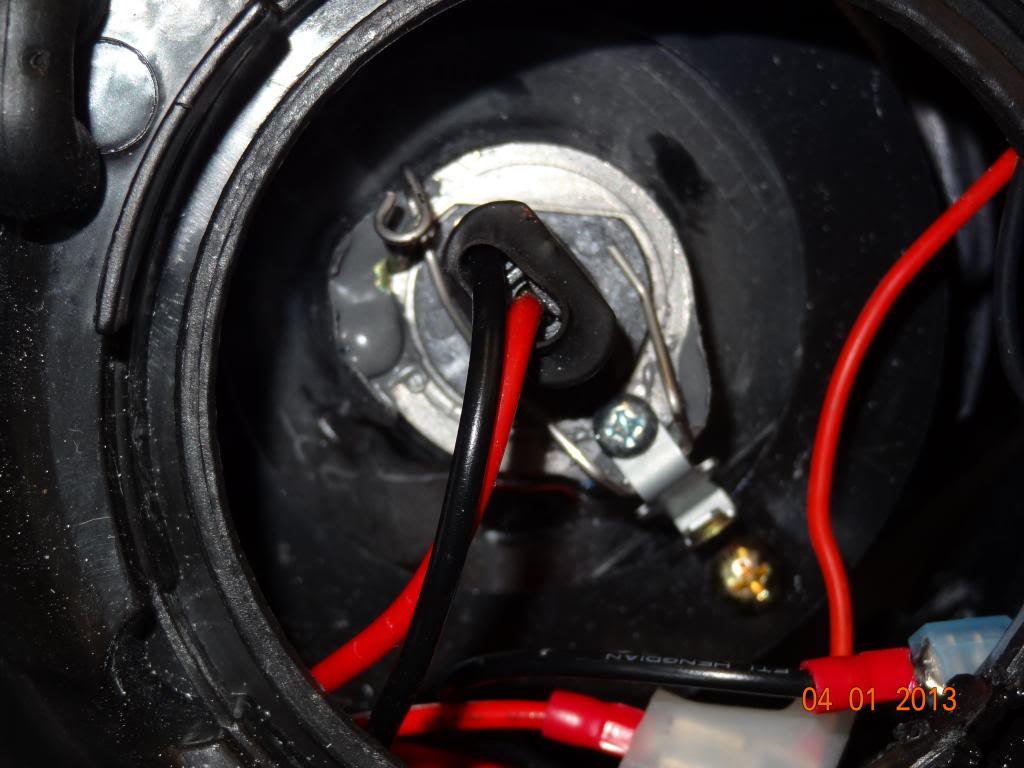
The new headlights
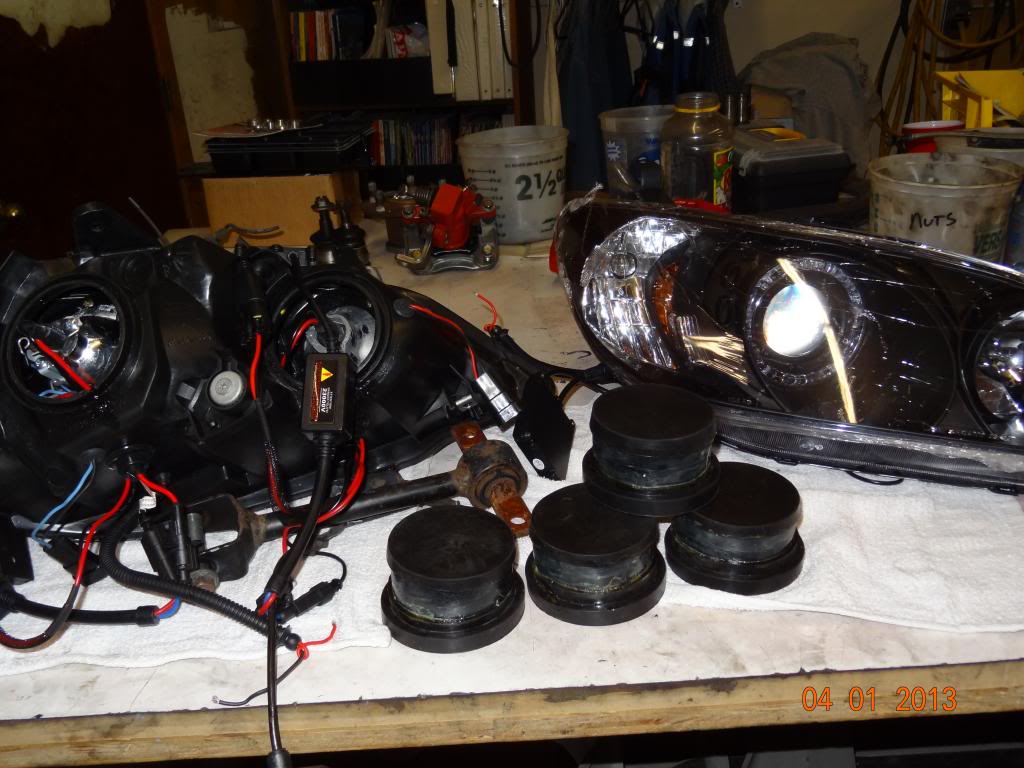
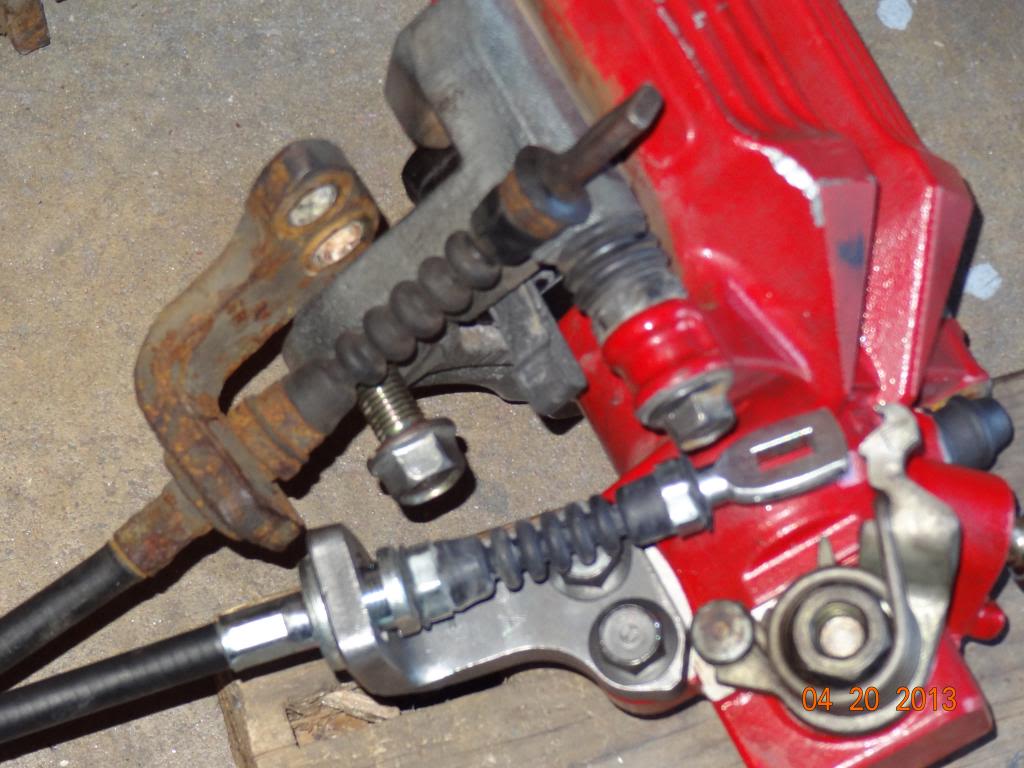
The finished fuel pump
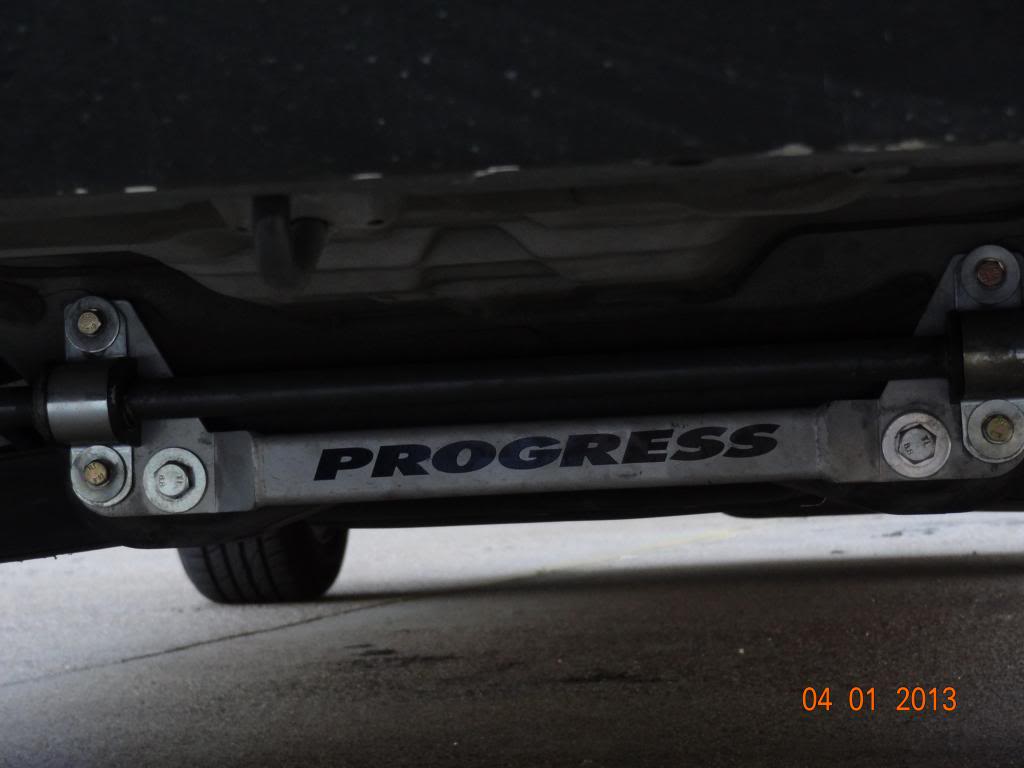
One side of the suspension (personally I think its sexy, not as sexy as my wife mind you..., but gettin close)

This pic is for posterity (the before)
I'll take another once the motor swap is complete
Add;
Need 36 MM socket
Remove;
Potentially the trunk leak
Side comment;
If you are, or plan to work on your car - invest in a good service manual (Haynes, Chilton, or manufacture)..., but either way - consider it an investment that'll pay for itself many times over
Ghost
Few things to cover this evening
Allow me to state/ restate the project
Take a 2004 Honda Civic Coupe; swap in a K20A motor..., and a complete JDM DC5 ITR suspension
I restate this so I'm clear..., and we all can keep this project separate from EP3 swaps - of any kind
=========================
Axles
As you view the pics
Bottom is the donor driver side
Next up is one of the SI axles I purchased for the K20 swap - with the stock suspension set up
Upper two are the DC5 axles specifically needed for the DC5 complete suspension swap
DC5 axles are longer..., bigger round at the hub end..., have 28 splines...., in stead of stock 26 at the hub end..., and the hub nut is 36MM - compared to the stock 32MM hub nut


Next
Ebrake cables
I have/ had a set of RSX cables (Dorman p/n C660730..., and C660833)
It was suggested I needed a set of EP3 cables
Following pics compare the two (I taped each side of the DC5 to its EP3 counterpart)
Length = exactly the same
Brackets = the same, with the following exceptions;
RSX has one extra bracket, on one cable, near the hand brake end - that can be easily removed
So essentially - they are the same


Trunk leak
Think I fixed it this time
It was a combination of;
Old gasket not properly sealing
Years of dirt accumulating under old gasket
A gap, at the very rear, where the inner and outer sheet metal connected
Cleaned the dirt..., filled the gap with silicone..., replaced the gasket
Ran water over the trunk - dry as a bone
Waiting till the next good rain before I stick a fork in it (and call it done)
Next set of pics is simply some eye candy
The new headlights
The finished fuel pump
One side of the suspension (personally I think its sexy, not as sexy as my wife mind you..., but gettin close)


This pic is for posterity (the before)
I'll take another once the motor swap is complete

Add;
Need 36 MM socket
Remove;
Potentially the trunk leak
Side comment;
If you are, or plan to work on your car - invest in a good service manual (Haynes, Chilton, or manufacture)..., but either way - consider it an investment that'll pay for itself many times over
Ghost
Last edited by Ghost Rider; Apr 20, 2013 at 10:27 PM.
Thread Starter
Registered!!
Joined: Mar 2013
Posts: 52
Likes: 0
Rep Power: 0 Re: A Little Project
Howdy All,
It�s been a bit since the last update, but then nothing much has happen to update
=================================
Trunk leak � it rained, trunk remained bone dry � that one is done
Received in the 36MM socket for the JDM axle nuts � it fit
==================
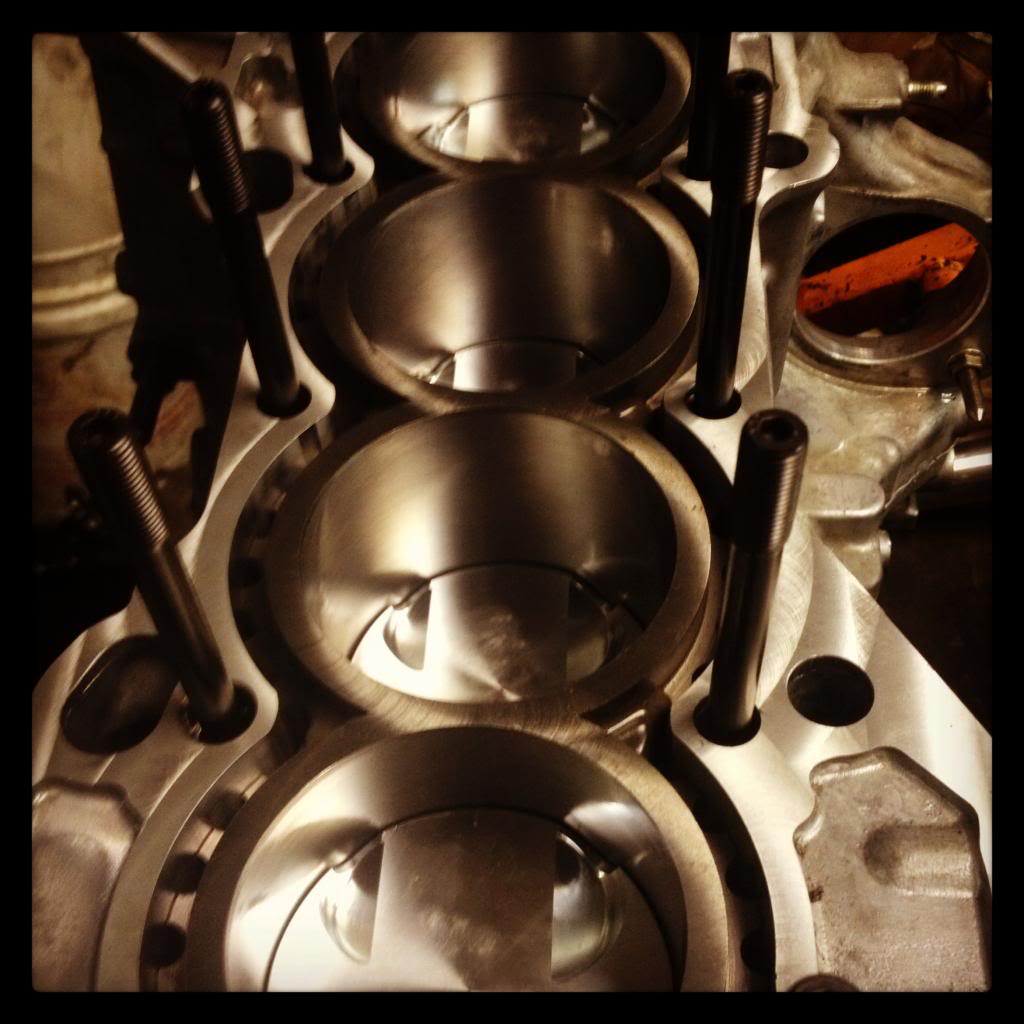
Motor
I thought, based on an update � the block would have arrived back a week or two ago � it arrived today (pic of it, and the head enclosed below)
So now the block is off to a local machine shop to get bored and honed � then back for assembly
Head is done
I�m thinking in ~ 3 weeks the motor will get installed
==========================
Suspension;
Been researching frame upgrades in order to stiffen the entire car � decided to fab up some sub-frame connectors�
Also looking into sub-frame X bracing
==========================
Throttle cable;
Ordered an 04 RSX throttle cable, and it "appears" to be too long
So I ordered a K20 Tuned throttle cable - we'll see it if it is the correct size and report here
====================
Wheels
Still searching�. Did find some Drag 27 machined Wheels I like (in fact I like em better than the previous wheel I posted here)
This link is a sample of what I referencing
http://www.ebay.com/itm/Drag-DR-27-16-16x8-25-5-114-3-15-FULL-MACHINED-FACE-WHEELS-RIMS-MUSTANG-/271203364466?pt=Motors_Car_Truck_Parts_Accessories&hash=item3f24faee72&vxp=mtr
========================================
Tomorrow I'll try to take some pics of the other stuff for the motor swap (radiator/ fan shroud/ shifter cables/ ect.)
Anyway, here�s the block and head
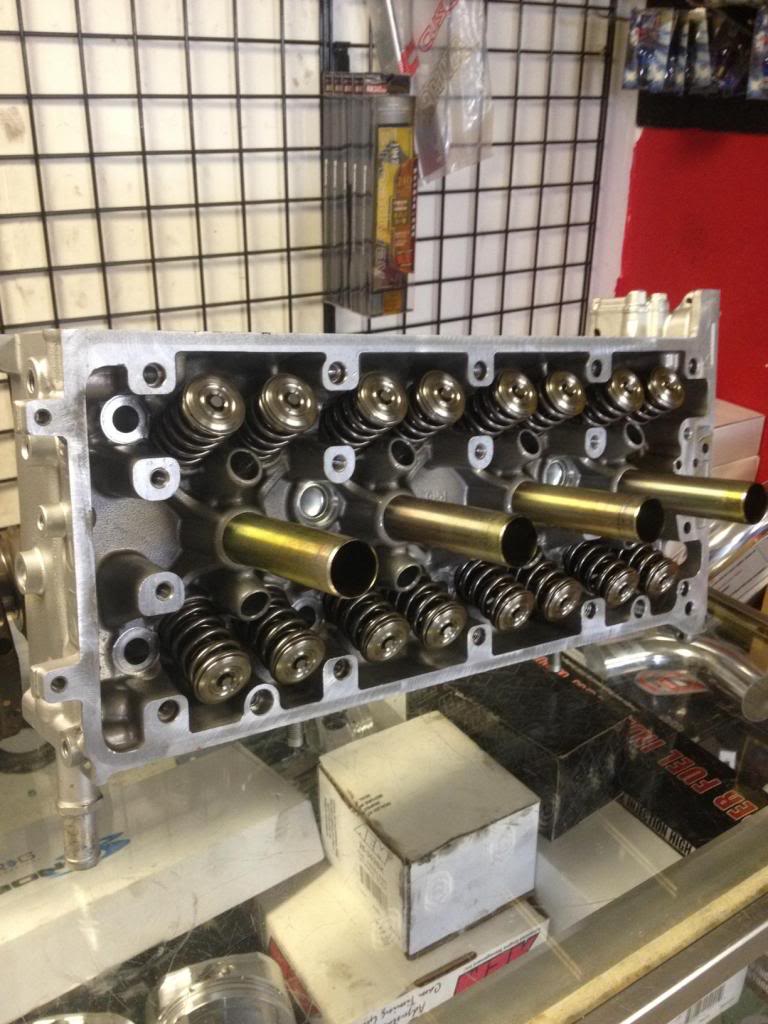
Ghost
It�s been a bit since the last update, but then nothing much has happen to update
=================================
Trunk leak � it rained, trunk remained bone dry � that one is done
Received in the 36MM socket for the JDM axle nuts � it fit
==================
Motor
I thought, based on an update � the block would have arrived back a week or two ago � it arrived today (pic of it, and the head enclosed below)
So now the block is off to a local machine shop to get bored and honed � then back for assembly
Head is done
I�m thinking in ~ 3 weeks the motor will get installed
==========================
Suspension;
Been researching frame upgrades in order to stiffen the entire car � decided to fab up some sub-frame connectors�
Also looking into sub-frame X bracing
==========================
Throttle cable;
Ordered an 04 RSX throttle cable, and it "appears" to be too long
So I ordered a K20 Tuned throttle cable - we'll see it if it is the correct size and report here
====================
Wheels
Still searching�. Did find some Drag 27 machined Wheels I like (in fact I like em better than the previous wheel I posted here)
This link is a sample of what I referencing
http://www.ebay.com/itm/Drag-DR-27-16-16x8-25-5-114-3-15-FULL-MACHINED-FACE-WHEELS-RIMS-MUSTANG-/271203364466?pt=Motors_Car_Truck_Parts_Accessories&hash=item3f24faee72&vxp=mtr
========================================
Tomorrow I'll try to take some pics of the other stuff for the motor swap (radiator/ fan shroud/ shifter cables/ ect.)
Anyway, here�s the block and head


Ghost
Thread Starter
Registered!!
Joined: Mar 2013
Posts: 52
Likes: 0
Rep Power: 0 Re: A Little Project
Hey Blue
No Sir, not yet
I�m holding off swapping out to the JDM suspension until after the motor swap � otherwise I would need to buy (actually make because they don�t sell them) an interim set of axles to fit the D17 motor / JDM suspension
I do plan to take pics of the suspension swap and post em
But the first step is to get the motor swapped and broken in
=======================================
Btw; If you want these EP ebrake cables, you can have em if you�ll pay for the shipping
I�m planning to use the RSX cables and remove the 1 extra bracket - so I don�t need em
They are the same length
Ghost
Thread Starter
Registered!!
Joined: Mar 2013
Posts: 52
Likes: 0
Rep Power: 0 Re: A Little Project
The motor is done
Dropped off the car this evening
Motor guy said it'll take about a week/ week and a half
Then
I'll post some pictures when I get it home
Next steps;
Break in the motor
Swap the suspension
Need wheels & Tires
Ghost
Dropped off the car this evening
Motor guy said it'll take about a week/ week and a half
Then
I'll post some pictures when I get it home

Next steps;
Break in the motor
Swap the suspension
Need wheels & Tires
Ghost
"Come to terms with your slow *** whip"
Joined: Feb 2011
Posts: 765
Likes: 1
From: Texas
Rep Power: 192 Re: A Little Project
I laughed when I read the "600 hp" part of your goals...but after reading the thread I realized you weren't kidding lol. It'll be interesting to see how everything turns out, good luck!!
Thread Starter
Registered!!
Joined: Mar 2013
Posts: 52
Likes: 0
Rep Power: 0 Re: A Little Project
Thanks RJ
No doubt it's a farfetched goal, but also one of the reasons I'm doing it (crazy *** Texan)
Depending on the part of Texas you live in we may see each other on the road / track one day - flag/ wave me down and say howdy
I'll be the Honda with the stupid looking hood scoop... LOL..., but, I do have a plan to change that (more on this one later)
Take Care
Ghost
Thread Starter
Registered!!
Joined: Mar 2013
Posts: 52
Likes: 0
Rep Power: 0 Re: A Little Project
Progress Baby
I picked up the original motor/ trans last night and got a look see - all I can say is damn
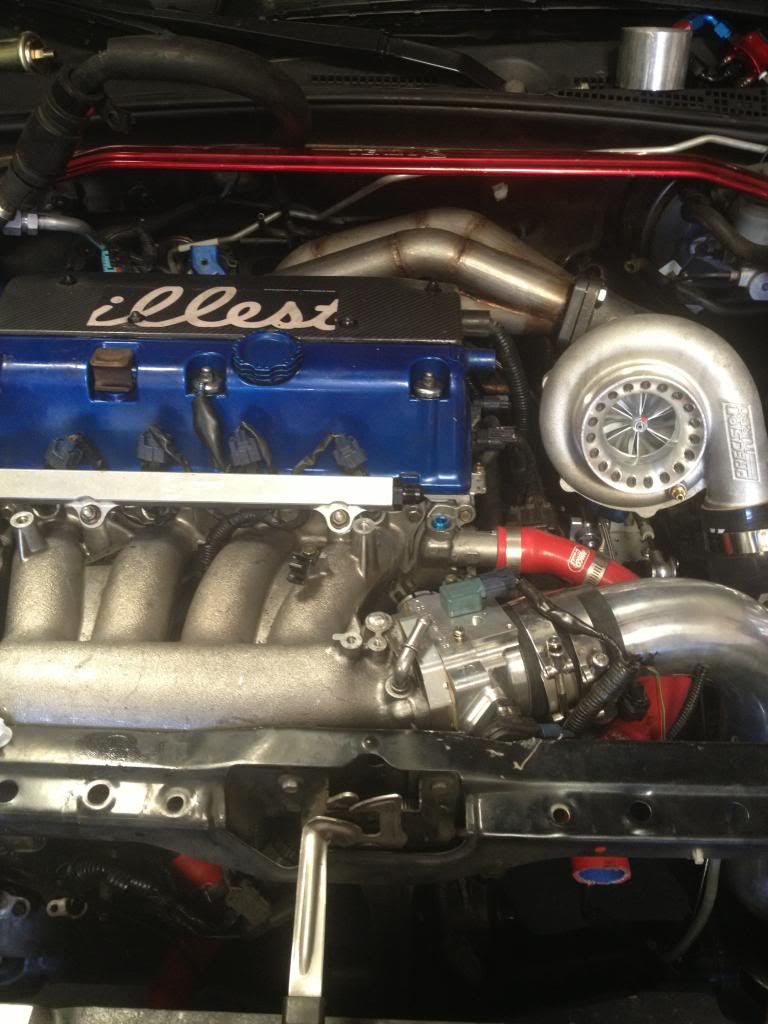
Remaining;
Plumb the fuel lines
Wire the motor
Fab the exhaust
Start
Tune
Motor guy thinks it'll make ~550 hp on pump gas / 750 + w/ race gas (he also said the block would handle that and more)
I'm going with pump
Should be about another week give or take (I've asked him to take his time and get it right)
I'll post the dyno sheet and more motor pics when I get em
=========================
btw;
Anyone needing a D17 motor w/ 5 speed trans (108k miles) - I've got one to sell
Ghost


