** NEW ** DIY: 02 Civic LX sedan F-Door Speaker Installation
 01-07-2007
#1
Registered!!
Thread Starter

Join Date: Jan 2007
Location: Dupont, PA
Age: 36
Posts: 46
Likes: 0
Received 0 Likes
on
0 Posts
Rep Power: 0 
** NEW ** DIY: 02 Civic LX sedan F-Door Speaker Installation
Well, Today my brother and I decided to install a new pair of 6.5's in the front doors of my 2002 Civic LX 4-dr (Power Windows/Locks). After doing a bit of searching, I found numerous posts on many forums explaining step-by-step on how to remove door panels to install the speakers, and although many of these DIY's were pretty good, I still ran into a really hard time getting the panels off. So, This being my first DIY, I'm going to try to explain step-by-step EXACTLY what I have done to remove the panels on my "ES1".
What I did first, is make sure that the windows were up in my car, just incase the weather decided to screw me over mid-way through the project.
Drivers Side:
Now that you are nice and prepared, Open up your drivers side door and sit down on the drivers seat facing the opened door (Its nice to be comfortable while working :P).
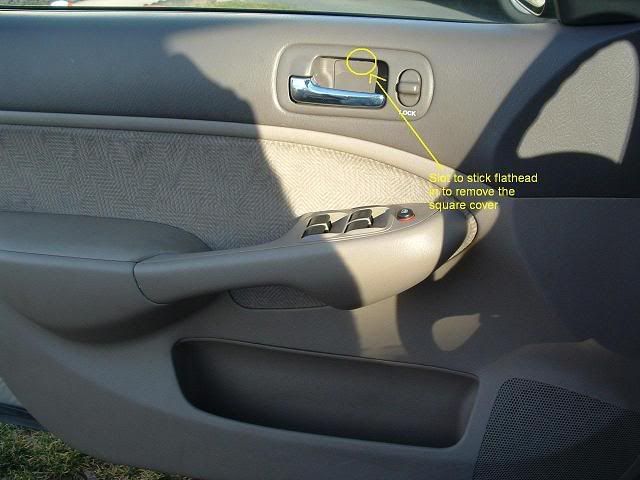
1. On the back of the plastic door handle area, you will see a plastic square cover with a little square opening at the very top. This cover is covering TWO screws. What you must do to get this off, is stick a little flathead screwdriver in that small opening and pry the plastic cover off. This isn't too hard to get off.
2. Now that the plastic cover is removed from the backside of the door handle, the two screws that I aforementioned should now be revealed. Take a phillips head screw driver, and take BOTH of these screws out and set them aside somewhere safe.
3. Gently pull the entire door handle block towards you, away from the door. BE CAREFUL: Do not pull it too far, because if you have power locks like me, there is a wire harness attatched to the lock mechanism on the handle block. ALSO, there is a metal rod that is connected to a plastic clip on the door handle lever. In order to remove this rod, just unclip the plastic and pull the rod out of the plastic hole on the door handle. To remove the wire harness which is attatched to the power lock switch, you must push in the white square clip on the back of the harness and pull downwards.
4. Now, with the handle completely removed from the door, it's time to remove pieces of the arm console on the door. This, for me atleast, happened to be the hardest part of the project. For some reason, I couldn't just "Push in and slide" the plastic covering off. Underneath the arm rest on the door, thier is another little square opening that you can stick a screwdriver into. What you want to do is stick a flathead in there and kind of press up on it. While applying pressure to the screw driver, I had to hold the outer plastic covering of the arm rest with one hand and use quite a bit of force to bend it downwards and forward. Let me repeat, this is the Hardest part of the project IMHO. When using this technique, you dont want to bend the plastic covering straight down because you could potentially snap the clip on the back end of it, so try to bend it down while sliding it forward. Once you get the plastic covering off, pat yourself on the back and get a drink, now it gets easier.
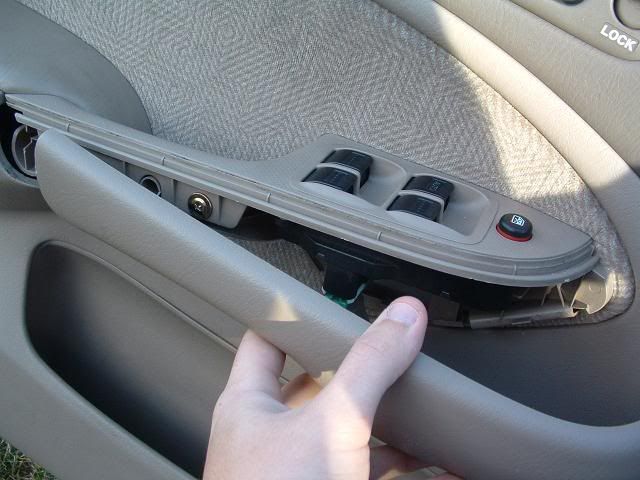
Update: I downloaded the complete Honda Tech manual from another post on this site, and according to the diagram, your supposed to start by sticking the flathead screwdriver in the little opening like I said earlier, and then start prying it towards you along the bottom side of the covering up to and along the top side of the covering, then you should beable to slide it forward and off.
5. With the plastic covering off, you should now see TWO phillips screws in plain site. Take them out and set them aside along with your handle screws.
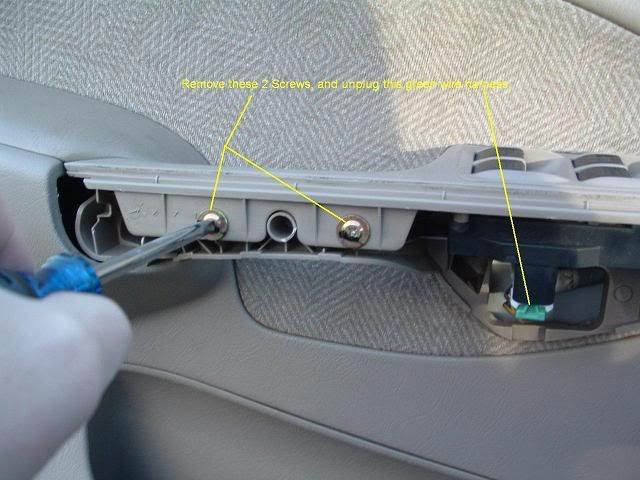
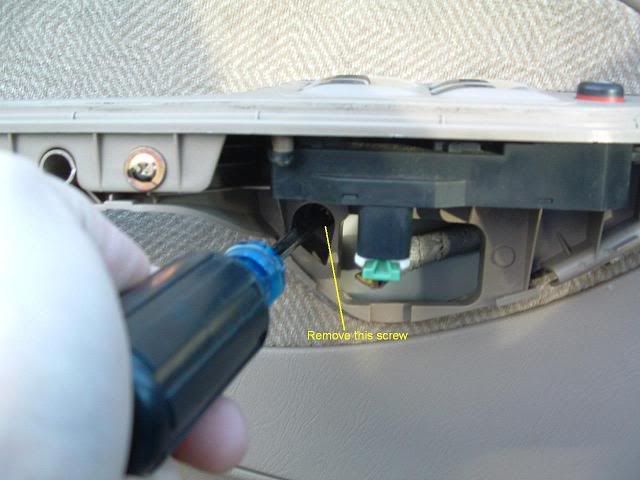
6. There are two more screws not so easily spotable. One is towards the front of the arm rest, anchored into the door itself. The other is towards the back of the arm rest, also anchored into the door. Take BOTH of these out and set them aside.

7. If you have power windows like me, under the FOUR switches on the arm rest, you will notice a green wire harness. On one side of the harness there is a little green clip, press it in and pull the harness downward, away from the switch console, and stick it through the backside of the door panel if possible.
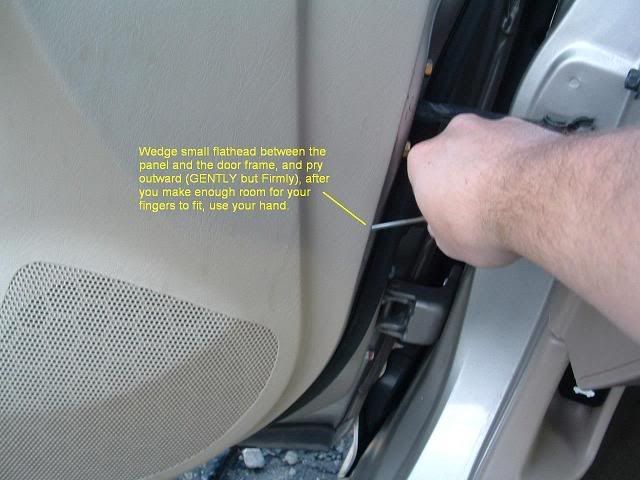
8. Unlike a few others, I couldn't find a little space to put my fingers in to start prying the door panel off, so what you could do is take a flathead screw driver, and stick it between the door panel and the door frame itself towards the front of the door just above the speaker part. Gently pry open a space until you hear a pop. This is one of the plastic pins holding the door panel on popping free. This is a good sound! Now, there should be sufficient space to stick your fingers into and pop off the rest of the pins. WARNING: start from the front of the door, and work all along the bottom, up to the left side of the door THE TOP DOES NOT POP OFF.
8. After you pop all the pins off of the door panel, grab the top of the black plastic triangle which is right at the inside corner of the window/door and bend it down towards you, this will pop it off and allow the door panel to be slid upwards in the next step.
9. Bend the bottom of the door panel towards you just a bit, (about 5-8 inches away from door) and try to slide the panel upwards. It may take a little nudging, but the door panel should pop up and be completely free. CAUTION: If you havent put the power window wire harness through the back of the door in step 7, then do so now, or else you'll rip it off!
10. Now that your door panel is off, you can then proceed to follow your speaker manufacturers instructions on installation, or whatnot. I'm just going to breifly describe what I did to the factory speakers:
Since the factory speakers were encased in a plastic housing which clips into the door frame, I had to rip the whole plastic housing out. I did this by taking a flat head screwdriver and sticking it between the plastic speaker housing and the metal door surface and prying like a ****. I wasn't too worried about the damage to the speaker/speaker housing, because thats why I bought new speakers to begin with. WARNING: One thing you DO want to becareful with though, is after popping off the speaker from the door, be sure to UNPLUG the plastic wiring harness from the back of the factory speaker.
The speakers I chose to install were Alpine Type-S 6.5" 2-way's, I couldnt use the factory plug (Of course), so I had to cut the plug off, strip the ends of the wires, and splice the included alpine wire ends onto the factory wires. (Note: When installing the speakers, on the drivers side, the TWO Factory wires were RED/WHITE and GREEN/BLACK. The RED/WHITE is the positive, and the GREEN/BLACK is the negative. ON the passenger side, the Positive was Dark green, and the negative was Light green)
Passenger Side:
In order to get the passenger door panel off, You pretty much repeat the same steps. For the armrest on the passenger door, I had a bit of a harder time though. Thiers a little square hole to fit a flathead in on the front side of the plastic armrest cover, so I put the flathead in, and then used the flathead to pry the bottom side of the plastic arm rest towards me and forwards (Towards the dash of your car). It should pop off, if not, Keep at it, varying pressure/direction of pull.
Once you get that armrest cover off, once again, there are four screws that you need to take out, and the same "pin popping" process should be repeated for the door panel.
This being my first DIY AND first 7thgencivic post, I hope this will make life alot easier for some other 7th gen civic owners who are looking into swapping out thier factory squeakers for some quality speakers.
Oh and also, Feel free to make suggestions or anything else on this DIY, I'd like to do as much as possible to make it as user friendly as possible.
What I did first, is make sure that the windows were up in my car, just incase the weather decided to screw me over mid-way through the project.
Drivers Side:
Now that you are nice and prepared, Open up your drivers side door and sit down on the drivers seat facing the opened door (Its nice to be comfortable while working :P).
1. On the back of the plastic door handle area, you will see a plastic square cover with a little square opening at the very top. This cover is covering TWO screws. What you must do to get this off, is stick a little flathead screwdriver in that small opening and pry the plastic cover off. This isn't too hard to get off.
2. Now that the plastic cover is removed from the backside of the door handle, the two screws that I aforementioned should now be revealed. Take a phillips head screw driver, and take BOTH of these screws out and set them aside somewhere safe.
3. Gently pull the entire door handle block towards you, away from the door. BE CAREFUL: Do not pull it too far, because if you have power locks like me, there is a wire harness attatched to the lock mechanism on the handle block. ALSO, there is a metal rod that is connected to a plastic clip on the door handle lever. In order to remove this rod, just unclip the plastic and pull the rod out of the plastic hole on the door handle. To remove the wire harness which is attatched to the power lock switch, you must push in the white square clip on the back of the harness and pull downwards.
4. Now, with the handle completely removed from the door, it's time to remove pieces of the arm console on the door. This, for me atleast, happened to be the hardest part of the project. For some reason, I couldn't just "Push in and slide" the plastic covering off. Underneath the arm rest on the door, thier is another little square opening that you can stick a screwdriver into. What you want to do is stick a flathead in there and kind of press up on it. While applying pressure to the screw driver, I had to hold the outer plastic covering of the arm rest with one hand and use quite a bit of force to bend it downwards and forward. Let me repeat, this is the Hardest part of the project IMHO. When using this technique, you dont want to bend the plastic covering straight down because you could potentially snap the clip on the back end of it, so try to bend it down while sliding it forward. Once you get the plastic covering off, pat yourself on the back and get a drink, now it gets easier.
Update: I downloaded the complete Honda Tech manual from another post on this site, and according to the diagram, your supposed to start by sticking the flathead screwdriver in the little opening like I said earlier, and then start prying it towards you along the bottom side of the covering up to and along the top side of the covering, then you should beable to slide it forward and off.
5. With the plastic covering off, you should now see TWO phillips screws in plain site. Take them out and set them aside along with your handle screws.
6. There are two more screws not so easily spotable. One is towards the front of the arm rest, anchored into the door itself. The other is towards the back of the arm rest, also anchored into the door. Take BOTH of these out and set them aside.
7. If you have power windows like me, under the FOUR switches on the arm rest, you will notice a green wire harness. On one side of the harness there is a little green clip, press it in and pull the harness downward, away from the switch console, and stick it through the backside of the door panel if possible.
8. Unlike a few others, I couldn't find a little space to put my fingers in to start prying the door panel off, so what you could do is take a flathead screw driver, and stick it between the door panel and the door frame itself towards the front of the door just above the speaker part. Gently pry open a space until you hear a pop. This is one of the plastic pins holding the door panel on popping free. This is a good sound! Now, there should be sufficient space to stick your fingers into and pop off the rest of the pins. WARNING: start from the front of the door, and work all along the bottom, up to the left side of the door THE TOP DOES NOT POP OFF.
8. After you pop all the pins off of the door panel, grab the top of the black plastic triangle which is right at the inside corner of the window/door and bend it down towards you, this will pop it off and allow the door panel to be slid upwards in the next step.
9. Bend the bottom of the door panel towards you just a bit, (about 5-8 inches away from door) and try to slide the panel upwards. It may take a little nudging, but the door panel should pop up and be completely free. CAUTION: If you havent put the power window wire harness through the back of the door in step 7, then do so now, or else you'll rip it off!
10. Now that your door panel is off, you can then proceed to follow your speaker manufacturers instructions on installation, or whatnot. I'm just going to breifly describe what I did to the factory speakers:
Since the factory speakers were encased in a plastic housing which clips into the door frame, I had to rip the whole plastic housing out. I did this by taking a flat head screwdriver and sticking it between the plastic speaker housing and the metal door surface and prying like a ****. I wasn't too worried about the damage to the speaker/speaker housing, because thats why I bought new speakers to begin with. WARNING: One thing you DO want to becareful with though, is after popping off the speaker from the door, be sure to UNPLUG the plastic wiring harness from the back of the factory speaker.
The speakers I chose to install were Alpine Type-S 6.5" 2-way's, I couldnt use the factory plug (Of course), so I had to cut the plug off, strip the ends of the wires, and splice the included alpine wire ends onto the factory wires. (Note: When installing the speakers, on the drivers side, the TWO Factory wires were RED/WHITE and GREEN/BLACK. The RED/WHITE is the positive, and the GREEN/BLACK is the negative. ON the passenger side, the Positive was Dark green, and the negative was Light green)
Passenger Side:
In order to get the passenger door panel off, You pretty much repeat the same steps. For the armrest on the passenger door, I had a bit of a harder time though. Thiers a little square hole to fit a flathead in on the front side of the plastic armrest cover, so I put the flathead in, and then used the flathead to pry the bottom side of the plastic arm rest towards me and forwards (Towards the dash of your car). It should pop off, if not, Keep at it, varying pressure/direction of pull.
Once you get that armrest cover off, once again, there are four screws that you need to take out, and the same "pin popping" process should be repeated for the door panel.
This being my first DIY AND first 7thgencivic post, I hope this will make life alot easier for some other 7th gen civic owners who are looking into swapping out thier factory squeakers for some quality speakers.
Oh and also, Feel free to make suggestions or anything else on this DIY, I'd like to do as much as possible to make it as user friendly as possible.
Last edited by Europort; 03-05-2007 at 01:54 PM. Reason: Included Pics in Post
 01-08-2007
#5
Registered!!
Thread Starter
Join Date: Jan 2007
Location: Dupont, PA
Age: 36
Posts: 46
Likes: 0
Received 0 Likes
on
0 Posts
Rep Power: 0 Ok Pictures are up, but since I already installed the speakers yesterday, I just took the arm cover off to take pics of the screws and stuff, the other steps are easy to follow.
01-22-2007
#7
Registered!!

Join Date: Jun 2006
Age: 37
Posts: 22
Likes: 0
Received 0 Likes
on
0 Posts
Rep Power: 0 
i have a 2001 lx sedan, and the speaker mounts that crutchfield sent me sucked. i have had good experience with them before, i use them for everything. however in this case the speaker mounts were way too thick, so much that i couldn't put back my door panel when finished. in the end i made my own out of some wood that was lying around. 
01-22-2007
#8
Dain Bramaged.
Join Date: Feb 2006
Location: Ft. Worth TX
Posts: 820
Likes: 0
Received 0 Likes
on
0 Posts
Rep Power: 0 You need to put the pictures actually into the article itself. With this and most other forum boards, you can use [img] tags to get it done. Just take the URL of the picture (this'll show in the navigation bar in your browser when you click the thumbnails) and copy them into the article where they need to be, wrapping [img] tags around them. That means, you'll put [img] in front of the URL and [/img ] (except without the space. If I hadn't put the space in there, all you'd see between the [img] and the [/img ] would be a red x icon.) behind it.
But yes. Very nicely done DIY.
But yes. Very nicely done DIY.
01-24-2007
#9
Registered!!
Thread Starter
Join Date: Jan 2007
Location: Dupont, PA
Age: 36
Posts: 46
Likes: 0
Received 0 Likes
on
0 Posts
Rep Power: 0 Actually, I bougth the speakers from best buy, and for the most part they fit alright. The only problem with the Alpine speakers that I bought, is that they are a little too deep, so the back of the speaker is kinda pressing against the outside of the door panel. Not hard, but its kinda snug in there. After the job was done, I was browsing crutchfield and saw some speaker mounting brackets that look exactly like the ones you rip out of the door. So I might just suggest investing in a set of those, thier cheap, only like 15 bucks I think.
01-24-2007
#10
Registered!!
iTrader: (2)

Join Date: May 2005
Location: LA
Age: 39
Posts: 412
Likes: 0
Received 0 Likes
on
0 Posts
Rep Power: 0 i duno about buying a set from crutchfield, but for me, personally i just saw out the original speaker from the mounting bracket and put my new 6.5 polks in place of the original speakers. save money and time... just my .02cents
01-24-2007
#11
Administrator
Administrator
iTrader: (44)
Join Date: Aug 2006
Location: Charlotte
Age: 45
Posts: 2,978
Likes: 0
Received 4 Likes
on
3 Posts
Rep Power: 267 
the infinity reference 6012's are too deep and hit the window when it's down. i had to make a spacer. i'm going to be doing a DIY on what i did. i took around 30 pics while i was doing it. i measured the depth and it's about 1-3/4" deep before the speaker will hit the window. so if your speaker is shallower than that, you'll be fine. the infinity's are 2-1/16" deep. they sound awesome though.
02-01-2007
#12
Registered!!
Join Date: Feb 2007
Location: Ohio
Age: 47
Posts: 3
Likes: 0
Received 0 Likes
on
0 Posts
Rep Power: 0 Not to sound stupid....I like the pics of the spots were the screws are but im wondering i have a 2002 civic ex and was looking for a step by step door panel removal/speaker install with pics....Also a pic and what type of wood i would use for the mounting bracket
02-01-2007
#13
Administrator
Administrator
iTrader: (44)
Join Date: Aug 2006
Location: Charlotte
Age: 45
Posts: 2,978
Likes: 0
Received 4 Likes
on
3 Posts
Rep Power: 267 Not to sound stupid....I like the pics of the spots were the screws are but im wondering i have a 2002 civic ex and was looking for a step by step door panel removal/speaker install with pics....Also a pic and what type of wood i would use for the mounting bracket
 02-23-2007
#15
Rough, Tough, Real Stuff.
Join Date: Feb 2007
Location: Texas
Age: 35
Posts: 1,207
Likes: 0
Received 0 Likes
on
0 Posts
Rep Power: 224 I still think you need to work the pictures into the article itself. It would be much more comprehensible to not have to scroll up and down.
03-05-2007
#18
Registered!!
Thread Starter
Join Date: Jan 2007
Location: Dupont, PA
Age: 36
Posts: 46
Likes: 0
Received 0 Likes
on
0 Posts
Rep Power: 0 Alright guys, I FINALLY got a chance to update the post.. I now Included the pictures within the post for easier following! Thanks for the positive remarks!
03-20-2007
#20
Registered!!

Join Date: Apr 2006
Location: 604
Age: 37
Posts: 241
Likes: 0
Received 0 Likes
on
0 Posts
Rep Power: 0 Re: ** NEW ** DIY: 02 Civic LX sedan F-Door Speaker Installation
how did you mount the speakers? my 6.5" b/a came with metal clips and screws, but there is no way of screwing it on. the screws wont be able to reach the clip as the hole in the door for the driver is too small.
as a test, i temporarily screwed both speakers on thru the holes meant for stock speaker clips.. though the holes are way too big, i managed to use 3 screws to wedge the speaker in place. i want a more permanent solution so i can put my panels back on.
as a test, i temporarily screwed both speakers on thru the holes meant for stock speaker clips.. though the holes are way too big, i managed to use 3 screws to wedge the speaker in place. i want a more permanent solution so i can put my panels back on.
03-21-2007
#21
Administrator
Administrator
iTrader: (44)
Join Date: Aug 2006
Location: Charlotte
Age: 45
Posts: 2,978
Likes: 0
Received 4 Likes
on
3 Posts
Rep Power: 267 Re: ** NEW ** DIY: 02 Civic LX sedan F-Door Speaker Installation
how did you mount the speakers? my 6.5" b/a came with metal clips and screws, but there is no way of screwing it on. the screws wont be able to reach the clip as the hole in the door for the driver is too small.
as a test, i temporarily screwed both speakers on thru the holes meant for stock speaker clips.. though the holes are way too big, i managed to use 3 screws to wedge the speaker in place. i want a more permanent solution so i can put my panels back on.
as a test, i temporarily screwed both speakers on thru the holes meant for stock speaker clips.. though the holes are way too big, i managed to use 3 screws to wedge the speaker in place. i want a more permanent solution so i can put my panels back on.

Thread
Thread Starter
Honda Civic Forum
Replies
Last Post
mistermenphis22
Mechanical Problems/Vehicle Issues and Fix-it Forum
5
04-03-2016 08:06 AM
Civicchicky87
Idle Issues
5
04-22-2015 07:16 PM

