
DIY:Installed Aluminum Gauge Panel Bezel

Thread Starter
Registered!!
iTrader: (5)
Joined: May 2001
Posts: 1,143
Likes: 4
From: Fort Oglethorpe
Rep Power: 317 
DIY:Installed Aluminum Gauge Panel Bezel
Just finished installing the alum. gauge panel bezel I bought on eBay. Yes I took a bunch of pics for you pic hounds! Enjoy!
I took several pics as I took the gauge trim pieces out so you can see what's involved. If you want detailed instructions on how to take these out, check out the DIY on Indiglo Gauges by Krepoort here. (Nice job, Krepoort!) Here's the bottom of the black plastic trim piece.
A bottom shot showing the two clips that hold the bottom of it in place. You've probably already noticed the two screws at the top, so I didn't pic those. They're easy to remove with a short phillips screwdriver.
Two more pics of the top and bottom.
Here's the clear plastic piece, showing some of the clips that have to be gently pushed toward you to be popped loose. Yes, the bezel is already installed here, I forgot to show the clear piece before installing.[IMG]i/expressions/face-icon-small-tongue.gif[/IMG]
The next 3 shows the naked innards of the dash around the gauge and where the two clips pop into.
The bezel I bought is true aluminum, unlike the cheaper, painted plastic bezel that is also sold on eBay. It has some 3M tape on the back to be peeled off. There isn't much of an area to stick it to, so I guess just do the best you can.
Bezel installed...after some light dremel reaming of the two smaller holes (dash light and odometer sticks) for better alignment.
Yeah! It's finished and lookin' GREAT! The last pic shows it with all the lights lit up. If I feel froggy later, I'll try to take a pic after dark to see how it looks at night.
Overall, this was a VERY easy install, other than slightly dremelling two of the holes. A very cheap and quick mod for the interior. I'm sure it would look great with the metallic-looking dash trim.
If this is worthy of the DIY section of the site...c00l!
Last edited by Bellz; Nov 17, 2003 at 11:21 AM.
Thread Starter
Registered!!
iTrader: (5)
Joined: May 2001
Posts: 1,143
Likes: 4
From: Fort Oglethorpe
Rep Power: 317 SurfinTower20nBC, you could always spray some paint on it! Since it wouldn't be touched, like the dash trim, it should look great for a long time.
Here's the carbon fiber: eBay

Here's a pic of the one I got:

Versus the Crutchfield model:
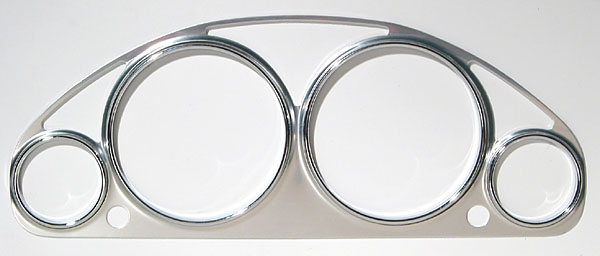
Not sure what the Crutchfield bezel is made of..it says metallic. And it says it has chrome rings for the 4 gauge holes. Mine is just a single piece of aluminum, w/o any rings. The Crutchfield model is also missing a tiny hole on the left side...not that you really need it.[IMG]i/expressions/face-icon-small-cool.gif[/IMG]
Here's the carbon fiber: eBay
Here's a pic of the one I got:
Versus the Crutchfield model:
Not sure what the Crutchfield bezel is made of..it says metallic. And it says it has chrome rings for the 4 gauge holes. Mine is just a single piece of aluminum, w/o any rings. The Crutchfield model is also missing a tiny hole on the left side...not that you really need it.[IMG]i/expressions/face-icon-small-cool.gif[/IMG]


Thread Starter
Registered!!
iTrader: (5)
Joined: May 2001
Posts: 1,143
Likes: 4
From: Fort Oglethorpe
Rep Power: 317 Netcbc, I didn't take the gauge cluster out like you would if you changed gauge faces, so I don't know if it comes out or how. Wouldn't it be simpler to get one of these bezels and just paint it?
CivicPro01, I got mine from *directcarparts* on eBay for $24.99 plus $5.50 shipping.
CivicPro01, I got mine from *directcarparts* on eBay for $24.99 plus $5.50 shipping.

Joined: Jul 2002
Posts: 22,702
Likes: 0
From: Chicago Burbs, Other, ZEBRA
Rep Power: 529 
Um... how'd you get black gauges? I thought our cars were light grey for sedans and dark grey for coupes.
Looks good tho. Two s
s
IronFist
Looks good tho. Two
sIronFist
Premium Member
Joined: Oct 2001
Posts: 3,860
Likes: 0
From: Alabama, US
Rep Power: 0 I got the one with the little cut out at the bottom and there's a little red "H" emblem in there. I think it looks much spiffier with that little red "H". Especially since I got the carbon fiber one.
Thread Starter
Registered!!
iTrader: (5)
Joined: May 2001
Posts: 1,143
Likes: 4
From: Fort Oglethorpe
Rep Power: 317 Ironfist...uhh..the gauges are black from the factory. Hehe, I've never seen a gauge kit for the DX, all I've ever seen is the one for LX and EX, which have the tachometer standard.

Registered!!
iTrader: (1)
Joined: Oct 2001
Posts: 249
Likes: 0
From: Long Island, New York, US
Rep Power: 0 anybody got a better price than crutchfield for the one WITH the rings? I really like the rings. Makes all the difference I think. If fact I might just put the rings and not the bezel. The crutchfield price is $70  too much for a few small pieces of chrome / aluminum. By the way - the crutchfield one is made by Eurolite.
too much for a few small pieces of chrome / aluminum. By the way - the crutchfield one is made by Eurolite. Registered!!
iTrader: (1)
Joined: Jul 2002
Posts: 2,712
Likes: 0
From: Scarborough, Ontario, Canada
Rep Power: 0 

Registered!!
Joined: Mar 2003
Posts: 318
Likes: 0
From: Bangkok, Other, ZEBRA
Rep Power: 0 E-Mail: sales@hcauto.com at this website http://www.hcauto.com/.
They told me if they get enough enquires they'll have the rings made up. They already sell the ones for BMW as well as loads of other good cheap stuff for civics.
They told me if they get enough enquires they'll have the rings made up. They already sell the ones for BMW as well as loads of other good cheap stuff for civics.

Thread Starter
Registered!!
iTrader: (5)
Joined: May 2001
Posts: 1,143
Likes: 4
From: Fort Oglethorpe
Rep Power: 317 Talk about reviving the dead!
The pics from this were moved, as you probably noticed.
If you want to see this DIY in pdf form, keep an eye on the DX-R site in my sig. I'll add it soon if there's any interest.
The pics from this were moved, as you probably noticed.
If you want to see this DIY in pdf form, keep an eye on the DX-R site in my sig. I'll add it soon if there's any interest.

Thread
Thread Starter
Honda Civic Forum
Replies
Last Post
Wankenstein
Mechanical Problems/Vehicle Issues and Fix-it Forum
11
Sep 27, 2015 11:33 AM
OptimisticWay
7th Generation Civic 2001 - 2005
4
Sep 18, 2015 09:37 PM
srtlat
Mechanical Problems/Vehicle Issues and Fix-it Forum
6
Sep 17, 2015 11:02 PM
aaronmechanx
Mechanical Problems/Vehicle Issues and Fix-it Forum
2
Sep 14, 2015 08:45 PM

