
DIY: Brake Pads and Rotor Install *Updated*

Re: DIY: Brake Pads and Rotor Install *Updated*
Grey, ditto. I just reread some of your DIY's for reference, I am preparing to do my timing belt! You definitely have a good eye for detail.
Uh, Feminazi Sara-Lee, may I suggest, and this is just a suggestion, that you leave the year, and model of your vehicle so that you can add intelligence to this thread? There may be others in the same [let's hope not, but, I guess it is possible] predicament as you.
Uh, Feminazi Sara-Lee, if you are struggling to register to this website, you may want to board the short bus tomorrow morning.
Uhhhh, Fem-i-****, Sara-Lee, for the most part, folks on this website are from the U S and A. Here, we have privileges that allow us to make choices on our own. Just like your unfortunate choice to leave a comment here on this forum!!
Feminazi Sara-Lee, are you sure about this? Have you discussed this with anyone?
Feminazi, this is the only comment you made that raised our trust in your intelligence. Sorry Hunny, [if you are a chick.]
Bye.
Oh, and Feminazi? No need to reply. This is a one time posting.
On my Civic, the rear pistons are threaded. You have to screw them in, not push them in using a c-clamp.
You also have to unclip the handbrake cable before you can remove the caliper. The length and position of the brake fluid pipe also makes it impossible to use the trick of unfastening the bottom nut and flipping the caliper up. Instead you have to wiggle and push to lift the caliper off.
I found that my Civic had non-standard pads: that is, they didn't match the model and year chart at Halfords, or online. I guess this isn't usual. But before buying pads, I wished I had taken them out and drawn the profile and measured. That would have saved a lot of time.
Feminazi, this is the only comment you made that raised our trust in your intelligence. Sorry Hunny, [if you are a chick.]
Bye.
Oh, and Feminazi? No need to reply. This is a one time posting.
Joined: Nov 2003
Posts: 3,318
Likes: 0
From: Boise, Idaho
Rep Power: 329 

Registered!!
Joined: Oct 2007
Posts: 7
Likes: 0
From: Edison, NJ / Leesburg, VA
Rep Power: 0 

Joined: Nov 2003
Posts: 3,318
Likes: 0
From: Boise, Idaho
Rep Power: 329 Re: DIY: Brake Pads and Rotor Install *Updated*
If you have a vibration after new rotors its not from them being slotted. Its from not indexing the rotor to the hub to minimize run-out. Max run-out is .003" (.004" per honda ) and the best way to cure the problem now is to have them machined on the car!

Registered!!
Joined: Aug 2008
Posts: 9
Likes: 0
From: San Antonio, TX
Rep Power: 0 Re: DIY: Brake Pads and Rotor Install *Updated*
Grey, great DIY. I've done brake rotor/pad replacements on most of my vehicles, & your DIY seems spot-on. But I do have a couple of questions:
1-) I never know the difference between "right-hand" & "left-hand" threads. "Standard" threads are clockwise to tighten & counter-clockwise to loosen (as my wife says: "Righty-tighty & Lefty-loosey"). But which way to tighten/loosen "right" or "left" hand threads?
2-)We have always bled brake lines by attaching a piece of rubber hose to each bleeder nipple an pushing the other ends into clean soda bottles half-full of fresh brake fluid, then bleeding the brakes individually, starting with the one furthest from the master cylinder (longest line) & ending with the one closest to the master cyl (shortest line). this allows a single person to bleed the lines - w/o help. of course, one must always be careful to not let the master cyl run dry. however, it has always worked for me, and I've never needed any help bleeding the lines. Is there a problem with this method?
3-) & here's why I'm wanting to UPGRADE the brakes & not just "replace" the pads & rotors on my Civic ('98 LX w/90k "all mine" miles): the rotors always seem to warp before the pads get halfway worn out! (and, I want to drive the thing another 10 years or so w/o having to replace the rotors several more times. SO, what would be the best heavy-duty rotors available?
Please excuse any typos - I'm typing this on my PocketPC from the hotel room (kids & wife are asleep) while we're out of town, and my fingers are fatter than these keys!!!
Thanks for sharing your expertise,
David
San Antonio, TX
Last edited by DarkFlame; Aug 31, 2008 at 11:35 PM.

Registered!!
Joined: Dec 2008
Posts: 13
Likes: 0
Rep Power: 0 Re: DIY: Brake Pads and Rotor Install *Updated*
I have ROTORA BIG brAKE KIT ON MY CIVIC, THEY ARE AWSOME WAY BETTER THAN BREMBO, BUT IF U WANT BETTER THAN ROTORA, U CAN GO WITH WILLWOOD BRAKE SYSTEM, OR ENDLESS .........THEY ARE GREAT, BUT U GONNA NEED A TON OF CASH.
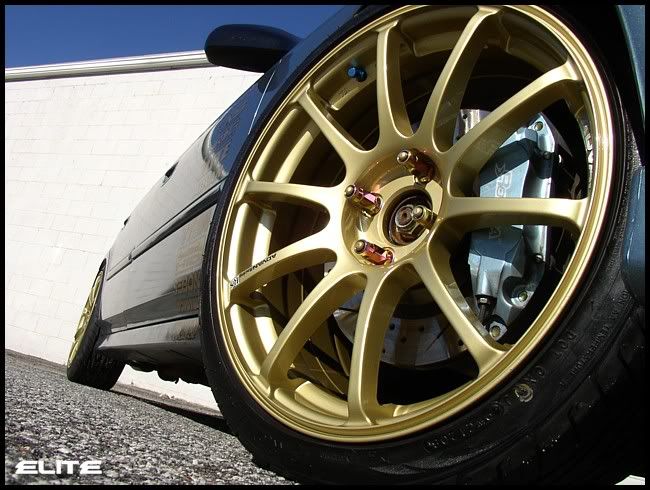

NOTE: this pics are from my old civic, this same rotora brake system it ll be install in my new EM2, i have a bunch of after market parts sitting in my garage, but im waiting for the winter to be over, so by spring i ll put the big brake kit, and the other stuff, i need this EM2, really clean jdm style, for the beginning tour of HIN in april.


and to explain thing better, as u see in this 2000 civic ferio, it has a set of advan wheels, those wheel are now on my EM2, here is a pic.


NOTE: this pics are from my old civic, this same rotora brake system it ll be install in my new EM2, i have a bunch of after market parts sitting in my garage, but im waiting for the winter to be over, so by spring i ll put the big brake kit, and the other stuff, i need this EM2, really clean jdm style, for the beginning tour of HIN in april.
and to explain thing better, as u see in this 2000 civic ferio, it has a set of advan wheels, those wheel are now on my EM2, here is a pic.
Last edited by 00telehit; Dec 8, 2008 at 09:35 AM. Reason: because i need to add something else , that i forgot
Registered!!
Joined: May 2009
Posts: 58
Likes: 0
Rep Power: 0 Re: DIY: Brake Pads and Rotor Install *Updated*
So basically before I bleed the brakes I take out as much fluid from the resovoir and then put new fluid in there. Then I start with one brake and bleed it and then add more fluid when it gets low. Then I do this 3 more times, then fill it again at the end. So I need to fill it after bleeding each brake.
Registered!!
Joined: May 2009
Posts: 58
Likes: 0
Rep Power: 0 Re: DIY: Brake Pads and Rotor Install *Updated*
Registered!!
Joined: May 2009
Posts: 58
Likes: 0
Rep Power: 0 Re: DIY: Brake Pads and Rotor Install *Updated*
No i havent had any problems. I had a slight grinding at first but after a few hard braking stages to heat up the pads it went away. Sometimes with ceramic pads/rotors there could be a bur in the metal. but it will soon go away, like i said with a few hard braking tests. Recommend doing this in a neighborhood, or not as busy road


Re: DIY: Brake Pads and Rotor Install *Updated*
I tried changing my brake pads and rotors yesterday and ran into a small problem. Everything went well until I got to the last brake pad(The pad on the outside of the caliper). The pad slipped in and when I went to put the caliper back on it would not fit over the rotor. Before jumping to conclusion, I already used a C clamp to push the piston all the way back. When I try to put it on it is getting caught between the outside brake pad and the inside of the caliper. I repeat, it is not getting caught between the two brake pads. It is getting caught between the outside brake pad and the caliper itself.
I fooled with it for over an hour.
I put the old pad back in so I could make it to work today.
Any suggestions?
I fooled with it for over an hour.
I put the old pad back in so I could make it to work today.
Any suggestions?

Registered!!
Joined: Feb 2005
Posts: 939
Likes: 0
From: Green Bay, WI
Rep Power: 0 
Re: DIY: Brake Pads and Rotor Install *Updated*
I tried changing my brake pads and rotors yesterday and ran into a small problem. Everything went well until I got to the last brake pad(The pad on the outside of the caliper). The pad slipped in and when I went to put the caliper back on it would not fit over the rotor. Before jumping to conclusion, I already used a C clamp to push the piston all the way back. When I try to put it on it is getting caught between the outside brake pad and the inside of the caliper. I repeat, it is not getting caught between the two brake pads. It is getting caught between the outside brake pad and the caliper itself.
I fooled with it for over an hour.
I put the old pad back in so I could make it to work today.
Any suggestions?
I fooled with it for over an hour.
I put the old pad back in so I could make it to work today.
Any suggestions?
Are they Weaver Silver pads from Advance Auto Parts? I read a few reviews that said the pads were too large and wouldn't fit...

Registered!!
Joined: Mar 2010
Posts: 20
Likes: 0
From: Dallas,TX
Rep Power: 0 Re: DIY: Brake Pads and Rotor Install *Updated*
i know im pullin a old thread. so i dont get burned for starting a new one.
I just wanted to ask if anyone gots a trick to get off them damn screws that hold the rotor on. i have been spraying them down with WD-40 but no help i could only get off one.
i have already broke the handle off one of my screwdriver
I just wanted to ask if anyone gots a trick to get off them damn screws that hold the rotor on. i have been spraying them down with WD-40 but no help i could only get off one.
i have already broke the handle off one of my screwdriver

Re: DIY: Brake Pads and Rotor Install *Updated*
most likely you will have to drill them out and get new ones or use a impact screw driver. Im not sure if thats the real name of it or not. but if you just drill them out and just pull the rotor off you can then just grab whats left of the screw and pull it out
Registered!!
Joined: Mar 2012
Posts: 25
Likes: 0
Rep Power: 0 Re: DIY: Brake Pads and Rotor Install *Updated*
One step you forgot to mention: Pushing brake piston back
Because your older brake pads would've been worn out and the new ones aren't you will need to push the brake piston back into the caliper. To do this:
1. Open brake fluid reservoir lid
2. Using adjustable pliers, smoothly squeeze the piston back into the caliper
You should now be able to put the new brake pads.


Thread
Thread Starter
Honda Civic Forum
Replies
Last Post
Star1967
Wheels, Tires & Brakes Modifications
11
Jun 8, 2015 04:23 AM
masongap
Mechanical Problems/Vehicle Issues and Fix-it Forum
9
May 26, 2015 07:55 PM
rhvic
Mechanical Problems/Vehicle Issues and Fix-it Forum
3
May 22, 2015 03:06 PM
ayoitzjulesdx98
Wheels, Tires & Brakes Modifications
2
May 14, 2015 08:29 AM

