
preparing the engine block for the head and gasket + oiling the head bolts

If you think a good mechanic is expensive, try hiring a bad one
Joined: Dec 2011
Posts: 32,017
Likes: 256
From: Midwest. Aiming about mid-chest
Rep Power: 519 

Re: preparing the engine block for the head and gasket + oiling the head bolts
How bad is it to keep an engine on that single stud instead of two?
Eventually it will come apart and someone could get killed.
Would one suffice for a little while
The rocking motion of the engine will loosen the one remaining fastener while you drive.
Can you guess what happens next?
At least the wheel (probably) won't fall off and kill someone while you are driving.
OF top 99.5% creator (Formerly of the Puffinblunts variety)
Joined: May 2012
Posts: 3,634
Likes: 109
Rep Power: 211 Re: preparing the engine block for the head and gasket + oiling the head bolts
In the image below which part is stripped..the stud hole or the top nut?
If it's the stud hole you can do as Ezone mentioned:
1) Purchase appropriate sized helicoil kit (tap, helicoils and tang tool) and use loctite red thread locker on outer helicoil to keep in place during future engine work.
2) Install a Time-Sert http://www.timesert.com/ which is more durable than a helicoil but also a much more expensive kit. You could call around and find a mechanic that already has a Tme Sert kit and will just charge labor plus small fee for insert.
3) U-Pull or have one pulled from a junkyard
4) New OEM via Ebay: http://www.ebay.com/itm/HONDA-OEM-20...9ZTGnS&vxp=mtr
5) Go route of man's third best friend: 1) Dog 2) Duct tape 3) JB Weld Original .... LOL JK..may work but not worth the risk.
Last edited by Wankenstein; Aug 19, 2017 at 09:53 PM.
If you think a good mechanic is expensive, try hiring a bad one
Joined: Dec 2011
Posts: 32,017
Likes: 256
From: Midwest. Aiming about mid-chest
Rep Power: 519 Re: preparing the engine block for the head and gasket + oiling the head bolts
^I took his description to mean the threads pulled out of the cast bracket, leaving a single stud to support the weight of the engine.
Have you priced a Helicoil kit or a Time-sert kit lately?
Have you priced a Helicoil kit or a Time-sert kit lately?
OF top 99.5% creator (Formerly of the Puffinblunts variety)
Joined: May 2012
Posts: 3,634
Likes: 109
Rep Power: 211 Re: preparing the engine block for the head and gasket + oiling the head bolts
Have you priced a Helicoil kit or a Time-sert kit lately?[/QUOTE]
Time Sert (inserts only) are inexpensive but the install kit is around $100 IIRC. I'd probably go the used part route first but I would check the part in the field to make sure it's not stripped too.
Specific sized helicoil kits are reasonable (online anyway): https://www.google.com/search?q=10+m...A0EQuw0IxQQoAg

Thread Starter
Registered!!
Joined: Apr 2014
Posts: 227
Likes: 0
Rep Power: 0 
Re: preparing the engine block for the head and gasket + oiling the head bolts
I think we're thinking of the same thing. Hopefully, he will clarify. He did mention that while tightening to 45 psi it kept turning and not tightneing so that lead me to think the casting threads are stripped. I mentioned the top nuts as a possibility.
Have you priced a Helicoil kit or a Time-sert kit lately?
Have you priced a Helicoil kit or a Time-sert kit lately?
Specific sized helicoil kits are reasonable (online anyway): https://www.google.com/search?q=10+m...A0EQuw0IxQQoAg[/QUOTE]
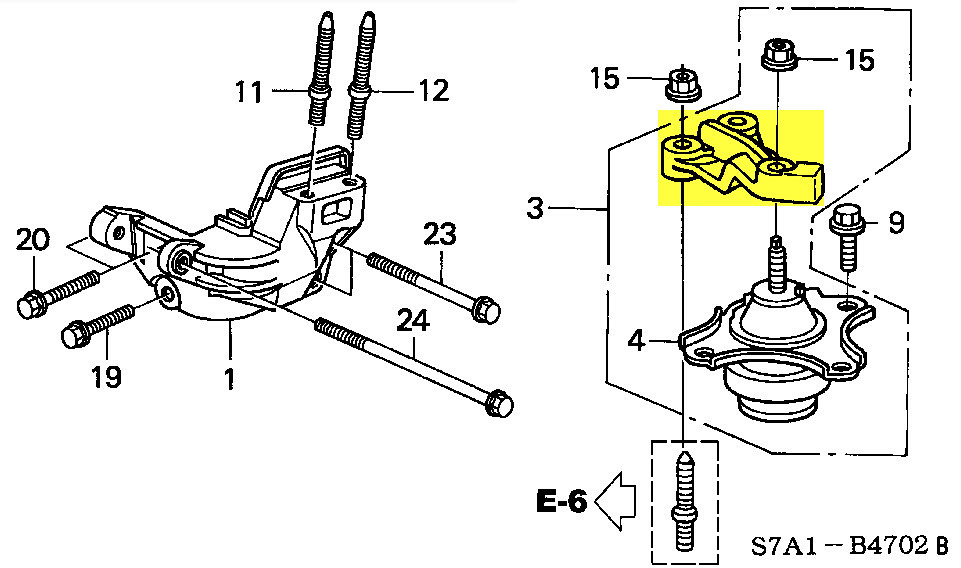
It was the bolt that completely came out of its holster. #12 in the image provided. I couldn't find the tap and helicoil anywhere I tried advanced auto, autozone, napa, and ace hardware no one seems to carry a 12x1.25 tap and helicoil.
If you think a good mechanic is expensive, try hiring a bad one
Joined: Dec 2011
Posts: 32,017
Likes: 256
From: Midwest. Aiming about mid-chest
Rep Power: 519 Re: preparing the engine block for the head and gasket + oiling the head bolts
Got a local machine shop? Take both parts in (bracket and stud) and see if they can repair the damaged threads----install a thread insert of their choice.
Thread Starter
Registered!!
Joined: Apr 2014
Posts: 227
Likes: 0
Rep Power: 0 Re: preparing the engine block for the head and gasket + oiling the head bolts
Now I am puzzled by another problem. When I put timing covers on I looked down to the crosshairs on the timing cover the timing mark (the one notch after the three notches) was like 4 inches off from where the crosshairs is. I don't know how this happened. I lined up the cam sprocket at TDC and the timing belt pulley at TDC. I spun the timing belt 6 revolutions and checked it and everything was still in time. Why would the harmonic balancer be off by so much? This is an indication that the car is in fact not in TDC because the crosshairs have to line up evenly to the 4th notch on the harmonic balancer.
Not sure how to correct this.
Registered!!
Joined: May 2016
Posts: 179
Likes: 1
From: SoCal
Rep Power: 124 Re: preparing the engine block for the head and gasket + oiling the head bolts
I had the same problem. The harmonic balancer had a tiny bit of play when inserted into the crank with the key. I knew the engine was spot on because i triple checked the timing, so i just tightened the harmonic balancer while holding it where it lines up with the mark.
If you think a good mechanic is expensive, try hiring a bad one
Joined: Dec 2011
Posts: 32,017
Likes: 256
From: Midwest. Aiming about mid-chest
Rep Power: 519 Re: preparing the engine block for the head and gasket + oiling the head bolts
(the one notch after the three notches) was like 4 inches off from where the crosshairs is.
Did you not install the key for the harmonic balancer, it rotated to wherever it felt like stopping?
Thread Starter
Registered!!
Joined: Apr 2014
Posts: 227
Likes: 0
Rep Power: 0 Re: preparing the engine block for the head and gasket + oiling the head bolts
Straight up? Not sure I follow. The keyway is the same as the woodruff key right? When I installed that I pressed it straight back into the timing belt pulley then installed the harmonic balancer. When I rotated it it didn't stop or anything just pulled toughly on it to make it spin. Was able to torque it to 148 ft-lbs and all.
Thread Starter
Registered!!
Joined: Apr 2014
Posts: 227
Likes: 0
Rep Power: 0 Re: preparing the engine block for the head and gasket + oiling the head bolts
If you think a good mechanic is expensive, try hiring a bad one
Joined: Dec 2011
Posts: 32,017
Likes: 256
From: Midwest. Aiming about mid-chest
Rep Power: 519 Re: preparing the engine block for the head and gasket + oiling the head bolts
The harmonic balancer I recall was about at 12 o'clock when I installed it and inserted the woodruff key.
Why would the harmonic balancer be off by so much?
If you are concerned you can spin it on through to line it up again......but guess what happens when you start the engine up.....
Thread Starter
Registered!!
Joined: Apr 2014
Posts: 227
Likes: 0
Rep Power: 0 Re: preparing the engine block for the head and gasket + oiling the head bolts
A Woodruff key is a half moon key, it's round on one edge.
Because the crank got rotated at some point. If you HAD everything aligned correctly then it's ok.
If you are concerned you can spin it on through to line it up again......but guess what happens when you start the engine up.....
Because the crank got rotated at some point. If you HAD everything aligned correctly then it's ok.
If you are concerned you can spin it on through to line it up again......but guess what happens when you start the engine up.....
Should I be concerned about starting the car now? Sounds like something is off.
If you think a good mechanic is expensive, try hiring a bad one
Joined: Dec 2011
Posts: 32,017
Likes: 256
From: Midwest. Aiming about mid-chest
Rep Power: 519 Re: preparing the engine block for the head and gasket + oiling the head bolts
The marks you used to set up the crank timing gear/aligned to the slash on the oil pump was TDC, the notch in the harmonic balancer/aligned to the pointer on the lower cover, is still the exact same TDC. You could make your own paint marks anywhere you want and call it TDC.
If you want to verify #1 piston is truly at TDC you can remove #1 spark plug and drop a long screwdriver into the hole then roll the crank back and forth to verify #1 piston is definitely at the top of its travel. Then confirm the notch and pointer are damn close to exactly aligned.
To address your last post....
Use a wrench to roll the crank through to TDC again. Check where the cam marks are at that position. (If the word UP is on the bottom of the cam gear, roll the crank one more revolution and recheck)
You do not need to remove the harmonic balancer to do this because all TDC marks represent the same crankshaft position.
Thread Starter
Registered!!
Joined: Apr 2014
Posts: 227
Likes: 0
Rep Power: 0 Re: preparing the engine block for the head and gasket + oiling the head bolts
The marks you used to set up the crank timing gear/aligned to the slash on the oil pump was TDC, the notch in the harmonic balancer/aligned to the pointer on the lower cover, is still the exact same TDC. You could make your own paint marks anywhere you want and call it TDC.
If you want to verify #1 piston is truly at TDC you can remove #1 spark plug and drop a long screwdriver into the hole then roll the crank back and forth to verify #1 piston is definitely at the top of its travel. Then confirm the notch and pointer are damn close to exactly aligned.
To address your last post....
Use a wrench to roll the crank through to TDC again. Check where the cam marks are at that position. (If the word UP is on the bottom of the cam gear, roll the crank one more revolution and recheck)
You do not need to remove the harmonic balancer to do this because all TDC marks represent the same crankshaft position.
If you want to verify #1 piston is truly at TDC you can remove #1 spark plug and drop a long screwdriver into the hole then roll the crank back and forth to verify #1 piston is definitely at the top of its travel. Then confirm the notch and pointer are damn close to exactly aligned.
To address your last post....
Use a wrench to roll the crank through to TDC again. Check where the cam marks are at that position. (If the word UP is on the bottom of the cam gear, roll the crank one more revolution and recheck)
You do not need to remove the harmonic balancer to do this because all TDC marks represent the same crankshaft position.
Thank you
I didn't realize but when I torqued it to 148 ft-lbs I had inadvertently moved the harmonic balancer forwards. I took of the upper timing cover off and the cam was also off by the same number of degrees. I shifted the harmonic balancer counter clockwise until the cam sprocket lined up at TDC. Then I looked through the crosshairs, it was dead on the mark. Put everything back together. Changed the oil. Now I am about to start the car. Any sort of preliminary checks I can do to make sure everything will be okay when I go to start it up?
If you think a good mechanic is expensive, try hiring a bad one
Joined: Dec 2011
Posts: 32,017
Likes: 256
From: Midwest. Aiming about mid-chest
Rep Power: 519 Re: preparing the engine block for the head and gasket + oiling the head bolts
Any sort of preliminary checks I can do to make sure everything will be okay when I go to start it up?
After that set of checks I then let it run through warmup and fans cycling.

Registered!!
Joined: Apr 2017
Posts: 76
Likes: 0
Rep Power: 0 Re: preparing the engine block for the head and gasket + oiling the head bolts
I agree with Ezone. Let run ab 30 seconds ck for any obvious leaks. Radiator fill funnel is your best friend when burping the coolant system. If no obvious leaks or noises then start back up like Ezone said u til at operating temp. I'd periodically look under car for leaks while getting up to temp.
Thread Starter
Registered!!
Joined: Apr 2014
Posts: 227
Likes: 0
Rep Power: 0 Re: preparing the engine block for the head and gasket + oiling the head bolts
I just make sure everything is done correct as I assemble the job....then have faith in my abilities and no fear of the unknown as I turn the key to fire it up. I might let it run 20-30 seconds then shut it off and recheck oil level and coolant level (I have the funnel-fill stuck in the radiator during this so I just keep it half full) and see if there are any growing puddles under the engine LOL.
After that set of checks I then let it run through warmup and fans cycling.
After that set of checks I then let it run through warmup and fans cycling.
Registered!!
Joined: Apr 2017
Posts: 76
Likes: 0
Rep Power: 0 Re: preparing the engine block for the head and gasket + oiling the head bolts
Did you fully burp the coolant system before the test drive? Reason you said now you are burping after the test drive and it overheated...
If you didn't do prior that would explain the overheating.
Checking coolant flow on the heater core is fairly simply. Get the temp off both hoses the inlet and outlet as vehicle is getting up to temp. Of course have the temp **** turned to the hot position.
Thread Starter
Registered!!
Joined: Apr 2014
Posts: 227
Likes: 0
Rep Power: 0 Re: preparing the engine block for the head and gasket + oiling the head bolts
I just make sure everything is done correct as I assemble the job....then have faith in my abilities and no fear of the unknown as I turn the key to fire it up. I might let it run 20-30 seconds then shut it off and recheck oil level and coolant level (I have the funnel-fill stuck in the radiator during this so I just keep it half full) and see if there are any growing puddles under the engine LOL.
After that set of checks I then let it run through warmup and fans cycling.
After that set of checks I then let it run through warmup and fans cycling.
I think I've read it on here before, but what the "set of checks" that you do? I've ran the car for an hour now seems to be good. Looking under the car, no leaks that I see.
If you think a good mechanic is expensive, try hiring a bad one
Joined: Dec 2011
Posts: 32,017
Likes: 256
From: Midwest. Aiming about mid-chest
Rep Power: 519 Re: preparing the engine block for the head and gasket + oiling the head bolts
but what the "set of checks" that you do?
Took it out for a spin around the corner and it overheated again. I am fully burping the system now.
You know, it only takes ONE overheat to ruin a whole bunch of work.
Thread Starter
Registered!!
Joined: Apr 2014
Posts: 227
Likes: 0
Rep Power: 0 Re: preparing the engine block for the head and gasket + oiling the head bolts
It didn't overheat, just began to climb, so I pulled it off to the side and waited for it to cool down. I burped it for an hour let all the bubbles out and it is not overheating at least for a 15 minute drive. Highway driving is another story.
If you think a good mechanic is expensive, try hiring a bad one
Joined: Dec 2011
Posts: 32,017
Likes: 256
From: Midwest. Aiming about mid-chest
Rep Power: 519 Re: preparing the engine block for the head and gasket + oiling the head bolts
I burped it for an hour let all the bubbles out and it is not overheating at least for a 15 minute drive.
Radiator now stays completely full?
Not developing air pockets or trying to overflow the reservoir while running?
After engine is warmed up: Got HOT heater output now? With the fan on full blast and engine idling for a few minutes?
Highway driving is another story.
Is the radiator cap and its gaskets good?
Sealing area inside the neck of radiator good?
Will build and hold 13PSI of pressure before it vents?
Flow test the radiator?
Got airflow through the radiator fins/condenser fins? Washed out with a hose?
Thread Starter
Registered!!
Joined: Apr 2014
Posts: 227
Likes: 0
Rep Power: 0 Re: preparing the engine block for the head and gasket + oiling the head bolts
Radiator fans run properly?
Radiator now stays completely full?
Not developing air pockets or trying to overflow the reservoir while running?
After engine is warmed up: Got HOT heater output now? With the fan on full blast and engine idling for a few minutes?
Once upon a time.....
Is the radiator cap and its gaskets good?
Sealing area inside the neck of radiator good?
Will build and hold 13PSI of pressure before it vents?
Flow test the radiator?
Got airflow through the radiator fins/condenser fins? Washed out with a hose?
Radiator doesn't seem to be spitting coolant out the overflow. I noticed when I had to bucket on the rad that it was bubbling a lot then it stop and a lot of hot steam was coming off of the bucket, not sure if that is normal or not?
Also, I am getting hot air from inside the cabin when I turn the heat on. The engine seems to get up the mid temp pretty quickly within maybe 2.5 minutes. Can't remember how fast it was before. The upper hose is still hot like before but it doesn't seem to be overheating.
Cap and gasket seems good, nothing looks wrong with it but I guess I never know there could be a problem. Sealing area inside the radiator I think should be good, I installed the rad brand new, a denso if that makes any difference, I heard they are a good brand to use.
Sadly I don't have a compression tester with me. A friend lent me the one before and I don't want to ask for any more favors

If you think a good mechanic is expensive, try hiring a bad one
Joined: Dec 2011
Posts: 32,017
Likes: 256
From: Midwest. Aiming about mid-chest
Rep Power: 519 Re: preparing the engine block for the head and gasket + oiling the head bolts
Did you let it run in the driveway during filling and burping long enough to have the fans cycle more than one time?
Where was the temperature gauge at the moment the fans turned on?
Now, on the highway. What's it do there?
The rest of the post sounded kinda sorta normal.
Thread Starter
Registered!!
Joined: Apr 2014
Posts: 227
Likes: 0
Rep Power: 0 Re: preparing the engine block for the head and gasket + oiling the head bolts
The fans can take a long time to turn on because of where the temp switch is located in relation to flow of the system.
Did you let it run in the driveway during filling and burping long enough to have the fans cycle more than one time?
Where was the temperature gauge at the moment the fans turned on?
Now, on the highway. What's it do there?
The rest of the post sounded kinda sorta normal.
Did you let it run in the driveway during filling and burping long enough to have the fans cycle more than one time?
Where was the temperature gauge at the moment the fans turned on?
Now, on the highway. What's it do there?
The rest of the post sounded kinda sorta normal.
Also, I've noticed a new sound coming from the car. Mostly when I drive the car doesn't make noise but when I make a sharp turn or turn the wheel a large amount I will hear this chirping noise, guessing that is the power steering belt possibly overtightened or under tightened. Could rust on the power steering pulleys cause this?
Another issue is when I let go of the steering wheel the car begin to slowly veer to the right of the road.
If you think a good mechanic is expensive, try hiring a bad one
Joined: Dec 2011
Posts: 32,017
Likes: 256
From: Midwest. Aiming about mid-chest
Rep Power: 519 Re: preparing the engine block for the head and gasket + oiling the head bolts
and that the fuse box needs to be replaced. Not sure what that was all about
Easy enough to verify its operation with an ohmmeter and boiling water.
Fusebox was a lousy guess unless someone can actually prove it is a problem.
They cut some cord open around the radiator leaving it exposed.
They seemed to think the people that owned the car before might have rigged the electrical system.
Also, I've noticed a new sound coming from the car. Mostly when I drive the car doesn't make noise but when I make a sharp turn or turn the wheel a large amount I will hear this chirping noise, guessing that is the power steering belt possibly overtightened or under tightened. Could rust on the power steering pulleys cause this?
Another issue is when I let go of the steering wheel the car begin to slowly veer to the right of the road.
Thread Starter
Registered!!
Joined: Apr 2014
Posts: 227
Likes: 0
Rep Power: 0 Re: preparing the engine block for the head and gasket + oiling the head bolts
You said the fans run with a paper clip stuck in the temp switch connector, therefore that temp switch is the last questionable item.
Easy enough to verify its operation with an ohmmeter and boiling water.
Fusebox was a lousy guess unless someone can actually prove it is a problem.
Whut?
Yea this happens a lot when nobody can figure out the head gasket is blown causing the overheating. .
IF it's belt noise......with the engine running and car NOT moving...simply turn the steering wheel all the way to one side and see if the belt makes a loud screech. (belt too loose).
Tire pressures checked and aired?
Hello again. I just wanted to say thank you ezone and everyone else for helping me through these issues.
An update: car has been driven about 30miles. Today it was raining and I drove up and steep incline with bumps. All the sudden the CEL came on. I wasn't able to read the codes because I don't own a code reader. I went to a friend's house and parked it. This was maybe a 10 minute drive. I hung out with my friends. And went to start the car. Dash lights come on, I fully turn the key, then nothing but blackness. Then I flip the key back and try again, absolutely nothing. I then waited for about 20+ minutes. And go to start and it hesitates for a few seconds and it starts. I let it run for awhile then drove it home. The CEL was gone after I restarted the car.
I read a post that was created on here recently about this same issue. I think it could be the battery terminals are loose and causing some contact issues. Will check that. But it seems also likely that it could be the "main" relay or the "fuel" relay based on the symptoms that other posters have had here and on other forums. How could one test both relays?
Also, tire pressure on all 4 tires is 32psi. It seems to be a tow in or tow out issue from what I've read.
Thanks again!
If you think a good mechanic is expensive, try hiring a bad one
Joined: Dec 2011
Posts: 32,017
Likes: 256
From: Midwest. Aiming about mid-chest
Rep Power: 519 Re: preparing the engine block for the head and gasket + oiling the head bolts
I fully turn the key, then nothing but blackness
Could be either positive or negative.
All components that have to make electrical contact should be cleaned to shiny metal (wire brush, terminal brush) and tight enough you can't twist the cable free by hand.
If you have the cheap cable ends where the wires are pinched, that's a good place for a bad connection too.


