07 civic rear upper control arm
 03-04-2011
#1
Registered!!
Thread Starter

Join Date: Mar 2011
Posts: 3
Likes: 0
Received 0 Likes
on
0 Posts
Rep Power: 0 
07 civic rear upper control arm
can any one help me just ordered rear upper control arm kit sb 08-001 how to replace parts and the torque specs for the bolts any help would be great
 03-04-2011
#2
PITA Admin
Administrator
iTrader: (1)
Join Date: Dec 2008
Location: TN
Age: 52
Posts: 14,791
Received 1,446 Likes
on
1,201 Posts
Rep Power: 338 

Re: 07 civic rear upper control arm
git a haynes manual in any parts store
 03-04-2011
#4
Live for the Twisties
Administrator
Join Date: Jun 2010
Location: Langley, BC
Posts: 8,580
Likes: 0
Received 5 Likes
on
5 Posts
Rep Power: 260 Re: 07 civic rear upper control arm
There are Helms manuals for 8g Civics available, here's a link..
http://www.helminc.com/helm/Result.a...elected_media=
They're expensive though, so I'll see if I can find a DIY.
http://www.helminc.com/helm/Result.a...elected_media=
They're expensive though, so I'll see if I can find a DIY.
03-04-2011
#5
PITA Admin
Administrator
iTrader: (1)
Join Date: Dec 2008
Location: TN
Age: 52
Posts: 14,791
Received 1,446 Likes
on
1,201 Posts
Rep Power: 338 Re: 07 civic rear upper control arm
Oh, c.r.a.p, did not notice this was on 8th gen... (was on the "new posts" search function...)
Yeah, think the 8th had "some" (major) differences in them...
if i stumble on something, will post here too... sorry bout that...
Yeah, think the 8th had "some" (major) differences in them...
if i stumble on something, will post here too... sorry bout that...
Last edited by sdaidoji; 03-04-2011 at 10:52 PM.
03-04-2011
#7
PITA Admin
Administrator
iTrader: (1)
Join Date: Dec 2008
Location: TN
Age: 52
Posts: 14,791
Received 1,446 Likes
on
1,201 Posts
Rep Power: 338 Re: 07 civic rear upper control arm
from H-T
Also from H-T, quick overview of strut swap (not control arm, but works part-way, and no pics there
<FONT COLOR="red">Rear Suspension!</FONT>
Okay, this is a bit more of an under-taking that the fronts. Not super difficult but quite a bit more intensive.
My camera battery died so I neglected to take any pictures but I'll give a short overview of whats involved.
Jack up car, remove rear wheels, support with jackstands.
Using your floor jack, load the rear suspension by jacking up the knuckle where it connects to the rear portion of the trailing arm. With the rear suspension slightly loaded loosen and remove the lower damper flange bolt.(14mm)
Remove the brake line bracket - 12mm bolt and the wheel speed sensor 10 mm bolt- be sure the oring stays with the sensor and use car when handling the sensor. disconnect the clip that holds the wire to the bracket and move the wire out of the way.
Using a hex key and 14 wrench remove the two bolts from the stablizer link on the rear sway bar
Remove 14mm flange bolt that holds the knuckle to the upper arm of the suspension.
Remove the two 14 mm flange bolts that hold the front of the trailing arm to the body. these will require a good amount of muscle to break loose.
Moving to the trunk area, remove spare tire cover, needs to be unclipped near where seatbacks fold down. paritally remove weatherstripping from trunk area so you can remove plastic panel that is near trunk striker. unscrew 3 clips and remove christmas tree clip and move rear carpet out of the way to allow access to upper damper bolt.
Using a hex key and 14mm wrench un-do upper damper bolt.
slightly lower floor jack , compress damper by hand and remove damper. lower floor jack if need be and remove rear spring. note the orentation of lower spring seat and upper mounting rubber.
Install new spring with old upper mounting rubber and lower spring seat. make sure that spring is aligned with lower seat as it was before.
slightly load rear suspension again with floor jack. reinstall two front trailing arm flange bolts loosely
loosely install flange bolt that connects upper knuckle with upper control arm
Verify that new bushing is on upper portion of damper, put damper into place, lower/raise floor jack so that lower damper bolt can be loosely installed
re-install stablizer link
install old upper damper mounting bushing, washer and new self-locking nut
raise rear susp to load vehicle weight and finish torquing all bolts
re-install brake hose bolt. wheel speed sensor clip and sensor itself
trailing arm bolts: 79.6 lb-ft
flange bolt 79.6lb-ft
damper flange bolt 43 lb-ft
stab. link 29 lb-ft
reinstall rear trunk components, torque down wheels, double check all hoses
As mentioned before, get the honda instructions and read them over when doing this... didnt spend much time on this write up so i may have missed a couple small things along the way.
Last edited by sdaidoji; 03-04-2011 at 10:04 PM.
03-04-2011
#8
PITA Admin
Administrator
iTrader: (1)
Join Date: Dec 2008
Location: TN
Age: 52
Posts: 14,791
Received 1,446 Likes
on
1,201 Posts
Rep Power: 338 Re: 07 civic rear upper control arm
this one have more info - comes from a coilover install. Also, from H-T forum
Please save the pictures - this are linked to this member's photo storage, so could be deleted by his whim.
Please save the pictures - this are linked to this member's photo storage, so could be deleted by his whim.
Okay, any input on this DIY is helpful since it is for the community here and I will be linking to it...
I installed the B&G Full Coilovers and SPC front/rear camber kits in approx 14 hours total. This is mostly due to my lack of previous experience with a job of this calibur, and also the lack of proper tools (I had to walk to a store 3 times for sundry parts) and/or air tools and a buddy to help with some of the tougher parts. Oh, not to mention lack of instructions . On a scale of 1-10, 10 being hardest, this job was a 7, but if you factor in the time it took and all the hiccups I ran into, it was more like a 9
  . Learn from my mistakes!
Parts you'll need:
Honda Civic 06-07 Maintenance guide with torque specs
10, 12, 14, 16, 21/22mm (can't remember) socket wrench sizes.
A pass through 19mm socket wrench that will be able to get to the top strut bolt sitting in the recession.
3/16in. socket wrench.
Hex Set
Flat head screwdriver
Zip ties
2x 8mm 1.25 nuts
Spring Compressor!! Don't start without it.
Hydrolic jack (2ton)
Smaller 1.5ton jack (optional)
2/4x jack stands
Patience and Muscle!
Any ways, here goes:
Start with the fronts just to leave the easier to handle rear last.
1) Break the lug nuts before lifting the vehicle.
2) Jack the front up by the front cross member and place jack stands at both front jack points (see manual), then remove both front tires.
3) Pop the hood and look for the cowling plates that are hiding the front strut's top mounting bolts.
4) Loosen all 3 smaller bolts (remove two if you like), then take your 19mm open ended socket wrench and break the thread on the strut bolt. It's a pain, but it's SOOO much easier while the strut in on the car. DO NOT TAKE IT OFF!
5) Take the ABS line off the strut, and also the brake line, and make sure they are hanging out of the way.

6) Take off the top strut assembly bolt, then the bottom - make sure you take the top one off, then tilt the rotor towards yourself so the strut doesn't stick on the mounting point. Be careful when taking off that last bolt, the front struts have quite a bit of compression left in them. Also, use a block/brick/tire/spare jack to hold the wheel assembly up so it doesn't just fall down once the bolts are out.
7) Once the bolts are out, pull the strut assembly off to the side so it isn't hitting your speedo/brake lines or CV boot, then take off the bolts at the top holding the strut on and pull the strut assembly out carefully. (NOTE: If you have problems removing the strut, work the Spring Compressors in there and compress the spring to give you a little more wiggle room. Be careful of your CV Boot Joint!!)
8) Now that it's out, compress the spring using the spring compressors (VERY necessary! It wasn't on EP3s, but FA/FG's are compressed WAY more), then take the top strut bolt the rest of the way off. (This is what took me forever since I didn't have a open wrench that could get a grip on the bolt, and I didn't loosen the bolt while it was on the car.)

9) After it's off, remove the spring compressors, take the Top Hat/Pillow ball mount off the stockers, and put them on the B&G's. (NOTE: This isn't necessary if you bought aftermarket pillowball mounts!). Also make sure you notice the arrow on the top hat, it should be facing in towards the engine when you install it back in.
10) Adjust the height on the front Coilovers if they have that option, then put the Coilover assembly back in the same way you took the stock ones out, put the 3 top bolts on to hold it in place.
11) If you got the SPC front camber bolts, put the camber bolt in the top bolt hole.
12) Tighten the top 3 bolts, then tighten the top strut bolt with the 19mm open ended socket wrench 'till it turns the thread.
13) Now the B&Gs I got didn't have a long enough stem for the ABS line to clip back into. I need to send pics to CorSport which will be relayed to B&G about this. So for now, loosely zip tie the ABS line to keep it out of the way while driving. I honestly don't think it would catch or pull or get snagged while driving w/o a zip tie, but better be safe than sorry.
14) Attach the brake line to the mounting point, and use the 8mm 1.25 threaded nuts that you bought. The stockers are welded onto the stock assembly .
.
15) Put your Front wheels back on, adjust camber using the SPC bolts, then lower the vehicle.
Fronts are done!
Rears:
1) Break the rear wheel lug nuts.
2) Use the rear cross member (in front of the gas tank, behind the sway bar) to lift the vehicle, then put jack stands under the two rear jack points. (see manual)
3) Take the wheels off.
4) Pop the brake line out of the bracket. Use a flat head screwdriver carefullly.

5) Unbolt the brake line bracket from the body.

6) Take the ABS line out of it's bracket.

7) Loosen the rear shock bolt on the top. Just pull back the trunk lining and use a wrench and a hex key to loosen it.

8) Here's where you can do one of two things. Loosen the lower camber arm bolt itself, or loosen the 10mm bolt, then use two wrenches to break the death grip thread.


^^ The little nut is holding the black nut and welded base in place. It turns easier than the other side, but if you have air tools or big muscles, it's unncessary.
9) Put a block/jack/tire under the wheel assemby with a bit of pressure so it doesn't just fall.
10) Make sure you bolt the 10mm bolt back into the base after pulling the camber bolt out.
11) Take out the bolt holding the shock in place.

12) Remove the top bolt holding on the endlink under the vehicle, and loosen the bottom one so the end link is not connected to the sway bar. You will probably need a hex key to loosen the bolts.

13) Remove the two bolts holding the Camber arm in place and remove it if you are going to replace it with an aftermarket one. Otherwise, leave it alone.
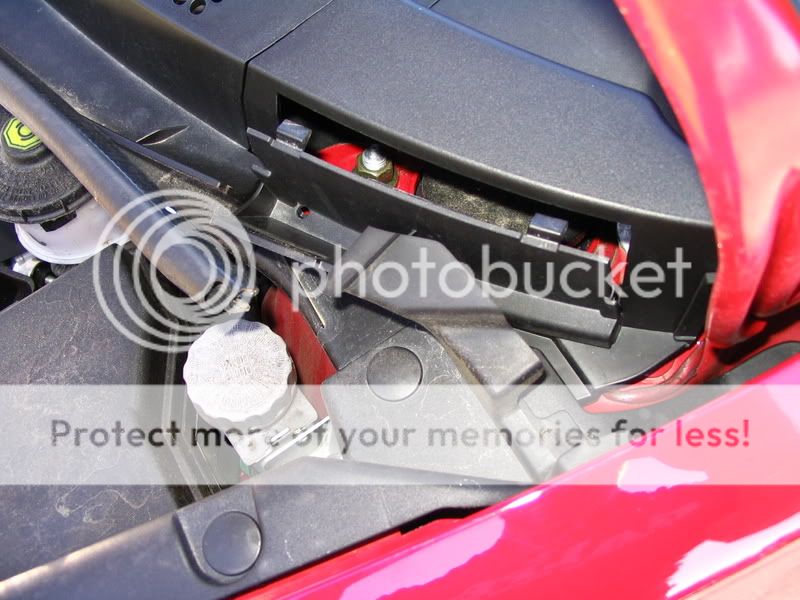
14) Here's a pic of the SPC rear arm compared to the stock one.

15) Remove the bolt holding the shock in from the top, then remove the shock.
16) Remove the stock coils. Just twist them away from cables to get it out.
17) Put the new shock from the coilover kit back up in the hole. The B&G came with a washer for the top, and a washer for the bottom of the hole. Tighten it down.
18) Put the SPC/Aftermarket camber arm in place on the body. Just follow the directions that came with it. A note on the SPC camber arms though, the "B" holes START at -3 degrees camber!! So put the bolts in the "A" holes (lol) to get daily driver camber. Here's a link to 8thcivic's DIY for the camber arm and some pics of the SPC.
DIY on 8th Civic. Props to 06blaksi!:
http://www.8thcivic.com/forums...32040
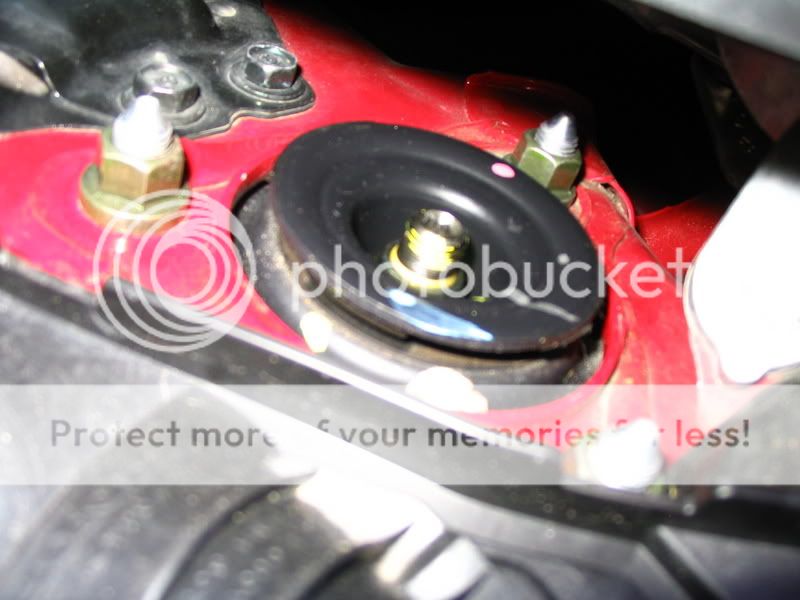
Adjustible camber bolt for the rear arm:

Camber bracket (in the "B" holes!):

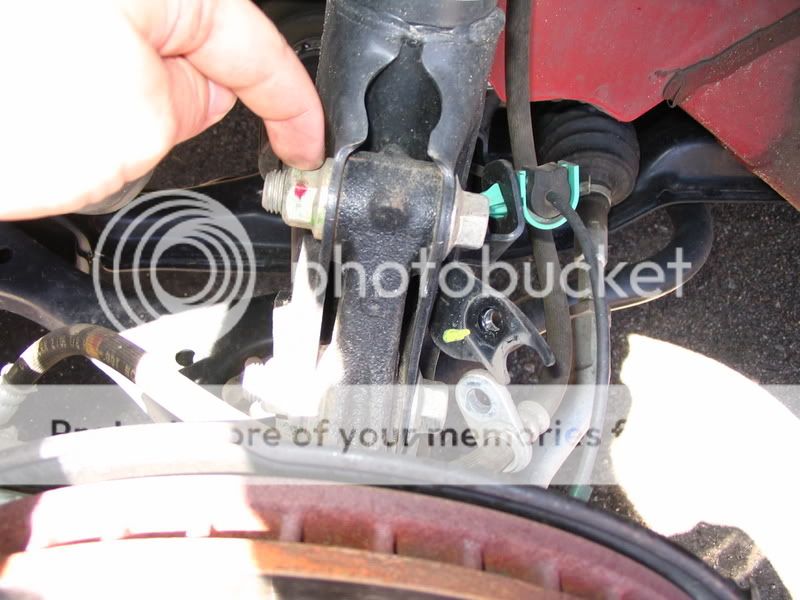
Camber arm mounted up and somewhat adjusted:

19) Install the Coils now. Adjust them to the height you want! On B&Gs, you will probably want to leave like 1 or 2 thread only if you are trying to get the tire a little in the well when it's just sitting. Oh, FYI, you can't install the B&Gs upside down...the holes are different I know!

20) Re-install the Camber bolt to the wheel assembly.
21) Re-install the bolt to the bottom of the shock.
22) Re-install the endlink to the sway bar.
23) Re-install the brake line bracket, and ABS line.
24) Put wheels back on.
25) Adjust camber
26) Lower vehicle.
DONE!
Of course, make sure all bolts are tightened back to specification while doing this!! And after you are all done, take the car out for a VERY short jaunt down the street, progressively gaining speed and listen for noises. The fronts will pop once each side (at least they did in mine), and that should be it. After driving it, lift it up, check all the bolts, change the height if you want, and lower it back down again. And then get an alignment
With the B&Gs, I started out at full soft on rebound/dampning, and just now upped the fronts to 11, and rears to 9 (out of 18). Seems to be the best for my style of driving, but I'm sure I will change them after a little while to fit my needs.
All in all, the B&Gs handle AWESOMELY. It has turned my fun handling car into something that I absolutely love to drive around corners in and feel like I'm in full control! I just need some summer tires to take full advantage of this fun now
Feel free to point out mistakes, or better methods to my madness. Remember this is all without previous coil install experience. I'm proud to have done this all myself.
Modified by MonkeyConQueso at 1:44 PM 6/21/2007
I installed the B&G Full Coilovers and SPC front/rear camber kits in approx 14 hours total. This is mostly due to my lack of previous experience with a job of this calibur, and also the lack of proper tools (I had to walk to a store 3 times for sundry parts) and/or air tools and a buddy to help with some of the tougher parts. Oh, not to mention lack of instructions
. On a scale of 1-10, 10 being hardest, this job was a 7, but if you factor in the time it took and all the hiccups I ran into, it was more like a 9 . Learn from my mistakes!Parts you'll need:
Honda Civic 06-07 Maintenance guide with torque specs
10, 12, 14, 16, 21/22mm (can't remember) socket wrench sizes.
A pass through 19mm socket wrench that will be able to get to the top strut bolt sitting in the recession.
3/16in. socket wrench.
Hex Set
Flat head screwdriver
Zip ties
2x 8mm 1.25 nuts
Spring Compressor!! Don't start without it.
Hydrolic jack (2ton)
Smaller 1.5ton jack (optional)
2/4x jack stands
Patience and Muscle!
Any ways, here goes:
Start with the fronts just to leave the easier to handle rear last.
1) Break the lug nuts before lifting the vehicle.
2) Jack the front up by the front cross member and place jack stands at both front jack points (see manual), then remove both front tires.
3) Pop the hood and look for the cowling plates that are hiding the front strut's top mounting bolts.
4) Loosen all 3 smaller bolts (remove two if you like), then take your 19mm open ended socket wrench and break the thread on the strut bolt. It's a pain, but it's SOOO much easier while the strut in on the car. DO NOT TAKE IT OFF!
5) Take the ABS line off the strut, and also the brake line, and make sure they are hanging out of the way.
6) Take off the top strut assembly bolt, then the bottom - make sure you take the top one off, then tilt the rotor towards yourself so the strut doesn't stick on the mounting point. Be careful when taking off that last bolt, the front struts have quite a bit of compression left in them. Also, use a block/brick/tire/spare jack to hold the wheel assembly up so it doesn't just fall down once the bolts are out.
7) Once the bolts are out, pull the strut assembly off to the side so it isn't hitting your speedo/brake lines or CV boot, then take off the bolts at the top holding the strut on and pull the strut assembly out carefully. (NOTE: If you have problems removing the strut, work the Spring Compressors in there and compress the spring to give you a little more wiggle room. Be careful of your CV Boot Joint!!)
8) Now that it's out, compress the spring using the spring compressors (VERY necessary! It wasn't on EP3s, but FA/FG's are compressed WAY more), then take the top strut bolt the rest of the way off. (This is what took me forever since I didn't have a open wrench that could get a grip on the bolt, and I didn't loosen the bolt while it was on the car.)
9) After it's off, remove the spring compressors, take the Top Hat/Pillow ball mount off the stockers, and put them on the B&G's. (NOTE: This isn't necessary if you bought aftermarket pillowball mounts!). Also make sure you notice the arrow on the top hat, it should be facing in towards the engine when you install it back in.
10) Adjust the height on the front Coilovers if they have that option, then put the Coilover assembly back in the same way you took the stock ones out, put the 3 top bolts on to hold it in place.
11) If you got the SPC front camber bolts, put the camber bolt in the top bolt hole.
12) Tighten the top 3 bolts, then tighten the top strut bolt with the 19mm open ended socket wrench 'till it turns the thread.
13) Now the B&Gs I got didn't have a long enough stem for the ABS line to clip back into. I need to send pics to CorSport which will be relayed to B&G about this. So for now, loosely zip tie the ABS line to keep it out of the way while driving. I honestly don't think it would catch or pull or get snagged while driving w/o a zip tie, but better be safe than sorry.
14) Attach the brake line to the mounting point, and use the 8mm 1.25 threaded nuts that you bought. The stockers are welded onto the stock assembly
.15) Put your Front wheels back on, adjust camber using the SPC bolts, then lower the vehicle.
Fronts are done!
Rears:
1) Break the rear wheel lug nuts.
2) Use the rear cross member (in front of the gas tank, behind the sway bar) to lift the vehicle, then put jack stands under the two rear jack points. (see manual)
3) Take the wheels off.
4) Pop the brake line out of the bracket. Use a flat head screwdriver carefullly.
5) Unbolt the brake line bracket from the body.
6) Take the ABS line out of it's bracket.
7) Loosen the rear shock bolt on the top. Just pull back the trunk lining and use a wrench and a hex key to loosen it.
8) Here's where you can do one of two things. Loosen the lower camber arm bolt itself, or loosen the 10mm bolt, then use two wrenches to break the death grip thread.
^^ The little nut is holding the black nut and welded base in place. It turns easier than the other side, but if you have air tools or big muscles, it's unncessary.
9) Put a block/jack/tire under the wheel assemby with a bit of pressure so it doesn't just fall.
10) Make sure you bolt the 10mm bolt back into the base after pulling the camber bolt out.
11) Take out the bolt holding the shock in place.
12) Remove the top bolt holding on the endlink under the vehicle, and loosen the bottom one so the end link is not connected to the sway bar. You will probably need a hex key to loosen the bolts.
13) Remove the two bolts holding the Camber arm in place and remove it if you are going to replace it with an aftermarket one. Otherwise, leave it alone.
14) Here's a pic of the SPC rear arm compared to the stock one.
15) Remove the bolt holding the shock in from the top, then remove the shock.
16) Remove the stock coils. Just twist them away from cables to get it out.
17) Put the new shock from the coilover kit back up in the hole. The B&G came with a washer for the top, and a washer for the bottom of the hole. Tighten it down.
18) Put the SPC/Aftermarket camber arm in place on the body. Just follow the directions that came with it. A note on the SPC camber arms though, the "B" holes START at -3 degrees camber!! So put the bolts in the "A" holes (lol) to get daily driver camber. Here's a link to 8thcivic's DIY for the camber arm and some pics of the SPC.
DIY on 8th Civic. Props to 06blaksi!:
http://www.8thcivic.com/forums...32040
Adjustible camber bolt for the rear arm:
Camber bracket (in the "B" holes!):
Camber arm mounted up and somewhat adjusted:
19) Install the Coils now. Adjust them to the height you want! On B&Gs, you will probably want to leave like 1 or 2 thread only if you are trying to get the tire a little in the well when it's just sitting. Oh, FYI, you can't install the B&Gs upside down...the holes are different
I know!20) Re-install the Camber bolt to the wheel assembly.
21) Re-install the bolt to the bottom of the shock.
22) Re-install the endlink to the sway bar.
23) Re-install the brake line bracket, and ABS line.
24) Put wheels back on.
25) Adjust camber
26) Lower vehicle.
DONE!
Of course, make sure all bolts are tightened back to specification while doing this!! And after you are all done, take the car out for a VERY short jaunt down the street, progressively gaining speed and listen for noises. The fronts will pop once each side (at least they did in mine), and that should be it. After driving it, lift it up, check all the bolts, change the height if you want, and lower it back down again. And then get an alignment
With the B&Gs, I started out at full soft on rebound/dampning, and just now upped the fronts to 11, and rears to 9 (out of 18). Seems to be the best for my style of driving, but I'm sure I will change them after a little while to fit my needs.
All in all, the B&Gs handle AWESOMELY. It has turned my fun handling car into something that I absolutely love to drive around corners in and feel like I'm in full control! I just need some summer tires to take full advantage of this fun now
Feel free to point out mistakes, or better methods to my madness. Remember this is all without previous coil install experience. I'm proud to have done this all myself.
Modified by MonkeyConQueso at 1:44 PM 6/21/2007
Last edited by sdaidoji; 03-04-2011 at 10:10 PM.
03-04-2011
#9
PITA Admin
Administrator
iTrader: (1)
Join Date: Dec 2008
Location: TN
Age: 52
Posts: 14,791
Received 1,446 Likes
on
1,201 Posts
Rep Power: 338 Re: 07 civic rear upper control arm
hope this helps.
Let us know how the process goes.
This can be credited to some members at Honda-tech (I own a 7th gen after all, not a 8th gen )
)
Let us know how the process goes.
This can be credited to some members at Honda-tech (I own a 7th gen after all, not a 8th gen
)
03-04-2011
#10
Live for the Twisties
Administrator
Join Date: Jun 2010
Location: Langley, BC
Posts: 8,580
Likes: 0
Received 5 Likes
on
5 Posts
Rep Power: 260 Re: 07 civic rear upper control arm
I searched the other major forums too, none have specific guides specific to upper control arm replacement. I think the links posted up by sdaidoji are the best guides we can hook you up with.
03-04-2011
#11
PITA Admin
Administrator
iTrader: (1)
Join Date: Dec 2008
Location: TN
Age: 52
Posts: 14,791
Received 1,446 Likes
on
1,201 Posts
Rep Power: 338 Re: 07 civic rear upper control arm
yeah, could not find more useful info either...
But, heck, loking these pics on the DIY... I never paid real attention to the 8th gen suspension until now... Man, these are like some of the older VW golf type suspensions... struts separated from the springs... and coilovers... i... i... bwaahahaha!
have to think that honda is trying to complete the cycle. one day we'll be back to leaf springs... and finally back to no springs at all.
 Prowired Can wait to get started.
Thread
Thread Starter
Honda Civic Forum
Replies
Last Post

