
DIY: EBAY FOGS... need a.s.a.p... HELP!!!

Thread Starter
Registered!!
iTrader: (1)
Joined: Sep 2007
Posts: 148
Likes: 0
From: Sacramento
Rep Power: 0 
DIY: EBAY FOGS... need a.s.a.p... HELP!!!
WELL, Ive been searching around for a DIY for ebay fogs,
but most of the links provided are not working. Can some one
please help me find a link, or and article that has detailed
instruction on how to install them??? THANKS in advanced.
but most of the links provided are not working. Can some one
please help me find a link, or and article that has detailed
instruction on how to install them??? THANKS in advanced.
Registered!!
Joined: Oct 2007
Posts: 64
Likes: 0
Rep Power: 0 Re: DIY: EBAY FOGS... need a.s.a.p... HELP!!!
Hmmm... never really found a link, but I'm running eBay fogs with Nokyo Arctic White bulbs... looks great... it's easy, just DIY without any instructions like me~!  It's hard to make eBay foglights fit flush...
It's hard to make eBay foglights fit flush... Thread Starter
Registered!!
iTrader: (1)
Joined: Sep 2007
Posts: 148
Likes: 0
From: Sacramento
Rep Power: 0 Re: DIY: EBAY FOGS... need a.s.a.p... HELP!!!
I'm going to try to put them in tonight. I ended up
getting a DIY for the 04-05 fogs, which should be
almost the same!
IF ANYONE HAS THE DIY FOR 01-03, LET ME KNOW
getting a DIY for the 04-05 fogs, which should be
almost the same!
IF ANYONE HAS THE DIY FOR 01-03, LET ME KNOW
Joined: Aug 2006
Posts: 8,362
Likes: 1
From: Portland, Oregon
Rep Power: 389 

Re: DIY: EBAY FOGS... need a.s.a.p... HELP!!!
Just adapt the install instructions for the OEM lights off of H&A
- View 2001-2002 4 door Installation Instructions
- View 2001-2002 2 door Installation Instructions
- View 2003 LX-EX Installation Instructions
- View 2003 DX-HX Installation Instructions
Take bumper off, dremel out holes for lights, install them with the mounting hardward provided in the ebay kit. The figure out the wire harness- one part is the ground, the other goes to a bround connector just under the passanger headlight - its probably covered in road grime so spend a few minutes looking for it. Then you need to decide how you want to wire them and do that. remove the center dash par- the one with the cig lighter part and the other side of that connector you plugged your fogs into is taped to the harness in there- its a slgihtly tricky find, but its taped there. From there you use that wire to wire it how you want. I used a seperate switch than what came with the kit because that switch doesnt fit and its garbage... autozone has them- the three pronged one - in/out/ground. Then just hook that up to an inline fuse to the fuse box. I think your set then. You can wire it several different ways. This will be kind of tough for you if you've never stripper a wire and dont understand the concept of grounding... if you've done wire work before you can make it through the install. Having a friend help is always a plug. Dont forget the six pack.
Last edited by TRIZ; Feb 26, 2008 at 05:28 PM.
Thread Starter
Registered!!
iTrader: (1)
Joined: Sep 2007
Posts: 148
Likes: 0
From: Sacramento
Rep Power: 0 New Mod on the Block
iTrader: (35)
Joined: Jul 2004
Posts: 3,473
Likes: 0
From: North Miami Beach, FL
Rep Power: 322 Re: DIY: EBAY FOGS... need a.s.a.p... HELP!!!
the wiring harness is probably not going to line up so you might have to find a way to power them yourself. i wired mine to my 12v accessory outlet.
Registered!!
Joined: Sep 2004
Posts: 114
Likes: 0
From: across the pond from seattle
Rep Power: 0 Re: DIY: EBAY FOGS... need a.s.a.p... HELP!!!
Registered!!
Joined: Nov 2005
Posts: 243
Likes: 0
From: Denton, TX
Rep Power: 253 Re: DIY: EBAY FOGS... need a.s.a.p... HELP!!!
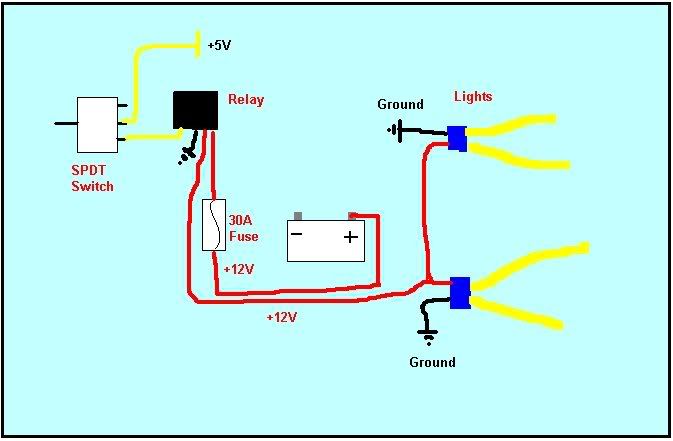
Here is the simplest way to wire them. You can just throw away the wiring harness that came with them if you'd like...That's what I did.
Connect the two positive terminals of the fog lights together and attach a wire to them that will go into the car (I routed the wire over my passenger tire and in through a rubber grommet). Next attach a wire to the positive terminal of your battery and wire in line with a 30Amp fuse (Amperage value may be different depending on how much current you draw.)
Amps = Watts/Volts
I chose 30 just because it's a common fuse even though it's overkill. You may also choose to use a circuit breaker instead of a fuse so that you can just reset it instead of buying another fuse. (you can get them at autozone or a hardware store.)
Wire both of these +12v wires to the corresponding terminals of your relay. It will be something like +12v supply and +12v output.
A small explanation of a relay: The reason for a relay is that most simple switches aren't capable of handling high current loads; A relay is. It is a double switch that, when turned on, closes the gate and allows high current power to flow from the source terminal the output terminal.
Next you will need to ground your relay and connect a wire that will supply the low current voltage to turn the relay on and off. You may choose to have this on/off wire connected to your headlights/parking lights, in which case just splice into the corresponding wire under the dash, or you may choose to have a switch so you can have your fogs on whenever you like (no headlights, low beams, high beams.)
If you choose to wire to a switch there are two options. You can either have the switch wired directly to the battery, in which case you'll need another wire to run to the engine bay, or you can splice into a wire that is only hot (carrying a voltage) when the car is on. I recommend the latter so you don't accidentally leave your fog lights on when the car is off and drain your battery.

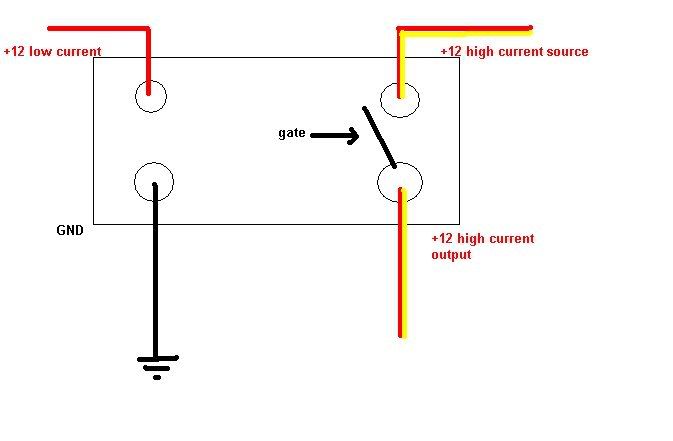
As far as wiring the switch, simply connect two adjacent terminals (if the switch has terminals like the one below.) In the picture below the top wire doesn't actually need to be connected to anything. This switch works by connecting the bottom two pins together in one toggle mode, and in the other mode it conects the top 2 pins. So the pin that isn't going directly into the relay needs to either be wired to the battery or to a wire that is only hot when the car is on, as mentioned above. This supply voltage doesn't necessarily have to be +5V. It just needs to be what your relay is rated for. If you buy one at radioshack or some such store, there will be a wiring diagram on the back that will tell you.

After this is all done, you should be able to fire those puppies up! Good Luck!

Last edited by Lord ET; Feb 27, 2008 at 02:33 PM.
Thread Starter
Registered!!
iTrader: (1)
Joined: Sep 2007
Posts: 148
Likes: 0
From: Sacramento
Rep Power: 0 Re: DIY: EBAY FOGS... need a.s.a.p... HELP!!!
Thanks for the info LORD ET. My friend and I just custom wired it directly to the battery. The harness they provide, doent even make any sense. I wired them to the 12v outlet as well.
(SnOwBoArDeR | FoReVeR)
iTrader: (9)
Joined: Sep 2003
Posts: 2,846
Likes: 0
From: Mission Viejo
Rep Power: 305 Re: DIY: EBAY FOGS... need a.s.a.p... HELP!!!
hey sorry my pictures are sooo large to send through email. but u can use the switch they provided instead of mkaing ur own switch
Registered!!
Joined: Nov 2005
Posts: 243
Likes: 0
From: Denton, TX
Rep Power: 253 Re: DIY: EBAY FOGS... need a.s.a.p... HELP!!!
^^^
Yeah, you can use the switch they provided. Just make sure you have a relay because most switches aren't capable of handling the power that fog lights require.
On another note the program I use to quickly resize pictures is Irfanview. www.irfanview.com
It's as simple as oping the picture in the program --> edit-->resize/resample-->choose resolution--> save

Canadian, Eh!
Joined: Dec 2005
Posts: 2,694
Likes: 0
From: Calgary, Alberta
Rep Power: 278 Re: DIY: EBAY FOGS... need a.s.a.p... HELP!!!
Registered!!
Joined: Nov 2005
Posts: 243
Likes: 0
From: Denton, TX
Rep Power: 253 Re: DIY: EBAY FOGS... need a.s.a.p... HELP!!!
Canadian, Eh!
Joined: Dec 2005
Posts: 2,694
Likes: 0
From: Calgary, Alberta
Rep Power: 278 Re: DIY: EBAY FOGS... need a.s.a.p... HELP!!!

Registered!!
Joined: Nov 2005
Posts: 243
Likes: 0
From: Denton, TX
Rep Power: 253 Re: DIY: EBAY FOGS... need a.s.a.p... HELP!!!
^^
sorry I posted the wrong link... Here are the ones I bought. http://cgi.ebay.com/ebaymotors/ws/eB...m=180183988492
sorry I posted the wrong link... Here are the ones I bought. http://cgi.ebay.com/ebaymotors/ws/eB...m=180183988492

Re: DIY: EBAY FOGS... need a.s.a.p... HELP!!!
you mentioned wiring the switch by looping two pins and doing nothing with the other pin? or did i read it wrong? how does it connect to the relay?
does this work as well?
https://www.civicforums.com/forums/7...tch-relay.html
/End Threadjack
does this work as well?
https://www.civicforums.com/forums/7...tch-relay.html
/End Threadjack
Last edited by Envy; Feb 27, 2008 at 03:57 PM.
Registered!!
Joined: Nov 2005
Posts: 243
Likes: 0
From: Denton, TX
Rep Power: 253 Re: DIY: EBAY FOGS... need a.s.a.p... HELP!!!
you mentioned wiring the switch by looping two pins and doing nothing with the other pin? or did i read it wrong? how does it connect to the relay?
does this work as well?
https://www.civicforums.com/forums/7...tch-relay.html
/End Threadjack
does this work as well?
https://www.civicforums.com/forums/7...tch-relay.html
/End Threadjack
Look at the lower left hand corner of the drawing. That's what I'm talking about. When the switch is 'thrown' in one direction the slider inside makes contact with 2 of the three pins. Either the middle and left, or middle and right. One of the outside pins needs to not be connected so that when the slider is contacting that pin and the middle pin there will be no voltage passing through.
Canadian, Eh!
Joined: Dec 2005
Posts: 2,694
Likes: 0
From: Calgary, Alberta
Rep Power: 278 Re: DIY: EBAY FOGS... need a.s.a.p... HELP!!!
^^
sorry I posted the wrong link... Here are the ones I bought. http://cgi.ebay.com/ebaymotors/ws/eB...m=180183988492
sorry I posted the wrong link... Here are the ones I bought. http://cgi.ebay.com/ebaymotors/ws/eB...m=180183988492


Registered!!
Joined: Jun 2006
Posts: 208
Likes: 0
Rep Power: 0 Re: DIY: EBAY FOGS... need a.s.a.p... HELP!!!
If i could connect it to turn on with the head lights... because i used a relay for my headlights and i still have one plug coming from the car that isnt used would the relay connect with that so i dont have to worry about a siwtch and jus do the postive and ground wire?
Registered!!
Joined: Nov 2005
Posts: 243
Likes: 0
From: Denton, TX
Rep Power: 253 Re: DIY: EBAY FOGS... need a.s.a.p... HELP!!!
honestly you should just be able to splice the low current +V wire from the relay onto the headlight +V wire.
^^ Dex, when I got that switch, it didn't work where I needed it to go. It was meant for the middle console but I've already got 2 switches there. I don't however have a moonroof so I wanted the switch to go there.
^^ Dex, when I got that switch, it didn't work where I needed it to go. It was meant for the middle console but I've already got 2 switches there. I don't however have a moonroof so I wanted the switch to go there.
Canadian, Eh!
Joined: Dec 2005
Posts: 2,694
Likes: 0
From: Calgary, Alberta
Rep Power: 278 Re: DIY: EBAY FOGS... need a.s.a.p... HELP!!!

Registered!!
Joined: Nov 2005
Posts: 243
Likes: 0
From: Denton, TX
Rep Power: 253 Re: DIY: EBAY FOGS... need a.s.a.p... HELP!!!
In my car, the ones over the cupholders are larger...I'm not sure why, but they were. The switch would fit there, but not to the left of the wheel. ??

