
BoostED..... Boilermaker Style. (Edited 4/11/06 see page 4)

Thread Starter
Joined: Jul 2002
Posts: 13,151
Likes: 3
From: Washington DC
Rep Power: 425 

BoostED..... Boilermaker Style. (Edited 4/11/06 see page 4)
Ladies and gentlemen, I'm exhausted. I drove over 900 miles to spend about 14 hours under the car this weekend, but... the turbo has landed.
First things first, I need to publicly thank Gerry (02FPcivic) who not only helped me put this together this weekend, but let me crash at his house. A truly nice guy and I don't think I can thank him enough for the help.
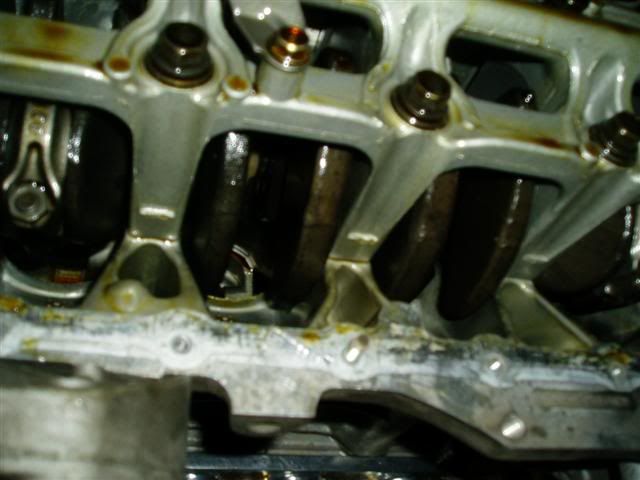
Lets get the party started... someone yank my crank
I'm not going to go big time into details here, a lot of this stuff is known, and I don't intend to make a DIY, but I've got some pointers. Enough of this stuff is pretty well known, and if you don't understand it, you need to learn it before trying crap like this. If you want my opinion, even if you buy a kit, this is NOT a driveway DIY project. You need someone who can TIG weld, and you probably also need some saws and other tools to do metal work with.
Sufficient to say, mine is custom, and there are no plans whatsoever of duplicating it.
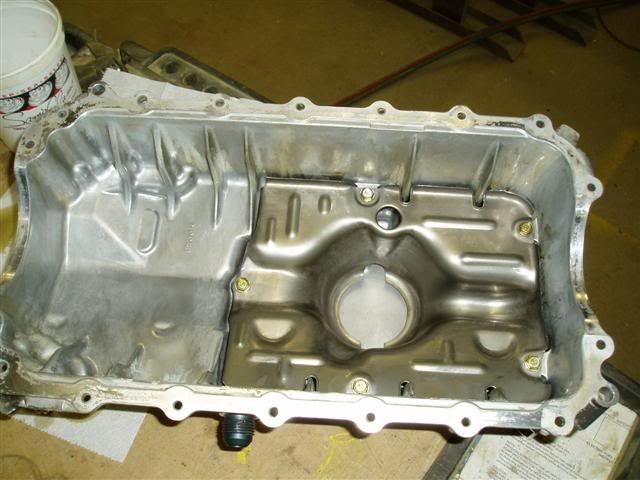
This is the inside of the oil pan in case you've never seen it
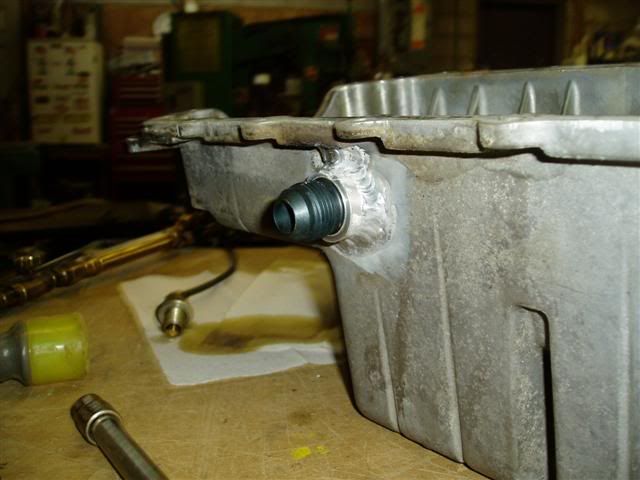
This is the oil pan with a return bung welded in (this is the part where you need the TIG), don't bolt it in, the oil pan side isnt flat. Also 1 tube of Hondabond= 1 Oil pan Gasket
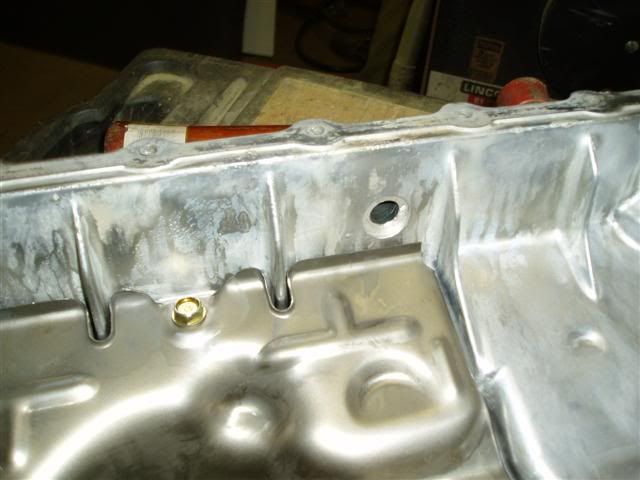
Good aim puts the hole above the sump baffle, between the bolt holes and between the support ribs. Take the pan off before you drill, and remove the baffle so you're sure to get all the drill shavings out.
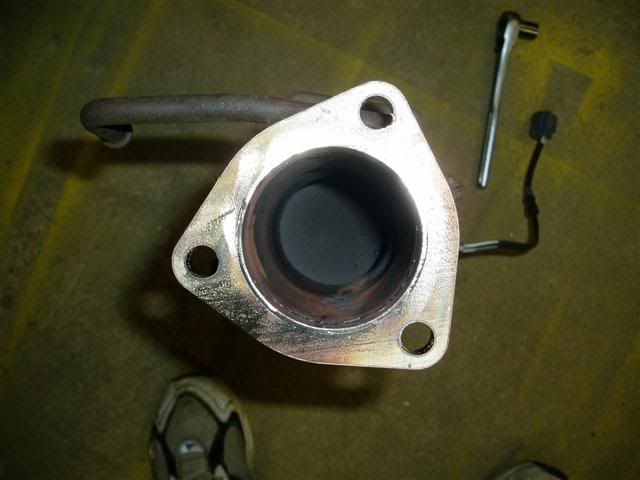
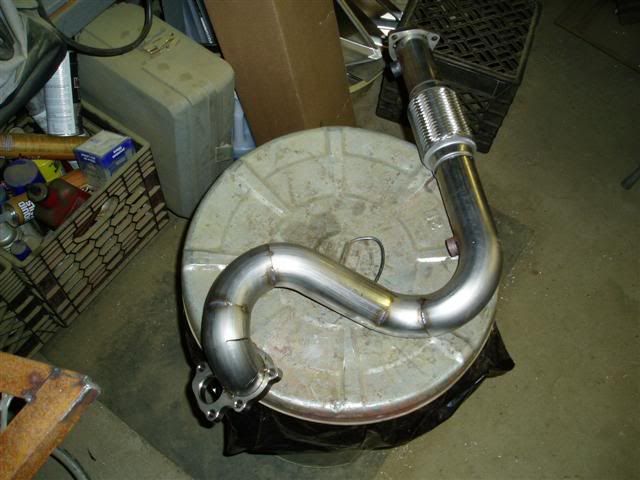
We burned out the cheater pipe, so now its a true 2.25" DP. It was flanged, and so is the turbo DP.
I don't need no stinking charge pipes! Thats the top of the intercooler, into a 4 ply reinforced elbow, and into the engine. Piece o' cake.
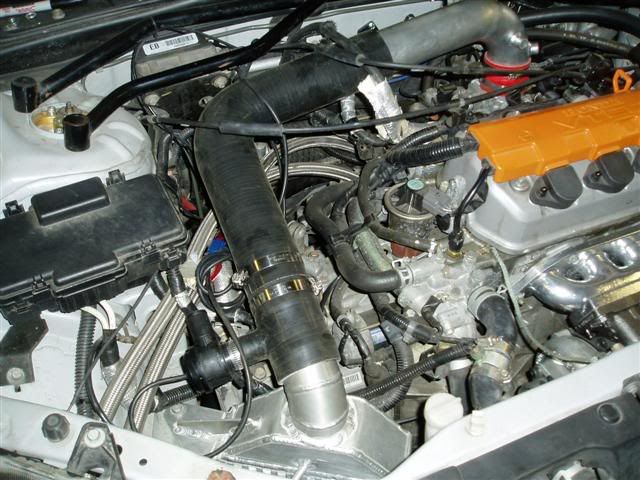
Side note: the intercooler is a side mount, don't ask me about it, I'm pretty sure no one else wants to deal with what we had to do to make it work. Good thing is there's basically no charge pipe. We welded an elbow to the turbo compressor housing, it goes to an elbow which feeds the bottom side of the IC, I'll post a picture later.
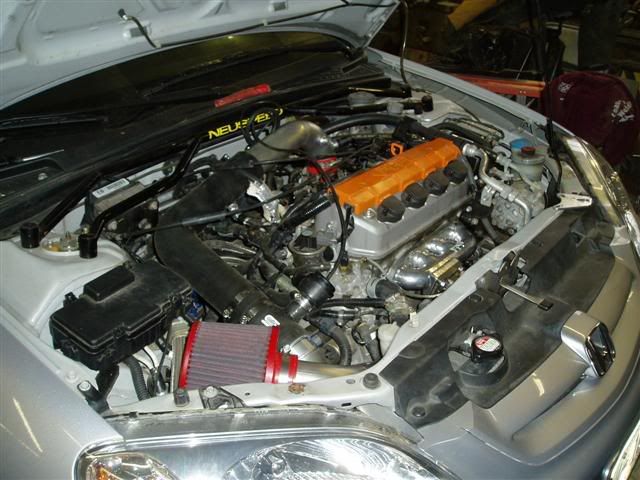
Getting a little short on room by the time we got to the intake. It fits, but its all tight. I'll probably end up with a cylindrical filter rather than the conical one, and may end up making the lower radiator hose into a partial hard line.

Somehow it all fits....
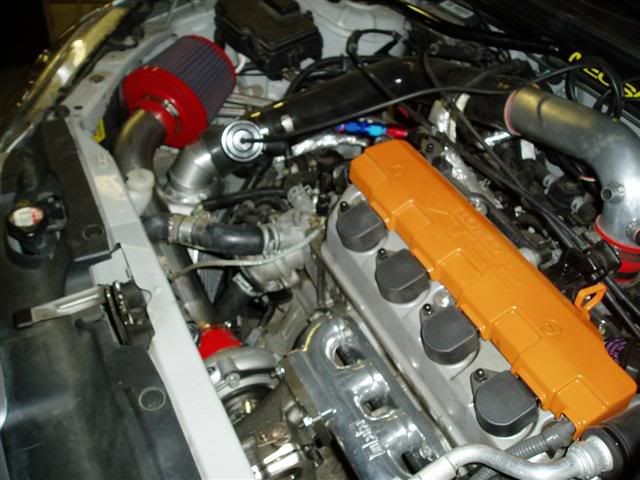
The other side
And the crazy *** downpipe, it clears the AC, barely. its not done yet, it still needs to have the WG dumptube put in, and get welded together.
I'll post more later, the parts are all still in my trunk.
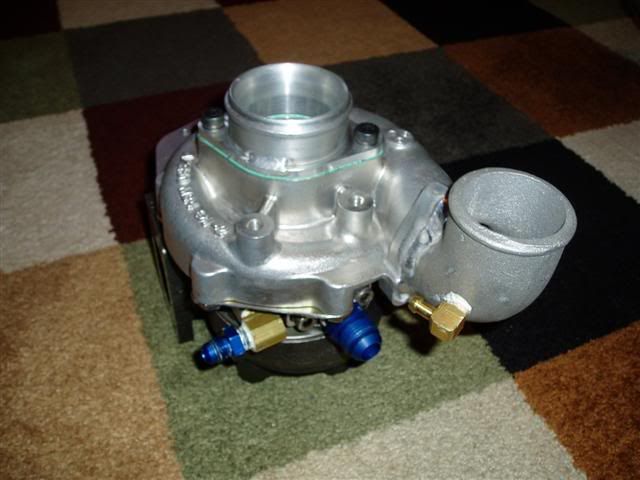
Its a GT28R, on a HKS manifold, yes we had to notch the core support, but everything else fits. I would think with a smaller compressor housing you wouldn't need to mess with the core support.
IT DOES RUN (See page 4)
Don't ask me how it feels, or anything of the sort. Its not installed. We test fit and mocked everything up, and if you haven't figured out by now based on what I said about the DP not being done, etc..... its not installed. I'll be at Summit Point next week, I didn't want to blow it up a week after installing it. Its going in April 9.
First things first, I need to publicly thank Gerry (02FPcivic) who not only helped me put this together this weekend, but let me crash at his house. A truly nice guy and I don't think I can thank him enough for the help.
Lets get the party started... someone yank my crank
I'm not going to go big time into details here, a lot of this stuff is known, and I don't intend to make a DIY, but I've got some pointers. Enough of this stuff is pretty well known, and if you don't understand it, you need to learn it before trying crap like this. If you want my opinion, even if you buy a kit, this is NOT a driveway DIY project. You need someone who can TIG weld, and you probably also need some saws and other tools to do metal work with.
Sufficient to say, mine is custom, and there are no plans whatsoever of duplicating it.
This is the inside of the oil pan in case you've never seen it
This is the oil pan with a return bung welded in (this is the part where you need the TIG), don't bolt it in, the oil pan side isnt flat. Also 1 tube of Hondabond= 1 Oil pan Gasket
Good aim puts the hole above the sump baffle, between the bolt holes and between the support ribs. Take the pan off before you drill, and remove the baffle so you're sure to get all the drill shavings out.
We burned out the cheater pipe, so now its a true 2.25" DP. It was flanged, and so is the turbo DP.
I don't need no stinking charge pipes! Thats the top of the intercooler, into a 4 ply reinforced elbow, and into the engine. Piece o' cake.
Side note: the intercooler is a side mount, don't ask me about it, I'm pretty sure no one else wants to deal with what we had to do to make it work. Good thing is there's basically no charge pipe. We welded an elbow to the turbo compressor housing, it goes to an elbow which feeds the bottom side of the IC, I'll post a picture later.
Getting a little short on room by the time we got to the intake. It fits, but its all tight. I'll probably end up with a cylindrical filter rather than the conical one, and may end up making the lower radiator hose into a partial hard line.
Somehow it all fits....
The other side
And the crazy *** downpipe, it clears the AC, barely. its not done yet, it still needs to have the WG dumptube put in, and get welded together.
I'll post more later, the parts are all still in my trunk.
Its a GT28R, on a HKS manifold, yes we had to notch the core support, but everything else fits. I would think with a smaller compressor housing you wouldn't need to mess with the core support.
IT DOES RUN (See page 4)
Don't ask me how it feels, or anything of the sort. Its not installed. We test fit and mocked everything up, and if you haven't figured out by now based on what I said about the DP not being done, etc..... its not installed. I'll be at Summit Point next week, I didn't want to blow it up a week after installing it. Its going in April 9.
Last edited by Boilermaker1; Apr 11, 2006 at 08:35 PM.


Registered!!
Joined: Jan 2003
Posts: 1,222
Likes: 0
From: Middleboro,MA
Rep Power: 298 Should be pretty stealthy. We added a port to recirculate the bov to keep it quiet after those pics were taken. What a bastard it was to get it all in there. Everything seems great though, I can wait to see how it all works out.


Talk about unique............
Will there be any loss in performance because of where the IC is?
More pics, I wanna see how it fits in there.

Will there be any loss in performance because of where the IC is?
More pics, I wanna see how it fits in there.
Last edited by jackburton; Mar 26, 2006 at 05:49 PM.
Thread Starter
Joined: Jul 2002
Posts: 13,151
Likes: 3
From: Washington DC
Rep Power: 425
Will there be any loss in performance because of where the IC is?

Joined: Nov 2003
Posts: 3,318
Likes: 0
From: Boise, Idaho
Rep Power: 329 EX = Aluminum pan
Originally Posted by ncirom2003
thats freakin sick!, why is your pan aluminum? mine is steel and a larger baffle thats spot welded in not bolted.
Registered!!
iTrader: (1)
Joined: Jul 2002
Posts: 2,699
Likes: 0
From: Montreal, Quebec, Canada
Rep Power: 0
Originally Posted by turboengnr
Looks sweet! I cant wait to see the results and hear how close it is to your expectations.

Thread Starter
Joined: Jul 2002
Posts: 13,151
Likes: 3
From: Washington DC
Rep Power: 425
Originally Posted by XxJDMCivicxX
What he said! Also your helping me decide between the gt28rs and the gt30
 Sorry Boil
Thread Starter
Joined: Jul 2002
Posts: 13,151
Likes: 3
From: Washington DC
Rep Power: 425 More pictures.... here's the final intake arm, the big port is for the BOV recirc, the little one is a slashcut for crankcase ventilation.
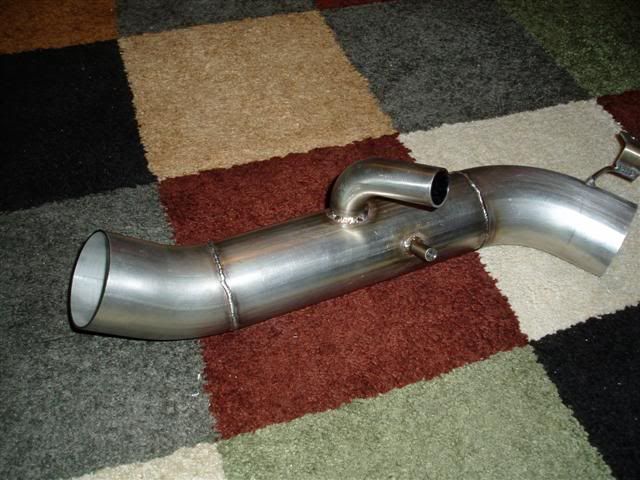
This is the whole intercooler.... the top feeds the motor, the turbo feeds the
"sink drain" at the bottom.
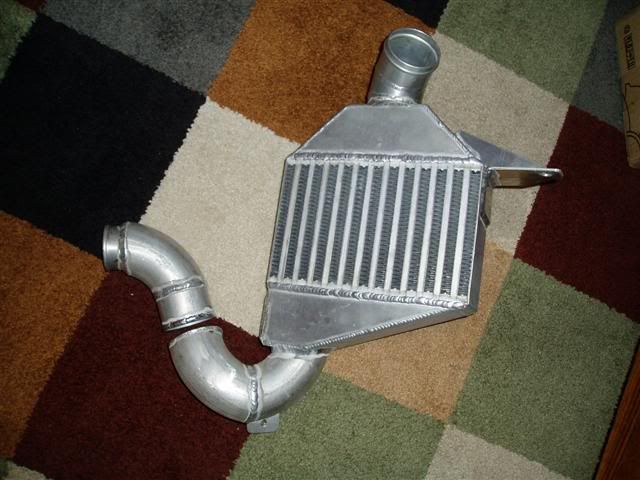
The turbo has an elbow welded to the compressor, it couples directly to the intercooler inlet.
This is the whole intercooler.... the top feeds the motor, the turbo feeds the
"sink drain" at the bottom.
The turbo has an elbow welded to the compressor, it couples directly to the intercooler inlet.
Thread Starter
Joined: Jul 2002
Posts: 13,151
Likes: 3
From: Washington DC
Rep Power: 425 Why do I need a big one?
7psi on a fairly small turbo doesn't need an enormous intercooler, this one should be more than enough to support 180 or so HP without issue. Why waste the pressure drop with a 28x6x3 core when I don't need to?
7psi on a fairly small turbo doesn't need an enormous intercooler, this one should be more than enough to support 180 or so HP without issue. Why waste the pressure drop with a 28x6x3 core when I don't need to?
the way you have it positioned, if you ever go to the track, just pull off your headlight...
the smic should get sufficient flow there, might want to route some kind of plastic stuff for a "ram air" type thing...but itll be fine
the smic should get sufficient flow there, might want to route some kind of plastic stuff for a "ram air" type thing...but itll be fine
Thread Starter
Joined: Jul 2002
Posts: 13,151
Likes: 3
From: Washington DC
Rep Power: 425
Originally Posted by Boost_Junkie
the way you have it positioned, if you ever go to the track, just pull off your headlight...
the smic should get sufficient flow there, might want to route some kind of plastic stuff for a "ram air" type thing...but itll be fine
the smic should get sufficient flow there, might want to route some kind of plastic stuff for a "ram air" type thing...but itll be fine
Another duct from under the car in the splash guard (part of which is going bye bye) and I'm considering pulling out the radiator overflow and replacing it with a smaller catch tank... which would free up a huge opening through the lower radiator mouth. Its in a pretty good spot for airflow with a couple minor modifications.

