
DIY Drum Brake Shoe Replacement

Thread Starter
Joined: Jul 2002
Posts: 13,151
Likes: 3
From: Washington DC
Rep Power: 425 

DIY Drum Brake Shoe Replacement
I should be charging about $20 per head to view this. I can't believe its 2005, this car's been out for the better part of 5 years and no one has written this yet.
You need
2 M8x20mm or longer bolts
2 flathead screwdrivers
Needlenose pliers (maybe 2 sets)
OR drum brake spring pliers (eliminates the need for screwdrivers)
1 Honda Brake Shoe Kit - Part Number 43053-S5D-A00 - $47 and change from the dealer
12mm wrench
Phillips head screwdriver
Jack up car, put on stands, remove rear wheels, disengage the parking brake.
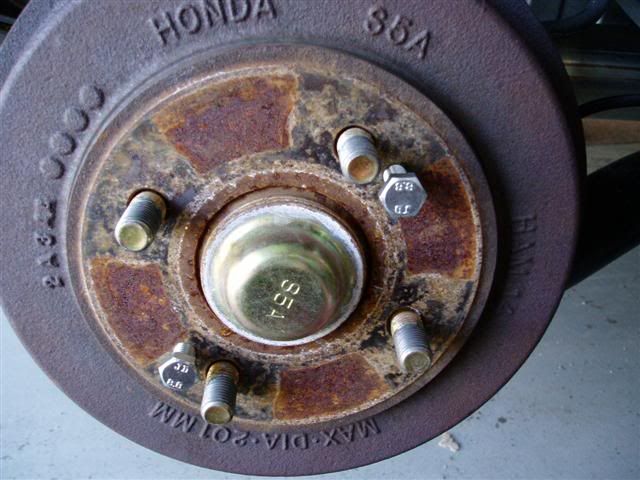
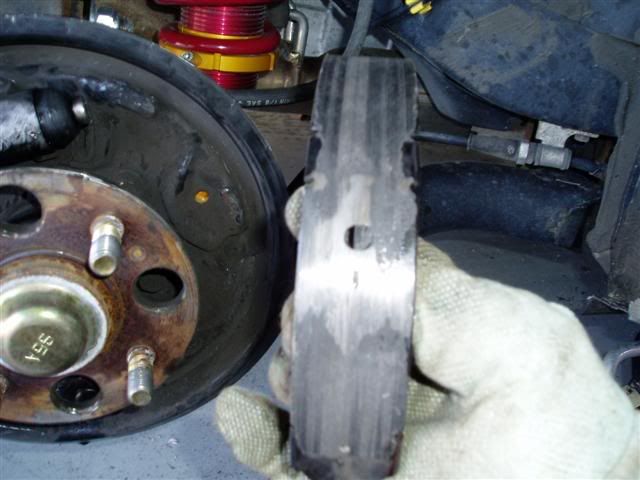
Thread the 2 8mm bolts into the drum as shown. Turn 2 revolutions at a time, then switch to the other bolt so the drum comes off straight. At some point the drum will pop loose, just slide it off the studs. Measure the inner diameter of it, it needs to be less than 201mm.... if its not, then buy new drums.
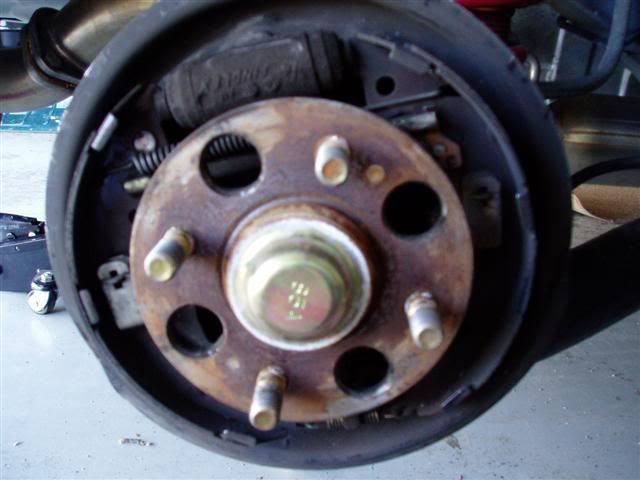
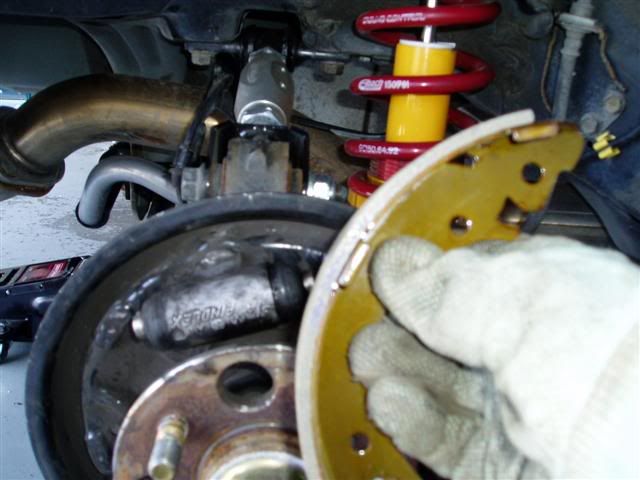
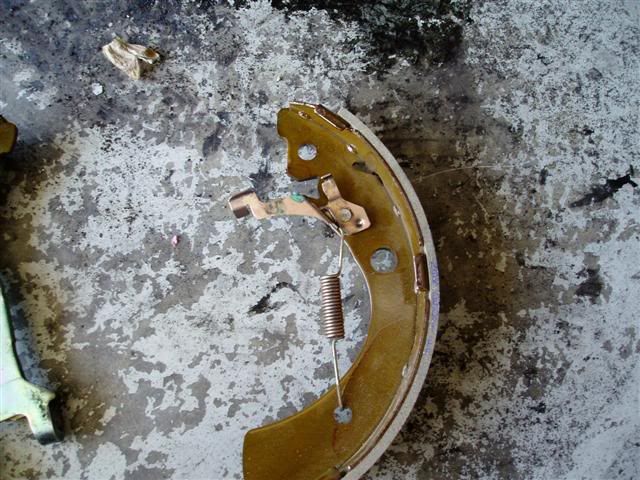
This is your enemy. Look it over.... it needs to all go back together like this. The tube at the top is the wheel cylinder... inspect it for leaks. If its leaking, replace it too.
You should see 2 springs.... a long one at the top, and a short one at the bottom.
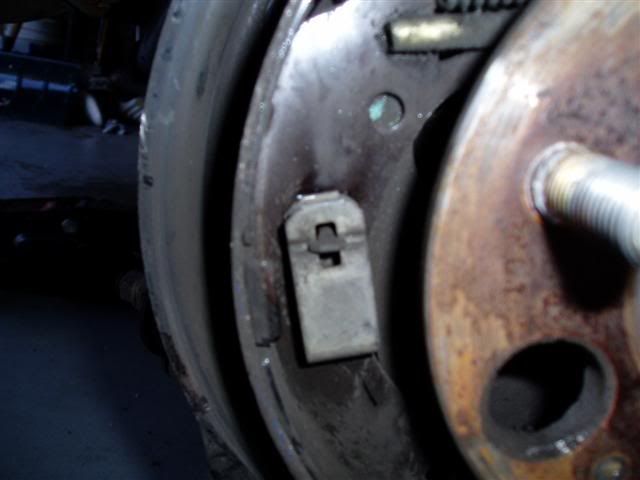
These clips hold the shoes in place. With the needle nose pilers and a screwdriver, depress the spring and turn the pin that holds the shoes in place. There's one per shoe.
Then,
Remove the bottom return spring first, then release the top one. Once you do that, the shoes will be separated and you can remove the front one. Make sure to grab both pieces of the clevis that goes between the 2 shoes (its the rod under the top return spring). The rear shoe will be loose now, but the parking brake cable also needs to be disconnected. Disconnect it from the clip.
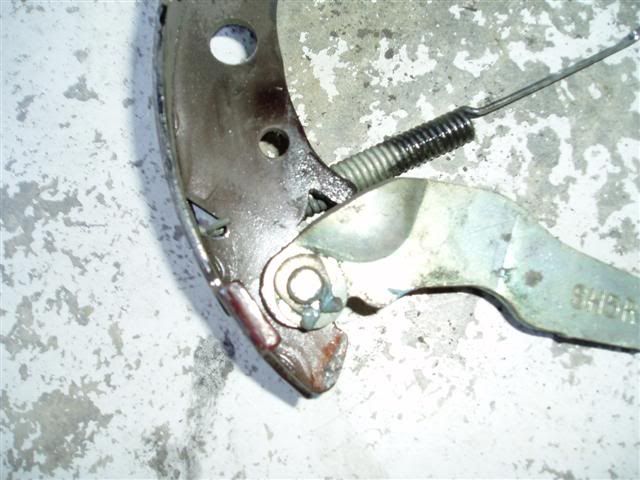
Once the rear shoe is out, flip it over, you'll see how the parking brake arm is connected. You need to remove the U clip. I used a dremel and just ground it from the edge in until it came off. If you do this, be careful not to grind the pin.
Old shoe vs. New shoe... I waited too long. You're supposed to replace them long before this happens.
Reassembly
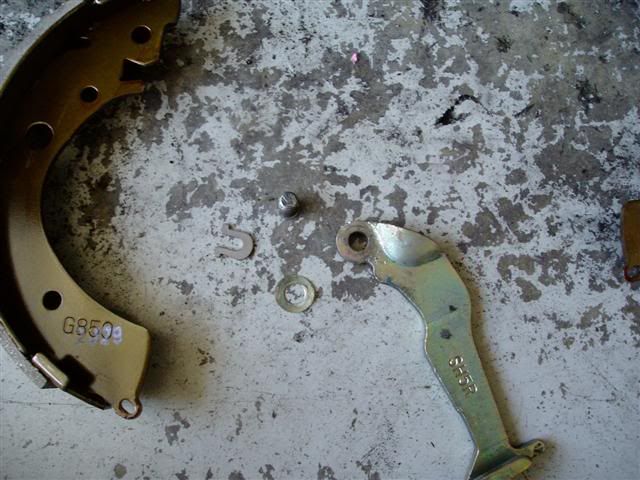
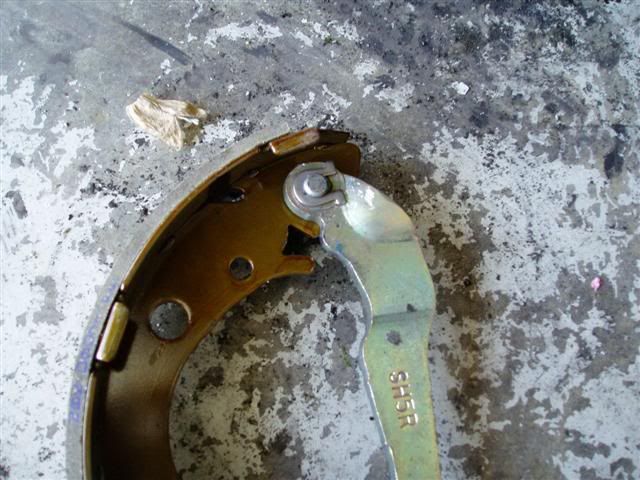
The Honda kit comes with new U clips and retaining pins/springs. This is why I recommend you buy it. If not, you need to buy new U clips. This is the parking brake mechanism. Put the pin through the front side of the shoe (the side you can see when its installed) the put the parking brake arm and wave washer on the back side, then install the U-clip. Squeeze the end together so it doesn't come off.
Assembled
On the front shoe, you need to assemble the self-adjust mechanism. Install the clip then put the spring into the hole like in the picture.
Now... here's the hard, frustrating part. You need to put all this crap back into place. Shorten the clevis by screwing the threaded portion all the way in. You'll notice that one side is missing a tab on it... thats for the parking brake. First, you need to reconnect the parking brake lever to the cable. That will leave the rear shoe hanging in place. Then put it back into its slot in the wheel cylinder. DON'T push hard on it, you'll pop piston for the front shoe out of the cylinder. Then, put the clevis on the front shoe, making sure the self-adjust tab fits in its slot in the clevis fork. Slide the front shoe in place, lining up the clevis in the slot for it in the rear shoe. Hold it there and re-install the top spring (extra hands is good).

Once you got that, and it may take a few tries, reinstall the bottom spring, making sure the shoes are resting behind the tab (if they're in front of it, then they won't pivot and you'll have no braking force), then install the rear spring with the spring behind the shoes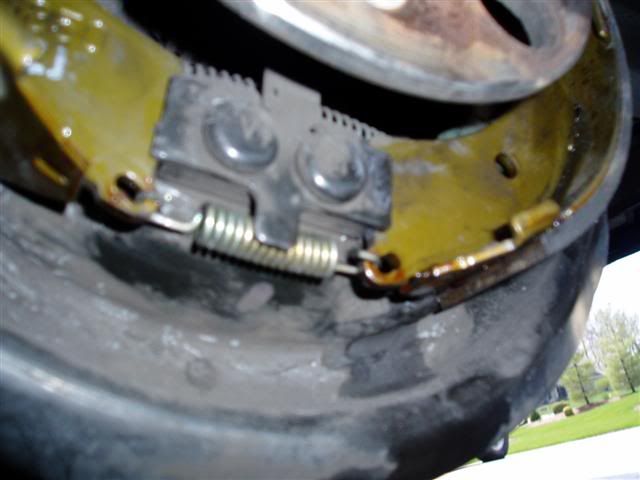
Then reinstall the retainer pins and springs. Magic.... its all done and this pic looks like the one you started with, except the shoes have some lining on them now and they're army green.
Put the drum back on.
Pump the brakes a couple times to reset the self-adjusters. Plan on bleeding the brakes regardless of how good or bad the install goes. Its always a wise idea.
Then re-adjust the parking brake. If you yank it, it probably goes up and doesn't do anything. Remove the 2 phillips head screws that hold the back of the center console in place. Then lift up on the e-brake cover and look down... there's a 12mm nut on that the line the handle is attached to. Release the e-brake and turn it to shorten the line and take slack out of the cable. Pull the e-brake again and try to turn the drums. If they're still turning, you need to tighten more. If they stop, then you're good.
Put the wheels back on. Take the car out.... do 5-10 stops from 40-5 (Don't completely stop), then drive around for a little, then do 5-10 hard stops from 40-5 to bed the shoes and make sure the self-adjusters are fully adjusted. Go easy on them for a little bit, then have at it.
This *looks* easy. In concept it is. I mean... look at it, you don't even need a socket wrench. Its just very frustrating when the springs don't go back on, and its a very tight place to work in. It took me the better part of 3.5-4 hours to do, about equal time on both sides. I had the pages from the Honda manual on hand when I did this.... it only helped for the basics. I had them both opened up at the same time, and basically re-assembled the first one by looking at the second one.
You need
2 M8x20mm or longer bolts
2 flathead screwdrivers
Needlenose pliers (maybe 2 sets)
OR drum brake spring pliers (eliminates the need for screwdrivers)
1 Honda Brake Shoe Kit - Part Number 43053-S5D-A00 - $47 and change from the dealer
12mm wrench
Phillips head screwdriver
Jack up car, put on stands, remove rear wheels, disengage the parking brake.
Thread the 2 8mm bolts into the drum as shown. Turn 2 revolutions at a time, then switch to the other bolt so the drum comes off straight. At some point the drum will pop loose, just slide it off the studs. Measure the inner diameter of it, it needs to be less than 201mm.... if its not, then buy new drums.
This is your enemy. Look it over.... it needs to all go back together like this. The tube at the top is the wheel cylinder... inspect it for leaks. If its leaking, replace it too.
You should see 2 springs.... a long one at the top, and a short one at the bottom.
These clips hold the shoes in place. With the needle nose pilers and a screwdriver, depress the spring and turn the pin that holds the shoes in place. There's one per shoe.
Then,
Remove the bottom return spring first, then release the top one. Once you do that, the shoes will be separated and you can remove the front one. Make sure to grab both pieces of the clevis that goes between the 2 shoes (its the rod under the top return spring). The rear shoe will be loose now, but the parking brake cable also needs to be disconnected. Disconnect it from the clip.
Once the rear shoe is out, flip it over, you'll see how the parking brake arm is connected. You need to remove the U clip. I used a dremel and just ground it from the edge in until it came off. If you do this, be careful not to grind the pin.
Old shoe vs. New shoe... I waited too long. You're supposed to replace them long before this happens.
Reassembly
The Honda kit comes with new U clips and retaining pins/springs. This is why I recommend you buy it. If not, you need to buy new U clips. This is the parking brake mechanism. Put the pin through the front side of the shoe (the side you can see when its installed) the put the parking brake arm and wave washer on the back side, then install the U-clip. Squeeze the end together so it doesn't come off.
Assembled
On the front shoe, you need to assemble the self-adjust mechanism. Install the clip then put the spring into the hole like in the picture.
Now... here's the hard, frustrating part. You need to put all this crap back into place. Shorten the clevis by screwing the threaded portion all the way in. You'll notice that one side is missing a tab on it... thats for the parking brake. First, you need to reconnect the parking brake lever to the cable. That will leave the rear shoe hanging in place. Then put it back into its slot in the wheel cylinder. DON'T push hard on it, you'll pop piston for the front shoe out of the cylinder. Then, put the clevis on the front shoe, making sure the self-adjust tab fits in its slot in the clevis fork. Slide the front shoe in place, lining up the clevis in the slot for it in the rear shoe. Hold it there and re-install the top spring (extra hands is good).
Once you got that, and it may take a few tries, reinstall the bottom spring, making sure the shoes are resting behind the tab (if they're in front of it, then they won't pivot and you'll have no braking force), then install the rear spring with the spring behind the shoes
Then reinstall the retainer pins and springs. Magic.... its all done and this pic looks like the one you started with, except the shoes have some lining on them now and they're army green.
Put the drum back on.
Pump the brakes a couple times to reset the self-adjusters. Plan on bleeding the brakes regardless of how good or bad the install goes. Its always a wise idea.
Then re-adjust the parking brake. If you yank it, it probably goes up and doesn't do anything. Remove the 2 phillips head screws that hold the back of the center console in place. Then lift up on the e-brake cover and look down... there's a 12mm nut on that the line the handle is attached to. Release the e-brake and turn it to shorten the line and take slack out of the cable. Pull the e-brake again and try to turn the drums. If they're still turning, you need to tighten more. If they stop, then you're good.
Put the wheels back on. Take the car out.... do 5-10 stops from 40-5 (Don't completely stop), then drive around for a little, then do 5-10 hard stops from 40-5 to bed the shoes and make sure the self-adjusters are fully adjusted. Go easy on them for a little bit, then have at it.
This *looks* easy. In concept it is. I mean... look at it, you don't even need a socket wrench. Its just very frustrating when the springs don't go back on, and its a very tight place to work in. It took me the better part of 3.5-4 hours to do, about equal time on both sides. I had the pages from the Honda manual on hand when I did this.... it only helped for the basics. I had them both opened up at the same time, and basically re-assembled the first one by looking at the second one.
Last edited by Boilermaker1; Oct 31, 2006 at 09:43 AM.
nice DIY!
there are two things that you seemed forgot to do..........
1. did you do anything to the star-rachet mechanism? they need to be re-adjusted....not just by the nut under the console.....but manually by turning the wheels and see whether they stop by 1~2 rotations..
2. you forgot to put some grease behind the pads? =)
ThE FaMiLy SeDaN
iTrader: (21)
Joined: Jul 2002
Posts: 4,221
Likes: 0
From: UCF, Florida, US
Rep Power: 0 dude i took mine apart to do this while back...
after 3 hours said forget it..
the damn pads wouldnt come off right and then fluid was leaking... i was like UGHHHHHH
put em back on.. oh well
after 3 hours said forget it..
the damn pads wouldnt come off right and then fluid was leaking... i was like UGHHHHHH
put em back on.. oh well
Thread Starter
Joined: Jul 2002
Posts: 13,151
Likes: 3
From: Washington DC
Rep Power: 425
Originally Posted by zen_master
nice DIY!
there are two things that you seemed forgot to do..........
1. did you do anything to the star-rachet mechanism? they need to be re-adjusted....not just by the nut under the console.....but manually by turning the wheels and see whether they stop by 1~2 rotations..
2. you forgot to put some grease behind the pads? =)
there are two things that you seemed forgot to do..........
1. did you do anything to the star-rachet mechanism? they need to be re-adjusted....not just by the nut under the console.....but manually by turning the wheels and see whether they stop by 1~2 rotations..
2. you forgot to put some grease behind the pads? =)
Honda replacement shoes come with a sprayed on film coating... no lube required. You can see where it globbed in the pictures.
Registered!!
iTrader: (13)
Joined: Apr 2003
Posts: 17,176
Likes: 3
From: Miami (Pembroke Pines), Florida
Rep Power: 454 Hey boilermaker, did the new rear brake shoe kit include new return springs and the other springs, I think there are 4 of them? Or did it just have the new u-clips and retaining springs?
Superior Evolutionary Element Destined-factor
iTrader: (10)
Joined: Apr 2004
Posts: 1,290
Likes: 0
From: Toronto
Rep Power: 0 i'm gonna paint my drums using a few steps of this DIY, black rims dont look good with rusty looking drums. it will also give me a chance to see how much life i've got on the shoes until they need replacing.
Thread Starter
Joined: Jul 2002
Posts: 13,151
Likes: 3
From: Washington DC
Rep Power: 425
Originally Posted by streetglower
Hey boilermaker, did the new rear brake shoe kit include new return springs and the other springs, I think there are 4 of them? Or did it just have the new u-clips and retaining springs?
Registered!!
iTrader: (13)
Joined: Apr 2003
Posts: 17,176
Likes: 3
From: Miami (Pembroke Pines), Florida
Rep Power: 454
Originally Posted by wonderz
.... how much is wheel cylinder?
The Declaration of Independence was written on marijuna paper
iTrader: (3)
Joined: Apr 2004
Posts: 1,486
Likes: 0
From: Chino Hills, Ca
Rep Power: 284
Originally Posted by rijowysock
dude i took mine apart to do this while back...
after 3 hours said forget it..
the damn pads wouldnt come off right and then fluid was leaking... i was like UGHHHHHH
put em back on.. oh well
after 3 hours said forget it..
the damn pads wouldnt come off right and then fluid was leaking... i was like UGHHHHHH
put em back on.. oh well

you can ask for the rear brake kit when you go to the dealer or www.hondaautomotiveparts.com
Escaped Convict
iTrader: (30)
Joined: Jun 2001
Posts: 6,450
Likes: 0
From: Westminster, California, US
Rep Power: 369 good DIY.
IMO its such a bi*tch to do the rear ones.. and places charge so much for it.
I rather swap front disc pads or (had we have rear disc pads) anyday of the week than dealing with those silly drums and shoes.
IMO its such a bi*tch to do the rear ones.. and places charge so much for it.
I rather swap front disc pads or (had we have rear disc pads) anyday of the week than dealing with those silly drums and shoes.


formerly 2k1CivicRacer
iTrader: (1)
Joined: Mar 2003
Posts: 1,429
Likes: 0
From: Hercules, Cali
Rep Power: 0 i got my car in 01 so imma need to do this so with caculating my miles around 99000 to the year car was boght ugh.... yup need to do...just been lazy.. so any one know how much shops charge just in case i get frustrated on doing the diy.
T.I.A.
T.I.A.
I need TP for my bunghole
iTrader: (3)
Joined: Jan 2003
Posts: 7,103
Likes: 0
From: OXNARD, CA. SoCal. "805", North of L.A.
Rep Power: 361
Originally Posted by joe6680
how many miles do u have that you needed to do this. I have 53,000 miles on mine and about 80% left on the shoes.
Also, the two bolts to the top right the pic that are used to hold a brake line bracket can used to back the drums off too.


Thread Starter
Joined: Jul 2002
Posts: 13,151
Likes: 3
From: Washington DC
Rep Power: 425 What first 2 bolts? There are no bolts. the 2 bolts you stick in the threaded holes on the drum are just to push the drum out of its seat.

Registered!!
Joined: Aug 2005
Posts: 13
Likes: 0
From: one step ahead of you, MD
Rep Power: 0 
this looks like a PITA
Very, very good write up, this is why I have never bought a car with drums in the rear. Few quick questions. Are there aftermarket shoes that are better than stock? I ask because I think honda oem brakes suck, and I can't stand the weak stopping power of my girlfriends civic. (she likes my braking power, I still think it's weak). I checked her front pads when I replaced her front tires, and those need to go @ 32k, and I figured I might as well do the shoes before winter comes, and I get lazy in the garage.
I'm sure it's all the same between the civics and the lx accords, so I'll look in my helms, but very great writeup nonetheless :thumbsup: :thumbsup: !
Registered!!
iTrader: (13)
Joined: Apr 2003
Posts: 17,176
Likes: 3
From: Miami (Pembroke Pines), Florida
Rep Power: 454
Originally Posted by 98EXL
this looks like a PITA
Very, very good write up, this is why I have never bought a car with drums in the rear. Few quick questions. Are there aftermarket shoes that are better than stock? I ask because I think honda oem brakes suck, and I can't stand the weak stopping power of my girlfriends civic. (she likes my braking power, I still think it's weak). I checked her front pads when I replaced her front tires, and those need to go @ 32k, and I figured I might as well do the shoes before winter comes, and I get lazy in the garage.
I'm sure it's all the same between the civics and the lx accords, so I'll look in my helms, but very great writeup nonetheless :thumbsup: :thumbsup: !
Very, very good write up, this is why I have never bought a car with drums in the rear. Few quick questions. Are there aftermarket shoes that are better than stock? I ask because I think honda oem brakes suck, and I can't stand the weak stopping power of my girlfriends civic. (she likes my braking power, I still think it's weak). I checked her front pads when I replaced her front tires, and those need to go @ 32k, and I figured I might as well do the shoes before winter comes, and I get lazy in the garage.
I'm sure it's all the same between the civics and the lx accords, so I'll look in my helms, but very great writeup nonetheless :thumbsup: :thumbsup: !
Thread Starter
Joined: Jul 2002
Posts: 13,151
Likes: 3
From: Washington DC
Rep Power: 425 The split in pressure is almost 5:1. The rear shoes do next to nothing, so yeah, performance shoes are useless... they basically just serve the purpose of putting enough force on the rear end to keep it down if you slam them on.

Thread Starter
Joined: Jul 2002
Posts: 13,151
Likes: 3
From: Washington DC
Rep Power: 425 Its a variable. There's no answer. According to Honda ~60K.
The definition of one persons normal driving is different than another.
The definition of one persons normal driving is different than another.

