
iPod Install in 2001 Honda Civic


Thread Starter
Registered!!
Joined: Apr 2002
Posts: 305
Likes: 1
From: Rockville, Maryland
Rep Power: 0 
iPod Install in 2001 Honda Civic
This is not my car, but I saw it on the net and thought it might benefit others.
Ipod Install website
Copied from the website for the lazy people.
The following is a description of how I was able to install my new iPod into my 2001 Honda Civic EX.
Edit 2003-07-20 13:07 - added the pictures
1) Acquire the necessary parts and do your homework�
First, you�ll need the HON-AUX input converter, available from Logjam Electronics - I bought mine for ~$50 + S&H. This plugs into the CD-Changer port which is located on the back of the your stock head unit, and talks the unit into thinking that a set of RCA inputs is really a CD changer. (If you�re clever, you�ll see how this can be used to tie in a satellite radio unit like XM or Sirius as well!)
Second, the HON-AUX converter provides female stereo RCA jacks, so you�ll need either a cable or adapter which converts 2 male RCA jacks to a 1/8″ stereo jack. I ended up with a $20 Monster Cable (because Best Buy was out of cheaper ones), but you can find one at your local RadioShack for under $10 - try part numbers 42-2551 ($6.99) or 42-2483 ($7.99).
Third, a power supply for your iPod. I�ve got one of the new 10GB ones with the Dock connector on the bottom, so I went with the Belkin unit, which you can get at an Apple retail store, or buy it online from Apple for $39.99
Fourth (optional), something to put your iPod on/in. I found a cell-phone holder at RadioShack for $21.99 which seems to work fine.
Fifth, tools. I used a couple metric sockets (8 and 10 mm), a flathead screwdriver, and a cordless drill.
Sixth, your stereo security code. In the packet of material that came with your owners manual, there should be a small card/sticker which contains your radio�s serial number and the security code for it (a 5-digit number). You�ll need this or your radio won�t work when you�re done!
2) Opening the center console and removing the stereo.
For this section, I relied on a couple illustrations from this page at carstereohelp.com. Print it up and take it out to your car with you!
a) Before doing any electrical work on your car, always disconnect the power. Pop open the hood and disconnect the negative battery terminal. The bolt on mine was tough to get a normal wrench at, but a 10mm socket wrench worked fine.
b) Remove the lower center panel (where the cigarette lighter plug is located at). It�s easiest to pry gently at the bottom left and right sides first - then the panel comes off fairly easily. Disconnect the power plug to the cigarette lighter (it pulls off).

Blue arrows indicate the points where the securing clips are located at. The two on the right side are mirrored in the left. Click the pic for a bigger view.
c) Following the diagrams you printed up, there are two bolts holding in the radio / air conditioner control assembly which are located under the top edge of the open panel. I just reclined the seat and laid upside-down with my head under the steering wheel to get good access. The bolts are both 8mm heads. Yellow arrows on the picture above show the approximate location of the bolts behind the panel.
d) Remove the upper panel. Be careful prying, as you can damage the dash! Just so you�re not surprised, this isn�t just the faceplate you�re removing - it�s the entire unit, which includes the climate control *****/buttons, the head unit, and the CD storage box.
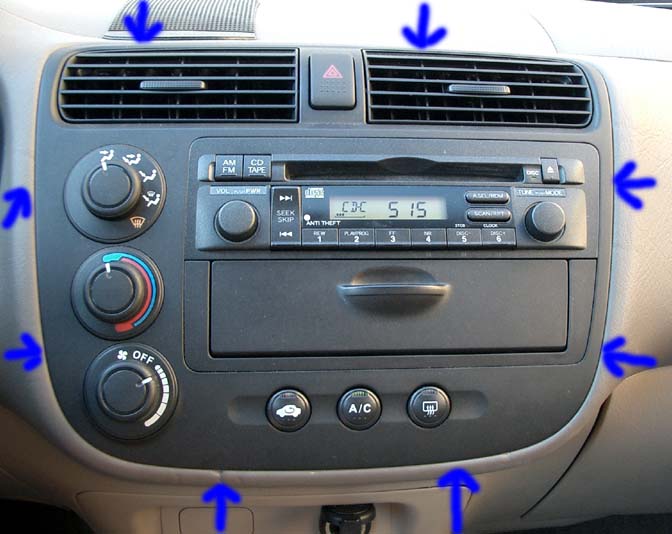
Blue arrows indicate approximate locations of securing clips. I did dent the console a little bit when I was prying on the bottom (bottom-left arrow).
e) The HON-AUX converter plugs into a connector on the rear of the head unit on the right side (just next to the main wiring harness). Based on the diagrams included with the converter, if you�ve got the factory cassette deck installed as well, I assume you daisy-chain and connect to the cassette deck instead.
f) Route the RCA jacks on the converter to a good location for you. I drilled a hole in the inside top of the little pocket in the bottom center panel and fed them through there. You might be able to just fish them around the side of the panel on the passenger side as an alternate routing.

The hole.
g) Reinstall the upper center panel, the bolts holding it in place, the cigarette lighter connector, and the lower center panel.
h) Reconnect the negative battery terminal, turn the car on. When you turn on the radio, it will request the security code, which you can enter using the radio station preset buttons.
3) Connecting the iPod
a) If you just plug the iPod into the input jacks directly, you�ll probably hear terrible static instead of your music. Apparently, the power source of the car and the iPod�s battery compete. So, the car charger isn�t only smart, it�s necessary. The Belkin adapter I�m using also provides line-out capability, so I plug into it instead of the iPod�s headphone jack.
b) To get your head unit to the new input, push the �CD / Tape� button until �CD-C� (CD-Changer) is displayed as the mode. Push again to cycle back to the in-dash CD player
c) I didn�t want to leave the iPod on my passenger seat to slide around, so I got a mount for it. The one I described above can be mounted into the tray below the parking brake handle. Putting it in the front left corner keeps it from interfering with the parking brake, and puts it right at your fingertips if your arm�s on the armrest.

Ipod Install website
Copied from the website for the lazy people.
The following is a description of how I was able to install my new iPod into my 2001 Honda Civic EX.
Edit 2003-07-20 13:07 - added the pictures
1) Acquire the necessary parts and do your homework�
First, you�ll need the HON-AUX input converter, available from Logjam Electronics - I bought mine for ~$50 + S&H. This plugs into the CD-Changer port which is located on the back of the your stock head unit, and talks the unit into thinking that a set of RCA inputs is really a CD changer. (If you�re clever, you�ll see how this can be used to tie in a satellite radio unit like XM or Sirius as well!)
Second, the HON-AUX converter provides female stereo RCA jacks, so you�ll need either a cable or adapter which converts 2 male RCA jacks to a 1/8″ stereo jack. I ended up with a $20 Monster Cable (because Best Buy was out of cheaper ones), but you can find one at your local RadioShack for under $10 - try part numbers 42-2551 ($6.99) or 42-2483 ($7.99).
Third, a power supply for your iPod. I�ve got one of the new 10GB ones with the Dock connector on the bottom, so I went with the Belkin unit, which you can get at an Apple retail store, or buy it online from Apple for $39.99
Fourth (optional), something to put your iPod on/in. I found a cell-phone holder at RadioShack for $21.99 which seems to work fine.
Fifth, tools. I used a couple metric sockets (8 and 10 mm), a flathead screwdriver, and a cordless drill.
Sixth, your stereo security code. In the packet of material that came with your owners manual, there should be a small card/sticker which contains your radio�s serial number and the security code for it (a 5-digit number). You�ll need this or your radio won�t work when you�re done!
2) Opening the center console and removing the stereo.
For this section, I relied on a couple illustrations from this page at carstereohelp.com. Print it up and take it out to your car with you!
a) Before doing any electrical work on your car, always disconnect the power. Pop open the hood and disconnect the negative battery terminal. The bolt on mine was tough to get a normal wrench at, but a 10mm socket wrench worked fine.
b) Remove the lower center panel (where the cigarette lighter plug is located at). It�s easiest to pry gently at the bottom left and right sides first - then the panel comes off fairly easily. Disconnect the power plug to the cigarette lighter (it pulls off).
Blue arrows indicate the points where the securing clips are located at. The two on the right side are mirrored in the left. Click the pic for a bigger view.
c) Following the diagrams you printed up, there are two bolts holding in the radio / air conditioner control assembly which are located under the top edge of the open panel. I just reclined the seat and laid upside-down with my head under the steering wheel to get good access. The bolts are both 8mm heads. Yellow arrows on the picture above show the approximate location of the bolts behind the panel.
d) Remove the upper panel. Be careful prying, as you can damage the dash! Just so you�re not surprised, this isn�t just the faceplate you�re removing - it�s the entire unit, which includes the climate control *****/buttons, the head unit, and the CD storage box.
Blue arrows indicate approximate locations of securing clips. I did dent the console a little bit when I was prying on the bottom (bottom-left arrow).
e) The HON-AUX converter plugs into a connector on the rear of the head unit on the right side (just next to the main wiring harness). Based on the diagrams included with the converter, if you�ve got the factory cassette deck installed as well, I assume you daisy-chain and connect to the cassette deck instead.
f) Route the RCA jacks on the converter to a good location for you. I drilled a hole in the inside top of the little pocket in the bottom center panel and fed them through there. You might be able to just fish them around the side of the panel on the passenger side as an alternate routing.
The hole.
g) Reinstall the upper center panel, the bolts holding it in place, the cigarette lighter connector, and the lower center panel.
h) Reconnect the negative battery terminal, turn the car on. When you turn on the radio, it will request the security code, which you can enter using the radio station preset buttons.
3) Connecting the iPod
a) If you just plug the iPod into the input jacks directly, you�ll probably hear terrible static instead of your music. Apparently, the power source of the car and the iPod�s battery compete. So, the car charger isn�t only smart, it�s necessary. The Belkin adapter I�m using also provides line-out capability, so I plug into it instead of the iPod�s headphone jack.
b) To get your head unit to the new input, push the �CD / Tape� button until �CD-C� (CD-Changer) is displayed as the mode. Push again to cycle back to the in-dash CD player
c) I didn�t want to leave the iPod on my passenger seat to slide around, so I got a mount for it. The one I described above can be mounted into the tray below the parking brake handle. Putting it in the front left corner keeps it from interfering with the parking brake, and puts it right at your fingertips if your arm�s on the armrest.

Registered!!
Joined: May 2004
Posts: 215
Likes: 0
Rep Power: 0 Suggestion: Don't cut an ugly looking hole in that plastic. Just run the cord around and have it come out from under the glove compartment.
Or, do what I did and have the cord run over the back edge of the glove compartment, into the glove compartment itself. Then you can keep your iPod (or whatever you use) in there. I don't run it off the power (I've got 8 - 12 hours of battery), so there are no wires anywhere (only one in the glove compartment, but you can't see it, obviously). Looks great!
Or, do what I did and have the cord run over the back edge of the glove compartment, into the glove compartment itself. Then you can keep your iPod (or whatever you use) in there. I don't run it off the power (I've got 8 - 12 hours of battery), so there are no wires anywhere (only one in the glove compartment, but you can't see it, obviously). Looks great!

Joined: Sep 2002
Posts: 51,241
Likes: 20
From: NV
Rep Power: 813 
I'm pretty sure it's any deck with an aux output. And I remember seeing a better diy where they cut a hole for wires inside the center tray so it's not visible.
Joined: Sep 2001
Posts: 10,658
Likes: 4
From: Woostah
Rep Power: 414
Originally Posted by gearbox
I'm pretty sure it's any deck with an aux output. And I remember seeing a better diy where they cut a hole for wires inside the center tray so it's not visible.
Here ya go: http://7thgencivic.com/forums/showth...highlight=ipod

Thread
Thread Starter
Honda Civic Forum
Replies
Last Post
LionSpratt
General Automotive Discussion
14
Jan 29, 2017 11:07 PM
aZnVoYCe
Bolt-on Engine Performance
3
Nov 4, 2001 10:18 AM

