
2004 civic door speaker install w/ pics
 05-05-2010
#1
Registered!!
Thread Starter

Join Date: May 2010
Location: Ontario, Canada
Posts: 1
Likes: 0
Received 0 Likes
on
0 Posts
Rep Power: 0 
2004 civic door speaker install w/ pics
Hey everyone this is my first post on this site. I thought I could help with some door installs on 04 sedan civics. Mine is Si model with power windows and locks. Im sure this should go in 7th gen civic>DIY>Audio but it wouldnt let me post there.
First of all, I'm no pro, I don't guarantee ur not going to hurt yourself using some of the tools, and I don't guarantee that this is the best way to do it but it worked for me, it sounds good, and I'm still alive. I'm sure some people are going to rip this apart and tell me everything I did wrong but that's OK, it will make them feel good about themselves. Oh and PS, I'm not proud of using hot glue but it worked lol, I know I'm a noob.
Anyways, I'll get started.
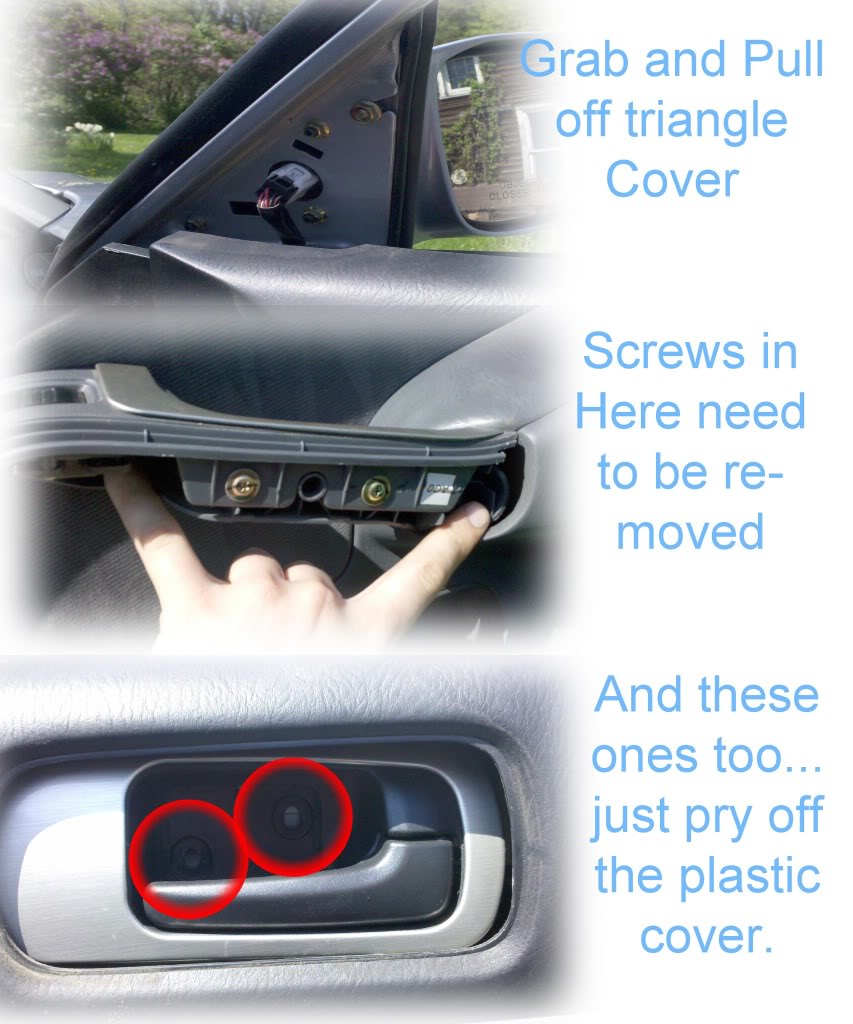
First things first, you have to remove the door panel. Very easy, especially with power windows. Just rip off the triangle plastic piece in the corner of the window, pop off the plastic covers 1) inside the door latch, 2) on the bottom of the armrest grab handle. Unscrew the two screws inside the latch part, and the two sunk-in, harder-to-see screws where my fingers are pointing in the first picture.
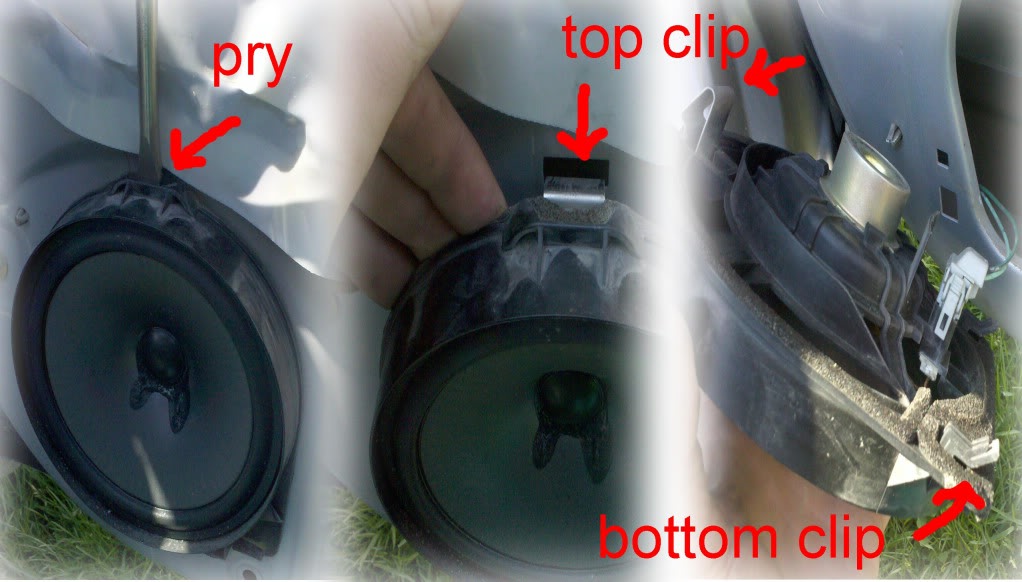
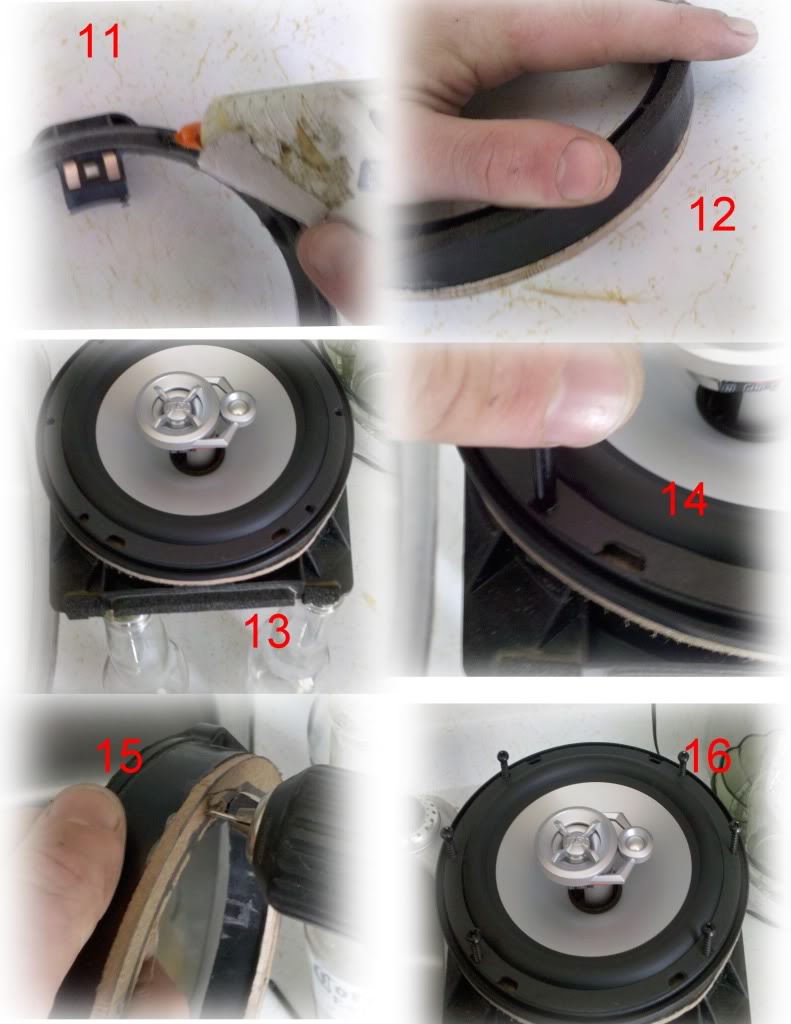
Next, remove the stock speaker from the door. All you have to do is stick a flat head screwdriver into the clip at the top, press down and push out. Then lift it up and away from the door and disconnect the wiring harness. Easy.
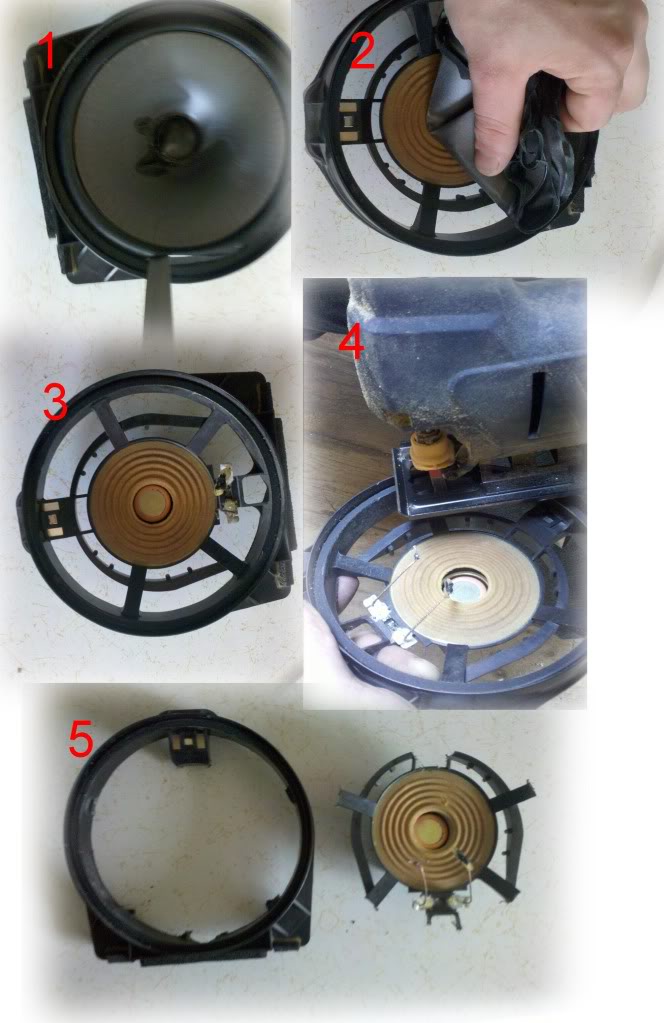
Now for some modification! The new MTX's couldn't simply be screwed into the door panel because the magnet was too deep and the window would hit it if I put it down all the way. So basically, the speaker had to be lifted off of the door panel at least an inch to allow the window to slide down all the way. I could have made a thick ring out of 2 pieces of MDF and mounted it directly on but my way was more fun, and I can just unclip the speaker if i ever have to.
The first thing I did was rip off the old speaker cone. Then I took a jigsaw to the plastic supports that held the old magnet on there. The only part I didnt cut of was the clip that held the unit on at the top.
Next, I had to flatten down the lifted rim around the outside. I cut it down with the jigsaw, then smoothed it with a belt sander. Then I checked to make sure the new speaker would sit in the new mount nicely ( it did, as I knew it would). Next I traced the outside and inside of the mount onto a piece of 1/4 inch mdf, and finished whatever lines i couldn't trace by hand. Then I cut out the ring, leaving a little extra wood on the inside of the ring, for a little more strength. Once done, I checked to see that it fit nicely onto the mount.
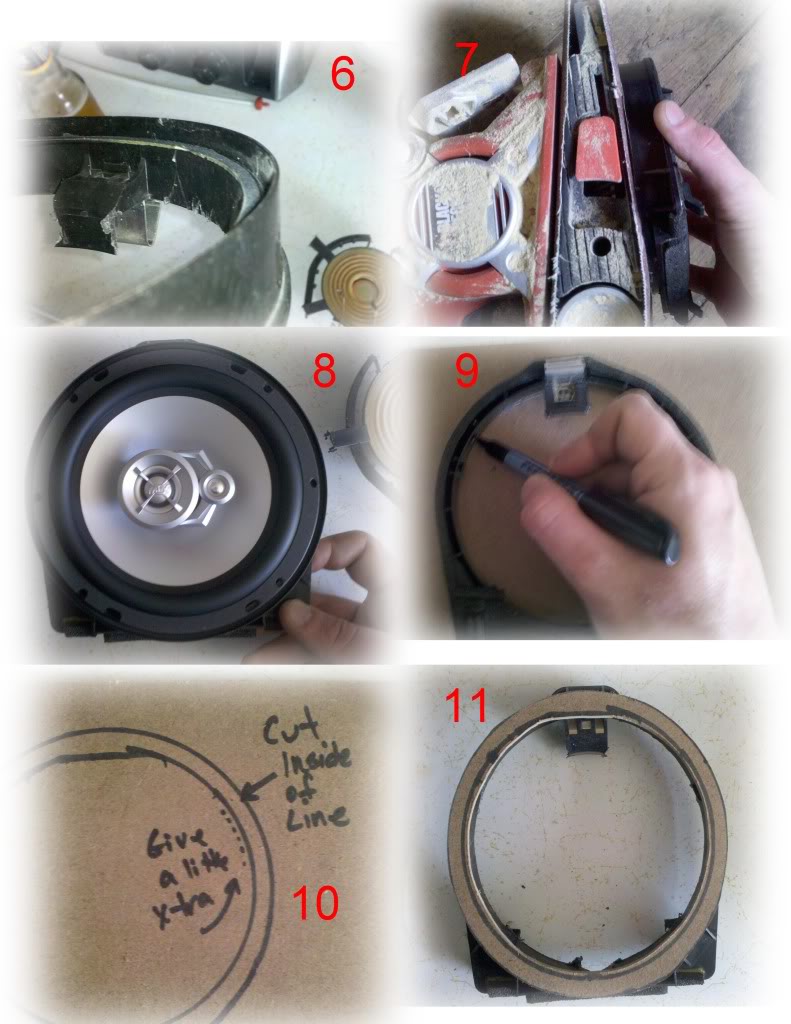
Next, I hot glued (yea that's right, hot glue ****'s lol) the wooden ring onto the face of the mount. I used hot glue because it would eliminate any rattling, seal up any bumps that werent sanded down nicely, and set quickly. The actual speaker will be screwed in through the wood into the plastic, so the glue doesn't need to hold anything together permanantly. I pressed the unit down onto the wood once glued to squeeze out any extra. I set the mount on beer bottles to hold it off the ground, then dropped in the speaker and marked dots where I would drill pilot holes for the screws. I drilled the pilots, started all the screws, then finished screwing them in once they were all in place. This unit is now very solid, and is ready to be simply popped back in where the old speaker went.
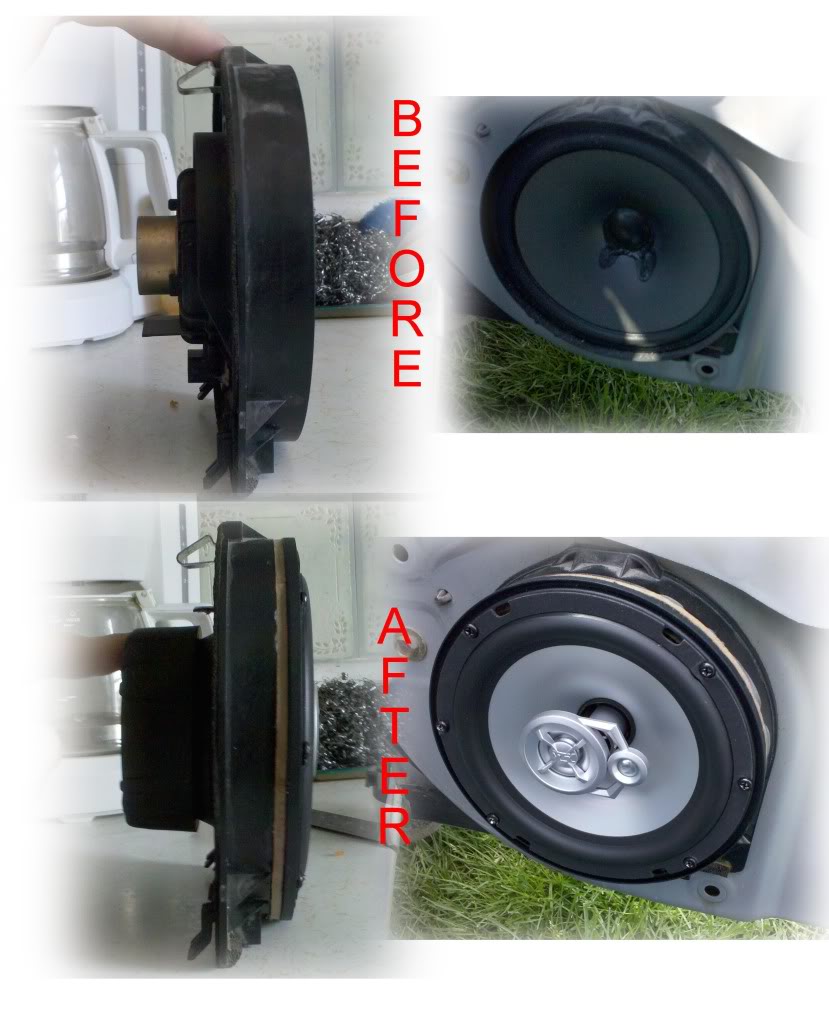
This is the before and after. You can see the huge difference in the size of the speaker magnet.
All that is left to do now is run the wires. In the past I have just used the old speaker wire that was in place, but this time I ran new wire through the doors. Just run a straightened coat hanger through the rubber passage from door to body, tape on the wire, and feed it though. Sorry no pics.
Thank's for reading this post, take it easy on my noobishness, and superfast typing and spelling errors! Have a good one all.
MOD EDIT:
i replaced your links with the direct pictures so people wont have to click on them.
-sl33pyriceboi
First of all, I'm no pro, I don't guarantee ur not going to hurt yourself using some of the tools, and I don't guarantee that this is the best way to do it but it worked for me, it sounds good, and I'm still alive. I'm sure some people are going to rip this apart and tell me everything I did wrong but that's OK, it will make them feel good about themselves. Oh and PS, I'm not proud of using hot glue but it worked lol, I know I'm a noob.
Anyways, I'll get started.
First things first, you have to remove the door panel. Very easy, especially with power windows. Just rip off the triangle plastic piece in the corner of the window, pop off the plastic covers 1) inside the door latch, 2) on the bottom of the armrest grab handle. Unscrew the two screws inside the latch part, and the two sunk-in, harder-to-see screws where my fingers are pointing in the first picture.
Next, remove the stock speaker from the door. All you have to do is stick a flat head screwdriver into the clip at the top, press down and push out. Then lift it up and away from the door and disconnect the wiring harness. Easy.
Now for some modification! The new MTX's couldn't simply be screwed into the door panel because the magnet was too deep and the window would hit it if I put it down all the way. So basically, the speaker had to be lifted off of the door panel at least an inch to allow the window to slide down all the way. I could have made a thick ring out of 2 pieces of MDF and mounted it directly on but my way was more fun, and I can just unclip the speaker if i ever have to.
The first thing I did was rip off the old speaker cone. Then I took a jigsaw to the plastic supports that held the old magnet on there. The only part I didnt cut of was the clip that held the unit on at the top.
Next, I had to flatten down the lifted rim around the outside. I cut it down with the jigsaw, then smoothed it with a belt sander. Then I checked to make sure the new speaker would sit in the new mount nicely ( it did, as I knew it would). Next I traced the outside and inside of the mount onto a piece of 1/4 inch mdf, and finished whatever lines i couldn't trace by hand. Then I cut out the ring, leaving a little extra wood on the inside of the ring, for a little more strength. Once done, I checked to see that it fit nicely onto the mount.
Next, I hot glued (yea that's right, hot glue ****'s lol) the wooden ring onto the face of the mount. I used hot glue because it would eliminate any rattling, seal up any bumps that werent sanded down nicely, and set quickly. The actual speaker will be screwed in through the wood into the plastic, so the glue doesn't need to hold anything together permanantly. I pressed the unit down onto the wood once glued to squeeze out any extra. I set the mount on beer bottles to hold it off the ground, then dropped in the speaker and marked dots where I would drill pilot holes for the screws. I drilled the pilots, started all the screws, then finished screwing them in once they were all in place. This unit is now very solid, and is ready to be simply popped back in where the old speaker went.
This is the before and after. You can see the huge difference in the size of the speaker magnet.
All that is left to do now is run the wires. In the past I have just used the old speaker wire that was in place, but this time I ran new wire through the doors. Just run a straightened coat hanger through the rubber passage from door to body, tape on the wire, and feed it though. Sorry no pics.
Thank's for reading this post, take it easy on my noobishness, and superfast typing and spelling errors! Have a good one all.
MOD EDIT:
i replaced your links with the direct pictures so people wont have to click on them.
-sl33pyriceboi
Last edited by sl33pyriceboi; 04-11-2012 at 05:56 PM.

 04-11-2012
#3
Registered!!

Join Date: Apr 2012
Location: Johnson city, TN
Posts: 5
Likes: 0
Received 0 Likes
on
0 Posts
Rep Power: 0 
Re: 2004 civic door speaker install w/ pics
I read your article a few weeks back before i joined. Thankyou so much, i just got some pioneer 6.5's for the front and back and didn't even realize i couldn't just screw them on. This was a great help and your pics made it an incredibly easy job.
I did do mine just a slight bit different though, i didn't have mdf board so i kind rigged some screw points and i didnt have a jigsaw so i used a steak knife (bad idea unless u have bandages) but other then that it was incredibly simple.
Again, it was a great help!
I did do mine just a slight bit different though, i didn't have mdf board so i kind rigged some screw points and i didnt have a jigsaw so i used a steak knife (bad idea unless u have bandages) but other then that it was incredibly simple.
Again, it was a great help!
 09-22-2012
#5
Registered!!

Join Date: Sep 2012
Posts: 1
Likes: 0
Received 0 Likes
on
0 Posts
Rep Power: 0 Re: 2004 civic door speaker install w/ pics
Awesome post man! Some great info here. Did you have any problems with replacing the door panel? I'm thinking the speaker would be sticking out too much. Did you have enough space?

Thread
Thread Starter
Honda Civic Forum
Replies
Last Post
meicalnissyen
Mechanical Problems/Vehicle Issues and Fix-it Forum
7
09-25-2015 12:12 AM
TheRiddicles
8th & 9th Generation Civic 2006 - 2015
2
09-21-2015 03:34 PM
TheRiddicles
Suspension Performance Modifications
0
09-21-2015 01:28 AM

