
Changing Dashboard Lighting

Thread Starter
Registered!!
Joined: Dec 2008
Posts: 27
Likes: 0
Rep Power: 0 
Changing Dashboard Lighting
hey guys,
so a while back i found a DIY on how to change the lighting of the dashboard from red to w/e color, but now i can't find it anywhere and wanted to know if anyone had the link to it or if anyone knew of a good DIY? i'm talkin speedometer, tachometer, gas/heat gauges... i dont really wanna change the color of my air conditioning symbols and stuff like that (although if the DIY includes that too, i'd appreciate it). Also, since i'm guessing ima have to buy some new little LED bulbs or something, if anyone knows where i can get some in southern california, near long beach / redondo beach / los angeles area, i dont wanna bother with ebay if i can get em from a store.
Thanks...
Registered!!
Joined: Feb 2007
Posts: 29
Likes: 0
From: los angeles
Rep Power: 0 


Joined: Sep 2002
Posts: 51,241
Likes: 20
From: NV
Rep Power: 811 

Re: Changing Dashboard Lighting
pink leds exist, but extremely poor quality. after a month the coating inside burns off and you are left with white color.
Registered!!
Joined: Sep 2008
Posts: 74
Likes: 0
From: New York
Rep Power: 0 Re: Changing Dashboard Lighting
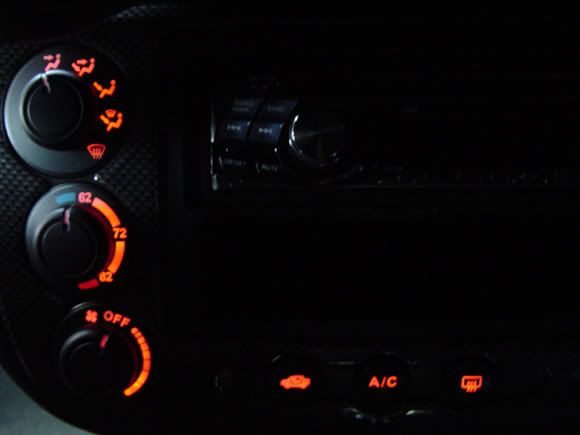
i just put red leds in my dash to match my new gauges. here's a pic! hah, this is prob the look ur goin for but theyre actually REALLY red. my camera is pretty crappy tho. everything matches pretty well! =]


pardon the headlights...crappy ebay projectors =\
pardon the headlights...crappy ebay projectors =\
Last edited by cornd0g; Mar 5, 2009 at 09:43 PM.
Thread Starter
Registered!!
Joined: Dec 2008
Posts: 27
Likes: 0
Rep Power: 0 Re: Changing Dashboard Lighting
Ok so i looked up some stuff on that DIY that was posted by gearbox, and i felt that the beginning started out too fast for me.
First off anyone here that has a DX 02 coupe, when u post let me know
and second can i keep the needles red but change everything else to blue? because i ordered a tachometer from ebay that is blue w/ a red needle, and i wanna match that.
And last, what exactly does the tape / coating do on the back of the gauge cluster shown in the first photo of this DIY https://www.civicforums.com/forums/1...sh-lights.html
P.S. here is a link to my tach that is in the process of being shipped atm http://cgi.ebay.com/ebaymotors/ws/eB...ayphotohosting
Oh and vic is manual too, forgot to mention that
Last edited by Raging Monkey; Mar 6, 2009 at 12:00 AM. Reason: link
Registered!!
Joined: Feb 2009
Posts: 33
Likes: 0
From: Florida
Rep Power: 0 Re: Changing Dashboard Lighting
I was about to post an ALTERNATE DIY for changing the HVAC control colors.
I spent a night experimenting with this and I think I have worthwhile results that are worth sharing. To clarify, this is how I changed my air conditioner ***** and buttons to BLUE in about ten minutes. No wiring!
Okay, simply strip apart the center console as previously directed. I'll refresh for you in case you can't find it (from '03 coupe EX):
1) Remove utility panel (horseshoe shaped around shifter)...this just pops off.
2) reach under the HVAC console with a socket or driver and remove the two small screws that point upward.
3) Reach up and behind the metal bracket that had the screws in it and push the center panel out, radio and all.
4) Disconnect everything (REMEMBER: You'll need your radio code to use your radio after this! I learned the hard way.) There should be one plug on bottom, two on side, one on top and antenna and plug on radio.
5) Take the entire panel somewhere comfortable and unscrew the total of five brass screws holding the controls in place from back.
6) Pop off all of the ***** and buttons. Pop off the actual faces of the HVAC controls behind the ***** to make reaching the inside easier.
Okay, now this is where I got creative. I wasn't convinced that I couldn't change the color of the lights simply by changing the gel, or colored tint, on the inside of the control. So, the first step was picking off all of the red colored tint on the back of each **** and button. If you simply do this without replacing another color, your lights will look pretty yellow.
I made a trip to walmart and bought several transparent blue items that I thought might make good replacement gels. After working with each of them for several hours I found something by happenstance that worked really well. I had a blue Sharpie permanent marker sitting on my desk, so I began coloring all of the whitish parts of the controls (that used to be red) blue.
It took a couple of coats because the marker tends to streak, but eventually the coverage was even (I recommend holding them up to a light source to check for streaks before putting it all back together.) Make sure you color all of white part of the little ***** because some white might get through otherwise.
PROS: This took a very short amount of time. There was no wiring. I could have chosen any color that they make a marker for. It was free. The brightness control still works. The color is uniform and solid, no patchiness.
CONS: The overall brightness is slightly dimmer than it was before. There is still a tiny bit of white light bleed on a couple of the *****, but I think I can fix it by tearing it all down again and putting another coat of blue.
I don't foresee any issues with heat because the lights are rather far from the actual surface that I colored. Additionally, I think this method would make it much easier to color the other lighted controls that are hard to wire/fit LEDs into, such as the window and moon roof. I'll probably start doing the others tomorrow and I'll get back to you on that.
If you're not into all of the soldering and wiring (as I'm not right now) give it a try!
(Sorry...I don't have a camera!)
Registered!!
Joined: Sep 2008
Posts: 74
Likes: 0
From: New York
Rep Power: 0 Re: Changing Dashboard Lighting
hmm, sounds like a pretty simple quick fix hah. i still prefer leds. its not too complicated and the whole dash took me about half an hour. its much brighter and easier to see the controls; and with the right resistors, the bulbs will last a looong time!
Registered!!
Joined: Feb 2009
Posts: 33
Likes: 0
From: Florida
Rep Power: 0 Re: Changing Dashboard Lighting
Yeah...I would definitely file it into the quick-fix bin, myself. I'm going to try doing all of the other controls in the cockpit this way right now. I might eventually go back and do LEDs for the center console since it would be brighter, but I'll have to think about it...not sure I even want it brighter XD
Thread Starter
Registered!!
Joined: Dec 2008
Posts: 27
Likes: 0
Rep Power: 0 Re: Changing Dashboard Lighting
Ok so today i thought i would take a look at how my gauge cluster is set up electronicaly... but that's hard to do when i can't even remove my gauge cluster, i'm in an 02 dx manual coupe (FYI) and i can't figure out how to remove the plastic trim in front of the glass on my gauge cluster. I tried removing the trim that covers the sterring wheel's connection to the dash which is two peices, but i couldn't get the seperated, and then even if i did that i still dont know where the plastic around the glass is connected still because it wont pop out after i unscrewed the screws that screw into the top of that plastic peice, let me know if u know how to take the gauge cluster out, or if u know of a DIY, if you didn't quite understand what the hell i was talking about try this picture

if the pic dont work for some reason... go to my profile and check it out in my picture album
if the pic dont work for some reason... go to my profile and check it out in my picture album
Last edited by Raging Monkey; Mar 6, 2009 at 06:31 PM. Reason: picture
Registered!!
Joined: Oct 2007
Posts: 305
Likes: 0
From: York, Pennsylvania
Rep Power: 229 Registered!!
Joined: Sep 2008
Posts: 74
Likes: 0
From: New York
Rep Power: 0 Re: Changing Dashboard Lighting
i think its glued down, so ur first time might be a little tough. try using a flat head screwdriver to pry it off. then yank it out lol. the little plastic piece above the steering wheel needs to come off too.

Thread Starter
Registered!!
Joined: Dec 2008
Posts: 27
Likes: 0
Rep Power: 0 Re: Changing Dashboard Lighting
nope you didn't read it wrong, my vic is a DX and i'm pretty sure dx's dont come with a tach, therefore i bought one from ebay to put in those lil 2" slot on the right

Joined: Sep 2002
Posts: 51,241
Likes: 20
From: NV
Rep Power: 811 Re: Changing Dashboard Lighting
orange ftw! just stuff them in the climate controls. piece of white paper inside helps to spread the light out so you dont get hotspots. there is alot of room in the dials but the buttons can get tricky. hopefully i never need to do this again.
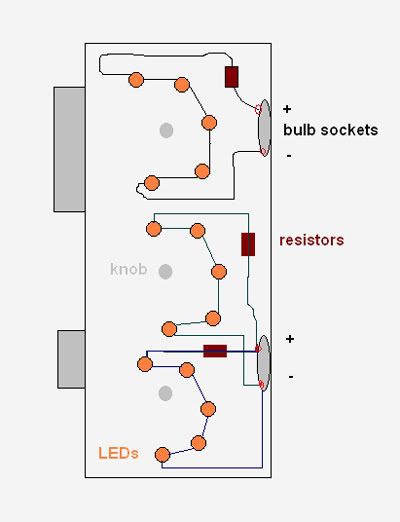
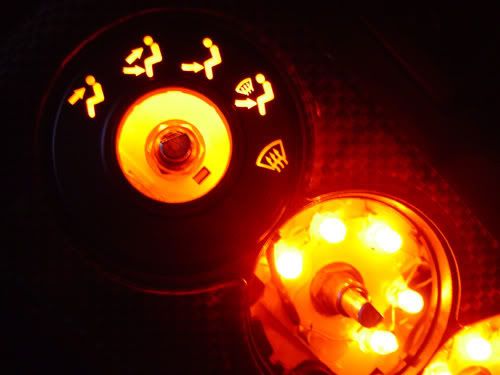

and matching orange led backlight for cluster

and matching orange led backlight for cluster
Registered!!
Joined: Oct 2007
Posts: 305
Likes: 0
From: York, Pennsylvania
Rep Power: 229 Re: Changing Dashboard Lighting
I've never seen a manual not have a tach before. Oh well it's not like you need one but that is very strange. Anyway I am pretty sure if you are buying the led replacement bulbs, it shouldn't matter what kind of bulb you get. The rectangulars should fit and spread light more evenly but the round ones will put off a brighter glow. I never touched the led replacement bulbs but they should look like the regular buls with clip and should screw on like the other bulbs. let us know how it goes.
Re: Changing Dashboard Lighting
[QUOTE=mrplow123456;4395441]I've never seen a manual not have a tach before. Oh well it's not like you need one but that is very strange. QUOTE]
I believe the Dx/Vp model didnt come with a tach.
I believe the Dx/Vp model didnt come with a tach.
Joined: Sep 2002
Posts: 51,241
Likes: 20
From: NV
Rep Power: 811 Re: Changing Dashboard Lighting
yeah 01-05 dx/vp has no tach. my alpine 9847 has adjustable lighting (4 colors for the big buttons red/orange/green/blue, and two colors for the other buttons green/orange). i dont know why alpine didnt keep that feature. its the best way to match colors. ive had my faceplate open many times and no its very difficult to change the leds. they are all small SMT and almost impossible to solder on new ones.

