
How to make a simple areo part (rear lip)


Thread Starter
Registered!!
Joined: Aug 2005
Posts: 248
Likes: 0
Rep Power: 0 
How to make a simple areo part (rear lip)
First I sketched out the design on paper. It was nothing fancy just something to use as a loose guide. I changed a few things as I went.
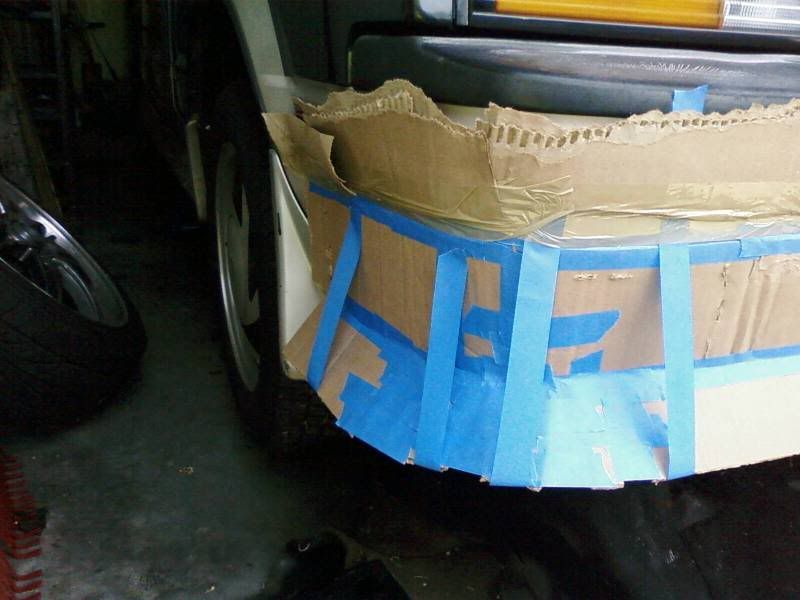
Next the design will dictate what materials you need to use as a base. Since the mr2 is boxy and the lip will be somewhat as well. I went for a 240sx looking rear lip. Just something simple and flows nicely. I chose to use cardboard since imo is the best for a boxy design.
Now that we are about to begin here are some quick tips.
-Wear old clothes
-Spend the extra few bucks to get the latex gloves, if you get resin on your hands it takes some time to get off your hands. Eventually it will turn black from dirty sticking to it and you will look like you never take a shower.
-Design ahead and plan everything out, if you don�t you will waste product, money and time.
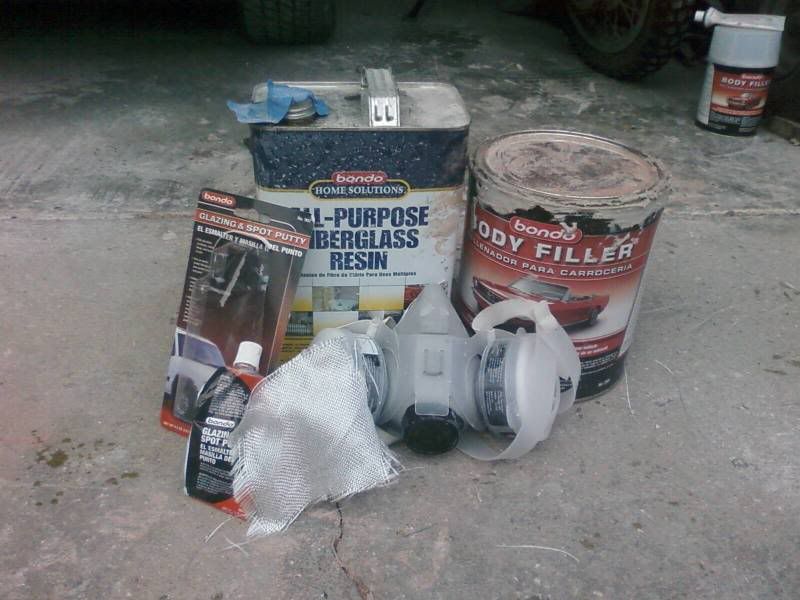
Materials you will need and where to buy:
-Masking tape (I like to use the blue painters tape) anywhere
-disposable paint brushes homedepot, lowes, ace
-1.3-1.5 gallons of resin
(polyester is what I used for this) homedepot, lowes or auto supply store
-bondo (2 tubs is what I used)
I used the cheaper filler for this. I usually use ragegold or dynalite homedepot, auto parts store, walmart
-bondo spreaders homedepot, lowes, walmart, auto parts store
-spot putty/glazing walmart, autopart store
-respirator (not recommended, but you will get a headache from bondo and resin if you don�t have one) homedepot, lowes possibly walmart
-spray glue
-chop matt
-fiberglass cloth both dry fiberglass homedepot, lowes, walmart
-Sander
-low grit paper, 60,80 mid grit 120 high 320, 400 600
My advice is to buy all this stuff off the internet, that way you get more for your money and you have more of a selection.
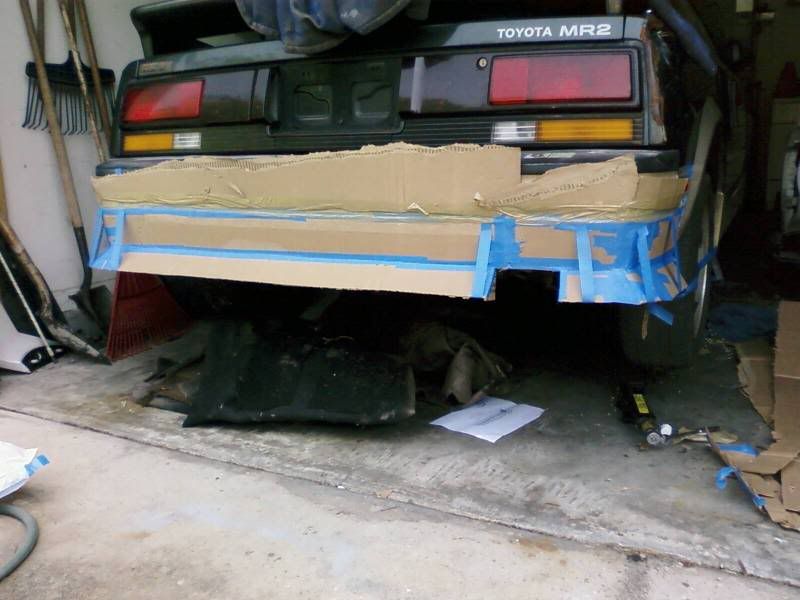
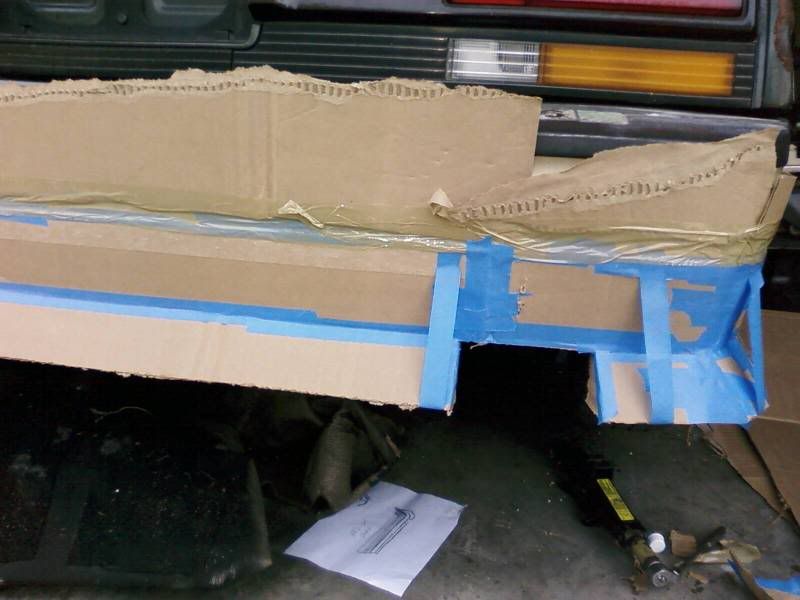
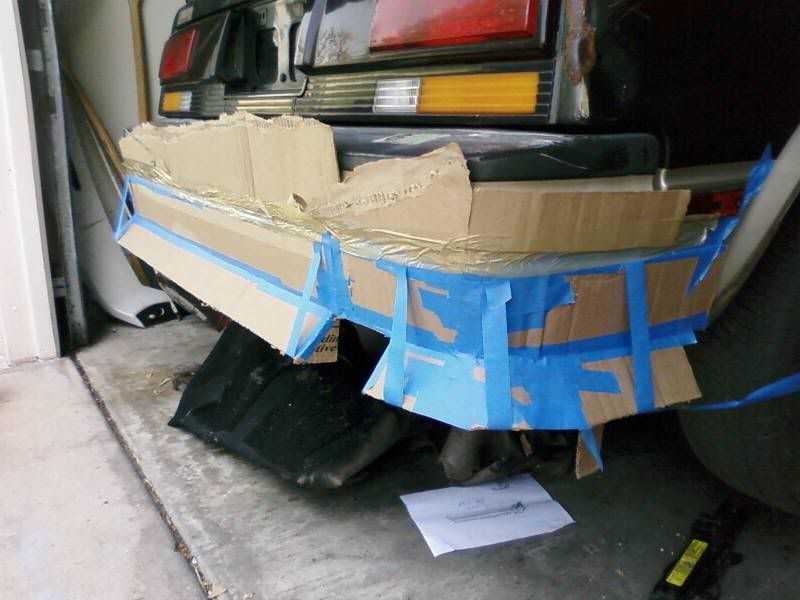
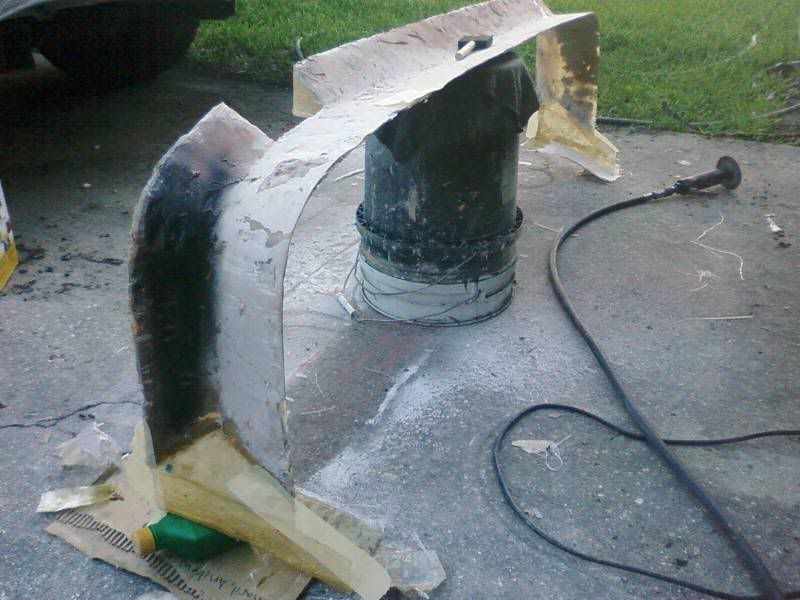
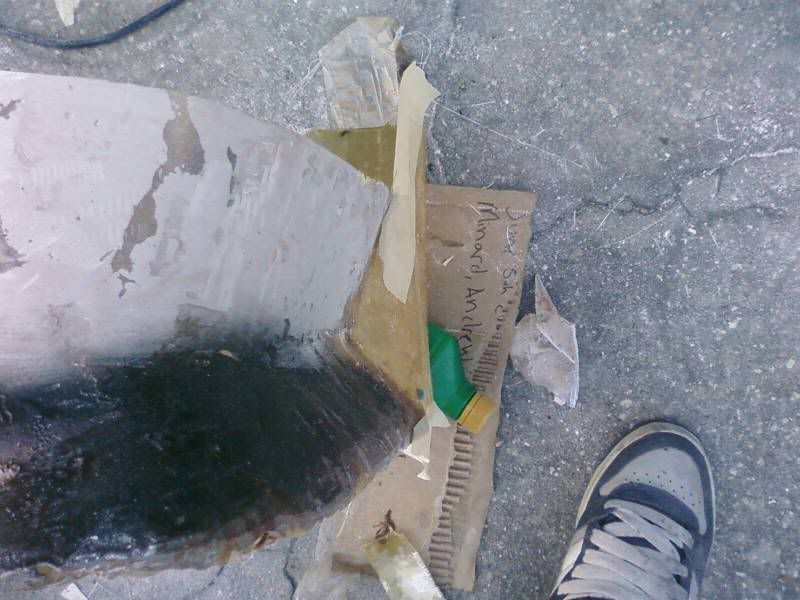
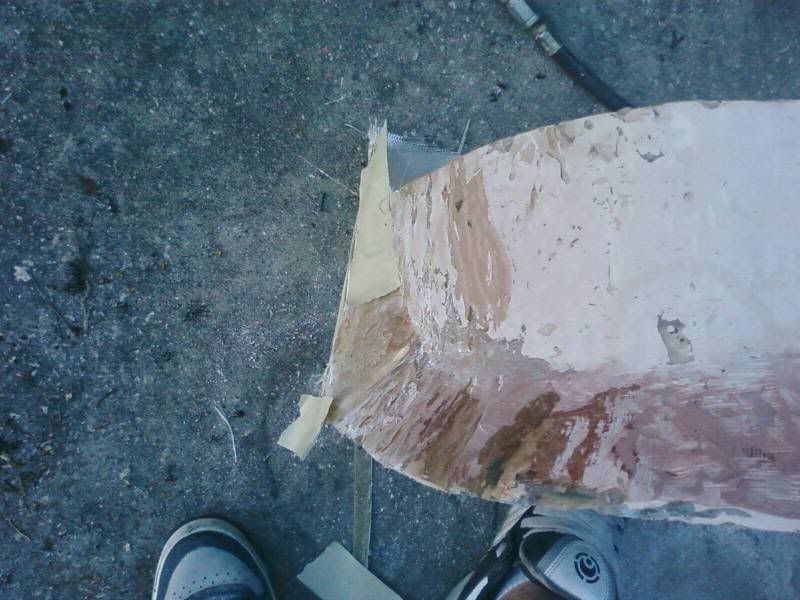
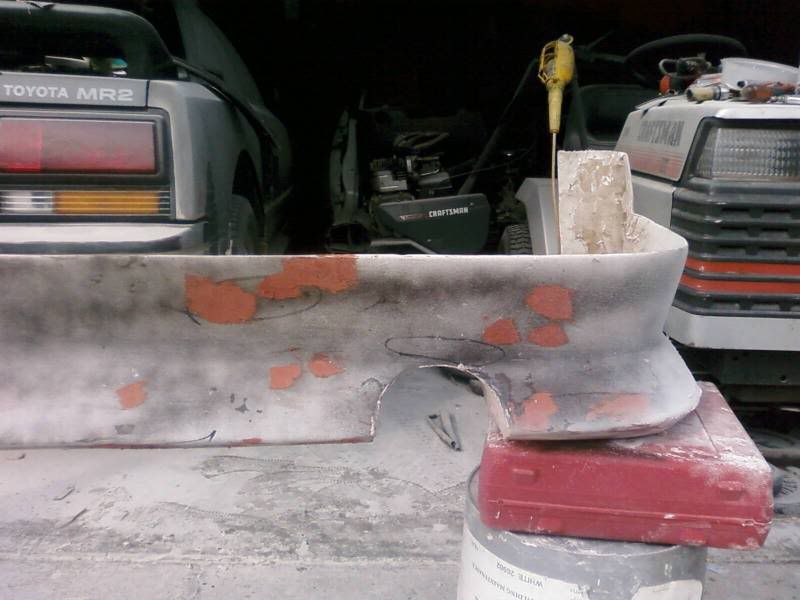
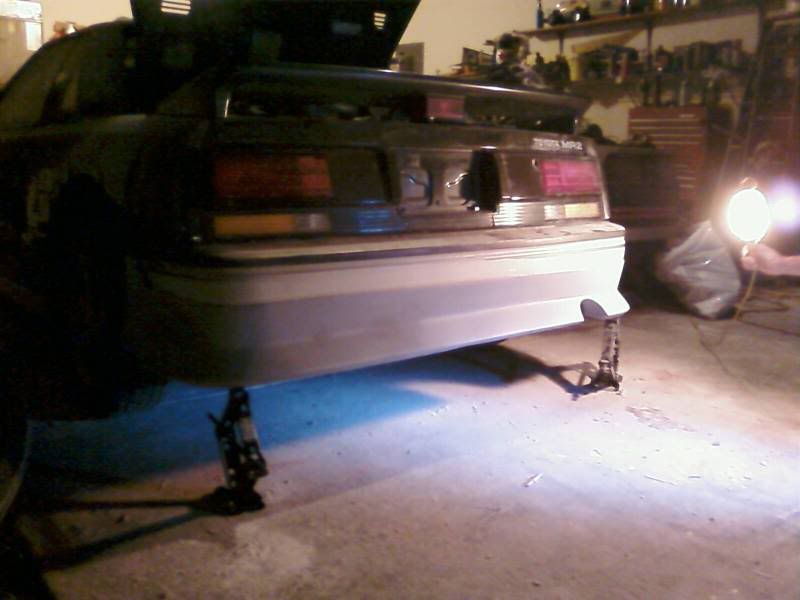
I built the whole lip out of CB (cardboard) first. I then put CB above the lip so no resin got on the bumper. Then cover the whole lip in tape. Put alittle car wax on the lip.


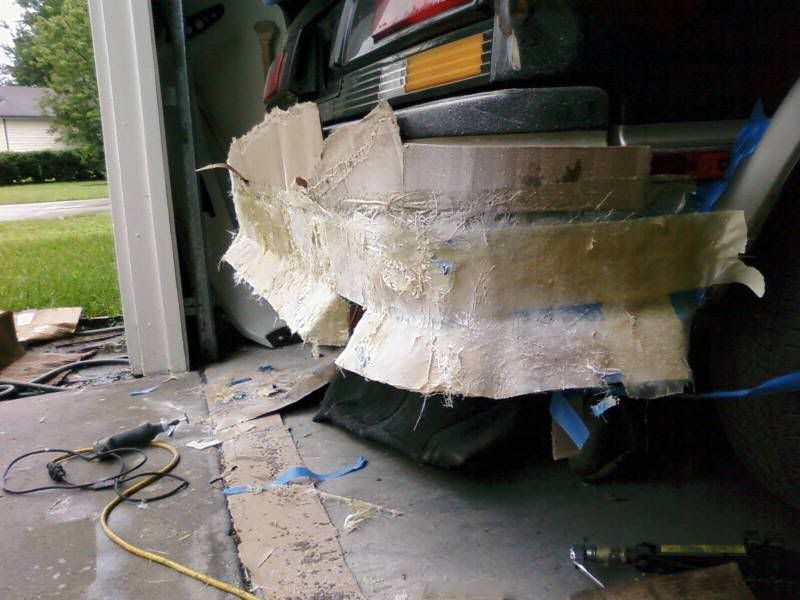
Spray an area of the lip with spray glue, then place the chop matt to the lip, keep doing this until the whole lip is covered in chop matt. Once that is done, mix the resin, apply with the disposable brush. DAB it on! If you apply in strokes the matte will move. Mix the resin in small batches and apply until the chop matt is soaked. After a few coats it will look something like this: Dabbing will also prevent air bubbles down to a minimum. After a few coats it will look something like this:

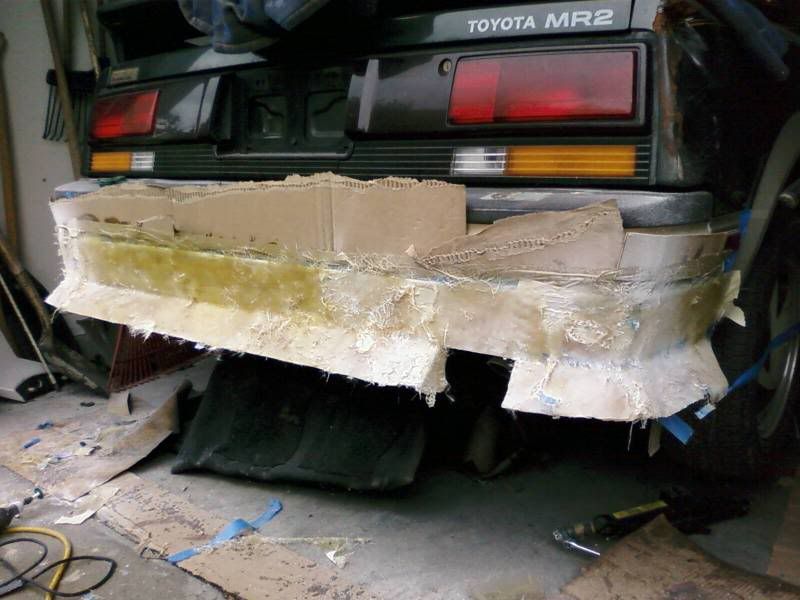


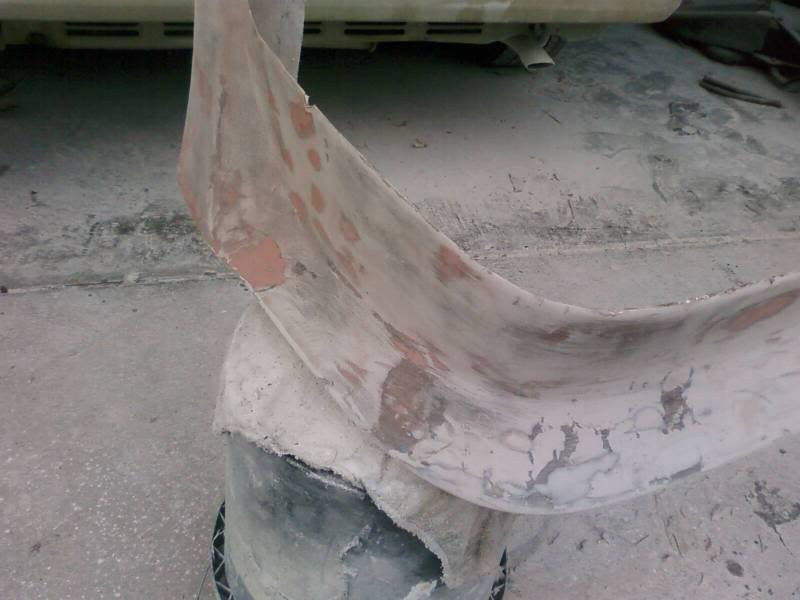
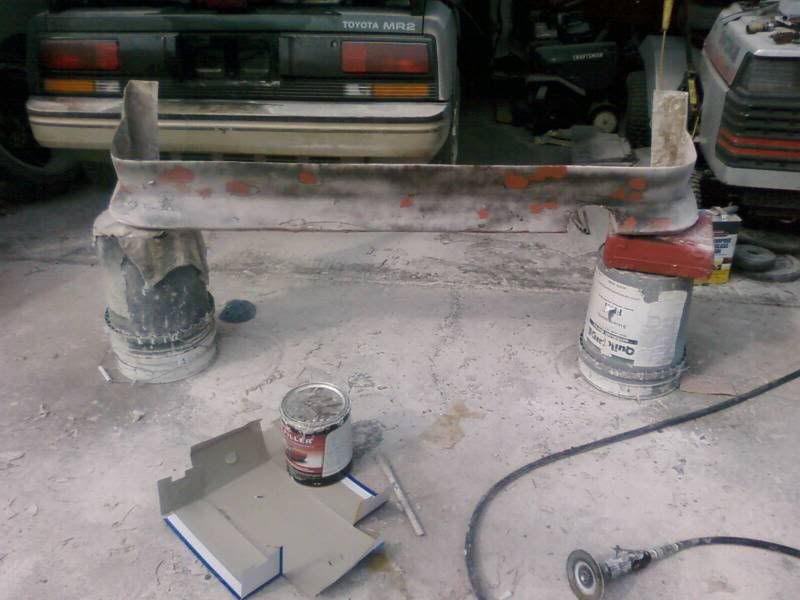
Once you get a few coats on and it is sturdy goahead and pop it off the car and remove the CB and tape from the backside Let it sit for a few min so any damp/sticky spots can cure. I then taped off the exposed bumper and mounted the lip. I applied 2 more layers and then pulled it back off the car. I strengthened from the backside. I only did 1 coat because any more would have caused fitment issues.
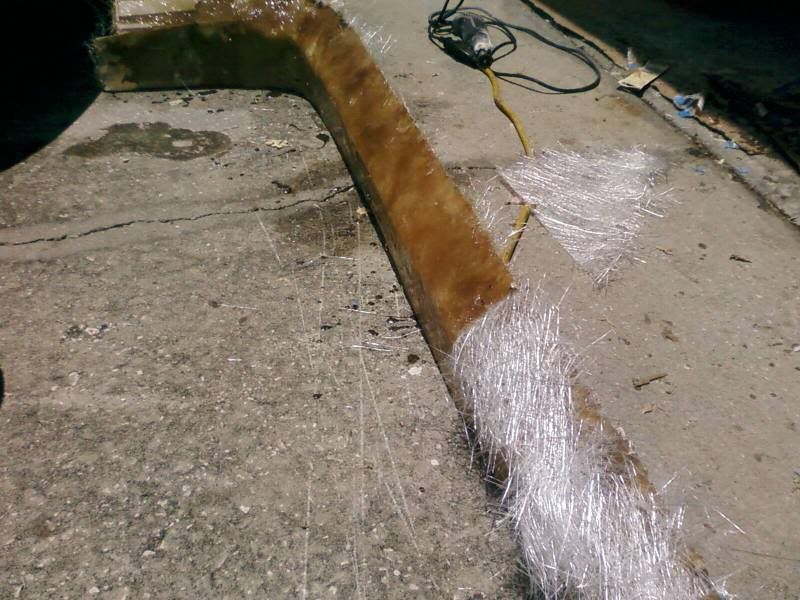

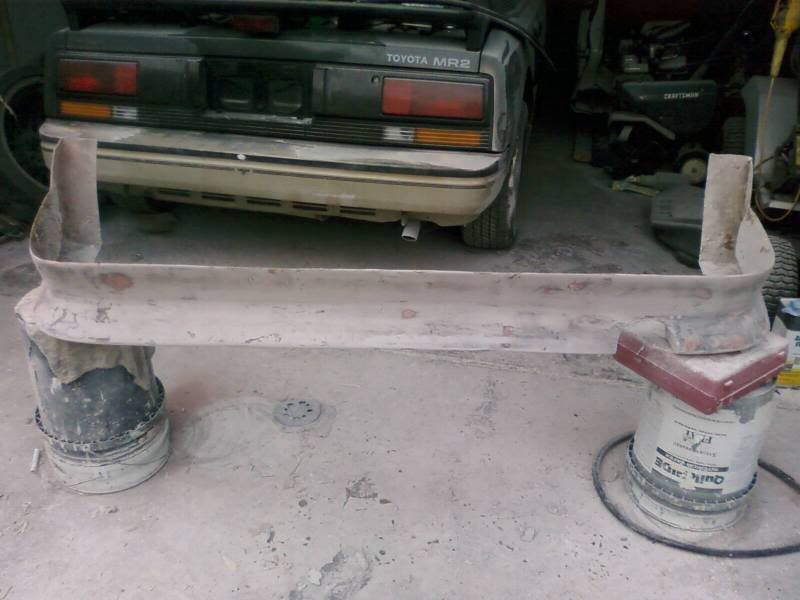
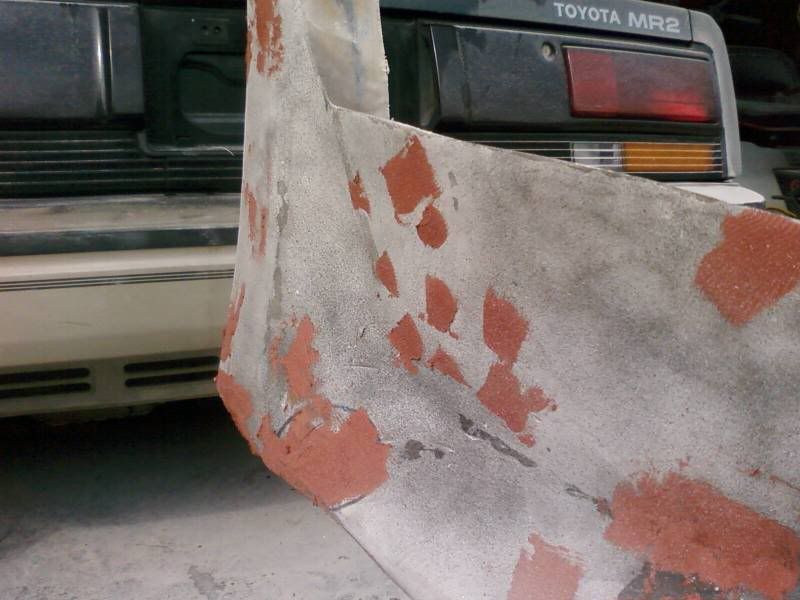
Once that is done go ahead and sand with 60 grit to knock any standing glass or high spots. Mix up bondo in small batches and apply with the spreader. Apply it smooth as possible because this will prevent more sanding work. I like to do thin layers to avoid a lot of sanding. Trim the lip to the final shape.
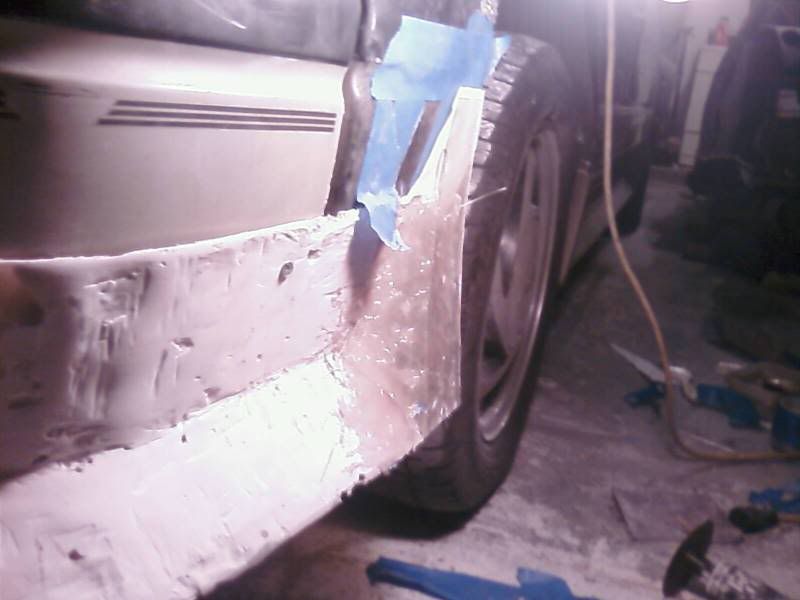
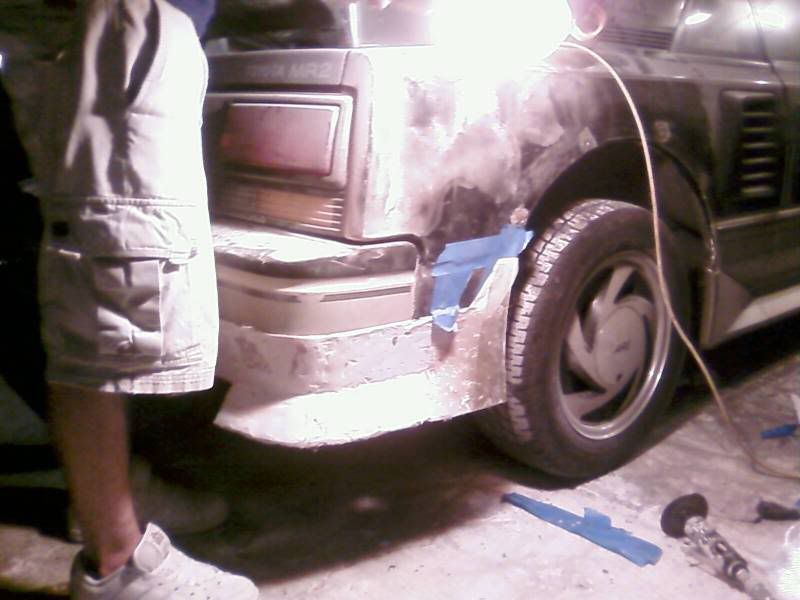
Keep doing this until you get it somewhat smooth, it doesn�t have to be 100% perfect just yet. Now get a cheap dark spray paint and lightly paint the lip. Now take your sanding block and sand with 80. Sand until desired, and dark spots are low spots and need to be filled with body filler and bondo colored spots are high spots and need to be sanded down. Objective is to get the lip all the same color (bondo color) Once you achieve this get a sharpie and circle any small holes air pockets in bondo that were exposed from sanding. Now take a clean spreader and your spot putty and apply to small pin holes. Then sand off with a 120 until the hole is gone and the surface is smooth.

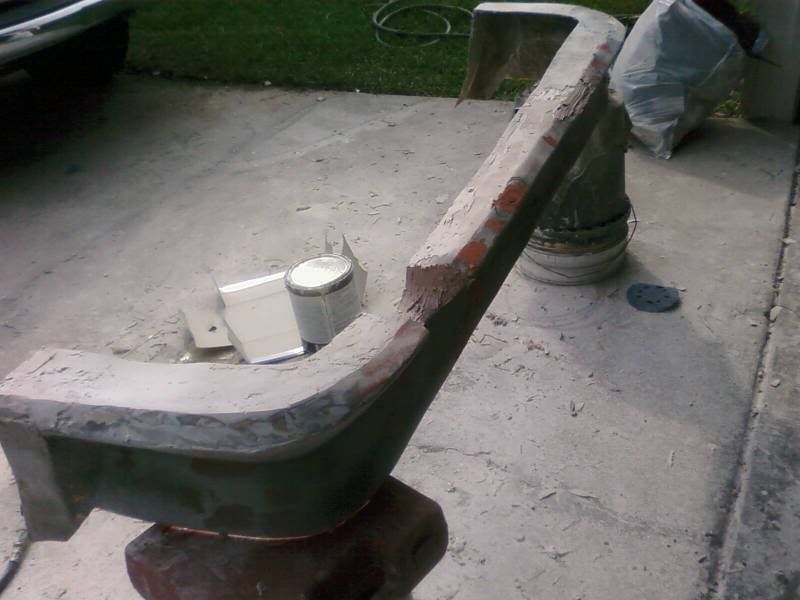
Now spray the lip in cheap sandable primer, stand back and pick out what looks off and make notes on the lip with the sharpie.You just want the lip to look uniform so it is easier to see what is off and then you can address the problem.

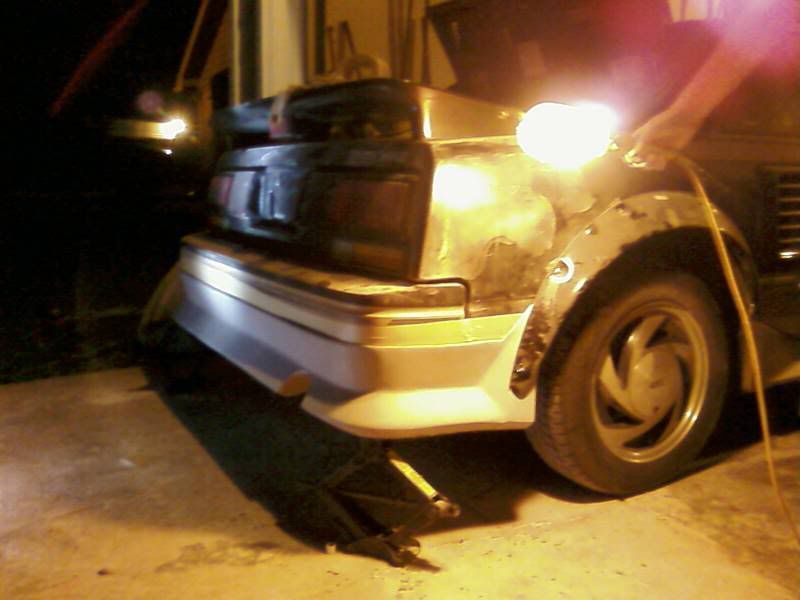
Now that you have it somewhat looking like a lip now take a lot of pictures and upload them to the computer. Look at different angles and you will find more imperfections that you couldn�t see when you were standing there in infront of the lip. Make notes and fix it. Keep doing this until you are satisfied. Once you have it all fixed spray with the better of the primers in the rattle cans (duplicolor high build sandable primer) , dry sand 180-400 then wet sand 320-600. Do this until it is smooth.

I will update the thread with better pictures of the final product this week.
ENJOY!
Thanks Honda05 (chad) for the extra set of hands
Next the design will dictate what materials you need to use as a base. Since the mr2 is boxy and the lip will be somewhat as well. I went for a 240sx looking rear lip. Just something simple and flows nicely. I chose to use cardboard since imo is the best for a boxy design.
Now that we are about to begin here are some quick tips.
-Wear old clothes
-Spend the extra few bucks to get the latex gloves, if you get resin on your hands it takes some time to get off your hands. Eventually it will turn black from dirty sticking to it and you will look like you never take a shower.
-Design ahead and plan everything out, if you don�t you will waste product, money and time.
Materials you will need and where to buy:
-Masking tape (I like to use the blue painters tape) anywhere
-disposable paint brushes homedepot, lowes, ace
-1.3-1.5 gallons of resin
(polyester is what I used for this) homedepot, lowes or auto supply store
-bondo (2 tubs is what I used)
I used the cheaper filler for this. I usually use ragegold or dynalite homedepot, auto parts store, walmart
-bondo spreaders homedepot, lowes, walmart, auto parts store
-spot putty/glazing walmart, autopart store
-respirator (not recommended, but you will get a headache from bondo and resin if you don�t have one) homedepot, lowes possibly walmart
-spray glue
-chop matt
-fiberglass cloth both dry fiberglass homedepot, lowes, walmart
-Sander
-low grit paper, 60,80 mid grit 120 high 320, 400 600
My advice is to buy all this stuff off the internet, that way you get more for your money and you have more of a selection.
I built the whole lip out of CB (cardboard) first. I then put CB above the lip so no resin got on the bumper. Then cover the whole lip in tape. Put alittle car wax on the lip.
Spray an area of the lip with spray glue, then place the chop matt to the lip, keep doing this until the whole lip is covered in chop matt. Once that is done, mix the resin, apply with the disposable brush. DAB it on! If you apply in strokes the matte will move. Mix the resin in small batches and apply until the chop matt is soaked. After a few coats it will look something like this: Dabbing will also prevent air bubbles down to a minimum. After a few coats it will look something like this:
Once you get a few coats on and it is sturdy goahead and pop it off the car and remove the CB and tape from the backside Let it sit for a few min so any damp/sticky spots can cure. I then taped off the exposed bumper and mounted the lip. I applied 2 more layers and then pulled it back off the car. I strengthened from the backside. I only did 1 coat because any more would have caused fitment issues.
Once that is done go ahead and sand with 60 grit to knock any standing glass or high spots. Mix up bondo in small batches and apply with the spreader. Apply it smooth as possible because this will prevent more sanding work. I like to do thin layers to avoid a lot of sanding. Trim the lip to the final shape.
Keep doing this until you get it somewhat smooth, it doesn�t have to be 100% perfect just yet. Now get a cheap dark spray paint and lightly paint the lip. Now take your sanding block and sand with 80. Sand until desired, and dark spots are low spots and need to be filled with body filler and bondo colored spots are high spots and need to be sanded down. Objective is to get the lip all the same color (bondo color) Once you achieve this get a sharpie and circle any small holes air pockets in bondo that were exposed from sanding. Now take a clean spreader and your spot putty and apply to small pin holes. Then sand off with a 120 until the hole is gone and the surface is smooth.
Now spray the lip in cheap sandable primer, stand back and pick out what looks off and make notes on the lip with the sharpie.You just want the lip to look uniform so it is easier to see what is off and then you can address the problem.
Now that you have it somewhat looking like a lip now take a lot of pictures and upload them to the computer. Look at different angles and you will find more imperfections that you couldn�t see when you were standing there in infront of the lip. Make notes and fix it. Keep doing this until you are satisfied. Once you have it all fixed spray with the better of the primers in the rattle cans (duplicolor high build sandable primer) , dry sand 180-400 then wet sand 320-600. Do this until it is smooth.
I will update the thread with better pictures of the final product this week.
ENJOY!
Thanks Honda05 (chad) for the extra set of hands

My Pony Princess is the inspiration for my ride.
iTrader: (17)
Joined: Apr 2006
Posts: 5,217
Likes: 0
Rep Power: 0 
Re: How to make a simple areo part (rear lip)
Props for doing that **** yourself man! I love DIY and working on stuff but have never played with glass at all. Looks really good!
Joined: Feb 2006
Posts: 9,365
Likes: 0
From: Oregon
Rep Power: 348 
Re: How to make a simple areo part (rear lip)
At first I was like, "oh god, he's gonna do a cardboard body kit", but damn, that **** turned out great. Major props 
Joined: Apr 2006
Posts: 1,266
Likes: 0
From: Phoenix, AZ
Rep Power: 257 Joined: Feb 2006
Posts: 9,365
Likes: 0
From: Oregon
Rep Power: 348 Re: How to make a simple areo part (rear lip)
The thread popped up and the first thing I saw was a bunch of text and then a picture of cardboard on the rear. Of course I read through it, why else would I say it turned out great?


 , props to you man!
 Registered!!
Joined: Oct 2006
Posts: 560
Likes: 0
From: Northern Illinois
Rep Power: 265 Re: How to make a simple areo part (rear lip)
that is definitely a lot different than i thought it was going to be when i opened the thread. nice work! it looks really good; makes me wish that i had time to do something like with my car.


A long winded 7th genr
Joined: Jan 2006
Posts: 1,755
Likes: 0
From: Northern California Humboldt
Rep Power: 288 Re: How to make a simple areo part (rear lip)
That's nice, looks great, can't wait to see it when you paint it and get it on.
Know what else I do when fabricating, I use balsa wood, and glue to get the shape, then saturate the wood with resin, so it holds shape, then pull it off and go from there.
I'm going to use the same method to create a set of fins for my wing.
What color are you going to paint?
Know what else I do when fabricating, I use balsa wood, and glue to get the shape, then saturate the wood with resin, so it holds shape, then pull it off and go from there.
I'm going to use the same method to create a set of fins for my wing.
What color are you going to paint?
Registered!!
Joined: Jun 2006
Posts: 74
Likes: 0
From: New Brunswick, NJ
Rep Power: 0 Re: How to make a simple areo part (rear lip)
great work but I dont envy you for all the sanding you had to do!
I did something like that for my toyota tercel.
It took me days to sand that stuff down. Wont do that again ... EVER.
I did something like that for my toyota tercel.
It took me days to sand that stuff down. Wont do that again ... EVER.

Thread Starter
Registered!!
Joined: Aug 2005
Posts: 248
Likes: 0
Rep Power: 0 Re: How to make a simple areo part (rear lip)

Thread
Thread Starter
Honda Civic Forum
Replies
Last Post
ej8
6th Generation Civic 1996 - 2000
2
Apr 13, 2015 06:36 PM

