
DIY Shifter Cable Replacement

Thread Starter
Registered!!
Joined: Jul 2010
Posts: 13
Likes: 0
Rep Power: 0 
DIY Shifter Cable Replacement
Do it Yourself Shifter Cable Replacement
2004 Honda Civic Sedan EX
Disclaimer: Please use this post as a guide, I cannot take any responsibility for any errors of mishaps. God forbid they should happen to you... Please double check your work.
After 193K miles, the boot from my shifter cable broke which was a guide for the cable to move in and out when shifting the gearbox. Since the boot broke, It prevented me from shifting to First, Third, and Fifth gears. It was pretty scary when you want to drop a gear to overtake a car... Thats how I learned of this problem... For a temporary fix, the boot was wired in place, but its only good for a few months, and you simply cannot shift like you'd like to... I was fortunate to find a website that sold OEM Honda parts for half the cost that my nearby Honda Stealership wanted. Overall cost: approximately $90 USD.
TOOLS
-3/8 driver socket wrench (shorter length will work best)
-10mm socket
-6 inch extension
-Needle Nose Pliers
-Dikes Pliers
-adjustable pliers
-med. Phillips Screw Driver
PARTS
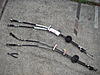
-Part no. 54310-S5A-033 Wire Change (better known as the shifter cable
-Part no. 94201-20220 split Pin ( better known as a cotter pin)
STEP 1: CENTER CONSOLE REMOVAL
1. Remove all contents from the center storage container. Remove rubber mat inside to reveal 3 phillips head screws. Remove screws
2. Slide both the driver and passenger seats foreward and lean seats foreward. this will reveal 2 screws on the side of the center console. Remove the screws on both sides.
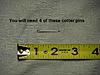
3. located toward the front on both the driver and passenger side, just underneath the dash, remove the plastic pins that secure the center console.
4. With a thin flat blade, carefully wedge it underneath the black panel that rests on the center console and holds the shifter skirt. Carefully pry that panel off.
5. detach the shifter skirt where the plastic sleeve meets the shifter ****. It should snap off.
6. unscrew the shifter **** and remove.
7. remove the panel (shifter skirt and base panel)
8. remove the two screws that are near the shifter
9. remove center console
FREE THE SHIFTER CABLE FROM INSIDE
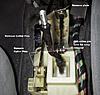
10. Pull the plate that secures the right shifter cable using the adjustable pliers.
11. Remove the cotter pins that secure the ends of the shifter cable.
12. Free the left shifter cable by turning counterclockwise until you can pull it out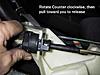
DOWN UNDER
13. Jack up the Civic from the front and place two jacks on the sides (jack points behind the front wheels) for safety.
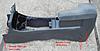
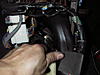
14. Remove the heat shield that surrounds the Catalytic Convertor Using a 10mm socket. This will expose the rubber cover where the shifter cable enters through the inside.
15. Remove the two brackets that hold the shifter cable using a 10mm socket
16. Detach the rubber cover where the shifter cable enters the car.
FROM THE HOOD
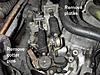
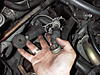
17. Remove the cotter pins and the plates that hold the shifter cable in place. Use the adjustable pliers to remove the plates. Pull toward you then upward.
REMOVING THE CABLE
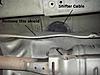
18. From the Inside, position the cables so that they can exit through the opening in the hole.
19. From the hood, position the cables so that when you pull from underneath, they can be maneuvered through the back side of the engine bay and below.
20. From underneath, Carefully maneuver the shifter cable by pulling the cable forward.
INSTALLING THE CABLE
21. Install the Cable from the engine bay, toward the back , then underneath, threading through the floor and into the car.
FASTEN THE CABLE FROM INSIDE
22. Once you have the shifter cable in the proper position, its time to fit them back. No adjustment should be needed. If you do, you have the wrong cable...
23. re-fasten the ends of the shifter cables from inside and use new cotter pins.
24. Re-fasten the ends of the shifter cables from the engine bay side, and use new cotter pins and replace the tabs. Note, the Curved side will face you. Cut the excess of the cotter pin that sticks out to avoid damage and possibly getting snagged.
25. Test the shifter to make sure that you can shift in all 5 gears and reverse as well.
26. Fasten the rubber seal where the cables enter the inside of the Civic and bolt on the brackets that hold the shifter cables to the chassis.
27. Reinstall the center console and the heat shield
FINISH
2004 Honda Civic Sedan EX
Disclaimer: Please use this post as a guide, I cannot take any responsibility for any errors of mishaps. God forbid they should happen to you... Please double check your work.
After 193K miles, the boot from my shifter cable broke which was a guide for the cable to move in and out when shifting the gearbox. Since the boot broke, It prevented me from shifting to First, Third, and Fifth gears. It was pretty scary when you want to drop a gear to overtake a car... Thats how I learned of this problem... For a temporary fix, the boot was wired in place, but its only good for a few months, and you simply cannot shift like you'd like to... I was fortunate to find a website that sold OEM Honda parts for half the cost that my nearby Honda Stealership wanted. Overall cost: approximately $90 USD.
TOOLS
-3/8 driver socket wrench (shorter length will work best)
-10mm socket
-6 inch extension
-Needle Nose Pliers
-Dikes Pliers
-adjustable pliers
-med. Phillips Screw Driver
PARTS
-Part no. 54310-S5A-033 Wire Change (better known as the shifter cable
-Part no. 94201-20220 split Pin ( better known as a cotter pin)
STEP 1: CENTER CONSOLE REMOVAL
1. Remove all contents from the center storage container. Remove rubber mat inside to reveal 3 phillips head screws. Remove screws
2. Slide both the driver and passenger seats foreward and lean seats foreward. this will reveal 2 screws on the side of the center console. Remove the screws on both sides.
3. located toward the front on both the driver and passenger side, just underneath the dash, remove the plastic pins that secure the center console.
4. With a thin flat blade, carefully wedge it underneath the black panel that rests on the center console and holds the shifter skirt. Carefully pry that panel off.
5. detach the shifter skirt where the plastic sleeve meets the shifter ****. It should snap off.
6. unscrew the shifter **** and remove.
7. remove the panel (shifter skirt and base panel)
8. remove the two screws that are near the shifter
9. remove center console
FREE THE SHIFTER CABLE FROM INSIDE
10. Pull the plate that secures the right shifter cable using the adjustable pliers.
11. Remove the cotter pins that secure the ends of the shifter cable.
12. Free the left shifter cable by turning counterclockwise until you can pull it out
DOWN UNDER
13. Jack up the Civic from the front and place two jacks on the sides (jack points behind the front wheels) for safety.
14. Remove the heat shield that surrounds the Catalytic Convertor Using a 10mm socket. This will expose the rubber cover where the shifter cable enters through the inside.
15. Remove the two brackets that hold the shifter cable using a 10mm socket
16. Detach the rubber cover where the shifter cable enters the car.
FROM THE HOOD
17. Remove the cotter pins and the plates that hold the shifter cable in place. Use the adjustable pliers to remove the plates. Pull toward you then upward.
REMOVING THE CABLE
18. From the Inside, position the cables so that they can exit through the opening in the hole.
19. From the hood, position the cables so that when you pull from underneath, they can be maneuvered through the back side of the engine bay and below.
20. From underneath, Carefully maneuver the shifter cable by pulling the cable forward.
INSTALLING THE CABLE
21. Install the Cable from the engine bay, toward the back , then underneath, threading through the floor and into the car.
FASTEN THE CABLE FROM INSIDE
22. Once you have the shifter cable in the proper position, its time to fit them back. No adjustment should be needed. If you do, you have the wrong cable...
23. re-fasten the ends of the shifter cables from inside and use new cotter pins.
24. Re-fasten the ends of the shifter cables from the engine bay side, and use new cotter pins and replace the tabs. Note, the Curved side will face you. Cut the excess of the cotter pin that sticks out to avoid damage and possibly getting snagged.
25. Test the shifter to make sure that you can shift in all 5 gears and reverse as well.
26. Fasten the rubber seal where the cables enter the inside of the Civic and bolt on the brackets that hold the shifter cables to the chassis.
27. Reinstall the center console and the heat shield
FINISH
Last edited by Grey Ghost; Apr 5, 2012 at 09:33 AM.

 +1
+1 
Registered!!
Joined: Feb 2015
Posts: 27
Likes: 0
From: Canada
Rep Power: 0 
Re: DIY Shifter Cable Replacement
will this part work??
54310-S6A-U02 is the part number.
This is what I found as for the website
http://www.corsportusa.com/02-05-hon...hifter-cables/
54310-S6A-U02 is the part number.
This is what I found as for the website
http://www.corsportusa.com/02-05-hon...hifter-cables/

Registered!!
Joined: Oct 2011
Posts: 30
Likes: 0
From: Bay Area , California
Rep Power: 0  Is this basically the same DIY Shift Cable replacements for a (2006 Honda Civic Si) ? i know the part listed will NOT work... i believe this is the part i would need to use (Honda Part No.: 54310-SNG-A02)
Thread
Thread Starter
Honda Civic Forum
Replies
Last Post
Nalmonte
7th Generation Civic 2001 - 2005
3
Jun 3, 2015 11:01 AM
Flipg123
Mechanical Problems/Vehicle Issues and Fix-it Forum
2
May 22, 2015 10:43 PM
thesushiboy
Mechanical Problems/Vehicle Issues and Fix-it Forum
6
Apr 12, 2015 02:54 AM
toastyghosty
General Honda Civic Forum Archive.
37
Jun 10, 2002 01:07 AM

