
DIY clutch install

Thread Starter
Once you go Black on Black, You Never Go Back.
iTrader: (5)
Joined: Nov 2003
Posts: 857
Likes: 1
From: Delaware
Rep Power: 282 
ok this is a diy for a ACT HD00 clutch install on my 03 coupe, i imagine its all the same, so here goes:
tools you will need:

JUST KIDDING!
you will definitly need the following, but the more tools you have the easier it is, we had the privlege of working with this tool box
jackstands
adjustable jack
socket set, wrenches, breaker bar, extensions, axle nut socket
long pry bar
tourque wrench
hammer
(swivel sockets help big time)
one of more of your freinds
first you want to get the car as high in the air as possible for where you are working, we had it about 2 foot off the ground and it was fine.
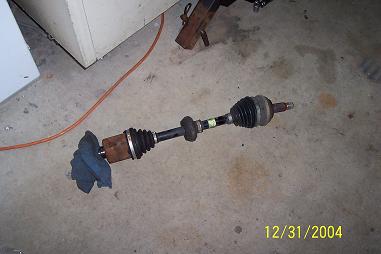
for the next step you will need to remove the axles from the trans, to do this take off the front wheels. Once they are off, remove the cotter pin from the lower ball joint on hub, the nut is a 15mm, once that is removed hit the side of the joint with a hammer until it seperates. before you remove the shafts, drain the trans fluid, there is a plug on the side of the trans
next, remove the axle nut and pull the rotor and hub away from the axle. pry the axle out of the trans with the pry bar, remove the axles completely.


next, remove whatever is in the way of seeing your trans, for example, stock air box, cold air intake, or in my case the charge pipe from the intercooler.


next you want to remove the starter, there are 2 bolts holding it in.

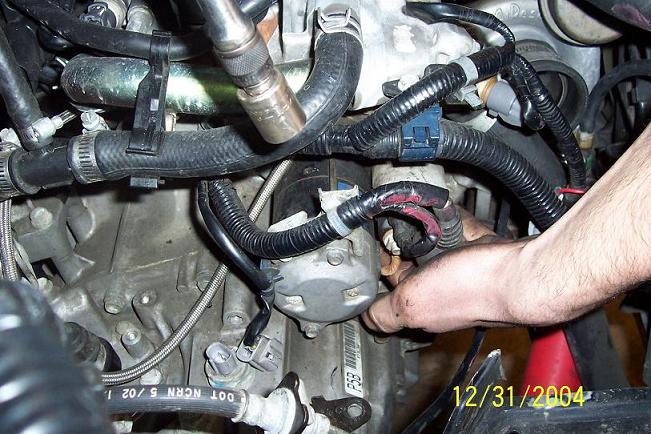

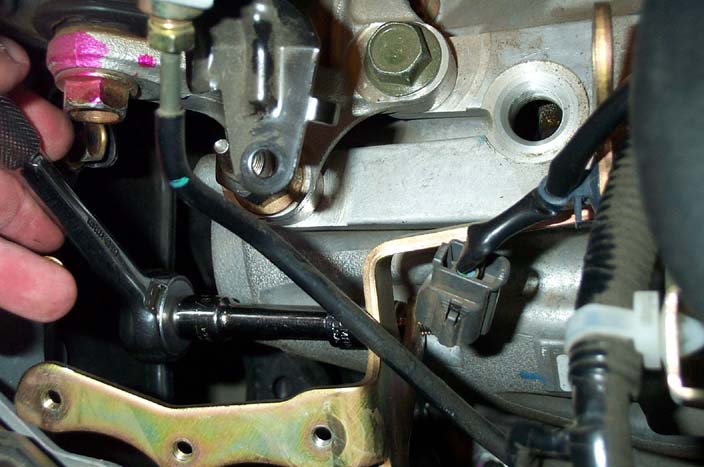
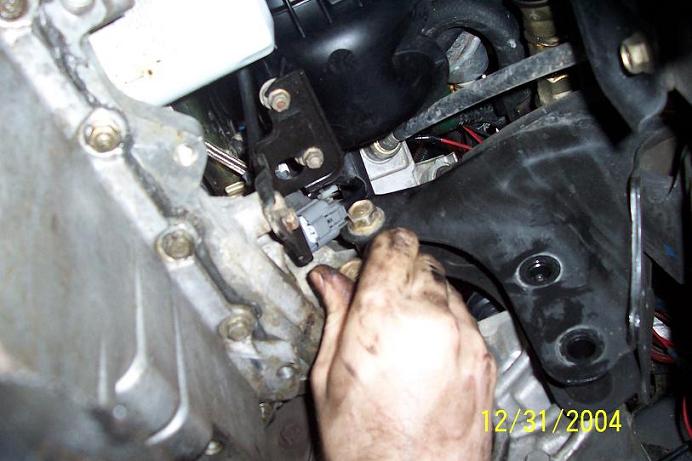
next, you have to remove the linkage off the top of the trans. there is a bracket bolted to the trans by 3 bolts, remove these 3 bolts, then remove the pins holding to 2 linkages to the trans. after the pins are removed, pop the linkage off and set it to the side. while doing this, you will also have to remove a sensor in the back of the trans behind this linkage.
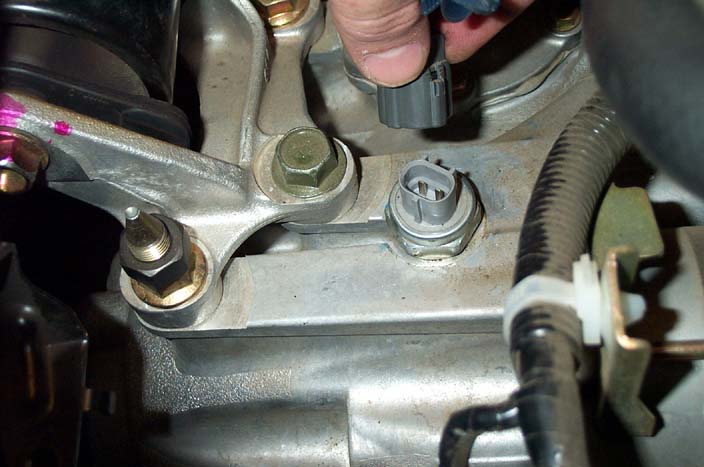
while on the top of the trans, remove the reverse sensor and braket for the hydraulic line.
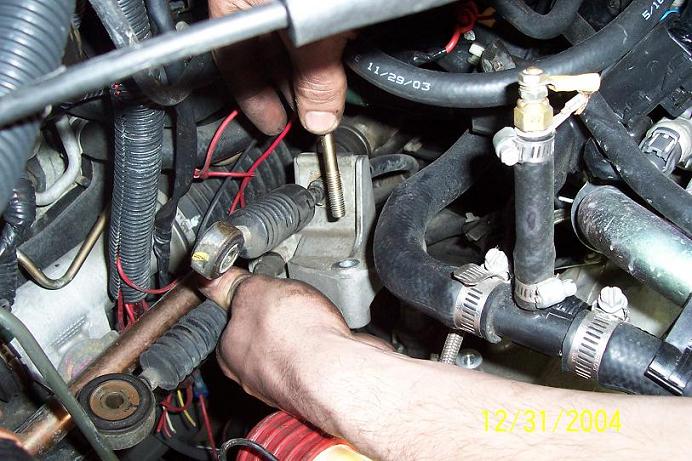
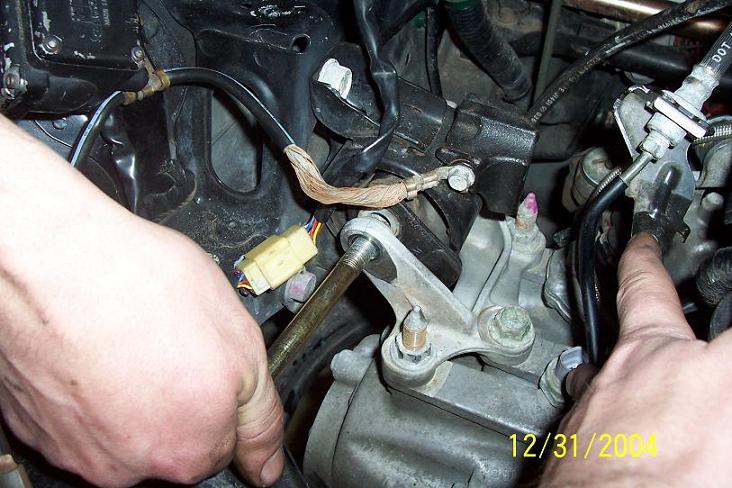
now comes the fun part, your going to have to remove both the front and back motor mount, and trans mounts. this will allow you to let the motor down a little to slip the trans in and out of the motor, and it will stay in the engine bay throughout the whole install, also it will allow you to move the trans as far away from the motor as possible without droping the subframe and removing everything. you want to have a jack under the motor on the oil pan, make sure you put a piece of wood between the jack and motor. hese is what the mounts look like:
trans mount:
front mount:


rear mount:
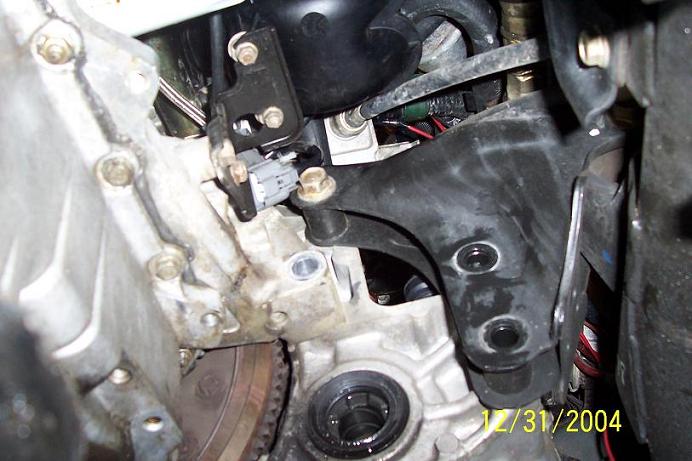
once these mounts are disasembled the motor should be free to move
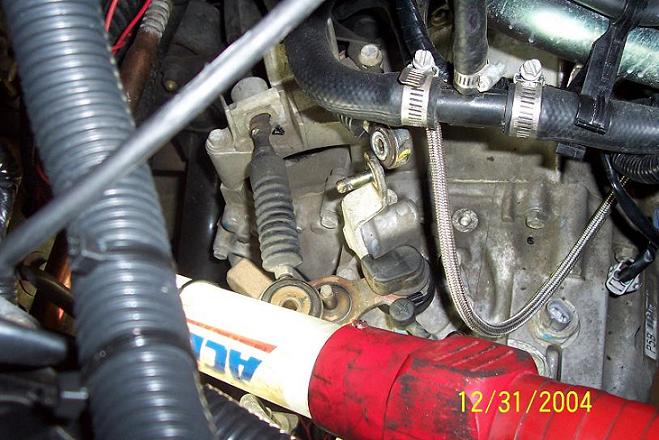
next come the bell housing bolts on the trans, remove all of these

before you go to move the trans, remove the rest of the trans mount that is bolted to the trans, it will give you more room to move the trans
you will also have to remove the hydraulics from the front side of the trans. it is a rubber boot with a line running into it. remove the 2 bolts on top holding the bracket on, then pull it away from the trans.
now pull the trans away from the motor and move it as far to the left as possible

when the trans is disengaged from the motor, you will need to remove the shift fork and release bearing, and install the new one. do this by pulling the fork out from the inside. the new bearing should slide right in and you can reinstall the fork, make sure it is seated all the way down when you put it back in.

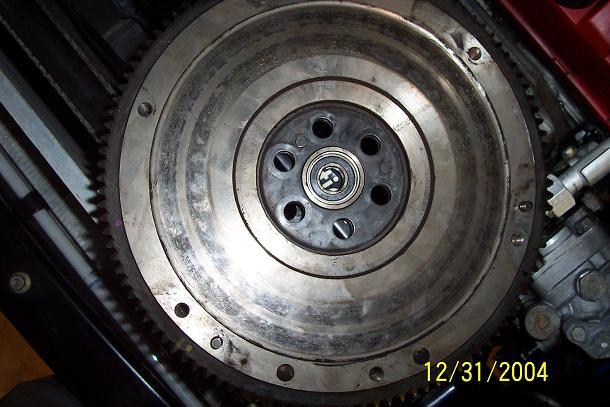
now there should be enough room to get to the bolts on the pressure plate and flywheel. have your freind hold the pry bar on the teeth of the flywheel while you break loose the bolts on the clutch and flywheel. rotate the flywheel to have easy access to all the bolts. its good to have another freind hold the trans back while you are removing the clutch.
when the flywheel comes out, either take it to a shop to have it refinished of buy a new one. pep boys does it for $31.00. this is a very important step, do not skip it.


now that your flywheel has a new surface, its time to put everything back together. your clutch kit should also come with a small bearing, this is the bearing in your flywheel, whoever resurfaced the flywheel would have had to remove this bearing. anyway, pop the new bearing in the center of the flywheel and make sure it is seated fully.
next bolt the flywheel up using the same method you used to take it off. we tourqued my flywheel to 80 ftlbs because we did not have the honda bible. 80 for the flywheel and 40 for the pressure plate is the usual.
now using the clutch allignment tool, line up the pressure plate and the clutch disk to the flywheel and bolt the whole assembly up. is is very important you use the alligment tool to line the splines up, or the shaft of the trans will not slide in the motor.


once everything is bolted up, remove the allignment tool. you are now ready to slide the trans shaft into the motor. make sure everything is clear and get one guy under the trans, one on top, and proceed to put it back together. it is important that the trans alligns by its self, dont allign the trans by running the bell housing bolts in. if the trans does not slide together, there is usually a problem. once everyting is in place, tightent the bell houseing bolts.
now that the trans and motor are reassembled, proceed to put everything back in reverse order you took it off:
hydraulic linkage on front of trans to shift fork and rubber boot (2 bolts)
front, rear, and trans mounts
linkage on back of the trans (3 bolts)
2 sensors on trans, one in back, one on top.
reinstall the braket on top of trans for hydraulic line.
reinstall starter (2 bolts)
reinstall CV shafts and reconnect lower ball joints, and axle nut
(make sure you seat the CV's into the trans, you will hear it pop in, you should not be able to pull the CV's out once they are snapped in)
reinstall wheels
reinstall air box, CAI, or charge pipe

lastly you will need to add fluid to the trans. the last page of your owners manual states the following:
use honda manual trans fluid or SAE 10w-30 as a replacement
trans and transfer case capacity is about 1.6 US quarts
(you will need to pump the oil into the trans using a bottle pump)
reinstall the drain plug.
let your car down and start it up to make sure everything is normal.
there are alot of theories about how to break in your new clutch, we felt as tho i should break it in how it was going to be driven, so we took it out and ran it hard for about a half hour. everything was fine.
tools you will need:
JUST KIDDING!
you will definitly need the following, but the more tools you have the easier it is, we had the privlege of working with this tool box
jackstands
adjustable jack
socket set, wrenches, breaker bar, extensions, axle nut socket
long pry bar
tourque wrench
hammer
(swivel sockets help big time)
one of more of your freinds
first you want to get the car as high in the air as possible for where you are working, we had it about 2 foot off the ground and it was fine.
for the next step you will need to remove the axles from the trans, to do this take off the front wheels. Once they are off, remove the cotter pin from the lower ball joint on hub, the nut is a 15mm, once that is removed hit the side of the joint with a hammer until it seperates. before you remove the shafts, drain the trans fluid, there is a plug on the side of the trans
next, remove the axle nut and pull the rotor and hub away from the axle. pry the axle out of the trans with the pry bar, remove the axles completely.
next, remove whatever is in the way of seeing your trans, for example, stock air box, cold air intake, or in my case the charge pipe from the intercooler.
next you want to remove the starter, there are 2 bolts holding it in.
next, you have to remove the linkage off the top of the trans. there is a bracket bolted to the trans by 3 bolts, remove these 3 bolts, then remove the pins holding to 2 linkages to the trans. after the pins are removed, pop the linkage off and set it to the side. while doing this, you will also have to remove a sensor in the back of the trans behind this linkage.
while on the top of the trans, remove the reverse sensor and braket for the hydraulic line.
now comes the fun part, your going to have to remove both the front and back motor mount, and trans mounts. this will allow you to let the motor down a little to slip the trans in and out of the motor, and it will stay in the engine bay throughout the whole install, also it will allow you to move the trans as far away from the motor as possible without droping the subframe and removing everything. you want to have a jack under the motor on the oil pan, make sure you put a piece of wood between the jack and motor. hese is what the mounts look like:
trans mount:
front mount:
rear mount:
once these mounts are disasembled the motor should be free to move
next come the bell housing bolts on the trans, remove all of these
before you go to move the trans, remove the rest of the trans mount that is bolted to the trans, it will give you more room to move the trans
you will also have to remove the hydraulics from the front side of the trans. it is a rubber boot with a line running into it. remove the 2 bolts on top holding the bracket on, then pull it away from the trans.
now pull the trans away from the motor and move it as far to the left as possible
when the trans is disengaged from the motor, you will need to remove the shift fork and release bearing, and install the new one. do this by pulling the fork out from the inside. the new bearing should slide right in and you can reinstall the fork, make sure it is seated all the way down when you put it back in.
now there should be enough room to get to the bolts on the pressure plate and flywheel. have your freind hold the pry bar on the teeth of the flywheel while you break loose the bolts on the clutch and flywheel. rotate the flywheel to have easy access to all the bolts. its good to have another freind hold the trans back while you are removing the clutch.
when the flywheel comes out, either take it to a shop to have it refinished of buy a new one. pep boys does it for $31.00. this is a very important step, do not skip it.
now that your flywheel has a new surface, its time to put everything back together. your clutch kit should also come with a small bearing, this is the bearing in your flywheel, whoever resurfaced the flywheel would have had to remove this bearing. anyway, pop the new bearing in the center of the flywheel and make sure it is seated fully.
next bolt the flywheel up using the same method you used to take it off. we tourqued my flywheel to 80 ftlbs because we did not have the honda bible. 80 for the flywheel and 40 for the pressure plate is the usual.
now using the clutch allignment tool, line up the pressure plate and the clutch disk to the flywheel and bolt the whole assembly up. is is very important you use the alligment tool to line the splines up, or the shaft of the trans will not slide in the motor.
once everything is bolted up, remove the allignment tool. you are now ready to slide the trans shaft into the motor. make sure everything is clear and get one guy under the trans, one on top, and proceed to put it back together. it is important that the trans alligns by its self, dont allign the trans by running the bell housing bolts in. if the trans does not slide together, there is usually a problem. once everyting is in place, tightent the bell houseing bolts.
now that the trans and motor are reassembled, proceed to put everything back in reverse order you took it off:
hydraulic linkage on front of trans to shift fork and rubber boot (2 bolts)
front, rear, and trans mounts
linkage on back of the trans (3 bolts)
2 sensors on trans, one in back, one on top.
reinstall the braket on top of trans for hydraulic line.
reinstall starter (2 bolts)
reinstall CV shafts and reconnect lower ball joints, and axle nut
(make sure you seat the CV's into the trans, you will hear it pop in, you should not be able to pull the CV's out once they are snapped in)
reinstall wheels
reinstall air box, CAI, or charge pipe
lastly you will need to add fluid to the trans. the last page of your owners manual states the following:
use honda manual trans fluid or SAE 10w-30 as a replacement
trans and transfer case capacity is about 1.6 US quarts
(you will need to pump the oil into the trans using a bottle pump)
reinstall the drain plug.
let your car down and start it up to make sure everything is normal.
there are alot of theories about how to break in your new clutch, we felt as tho i should break it in how it was going to be driven, so we took it out and ran it hard for about a half hour. everything was fine.
Last edited by Havok2k1; Dec 26, 2006 at 11:07 PM.


 )
) Thread Starter
Once you go Black on Black, You Never Go Back.
iTrader: (5)
Joined: Nov 2003
Posts: 857
Likes: 1
From: Delaware
Rep Power: 282 well new years eve morning, i was wasted at night. dude i wish someone would put this thing into the DIY section, it took me a long time to write it up, and i think its pretty good. i mean ****, i know alot of you dudes could use this so thats why i took the extra time to note stuff down and take pics during the install. granted its not perfect, but its more then i had going in to this project, i might as well had a blindfold on
Prowlin' with a Purpose
iTrader: (16)
Joined: Nov 2002
Posts: 5,239
Likes: 0
From: Minnesota
Rep Power: 339 wtf mate? wheres the engine sling, air tools, second hand? torque bar
without the engine sling, the motor will just DROP down ONTOP of you if you pull out the engine mounts
without the engine sling, the motor will just DROP down ONTOP of you if you pull out the engine mounts
Thread Starter
Once you go Black on Black, You Never Go Back.
iTrader: (5)
Joined: Nov 2003
Posts: 857
Likes: 1
From: Delaware
Rep Power: 282 thats why you have the adjustable jack under the motor so you can raise or lower it when you want, the tourque wrench tourqued all the bolts, i think we all know how to use a tourque wrench, and the second and third set of hands are there, actually, you can see me holding the tranny while me buddy bolted the pressure plate on. and the air tools are in that 30,000 dollar snap on tool box

Registered!!
Joined: Mar 2011
Posts: 5
Likes: 0
Rep Power: 0 
Re: DIY clutch install
First of all, I want to thank you robo 1040 for a very helpful DIY. I'm a Ford guy, but my wife's a Honda girl. I've kept her in fairly new ones in the past, but this 2005 Civic just hit 108K and the clutch was starting to slip. I'm not ready to buy new, so I figured it was time to do some research. Thanks to this, it made the process seem doable.
I would like to add that I have a few items to add to your procedure that might make it even smoother for the really green guys and I've got pics too....
I would like to add that I have a few items to add to your procedure that might make it even smoother for the really green guys and I've got pics too....
Registered!!
Joined: Mar 2011
Posts: 5
Likes: 0
Rep Power: 0 Re: DIY clutch install
I emailed robo1040 to see if he'd like to add my stuff to his post. If not, with everyone's permission, I could repost everything at the end. I don't want to step on anyone's toes...
Kenny the Ricer
iTrader: (1)
Joined: Oct 2009
Posts: 5,580
Likes: 0
From: In your trunk
Rep Power: 292 
Re: DIY clutch install
the OP hasn't been on in several months and this thread is about 5 years old, this thread was almost lost in the archives until I dug it up recently
So if you'd like to post a complete and more thorough guide, you're welcome to post a new guide.
Otherwise, if you only have a couple pictures to add, and a few comments, keep to this thread.
So if you'd like to post a complete and more thorough guide, you're welcome to post a new guide.
Otherwise, if you only have a couple pictures to add, and a few comments, keep to this thread.

Registered!!
Joined: Aug 2010
Posts: 13
Likes: 0
From: Texas
Rep Power: 0 Re: DIY clutch install
hi... so i think it is time to put in a new clutch but i am VERY intimidated by the shear scope of this project...so if i haven't done mutch/any engine work how hard would this be on a scale of 1-10... i want to start doing my own repairs, and this is currently what needs to be done...
A descendant of 2k1civic.com
iTrader: (6)
Joined: Jul 2001
Posts: 5,619
Likes: 3
From: Nebraska
Rep Power: 360 Re: DIY clutch install
hi... so i think it is time to put in a new clutch but i am VERY intimidated by the shear scope of this project...so if i haven't done mutch/any engine work how hard would this be on a scale of 1-10... i want to start doing my own repairs, and this is currently what needs to be done...
Registered!!
Joined: Aug 2010
Posts: 13
Likes: 0
From: Texas
Rep Power: 0 

Registered!!
Joined: Apr 2015
Posts: 14
Likes: 0
Rep Power: 0 Re: DIY clutch install
Hey guys ,
my clutch is going and going but i need to change it before its gone,...
2003 civic 4dr sedan
im looking online for " clutch kit " , any recommendations ?
please inbox me with a link or here,,
thanks
my clutch is going and going but i need to change it before its gone,...
2003 civic 4dr sedan
im looking online for " clutch kit " , any recommendations ?
please inbox me with a link or here,,
thanks

Registered!!
Joined: Nov 2014
Posts: 11
Likes: 0
Rep Power: 0 Re: DIY clutch install
Im gonna do it myself, but im not sure if i should bring it to my friends shop or do it by myself in my garage. Any recommendations on soloing it?
Joined: Aug 2003
Posts: 21,620
Likes: 1,252
From: Las Vegas, NV
Rep Power: 512 Re: DIY clutch install
It takes a bit of mechanical know-how to DIY, but it's definitely doable. As far as clutch kit recommendations, I'd recommend the Exedy OEM Replacement clutch kit. It's $81.40 shipped on thmotorsports, and there's apparently a $10 cashback/rebate thing going on with coupon code "exedycash".
I'm rocking that clutch right now and it's been good to me.
I'm rocking that clutch right now and it's been good to me.
Registered!!
Joined: Nov 2013
Posts: 380
Likes: 3
From: Raleigh, NC
Rep Power: 156 Re: DIY clutch install
just wanted to say this is a great thread and thanks for sharing your work!! it's been a great guide for working on mine today.
just wanted to add to the knowledge base some things I learned that weren't in the DIY.
To remove the sensor on top of the trans you need a 27mm deep socket. I wasn't able to get the little bracket holding the hydraulic line off without removing the sensor.
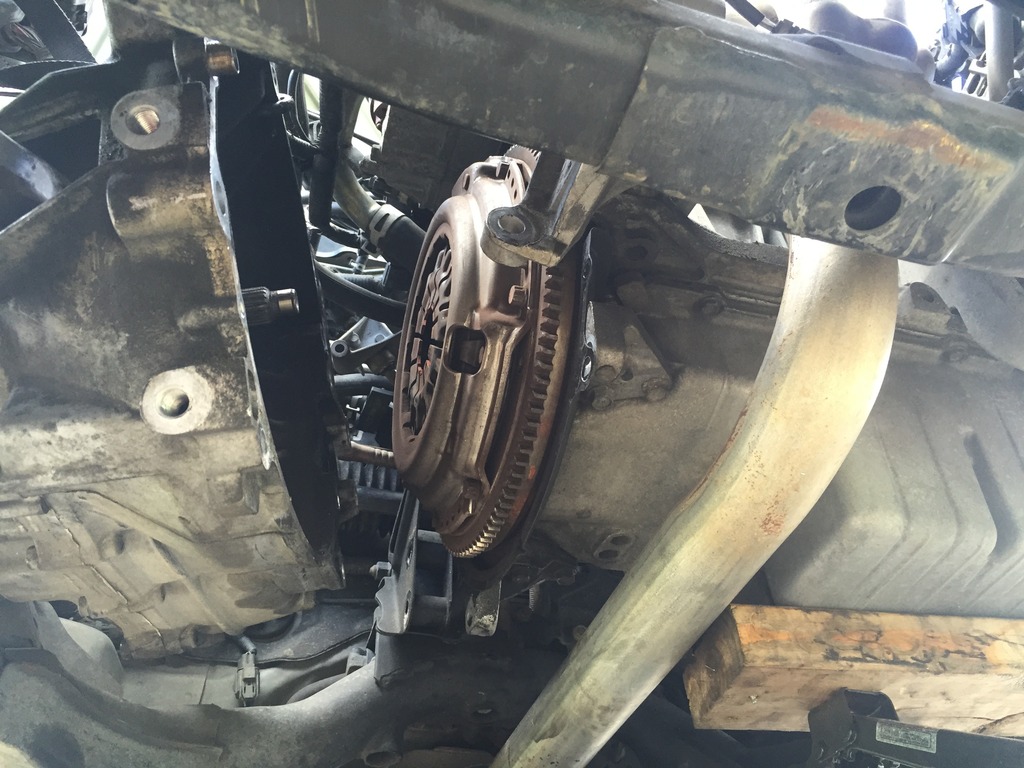
I had a jack under the engine and a jack under the trans. I wasn't sure how it was going to move once all the bolts were out and didn't want it to drop off the car. I loosened all the bolts under the car first so I didn't have to work around the jacks. Then I loosened the top ones and slide the transmission back. To my surprise it really wasn't heavy at all. I wedged it between the frame and sub frame and wrapped a strap around the engine mount bracing to hold it in place.

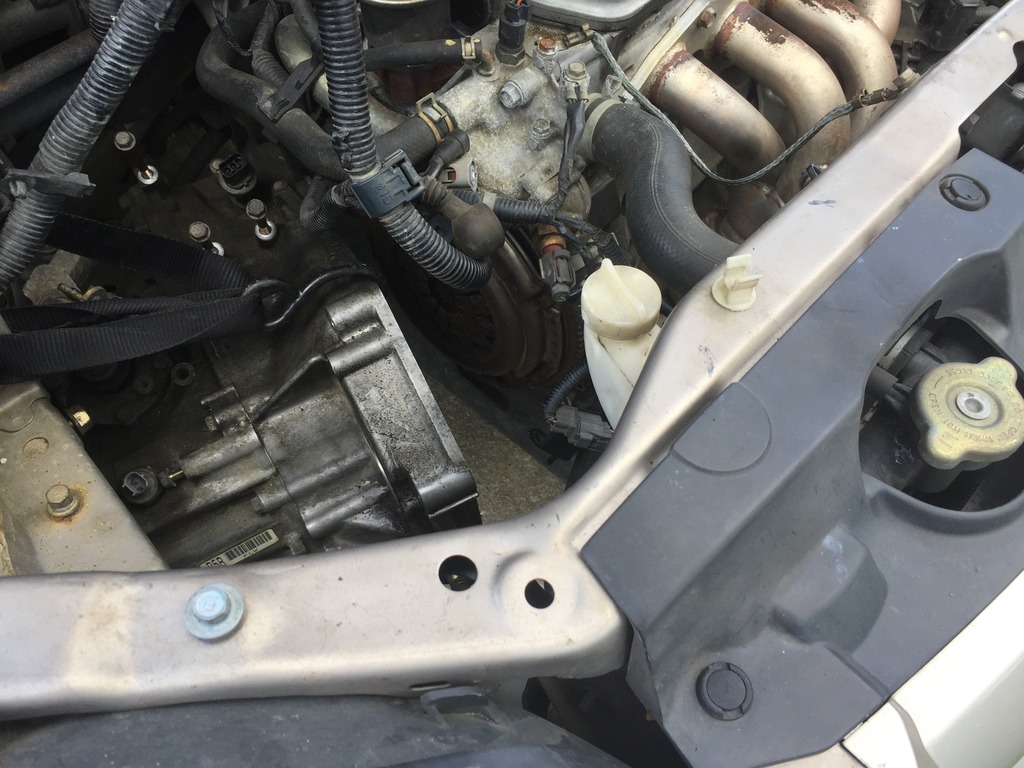
Here's a picture of all the trans bolts that need to be removed.
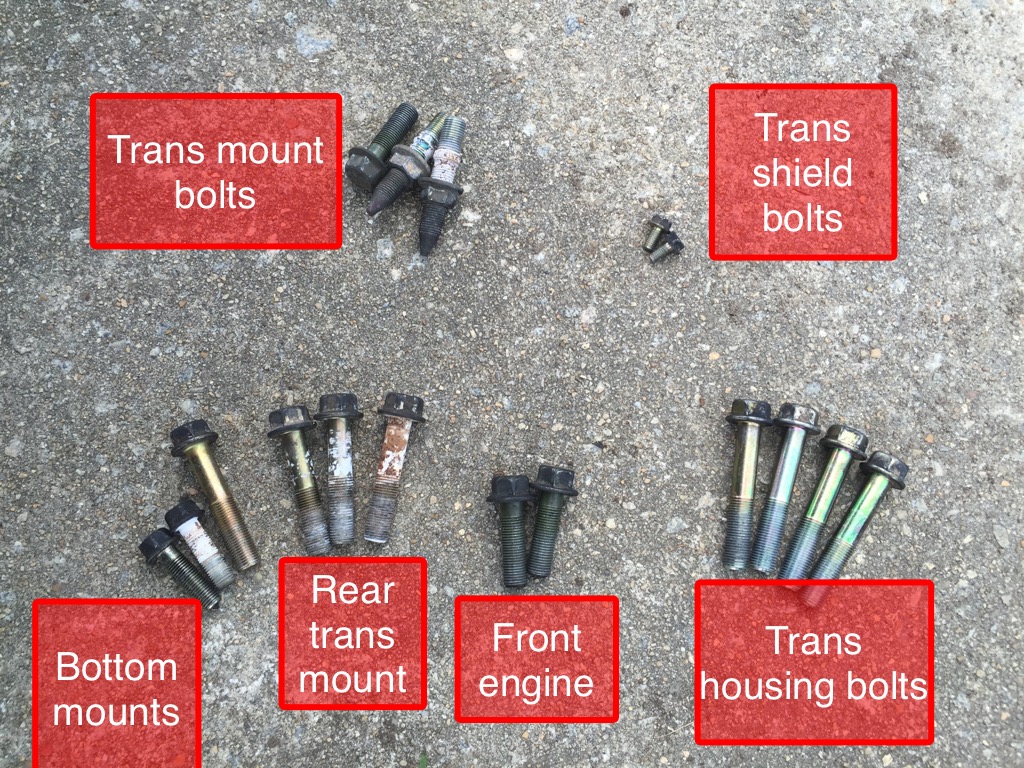
I took the entire trans mount off the left side just to make sure I had enough working room. The nut for the studs was frozen so when I removed them, the entire stud came out. That's why there's 3 bolts there instead of just nuts.
When you're under the car there's a thin black shield that covers the trans. There's 2 bolts that hold it in place, you'll have to remove these to get the trans to move.
The bottom mount bolts are from the two little triangular brackets that are front/back of the motor and hold the motor and trans together. The long bolt here is a housing bolt that's next to the rear engine/trans mount.
The 3 rear engine/trans bolts are self explanatory.
For the front engine mount there's 3 bolts that hold everything together. The two here are in the trans and there's a longer, skinnier one that bolts into the engine. I put this one back in after I got the trans separated to give a little more support to the engine.
Then the housing bolts are accessible from the top. Two under the water housing/thermostat area. And two more near the front engine mount.
With the trans still in the car there's actually a good bit of room to work. But I think if the studs hadn't come out the way they did I wouldn't have as much room.
just wanted to add to the knowledge base some things I learned that weren't in the DIY.
To remove the sensor on top of the trans you need a 27mm deep socket. I wasn't able to get the little bracket holding the hydraulic line off without removing the sensor.
I had a jack under the engine and a jack under the trans. I wasn't sure how it was going to move once all the bolts were out and didn't want it to drop off the car. I loosened all the bolts under the car first so I didn't have to work around the jacks. Then I loosened the top ones and slide the transmission back. To my surprise it really wasn't heavy at all. I wedged it between the frame and sub frame and wrapped a strap around the engine mount bracing to hold it in place.

Here's a picture of all the trans bolts that need to be removed.

I took the entire trans mount off the left side just to make sure I had enough working room. The nut for the studs was frozen so when I removed them, the entire stud came out. That's why there's 3 bolts there instead of just nuts.
When you're under the car there's a thin black shield that covers the trans. There's 2 bolts that hold it in place, you'll have to remove these to get the trans to move.
The bottom mount bolts are from the two little triangular brackets that are front/back of the motor and hold the motor and trans together. The long bolt here is a housing bolt that's next to the rear engine/trans mount.
The 3 rear engine/trans bolts are self explanatory.
For the front engine mount there's 3 bolts that hold everything together. The two here are in the trans and there's a longer, skinnier one that bolts into the engine. I put this one back in after I got the trans separated to give a little more support to the engine.
Then the housing bolts are accessible from the top. Two under the water housing/thermostat area. And two more near the front engine mount.
With the trans still in the car there's actually a good bit of room to work. But I think if the studs hadn't come out the way they did I wouldn't have as much room.


Registered!!
Joined: May 2016
Posts: 1
Likes: 0
Rep Power: 0 Re: DIY clutch install
Hello I actually have a question more than anything. So I hired a guy from Craigslist to install flywheel and clutch on my sons 94 Acura with b20 CRV engine swap. I didn't have time to do it with my son due to work. I got home and this guy is still working on the car after 11 hours. So the problem was, after he did that the car wouldn't start. There was a sensor on the engine that he broke when he lowered the engine I don't know if it's the coolant sensor, or what sensor it is. But the car starts as soon as you press the gas it dies. My son figured out one Morning to warm the engine up. If the engine is warm no problem the car is able to run. Also prior to this the check engine light wasn't on after the install the light is now on. The exhaust pipe didn't have anything coming out of it and now there's smoke. I just want to make sure that my son is safe driving this car. I don't really know what this guy did. There's a lot of lose bolts and a a couple missing but right now it's secure.. We also tried to disconnect the battery to try to restart the computer in the car and it didn't help at all check engine still on. Please help if there is anything you can advice. Thank you in advance.
=drhawkinz;4708079]just wanted to say this is a great thread and thanks for sharing your work!! it's been a great guide for working on mine today.
just wanted to add to the knowledge base some things I learned that weren't in the DIY.
To remove the sensor on top of the trans you need a 27mm deep socket. I wasn't able to get the little bracket holding the hydraulic line off without removing the sensor.
I had a jack under the engine and a jack under the trans. I wasn't sure how it was going to move once all the bolts were out and didn't want it to drop off the car. I loosened all the bolts under the car first so I didn't have to work around the jacks. Then I loosened the top ones and slide the transmission back. To my surprise it really wasn't heavy at all. I wedged it between the frame and sub frame and wrapped a strap around the engine mount bracing to hold it in place.
Here's a picture of all the trans bolts that need to be removed.

I took the entire trans mount off the left side just to make sure I had enough working room. The nut for the studs was frozen so when I removed them, the entire stud came out. That's why there's 3 bolts there instead of just nuts.
When you're under the car there's a thin black shield that covers the trans. There's 2 bolts that hold it in place, you'll have to remove these to get the trans to move.
The bottom mount bolts are from the two little triangular brackets that are front/back of the motor and hold the motor and trans together. The long bolt here is a housing bolt that's next to the rear engine/trans mount.
The 3 rear engine/trans bolts are self explanatory.
For the front engine mount there's 3 bolts that hold everything together. The two here are in the trans and there's a longer, skinnier one that bolts into the engine. I put this one back in after I got the trans separated to give a little more support to the engine.
Then the housing bolts are accessible from the top. Two under the water housing/thermostat area. And two more near the front engine mount.
With the trans still in the car there's actually a good bit of room to work. But I think if the studs hadn't come out the way they did I wouldn't have as much room.
 [/QUOTE]
=drhawkinz;4708079]just wanted to say this is a great thread and thanks for sharing your work!! it's been a great guide for working on mine today.
just wanted to add to the knowledge base some things I learned that weren't in the DIY.
To remove the sensor on top of the trans you need a 27mm deep socket. I wasn't able to get the little bracket holding the hydraulic line off without removing the sensor.
I had a jack under the engine and a jack under the trans. I wasn't sure how it was going to move once all the bolts were out and didn't want it to drop off the car. I loosened all the bolts under the car first so I didn't have to work around the jacks. Then I loosened the top ones and slide the transmission back. To my surprise it really wasn't heavy at all. I wedged it between the frame and sub frame and wrapped a strap around the engine mount bracing to hold it in place.
Here's a picture of all the trans bolts that need to be removed.
I took the entire trans mount off the left side just to make sure I had enough working room. The nut for the studs was frozen so when I removed them, the entire stud came out. That's why there's 3 bolts there instead of just nuts.
When you're under the car there's a thin black shield that covers the trans. There's 2 bolts that hold it in place, you'll have to remove these to get the trans to move.
The bottom mount bolts are from the two little triangular brackets that are front/back of the motor and hold the motor and trans together. The long bolt here is a housing bolt that's next to the rear engine/trans mount.
The 3 rear engine/trans bolts are self explanatory.
For the front engine mount there's 3 bolts that hold everything together. The two here are in the trans and there's a longer, skinnier one that bolts into the engine. I put this one back in after I got the trans separated to give a little more support to the engine.
Then the housing bolts are accessible from the top. Two under the water housing/thermostat area. And two more near the front engine mount.
With the trans still in the car there's actually a good bit of room to work. But I think if the studs hadn't come out the way they did I wouldn't have as much room.
[/QUOTE] 
Registered!!
Joined: Nov 2016
Posts: 1
Likes: 0
Rep Power: 0 Re: DIY clutch install
I realize this is an older thread but I'm going to tackle replacing the clutch on my son's 2002 civic this weekend. I've read through a few different write ups on how to do this but some say to remove the subframe to drop the transmission completely out and others don't. I'm going to be supporting the engine and transmission from below with a couple floor jacks and it seems like getting subframe out would be a PITA. From this write up it appears he didn't need to remove the transmission just pulled it out of the way. To those of you who have done this job, it this the way to go or should I plan on dropping the subframe and transmission completely out?

