
Ball Joint DIY V.2 - No air hammer necessary

Thread Starter
Whachya lookin at?
iTrader: (1)
Joined: May 2009
Posts: 6,388
Likes: 13
From: Canada
Rep Power: 313 

Ball Joint DIY V.2 - No air hammer necessary
First I wanna say this is just a guide, I'm not responsible if you attempt this job and eff it up. ANY JOB suspension wise you should know what your doing and the risks involved. This is how I would do it, not necesarilly the right way so keep this in mind while doing it. This guide does not require you to have air tools to complete the job, though they do help. That being said, on with the DIY.
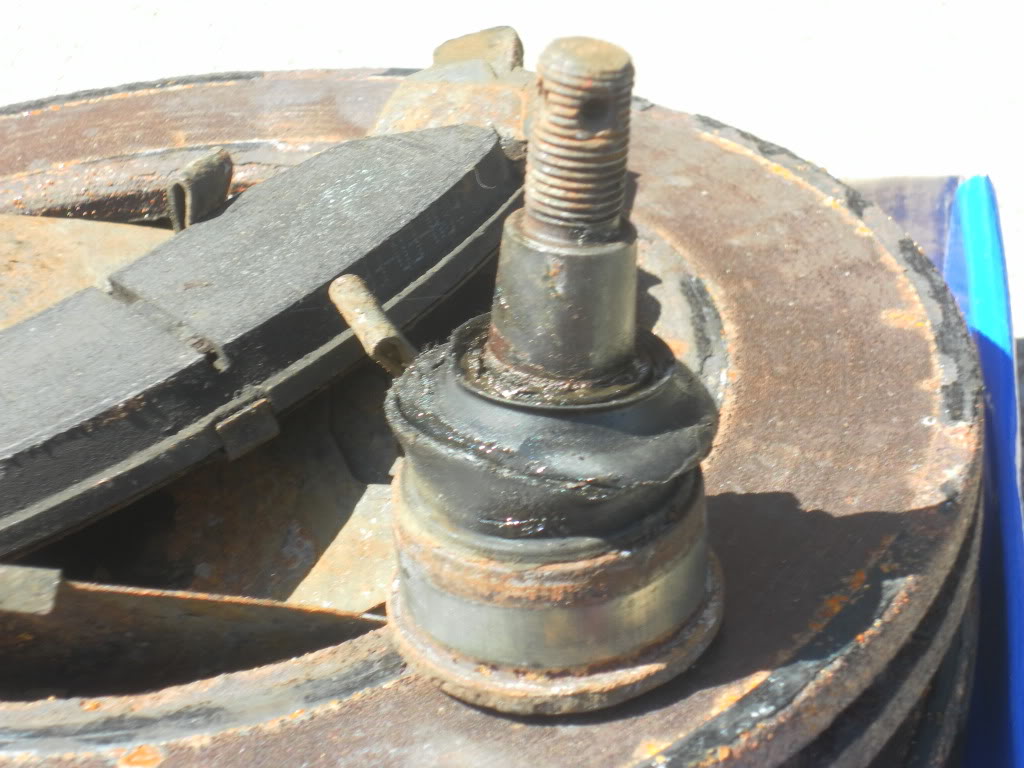
Here is my ball joint after it was pulled out, obviously toast:
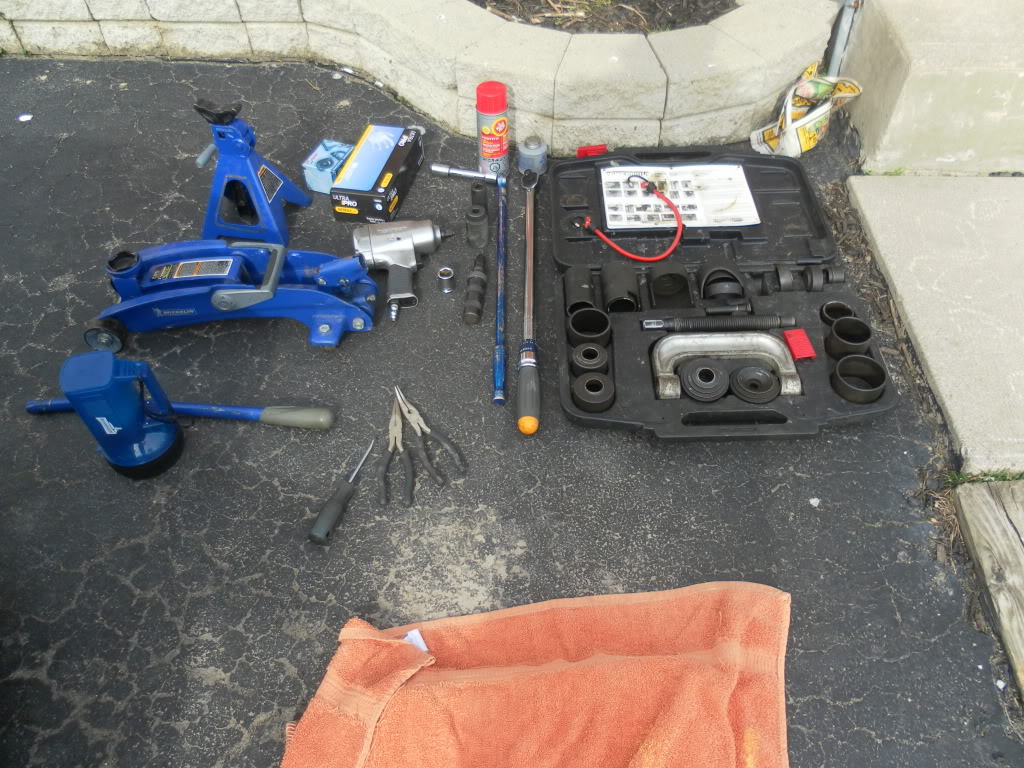
This is what your going to want to have when you start the job:
A new ball joint
A hydraulic jack
JACKSTANDS, USE THEM
A ratchet set including 10mm, 17mm, 19mm, and 22mm ratchets.
An axle nut impact socket
A good 3' breaker bar helps A LOT
A torque wrench
Some extensions will be necessary for your ratchets.
A 22mm impact socket for use with the ball joint press tool
A hammer
A good set of needlenose pliers, mine had a nice bend in them.
A flathead screwdriver
A bungeeee cord
Anti seize paste
An impact gun helps but is not necessary, obviously a compressor too.
2 Brand Spankin' New Axle Nuts
latex gloves help keep your hands clean.
Here is what I had on hand:
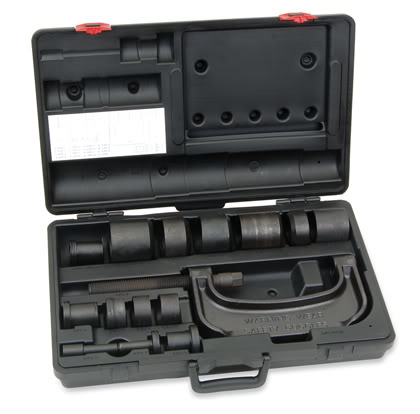
Most importantly: A Ball joint press tool I'm showing this twice because you NEED it if your doing this at home.
Okay, let's have some fun. I'm going to deviate from the service manual right away because I'm assuming you don't have access to air tools.
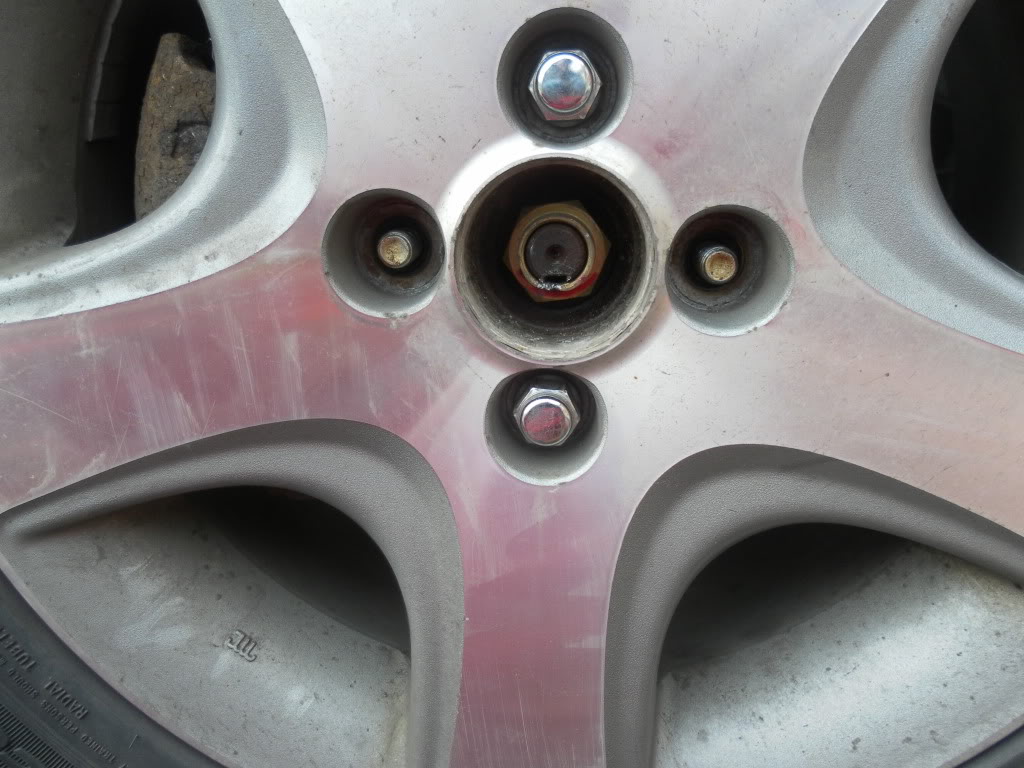
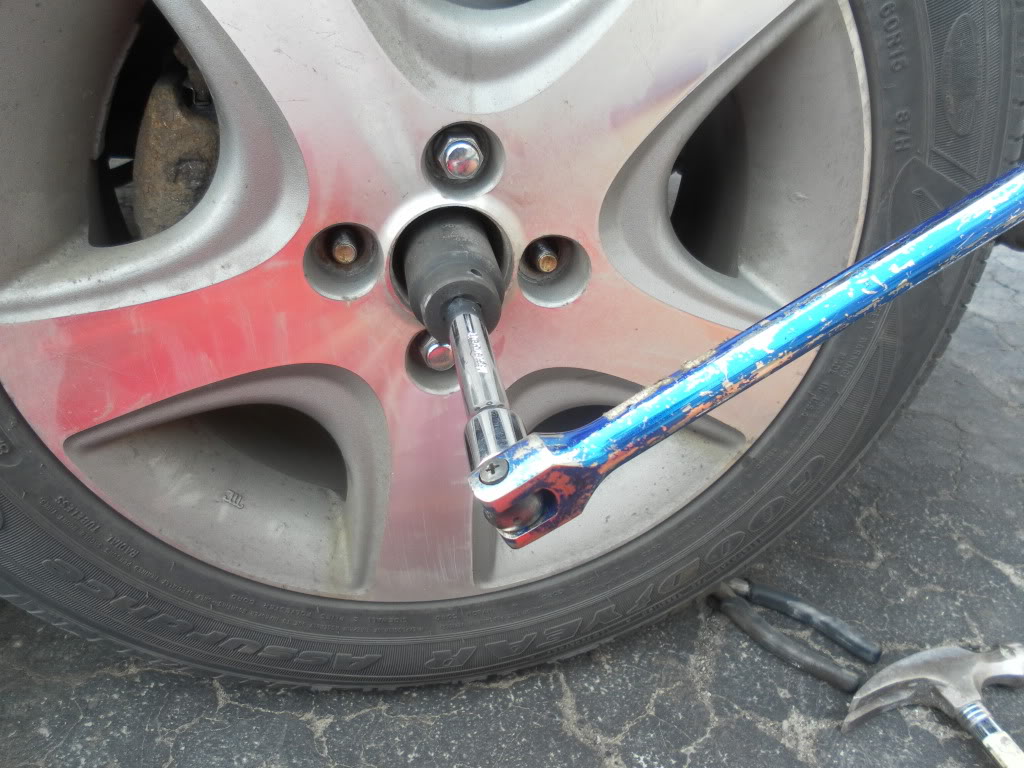
1. Loosen your lug nuts, jack up the car safely and remove the tire. Knock the centercap out from the inside of the rim. You can pry the centercap off with the wheel on the ground but you risk damaging it. There is almost no way to damage it if you knock it off from the inside. After the centercap is knocked out, use your flathead screwdriver and carefully pry the notch out of the axle nut. Be careful doing this I broke two screwdrivers. Here is a picture of the axle nut.
2. Great, now put the wheel back on the car and just snug up the lug nuts. Put the car back on the ground and grab your breaker bar, an extension, and the massive axle nut socket. Get that baby in there and break the 134 ft/lbs of seized on torque off the nut free. If you can't get the nut free this way, you will need an impact gun. Here is what the socket looks like passing through the rim:
3. Great, now take your stupid wheel back off the stupid car ( a bit repetative I know, if you have access to air tools you can remove the axle nut with the wheel off to begin with which makes it a lot easier. ) After the wheel is removed take these two 17mm bolts off of the caliper, and hang it up out of the way all nice like. DO NOT REMOVE THE BRAKE LINE BOLT!!!:
4. Now, remove the two 22mm nuts off the strut assembly, these are attached at 71ft/lbs and are probably seized a bit so it might be a bit of a battle to get them out. LEAVE the bolts on, you will need them there to break the balljoint free from the lower control arm:
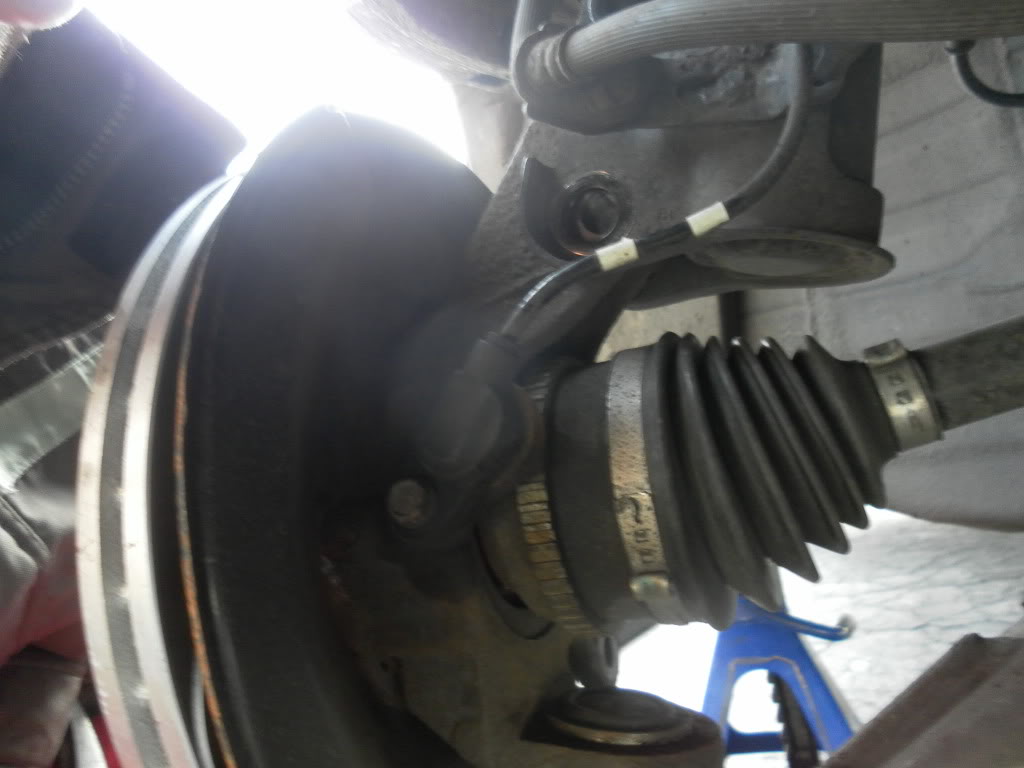
5. Now your well on your way, and it's time to remove the vehicle speed sensor. This was a ROYAL bitch because I was terrified to destroy the sensor and it was seized in. Remove the 10mm bolt, then I ended up having to get a pair of vice grips and attached them tightly to the sensor. Then I slowly started to spin the sensor until it came free. DO NOT disconnect the sensor connector, remove the entire sensor as a whole
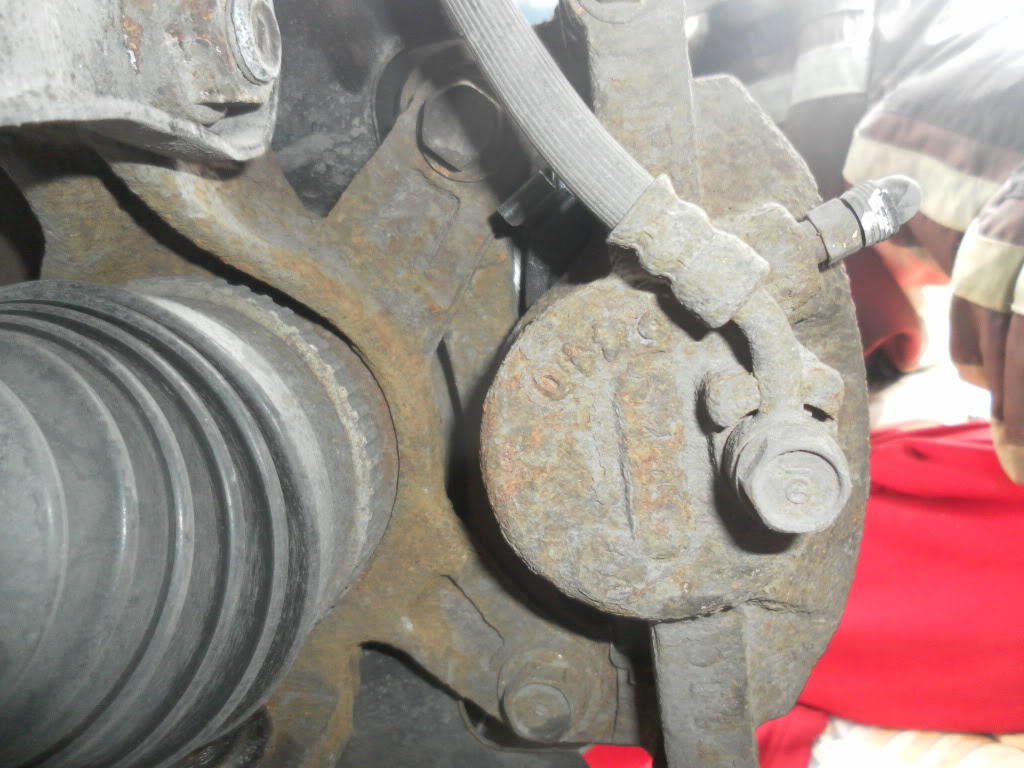
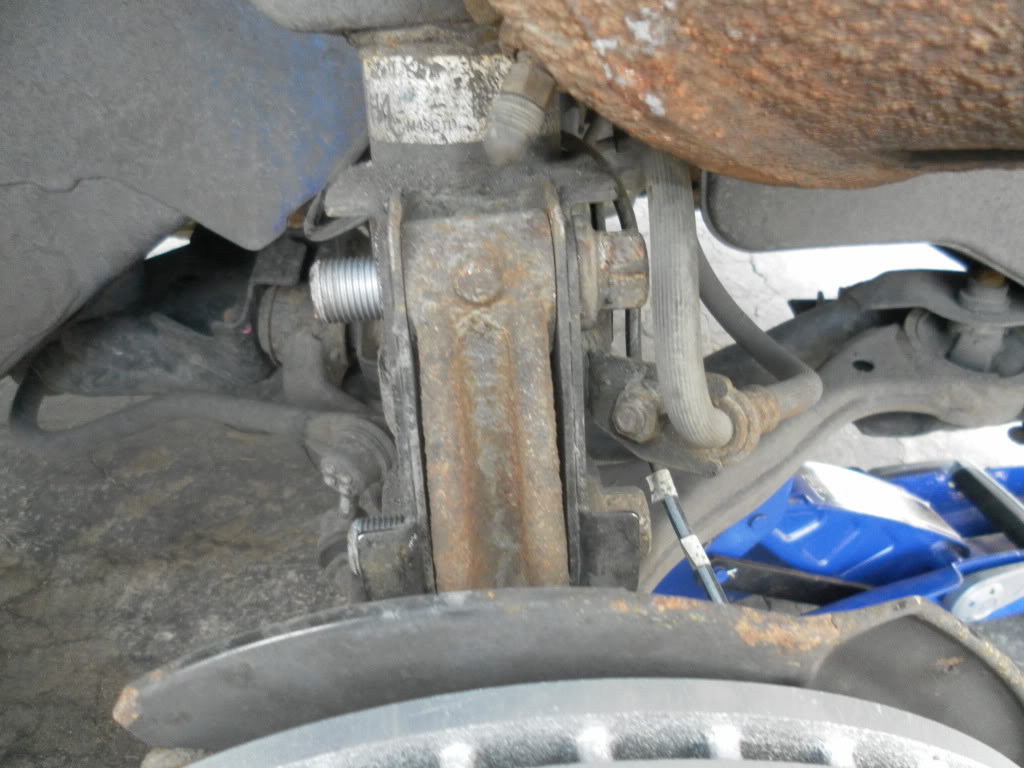
6. Now you have to remove the cotter pin off the 17mm castle nut. You can cut it off or pry it straight with plyers and pull it out. Even if you manage to "Save" the cotter pin, use a new one. It should have come with the ball joint anyway. Here is a picture of the castle nut before and after removal.
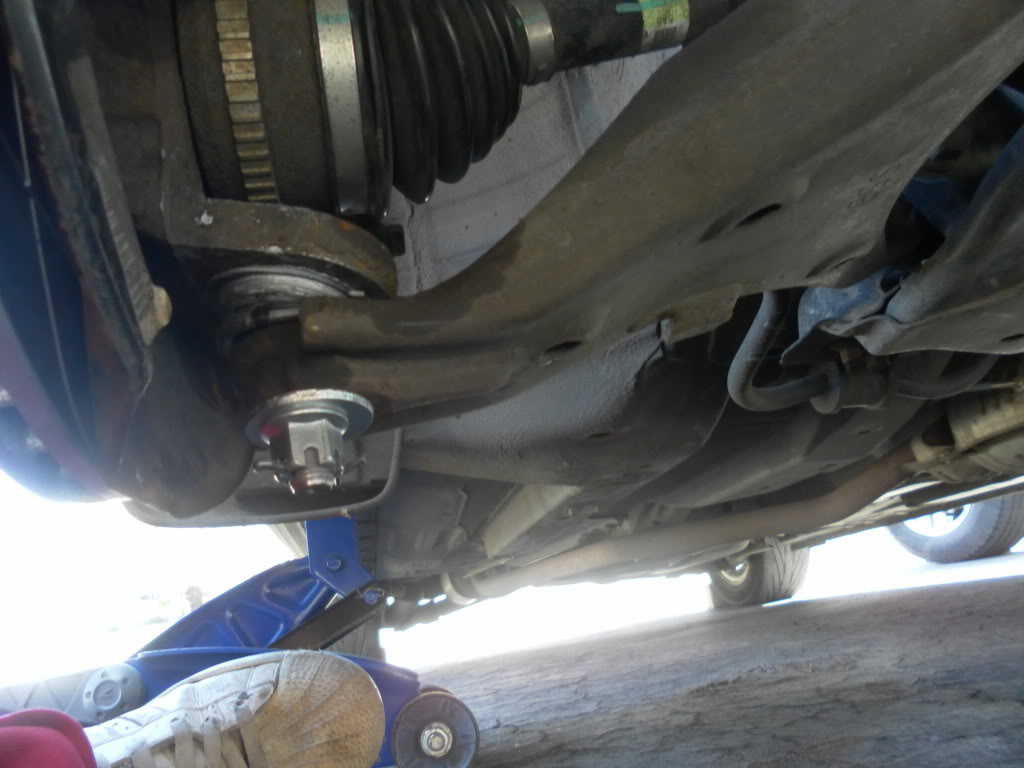
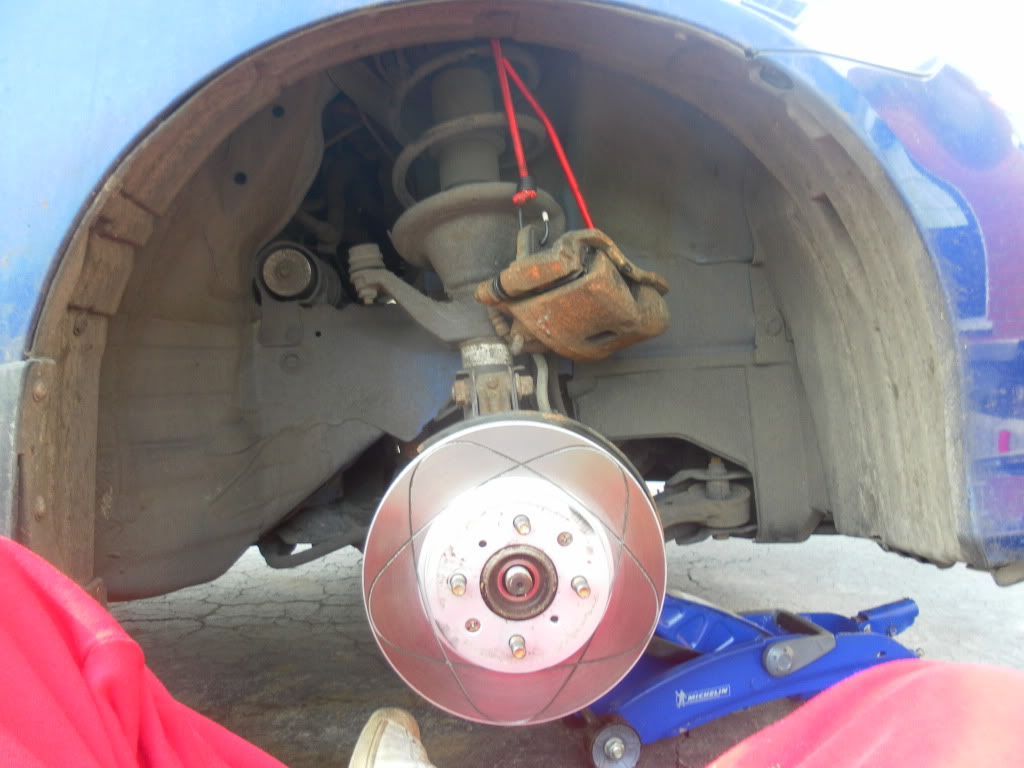
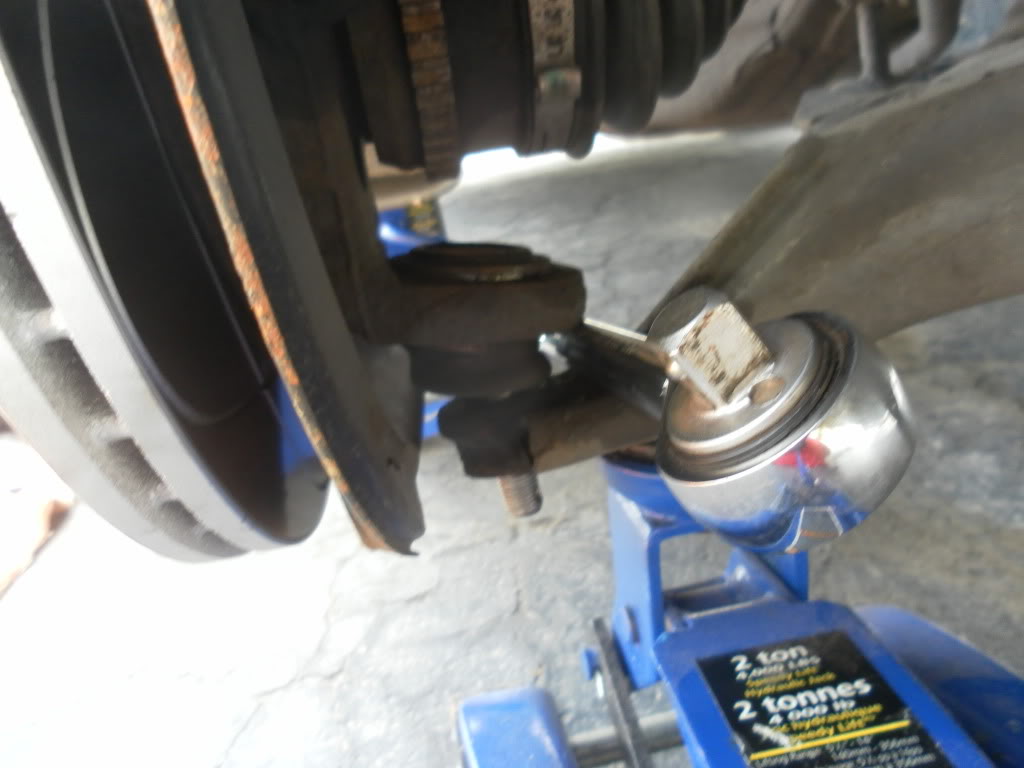
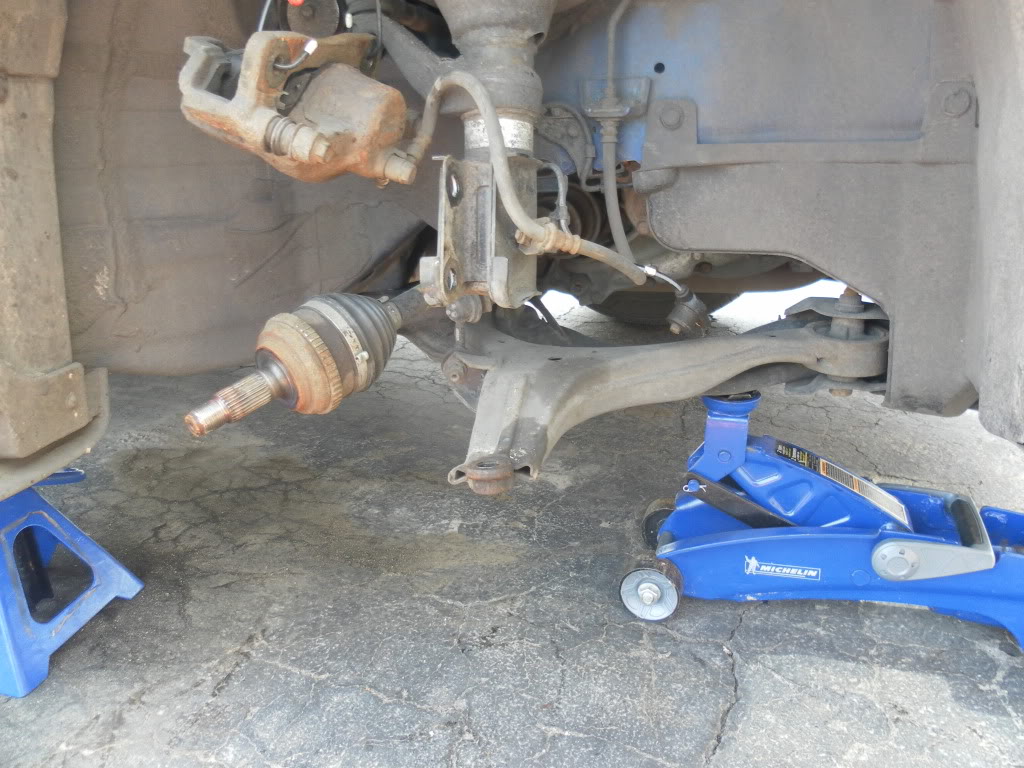
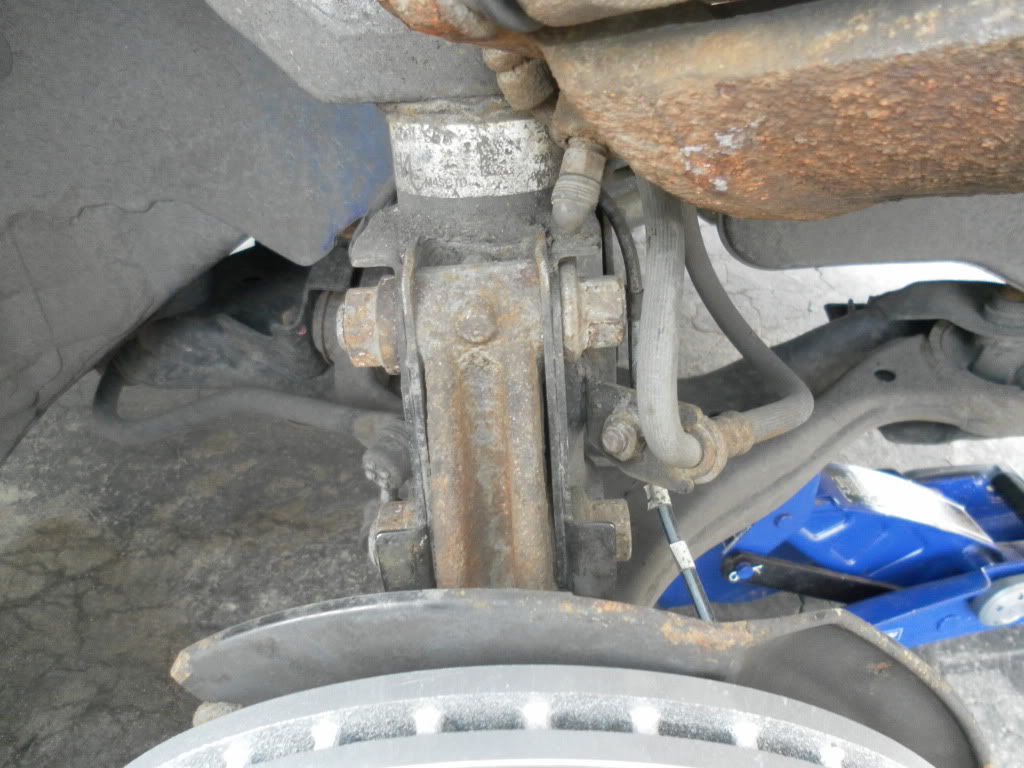
7. Now its time to break the balljoint free from the lower control arm. There is a very simple method to doing this that will save you LOTS of time if you do it this way. It involves your hydraulic jack and a ratchet. What you do is jack up the lower control arm until you can fit a ratchet between the knuckle and arm itself:
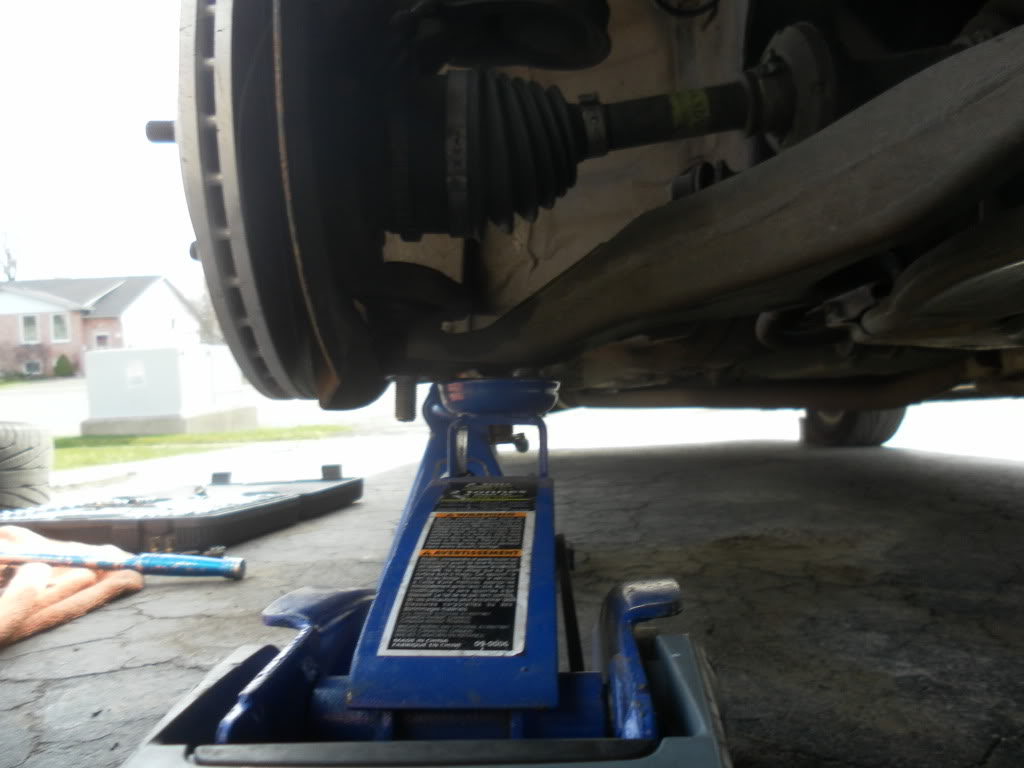
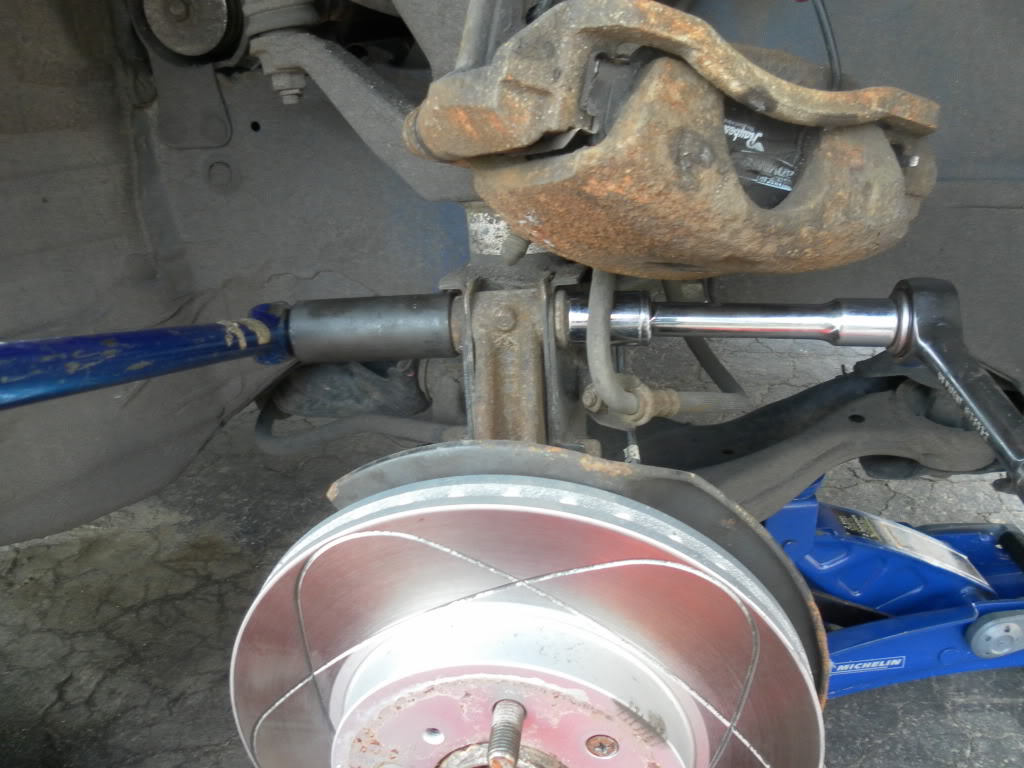
8. Fit the ratchet inbetween the LCA and knuckle.
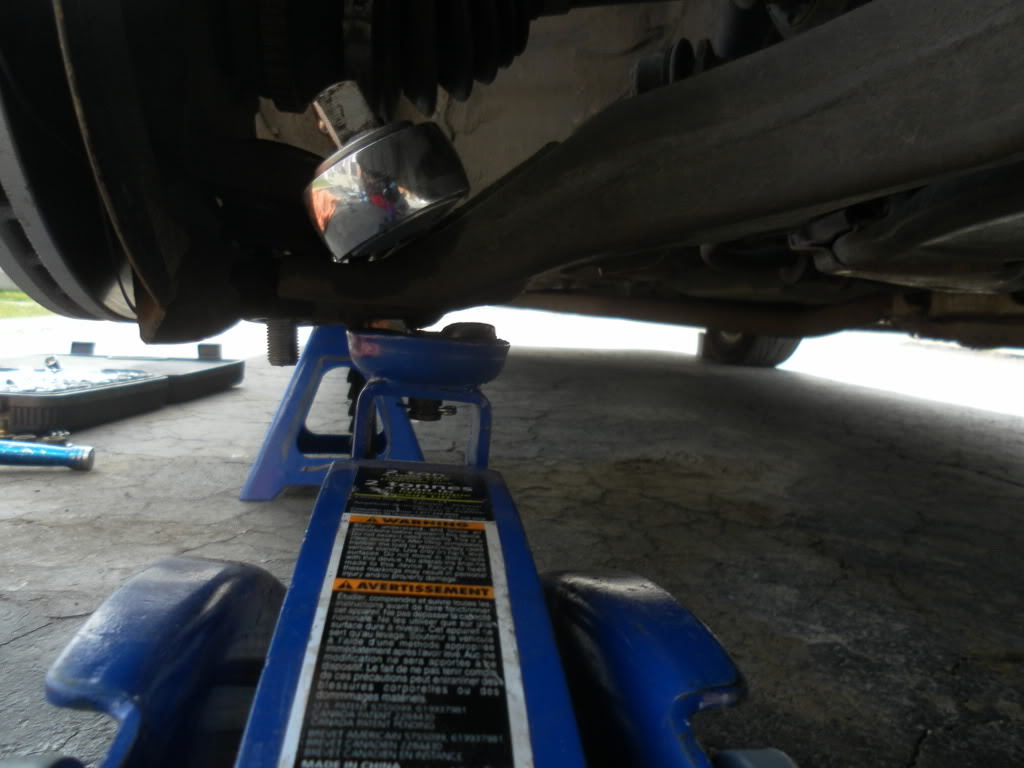
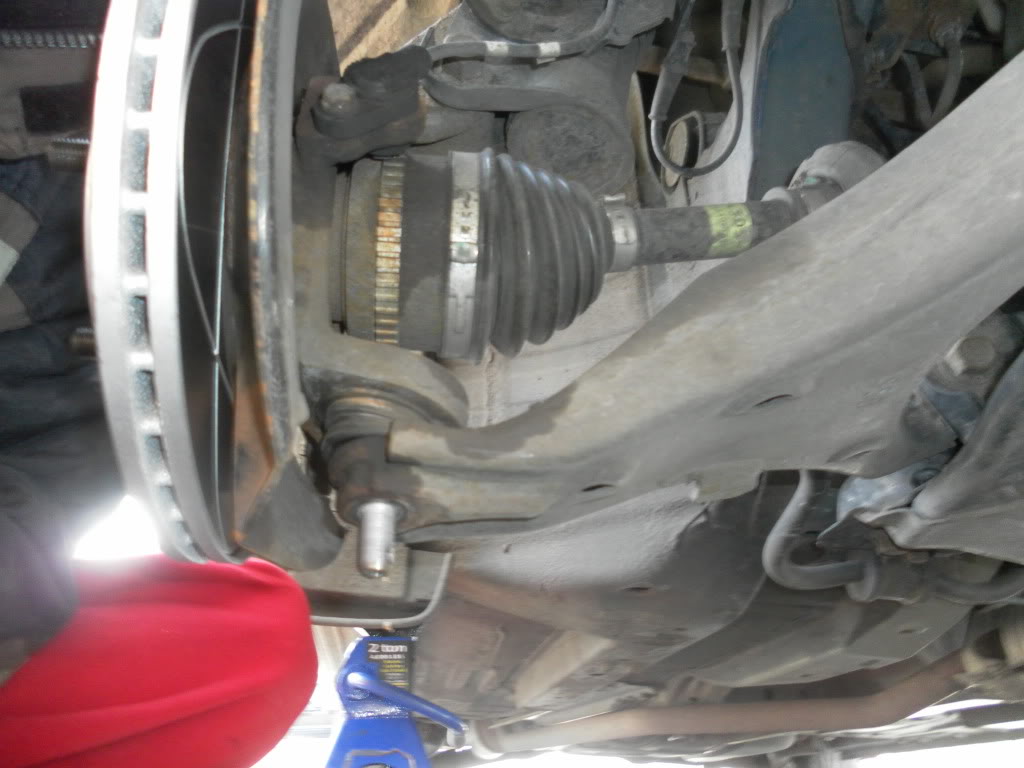
9. After its in place, simply lower the jack all the way down and you will hear a "POP" sound. If you look the ball joint should be seperated from the control arm:
10. Now you can use a hammer to drive the axle (spindle) back into the knuckle, you can use a regular hammer as long as you don't smash on it. You really shouldn't have to hit it very hard. If you cant get the axle fully out from behind you can get it when you remove the last two bolts off the knuckle.
11. Great, the hard part is done, now you can remove the two bolts from the strut assembly. Sorry this picture is a little bit fuzzy but its basically the two bolts that you removed the nuts from earlier. You can tap them with a hammer to get them out. Just don't go buck wild and mess up your threads.
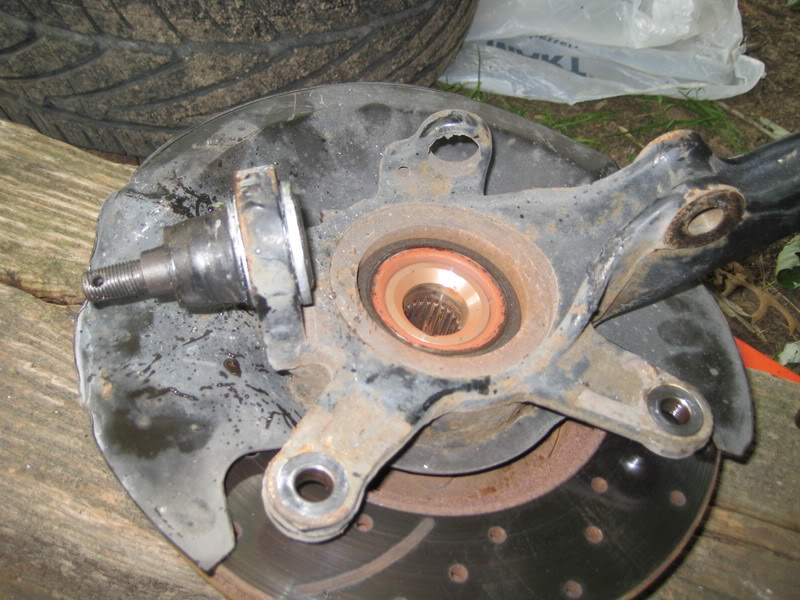
12. The knuckle will want to come out easilly, but you might have to hammer the lower ball joint upwards a little bit to actually remove it from the car. This is where a second person comes in handy, but it can be done by one person. So your kinda doing three things at once here, making sure the axle is fully clear of the knuckle, making sure the balljoint is coming out of the lower control arm nicely, and balancing the knuckle to make sure when it comes free you don't drop it. Great, now the knuickle should be out of the car.
13. Hold the knuckle in your hand with a smile. If you can accomplish this you can do most suspension work on the front end of a honda civic yourself. Anyway... here it is:
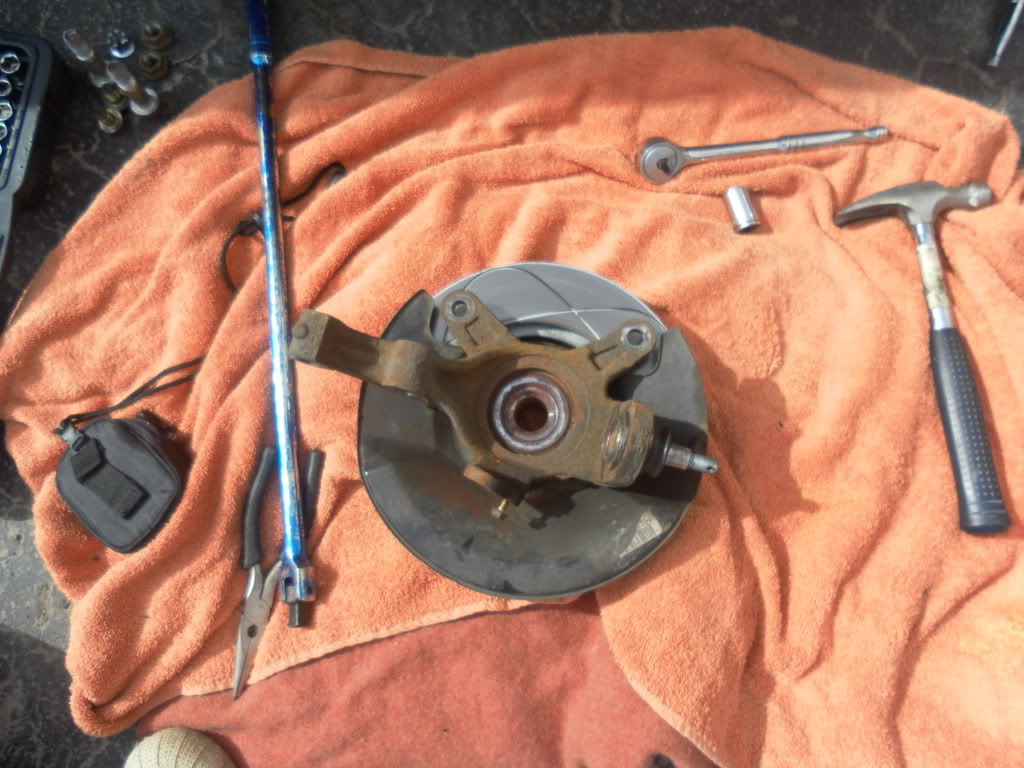
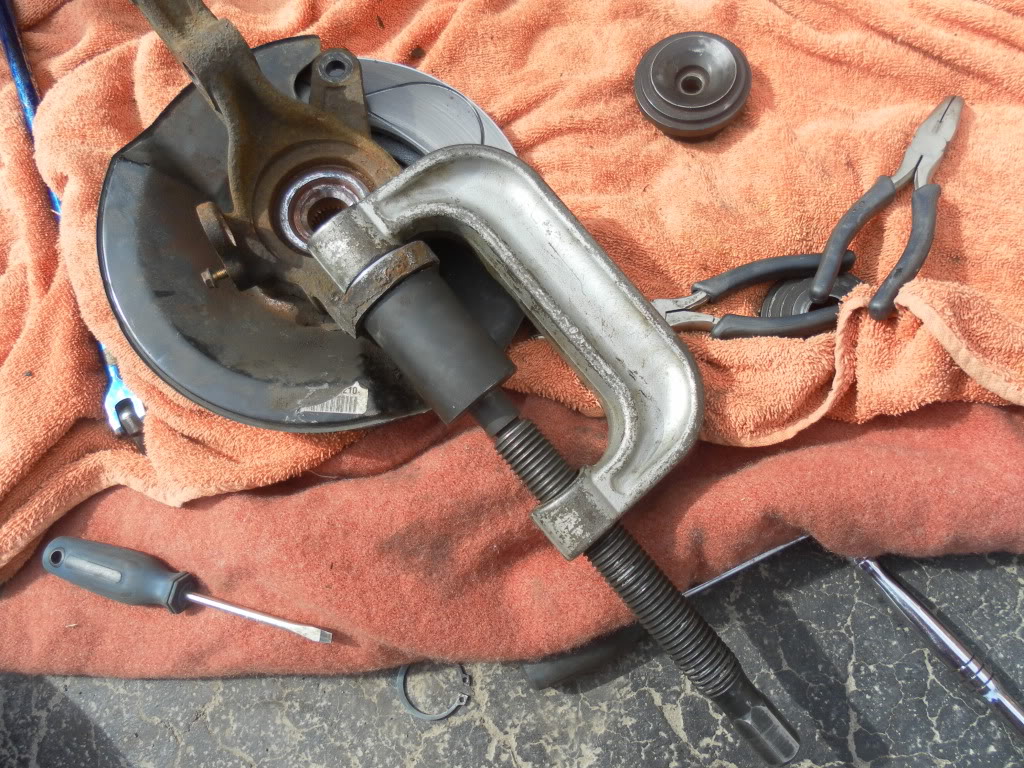
14. Now to press the ball joint out with your fancy *** tool. This is where an impact comes in VERY handy but you can do it with a ratchet. You look at the tool and it looks pretty confusing. Luckilly, you only need a few of the pieces that come with the tool. You have to make sure you select an adapter that will allow the ball joint to "Push" out and an adapter does not sit flat up against the knuckle, it should actually sit up against the flat piece on the bolt of the ball joint. It's very hard to explain but hopefully you get it. It should look like this to remove the ball joint:
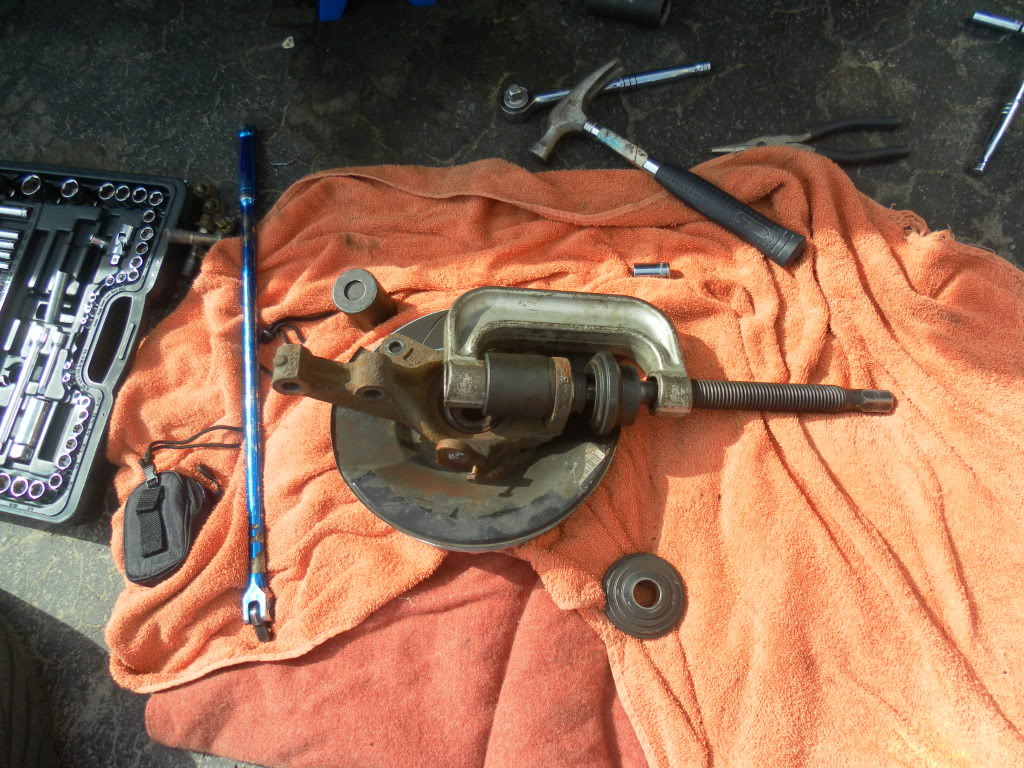
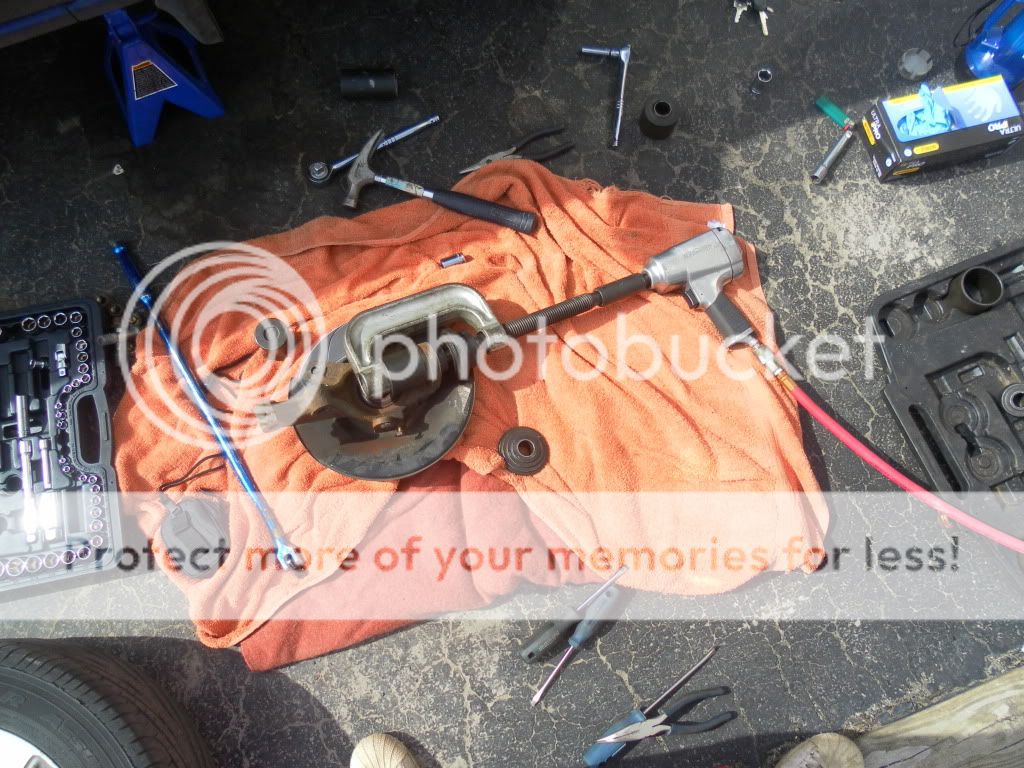
15. I cheated and used my impact even though this is an air tool free guide, but I have done it with a ratchet, as you can tell I'm messy as hell:
16. You should have no problem pressing the ball joint out with this method, it might take a little bit of time and a little bit of muscle. A vice would help a lot to keep things stable if your not using air. Pressing in the ball joint is pretty much the exact opposite, just make sure you put a **** ton of anti seize paste on the knuckle where the ball joint will seat. The push side has to be up against the flat part of the ball joint. You can actually attach the C clamp right to the ball joint, it fits well. Make sure you select an adapter on the bolt side that allows the joint to slide through fully. You know the ball joint is fully seated when it sits flush up against the knuckle. Some aftermarket joints like the one I got come with rings, you have to insert the rings into the groove on the ball joint on the bolt side. Use the two little holes and insert a pair of needle nose pliers into them, then spread the rings apart and fit it into the groove. It's a royal pain in the *** and it's nice to have two people for this. It's doable by yourself It should look something like this when you are finished pressing it in:
17. I forgot to take a picture of the ball joint installed on the knuckle so I stole one from the other DIY guide, sorry greeen01civic4d
18. Your done, reassembly is very very very very simple and easy. To put the knuckle back on you insert the ball joint into the lower control arm first, then guide the spindle back through the bearing. After that you can seat the upper portion of the knuckle into the lower strut assembly. Once the knuckle is lined up to the bolt holes and the axle is through, you can put the two 19mm lower strut bolts back in and torque the 22mm nuts to 71ft/lbs. Don't forget to apply your anti seize lube on the threads:
19. Lube the hole where the vehicle speed sensor goes with anti seize paste and torque the 10mm bolt to 7.2ft/lbs.
20. Put anti seize paste on the ball joint threads that are sticking through the lower control arm. The castle nut does not have a torque spec it has a torque range. You have to do your best to line up the holes for the cotter pin and still get it within that torque range. The range for the 17mm castle nut is 43-51ft/lbs. I had major issues with this because when hand tight one of the ball joint castle nuts was way past the holes for the cotter pin already. This was a major pissoff so I redid the balljoint with the same result. I ended up putting a washer on it to make the holes line up as I'm afraid to lose the castle nut. I called a mechanic shop and they said it was O.K. Here is a picture of the final result, you can see the washer above the nut:
21. Now to reinstall the caliper. Just carefully slide the caliper onto the rotor and install (after anti seizing) the two 17mm bolts on the back and torque them to 80ft/lbs.
22. Put antiseize on the end of the axle(spindle) and snug up the new axle (spindle) nut on the end of the axle. Now, with your centercap still off your rim, reinstall the tire and snug up the lugnuts. They don't have to be torqued on just yet, lower the car down on so its on its own weight and torque that baby to 134ft/lbs. After torqued grab your flathead screwdriver and smash the end of the nut into the little groove. It should look something like this whe finished:

23. Now you can torque your wheels back on to 80ft/lbs, install your centercap and call it a day.
I tried to make this as comprehensive as possible so anyone can do it. Unfortunatly my camera died halfway through so the actual removal of the knuckle isnt shown that well in pictures. Hopefully this helps you complete your ball joint replacement
Here is my ball joint after it was pulled out, obviously toast:
This is what your going to want to have when you start the job:
A new ball joint
A hydraulic jack
JACKSTANDS, USE THEM
A ratchet set including 10mm, 17mm, 19mm, and 22mm ratchets.
An axle nut impact socket
A good 3' breaker bar helps A LOT
A torque wrench
Some extensions will be necessary for your ratchets.
A 22mm impact socket for use with the ball joint press tool
A hammer
A good set of needlenose pliers, mine had a nice bend in them.
A flathead screwdriver
A bungeeee cord
Anti seize paste
An impact gun helps but is not necessary, obviously a compressor too.
2 Brand Spankin' New Axle Nuts
latex gloves help keep your hands clean.
Here is what I had on hand:
Most importantly: A Ball joint press tool I'm showing this twice because you NEED it if your doing this at home.
Okay, let's have some fun. I'm going to deviate from the service manual right away because I'm assuming you don't have access to air tools.
1. Loosen your lug nuts, jack up the car safely and remove the tire. Knock the centercap out from the inside of the rim. You can pry the centercap off with the wheel on the ground but you risk damaging it. There is almost no way to damage it if you knock it off from the inside. After the centercap is knocked out, use your flathead screwdriver and carefully pry the notch out of the axle nut. Be careful doing this I broke two screwdrivers. Here is a picture of the axle nut.
2. Great, now put the wheel back on the car and just snug up the lug nuts. Put the car back on the ground and grab your breaker bar, an extension, and the massive axle nut socket. Get that baby in there and break the 134 ft/lbs of seized on torque off the nut free. If you can't get the nut free this way, you will need an impact gun. Here is what the socket looks like passing through the rim:
3. Great, now take your stupid wheel back off the stupid car ( a bit repetative I know, if you have access to air tools you can remove the axle nut with the wheel off to begin with which makes it a lot easier. ) After the wheel is removed take these two 17mm bolts off of the caliper, and hang it up out of the way all nice like. DO NOT REMOVE THE BRAKE LINE BOLT!!!:
4. Now, remove the two 22mm nuts off the strut assembly, these are attached at 71ft/lbs and are probably seized a bit so it might be a bit of a battle to get them out. LEAVE the bolts on, you will need them there to break the balljoint free from the lower control arm:
5. Now your well on your way, and it's time to remove the vehicle speed sensor. This was a ROYAL bitch because I was terrified to destroy the sensor and it was seized in. Remove the 10mm bolt, then I ended up having to get a pair of vice grips and attached them tightly to the sensor. Then I slowly started to spin the sensor until it came free. DO NOT disconnect the sensor connector, remove the entire sensor as a whole
6. Now you have to remove the cotter pin off the 17mm castle nut. You can cut it off or pry it straight with plyers and pull it out. Even if you manage to "Save" the cotter pin, use a new one. It should have come with the ball joint anyway. Here is a picture of the castle nut before and after removal.
7. Now its time to break the balljoint free from the lower control arm. There is a very simple method to doing this that will save you LOTS of time if you do it this way. It involves your hydraulic jack and a ratchet. What you do is jack up the lower control arm until you can fit a ratchet between the knuckle and arm itself:
8. Fit the ratchet inbetween the LCA and knuckle.
9. After its in place, simply lower the jack all the way down and you will hear a "POP" sound. If you look the ball joint should be seperated from the control arm:
10. Now you can use a hammer to drive the axle (spindle) back into the knuckle, you can use a regular hammer as long as you don't smash on it. You really shouldn't have to hit it very hard. If you cant get the axle fully out from behind you can get it when you remove the last two bolts off the knuckle.
11. Great, the hard part is done, now you can remove the two bolts from the strut assembly. Sorry this picture is a little bit fuzzy but its basically the two bolts that you removed the nuts from earlier. You can tap them with a hammer to get them out. Just don't go buck wild and mess up your threads.
12. The knuckle will want to come out easilly, but you might have to hammer the lower ball joint upwards a little bit to actually remove it from the car. This is where a second person comes in handy, but it can be done by one person. So your kinda doing three things at once here, making sure the axle is fully clear of the knuckle, making sure the balljoint is coming out of the lower control arm nicely, and balancing the knuckle to make sure when it comes free you don't drop it. Great, now the knuickle should be out of the car.
13. Hold the knuckle in your hand with a smile. If you can accomplish this you can do most suspension work on the front end of a honda civic yourself. Anyway... here it is:
14. Now to press the ball joint out with your fancy *** tool. This is where an impact comes in VERY handy but you can do it with a ratchet. You look at the tool and it looks pretty confusing. Luckilly, you only need a few of the pieces that come with the tool. You have to make sure you select an adapter that will allow the ball joint to "Push" out and an adapter does not sit flat up against the knuckle, it should actually sit up against the flat piece on the bolt of the ball joint. It's very hard to explain but hopefully you get it. It should look like this to remove the ball joint:
15. I cheated and used my impact even though this is an air tool free guide, but I have done it with a ratchet, as you can tell I'm messy as hell:
16. You should have no problem pressing the ball joint out with this method, it might take a little bit of time and a little bit of muscle. A vice would help a lot to keep things stable if your not using air. Pressing in the ball joint is pretty much the exact opposite, just make sure you put a **** ton of anti seize paste on the knuckle where the ball joint will seat. The push side has to be up against the flat part of the ball joint. You can actually attach the C clamp right to the ball joint, it fits well. Make sure you select an adapter on the bolt side that allows the joint to slide through fully. You know the ball joint is fully seated when it sits flush up against the knuckle. Some aftermarket joints like the one I got come with rings, you have to insert the rings into the groove on the ball joint on the bolt side. Use the two little holes and insert a pair of needle nose pliers into them, then spread the rings apart and fit it into the groove. It's a royal pain in the *** and it's nice to have two people for this. It's doable by yourself It should look something like this when you are finished pressing it in:
17. I forgot to take a picture of the ball joint installed on the knuckle so I stole one from the other DIY guide, sorry greeen01civic4d
18. Your done, reassembly is very very very very simple and easy. To put the knuckle back on you insert the ball joint into the lower control arm first, then guide the spindle back through the bearing. After that you can seat the upper portion of the knuckle into the lower strut assembly. Once the knuckle is lined up to the bolt holes and the axle is through, you can put the two 19mm lower strut bolts back in and torque the 22mm nuts to 71ft/lbs. Don't forget to apply your anti seize lube on the threads:
19. Lube the hole where the vehicle speed sensor goes with anti seize paste and torque the 10mm bolt to 7.2ft/lbs.
20. Put anti seize paste on the ball joint threads that are sticking through the lower control arm. The castle nut does not have a torque spec it has a torque range. You have to do your best to line up the holes for the cotter pin and still get it within that torque range. The range for the 17mm castle nut is 43-51ft/lbs. I had major issues with this because when hand tight one of the ball joint castle nuts was way past the holes for the cotter pin already. This was a major pissoff so I redid the balljoint with the same result. I ended up putting a washer on it to make the holes line up as I'm afraid to lose the castle nut. I called a mechanic shop and they said it was O.K. Here is a picture of the final result, you can see the washer above the nut:
21. Now to reinstall the caliper. Just carefully slide the caliper onto the rotor and install (after anti seizing) the two 17mm bolts on the back and torque them to 80ft/lbs.
22. Put antiseize on the end of the axle(spindle) and snug up the new axle (spindle) nut on the end of the axle. Now, with your centercap still off your rim, reinstall the tire and snug up the lugnuts. They don't have to be torqued on just yet, lower the car down on so its on its own weight and torque that baby to 134ft/lbs. After torqued grab your flathead screwdriver and smash the end of the nut into the little groove. It should look something like this whe finished:
23. Now you can torque your wheels back on to 80ft/lbs, install your centercap and call it a day.
I tried to make this as comprehensive as possible so anyone can do it. Unfortunatly my camera died halfway through so the actual removal of the knuckle isnt shown that well in pictures. Hopefully this helps you complete your ball joint replacement
Last edited by BlueEM2; Apr 15, 2011 at 05:42 AM.
Thread Starter
Whachya lookin at?
iTrader: (1)
Joined: May 2009
Posts: 6,388
Likes: 13
From: Canada
Rep Power: 313 Re: Ball Joint DIY V.2 - No air hammer necessary
Okay, I'll get this finished tonight. It should help guide anyone that wants to do ball joints enough to get the job done.
Thread Starter
Whachya lookin at?
iTrader: (1)
Joined: May 2009
Posts: 6,388
Likes: 13
From: Canada
Rep Power: 313 Re: Ball Joint DIY V.2 - No air hammer necessary
Okay, all finished I think. If I missed something I apologise and if someone knows I missed something let me know. Yea CV joints are okay for now 
Joined: Dec 2008
Posts: 15,176
Likes: 1,605
From: TN
Rep Power: 367 Re: Ball Joint DIY V.2 - No air hammer necessary
just make a note to stay away from the path of the wrench if it slips when removing the ball joint  - I had to when i tried it without the removal tool... BTW, since this is in the DIY section, we cannot edit the post... so i posted a new one... bummer.
- I had to when i tried it without the removal tool... BTW, since this is in the DIY section, we cannot edit the post... so i posted a new one... bummer. Thread Starter
Whachya lookin at?
iTrader: (1)
Joined: May 2009
Posts: 6,388
Likes: 13
From: Canada
Rep Power: 313 Re: Ball Joint DIY V.2 - No air hammer necessary
HAHA It most definitely is a princess auto breaker bar. That baby freed up my crankshaft bolt without any problems at all..
Live for the Twisties
Administrator
Joined: Jun 2010
Posts: 8,580
Likes: 5
From: Langley, BC
Rep Power: 285 Re: Ball Joint DIY V.2 - No air hammer necessary
So I spent four hours working on my front suspension today, 3.5 of which were dedicated to trying to sperate my ball joint front the knuckle. It's still attached and I'm not sure what I'm doing wrong or why it would be so hard to seperate..
I tried Tom's method, no luck.
I tried a gear puller, that was useless.
I tried a giant crow bar, I tore the boot and otherwise nothing.
I hammered on the LCA, I achieved denting my lca.
The only thing i haven't done is hammer on the ball joint itself, which I am not going to attempt, because I'm not replacing my ball joints till next week. Right now I'm just pulling the knuckle to replace my wheels studs.
Any suggestions.. I'm trying to figure out if I'm doing something wrong, but I can't imagine what.
I half think it's already as out as it's supposed to be, but I seperated the knuckle from the strut and I couldn't get it free.
Thread Starter
Whachya lookin at?
iTrader: (1)
Joined: May 2009
Posts: 6,388
Likes: 13
From: Canada
Rep Power: 313 Re: Ball Joint DIY V.2 - No air hammer necessary
Make sure you have the two strut bolts in place when you are doing it. I spent a lot of time on the first one only to realize that it won't work without the strut bolts there. If that doesn't work you need to use the puller.
SO.. Make sure these two are still in:

And the ratchet is like this:

Drop the suspension down. Sometimes you may have to put your foor ontop of the rotor and push down with some force to break it free. You need to jack up the LCA to get the ratchet in there. And release the jack at full speed to make sure you have the most ball joint release force you can.
SO.. Make sure these two are still in:
And the ratchet is like this:
Drop the suspension down. Sometimes you may have to put your foor ontop of the rotor and push down with some force to break it free. You need to jack up the LCA to get the ratchet in there. And release the jack at full speed to make sure you have the most ball joint release force you can.

Registered!!
Joined: Jun 2011
Posts: 46
Likes: 0
Rep Power: 0 
Re: Ball Joint DIY V.2 - No air hammer necessary
what if i hammered my new balljoints in, they went in straight and seated perfect, but did i cause any damage. I used a 3 lbs. hammer looks like a small sledge hammer w/ light taps evenly ontop of the new balljoint.
Thread Starter
Whachya lookin at?
iTrader: (1)
Joined: May 2009
Posts: 6,388
Likes: 13
From: Canada
Rep Power: 313 Re: Ball Joint DIY V.2 - No air hammer necessary
It's not ideal but I've heard hammering them in works... I don't recommend it myself but that's your own perogative  I don't think you would have damaged anything as long as you don't smash on it. Just check for dents and such in the steel portion of the joint. I'm not a mechanic however so my advice is more opinion than knowledge. Why hammer it in when tool rental is free though?
I don't think you would have damaged anything as long as you don't smash on it. Just check for dents and such in the steel portion of the joint. I'm not a mechanic however so my advice is more opinion than knowledge. Why hammer it in when tool rental is free though? Registered!!
Joined: Jun 2011
Posts: 46
Likes: 0
Rep Power: 0 Re: Ball Joint DIY V.2 - No air hammer necessary
because i asked autozone how do use it on my knuckle and they told me it would not work because the threaded post was hitting against the top of the knuckle and wasn't pushing on it straight. so i took it to my buddys shop and we tried it on the press but could not get the knuckle to sit on the press right, however i have to replace the passengar side balljoin cause the boot is torn.
Thread Starter
Whachya lookin at?
iTrader: (1)
Joined: May 2009
Posts: 6,388
Likes: 13
From: Canada
Rep Power: 313 Re: Ball Joint DIY V.2 - No air hammer necessary
Well you can do it but the knuckl has to be removed from the car I guess. He was probably thinking you were going to replace it with the knuckle in place... Rent the tool next time and don't listen to Autozone parts salesman 
Rent the tool next time and don't listen to Autozone parts salesman Live for the Twisties
Administrator
Joined: Jun 2010
Posts: 8,580
Likes: 5
From: Langley, BC
Rep Power: 285 Re: Ball Joint DIY V.2 - No air hammer necessary
Hammering on it might work, but a repeated impact force applies much more stress on the ball joint than a continuous clamping force. Considering the ball joint is one of the most important components of your entire car, I wouldn't take the risk. It's possible to do it with the tool, many of us have.
Re: Ball Joint DIY V.2 - No air hammer necessary
very good diy....i hammered in my balljoints back in the day....just placed a piece of 2x4 on top the balljoint and lightly hammered away. Never had a issue doing this. I also used a hammer and chisel to get the ball joints out....pretty easy without all the "neccessary tools".
Thread Starter
Whachya lookin at?
iTrader: (1)
Joined: May 2009
Posts: 6,388
Likes: 13
From: Canada
Rep Power: 313 Re: Ball Joint DIY V.2 - No air hammer necessary
Wellll hammering brand new balljoints isnt ideal to be honest but you can get away with it. It's been covered on the forum so I won't get into it. I just don't understand why people do that when tool rental is free.
Thread Starter
Whachya lookin at?
iTrader: (1)
Joined: May 2009
Posts: 6,388
Likes: 13
From: Canada
Rep Power: 313 Re: Ball Joint DIY V.2 - No air hammer necessary
Well that totally blows.. I live in a fairly small city (48k) and there are a few here that rent tools. I guess I'm just lucky.

Thread Starter
Whachya lookin at?
iTrader: (1)
Joined: May 2009
Posts: 6,388
Likes: 13
From: Canada
Rep Power: 313 Re: Ball Joint DIY V.2 - No air hammer necessary
I got axle nuts from Honda yes, and I used Napa brand ball joints. They were made in Japan and they seemed great quality.
^Warranty voider
Joined: Oct 2008
Posts: 821
Likes: 1
From: Gainesville, Your college town is weak.
Rep Power: 222 Re: Ball Joint DIY V.2 - No air hammer necessary
id use a ball joint separator and just destroy the old ball joint. fehk it why not?
check out carquests raybestos ball joints and front end parts. they are impressive and priced well.
check out carquests raybestos ball joints and front end parts. they are impressive and priced well.

Registered!!
Joined: Oct 2012
Posts: 1
Likes: 0
Rep Power: 0 Re: Ball Joint DIY V.2 - No air hammer necessary
in step 3 u say do not remove break line bolt i was doing this before i found thia thread and i already removed the line is it really bad what should i do i have it off already i had nothing to hang the caliper with at the time and i wanted to get done with it

Registered!!
Joined: Dec 2012
Posts: 122
Likes: 3
Rep Power: 0 Help!
Hey all,
Took on this job thanks to the great write up!
Bought a couple of Moog K90332 ball joint, which appear to be correct for the 2002 Honda Civic EX 4dr that I have. Even spoke to Federal Mobile several times about it and they said it was right. They are the manufacturer of Moog parts.
Anyway, Moog parts come with a zerk grease joint (90 degree) and I pre-installed it before attaching the knuckle. When I tried to put the knuckle back in the zerk joint hits the CV boot and won't go in. So I removed the zerk joint and got the axle back through the hub, but seems there is no way to get the zerk joint installed. Even if I went with a smaller (non 90 degree) zerk, there would be no way to grease it, and the ball joint is not pre-greased.
Anyone else had this problem? At this point, I don't think this ball joint is compatible with the 7th gen (or at least my 2002) civic.
I have attached a pic that shows the axle installed all the way, the ball joint castle nut has not been secured, but the joint is fully inserted. The knuckle has not yet been reattached to the strut assembly, but I don't think that is going to change anything either. The zerk fitting is just resting on top of where it should be installed.
Thoughts?
-- Peter

