Timing Belt DIY 2
 10-03-2009
#91
Registered!!

Join Date: Oct 2009
Posts: 54
Likes: 0
Received 0 Likes
on
0 Posts
Rep Power: 178 
Re: Timing Belt DIY 2
Update: Thank you, ostetco, for posting the correct hex size (50 mm) for the crankshaft pulley on 2001-2005 Civics.
Apparently it is only some 1990s Preludes and some manual transmission Acuras that use the 45 mm hex size.
Apparently it is only some 1990s Preludes and some manual transmission Acuras that use the 45 mm hex size.
Last edited by honda.lioness; 06-07-2010 at 12:42 PM.
 10-11-2009
#92
Registered!!
Join Date: Oct 2009
Location: Northeastern Illinois
Posts: 5
Likes: 0
Received 0 Likes
on
0 Posts
Rep Power: 0 
Re: Timing Belt DIY 2
This DIY will certainly come in handy when its time. I replaced the timing belt on my Jetta TDI, so I'm confident that I can do it on the wife's Civic (perhaps next spring or fall?)
Last edited by rocketeer928; 04-05-2010 at 09:22 AM.
11-01-2009
#93
Registered!!

Join Date: Nov 2009
Posts: 6
Likes: 0
Received 0 Likes
on
0 Posts
Rep Power: 0 Re: Timing Belt DIY 2
I believe my hex was 50 mm for crank pulley bolt. I have a 2005 civic.
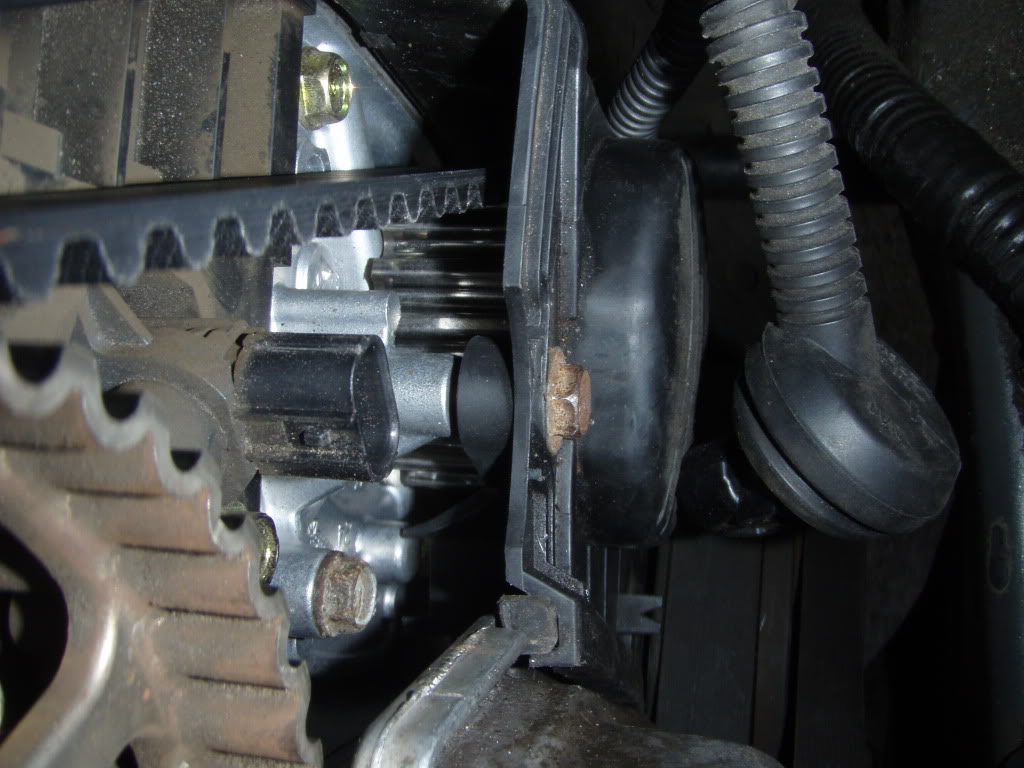
So i followed this excellent timing belt DIY. Everything went perfect except for a little annoying noise. At around 1000-1500 rpm, i can hear either the water pump or the auto tensioner rub against the cover. I removed the top cover and loosened the bottom cover, and when i pull it away, the noise is gone but when i close it again something rubs. It's not the belt, i'm 99% sure its the water pump, but i can't find a position to fasten the cover bolts where it won't rub the cover..
Are there aftermarket timing belt covers??? I hate this.
Thanks in advance to everyone.
11-01-2009
#94
Registered!!
Thread Starter

Join Date: Apr 2004
Location: SoCal OC / LA / San Diego
Age: 41
Posts: 338
Likes: 0
Received 1 Like
on
1 Post
Rep Power: 249 
Re: Timing Belt DIY 2
I believe my hex was 50 mm for crank pulley bolt. I have a 2005 civic.
So i followed this excellent timing belt DIY. Everything went perfect except for a little annoying noise. At around 1000-1500 rpm, i can hear either the water pump or the auto tensioner rub against the cover. I removed the top cover and loosened the bottom cover, and when i pull it away, the noise is gone but when i close it again something rubs. It's not the belt, i'm 99% sure its the water pump, but i can't find a position to fasten the cover bolts where it won't rub the cover..
Are there aftermarket timing belt covers??? I hate this.
Thanks in advance to everyone.
Pictures would help. It could also be the tensioner, but I'd have to see how you did it.
11-01-2009
#95
Registered!!
Join Date: Nov 2009
Posts: 6
Likes: 0
Received 0 Likes
on
0 Posts
Rep Power: 0 Re: Timing Belt DIY 2
As requested, here are some pics.
Yes, I took the valve cover off to remove / re-install upper cover. The whole lip thing. I have the whole timing belt procedure to under 2 hours lol. I took it apart several times and put it back together to locate the problem.
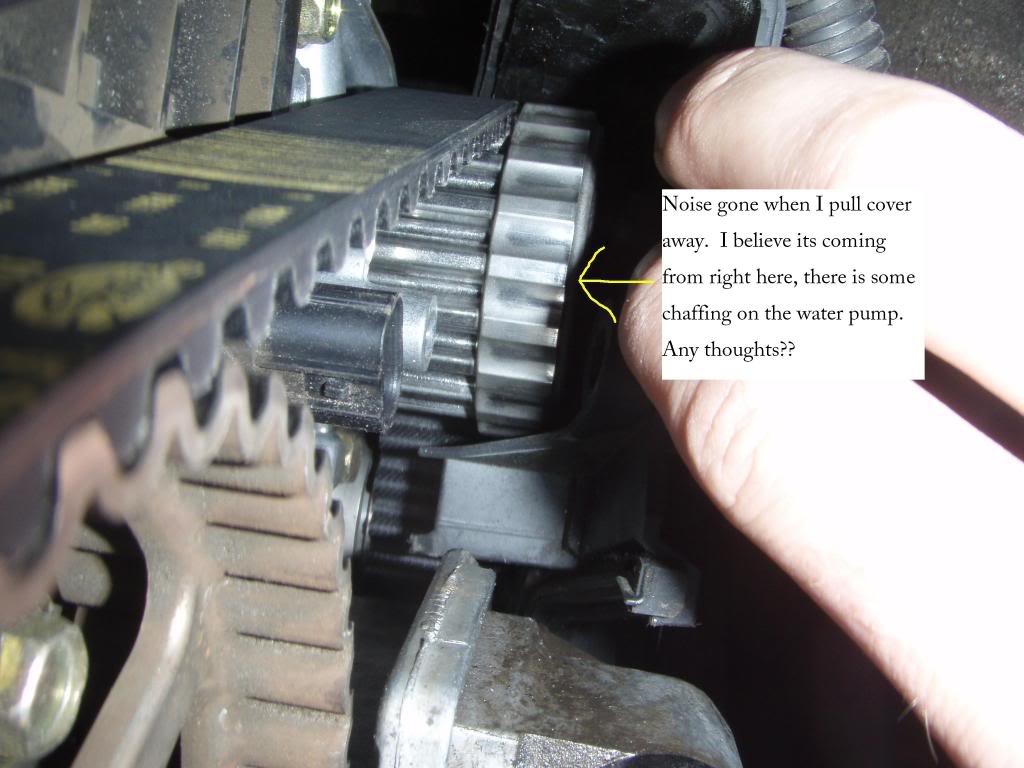
So in this picture, there is noise at 1000-1500 rpm. Again, nothing major, just an annoying light plastic grinding.
In this picture its gone. The bottom cover can only go in 1 way, and the screws ensure it is sitting in the proper position. So I have no clue how to fix this problem. I broke off the corner piece of the cover because at first i thought that's where it was coming from.
UPDATE:
So now I convinced myslef its actually not the water pump. I pushed the cover in to touch the water pump and it makes a LOUD grinding noise. What I have now is a light grinding, very light. I can hear it best when it gears down after reving to over 2000 when it gears down to below 1500 i can hear this echoing brr brrr. Might be because its a new belt. NO! Something is definitely wrong here.
I THINK it may be the auto tensioner now, because in the pic on the DIY, the belt was about 2mm off from the auto tensioner. This is how mine was when i installed it. BUT after taking it apart several times, the belt was FULLY on the auto tensioner. But its still making an annoying sound at those RPMs ...
Help anyone ... hehe
Yes, I took the valve cover off to remove / re-install upper cover. The whole lip thing. I have the whole timing belt procedure to under 2 hours lol. I took it apart several times and put it back together to locate the problem.
So in this picture, there is noise at 1000-1500 rpm. Again, nothing major, just an annoying light plastic grinding.
In this picture its gone. The bottom cover can only go in 1 way, and the screws ensure it is sitting in the proper position. So I have no clue how to fix this problem. I broke off the corner piece of the cover because at first i thought that's where it was coming from.
UPDATE:
So now I convinced myslef its actually not the water pump. I pushed the cover in to touch the water pump and it makes a LOUD grinding noise. What I have now is a light grinding, very light. I can hear it best when it gears down after reving to over 2000 when it gears down to below 1500 i can hear this echoing brr brrr. Might be because its a new belt. NO! Something is definitely wrong here.
I THINK it may be the auto tensioner now, because in the pic on the DIY, the belt was about 2mm off from the auto tensioner. This is how mine was when i installed it. BUT after taking it apart several times, the belt was FULLY on the auto tensioner. But its still making an annoying sound at those RPMs ...
Help anyone ... hehe
Last edited by ostetco; 11-01-2009 at 03:21 PM.
11-05-2009
#96
Registered!!

Join Date: Nov 2009
Posts: 1
Likes: 0
Received 0 Likes
on
0 Posts
Rep Power: 0 Re: Timing Belt DIY 2
it may be a piece of the lower dust cover's rubber seal that broke and is sitting under the crank timing belt pully or some other piece of debris under the dust cover rubbing against the timing belt at some point. i bet its some small part of plastic or rubber in the dust cover. anyhow a sure fix would be to just break it back down, remove the lower dust cover, find whatever is in there rubbing/remove it, and reinstall everything. you did put back the lower dust cover rubber seal and didn't discard it?(although im not sure the cover mounting bolts would actually be able to pull the cover close enough to rub on something before they bottomed out?) just some thoughts good luck
a stretch... maybe the water pump's shot and the pully has actually moved further away from the engine?????
a stretch... maybe the water pump's shot and the pully has actually moved further away from the engine?????
Last edited by grantgilley; 11-05-2009 at 12:57 AM. Reason: addition
11-06-2009
#97
Registered!!
Join Date: Nov 2009
Posts: 6
Likes: 0
Received 0 Likes
on
0 Posts
Rep Power: 0 Re: Timing Belt DIY 2
Thanks for your input. Problem still not resolved but after asking several mechanics they seem of the opinion that its just the belt and that it needs to break in. Well, I will drive for 3000 kms and see if it goes away. Nothing else I can do now. Took it apart 4 and put it back together 4 times now. Its kind of going away. Mechanics might be right  ... we'll see.
... we'll see.
11-11-2009
#98
Registered!!

Join Date: Nov 2009
Location: Atlanta, GA
Posts: 5
Likes: 0
Received 0 Likes
on
0 Posts
Rep Power: 0 Hey, guys. First, thanks for the great DIY, reddawnman. I decided to do it. Everything went as expected. Hellishly (not quite done, I'm pretty slow, and also had to build my toolkit along the way, which sucks when 3 broke trying to remove the crank pulley bolt, so I'm just finishing day 2, with everything now removed, coming back tomorrow to reassemble).
I thought I'd add some neat diagrams I found looking for further information on how to ensure TDC (I'm very paranoid, and DON'T want to mess this up). I found them to be a nice supplement to the descriptions provided by reddawnman. Hope it helps someone.
Links to .gifs:
TB Assembly Overview
Crank pulley marks
Honda tools?
TB cover assembly
CKP Sensor
Auto Tensioner
TDC Mark on Crank Pulley
TDC Marks on Cam Pulley
TB Assembly Overview 2
11-12-2009
#99
Registered!!
Thread Starter
Join Date: Apr 2004
Location: SoCal OC / LA / San Diego
Age: 41
Posts: 338
Likes: 0
Received 1 Like
on
1 Post
Rep Power: 249 Re: Timing Belt DIY 2
Hey, guys. First, thanks for the great DIY, reddawnman. I decided to do it. Everything went as expected. Hellishly (not quite done, I'm pretty slow, and also had to build my toolkit along the way, which sucks when 3 broke trying to remove the crank pulley bolt, so I'm just finishing day 2, with everything now removed, coming back tomorrow to reassemble).
I thought I'd add some neat diagrams I found looking for further information on how to ensure TDC (I'm very paranoid, and DON'T want to mess this up). I found them to be a nice supplement to the descriptions provided by reddawnman. Hope it helps someone.
Links to .gifs:
TB Assembly Overview
Crank pulley marks
Honda tools?
TB cover assembly
CKP Sensor
Auto Tensioner
TDC Mark on Crank Pulley
TDC Marks on Cam Pulley
TB Assembly Overview 2
11-12-2009
#100
Registered!!
Thread Starter
Join Date: Apr 2004
Location: SoCal OC / LA / San Diego
Age: 41
Posts: 338
Likes: 0
Received 1 Like
on
1 Post
Rep Power: 249 Re: Timing Belt DIY 2
Thanks for your input. Problem still not resolved but after asking several mechanics they seem of the opinion that its just the belt and that it needs to break in. Well, I will drive for 3000 kms and see if it goes away. Nothing else I can do now. Took it apart 4 and put it back together 4 times now. Its kind of going away. Mechanics might be right ... we'll see.
... we'll see.I think it might just be the belt getting broken in, but after about 3K miles I'd take the top cover off and see if there's any serious damage or major indications of rubbing on something. I think that'd be soon enough to prevent belt failure in case something became really messed up.
One other thought - it couldn't be the tensioner spring, right? I see the chafing on the outside, so its probably (actually definitely) not that.
I'm with the others and I'm thinking it is something hitting the covers, a busted piece of rubber or voodoo. I'm out of ideas other than calling joe pesci.
 11-15-2009
#101
Registered!!
Join Date: Nov 2009
Posts: 6
Likes: 0
Received 0 Likes
on
0 Posts
Rep Power: 0 Re: Timing Belt DIY 2
Sorry for beating a dead horse, but my noise still hasn't gone away.
1. What the heck does this guy do at 09:15 in this video?
http://www.youtube.com/watch?v=KIzcttirhts
2. Can I manually adjust the timing belt to be tighter or looser? Or does the auto tensioner do this automatically?
3. I'm starting to think that the auto tensioner (even though its new) might not be tensioning enough creating slack in the belt and making it whip around and hit the cover.
Any ideas?
Thank you. Thank you!
11-15-2009
#102
Premium Member
Hey! Look At Me!! I'm a Supporting Member!!
iTrader: (95)

Join Date: Sep 2002
Location: NV
Age: 43
Posts: 51,241
Likes: 0
Received 18 Likes
on
13 Posts
Rep Power: 787 Re: Timing Belt DIY 2
auto tensioner should be working by itself to properly adjust the belt tension. its not possible to adjust it manually.
01-03-2010
#103
Registered!!
Join Date: Aug 2009
Location: SoCal
Age: 39
Posts: 1
Likes: 0
Received 0 Likes
on
0 Posts
Rep Power: 0 Re: Timing Belt DIY 2
Excellent write up!!!
I just finished up changing the water pump, timing belt, accessory belts, and valve cover gaskets on my '02 civic. While I had a haynes manual handy, along with a youtube video showing the process, I'd say your write up was hands down the best resource of the three.
Did anyone who replaced the spark plug well gaskets have a hard time removing and inserting them? I spent the better part of an hour with a pair of pliers trying to get those things out. By the time I had them out they were bent in every direction. When inserting the new ones, I couldnt find a reliable/safe way to press them in. I ended up greasing the edges of the gaskets and pressing the sides in with a screwdriver.....that was a bad idea. I punctured one of the gaskets in 2 places, and used black RTV to seal it up. So far everything is holding up, but we'll see how long that lasts. Anyone have a better method of pressing the gaskets in?
01-04-2010
#104
Registered!!
Thread Starter
Join Date: Apr 2004
Location: SoCal OC / LA / San Diego
Age: 41
Posts: 338
Likes: 0
Received 1 Like
on
1 Post
Rep Power: 249 Re: Timing Belt DIY 2
Excellent write up!!!
I just finished up changing the water pump, timing belt, accessory belts, and valve cover gaskets on my '02 civic. While I had a haynes manual handy, along with a youtube video showing the process, I'd say your write up was hands down the best resource of the three.
Did anyone who replaced the spark plug well gaskets have a hard time removing and inserting them? I spent the better part of an hour with a pair of pliers trying to get those things out. By the time I had them out they were bent in every direction. When inserting the new ones, I couldnt find a reliable/safe way to press them in. I ended up greasing the edges of the gaskets and pressing the sides in with a screwdriver.....that was a bad idea. I punctured one of the gaskets in 2 places, and used black RTV to seal it up. So far everything is holding up, but we'll see how long that lasts. Anyone have a better method of pressing the gaskets in?
I just finished up changing the water pump, timing belt, accessory belts, and valve cover gaskets on my '02 civic. While I had a haynes manual handy, along with a youtube video showing the process, I'd say your write up was hands down the best resource of the three.
Did anyone who replaced the spark plug well gaskets have a hard time removing and inserting them? I spent the better part of an hour with a pair of pliers trying to get those things out. By the time I had them out they were bent in every direction. When inserting the new ones, I couldnt find a reliable/safe way to press them in. I ended up greasing the edges of the gaskets and pressing the sides in with a screwdriver.....that was a bad idea. I punctured one of the gaskets in 2 places, and used black RTV to seal it up. So far everything is holding up, but we'll see how long that lasts. Anyone have a better method of pressing the gaskets in?
As far as installing, I'd say a piece of PVC pipe of the diameter of the gaskets + hammer is your best bet...
04-05-2010
#105
Registered!!
Join Date: Oct 2009
Location: Northeastern Illinois
Posts: 5
Likes: 0
Received 0 Likes
on
0 Posts
Rep Power: 0 Re: Timing Belt DIY 2
This DIY will certainly come in handy when its time. I replaced the timing belt on my Jetta TDI, so I'm confident that I can do it on the wife's Civic (perhaps next spring or fall?)
04-05-2010
#106
Premium Member
Hey! Look At Me!! I'm a Supporting Member!!
iTrader: (95)
Join Date: Sep 2002
Location: NV
Age: 43
Posts: 51,241
Likes: 0
Received 18 Likes
on
13 Posts
Rep Power: 787 Re: Timing Belt DIY 2
the service book says to use new engine mount bolts each time. i reused mine cause the bolts had to be ordered and i didnt feel like waiting 2 weeks for them to get here. i think the main issue is so they do not snap when retightening them. they need alot of torque and its best to use a new bolt and avoid problems.
04-06-2010
#108
Registered!!
Join Date: May 2008
Location: Monterrey,nuevo leon,mexico
Age: 37
Posts: 93
Likes: 0
Received 0 Likes
on
0 Posts
Rep Power: 0 Re: Timing Belt DIY 2
Wow that look like alot of work here in mexico they will charge me to do that about 80 dollars plus the belt and all the stuff
05-01-2010
#109
Registered!!

Join Date: Mar 2010
Posts: 1
Likes: 0
Received 0 Likes
on
0 Posts
Rep Power: 0 Re: Timing Belt DIY 2
I have completed my timing belt replacement. Just wanted to add my two cents to reddawnman's original post.
BTW this was a very well documented and illustrated post. Pretty much i did 90% of reddawnman's orginal protocol.
My list of protocols that may help and save some time and effort while attempting this DIY:
Definitally get the crankpully holder tool.....I found one on amazon for $25 bucks with shipping. It sucks that you only need it for not even 10 mins of real work but it is a def must.
While gathering your tools for taking off the crank pulley nut....
1. USE IMPACT SOCKETS.....do not use cheapy stainless craftsman crap...it will break and shatter.
2. Make sure that you are using 1/2"drive breaker bars and sockets......
The holder tool...and imact sockets are both 1/2" drive anyway. Also get 18"-24" exetension for the breaker bar......this is to clear the outside of the fender body....so you dont knick the body while cranking down on the nut to loosen it.
3. Get a piece of 2x4 wooden board that is approx 18" in length......dependind how height of the nut from the ground....you will chock the board up on some bricks legth wise until the height is met so you you can rest the extention of the breaker bar level on the end of the board. So while you crank down on the breaker bar to loosen the nut, you do not torque the motor, crankshaft or motor mounts......hence you will just torque evenly on the nut and it will come off.
4. If you dont think the nut is comming loose.....crank real hard.....maybe even a little body weight on the breaker bar. I am 190lbs, and it took a good amount of my body weight to untorque that nut off.
When putting the new belt on.... (MAKE SURE CAR IS NEUTRAL IF YOU HAVE AUTOMATIC TRANS)
Well before you take the old belt off....take the spark plugs out so the motor is a little easier to move. Move the cam pully into TDC position clockwise with a wrench. Light up your cam pully marks with the top of the head, and the marks on the crank pulley. After that take a sharpie marker and make some marks of your own on the crank-to-block and cam-to-head. Just to be a little more sure. Then take the old belt off.
When putting the new belt on....dont freak out. The crank and cam are pretty hard to move by your hands. Just know to thread/lay the belt on from crank to cam first...then work the belt around the water pump and tensioner. After all is installed.....take the same wrench you used to align you marks.....spin the motor clock wise one full rotation. Did you make one full rotation without any snags???? Good then you installed the belt correctly. If you felt a snag..then you goofed the belt install by one tooth or two...and valve and pistion have interfered with each other and you would have heard it, and your hand cranking of the motor would have stopped and got caught. Thank God you preformed that test by hand....its pretty hard to bend a valve by hand. So just go back and recheck your marks So if you can crank the motor around by hand(with a wrench) then you are looking good. Button everything up and your done.
Ever since I did my timing belt install...the car is running like a champ. My car is a 2005 with 102K on it. I just recently took my own MPG test.....and its getting 35 to the gallon exactally after the install.
Totaly amount spend on my install was about $125 Total.
All parts were bought on rockauto.com (could not beat thier prices even with shipping)..except new coolant(went to local napa).
I called a honda dealership and asked how much for thier install.....looking at $800 plus. So the math, this is probally THE best money saving DIY you can do yourself.
This install took me about 8hrs....my first time. Take your time, pay attention and have patience. Give your self the whole day. And study reddwanman's pictures.
Goodluck
Steve
06-07-2010
#110
Registered!!
Join Date: Oct 2009
Posts: 54
Likes: 0
Received 0 Likes
on
0 Posts
Rep Power: 178 Re: Timing Belt DIY 2
Here is the crankshaft pulley holding tool I used on my 2003 Civic LX coupe:

Directions on how to make it appear at http://sites.google.com/site/hondali...madepulleytool
Directions on how to make it appear at http://sites.google.com/site/hondali...madepulleytool
06-13-2010
#111
Registered!!

Join Date: May 2008
Location: San Antonio
Age: 38
Posts: 1
Likes: 0
Received 0 Likes
on
0 Posts
Rep Power: 0 Help!:
I just recently flushed my coolant following the DIY to the letter. But the fans never switched on while refilling the radiator. Now I'm noticing that the fans are not turning on at all resulting in the engine temp ski rocket to the top notch while at idle. I also noticed that my reserve tank is filling up and the top hose is hot while the bottom hose stays cool to the touch. I am new at this forum site and not extremely knowledgeable car guy. Could I have possible left air in the system? Also, my car is an 04 Civic EX with 64,000 miles... if that helps and everything worked fine before the flush. Does anyone have any pointers for me to resolve the fans not turning on and the over heating?
I just recently flushed my coolant following the DIY to the letter. But the fans never switched on while refilling the radiator. Now I'm noticing that the fans are not turning on at all resulting in the engine temp ski rocket to the top notch while at idle. I also noticed that my reserve tank is filling up and the top hose is hot while the bottom hose stays cool to the touch. I am new at this forum site and not extremely knowledgeable car guy. Could I have possible left air in the system? Also, my car is an 04 Civic EX with 64,000 miles... if that helps and everything worked fine before the flush. Does anyone have any pointers for me to resolve the fans not turning on and the over heating?
06-30-2010
#112
Trance Addict
Re: Coolant Flush DIY
Hey, very thorough write-up. I have a 2000 Civic and I wanna do this. I'm assuming the procedure is pretty much the same for my car(maybe coolant quantity and torque specs may vary for the drain bolt). Quick question though. Why disconnect the battery? Maybe I overlooked something.
. I have a 2000 Civic and I wanna do this. I'm assuming the procedure is pretty much the same for my car(maybe coolant quantity and torque specs may vary for the drain bolt). Quick question though. Why disconnect the battery? Maybe I overlooked something.
08-14-2010
#113
Registered!!

Join Date: Mar 2010
Location: San Diego, CA
Age: 43
Posts: 37
Likes: 0
Received 0 Likes
on
0 Posts
Rep Power: 0 Re: Timing Belt DIY 2
Great DIY man. Awesome!!
I recently got the coolant flush done and just last week one morning I noticed that the antifreeze level in the reserve tank was lower than the MIN mark when cold. I got some antifreeze and filled it up a little bit above the MAX mark and marked it with a marker.
Today I noticed it has gone slightly below the MAX mark in the reserve tank when cold. When the engine is up to temp it is way above the MAX mark (which is quite normal I suppose).
My only question is how to detect if there is a leak in the system?
Since its so hot and humid here is it normal for the antifreeze to evaporate a little bit each day?
The car doesn't overheat and everything is fine and I do not see any liquid drops or spills on the ground where I park, so should I be paranoid about this or just let it be?
Update - Nevermind, I got the answer.
Last edited by gangulyarchan; 08-17-2010 at 06:42 PM.
09-27-2010
#114
Registered!!
Join Date: Sep 2010
Posts: 8
Likes: 0
Received 0 Likes
on
0 Posts
Rep Power: 0
10-03-2010
#115
Registered!!
Join Date: Oct 2009
Location: Northeastern Illinois
Posts: 5
Likes: 0
Received 0 Likes
on
0 Posts
Rep Power: 0 Re: Timing Belt DIY 2
The hardest and most frustrating part was definitely turning the wingnut for the alternator belt tension. Stupid design on Honda's part, for both the alternator and power steering pump. But, I finally discovered that one can get a 12-mm open-end wrench in there to slowly turn that wingnut. I also had a little difficulty with the valve cover gasket, and learned the hard way that one has to remember to install the upper timing belt cover before installing the valve cover. Again, a dumb design if one simply want to observe the timing belts wear over time.
I didn't bother with the coolant drain plug on the engine block. The parts guys at my local Honda dealer told me that their technicians never pull this plug off. I had decided I was going to do it anyway, but then I could not figure out how to get a socket, wrench, or anything else in there to remove and the re-torque this drain plug. So, instead of getting frustrated, I said forget it. I know you can't always trust stealerships, but I decided to trust this piece of advise.
Since the car has only 42,000 miles on it, I didn't need to change out the camshaft or crankshaft seals.
Last edited by rocketeer928; 10-03-2010 at 06:40 AM.
10-15-2010
#116
Registered!!
Join Date: Nov 2009
Location: Atlanta, GA
Posts: 5
Likes: 0
Received 0 Likes
on
0 Posts
Rep Power: 0 Re: Timing Belt DIY 2
I didn't bother with the coolant drain plug on the engine block. The parts guys at my local Honda dealer told me that their technicians never pull this plug off. I had decided I was going to do it anyway, but then I could not figure out how to get a socket, wrench, or anything else in there to remove and the re-torque this drain plug. So, instead of getting frustrated, I said forget it. I know you can't always trust stealerships, but I decided to trust this piece of advise.
Just remember to use Honda coolant. That part, apparently, is very important.
 10-25-2010
#118
Registered!!

Join Date: Oct 2010
Posts: 2
Likes: 0
Received 0 Likes
on
0 Posts
Rep Power: 0 Awesome diy. Thanks!
A few things that I experienced:
Broke water pump bolt located on bottom and toward firewall while putting on new pump. Like the DIY says it only needs 8.7 lb/ft and that is not much. Be careful. It was a b*tch to get out. Had to buy a right angle drill and Alden Drill-Out Extractor from local Ace Hardware. Took my time drilling with the Drill-Out bit and used penetrating oil. Got it out and couldn't believe my eyes! Phew!
Forgot to connect the TDC sensor after installing the new components and engine started funny. Not much power when giving gas and would quickly die. Connected the TDC sensor and car started fine.
Hope this helps others. This thread was a lot of help to me.
11-02-2010
#119
Registered!!

Join Date: Jan 2009
Age: 40
Posts: 15
Likes: 0
Received 0 Likes
on
0 Posts
Rep Power: 0 Re: Timing Belt DIY 2
I read through the thread. Good DIY. Its always nice to have a 'real person's' take on the procedure. I thought I would add my 2cents to help someone out there.
I searched online to see if someone loaned the special tool. Advance Auto did NOT. However, I read somewhere that O'reilly's has this in their loan a tool program. I searched through one of their pamphlets....no dice. Looked on one of their counter top display pad things...dice. They had a second, different, counter top display and VOILA there it was.
The guy had to order it in, said it would be there in 3-4 days. The part number is 67101 if they need to call it in or check in their computer for availability.
enjoy.
11-06-2010
#120
Registered!!
Join Date: Jan 2009
Age: 40
Posts: 15
Likes: 0
Received 0 Likes
on
0 Posts
Rep Power: 0 Re: Timing Belt DIY 2
Well, just finished the job, just wanted to add two things to the write up.
-You talk about using a coat hanger etc etc to check which TDC you are at #1 or #4 piston. The easier way to tell is if you are on the TDC marks and there is play in the intake and exhaust valves on piston #1...then you are on TDC for that piston.
- Make sure you put the alternator bracket back on BEFORE you put on the upper timing cover. I was feeling good and put both timing covers on and all the stuff on the valve cover too only to realize that the alternator bracket needs to be on the inside of the top timing cover. Added quite a bit of time backtracking to the process. Maybe i'm just an idiot, but just a warning.

