
DIY: 01 LX Coupe Engine and Transmission Mounts


Thread Starter
Registered!!
Joined: Aug 2018
Posts: 39
Likes: 0
Rep Power: 0 
DIY: 01 LX Coupe Engine and Transmission Mounts
DISCLAIMER: This is my first DIY, so I'm bound to screw a few things up. I am also not a professional mechanic, so if you attempt this and end up with a worn muffler bearing or a broken blinker fluid reservoir, I am not responsible.
If you read the thread title, you'd know that this is a DIY for a 2001 Civic LX Coupe. My car doesn't have some of the fancy things that get in the way, like an ABS whatsitmabob, so if yours does, go watch a youtube video with your car. I'd also recommend watching a youtube video or two before you start anyway, because that helped me know what I was getting into and what I'd be looking for. I also have a manual transmission, so again, yours might look different. Hopefully, it looks cleaner...
If you don't want to do all 4 mounts at once, there are ways to diagnose which ones need replacing without removing them. You could also take the car to a mechanic and have them diagnose it. My Civic just passed 200k miles, and I know the previous owner never replaced the mounts, so I did them all. The front and front left have needed to be replaced for awhile. The rear mount looked like it was going to be a problem soon enough. The transmission mount looked okay, but I don't know how well the 17 year old rubber affects mount performance after 200k miles.
Tools needed:
Ratchet with 10mm, 14mm, deep and regular 17mm sockets and extensions
17mm wrench
Jack and jackstands
Tools recommended:
Torque wrench
Parts needed: (Price quotes from hondaautomotiveparts.com)
Stopper, Front Engine - Honda (50840-S5A-010) $85.42
Rubber, Engine Side Mounting (Toukai) - Honda (50827-S5A-003) $172.33
Rubber, Rear Engine Mounting - Honda (50810-S5A-013) $56.76
Rubber Assembly, Transmission Mounting - Honda (50805-S5A-033) $88.41
I did not use OEM parts. If you want your car to last another 100k+ miles, and you have the money for quality parts, YOU should use OEM parts. I could not afford them when I did the job. Usually when I don't go OEM, I end up having to fix the same thing again. In this case, it was either use a non-OEM mount, or use a broken OEM mount, and I was sick of the rattling and shaking. I went with Beck/Arnley from Rockauto, because I had a coupon. They all fit, but we'll see how long they last!
The first thing you want to do is get your car on jack stands. Both passenger and driver side. I found out after that I could've used those drive-up ramps, but some models need to turn the wheels all the way to the left to take out the rear mount. Just use the freaking jackstands!
After that, support the engine from below. Put a piece of wood on your jack where it lifts the car, put it under the oil pan, and jack it up a bit. You aren't trying to move the engine! You're just trying to support it while you take off the mounts. I raised the jack until it made contact with the oil pan, then a tiny bit more.
Do the front, front left, and rear mounts first. You will want to move your jack to do the transmission mount, so knock these out before you need to move it!
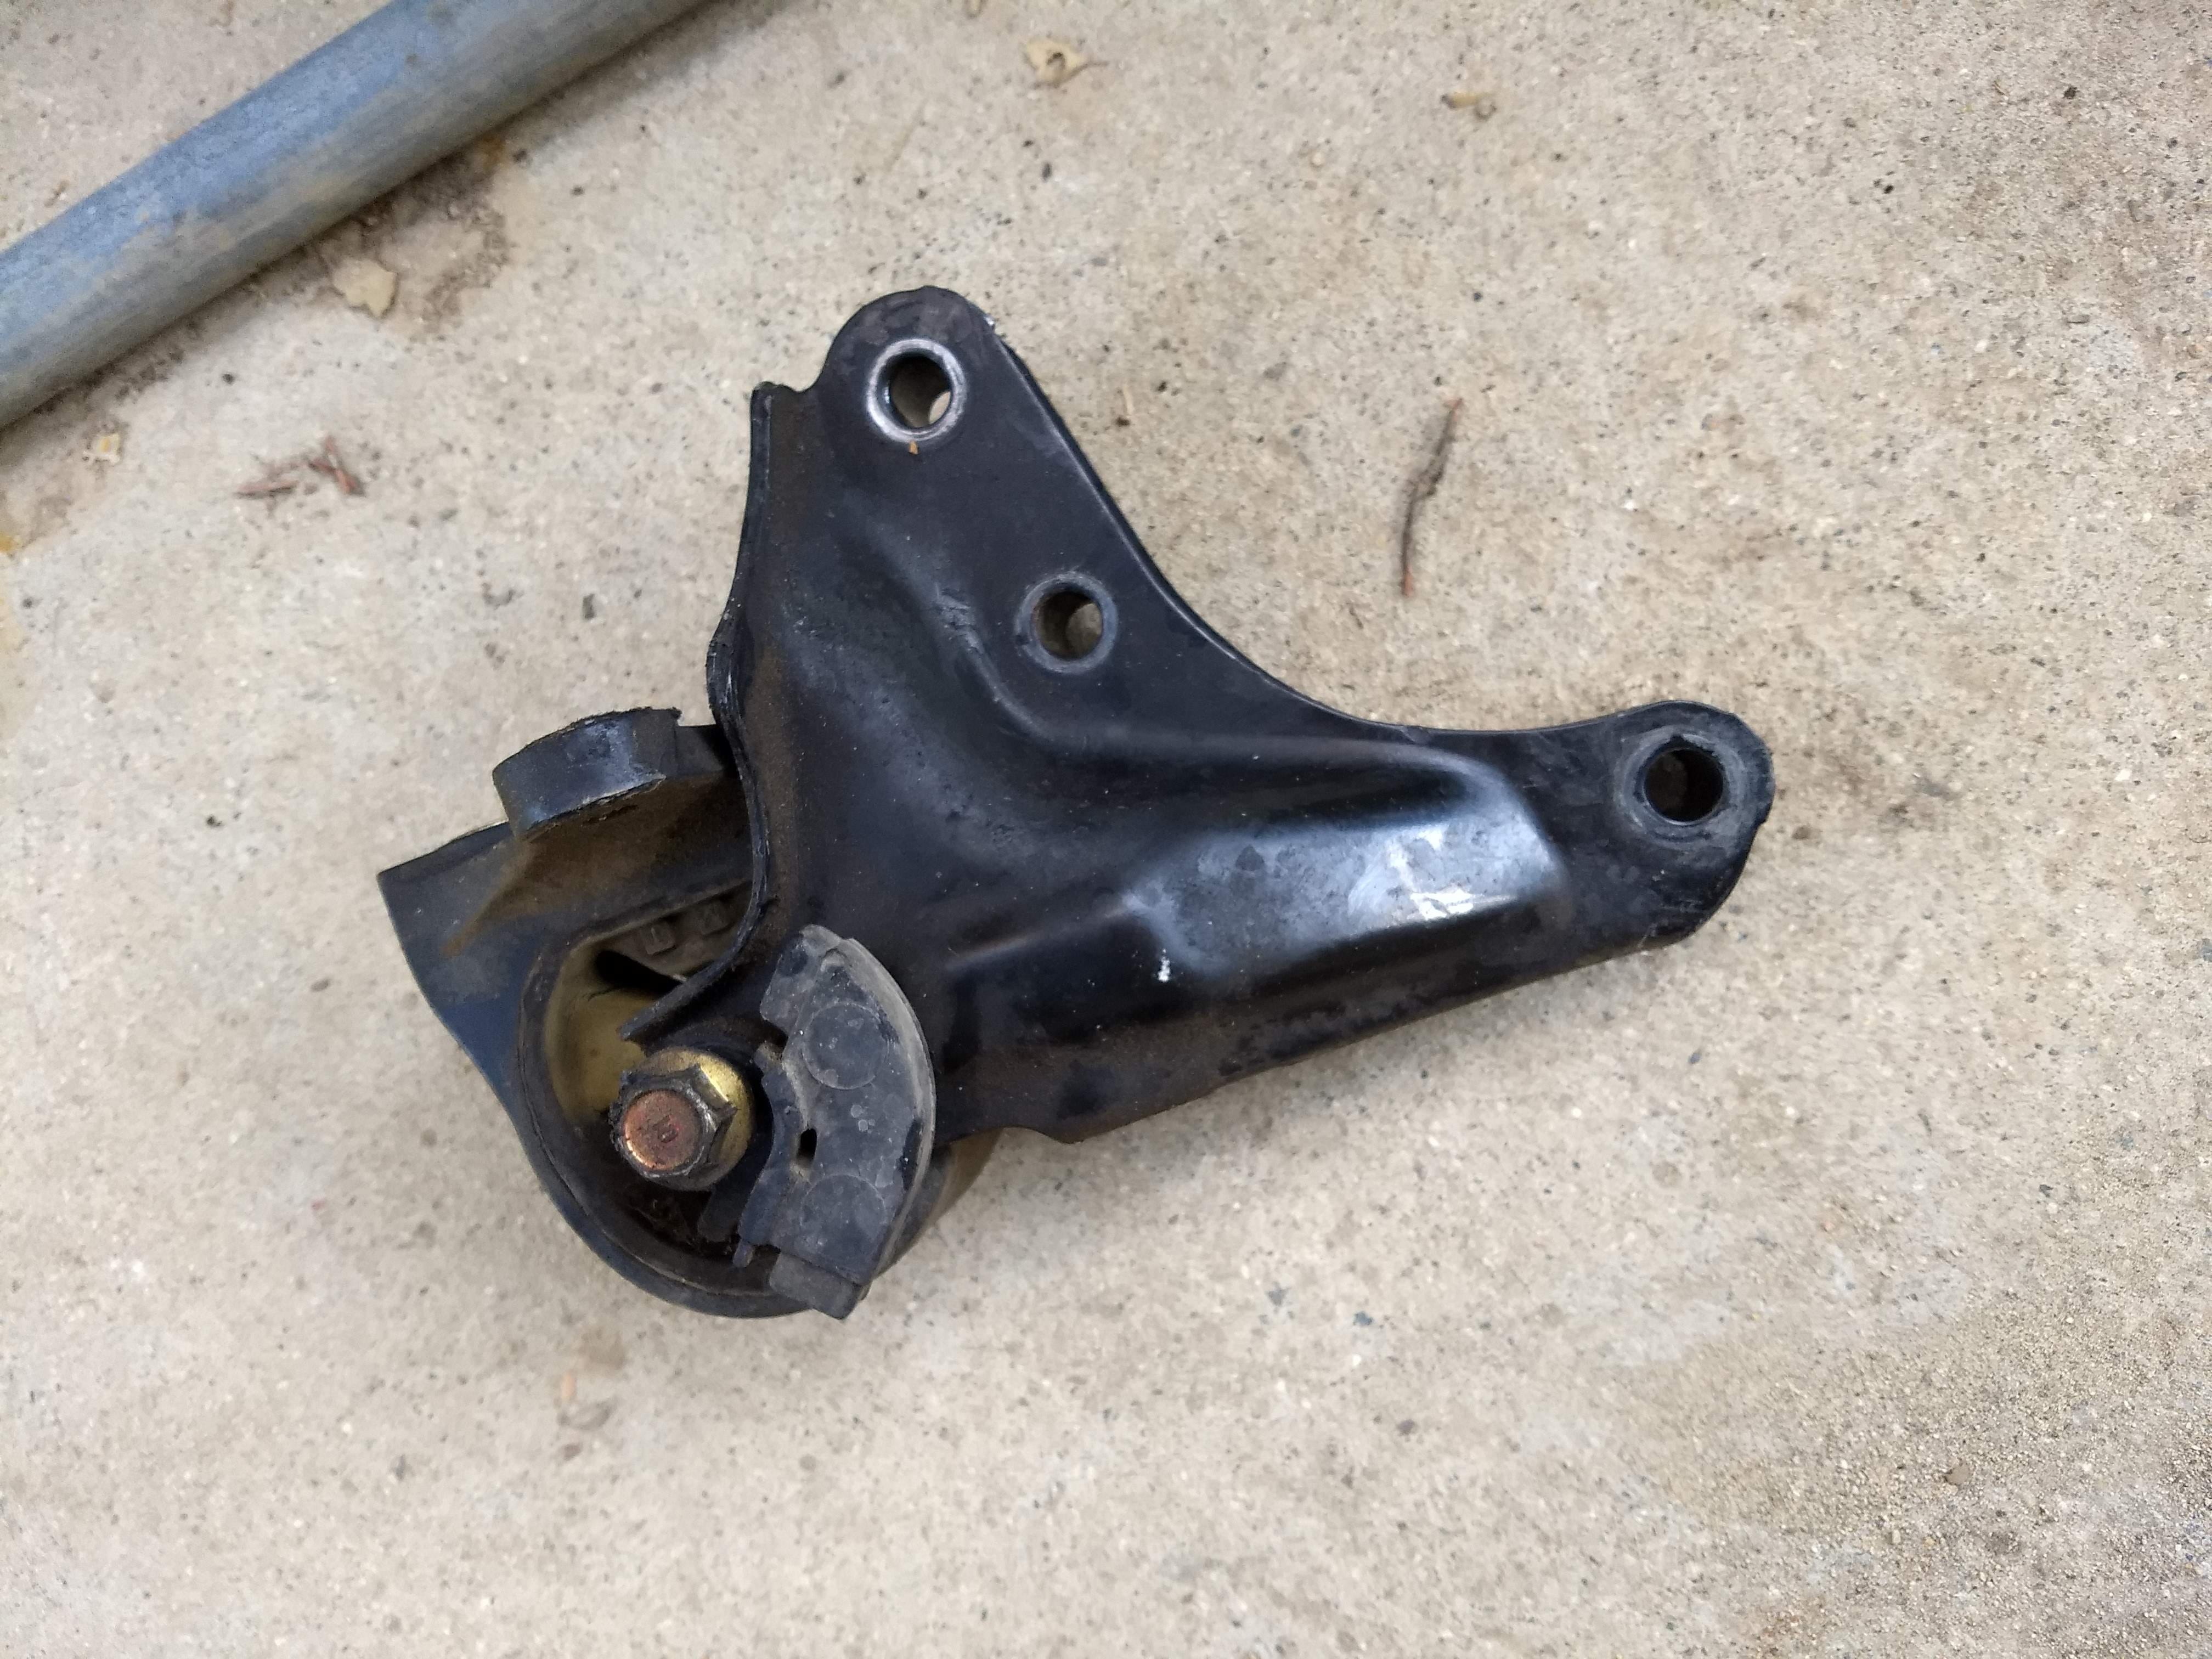
The front left mount is easiest, in my opinion. Here it is:

Yours might have a big magical box on the right hand side. That's an ABS thing, and I don't have to deal with it. Ha-Ha, sucks to be you! The youtube videos I watched that had it made it look pretty easy to get out of the way. Go watch one of those if you need help!
That thing with the red lid is your power steering fluid reservoir. There's a metal tab you press as you pull it to get it off, Move it out of the way, but DON'T DISCONNECT THE HOSES! They have plenty of play, and you should be able to just set it to the side.
Now that that's moved, grab your deep 17mm socket and remove these three fat nuts holding that metal bracket to your mount and your other metal bracket with studs. This will reveal your front left engine mount a little more.
Remove the three 14mm bolts securing the mount, remove the mount, inspect for damage and wear. Mine was torn on the bottom, and the fluid had all leaked out. It had to go.
Grab your shiny new mount, slap it in, line up the mounting holes, and secure it with those three 14mm bolts.
Slide that metal bracket you took off over the studs and the top of your mount, and torque to 47 lb/ft. Double check that torque spec with a service manual. The top plate on my new mount pivoted slightly. Don't over-tighten, or it'll wear out prematurely.
Deal with your ABS thing if you need to, and click the power steering reservoir back into place. That's one done. NEXT!
I recommend the front mount next. It''s less annoying than the rear one. Here's how you see it from the top:
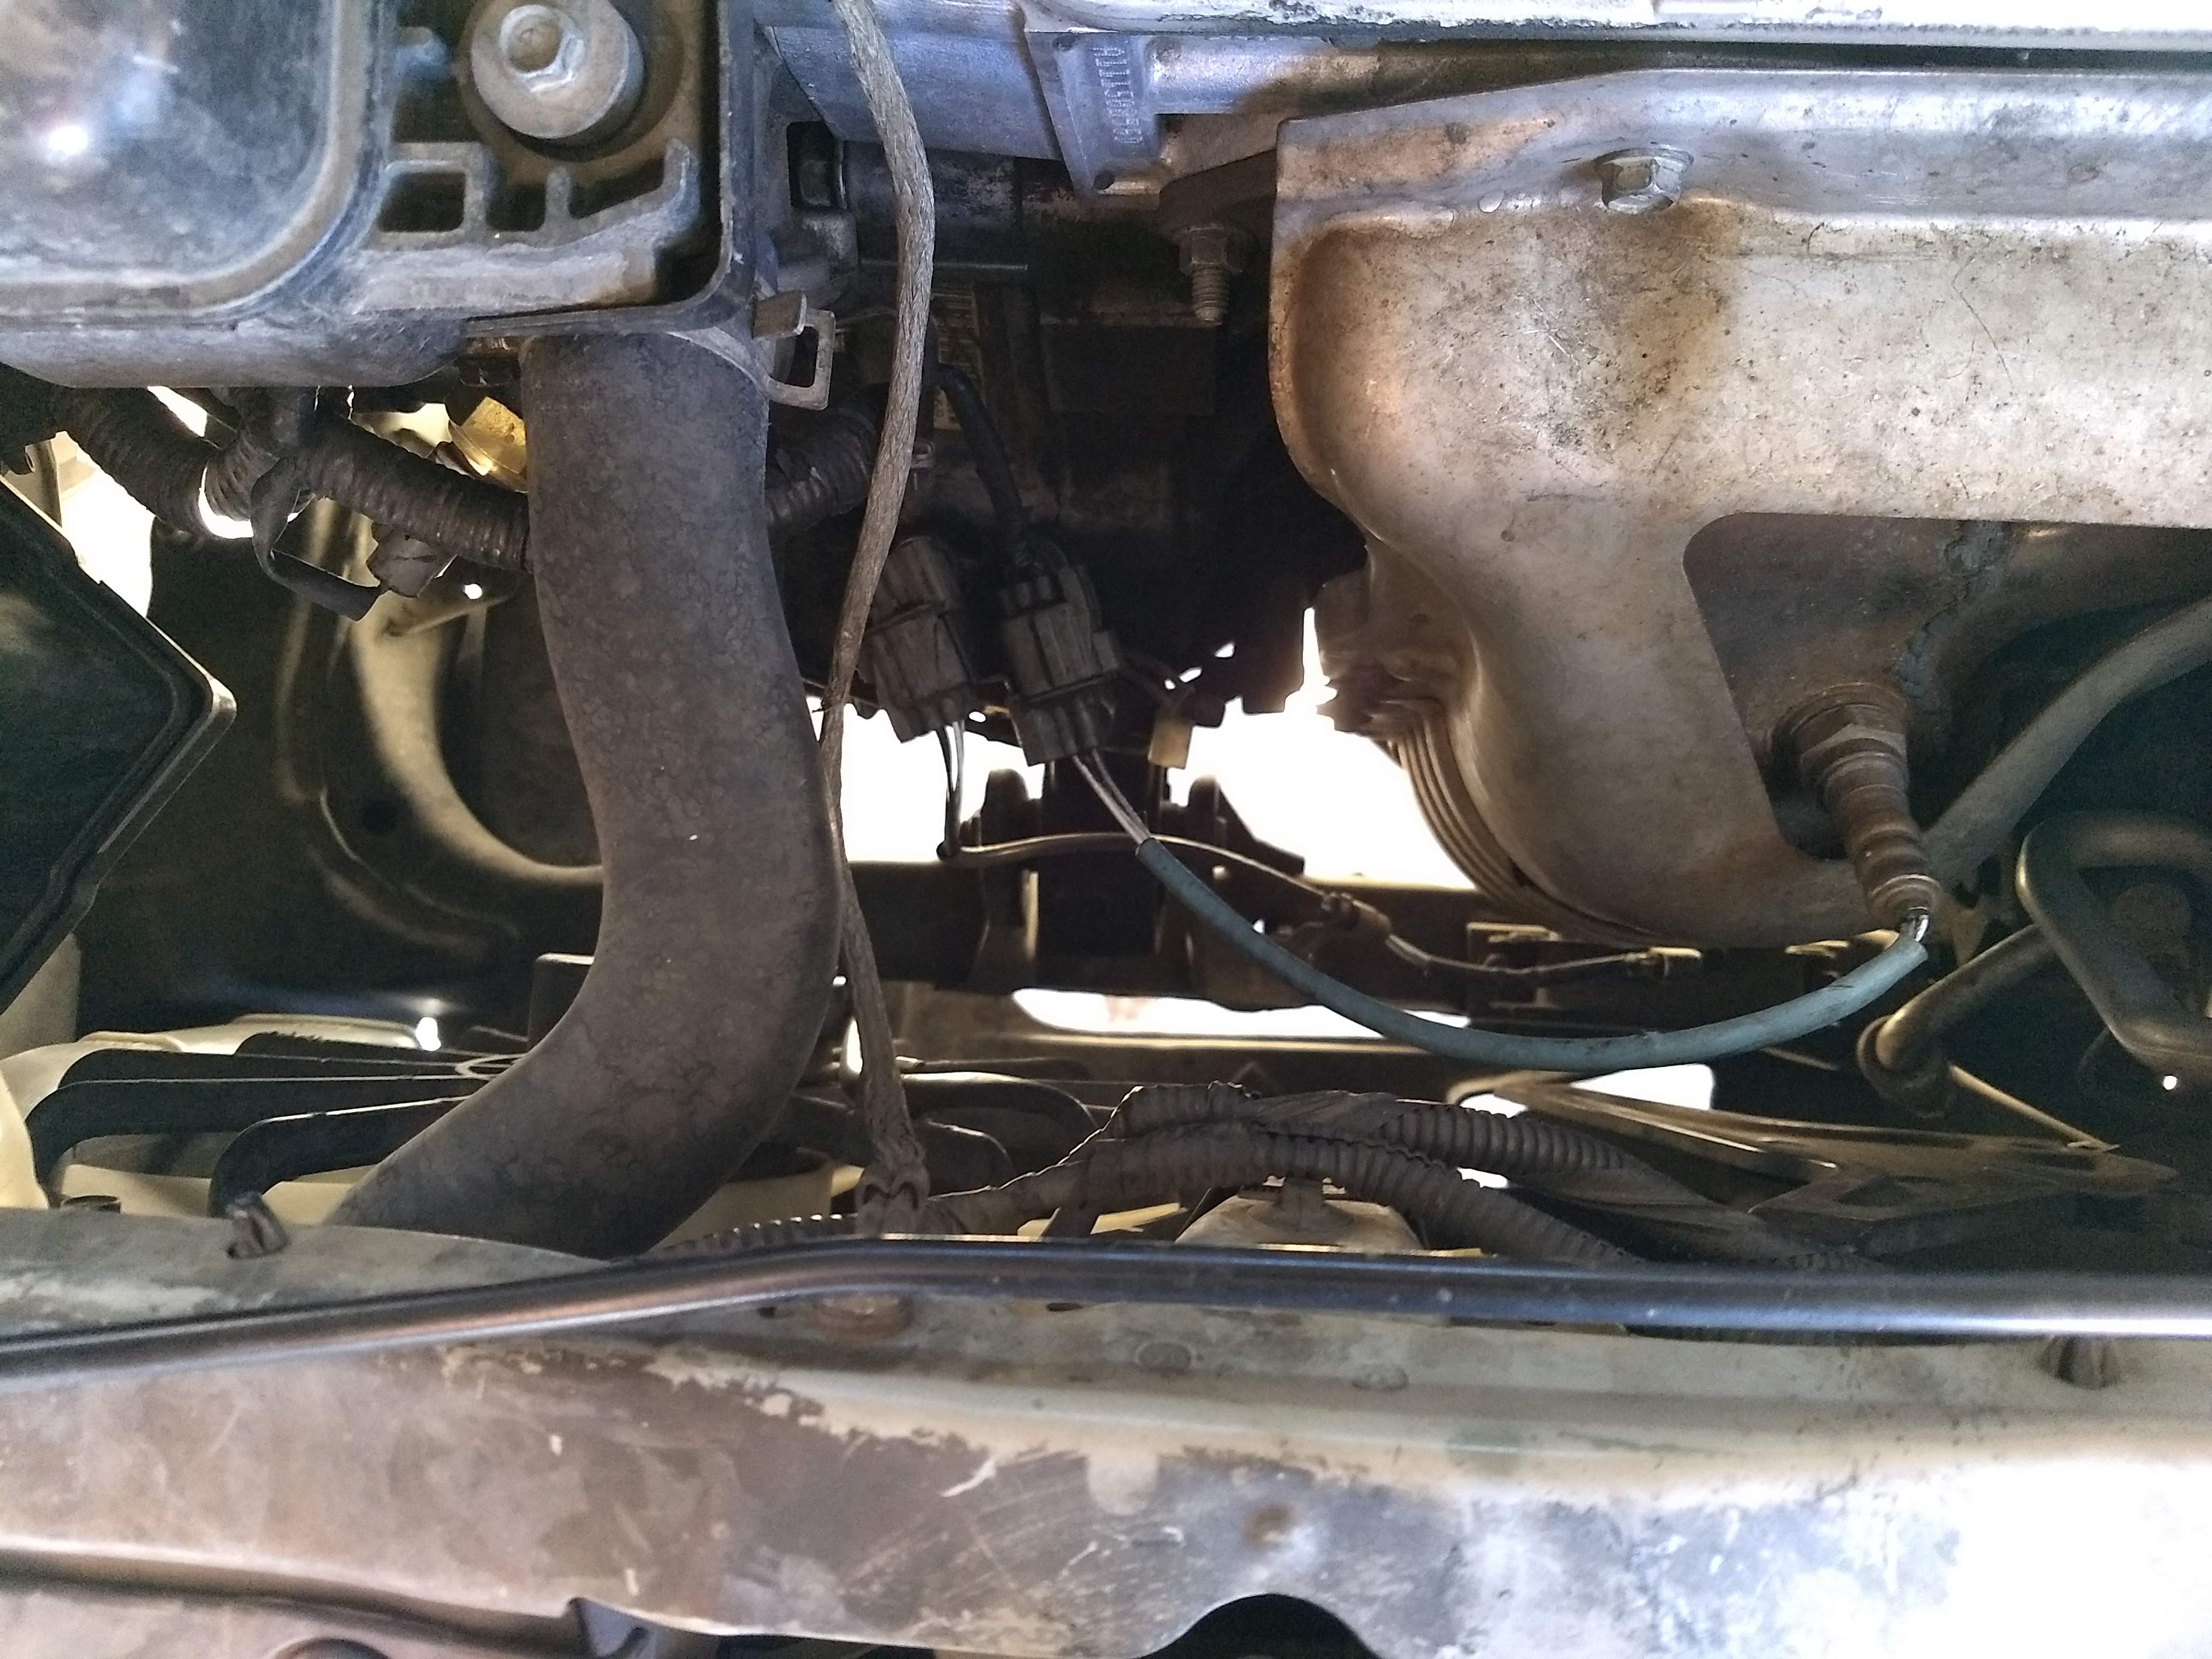
And from below:
Don't mess up those wires while you're in there! I took the lower one out of the little clip things, so I had more wiggle room with my ratchet.
Use your 17mm socket to remove the bolt that runs through the mount. Then, move under the car and get the 14mm bolt that secures the mount to the engine. I did this one first, because I didn't want the mount dropping on my face. You do you, though...
Remove the other two bolts from the top of the mount, where it secures to the engine. Pull out the mount and inspect for damage. Reuse it if it looks good.
The inside rubber of the mount should be fused to the metal outside. It should not come apart, like mine had:
Line up your new mount where the old one was. Screw in the bolt that passes through the mount first, but just a bit. Then, line up the mount and finger-tighten the bolts that secure it to the engine. Once they're in, tighten them with your ratchet. I couldn't fit my torque wrench in that space, so I just made them snug. DO NOT OVERTIGHTEN! Then, do the same with the bolt that passes through the mount. Again, DO NOT OVERTIGHTEN!
Clip your O2 sensor wire back in, if you moved it.
Cool, two done! Now it gets annoying. On to the REAR MOUNT!
The exhaust pipe blocks some of the bolts you need to remove. In the videos I watched, they got away with removing the pipe from the two rubber hanger things. I only had one of the rubber hanger things, and the pipe didn't droop low enough if I only took that off.
Here is what the hanger thing looks like, and hopefully yours is less filthy and oily:

The pipe hanger will slide right off.
If you find a second pipe hanger, great! I didn't, so I had to drop my exhaust pipe. I don't have a picture, but there are two spring-bolts connecting the exhaust pipe to the exhaust manifold. Just follow the big pipe toward the front of the car and you'll find them. Remove the spring bolts, and set the pipe on the ground. Now you have clearance to reach all the bolts you need to!
Here they are:

All three are 14mm bolts. Take them out!
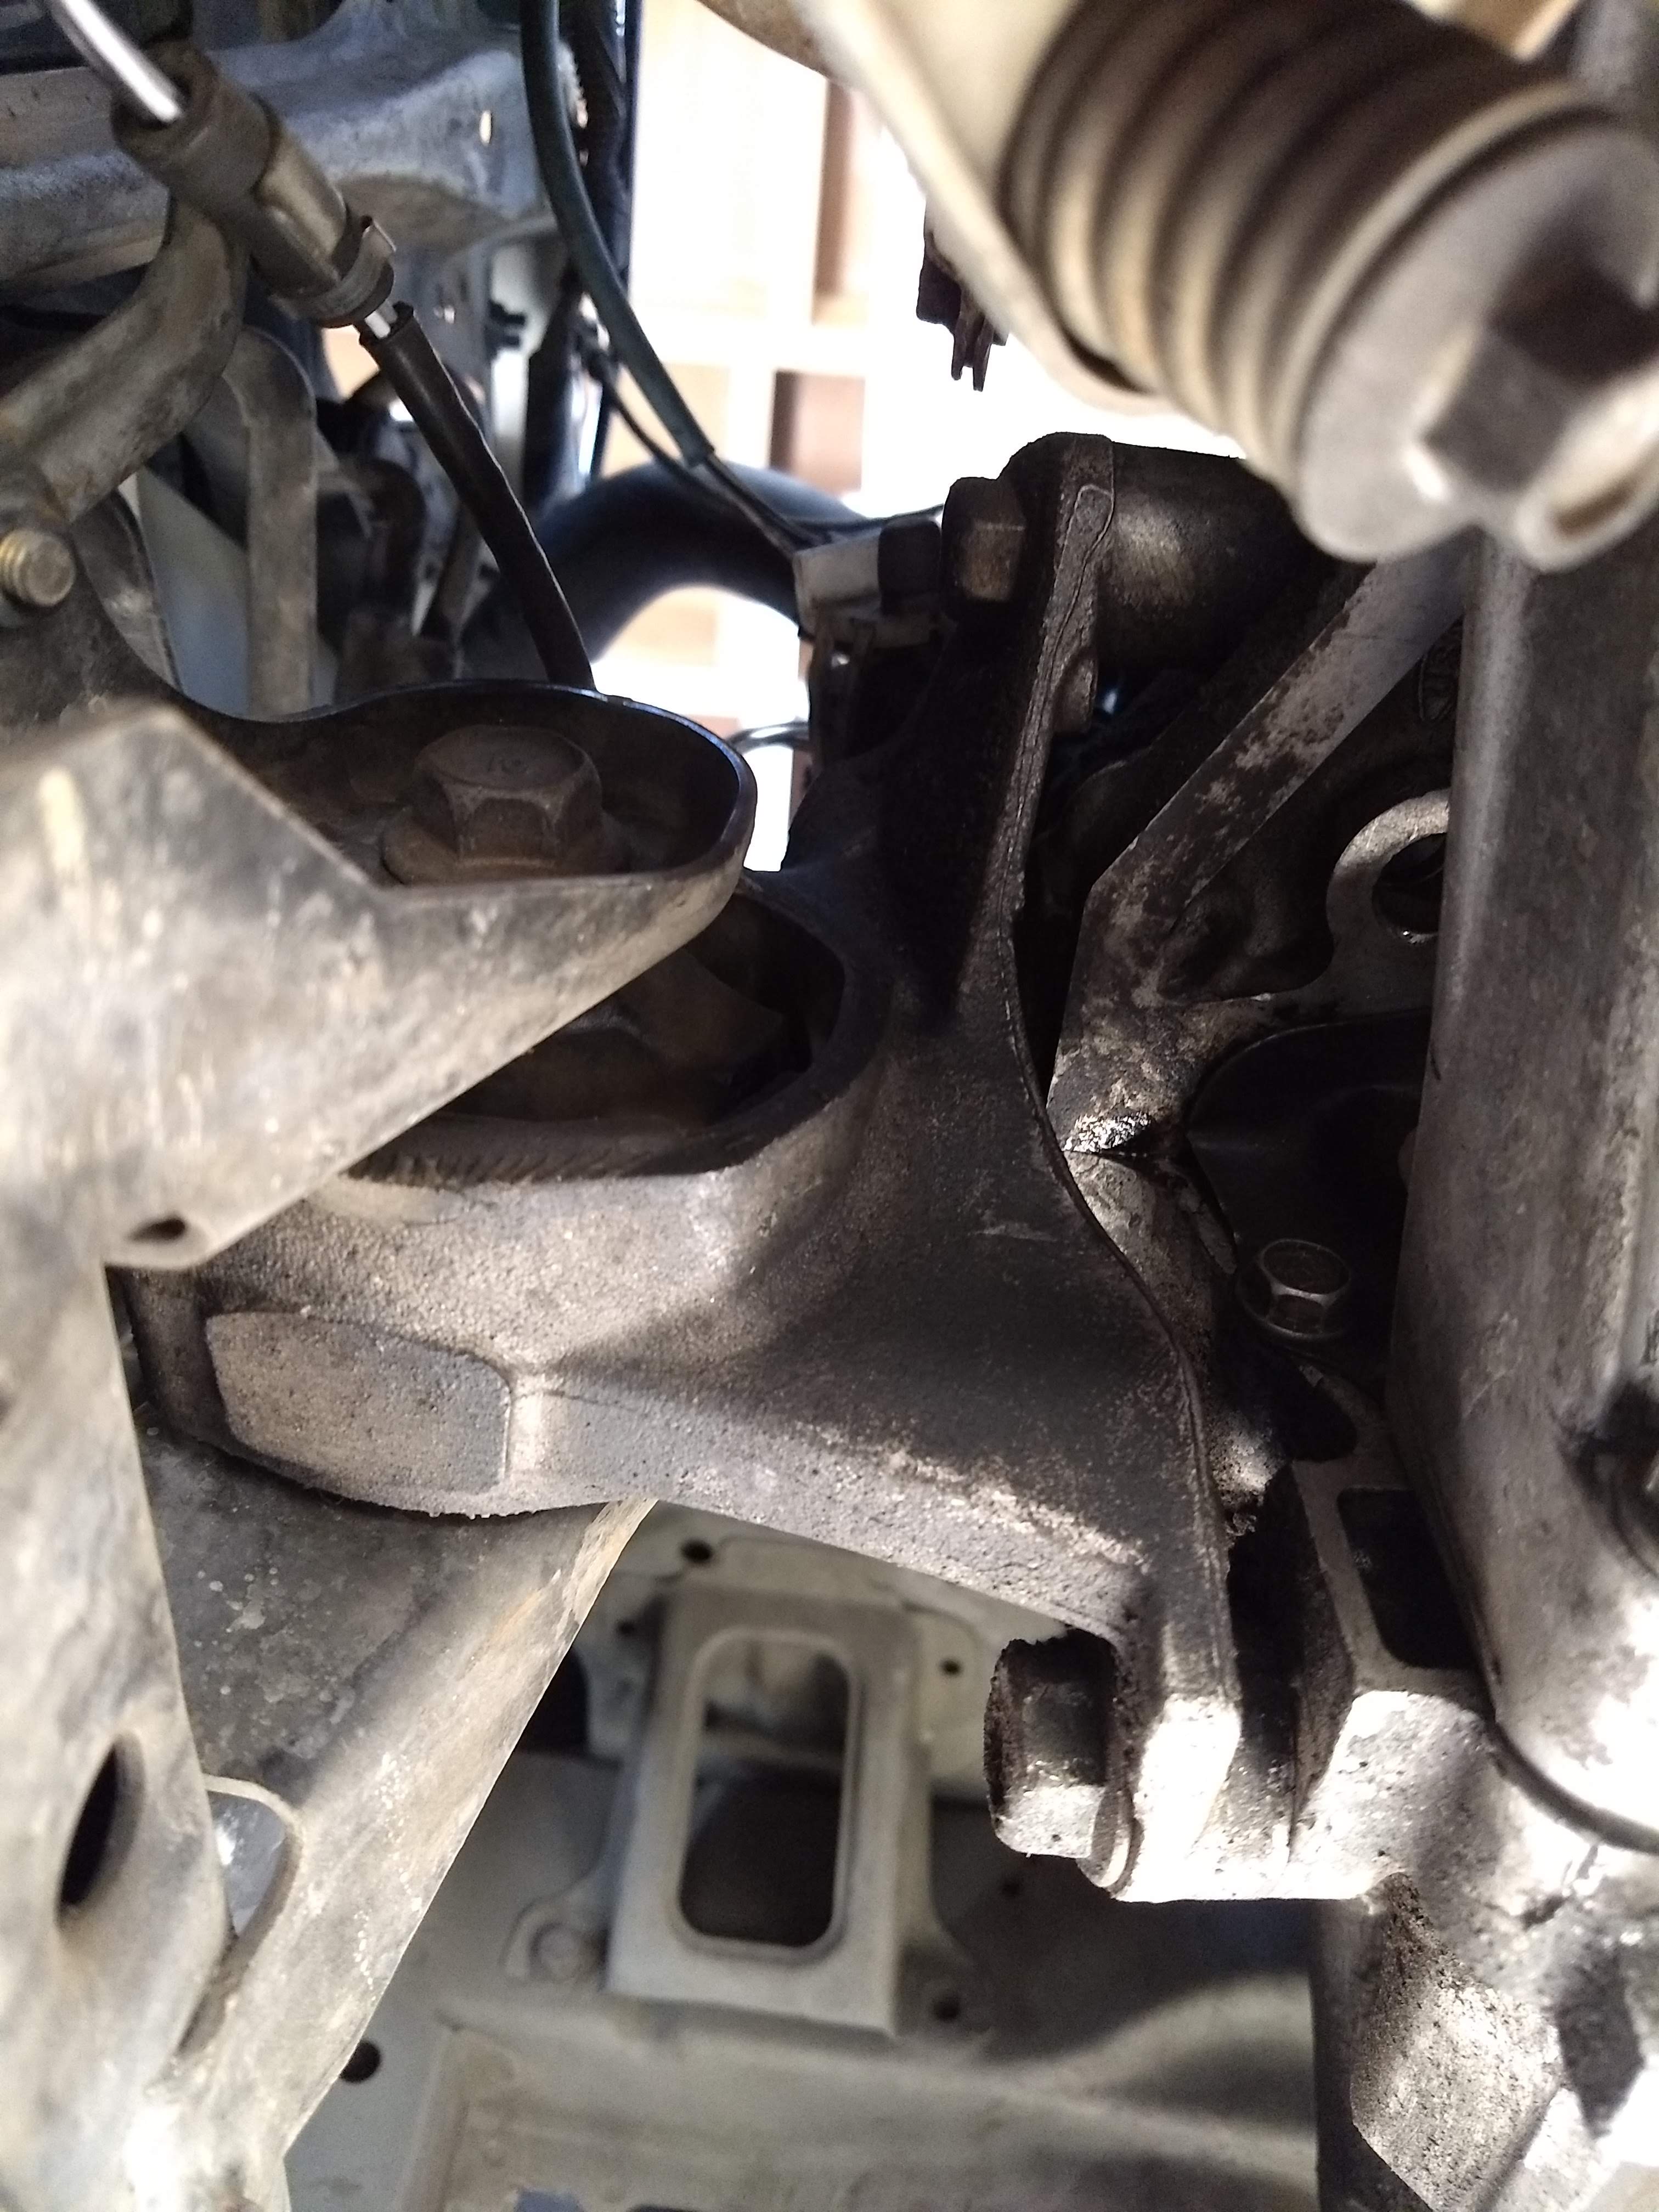
Next, move on to these on the right:
Remove the three 17mm bolts on that bracket. One is above the CV axle boot, and the other two are easier to see.
Now, the bracket and rear engine mount will come out as one piece. Before you pull it out, look at how it fits in there. Pay attention to how you take it out. You've been warned.
I was able to pull mine out from the same position I removed them from, right under the car. You might not be so lucky. You might have to take it over to the driver's side front wheel well, with the wheels turned all the way to the left, and pull it out through there. You'll have to put it back in the same way you pulled it out.
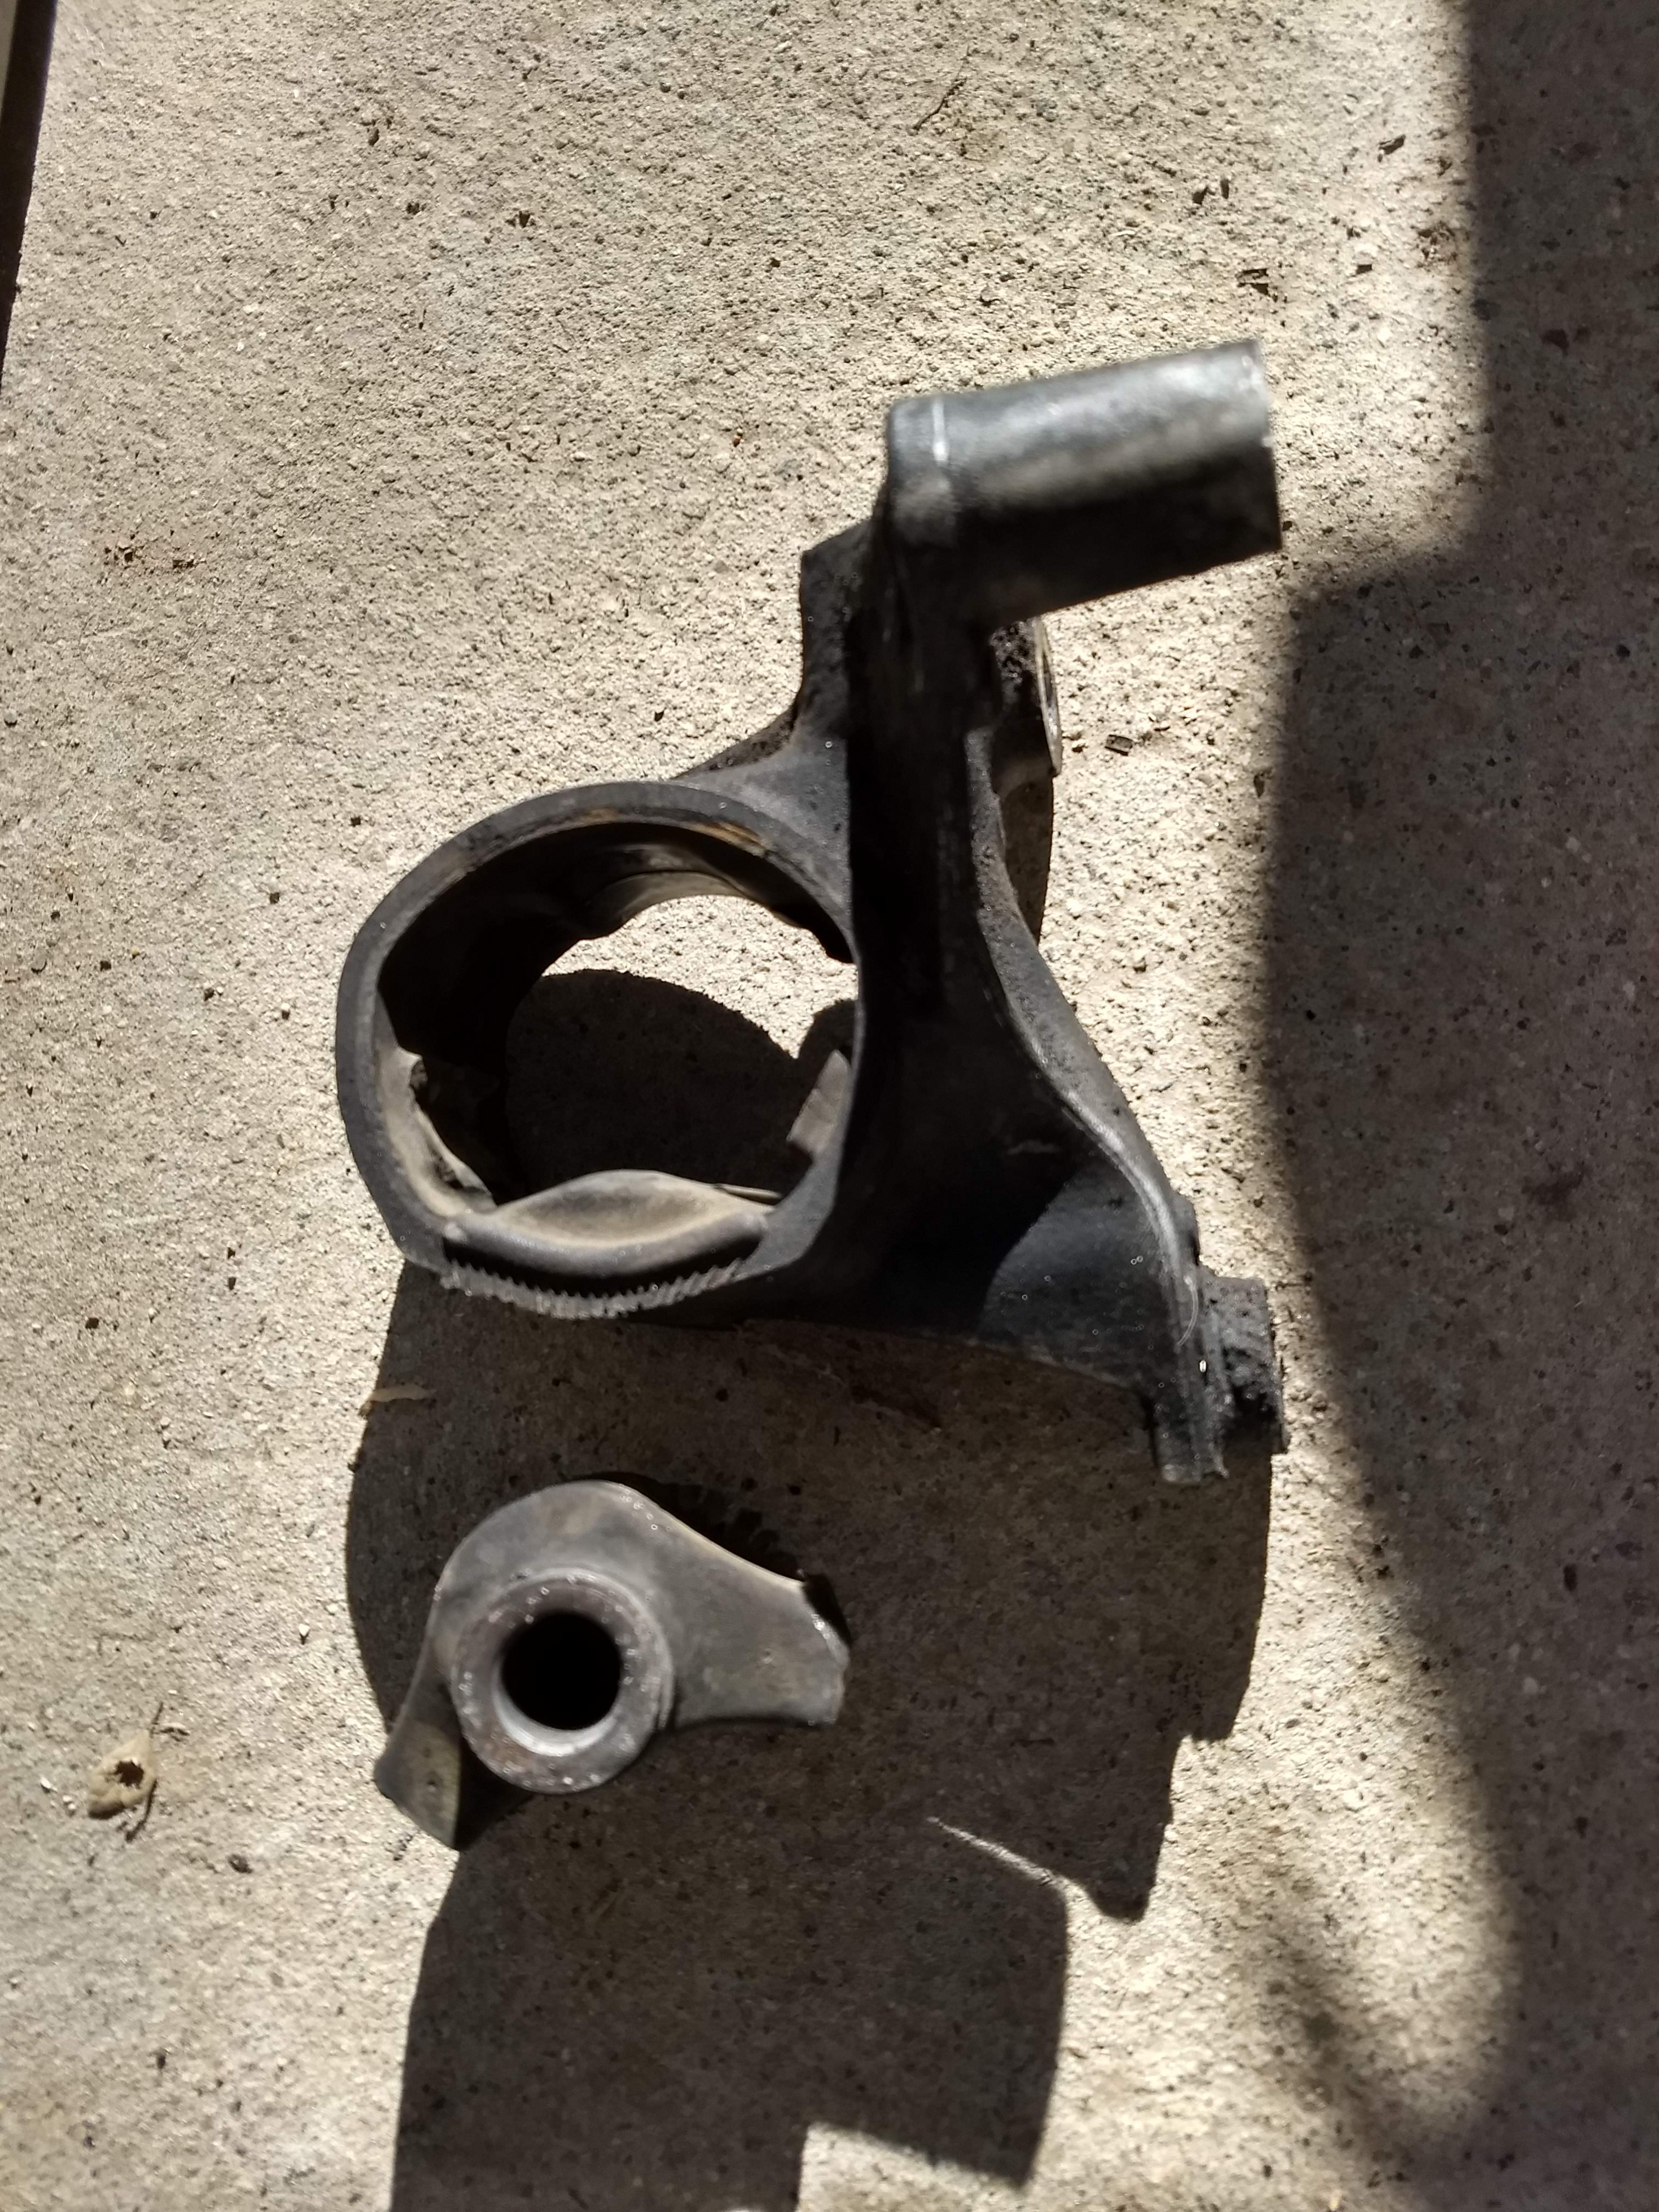
When you get it out, it should look like this:
Get two 17mm sockets and ratchets, or just one ratchet and a 17mm wrench, and take out that pass-through bolt. The mount will come right out.
Grab your new mount, and set it in place in the bracket. The side with the mounting holes should go toward the bracket. That little rubber stopper thing has a metal peg on it that should be in contact with the bracket. The one in the picture is not in the right place, because I loosened the bolt right away and forgot to take a picture. It should be rotated about 100 degrees clockwise from my picture.
Put the pass-through bolt back in, and tighten it up. You don't want this super tight. There should still be a little play that lets the mount spin in the bracket.
Now you get to do the annoying part.
This next bit made me feel like a frustrated toddler shoving a rectangle puzzle piece into a square slot, but with a better vocabulary of curse words. I had to take a break and come back to it. I will try to save you the trouble I had. Shove the assembly in mount-first. Mount side first. Do it.
I tried bracket-first, because it is thinner and easier to maneuver in the tight spaces. I thought it would be easier to rotate in the cramped space if I had that thin part in first. I was wrong, Shove the mount end through first, and save yourself some rage. It's harder to get into place at first, but then it just works.
With the assembly in place, put the bracket bolts in first. Again, I recommend doing the bolts finger-tight at first, all three, then finishing with the ratchet. I couldn't fit my torque wrench here, either. Just make them snug, and don't over-tighten!
Next, line up the mount with the mounting holes, and finger-tighten them to line them up.
*One video I watched said to do these bolts after letting your engine down off the jack, but I am not comfortable doing that. I'd rather line it up when I don't have to move the weight of the engine.
With those bolts in place, double check the three mounts you've replaced so far. Make sure they are all bolted on. When you are satisfied that you didn't screw anything up, drop the jack and lower the engine.
Now, you can tighten those bolts under the rear mount to the suggested torque spec. 47 lb/ft again? I'm not sure. Re-hang the exhaust pipe, and bolt it back into the manifold, if you took it off. Three down, one to go!
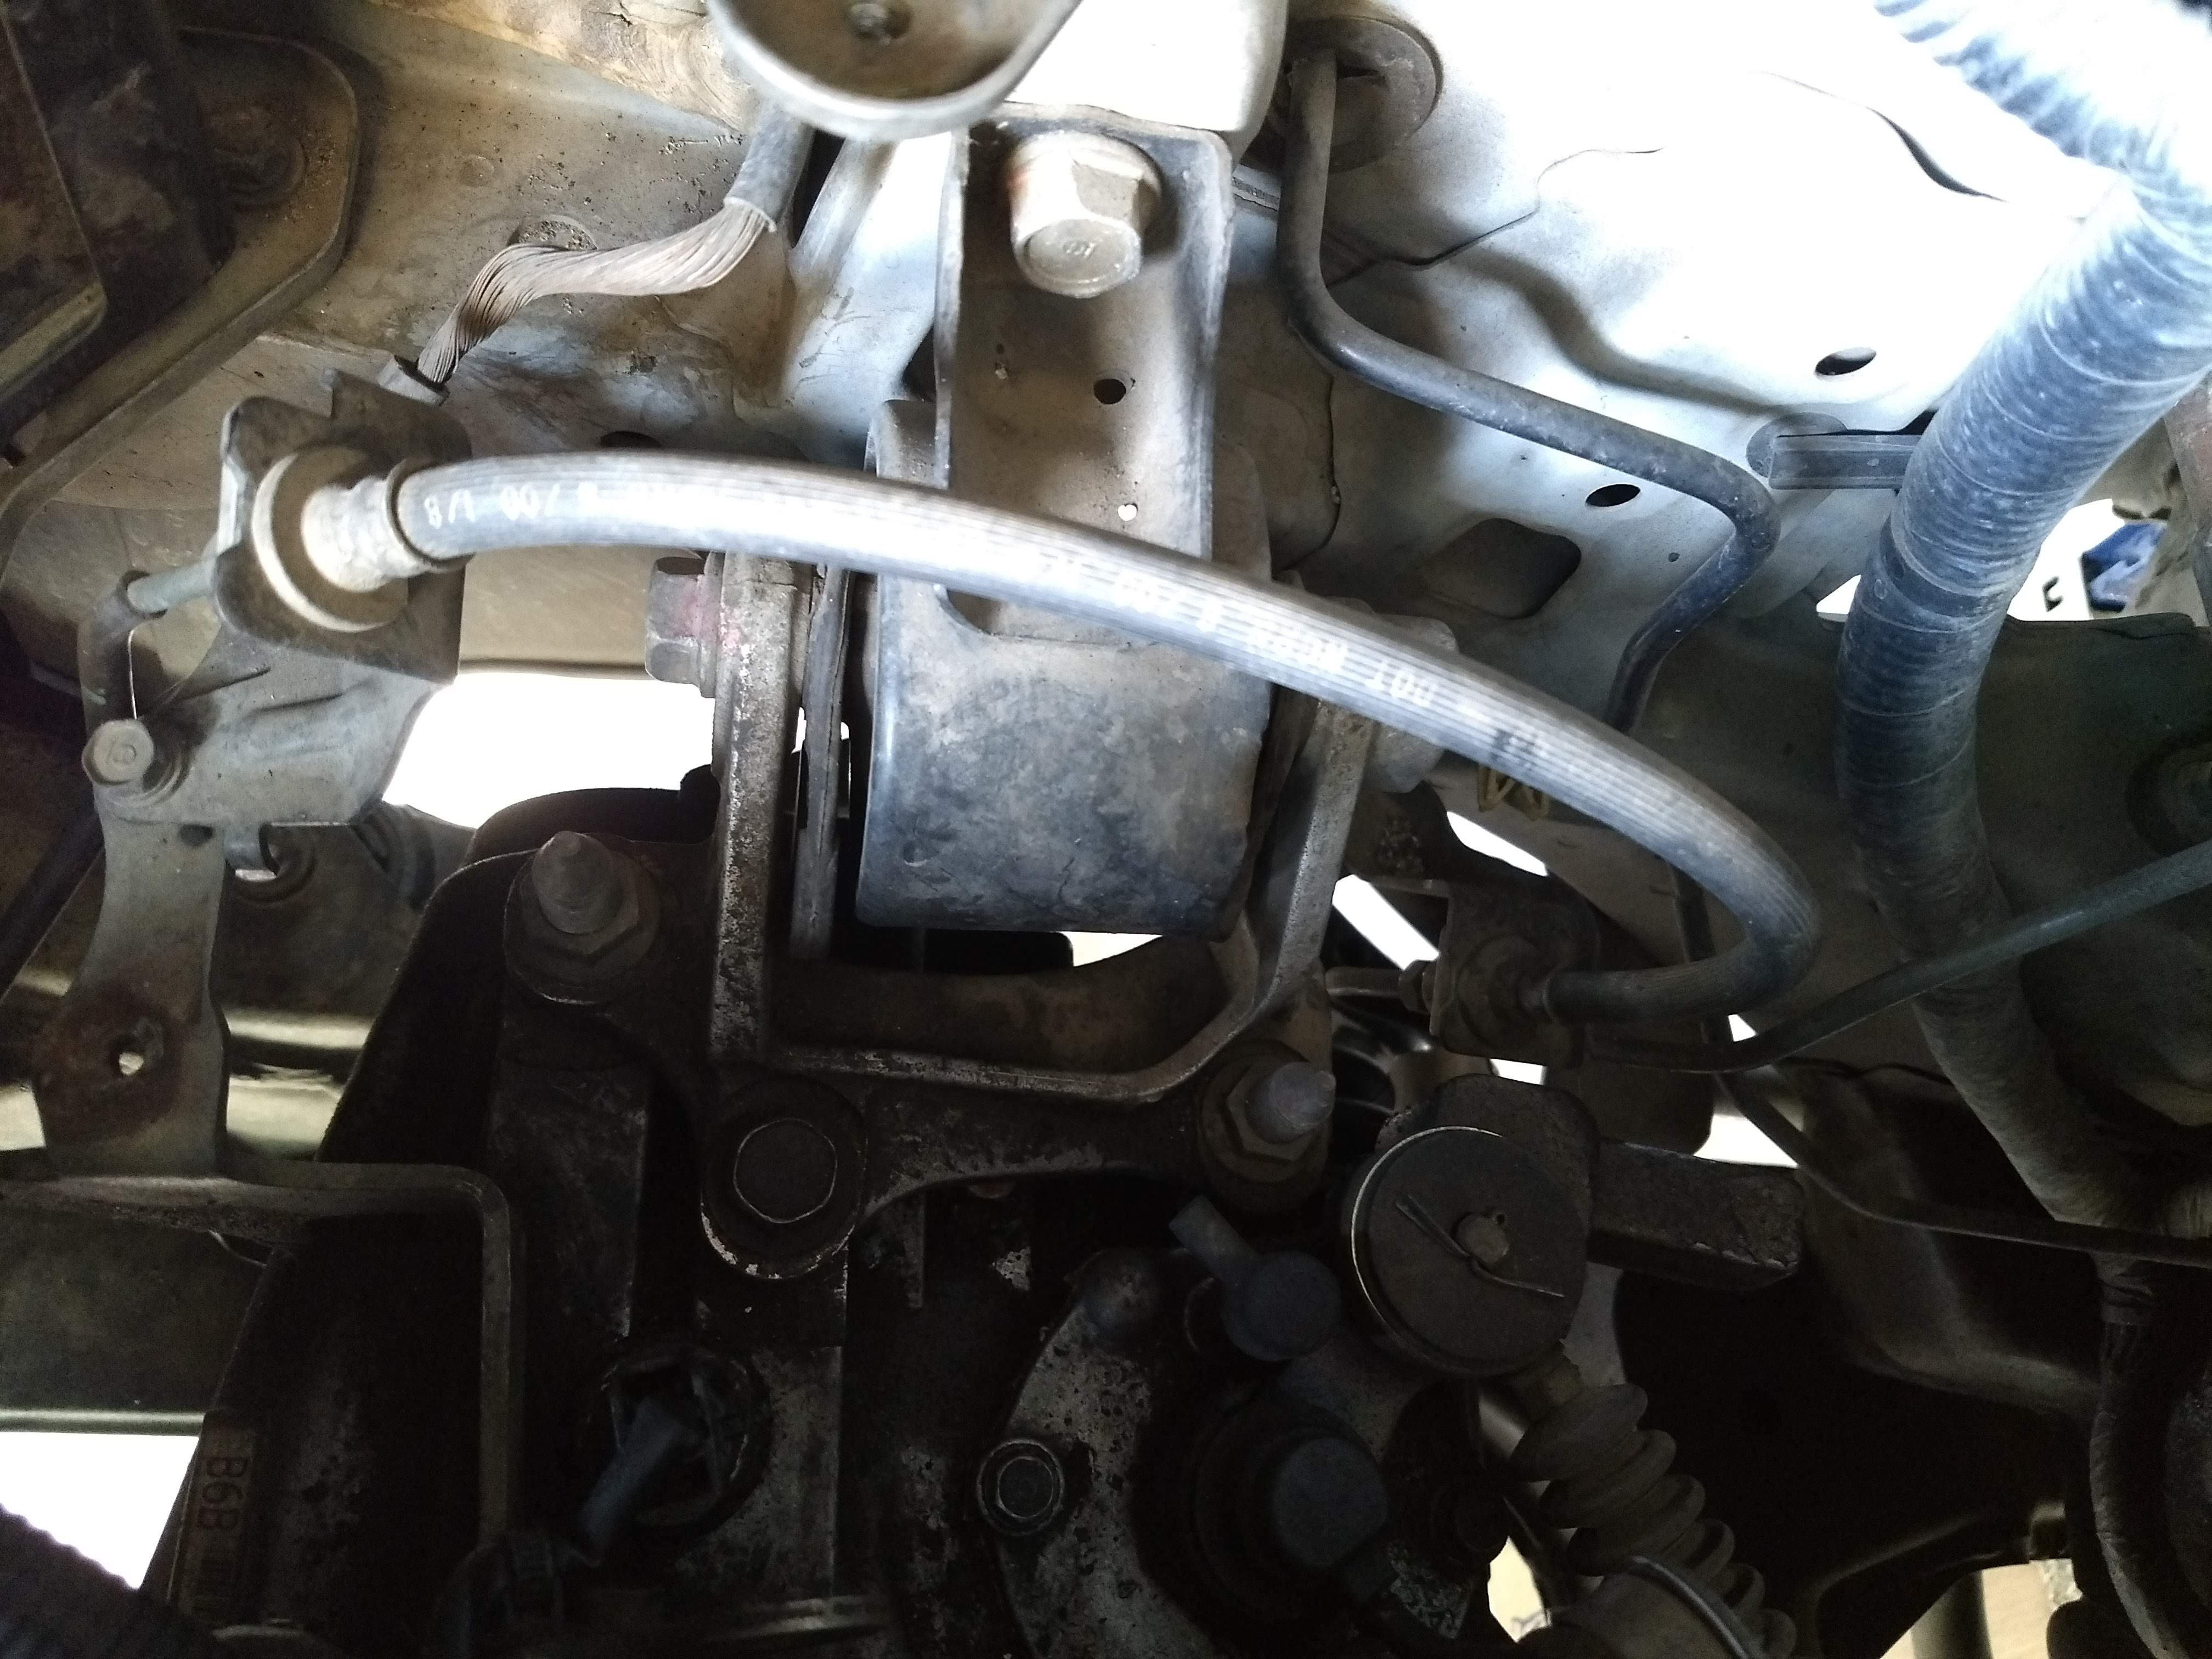
The last one is the transmission mount. Remember how you propped up the engine with a block of wood between your jack and your oil pan? Now you get to do that, but on your transmission case instead of your oil pan!
Support your transmission using a block of wood on your floor jack, and lift it just a little bit.
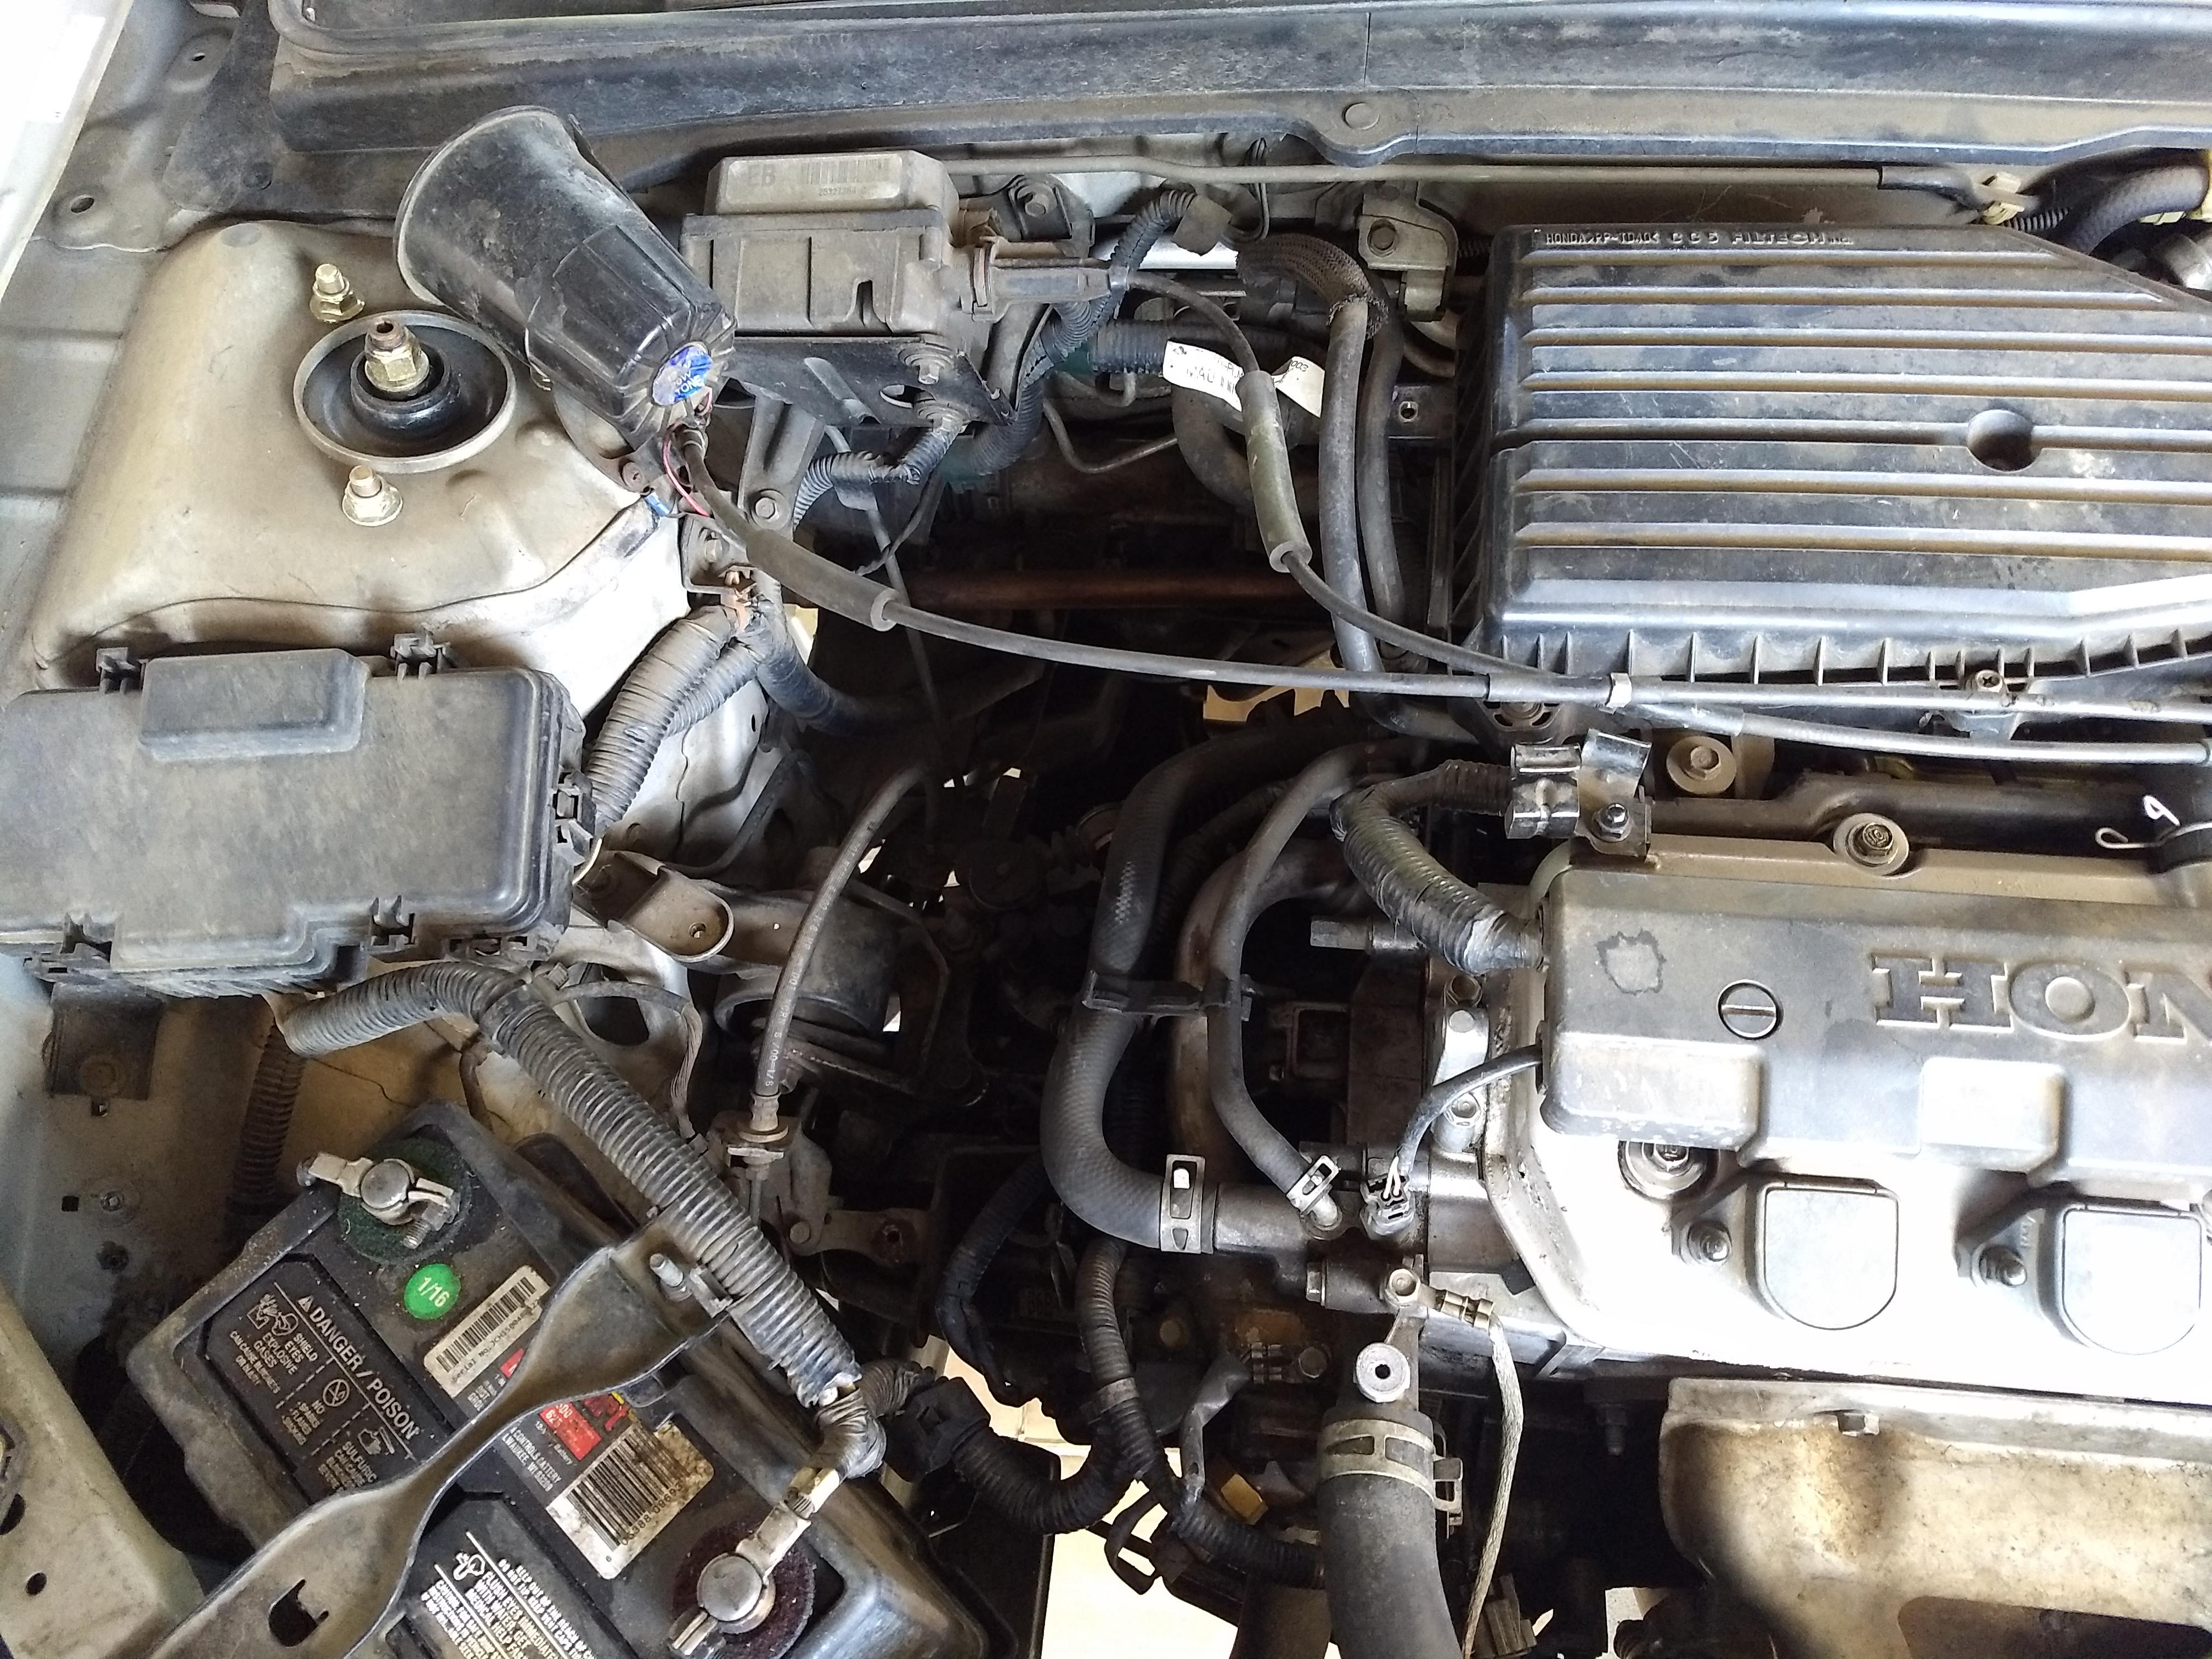
Next, remove your air box. It's that big black thing between your engine and the passenger side of the car:

There are six 10mm bolts holding it in place. Two are right by the air cleaner housing. One is just above a radiator hose. One is down a little lower, and between your battery and the air intake hose thing. One is kinda between your fuse box and that air intake hose. The last is on the left in the picture, on the outside of the air intake tube thing. I ended up removing the zip-tie clip thing from the air intake so I could pull it out.
Air box removed:
The transmission mount is on the left side wall in that pic.
Here is another angle:
For this one, try to take out the pass-through bolt first. You won't get it all the way, but take it out as much as you can. It's a 17mm bolt. I had to use a wrench on this one, because there isn't much clearance for a ratchet. ***If you have a pass-through ratchet or ratcheting wrench, or some other low-profile ratchet thing, this is a great time to use it!***
When you get it loose, take off the two 17mm nuts and the 17mm bolt for the transmission bracket. That will let you move the bracket and remove that pass-through bolt from the mount.
I had a slight problem on this next part, but it was easily fixed. My transmission mount bracket wouldn't come off with the mount in place, but I couldn't reach the lower right mount bolt with the bracket in place. I solved it by taking out the top mount bolt and the lower left mount bolt, and pivoting and wiggling the bracket off of the studs. Then, I was able to reach the last 17mm mount bolt, and remove the mount.
Putting the new one in was easier. Start with the bottom right bolt in the mount:

And leave it in loose, so the mount can spin on it. Slide the bracket over the studs, then tighten that lower mount bolt down. You'll have to hold the bracket up to reach the mount bolt.
Next, put in the other two mount bolts. Tighten them down until snug, and slide the pass-through bolt into place. Finger-tighten this bolt a little, but just to keep it in place.
Next, lift the transmission with your floor jack until the bottom of the transmission bracket touches the top of the transmission case. Then, tighten the nuts on the bracket, Again, I don't know the torque specs, but you should probably look them up. I'm going to guess 47lb/ft again...
Tighten the pass-through bolt. I couldn't fit my torque wrench here, either, so I just made it snug. Don't over-tighten! If you strip it now, you'll ruin your perfect run on this project!
Put the air box back in. It was easier for me to start at the air cleaner housing, and put that fat hose on first, then wiggle it into place. Secure it with those six 10mm bolts you took off earlier. Push that zip-tie clip back into place. Sigh in relief.
Lower the transmission with the floor jack. Take the car off of the jack stands. Start the car and take it for a little test drive.
Go buy food or beer or whatever and celebrate a job well done.
After replacing my mounts, my car doesn't shave hard on starting. It got rid of a rattle from my rear deck, and sound a lot quieter in the front. I just hope these third party mounts last a few years!
I hope this guide helps! I also hope the professionals in the audience call me out on things I did terribly wrong, so I can edit the DIY!
If you read the thread title, you'd know that this is a DIY for a 2001 Civic LX Coupe. My car doesn't have some of the fancy things that get in the way, like an ABS whatsitmabob, so if yours does, go watch a youtube video with your car. I'd also recommend watching a youtube video or two before you start anyway, because that helped me know what I was getting into and what I'd be looking for. I also have a manual transmission, so again, yours might look different. Hopefully, it looks cleaner...
If you don't want to do all 4 mounts at once, there are ways to diagnose which ones need replacing without removing them. You could also take the car to a mechanic and have them diagnose it. My Civic just passed 200k miles, and I know the previous owner never replaced the mounts, so I did them all. The front and front left have needed to be replaced for awhile. The rear mount looked like it was going to be a problem soon enough. The transmission mount looked okay, but I don't know how well the 17 year old rubber affects mount performance after 200k miles.
Tools needed:
Ratchet with 10mm, 14mm, deep and regular 17mm sockets and extensions
17mm wrench
Jack and jackstands
Tools recommended:
Torque wrench
Parts needed: (Price quotes from hondaautomotiveparts.com)
Stopper, Front Engine - Honda (50840-S5A-010) $85.42
Rubber, Engine Side Mounting (Toukai) - Honda (50827-S5A-003) $172.33
Rubber, Rear Engine Mounting - Honda (50810-S5A-013) $56.76
Rubber Assembly, Transmission Mounting - Honda (50805-S5A-033) $88.41
I did not use OEM parts. If you want your car to last another 100k+ miles, and you have the money for quality parts, YOU should use OEM parts. I could not afford them when I did the job. Usually when I don't go OEM, I end up having to fix the same thing again. In this case, it was either use a non-OEM mount, or use a broken OEM mount, and I was sick of the rattling and shaking. I went with Beck/Arnley from Rockauto, because I had a coupon. They all fit, but we'll see how long they last!
The first thing you want to do is get your car on jack stands. Both passenger and driver side. I found out after that I could've used those drive-up ramps, but some models need to turn the wheels all the way to the left to take out the rear mount. Just use the freaking jackstands!
After that, support the engine from below. Put a piece of wood on your jack where it lifts the car, put it under the oil pan, and jack it up a bit. You aren't trying to move the engine! You're just trying to support it while you take off the mounts. I raised the jack until it made contact with the oil pan, then a tiny bit more.
Do the front, front left, and rear mounts first. You will want to move your jack to do the transmission mount, so knock these out before you need to move it!
The front left mount is easiest, in my opinion. Here it is:
Yours might have a big magical box on the right hand side. That's an ABS thing, and I don't have to deal with it. Ha-Ha, sucks to be you! The youtube videos I watched that had it made it look pretty easy to get out of the way. Go watch one of those if you need help!
That thing with the red lid is your power steering fluid reservoir. There's a metal tab you press as you pull it to get it off, Move it out of the way, but DON'T DISCONNECT THE HOSES! They have plenty of play, and you should be able to just set it to the side.
Now that that's moved, grab your deep 17mm socket and remove these three fat nuts holding that metal bracket to your mount and your other metal bracket with studs. This will reveal your front left engine mount a little more.
Remove the three 14mm bolts securing the mount, remove the mount, inspect for damage and wear. Mine was torn on the bottom, and the fluid had all leaked out. It had to go.
Grab your shiny new mount, slap it in, line up the mounting holes, and secure it with those three 14mm bolts.
Slide that metal bracket you took off over the studs and the top of your mount, and torque to 47 lb/ft. Double check that torque spec with a service manual. The top plate on my new mount pivoted slightly. Don't over-tighten, or it'll wear out prematurely.
Deal with your ABS thing if you need to, and click the power steering reservoir back into place. That's one done. NEXT!
I recommend the front mount next. It''s less annoying than the rear one. Here's how you see it from the top:
And from below:
Don't mess up those wires while you're in there! I took the lower one out of the little clip things, so I had more wiggle room with my ratchet.
Use your 17mm socket to remove the bolt that runs through the mount. Then, move under the car and get the 14mm bolt that secures the mount to the engine. I did this one first, because I didn't want the mount dropping on my face. You do you, though...
Remove the other two bolts from the top of the mount, where it secures to the engine. Pull out the mount and inspect for damage. Reuse it if it looks good.
The inside rubber of the mount should be fused to the metal outside. It should not come apart, like mine had:
Line up your new mount where the old one was. Screw in the bolt that passes through the mount first, but just a bit. Then, line up the mount and finger-tighten the bolts that secure it to the engine. Once they're in, tighten them with your ratchet. I couldn't fit my torque wrench in that space, so I just made them snug. DO NOT OVERTIGHTEN! Then, do the same with the bolt that passes through the mount. Again, DO NOT OVERTIGHTEN!
Clip your O2 sensor wire back in, if you moved it.
Cool, two done! Now it gets annoying. On to the REAR MOUNT!
The exhaust pipe blocks some of the bolts you need to remove. In the videos I watched, they got away with removing the pipe from the two rubber hanger things. I only had one of the rubber hanger things, and the pipe didn't droop low enough if I only took that off.
Here is what the hanger thing looks like, and hopefully yours is less filthy and oily:
The pipe hanger will slide right off.
If you find a second pipe hanger, great! I didn't, so I had to drop my exhaust pipe. I don't have a picture, but there are two spring-bolts connecting the exhaust pipe to the exhaust manifold. Just follow the big pipe toward the front of the car and you'll find them. Remove the spring bolts, and set the pipe on the ground. Now you have clearance to reach all the bolts you need to!
Here they are:
All three are 14mm bolts. Take them out!
Next, move on to these on the right:
Remove the three 17mm bolts on that bracket. One is above the CV axle boot, and the other two are easier to see.
Now, the bracket and rear engine mount will come out as one piece. Before you pull it out, look at how it fits in there. Pay attention to how you take it out. You've been warned.
I was able to pull mine out from the same position I removed them from, right under the car. You might not be so lucky. You might have to take it over to the driver's side front wheel well, with the wheels turned all the way to the left, and pull it out through there. You'll have to put it back in the same way you pulled it out.
When you get it out, it should look like this:
Get two 17mm sockets and ratchets, or just one ratchet and a 17mm wrench, and take out that pass-through bolt. The mount will come right out.
Grab your new mount, and set it in place in the bracket. The side with the mounting holes should go toward the bracket. That little rubber stopper thing has a metal peg on it that should be in contact with the bracket. The one in the picture is not in the right place, because I loosened the bolt right away and forgot to take a picture. It should be rotated about 100 degrees clockwise from my picture.
Put the pass-through bolt back in, and tighten it up. You don't want this super tight. There should still be a little play that lets the mount spin in the bracket.
Now you get to do the annoying part.
This next bit made me feel like a frustrated toddler shoving a rectangle puzzle piece into a square slot, but with a better vocabulary of curse words. I had to take a break and come back to it. I will try to save you the trouble I had. Shove the assembly in mount-first. Mount side first. Do it.
I tried bracket-first, because it is thinner and easier to maneuver in the tight spaces. I thought it would be easier to rotate in the cramped space if I had that thin part in first. I was wrong, Shove the mount end through first, and save yourself some rage. It's harder to get into place at first, but then it just works.
With the assembly in place, put the bracket bolts in first. Again, I recommend doing the bolts finger-tight at first, all three, then finishing with the ratchet. I couldn't fit my torque wrench here, either. Just make them snug, and don't over-tighten!
Next, line up the mount with the mounting holes, and finger-tighten them to line them up.
*One video I watched said to do these bolts after letting your engine down off the jack, but I am not comfortable doing that. I'd rather line it up when I don't have to move the weight of the engine.
With those bolts in place, double check the three mounts you've replaced so far. Make sure they are all bolted on. When you are satisfied that you didn't screw anything up, drop the jack and lower the engine.
Now, you can tighten those bolts under the rear mount to the suggested torque spec. 47 lb/ft again? I'm not sure. Re-hang the exhaust pipe, and bolt it back into the manifold, if you took it off. Three down, one to go!
The last one is the transmission mount. Remember how you propped up the engine with a block of wood between your jack and your oil pan? Now you get to do that, but on your transmission case instead of your oil pan!
Support your transmission using a block of wood on your floor jack, and lift it just a little bit.
Next, remove your air box. It's that big black thing between your engine and the passenger side of the car:
There are six 10mm bolts holding it in place. Two are right by the air cleaner housing. One is just above a radiator hose. One is down a little lower, and between your battery and the air intake hose thing. One is kinda between your fuse box and that air intake hose. The last is on the left in the picture, on the outside of the air intake tube thing. I ended up removing the zip-tie clip thing from the air intake so I could pull it out.
Air box removed:
The transmission mount is on the left side wall in that pic.
Here is another angle:
For this one, try to take out the pass-through bolt first. You won't get it all the way, but take it out as much as you can. It's a 17mm bolt. I had to use a wrench on this one, because there isn't much clearance for a ratchet. ***If you have a pass-through ratchet or ratcheting wrench, or some other low-profile ratchet thing, this is a great time to use it!***
When you get it loose, take off the two 17mm nuts and the 17mm bolt for the transmission bracket. That will let you move the bracket and remove that pass-through bolt from the mount.
I had a slight problem on this next part, but it was easily fixed. My transmission mount bracket wouldn't come off with the mount in place, but I couldn't reach the lower right mount bolt with the bracket in place. I solved it by taking out the top mount bolt and the lower left mount bolt, and pivoting and wiggling the bracket off of the studs. Then, I was able to reach the last 17mm mount bolt, and remove the mount.
Putting the new one in was easier. Start with the bottom right bolt in the mount:
And leave it in loose, so the mount can spin on it. Slide the bracket over the studs, then tighten that lower mount bolt down. You'll have to hold the bracket up to reach the mount bolt.
Next, put in the other two mount bolts. Tighten them down until snug, and slide the pass-through bolt into place. Finger-tighten this bolt a little, but just to keep it in place.
Next, lift the transmission with your floor jack until the bottom of the transmission bracket touches the top of the transmission case. Then, tighten the nuts on the bracket, Again, I don't know the torque specs, but you should probably look them up. I'm going to guess 47lb/ft again...
Tighten the pass-through bolt. I couldn't fit my torque wrench here, either, so I just made it snug. Don't over-tighten! If you strip it now, you'll ruin your perfect run on this project!
Put the air box back in. It was easier for me to start at the air cleaner housing, and put that fat hose on first, then wiggle it into place. Secure it with those six 10mm bolts you took off earlier. Push that zip-tie clip back into place. Sigh in relief.
Lower the transmission with the floor jack. Take the car off of the jack stands. Start the car and take it for a little test drive.
Go buy food or beer or whatever and celebrate a job well done.
After replacing my mounts, my car doesn't shave hard on starting. It got rid of a rattle from my rear deck, and sound a lot quieter in the front. I just hope these third party mounts last a few years!
I hope this guide helps! I also hope the professionals in the audience call me out on things I did terribly wrong, so I can edit the DIY!


"Marge, anyone could miss Canada! All tucked away down there."
Joined: Feb 2016
Posts: 9,654
Likes: 1,285
From: Barrie, ON Canada
Rep Power: 223 
Re: DIY: 01 LX Coupe Engine and Transmission Mounts
For what its worth I used Beck/Arnley balljoints on my old car and they seemed to hold up pretty well. I had bought that front mount but I wrote off the car before i was able to install it

Thread
Thread Starter
Honda Civic Forum
Replies
Last Post
cgriffin51
8th & 9th Generation Civic 2006 - 2015
2
Oct 31, 2015 03:43 PM
AngryHatchback
Mechanical Problems/Vehicle Issues and Fix-it Forum
3
Oct 3, 2012 10:52 PM
batman900
7th Generation Civic 2001 - 2005
2
Jul 8, 2009 04:55 PM

