
Weapon-R secret intake "sagging" fix


Thread Starter
Joined: Sep 2002
Posts: 51,241
Likes: 20
From: NV
Rep Power: 813 

Weapon-R secret intake "sagging" fix
Okay those who have this intake know it does not stand up very well due to the poor and flexible mount bracket. so what you need to do is make a new bracket that the filter clamp can sit on. I got a 4 inch metal with holes from meijer (like walmart) and some machine screws with washers and nuts. put the washer on both sides, put the screw in, and tighten by holding the nut on the bottom with wrench. you want the metal piece to be under the stub of the metal filter clamp. you may need to adjust your clamp so that this piece is at the bottom. this ensures your intake or rubber wont be scratched or torn over time. so far this has been working well for me.
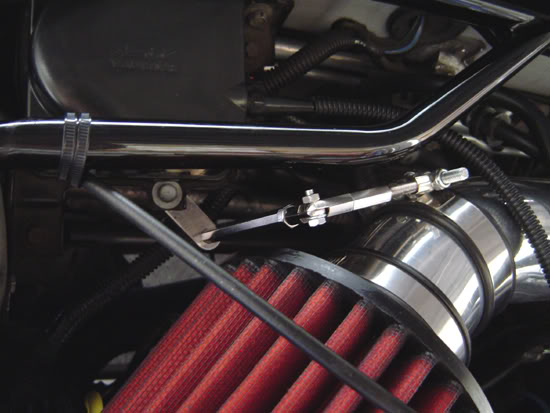
here is where i mounted the screw and bracket, to the cruise box where there was an open hole. you may have a wire harness here which can be easily pried off.


Here is where the bracket comes out on the other side, with the intake sitting on top of it. the really shiny piece is the bracket.


Okay! once you tighten the bracket, the intake should be sitting about an inch higher or more. nice and straight!
here is where i mounted the screw and bracket, to the cruise box where there was an open hole. you may have a wire harness here which can be easily pried off.
Here is where the bracket comes out on the other side, with the intake sitting on top of it. the really shiny piece is the bracket.
Okay! once you tighten the bracket, the intake should be sitting about an inch higher or more. nice and straight!
Joined: Jul 2002
Posts: 13,151
Likes: 3
From: Washington DC
Rep Power: 425 HELL YES! Ghettofabulous and effective.
Suggestion for a less ghetto fix... Do the same thing with a strip of aluminum and a TIG welder. While that works now... don't forget the motor rocks back and forth and vibrates. If that wiggles out of place, you're filter is doomed. For a temporary further ghetto fix.... wrap the end of that plate with electric tape, or better yet, wrap the plate and the intake with tape so they hold together in the orientation you want them in.
Suggestion for a less ghetto fix... Do the same thing with a strip of aluminum and a TIG welder. While that works now... don't forget the motor rocks back and forth and vibrates. If that wiggles out of place, you're filter is doomed. For a temporary further ghetto fix.... wrap the end of that plate with electric tape, or better yet, wrap the plate and the intake with tape so they hold together in the orientation you want them in.
Thread Starter
Joined: Sep 2002
Posts: 51,241
Likes: 20
From: NV
Rep Power: 813 the beauty is the intake wont move left to right so it will not fall off. i've tested this by driving fast around corners and up hills. still sits right on there. oh yea too bad i dont know any TIG welder or i would just get it fastened permanently. still works.

i found a place to mount that plate u gave me gear. i still had that bracket on the passenger side below the fusebox for the air filter resonator box. i put the plate ontop of it and it is holding up the filter. ill try to snap a pic. its kind of a ghetto rig but still works. only thing im worried about is that if the plate slips and gashs the filter. hopefully it doesnt.
^will do. actually ill do it now give me a few minz to snap it and post it.
was pretty damn easy as u can see and holds it up pretty well. it would sag alot more than that


was pretty damn easy as u can see and holds it up pretty well. it would sag alot more than that
Last edited by crazyasian; Aug 19, 2006 at 06:50 PM.
oh its pretty damn sweet. i love how its quite at some speeds and has that extra umph that the k&n typhoon didnt have. its helluva lot quieter than the damn typhoon but still kinda loud. exellent power at high cruising speeds. the sound is crazy. doesnt sound so ricey as the typhoon. bar none this one rocks.


im trying to think of a way to raise the intake a bit more b.c it still is sagging and was thinking of bending the bracket in the middle so that it sorta becomes like this: ___/----- so it has a step and the step would b under the filter raising it a bit. wonder if it would weaken it rather than helping?

Thread Starter
Joined: Sep 2002
Posts: 51,241
Likes: 20
From: NV
Rep Power: 813 Re: Weapon-R secret intake "sagging" fix
thought i would bump my 5 yr old thread lol. I can't believe i still have this intake. it is great in every way, and finally i was able to come up with a permanent fix for the mounting position. All i have left is to fix the iat wiring which is a bit rough since i did not know how to solder at the time.
parts bought from o-reilly auto:
spectre intake mounting bracket kit (universal) $6
spectre T-clamp (required for using above kit) $4
these are available from almost every auto store if you look in the rice section. sorry no pics of the boxes.
so after spending a few hrs trying to test and reason out a mounting design like legos, i finally found something that works really well. i will let the pics do most of the talking. the way this mount is made, you basically need to assemble it using studs and threaded spacers. the most important part is to make sure there is no wiggle when you tighten everything up. they give extra nuts to put inbetween parts if there is any movement. you want it to be one solid piece when youre done.
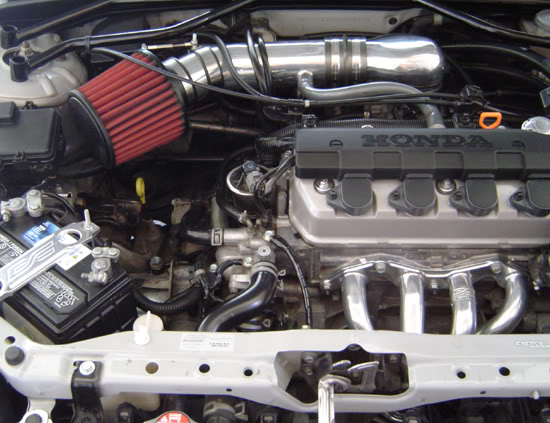
the beauty of this design is even tho everything is tight, there is still a good 1/2 inch of play in each direction to allow for intake movements when the engine is on. this is not looseness but rather a firm and sturdy soft mount to allow some flexing. the sagging is completely fixed (compare to above old pics in previous post) and im actually a bit worried about the evap line being so tight now with the intake pushing up on it. should be okay tho. i also added an aem dryflow filter so i wouldnt have to clean it as often.
i had to remove my neuspeed bar while working, and after finishing i realized the bar wouldnt fit so i had to move it again. most of the hardware has lock washers or nuts so i think this setup will work for a very long time. after reinstalling the neuspeed bar, i tied up the throttle cable so that it does not touch and ruin the filter (which sits very high and very close to the hood now. i looked inside and i dont think its actually touching the hood which is good. tightened the other connections and cut off a small part of the throttle body adapter so the other side sits lower and now i have a near perfectly mounted intake with no welded pieces that could break off.
the only fail i made was tightening the filter clamp before the bracket, so now i cannot remove the filter without either taking the neuspeed bar off or loosening the mount. oh well, hopefully that filter will not need as much attention since its a dry media.
i also decided to put the fuse box back to its original home since the dryflow filter has a closed top and doesnt need the airflow anymore. i am still thinking of some kind of custom fab heat shield to install above the auto trans to block heat from hitting the filter. but thats another project.
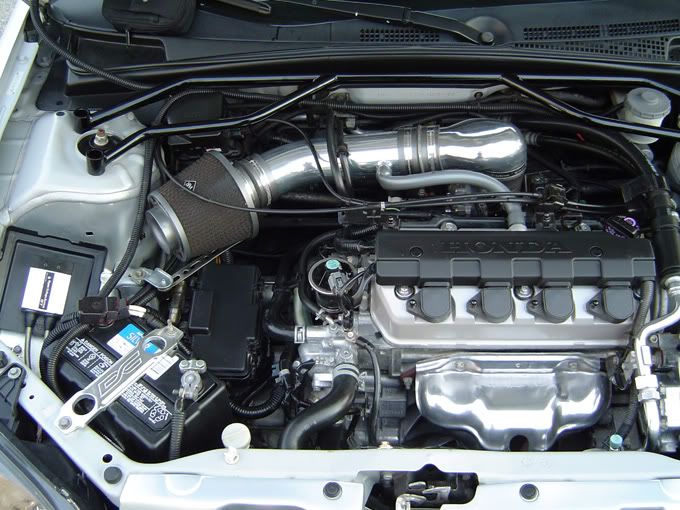
first pic shows the t-bracket mount on the elbow area with rubber grip, and the top of the bracket.

next pic shows a closeup (hard to see) where a long joint bends down to the cruise control bracket. i used a standard bolt with lock washer and nut from the bottom to hold the lower mount.
end result, a perfectly level and secure intake
parts bought from o-reilly auto:
spectre intake mounting bracket kit (universal) $6
spectre T-clamp (required for using above kit) $4
these are available from almost every auto store if you look in the rice section. sorry no pics of the boxes.
so after spending a few hrs trying to test and reason out a mounting design like legos, i finally found something that works really well. i will let the pics do most of the talking. the way this mount is made, you basically need to assemble it using studs and threaded spacers. the most important part is to make sure there is no wiggle when you tighten everything up. they give extra nuts to put inbetween parts if there is any movement. you want it to be one solid piece when youre done.
the beauty of this design is even tho everything is tight, there is still a good 1/2 inch of play in each direction to allow for intake movements when the engine is on. this is not looseness but rather a firm and sturdy soft mount to allow some flexing. the sagging is completely fixed (compare to above old pics in previous post) and im actually a bit worried about the evap line being so tight now with the intake pushing up on it. should be okay tho. i also added an aem dryflow filter so i wouldnt have to clean it as often.
i had to remove my neuspeed bar while working, and after finishing i realized the bar wouldnt fit so i had to move it again. most of the hardware has lock washers or nuts so i think this setup will work for a very long time. after reinstalling the neuspeed bar, i tied up the throttle cable so that it does not touch and ruin the filter (which sits very high and very close to the hood now. i looked inside and i dont think its actually touching the hood which is good. tightened the other connections and cut off a small part of the throttle body adapter so the other side sits lower and now i have a near perfectly mounted intake with no welded pieces that could break off.
the only fail i made was tightening the filter clamp before the bracket, so now i cannot remove the filter without either taking the neuspeed bar off or loosening the mount. oh well, hopefully that filter will not need as much attention since its a dry media.
i also decided to put the fuse box back to its original home since the dryflow filter has a closed top and doesnt need the airflow anymore. i am still thinking of some kind of custom fab heat shield to install above the auto trans to block heat from hitting the filter. but thats another project.
first pic shows the t-bracket mount on the elbow area with rubber grip, and the top of the bracket.
next pic shows a closeup (hard to see) where a long joint bends down to the cruise control bracket. i used a standard bolt with lock washer and nut from the bottom to hold the lower mount.
end result, a perfectly level and secure intake
Thread Starter
Joined: Sep 2002
Posts: 51,241
Likes: 20
From: NV
Rep Power: 813 Re: Weapon-R secret intake "sagging" fix
oh and btw, this fix only works with the 3 inch weapon-r intake tube. the kit will not work with 2.5 inch intakes.
Thread Starter
Joined: Sep 2002
Posts: 51,241
Likes: 20
From: NV
Rep Power: 813 Re: Weapon-R secret intake "sagging" fix
over 6 months later the fix is holding up nicely. and after a year the aem dryflow filter is nowhere near dirty enough to need cleaning.

Re: Weapon-R secret intake "sagging" fix
I'm sorry for posting in a thread as old as dinosaur poo but I just installed my new Secret Weapon yesterday. It's quite the discreet monster, but the included mounting bracket is completely useless. Gearbox's mounting bracket fix worked for me, however since the engine bay in my manual '03 EX is a bit different (not to mention dirtier!), I had to mount it differently.
I've been living on these forums for the past month now and this is my way of paying it forward for some poor newbie like me. Thanks everyone!
Here's the Spectre mounting kit (part 8703) and the 3" bracket (part 8701). I paid about ten bucks for the whole thing at O'Reillys.

Here's where I had it mounted to the cruise control box. I used an existing bolt to keep it on. It was a bit of a pain to get it tight, but eventually I prevailed!

Here's a close-up of my bracket configuration.

Here's the whole thing! The bracket doesn't look too bad! There's a bit of wiggle room like Gearbox said, but it seems sturdy enough and it doesn't sag anymore!

Oh, make sure you get some nice clamps and an S-shaped tube for the PCV as well! I just brought the WR tube into the store and the guy found what I was looking for! I'm definitely gonna clean the engine bay out next! Happy modding guys!
I've been living on these forums for the past month now and this is my way of paying it forward for some poor newbie like me. Thanks everyone!
Here's the Spectre mounting kit (part 8703) and the 3" bracket (part 8701). I paid about ten bucks for the whole thing at O'Reillys.
Here's where I had it mounted to the cruise control box. I used an existing bolt to keep it on. It was a bit of a pain to get it tight, but eventually I prevailed!
Here's a close-up of my bracket configuration.
Here's the whole thing! The bracket doesn't look too bad! There's a bit of wiggle room like Gearbox said, but it seems sturdy enough and it doesn't sag anymore!
Oh, make sure you get some nice clamps and an S-shaped tube for the PCV as well! I just brought the WR tube into the store and the guy found what I was looking for! I'm definitely gonna clean the engine bay out next! Happy modding guys!
Last edited by Poopies; Jul 10, 2013 at 06:13 PM.

Thread
Thread Starter
Honda Civic Forum
Replies
Last Post
ZeroDegreze
Mechanical Problems/Vehicle Issues and Fix-it Forum
0
Jun 17, 2015 11:10 PM

