2006 Honda Civic Exhaust Flange Repair
 01-16-2015
#1
Registered!!
Thread Starter

Join Date: Oct 2009
Posts: 5
Likes: 0
Received 0 Likes
on
0 Posts
Rep Power: 0 
2006 Honda Civic Exhaust Flange Repair
Hello to all,
I just finished replacing a broken / rusted exhaust flange on my 2006 Honda Civic EX Sedan. I had a hard time finding a repair kit so I wanted to share with you what I found in the hopes that it will save someone else a few headaches.
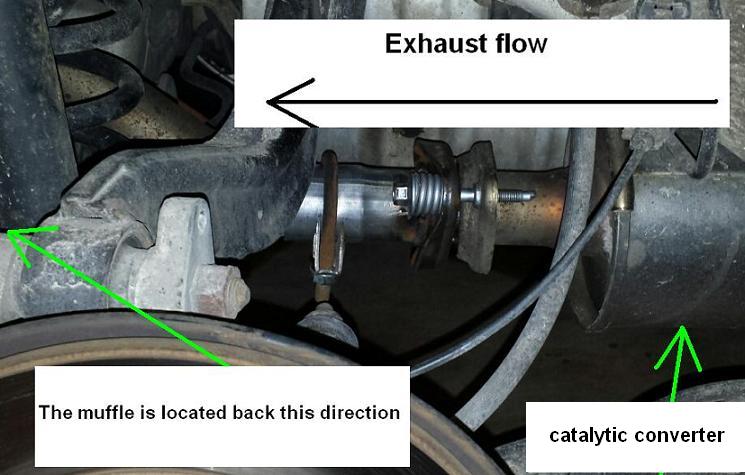
Problem: The exhaust flange on the muffler side of the joint located between the muffler and the catalytic converter failed (i.e., rusted in two). The rest of the components in the system (muffler, pipes, cat converter) were still in great shape. NOTE: The exhaust pipe is 1.75" O.D.
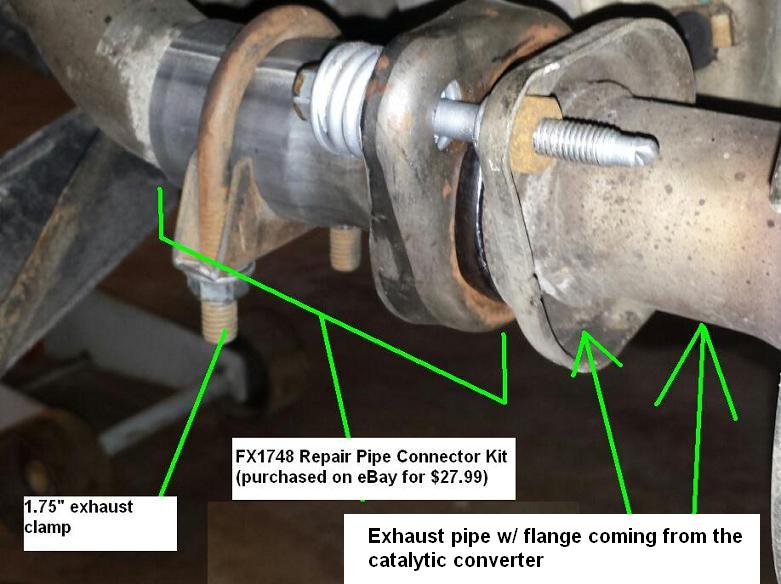
Parts Needed: FX1748 Repair Pipe Connector Kit ($27.95 on eBay) and a 1.75" exhaust clamp ($2.99 at auto parts store). That's it - just two parts!!! NOTE: The FX1748 repair kit states that it is for a Subaru. However, it worked perfectly for me except for the fact that I had to reuse my existing flange bolts & springs (the bolts that came with the kit have a different thread than what Honda uses).
Tools needed: WD-40, Hack Saw, metal file, chisel (or flat screwdriver), 9/16" wrench/socket, 12mm wrench/socket, safety glasses, jack, jack stands.
Step 1: Jack up the rear of the car and put jack stands in place for safety purposes.
Step 2: Remove the passenger side rear tire. This will make it much easier to get at things and see what you are doing.
Step 3: Soak the bolts and springs that connected the old flanges together with WD-40 or something similar. Carefully remove the bolts and springs so that you can use them for the replacement flange. NOTE: If your exhaust is completely rusted in two like mine was, do Step 4 first and then come back to Step 3...it will be easier that way.
Step 4: Remove the muffler assembly. You will need to disconnect the rubber hanger located at the back end of the muffler.
Step 5: With a chisel, carefully chip away all of the rusted remnants of the old graphite gasket that will be surrounding a short piece of exhaust pipe sticking out past the flange that is coming from the catalytic converter which is still on the car. NOTE: Be careful...this short piece of exhaust pipe may be fragile and easily damaged due to rust.
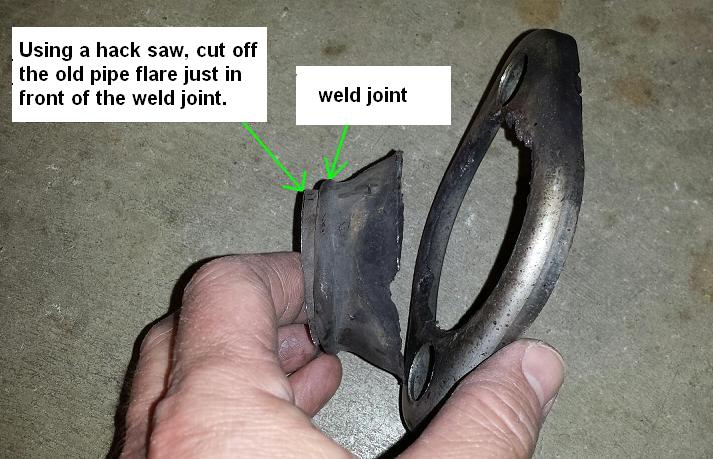
Step 6: On the muffler assembly, use a hack saw to cut off the remnants of the old pipe flare just behind the weld joint (see photo)
Step 7: After the old pipe flare is cut off, file the burrs and then slip the repair flange from the FX1748 kit over the exhaust pipe. The old exhaust pipe may be a little out of round so you might need to squeeze it with pliers in order to get the new flange to slip over it. NOTE: Do not put on the exhaust clamp yet...you will need to be able to rotate the flange in order to get it into the correct position once you get everything mounted again.
Step 8: Put the new graphite gasket onto the short piece of exhaust pipe coming from the catalytic converter.
Step 9: Put the muffler assembly back under the car and put the rubber hanger back into place.
Step 10: Slip the new flange over the graphite flange gasket and line up the holes in your new flange with the threaded holes in the mating flange. Put the flange bolts & springs back in place and tighten them up.
Step 11: Get behind the car and rotate the muffler so that the tip of the muffler is centered in the little contour of the bumper.
Step 12: Put on the exhaust clamp and tighten securely.
Step 13: Put the tire back on, remove the jack stands, lower the car and congratulate yourself on a job well done!
I just finished replacing a broken / rusted exhaust flange on my 2006 Honda Civic EX Sedan. I had a hard time finding a repair kit so I wanted to share with you what I found in the hopes that it will save someone else a few headaches.
Problem: The exhaust flange on the muffler side of the joint located between the muffler and the catalytic converter failed (i.e., rusted in two). The rest of the components in the system (muffler, pipes, cat converter) were still in great shape. NOTE: The exhaust pipe is 1.75" O.D.
Parts Needed: FX1748 Repair Pipe Connector Kit ($27.95 on eBay) and a 1.75" exhaust clamp ($2.99 at auto parts store). That's it - just two parts!!! NOTE: The FX1748 repair kit states that it is for a Subaru. However, it worked perfectly for me except for the fact that I had to reuse my existing flange bolts & springs (the bolts that came with the kit have a different thread than what Honda uses).
Tools needed: WD-40, Hack Saw, metal file, chisel (or flat screwdriver), 9/16" wrench/socket, 12mm wrench/socket, safety glasses, jack, jack stands.
Step 1: Jack up the rear of the car and put jack stands in place for safety purposes.
Step 2: Remove the passenger side rear tire. This will make it much easier to get at things and see what you are doing.
Step 3: Soak the bolts and springs that connected the old flanges together with WD-40 or something similar. Carefully remove the bolts and springs so that you can use them for the replacement flange. NOTE: If your exhaust is completely rusted in two like mine was, do Step 4 first and then come back to Step 3...it will be easier that way.
Step 4: Remove the muffler assembly. You will need to disconnect the rubber hanger located at the back end of the muffler.
Step 5: With a chisel, carefully chip away all of the rusted remnants of the old graphite gasket that will be surrounding a short piece of exhaust pipe sticking out past the flange that is coming from the catalytic converter which is still on the car. NOTE: Be careful...this short piece of exhaust pipe may be fragile and easily damaged due to rust.
Step 6: On the muffler assembly, use a hack saw to cut off the remnants of the old pipe flare just behind the weld joint (see photo)
Step 7: After the old pipe flare is cut off, file the burrs and then slip the repair flange from the FX1748 kit over the exhaust pipe. The old exhaust pipe may be a little out of round so you might need to squeeze it with pliers in order to get the new flange to slip over it. NOTE: Do not put on the exhaust clamp yet...you will need to be able to rotate the flange in order to get it into the correct position once you get everything mounted again.
Step 8: Put the new graphite gasket onto the short piece of exhaust pipe coming from the catalytic converter.
Step 9: Put the muffler assembly back under the car and put the rubber hanger back into place.
Step 10: Slip the new flange over the graphite flange gasket and line up the holes in your new flange with the threaded holes in the mating flange. Put the flange bolts & springs back in place and tighten them up.
Step 11: Get behind the car and rotate the muffler so that the tip of the muffler is centered in the little contour of the bumper.
Step 12: Put on the exhaust clamp and tighten securely.
Step 13: Put the tire back on, remove the jack stands, lower the car and congratulate yourself on a job well done!
Last edited by sthpawil; 01-16-2015 at 04:21 PM. Reason: Mis-identified the catalytic converter as a mid-muffler
 01-16-2015
#2
Registered!!
Join Date: Nov 2014
Location: Bedford, TX
Posts: 214
Likes: 0
Received 1 Like
on
1 Post
Rep Power: 118 
Re: 2006 Honda Civic Exhaust Flange Repair
Hello to all,
I just finished replacing a broken / rusted exhaust flange on my 2006 Honda Civic EX Sedan. I had a hard time finding a repair kit so I wanted to share with you what I found in the hopes that it will save someone else a few headaches.
Problem: The exhaust flange on the muffler side of the joint located between the muffler and the catalytic converter failed (i.e., rusted in two). The rest of the components in the system (muffler, pipes, cat converter) were still in great shape. NOTE: The exhaust pipe is 1.75" O.D.
Parts Needed: FX1748 Repair Pipe Connector Kit ($27.95 on eBay) and a 1.75" exhaust clamp ($2.99 at auto parts store). That's it - just two parts!!! NOTE: The FX1748 repair kit states that it is for a Subaru. However, it worked perfectly for me except for the fact that I had to reuse my existing flange bolts & springs (the bolts that came with the kit have a different thread than what Honda uses).
Tools needed: WD-40, Hack Saw, metal file, chisel (or flat screwdriver), 9/16" wrench/socket, 12mm wrench/socket, safety glasses, jack, jack stands.
Step 1: Jack up the rear of the car and put jack stands in place for safety purposes.
Step 2: Remove the passenger side rear tire. This will make it much easier to get at things and see what you are doing.
Step 3: Soak the bolts and springs that connected the old flanges together with WD-40 or something similar. Carefully remove the bolts and springs so that you can use them for the replacement flange. NOTE: If your exhaust is completely rusted in two like mine was, do Step 4 first and then come back to Step 3...it will be easier that way.
Step 4: Remove the muffler assembly. You will need to disconnect the rubber hanger located at the back end of the muffler.
Step 5: With a chisel, carefully chip away all of the rusted remnants of the old graphite gasket that will be surrounding a short piece of exhaust pipe sticking out past the flange that is coming from the catalytic converter which is still on the car. NOTE: Be careful...this short piece of exhaust pipe may be fragile and easily damaged due to rust.
Step 6: On the muffler assembly, use a hack saw to cut off the remnants of the old pipe flare just behind the weld joint (see photo)
Step 7: After the old pipe flare is cut off, file the burrs and then slip the repair flange from the FX1748 kit over the exhaust pipe. The old exhaust pipe may be a little out of round so you might need to squeeze it with pliers in order to get the new flange to slip over it. NOTE: Do not put on the exhaust clamp yet...you will need to be able to rotate the flange in order to get it into the correct position once you get everything mounted again.
Step 8: Put the new graphite gasket onto the short piece of exhaust pipe coming from the catalytic converter.
Step 9: Put the muffler assembly back under the car and put the rubber hanger back into place.
Step 10: Slip the new flange over the graphite flange gasket and line up the holes in your new flange with the threaded holes in the mating flange. Put the flange bolts & springs back in place and tighten them up.
Step 11: Get behind the car and rotate the muffler so that the tip of the muffler is centered in the little contour of the bumper.
Step 12: Put on the exhaust clamp and tighten securely.
Step 13: Put the tire back on, remove the jack stands, lower the car and congratulate yourself on a job well done!
 10-17-2022
#4
Registered!!

Re: Fixing 2006 Civic muffler pipe...again
moderator note: Copied from this post
Hi,
THe fx1748 kit is mild steel.
To answer the previous helper the welding people you cant weld SS T304 OEM exhaust to Mild Steel.
Your original exhaust from Honda is Stainless Steel T304 .
I also ran into this and the FX1748 rusted in one winter to completely brake off.
The company closed and ran so it wont offer warranty.
The fix is SS same type kit .
After long search I found one.
Bear River Converter sells SS parts that can work.
BRC8175SS joint
BC175SS Stainless high quality clamp.
These parts only cost 10-15 dollar more than that FX1748 cheap mild steel crap.
If I knew this a year ago, I would not be dong the job twice.
These parts are T304 Stainless Steel like the OEM exhaust.
NOTE:
1) The exhaust gasket on the new kit 1/8 bigger on that kit so I just used JB weld high temp to close the gap.
Worked well.
Or you can just buy exhaust donut Honda OEM. It will be exact fit.
2) I reused Hondas Spring bolts since the nut I didn't have to break off the other side from the resonator.
The kit comes with SAE Standard bolts not metric. You can do it both ways.
3) this repair T304 SS will last as original exhaust close to 10 yr


 10-17-2022
#6
Registered!!
Re: Fixing 2006 Civic muffler pipe...again
I haven't been on the forum in ages.. Where Is EZONE.. Is he alive?
Someone should sticky this repair and rewrite it .. It makes you keep your high quality muffler OEM ..
The **** the muffler shops sell now is not T304 Stainless Steel. Wont last 1-2 years in the Snow belt.
Keep your original OEM muffle and dont do this job twice with cheap mild steel **** FX kit.
Or get a Monroe Muffler cheap mild steel muffler.
You will be doing it twice .. trust me.

Thread
Thread Starter
Honda Civic Forum
Replies
Last Post
nbpEMCivic
Mechanical Problems/Vehicle Issues and Fix-it Forum
4
01-06-2003 09:06 PM

