
DIY: Amplifier Gain Setting Tutorial

Thread Starter
Kenny the Ricer
iTrader: (1)
Joined: Oct 2009
Posts: 5,580
Likes: 0
From: In your trunk
Rep Power: 292 

DIY: Amplifier Gain Setting Tutorial
Bought a new amp and don't know how to set the gain/level?
This DIY is aimed to show you how to achieve the best sound out of your system, without distortion or clipping.
NUMBER 1 MISTAKE:
Do not use the bass boost on your amplifier
This causes heavy distortion and bass clipping, causing you to damage your speakers
Tools needed:
DMM (Digital Multi-Meter)
Screwdriver? (Maybe)
Blank CD
I would suggest adding some extra bass test songs, like "bass i love you" or "bass excursion test" on this CD to not waste the CD, and it must be on CD for best results
60Hz (-6dB) test tune
Can use 60Hz (-5dB) tune as well. Make sure that this file is not in MP3 or a compressed format, WMA works as well. Search online for a 60Hz (not sweep) test tune, put it in Audacity and change the amplification level to -6
Initial setup:
1. Set your all EQ settings on your HU to 0, turn loudness off, and any boosts off
2. Remove Speaker wire from amp, and attach DMM to where the speaker wires originally were, set DMM to AC Voltage
3. Set gain/level and bass boost to 0 on your amp
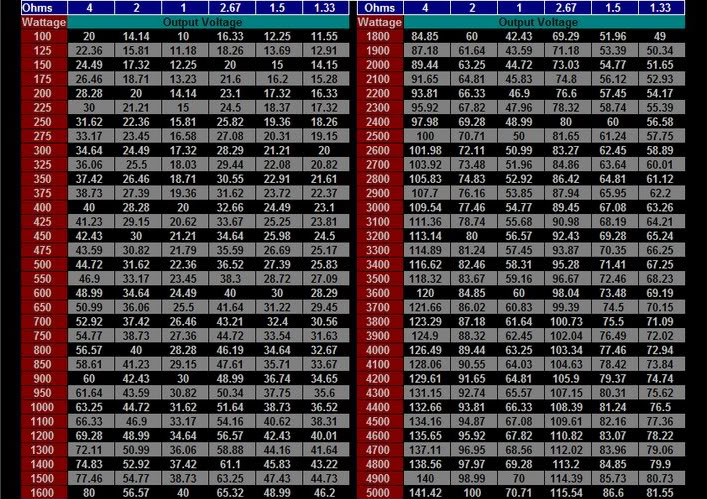
4. Determine the voltage you need to achieve by the following formula or chart (Make sure it's RMS and not peak power, you can find the specs of your amp online)
Or for those of you that hates math, use this chart
Process:
1. Put in your bass test tone CD into your HU
2. Select your 60Hz test tone, and set on repeat
3. Set volume to about 75%, or the max you will listen to (so if the max volume is 35, and you listen to about 20 at most, set it to 20)
4. Slowly raise the gain/level on your amp untill you reach the voltage previously determined. DO NOT RAISE BASS BOOST
5. If you aren't getting high enough voltage, raise the Subwoofer EQ on your headunit up to around 5 or 6, and adjust your Gain accordingly
Always set your DMM around .5V~1V lower than what it should be, to compensate for songs recorded at different levels
6. After everything is finished, you can return your regular EQ settings, but make sure Low is set to 0, because that would change the voltage that you just set
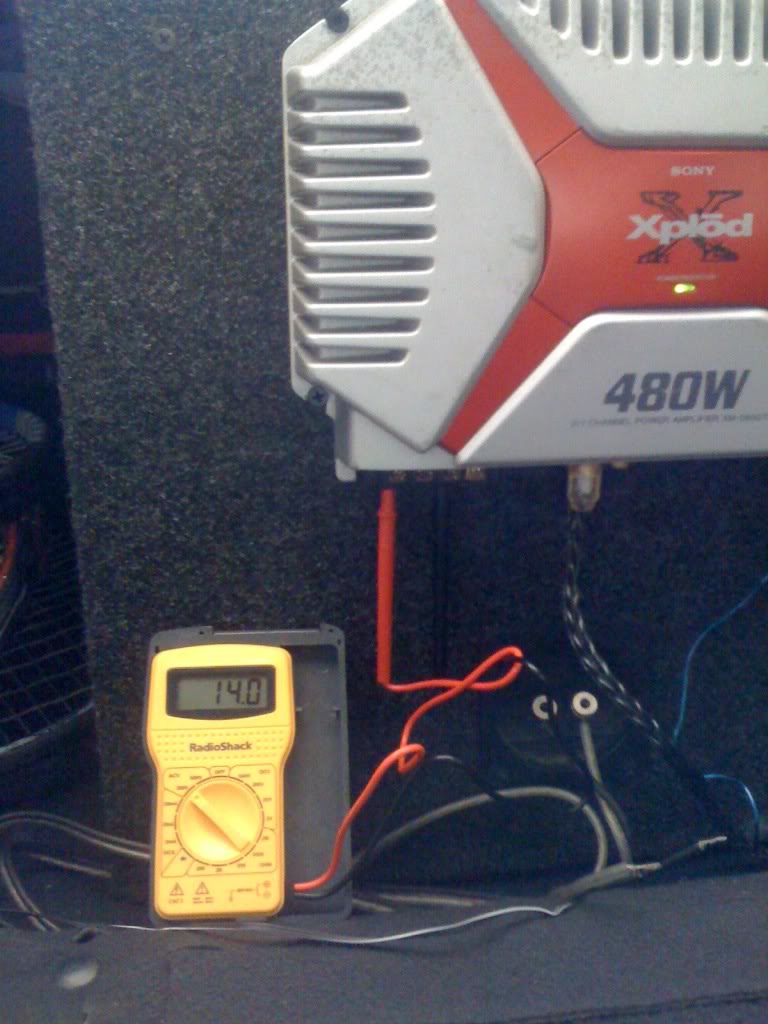
Heres my DMM showing 14v when gain is set on max, and sub is set on 0
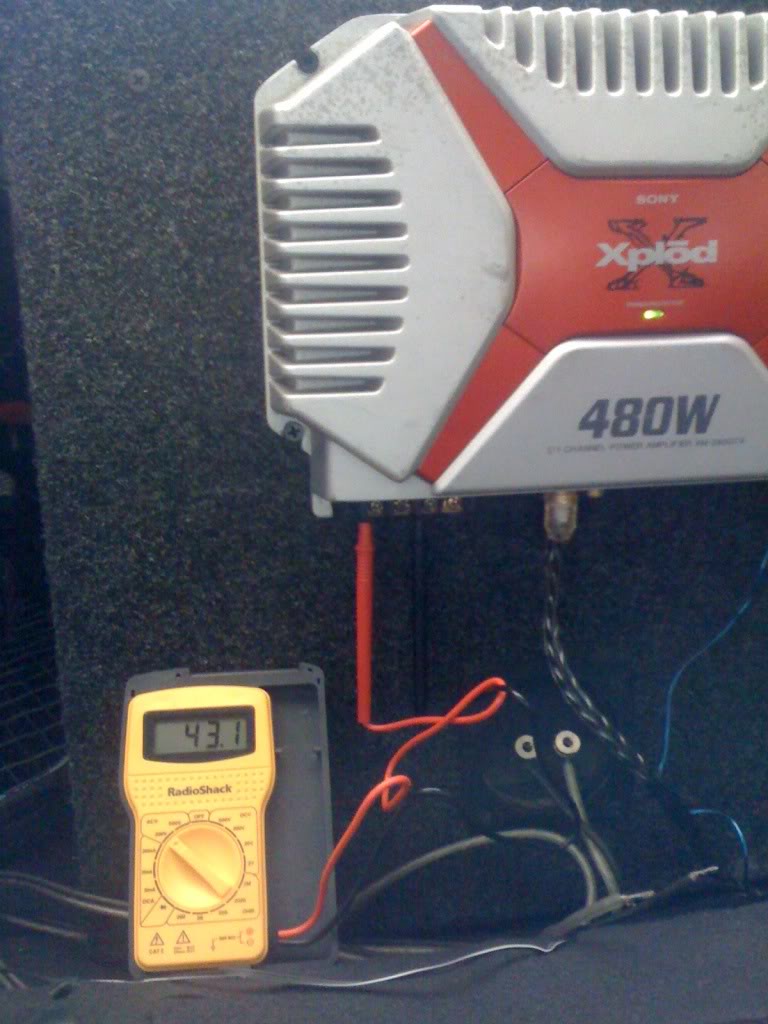
and heres my DMM showing 43v when gain is set on max, and sub is set on 6
I hope this tutorial helps you guys out
After I did this, my bass sounded cleaner and tighter than ever
Referenced from RealmofExcursion.com
This DIY is aimed to show you how to achieve the best sound out of your system, without distortion or clipping.
NUMBER 1 MISTAKE:
Do not use the bass boost on your amplifier
This causes heavy distortion and bass clipping, causing you to damage your speakers
Tools needed:
DMM (Digital Multi-Meter)
Screwdriver? (Maybe)
Blank CD
I would suggest adding some extra bass test songs, like "bass i love you" or "bass excursion test" on this CD to not waste the CD, and it must be on CD for best results
60Hz (-6dB) test tune
Can use 60Hz (-5dB) tune as well. Make sure that this file is not in MP3 or a compressed format, WMA works as well. Search online for a 60Hz (not sweep) test tune, put it in Audacity and change the amplification level to -6
Initial setup:
1. Set your all EQ settings on your HU to 0, turn loudness off, and any boosts off
2. Remove Speaker wire from amp, and attach DMM to where the speaker wires originally were, set DMM to AC Voltage
3. Set gain/level and bass boost to 0 on your amp
4. Determine the voltage you need to achieve by the following formula or chart (Make sure it's RMS and not peak power, you can find the specs of your amp online)
voltage = sqrt( watts X ohms )
In my situation, i have a 480watt amp, but is 240watts RMS bridged.
voltage= sqrt(240x4)
v=sqrt(960)
v=30.98
So in my situation, I would need my DMM to read around 30.5
In my situation, i have a 480watt amp, but is 240watts RMS bridged.
voltage= sqrt(240x4)
v=sqrt(960)
v=30.98
So in my situation, I would need my DMM to read around 30.5
Process:
1. Put in your bass test tone CD into your HU
2. Select your 60Hz test tone, and set on repeat
3. Set volume to about 75%, or the max you will listen to (so if the max volume is 35, and you listen to about 20 at most, set it to 20)
4. Slowly raise the gain/level on your amp untill you reach the voltage previously determined. DO NOT RAISE BASS BOOST
5. If you aren't getting high enough voltage, raise the Subwoofer EQ on your headunit up to around 5 or 6, and adjust your Gain accordingly
Always set your DMM around .5V~1V lower than what it should be, to compensate for songs recorded at different levels
6. After everything is finished, you can return your regular EQ settings, but make sure Low is set to 0, because that would change the voltage that you just set
Heres my DMM showing 14v when gain is set on max, and sub is set on 0
and heres my DMM showing 43v when gain is set on max, and sub is set on 6
I hope this tutorial helps you guys out
After I did this, my bass sounded cleaner and tighter than ever
Referenced from RealmofExcursion.com
Last edited by Kennykid2002; Oct 20, 2010 at 12:43 PM.
Joined: Aug 2003
Posts: 21,620
Likes: 1,252
From: Las Vegas, NV
Rep Power: 513 Re: DIY: Amplifier Gain Setting Tutorial
Nice. I'll have to try this out when I'm not so busy.. Or procrastinating school work by lurking on here or facebook.. lol
Thread Starter
Kenny the Ricer
iTrader: (1)
Joined: Oct 2009
Posts: 5,580
Likes: 0
From: In your trunk
Rep Power: 292 
Thread Starter
Kenny the Ricer
iTrader: (1)
Joined: Oct 2009
Posts: 5,580
Likes: 0
From: In your trunk
Rep Power: 292 Re: DIY: Amplifier Gain Setting Tutorial
So I decided to move my Audio threads into General Auto section so I can reopen them for discussion and questions
And also as an update:

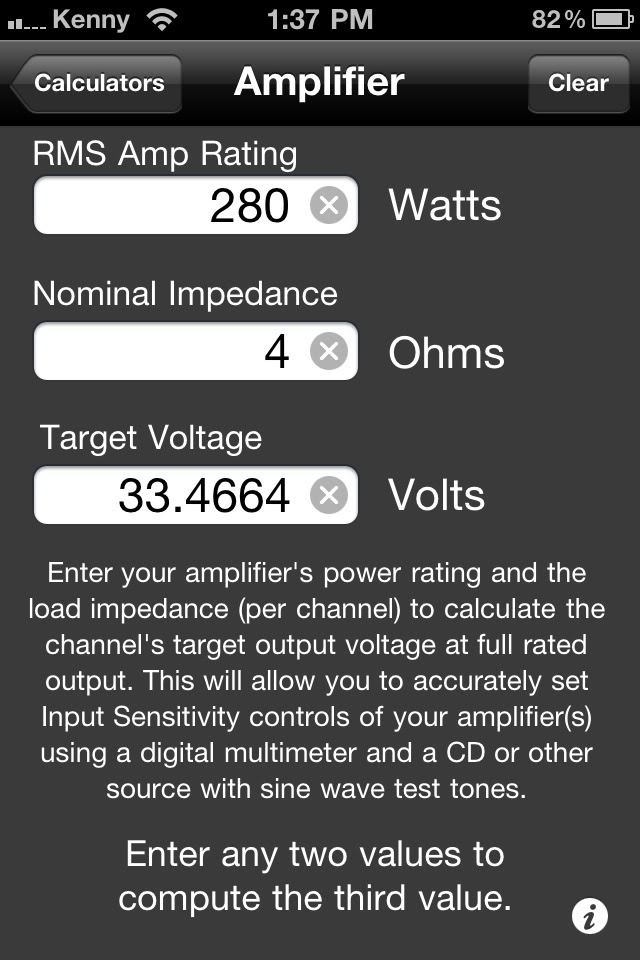
JL Audio has created an application for iPhone/iPod users
Check it out here
This new app has:
-SPL (Sound Pressure Level) Meter
-RTA (Real Time Analyzer)
-Speaker Polarity tester
-Also, you get four audio calculators designed to help with car audio installation and test.
The Amplifier Calculator is similar to the chart above, but more precise on exactly how much voltage you need based on your RMS Rating and Impedance level

And also as an update:
JL Audio has created an application for iPhone/iPod users
Check it out here
This new app has:
-SPL (Sound Pressure Level) Meter
-RTA (Real Time Analyzer)
-Speaker Polarity tester
-Also, you get four audio calculators designed to help with car audio installation and test.
The Amplifier Calculator is similar to the chart above, but more precise on exactly how much voltage you need based on your RMS Rating and Impedance level
Originally Posted by JL Audio
SPL, RTA, and Polarity are all fully functional tools, and they can all be upgraded to full professional-grade audio test tools.
SPL is a great digital SPL meter, with special microphone compensation built in to correct the iPhone and iPod touch mic, to get the best possible readings. SPL Upgrade adds A and C weighting, octave band weighting, ANSI Slow, Fast, Peak, Impulse, and LEQ modes, and the ability to store readings.
RTA is a 1/3-octave band Real Time Analyzer, including mic compensation to show the flattest possible readings using the iPhone and iPod touch mics. The upgrade adds a cursor, pink noise generation, Octave mode, different decay modes, noise curve overlays, and more.
Polarity lets you check your speaker polarity, using a waveform that you can download at our website. The upgrade adds filters for woofer, midrange, and tweeter, and generates the test signal internally.
Like all sound measurement apps, accuracy varies somewhat between devices, and some models of iPhone and iPod touch don't include mics.
All of these modules were built using the advanced engines from Studio Six Digital.

Registered!!
Joined: Apr 2014
Posts: 1
Likes: 0
Rep Power: 0 
Re: DIY: Amplifier Gain Setting Tutorial
I realize this is old, but for your sake I want to say something. I would like to point out that while your method is correct, your calculations on your amp were wrong. That amp does 200w bridged @ 4ohms. You should have come up with 28.28v.


Thread
Thread Starter
Honda Civic Forum
Replies
Last Post
JMKendrick
Mechanical Problems/Vehicle Issues and Fix-it Forum
4
Sep 16, 2015 06:17 PM

