
DIY: Alternator Replacement

Thread Starter
Kenny the Ricer
iTrader: (1)
Joined: Oct 2009
Posts: 5,580
Likes: 0
From: In your trunk
Rep Power: 292 

DIY: Alternator Replacement
New Duralast Alternator with lifetime warranty from Autozone.
Let's dive right into this.
First thing's first.
Equipment:
- Jack & Stands.
- New Alternator
- (Possibly new power steering/serpentine belt)
Tools:
- 10mm socket/ratchet
- 12mm socket/ratchet
- 14mm socket (Maybe require short extension)
Optional, but not required:
- Adjustable spanner/pipe wrench (Makes taking off wing nuts a breeze)
- Gloves
- Safety goggles
- Breaker bar (Or pipe for extension)
Safety First.
1. Disconnect battery. (You can leave off for about 5-10 mins to drain the remaining battery)
2. Loosen (But do not remove) wing nut. (Your adjustable spanner/pipe wrench will be your friend here)
Remove 2 12mm nuts from top and bottom mounts, bottom mount will be on the right side, underneath the belt.
3. After top nut has been removed, you can remove wing nut.
After removing wing nut, power steering belt should be loose enough to remove.
Remove belt, and move power steering pump and reservoir out of the way.
You'll want to remove the metal bracket that held the wingnut too. It can be removed with one 10mm bolt.
Now is also a good time to remove the resevoir bracket out of the way.
One 10mm bolt holds it in place.
4. Now to remove the power steering pump bracket.
It's held in place by 3 14mm bolts. (Here's where the small extension may come in handy)
Remove all three bolts, move wire out of bracket and take out the entire bracket.
And now you have access to the alternator.
You're going to want to loosen the top mount bolt for the alternator at this point.
5. Now to remove the electricals.
You're going to want to open up this clip in order to lift up the boot from the alternator wire. (It is clipped onto a bracket that's on the alternator)
After alternator wire is exposed, it can be removed by a 10mm socket.
Bottom plug can be removed by simply pushing back the boot, and unclipping the plug.
You're going to want to remove this bracket held on by 2 10mm bolts in order to move the wires out of the way.
Then move the wires out of the way.
6. Now is a good time to jack up the car, and remove the driver side front wheel.
7. After wheel has been removed, You're going to want to pry off the two tabs that hold the splash shield in place, and move the shield of out the way.
8. After getting access to the bottom, you're going to want to loosen (not remove) this 12mm bolt which is the alternator bottom mount.
9. Now go back to the engine bay, and remove this wing nut. (Again, pipe wrench or adjustable spanner will be much helpful in this part)
10. After the wing nut is removed, go ahead and remove the previous 12mm alternator bottom mount bolt.
It may be easier coming from the top (This is where a breaker bar, or pipe extension may help)
11. Serpentine belt should now be loose enough to remove.
Remove it, then remove alternator top mount bolt.
You should now be able to wiggle the alternator out from it's resting place and pull it out.
12. Now for inspection.
Check if your new alternator is same size and shape as the old one. (Higher alternators may be larger in size, or have a larger pulley)
Notice there's a bracket where the black clip was held on to on the old alternator. You're going to have to move it onto the new one.
Now is also a very good time to inspect the belts you removed.
If any of them are cracking, shows signs of age, you should have them replaced.
Mine seemed fairly decent, so I didn't replace them.
13. Now, installation is pretty much the opposite of removing the alt.
You're going to want to drop in the new alternator, and put the top alternator mounting bolt to hold it in place.
Those wing nuts will provide belt tension, and tighten up the belts as you reinstall.
Make sure everything is tight and reinstall everything opposite of how they were removed.
Key note: Make sure alternator fuse under the dash is not blown.
14. Enjoy your work.
Start up the car and leave it to run for about 10-15 mins with no electronics on to relearn idle.
Make sure to test if your alternator is working by reading the voltages, at idle, it should produce 14V+.
Joined: Aug 2003
Posts: 21,620
Likes: 1,252
From: Las Vegas, NV
Rep Power: 513 Re: DIY: Alternator Replacement
The job is infinitely easier if you take your driver side headlight out. Just sayin.
Thread Starter
Kenny the Ricer
iTrader: (1)
Joined: Oct 2009
Posts: 5,580
Likes: 0
From: In your trunk
Rep Power: 292 Re: DIY: Alternator Replacement


Registered!!
Joined: Sep 2010
Posts: 6
Likes: 0
Rep Power: 0 
Re: DIY: Alternator Replacement
many thanks Kennykid2002, you've just saved me 400 euros!! Just finished following your tutorial and I can confirm that a relatively newbie mechanic can definately do this given the right amount of time (took me about 3 half-days coming home from work) and tools.
I'd just like to add a comment for el-cheapo DIY mechanics (which we probably all are since otherwise we probably wouldn't be reading online tutorials in the first place): since the alternator is dead, that probably means that your battery died as well. Most people will be tempted to throw it away and buy a new one, this is unnecessary! Simply recharge it and if you see that it can't hold a charge anymore, get yourself a desulfator battery charger, if you shop around you'll see that it costs less than a new battery and will make it brand new (actually once you'll have one you'll realize that you'll never have to buy a new car battery again, ever, so it's well worth the investment )
)
Now to add a few amendments to Kennykid2002's tutorial to make a few things more clear in case some other noob like myself will read this in the future:
step 1. having a 12" flat ratchet wrench is CRUCIAL, otherwise you won't have the space to undo the bottom power steering pump bolt (unless you take out the driver side headlight as mentioned before but to do that you'll have to take off the front bumper, in the end it is just easier to rush to your local hardware store and buy the right tool). I'd also advise you unscrew the power steering fluid reservoir bracket first, that way you can set it horizontally so your hand won't knock against it every time you're turning the wrench.
step 3. when moving the steering pump and reservoir out of the way be careful not to flip it upside down, otherwise the power steering fluid will leak out of the reservoir, it will make a mess and you'll have to run to a parts store and buy more steering fluid. (probably a useless comment for seasoned mechanics but when you're a noob, you can easily make the mistake, trust me ).
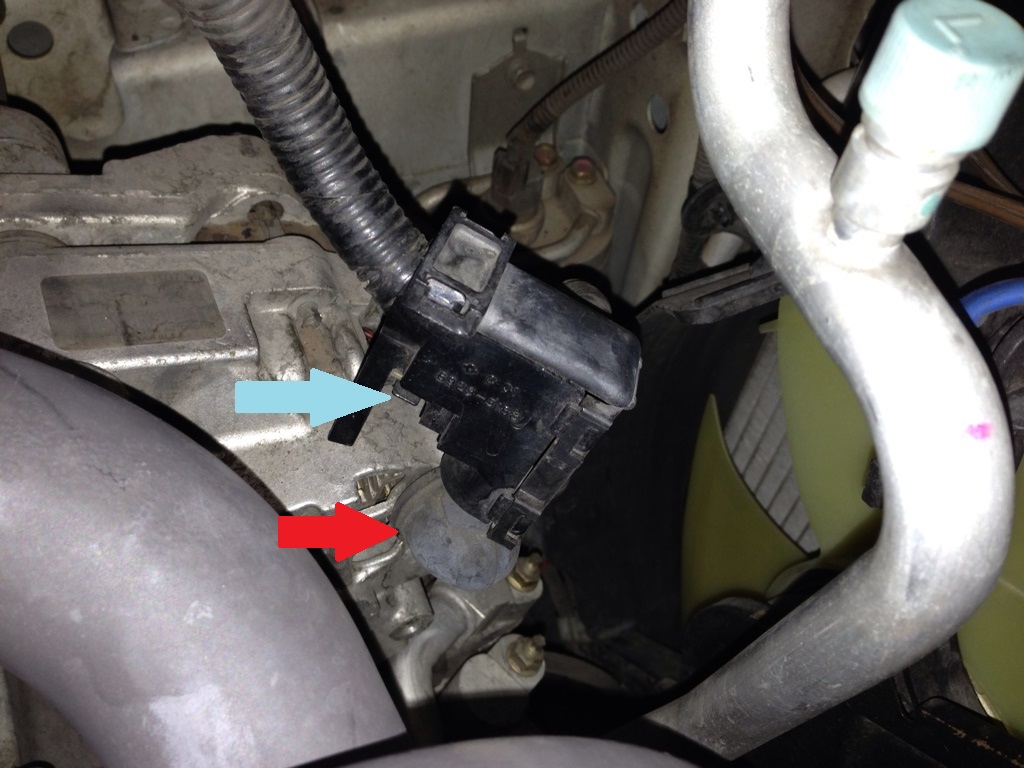
step 5. well it was mentioned in the tutorial but I didn't really get it, you have to press the little button on the bottom of the plastic thingy so detach it from the metal bracket that's on the alternator (blue arrow), otherwise you'll spend half an hour wobbling it and wondering how the hell does it come off lol. On the other hand, opening up the plastic bracket isn't really necessary, all you have to do is remove the rubber protection (red arrow) and unscrew the 10" bolt for the ground and unplug the wires from the alternator (not shown in the picture but easy to figure out).
step 13. (this one was a REAL pain until I finally learned how to do it the right way). To tension the alternator and power steering belts, you should put in the top and bottom bolts but do NOT fasten tightly! Once the top and bottom bolts are in, adjust the belt tension with the wing nuts until you can't tighten anymore (try a small set of pliers since there's really not a lot of space to tighten with your fingers). Only AFTER tightening the wing nut should you tighten the top and bottom bolts. I'd also advise you plug back the electricals in the alternator before tensioning the belt, I found it more logical doing it this way.
Another piece of advice: once you think the alternator belt is properly tightened, take out the power steering pump belt, make sure the power steering pump and reservoir aren't in the way and that the electric wires are hooked, reconnect the battery lead and turn on the engine (make sure that the car is in neutral since it's still jacked BTW). Set all the electricals to the max (headlights, rear defroster, A/C to the max, etc.) and check to see that there isn't any squeal coming from the alternator belt, if there is you'll have to tighten further (don't forget to untighten the top and bottom bolts first!). I say this because if you go through the hassle of mounting the power steering pump and THEN realize that the alternator belt isn't tensioned enough, you'll have to start all over again (and believe me it is a pain!). Don't forget to re-desconnect the battery lead before tightening and/or moving further to the power steering pump.
I'd just like to add a comment for el-cheapo DIY mechanics (which we probably all are since otherwise we probably wouldn't be reading online tutorials in the first place): since the alternator is dead, that probably means that your battery died as well. Most people will be tempted to throw it away and buy a new one, this is unnecessary! Simply recharge it and if you see that it can't hold a charge anymore, get yourself a desulfator battery charger, if you shop around you'll see that it costs less than a new battery and will make it brand new (actually once you'll have one you'll realize that you'll never have to buy a new car battery again, ever, so it's well worth the investment
)Now to add a few amendments to Kennykid2002's tutorial to make a few things more clear in case some other noob like myself will read this in the future:
step 1. having a 12" flat ratchet wrench is CRUCIAL, otherwise you won't have the space to undo the bottom power steering pump bolt (unless you take out the driver side headlight as mentioned before but to do that you'll have to take off the front bumper, in the end it is just easier to rush to your local hardware store and buy the right tool). I'd also advise you unscrew the power steering fluid reservoir bracket first, that way you can set it horizontally so your hand won't knock against it every time you're turning the wrench.
step 3. when moving the steering pump and reservoir out of the way be careful not to flip it upside down, otherwise the power steering fluid will leak out of the reservoir, it will make a mess and you'll have to run to a parts store and buy more steering fluid. (probably a useless comment for seasoned mechanics but when you're a noob, you can easily make the mistake, trust me
).step 5. well it was mentioned in the tutorial but I didn't really get it, you have to press the little button on the bottom of the plastic thingy so detach it from the metal bracket that's on the alternator (blue arrow), otherwise you'll spend half an hour wobbling it and wondering how the hell does it come off lol. On the other hand, opening up the plastic bracket isn't really necessary, all you have to do is remove the rubber protection (red arrow) and unscrew the 10" bolt for the ground and unplug the wires from the alternator (not shown in the picture but easy to figure out).
step 13. (this one was a REAL pain until I finally learned how to do it the right way). To tension the alternator and power steering belts, you should put in the top and bottom bolts but do NOT fasten tightly! Once the top and bottom bolts are in, adjust the belt tension with the wing nuts until you can't tighten anymore (try a small set of pliers since there's really not a lot of space to tighten with your fingers). Only AFTER tightening the wing nut should you tighten the top and bottom bolts. I'd also advise you plug back the electricals in the alternator before tensioning the belt, I found it more logical doing it this way.
Another piece of advice: once you think the alternator belt is properly tightened, take out the power steering pump belt, make sure the power steering pump and reservoir aren't in the way and that the electric wires are hooked, reconnect the battery lead and turn on the engine (make sure that the car is in neutral since it's still jacked BTW). Set all the electricals to the max (headlights, rear defroster, A/C to the max, etc.) and check to see that there isn't any squeal coming from the alternator belt, if there is you'll have to tighten further (don't forget to untighten the top and bottom bolts first!). I say this because if you go through the hassle of mounting the power steering pump and THEN realize that the alternator belt isn't tensioned enough, you'll have to start all over again (and believe me it is a pain!). Don't forget to re-desconnect the battery lead before tightening and/or moving further to the power steering pump.
Last edited by lemmiwinks; Mar 28, 2013 at 02:23 PM.
Banished to the Depths of Rice.
iTrader: (3)
Joined: Jun 2005
Posts: 9,196
Likes: 1
From: SoCal 714/909/626
Rep Power: 354 Thread Starter
Kenny the Ricer
iTrader: (1)
Joined: Oct 2009
Posts: 5,580
Likes: 0
From: In your trunk
Rep Power: 292 Thread Starter
Kenny the Ricer
iTrader: (1)
Joined: Oct 2009
Posts: 5,580
Likes: 0
From: In your trunk
Rep Power: 292 Re: DIY: Alternator Replacement
Sorry, didn't see this post till now.
No problem, glad I was able to help!
Hmm, I just used a socket wrench, didn't have any problems with that bolt there.
I also recommended that you remove power steering reservoir bracket in the DIY.
Haha, yes, that should be mentioned, however, mine was securely sealed. The cap held tight, and nothing poured out.
Though, I did think it was a good time to drain out some old fluid and drop some new fluid in, so I did.
Yes, it was attached to the metal bracket you needed to remove on the old alt.
It isn't absolutely necessary to remove, but it does help you give more play in the rubber boot.
Good advice.
I didn't go into much detail on that, since I figured most people (like yourself) will figure it out along the way.
It only seems logical to do it one way.
Now to add a few amendments to Kennykid2002's tutorial to make a few things more clear in case some other noob like myself will read this in the future:
step 1. having a 12" flat ratchet wrench is CRUCIAL, otherwise you won't have the space to undo the bottom power steering pump bolt (unless you take out the driver side headlight as mentioned before but to do that you'll have to take off the front bumper, in the end it is just easier to rush to your local hardware store and buy the right tool). I'd also advise you unscrew the power steering fluid reservoir bracket first, that way you can set it horizontally so your hand won't knock against it every time you're turning the wrench.
step 1. having a 12" flat ratchet wrench is CRUCIAL, otherwise you won't have the space to undo the bottom power steering pump bolt (unless you take out the driver side headlight as mentioned before but to do that you'll have to take off the front bumper, in the end it is just easier to rush to your local hardware store and buy the right tool). I'd also advise you unscrew the power steering fluid reservoir bracket first, that way you can set it horizontally so your hand won't knock against it every time you're turning the wrench.
I also recommended that you remove power steering reservoir bracket in the DIY.
step 3. when moving the steering pump and reservoir out of the way be careful not to flip it upside down, otherwise the power steering fluid will leak out of the reservoir, it will make a mess and you'll have to run to a parts store and buy more steering fluid. (probably a useless comment for seasoned mechanics but when you're a noob, you can easily make the mistake, trust me ).
).Though, I did think it was a good time to drain out some old fluid and drop some new fluid in, so I did.
step 5. well it was mentioned in the tutorial but I didn't really get it, you have to press the little button on the bottom of the plastic thingy so detach it from the metal bracket that's on the alternator (blue arrow), otherwise you'll spend half an hour wobbling it and wondering how the hell does it come off lol. On the other hand, opening up the plastic bracket isn't really necessary, all you have to do is remove the rubber protection (red arrow) and unscrew the 10" bolt for the ground and unplug the wires from the alternator (not shown in the picture but easy to figure out).
It isn't absolutely necessary to remove, but it does help you give more play in the rubber boot.
step 13. (this one was a REAL pain until I finally learned how to do it the right way). To tension the alternator and power steering belts, you should put in the top and bottom bolts but do NOT fasten tightly! Once the top and bottom bolts are in, adjust the belt tension with the wing nuts until you can't tighten anymore (try a small set of pliers since there's really not a lot of space to tighten with your fingers). Only AFTER tightening the wing nut should you tighten the top and bottom bolts. I'd also advise you plug back the electricals in the alternator before tensioning the belt, I found it more logical doing it this way.
Another piece of advice: once you think the alternator belt is properly tightened, take out the power steering pump belt, make sure the power steering pump and reservoir aren't in the way and that the electric wires are hooked, reconnect the battery lead and turn on the engine (make sure that the car is in neutral since it's still jacked BTW). Set all the electricals to the max (headlights, rear defroster, A/C to the max, etc.) and check to see that there isn't any squeal coming from the alternator belt, if there is you'll have to tighten further (don't forget to untighten the top and bottom bolts first!). I say this because if you go through the hassle of mounting the power steering pump and THEN realize that the alternator belt isn't tensioned enough, you'll have to start all over again (and believe me it is a pain!). Don't forget to re-desconnect the battery lead before tightening and/or moving further to the power steering pump.
Another piece of advice: once you think the alternator belt is properly tightened, take out the power steering pump belt, make sure the power steering pump and reservoir aren't in the way and that the electric wires are hooked, reconnect the battery lead and turn on the engine (make sure that the car is in neutral since it's still jacked BTW). Set all the electricals to the max (headlights, rear defroster, A/C to the max, etc.) and check to see that there isn't any squeal coming from the alternator belt, if there is you'll have to tighten further (don't forget to untighten the top and bottom bolts first!). I say this because if you go through the hassle of mounting the power steering pump and THEN realize that the alternator belt isn't tensioned enough, you'll have to start all over again (and believe me it is a pain!). Don't forget to re-desconnect the battery lead before tightening and/or moving further to the power steering pump.
I didn't go into much detail on that, since I figured most people (like yourself) will figure it out along the way.
It only seems logical to do it one way.


Registered!!
Joined: Aug 2011
Posts: 314
Likes: 0
Rep Power: 184 Re: DIY: Alternator Replacement
Is this considered a high quality alternator as reliable or exceeds OEM specifications?
I've seen the price, only 140$, man, that's really cheap compared to the crap 180$ rebuild I paid.
I've seen the price, only 140$, man, that's really cheap compared to the crap 180$ rebuild I paid.
Thread Starter
Kenny the Ricer
iTrader: (1)
Joined: Oct 2009
Posts: 5,580
Likes: 0
From: In your trunk
Rep Power: 292 Re: DIY: Alternator Replacement
The best part about is that it has a lifetime warranty.

Registered!!
Joined: Mar 2014
Posts: 1
Likes: 0
Rep Power: 0 Re: DIY: Alternator Replacement
In image 8 the pulley under the alternator, what is that bolted to and should this pulley spin? looking down from the top of the engine it appears mine is not spinning. My 03 civic has a squeal and I'm not sure if its the pulley on the alternator, one of the other pulleys or what. Just had new belts put on and they are tight so its not that.
Registered!!
Joined: Mar 2011
Posts: 2,499
Likes: 5
Rep Power: 211 Re: DIY: Alternator Replacement
In image 8 the pulley under the alternator, what is that bolted to and should this pulley spin? looking down from the top of the engine it appears mine is not spinning. My 03 civic has a squeal and I'm not sure if its the pulley on the alternator, one of the other pulleys or what. Just had new belts put on and they are tight so its not that.
Please, DubTee is my father, call me Dub
Joined: Aug 2012
Posts: 88
Likes: 0
From: Brandon, MS
Rep Power: 0 Re: DIY: Alternator Replacement
Thanks for this write up, saved me a ton of time about 2 weeks ago (haven't really touched my laptop since I used it in the garage).
Regarding the Duralast Gold alternators, during my time with AutoZone the return rate on the Golds were much lower than the normal Duralast remans. We rarely saw any come back. I drove an extra 20 miles to another store to pick mine up over the normal reman my local store had.
Regarding the Duralast Gold alternators, during my time with AutoZone the return rate on the Golds were much lower than the normal Duralast remans. We rarely saw any come back. I drove an extra 20 miles to another store to pick mine up over the normal reman my local store had.

Registered!!
Joined: Oct 2009
Posts: 54
Likes: 0
Rep Power: 204 Re: DIY: Alternator Replacement
step 13. (this one was a REAL pain until I finally learned how to do it the right way). To tension the alternator and power steering belts, you should put in the top and bottom bolts but do NOT fasten tightly! Once the top and bottom bolts are in, adjust the belt tension with the wing nuts until you can't tighten anymore (try a small set of pliers since there's really not a lot of space to tighten with your fingers). Only AFTER tightening the wing nut should you tighten the top and bottom bolts.
Last edited by honda.lioness; May 6, 2014 at 08:33 AM.
Re: DIY: Alternator Replacement
Hey guys, I recently had my alternator go out and I tried to have a go at this DIY the other day but was stopped short because the first bolt was stripped, now that I got the tool to remove that, I have a question. The second 12mm nut under the belt seems very difficult to reach/get off. Can anyone take a picture for me of the actual nut so I can make sure it's the right one. All the DIY videos and such i've seen for this just show a from behind view and no actual picture of the bottom mount nut.
I'd really appreciate it.
Edit: I took a picture, let me know if this is the bottom mount nut

I'd really appreciate it.
Edit: I took a picture, let me know if this is the bottom mount nut
Last edited by Mag1c; Dec 31, 2014 at 11:02 AM.
Registered!!
Joined: Mar 2011
Posts: 2,499
Likes: 5
Rep Power: 211 Re: DIY: Alternator Replacement
how are you trying to remove the bottom bolt? from the top?
its easiest to remove the drivers side front wheel and access the bolt through there, its pretty obvious which bolt it is when looking at the alt this way, look at step/picture number 8 in this DIY, it is a clear picture of the lower mount
its easiest to remove the drivers side front wheel and access the bolt through there, its pretty obvious which bolt it is when looking at the alt this way, look at step/picture number 8 in this DIY, it is a clear picture of the lower mount
Last edited by mikey1; Dec 31, 2014 at 11:22 AM.
Re: DIY: Alternator Replacement
Well I honestly haven't even gotten to that point... The first top mount bolt is stripped and I've tried so many things. Even a bolt extractor won't get it off. I'm not sure what else I can do at this point other than just take it to a mechanic.
Registered!!
Joined: Mar 2011
Posts: 2,499
Likes: 5
Rep Power: 211 Re: DIY: Alternator Replacement
if a bolt is stripped its normally EASIER to remove, not more difficult,
is the bolt turning? can you pull it out at all?
i have to ask the obvious.....are you turning it in the correct direction?

..
Last edited by mikey1; Dec 31, 2014 at 11:51 AM.
Re: DIY: Alternator Replacement
And yes lefty loosey righty tighty so that bolt I am turning towards the car to no avail.
Registered!!
Joined: Mar 2011
Posts: 2,499
Likes: 5
Rep Power: 211 Re: DIY: Alternator Replacement
I tried vice grips and sprayed penetrating oil. It won't come loose at all and now it's a complete circle. I'm going to buy a 12mm bolt extractor the kit I got of extractors didn't have a 12mm....
And yes lefty loosey righty tighty so that bolt I am turning towards the car to no avail.
And yes lefty loosey righty tighty so that bolt I am turning towards the car to no avail.
even if its round you still should be able to loosen it with a large pair of vice grips.....clamp those suckers on there as tight as possible and hit them with a hammer if you have to, use a small piece of wood between the hammer and vice grips
Re: DIY: Alternator Replacement
okay now i understand, i thought it was the threads that were stripped, but its the head of the bolt?....how did you manage to do that? are you not using metric sockets?
even if its round you still should be able to loosen it with a large pair of vice grips.....clamp those suckers on there as tight as possible and hit them with a hammer if you have to, use a small piece of wood between the hammer and vice grips
even if its round you still should be able to loosen it with a large pair of vice grips.....clamp those suckers on there as tight as possible and hit them with a hammer if you have to, use a small piece of wood between the hammer and vice grips
That bolt extractor worked wonders. Had to use 11mm hammered it onto the nut and presto! It came right off with a little force.
Now for this second bolt...
Re: DIY: Alternator Replacement
Now that I removed the old alternator, I go to put in the new one and of course it doesn't fit.
I bought the same exact one as in this thread and there is a groove on the right side making it not fit in properly.
I looked at a video online of replacing the alternator and the guy just easily puts in the new one.... Any suggestions??
Here is a couple of pics to show what I'm talking about.


edit:
comparison of the old alt and new one so you can see the difference.


I bought the same exact one as in this thread and there is a groove on the right side making it not fit in properly.
I looked at a video online of replacing the alternator and the guy just easily puts in the new one.... Any suggestions??
Here is a couple of pics to show what I'm talking about.
edit:
comparison of the old alt and new one so you can see the difference.
Last edited by Mag1c; Jan 18, 2015 at 03:30 PM.
Registered!!
Joined: Mar 2011
Posts: 2,499
Likes: 5
Rep Power: 211 Re: DIY: Alternator Replacement
i have no idea what your talking about looking at those pics, can you circle the part you are talking about in the picture?
what is hitting and where?
are you able to install the top bolt?
maybe have somebody else take a picture while you are trying to install the alternator so we can see whats hitting3and where?
what is hitting and where?
are you able to install the top bolt?
maybe have somebody else take a picture while you are trying to install the alternator so we can see whats hitting3and where?
Re: DIY: Alternator Replacement
i have no idea what your talking about looking at those pics, can you circle the part you are talking about in the picture?
what is hitting and where?
are you able to install the top bolt?
maybe have somebody else take a picture while you are trying to install the alternator so we can see whats hitting3and where?
what is hitting and where?
are you able to install the top bolt?
maybe have somebody else take a picture while you are trying to install the alternator so we can see whats hitting3and where?
The groove is on on the top mount on the right side.

