
my 91 hatch swap/build ( alot of pics)

Thread Starter
Joined: Apr 2005
Posts: 6,617
Likes: 0
From: nj..
Rep Power: 344 

my 91 hatch swap/build ( alot of pics)
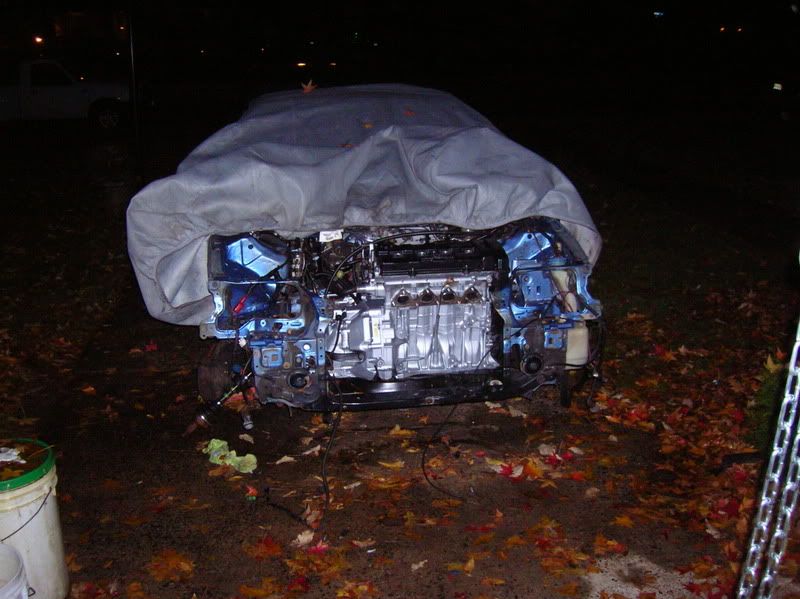
so im doing this and your going to let me know what you think. sound good? good. because i expect alot of comments. and if you view this and dont comment, i will not talk to you anymore. ok maybe not that but just do it.
im not going to comment much on the pics as they are mostly self explanitory any questions ask pleaseee.
quick background. i got this car when i turned 17 and it was bone stock. i had a ricer stage. then decided with my limited knowledge of cars and a friend who knew about swaps i could do it. well he bailed because of personal ****. and i was left to learn on my own. everything mechanical was done but wiring was an issue. so i abandoned this project 3 years ago to pick it back up and redo everything this past summer. slowly but surely im almost done.
here is a progression of my hatch from when i got it to about half way through the motor build.

now for the rest.
engine in

the rear disk

gone


got em

5sp i/m swap


ok WOW well that is ether from the fireball incident. orrrr just reallly dirty. good thing its off.

TB off. took a bit of coaxing but my good friend PB BLASTER had a talk with him.

yuck i was putting that on my car lol

blaa

fuel rail off.


im again... shame that that decal is worthless to me now....

pretty much stripped

ok. BRACE YOURSELVES HERE ARE THE OFFICIAL ACTION SHOTS!! LOL
had to dremmel out the pcv hose and valve. i have a brand new one dont worry.


messsss and smell.

outttt

both stripped. time for cleaning....

dropped the car off stands for the first time in 4 months. too low? you tell me! lol


ehhh got to be practical... this is my driving height.


new rims


port and polish time!!!!!!!!!!


new hatch time!!!!
picked this up. its dirty but in good shape.


oh and this too

now my rear is also complete....... rust is next
ok so today i put on the filler panel. the hatch and cleaned the carbon off the pistons.
all went smooth.
here we go.
before.
after...


now for the hatch. DISCLAMER!!!: the rear bumper IS NOT BOLTED ON! just kinda there untill i paint or whatever i decide to do. now as for that hks sticker. i wanna take it off. but it gives the bumper that extra look its missing.
now. Should i take it off or leave it?
now for pics.
before. (that center garnish is new)

yes that is a glowing H symbol. HEY everyone went through a ricer stage lololol

my poor attempt to fix the panel. hey at least the paint came out good! see i bet if i didnt say anything you wouldnt of noticed.


new vs old.

no hatch. looks sad.

dent again.

hatch on no garnish

now garnish on. looks ok i guess. until paint!!!!


and thats where im left now. should have the p&p head/im monday. then im running again.
plan for paint is
champ white
NHBP
mag metalic
flat black
that comes right after i get my front end.
front end plan is crx front end.
i think i covered everything. this has been a hodgpodge of copy and pastes from other forums i post at so if it dosnt make sense let me know. anything i left out please ask. thanks comments are appreciated
im not going to comment much on the pics as they are mostly self explanitory any questions ask pleaseee.
quick background. i got this car when i turned 17 and it was bone stock. i had a ricer stage. then decided with my limited knowledge of cars and a friend who knew about swaps i could do it. well he bailed because of personal ****. and i was left to learn on my own. everything mechanical was done but wiring was an issue. so i abandoned this project 3 years ago to pick it back up and redo everything this past summer. slowly but surely im almost done.
here is a progression of my hatch from when i got it to about half way through the motor build.
now for the rest.
engine in
the rear disk
gone
got em
5sp i/m swap
ok WOW well that is ether from the fireball incident. orrrr just reallly dirty. good thing its off.
TB off. took a bit of coaxing but my good friend PB BLASTER had a talk with him.
yuck i was putting that on my car lol
blaa
fuel rail off.
im again... shame that that decal is worthless to me now....
pretty much stripped
ok. BRACE YOURSELVES HERE ARE THE OFFICIAL ACTION SHOTS!! LOL
had to dremmel out the pcv hose and valve. i have a brand new one dont worry.
messsss and smell.
outttt
both stripped. time for cleaning....
dropped the car off stands for the first time in 4 months. too low? you tell me! lol
ehhh got to be practical... this is my driving height.
new rims
port and polish time!!!!!!!!!!
new hatch time!!!!
picked this up. its dirty but in good shape.
oh and this too
now my rear is also complete....... rust is next
ok so today i put on the filler panel. the hatch and cleaned the carbon off the pistons.
all went smooth.
here we go.
before.
after...
now for the hatch. DISCLAMER!!!: the rear bumper IS NOT BOLTED ON! just kinda there untill i paint or whatever i decide to do. now as for that hks sticker. i wanna take it off. but it gives the bumper that extra look its missing.
now. Should i take it off or leave it?
now for pics.
before. (that center garnish is new)
yes that is a glowing H symbol. HEY everyone went through a ricer stage lololol
my poor attempt to fix the panel. hey at least the paint came out good! see i bet if i didnt say anything you wouldnt of noticed.
new vs old.
no hatch. looks sad.
dent again.
hatch on no garnish
now garnish on. looks ok i guess. until paint!!!!
and thats where im left now. should have the p&p head/im monday. then im running again.
plan for paint is
champ white
NHBP
mag metalic
flat black
that comes right after i get my front end.
front end plan is crx front end.
i think i covered everything. this has been a hodgpodge of copy and pastes from other forums i post at so if it dosnt make sense let me know. anything i left out please ask. thanks comments are appreciated
Last edited by CivicHatch9one; Mar 23, 2008 at 11:00 AM.

Thread Starter
Joined: Apr 2005
Posts: 6,617
Likes: 0
From: nj..
Rep Power: 344 Re: my 91 hatch swap/build ( alot of pics)
thanks! shes almost done. the winter was hard and slow but now im picking back up.
all thats left:
put head and im on when i get it back.
front end.
paint.
wow, they grow up so fast.
all thats left:
put head and im on when i get it back.
front end.
paint.
wow, they grow up so fast.
Thread Starter
Joined: Apr 2005
Posts: 6,617
Likes: 0
From: nj..
Rep Power: 344 Re: my 91 hatch swap/build ( alot of pics)
lol. I'm going to get rid of my DD and buy a delorian and then trash everything in it and rice it out yo.im goint to put a food processor in the motor. and everything. and i will rely on that to be my DD. hows that?
Registered!!
Joined: Feb 2008
Posts: 7
Likes: 0
From: Houston
Rep Power: 0 

My Pony Princess is the inspiration for my ride.
iTrader: (17)
Joined: Apr 2006
Posts: 5,217
Likes: 0
Rep Power: 0 Re: my 91 hatch swap/build ( alot of pics)
Naw man you need to add the valve cover from the Civic EX Type-R conversion that you bought off Ebay. You know, sleeper style, so the drizzle from the turbo doesn't show.
Dumb question though Pete. Does the HF mani from the old Rex's fit the B so you can do a cheap boost build for it? You should have plenty of room in that bay to tuck a little T25 or T28 in there and run about 8lbs of boost for dirt cheap.
Dumb question though Pete. Does the HF mani from the old Rex's fit the B so you can do a cheap boost build for it? You should have plenty of room in that bay to tuck a little T25 or T28 in there and run about 8lbs of boost for dirt cheap.
Thread Starter
Joined: Apr 2005
Posts: 6,617
Likes: 0
From: nj..
Rep Power: 344 Re: my 91 hatch swap/build ( alot of pics)
well i got PnP mani now  comes tommorrow with the head. so yea i can throw a small turbo in it low boost for s&gs lol
i talked to the guy doing my head for an hour on why i should get nitrous and the proper way to use nitrous lol but id go turbo over nitrous anyday
comes tommorrow with the head. so yea i can throw a small turbo in it low boost for s&gs lol i talked to the guy doing my head for an hour on why i should get nitrous and the proper way to use nitrous lol but id go turbo over nitrous anyday
Registered!!
Joined: Oct 2006
Posts: 560
Likes: 0
From: Northern Illinois
Rep Power: 265 Re: my 91 hatch swap/build ( alot of pics)
nice thread! it is cool to see a classic hatch resurrected and done right; can't wait to see it finished up.

fyi - i found it in your sig while reading the flames in FG's thread.
fyi - i found it in your sig while reading the flames in FG's thread.
Registered!!
iTrader: (11)
Joined: Nov 2003
Posts: 4,576
Likes: 0
From: Lakewood, 562
Rep Power: 321 Re: my 91 hatch swap/build ( alot of pics)
looks good..you gonna go with a gsr tranny? it looks like you swapped out the pistons too. what kind of compression you using for the pistons?
Thread Starter
Joined: Apr 2005
Posts: 6,617
Likes: 0
From: nj..
Rep Power: 344 Re: my 91 hatch swap/build ( alot of pics)
pistons are stock. but the compression will be diffrent due to headwork.
does anyone know how to figure out compression?
Registered!!
iTrader: (11)
Joined: Nov 2003
Posts: 4,576
Likes: 0
From: Lakewood, 562
Rep Power: 321 Re: my 91 hatch swap/build ( alot of pics)
thanks!
i think im going to see how the ls trans works for right now. if i feel its not working out. i might go gsr or b16 hydro. but im trying to avoid going hydro bc tthat means new mount for it.
pistons are stock. but the compression will be diffrent due to headwork.
does anyone know how to figure out compression?
Here's a compression calculator. hope it helps
http://www.zealautowerks.com/
Registered!!
iTrader: (11)
Joined: Nov 2003
Posts: 4,576
Likes: 0
From: Lakewood, 562
Rep Power: 321 Re: my 91 hatch swap/build ( alot of pics)
thats some pretty high compresson from stock. did you upgrade your cams?
you sure you dont have to run 91oct? thats basically gsr compression.
you sure you dont have to run 91oct? thats basically gsr compression.
Thread Starter
Joined: Apr 2005
Posts: 6,617
Likes: 0
From: nj..
Rep Power: 344 Re: my 91 hatch swap/build ( alot of pics)
no cams yet.
but i will be running prem.
got the car running. today. worked out fine.. just need to fine tune from here.
but i will be running prem.
got the car running. today. worked out fine.. just need to fine tune from here.
Thread Starter
Joined: Apr 2005
Posts: 6,617
Likes: 0
From: nj..
Rep Power: 344 Re: my 91 hatch swap/build ( alot of pics)


first start up. just to see if everything is ok. no coolant or nothing.
[youtube]http://www.youtube.com/watch?v=3A_YpNry_Vs[/youtube]
Thread Starter
Joined: Apr 2005
Posts: 6,617
Likes: 0
From: nj..
Rep Power: 344 Re: my 91 hatch swap/build ( alot of pics)
wellllllllll. shes done.
vac lines and coolant in.
ran it for about 2 hours. lol not one Mechanical problem. after the coolant blead the surge went away.
cool.
on to the problems....... well being as low as i am. the traction bar going from right in front of the motor to the front brakes. on the drivers side. right next to the crank pulley. when i get in the car.(yea im heavy.) but also when i hit bumps goin down the road i heard it rub. soooooo
here are my options.
take off the drivers side mount and grind it down so it pulls the motor up.
raise the car up an inch (which i did, not too happy about that.)
orrrrr get the after market password jdm single puley for the alternator only.
well ill decide.
and another problem ONE oil leak. coiming from the front of the oil pan. might be from not torquing it down enough.
didnt put sealer on it.
too much oil
yea im running 5 qts.
3 @ 10w30
1 rislone
and 1 20w50.
because of the head. but im draining that anyway. hopefully thats it. lol i know its not tho lol
well now for the reson you came....
the video. here it is.
let me know...


Thread
Thread Starter
Honda Civic Forum
Replies
Last Post
ricer_em2
Mechanical Problems/Vehicle Issues and Fix-it Forum
2
May 11, 2016 08:09 PM
chiquita.banana
6th Generation Civic 1996 - 2000
5
Sep 24, 2015 09:42 AM
BBrosario
Mechanical Problems/Vehicle Issues and Fix-it Forum
1
Sep 17, 2015 07:51 PM

