
Head Gasket + Timing Belt DIY

Thread Starter
Whachya lookin at?
iTrader: (1)
Joined: May 2009
Posts: 6,388
Likes: 13
From: Canada
Rep Power: 314 

Head Gasket + Timing Belt DIY
--- A WORK IN PROGRESS ---
This has been a long time coming and I can't believe nobody has covered it yet. This is a non-comprehensive guide to aid you in changing your head gasket. I will be leaving some stuff out, but this should be good enough to help most backyard mechanics complete the job. I'm also going to steal some pictures from other members on this forum. I'll do my best to make mentions of who it was. Josh assembled a great part list, so instead of making my own I'll just link his in, I highly recommend reading through this thread before reading this DIY:
Headgasket Replacement Parts List
A couple other things I suggest you have handy
Wingnut Sockets
A couple studs for the intake and exhaust manifolds
New nuts for the intake and exhaust manifolds
Ratcheting wrenches will make a H-U-G-E difference
A 4' breaker bar if you can get your hands on one
Also, while doing this job I highly recommend doign a valve lash adjustment. Get familiar with this DIY as well, you should be using it sometime during this job. Grey did a GREAT job on this DIY and you should also take into consideration his part/tool list:
DIY: Valve Clearance Adjustment
So, let's get on to the fun stuff. This job took me a whole weekend. I took my sweet *** time and I suggest you do too, especially if you've never done it before. ALSO, this is not for someone who does not know their way around the engine bay. Mistakes on this job can very quickly cost you an engine!!!
Jack up the front of the car SAFELY and put it on jackstands! Remove the drivers side front wheel
Start by removing your glove box:
This is pretty easy, start by removing the lower passanger dash cover. That's the cover under the glove box:
- Gently pull down on the rear edge to release the clips (B)
- Pull the cover away to release the pins (C) from the holders (D).
- To remove the glove box start by removing the two bolts underneath it (the glove box won't move if closed when you take these bolts out), then while supporting it open it up, and you will see two clip-like things on both sides of the glove box. Push them through towards the inside of the glove box, and work them out. Now you can remove the glove box.
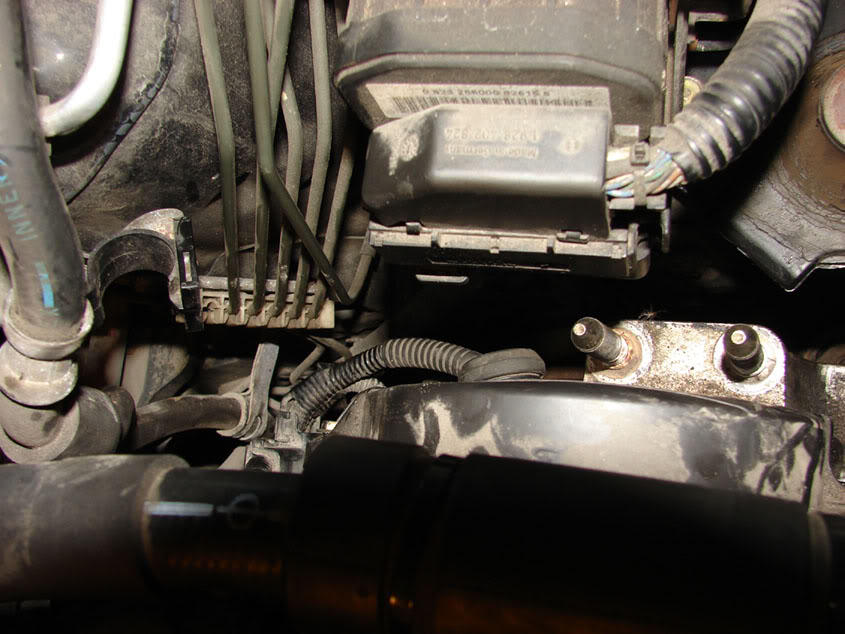
Now you have to remove the PGM fuel relay, this is all to relieve the fuel pressure so when you remove the injectors you don't get sprayed with fuel which is never nice. I had a really hard time getting my hands in there to remove the relay so I actually removed the steel support mount first to free the relay from it. To remove the support you just remove the bolts that hold it, the relay is the blue one on the left in the picture. Picture was borrowed from Maddem13:

Now that the relay has been removed. Put the heat on full blast and max heat and then start the engine and let it run untill it stalls. Remove the fuel cap at this point to relieve the pressure inside the gas tank. You can go further in relieving the pressure if you like but I feel this is all that is necessary.
Disconnect the negative battery terminal
Now is a great opportunity to drain the oil since you won't be starting the car again, also, remove the oil filter.
Next step is to drain the coolant. Here is a quick DIY on proper coolant drain procedure. The first step was done when you started the car with the heat on full and max. The car should be COLD, I put emphasis on this because if it's not your going to get sprayed with hot coolant.
- Remove the Radiator cap
- Loosen the drain plug on the radiator to drain majority of the coolant out (Pic borrowed from Reddawnman)
- Now the fun part is to remove the plug on the block. It's in the back close to where the oil filter was. You removed the oil filter first to allow easier access to this drain plug. Here is a pretty good picture of it's location. (Pic taken from Reddawnman)
- Remove the overflow container from it's place and drain it. You can put it back or let it hang by the hose for now as it won't really get in the way. There is 1 bolt on top holding it in place, after it's removed you can pull it straight up. If you remove the hose from it you can pull it right out.
That's it, the coolant is properly drained. There will be some coolant left in the engine as it's impossible to get rid of all of it. But now you know youve done everything you can to get rid of the majority of it.
Remove the throttle cable (A) and cruise control cable (B) by loosening the locknuts (C), then slipping the cable ends out of the accelerator linkage. DO NOT BEND THE CABLES WHEN REMOVING THEM!!! Safely put them off to the side.
Now the fun begins. We have to start removing the air box assembly and disconnecting hoses from the throttle body to prepare for intake manifold removal. A lot of people dont even remove the intake manifold. I decided to follow the service manual and removed the IM. It's a great opportunity to clean the throttle body and everything else. This is where it gets very important to Label and Mark EVERYTHING. When it comes time to put it all back together you want it to be as easy as possible. This is also where the job feels like it starts to speed up because parts in the engine bay start to disappear.
Let's continue on by removing the intake resonator. It's held on by 4 bolts, and comes out fairly easy:
Next is to remove the stock air box and expose the throttle body. There is a sensor connector, and 1 hose that need to be removed before you can move it. I cannot emphasize enough to mark your ****... it might seem like common sense where it goes now, but when it comes time to put it back together I assure you, you will be lost and it will cost you a lot of time trying to figure out where it all goes. Once the air box is removed stuff a rag in the throttle body so you don't knock dirt and other crap in there. This box is called the "Air Cleaner Housing" by the way, and is only held on by 2 bolts. It might take a bit of force and wiggling to pull it off of the throttle body because its sealed airtight style:
Now your looking at the throttle body. Take a close look at it or even take a picture just so you know what everything looks like assembled. You can take pictures throughout this job just so when it comes time to reassemble everything you don't struggle.
The first thing the manual says is to remove the brake booster vacuum hose off of the throttle body. I struggled to get my enormous fingers in there... so I actually left it on. I found it easier to remove it later on when the intake manifold was actually coming out. If you can get it off now I highly recommend you do it, if not save it for later. If you decide to do it later you WILL NEED a helping hand to get it off. One person to raise the manifold up, the other to remove the hose. This hose is on the back of the throttle body, fairly low on it as well. Also remove the crankcase ventilation hose which is located on the drivers side of the throttle body fairly low. This is another one that might be easier to remove a little later on but if you can get it now remove it:

If you managed to get it off great, if not lets continue on. This is where the manual says to relieve the fuel pressure. But hey, thats already done. I personally don't like running the car with no coolant (the manual says nothing of removing the oil) and all the other stuff disconnected so I do it right away.
Now to remove the EVAP canister hose. This is on the passanger side of the TB and comes off fairly easy:
This following picture is kinda hard to tell what it actually is. It's where the upper rad hose connects to the cylinder head. Remove the ground cable (A), upper radiator hose (B), lower radiator hose (C), heater hose (D) and water bypass hose (E).
Pretty straightforward stuff. If youve struggled up until now it might be a good time to reassemble everything and call a mechanic. It only gets better from here. I'm going to start leaving stuff out shortly because it's not in the manual and I've forgotten about it. Hopefully Josh starts reminding me of other stuff that must be done since he just did his HG
Now it's time to remove the water pipe. This is where youll be glad that you drained the coolant correctly. This is the pipe that runs on the passanger side of the engine to the back of the engine. It's going to take a bit of force and wiggle to get it out because its sealed watertight. There are two bolts holding the water pipe in place, after they are out you can remove it, leave the actual pipe hooked up to the clamp and off to the side:
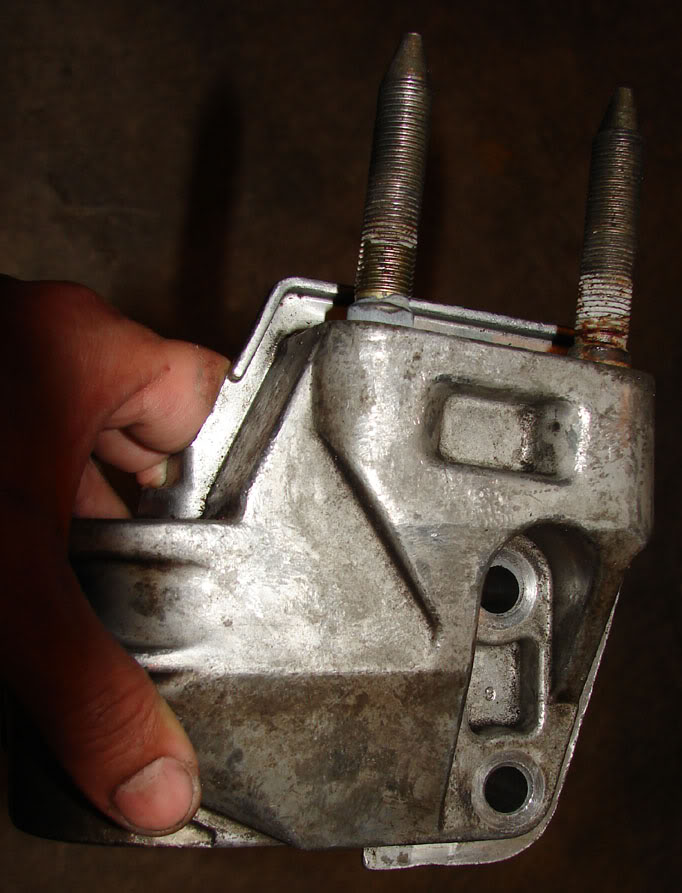
Now it's time to play with the power steering pump. Leave the power steering hoses hooked up and just move the actual pump assembly off to the side after it's been removed. Those hoses have a **** ton of play and you can almost pull it right out of the engine bay if you wanted to, and if you remove the hoses you create A LOT more work for yourself than necessary. Removing the power steering pump is actually a very simple procedure. I recommend having a set of wingnut sockets hanging around. Remove the adjusting plate mounting bolt (A), locknut (B) and mounting bolt (C), then remove the power steering (P/S) pump belt (D) and pump:
Now if you look down in the huge gaping hole that your power steering pump used to fill. You will see your alternator. SWEET, it looks comfortable in there. Let's take it out. This is pretty easy but it gets jammed in there sometimes and is a bitch to pull out. Then when you go to put it back it in doesnt fit in the designated slot *#$&@#(*%&@#(*%$&@#... Oh well, removing it is easy. Disconnect both cables from it and be careful not to lose the little nut. Loosen the adjusting bolt on the alternator (A wingnut socket helps a lot here). Remove the lock bolt on the lower alternator assembly (B) and then remove the big mounting bolt (C). Now you can remove the alternator belt, and the alternator itself. I smashed my knuckles doing this so be careful.
Cables:
Bolts:
Great, the alternator is out. Now that your probably pissed off to all hell because you had a hard time prying it out of the mounting brackets, let's do something easy. Remove the AC and PS hose bracket from near the valve cover on the drivers side of the engine. The PS bracket is technically infront of the engine near the valve cover again.
Remove every single connector and hose from the throttle body now... The manual lists them like this but you should be able to do it just by eyeballing it and labelling EVERYTHING. I'll give you a list, again take a picture if your not sure you will be able to assemble everythign again correctly:
Idle air control (IAC) valve connector
Throttle position sensor connector
Manifold absolute pressure (MAP) sensor connector
Evaporative emission (EVAP) canister purge valve connector (Except KT, KW models)
Engine coolant temperature (ECT) sensor connector
Radiator fan switch connector
CKP sensor connector
TDC sensor connector
Exhaust gas recirculation (EGR) connector (D14Z5, D15Y4, D16W7, D17A2 engines)
VTEC solenoid valve connector (D15Y4, D16V2, D16W7, D17A2, D17A5, D17Z3 engines)
VTEC oil pressure switch connector (D16W7 engine)
Oil pressure sensor connector
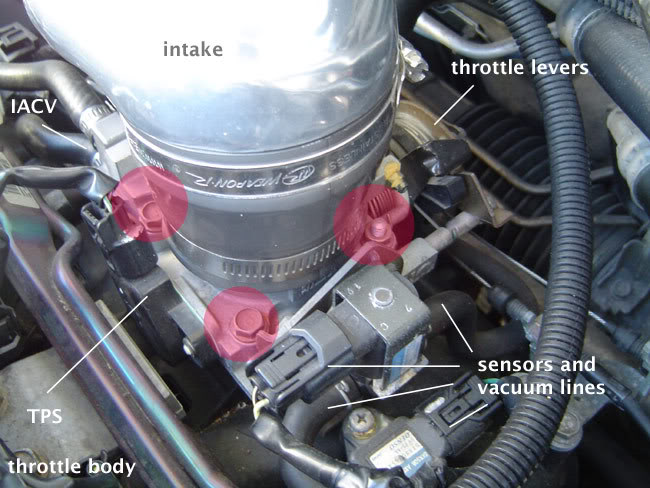
I found this great picture by gearbox that helps you identify a few of those hoses/connectors. This picture shows every hose/connector I think except for the two hoses on the passenger side of the TB (It only shows 1):
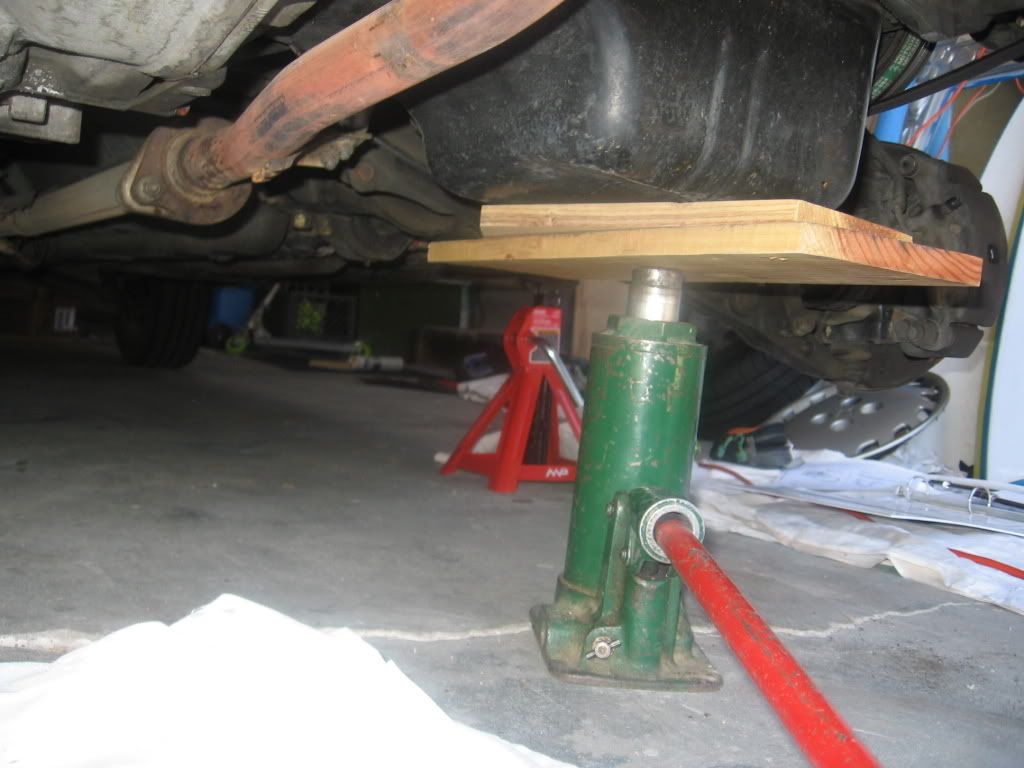
Now you need to support the bottom of the engine with a jack. IT IS IMPORTANT NOT TO USE THE JACK DIRECTLY ON THE OIL PAN. Please put a flat piece of wood between the jack and the oil pan to spread the pressure over the entire oil pan. The jack itself can puncture the oil pan. I found a great picture by Cleft_Asunder which shows how to support a 6th gen civic engine. Its the same as supporting a 7th gen, just looks a bit different:
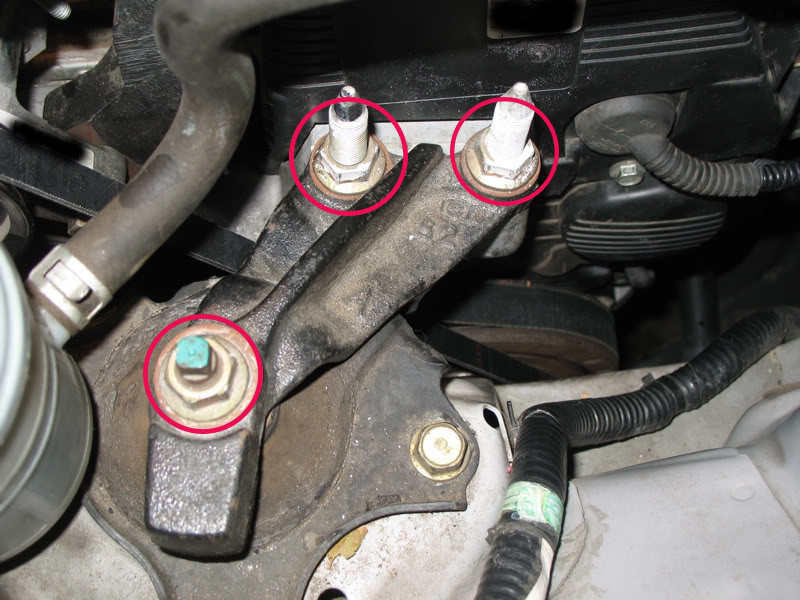
Remove the upper bracket for the EDIT: DRIVERS side engine mount. There are three bolts holding it on, and to remove it you might find you have to go up and down with the jack... If I remember correctly the engine has to be pretty level to remove it. If you supported it well it should come out pretty easy, if not play with the jack: (Pic from reddawnman)
Remove the manifold heat shield, it's held on by 3 bolts, 2 up top and 1 in the narrow section near the bottom.
Now we are going to remove the exhaust manifold. A lot of people say you don't have to do this but in order to get the head checked out properly it needs to be removed from the head. The manifold is a pain in the *** to remove because often it is rotted on. If you have access to an acetylene-oxygen torch it helps to heat the nuts up before you remove them, it gets them off a lot easier. If you strip a nut it's not the end of the world. I stripped 2 when I tried to take them off. Just cut them off with a hacksaw (handheld small hacksaw). Once the manifold is off you will have enough room to thread on 2 nuts against each other and get the stud out. The EX(D17A2) manifold is different from the other civics (D17A1). The D17A1 has a one piece manifold/catalytic converter so removal is a little bit different. I removed the manifold entirely from the car so crap from it wouldnt get into the cylinders when the head was removed.
The EX manifold has no O2 sensor in it, so just remove the nuts and bolts on the bottom (careful of the compression springs) and remove the manifold, easy as pie:
The D17A1 (lx etc.) manifold is a little different. You have to remove the O2 sensor before you can remove it.
Now to remove the intake manifold. This is a great time to double check and make sure everything is disconnected from the intake manifold. If you left the brake booster hose hooked up no big deal, you can get rid of it shortly. With the car jacked up now you have to get Waaay underneath it. There are three bolts on the bottom of the intake manifold that need to be removed from underneath the car. I know the picture only shows two but I assure you there are three... They are pretty easy to get out but you have to get WAAAY underneath the car to get them... They are attached to brackets. THIS IS A PLASTIC INTAKE MANIFOLD, DONT GO STUPID CRAZY ON THE BOLTS OR YOU WILL CRACK IT Once you locate and remove these bolts you can go back to looking at it from up top. Now you can remove the injectors from the head and again make sure that everything is disconnected from the throttle body. Once the injectors are out start removing the bolts/nuts from the intake manifold. You will quickly learn how tight it is in there and what a pain in the *** it is to remove them. Once they are out you can actually back the intake manifold away from the head and raise it up... With a helper raise it up just enough so he can get a pair of pliers in there to loosen off the brake booster hose, if you couldnt get it off before... after that hose is gone you should be able to lift the intake manifold out of the engine bay... Success!!! This is the hardest part of this job... the Intake Manifold is such a pain in the *** and once it's removed your kinda laughing, the only other thing is the stupid crank pulley bolt... but we will get to that soon Plug the 4 holes in the head with clean rags so no crap falls in there... if something falls into there you risk scarring your cylinder walls which could result in a new engine
After the intake manifold is removed, take off the knock sensor which was hiding behind it (1 bolt holds it on), let it dangle free. Take the ignition coil cover off, and then remove the ignition coils.

Remove the throttle body cable harness from ontop of the valve cover.
Remove the valve cover... Once the valve cover is off you can do your valve clearance adjustment. You can do it now or when you are reassembling everything. Here is the link, once again to grays DIY: https://www.civicforums.com/forums/1...djustment.html
Now you are well on your way to remove your head/timing belt. The intake manifold is off, valve cover is off, exhaust manifold has been removed, motor mount is out, alt and P/S pulleys are out... so.. next is to actually remove the timing belt. If youve gotten this far you should be able to finish this job no problem.
Turn the crank pulley so that the marks line up to TDC when your looking at it from up top.
You need to remove the entire front splash shield from the front end of the car, and you need to remove the splash shield from the drivers side wheel well to gain access to the timing belt and other components there.
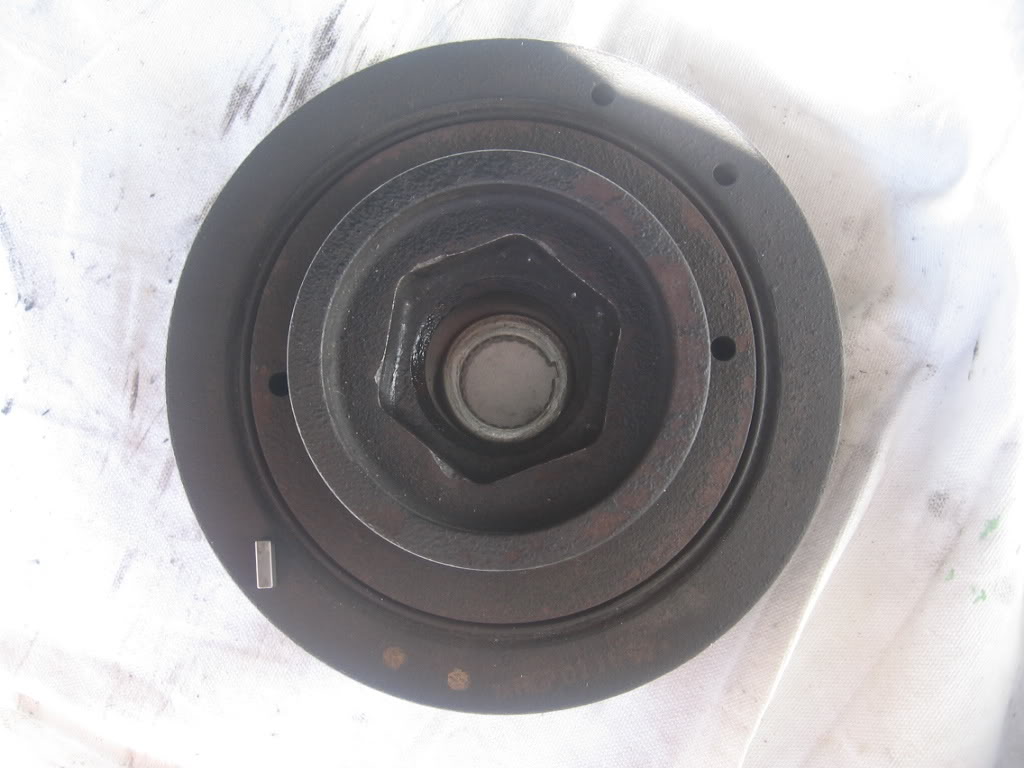
Now you need to crack that stupid crank pulley bolt. This bolt has some major torque and if your attempting a head gasket job I'm sure youve heard of how difficult this will be to remove. There is a little key inside the crank pulley called the Woodruff key. It is TINY but it keeps the crank pulley spinning in time with the timing belt pulley that lies underneath it. DO NOT LOSE THIS KEY, IT IS T-I-N-Y It is sitting on the bottom left of the crank pulley in this picture taken from Cleft_Asunders timing belt DIY:
DenLorsTools has a great video on youtube showing you how to use your crank pulley removal tool. So here it is:
You can now move on to removing the timing belt covers. Before you can remove them you need to get the TDC sensor + grommet off. Good luck with this because its hella tight in there and its a bit of a struggle to get it out. Once thats out remove all the small bolts from the timing belt covers and remove the covers. [BThe middle bolt will be longer than the rest and shiny The top cover has to come off first, then the bottoom.
Remove the alternator mount bracket from the head.
Remove the side engine mount bracket that is bolted onto the head. It is super tight on the side and I had to make millimeter movements with the wrench to get the bolts off. It might help to have a ratchet with a shallow socket but I can't remember if I could fit a ratchet head in there or not: (Pic borrowed from reddawnman)
Remove the CKP sensor from the oil pump WITHOUT disconnecting the connector for it ( LEAVE THE CONNECTOR CLIPPED IN AND REMOVE THE BOLT)
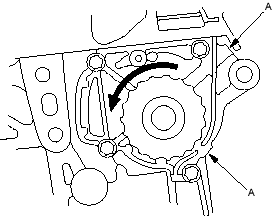
Make sure you are still TDC by checking your location on the cam gear. The "UP" marking should be pointing up. There is also a mark on the timing belt gear (on the crankshaft). The notch should line up with the notch in the block. When you are TDC, move the auto tensioner so the tension is off the belt, then you can remove the timing belt. You wont be TDC after the new head is installed anyway, but I'll cover that in the install procedure.
If you are going to replace the camshaft seal you will now need to remove the camshaft gear and the back cover for it. This can get tricky. DO NOT force the valves on the pistons to crack the bolt loose because if you do it too hard you WILL bend a valve. It's tricky to get off because it wants to spin, so I'll leave it to you to decide how you want to do it. You could always get the machine shop who checks your head out to remove it for you its up to you.

Now it's time to remove the head bolts. You MUST follow a specific patter when removing the bolts or you risk warping your head. The trick to this is to follow this sequence removing each bolt 1/3 of a turn at a time. If you don't do this you could destroy the head:
OFF WITH THE HEAD!!
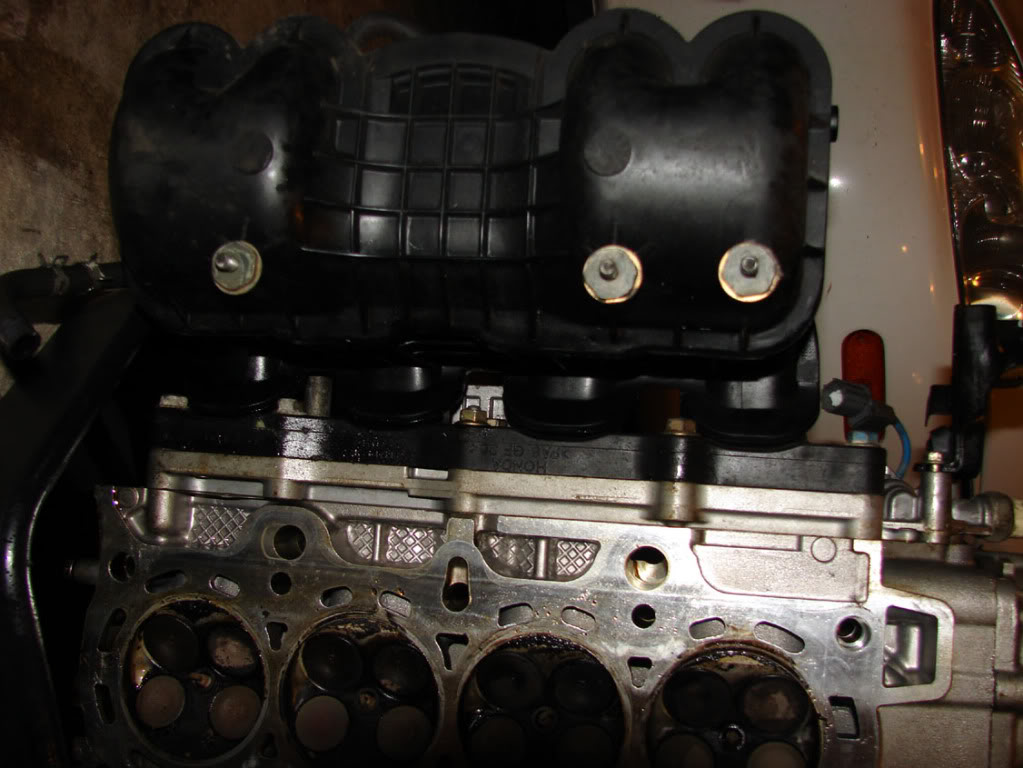
Remove the head from the car and look at your shiny pistons..., just be careful when removing the head not to lose the two dowel pins that line the block and head up properly. Sometimes they stay in the head and fall out, they can be a bitch to find. Take the head to a machine shop to get inspected and cleaned... When the head comes back you can start reassembly.
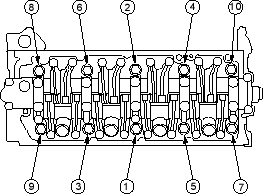
Here is what your looking at once the head has been removed. (Thanks Sandro (sdaidoji) for the picture)

It is very important to clean off the old gasket from the engine block. You will have to do this yourself since your probably not going to be taking the block to get cleaned up. The best way, and safest way, and the only way I can recommend doing it is a die grinder with an ALUMINUM SAFE white plastic attachment on it. However, since you might not have air and I didn't, I used very high grit sandpaper (1500+) wrapped around a small 2x4 and carefully sanded all the old gasket off. Remember, it might still look like there is gasket there but what's important is that it feels smooth. There is no tolerance for buildup so you have to be very careful when doing this. Most of the gasket will probably be on the head so there is another reason to take it to a shop and get that part done properly. The real pain in the *** is at the top of the cooling jacket, because its inset a bit to the rest of the block so you can't use a 2x4. Good Luck!
Once everything is cleaned up and the head is back from the machine shop, the easy part begins. Putting everything back together, but first lets go over a couple other things that you may be replacing in the process.
__________________________________________________ ___________________
Auto Tensioner mini DIY:
I replace or inspect the auto tensioner every time the timing belt is off. It is very easy to remove if you have everything else taken apart.
It is held on by one bolt that has to be removed, since the timing belt is already off you don't really have to worry about it:
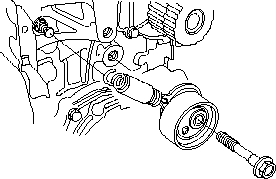
The tensioner has a detonator pin, and a spring on it. The pin is removed after assembly but for now leave it in until you get the head back on. The spring you can either leave hanging or put in a safe place for later on:
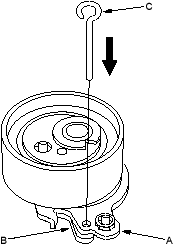
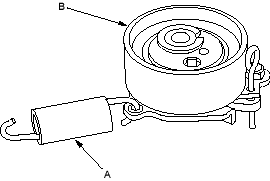
Install the tensioner and bolt onto the block and torque the bolt to 7.2 ft/lbs. It's hard to get a torque wrench in there, you can do it by feel but be careful NOT to over tighten it because i've heard lots of stories of people snapping the bolt off and it's a nightmare to fix afterwards. Remember, 7.2 ft/lbs is not much torque at all. Make sure you put anti seize paste on EVERYTHING you put back on.
That's it, we will finish the rest of the timing belt install later.
__________________________________________________ ___________________
Water Pump Mini DIY
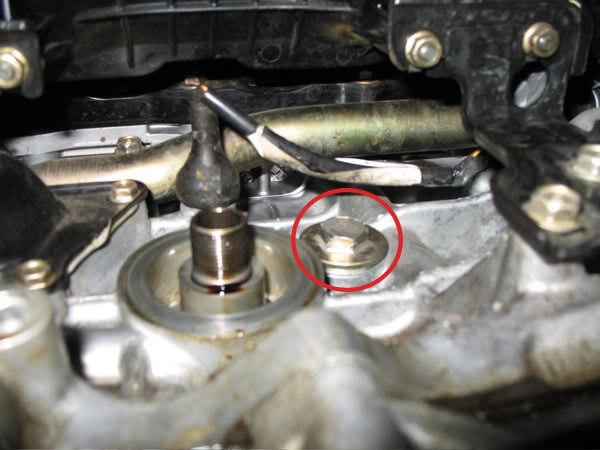
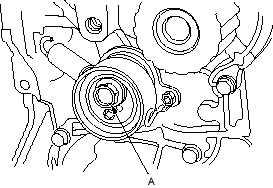
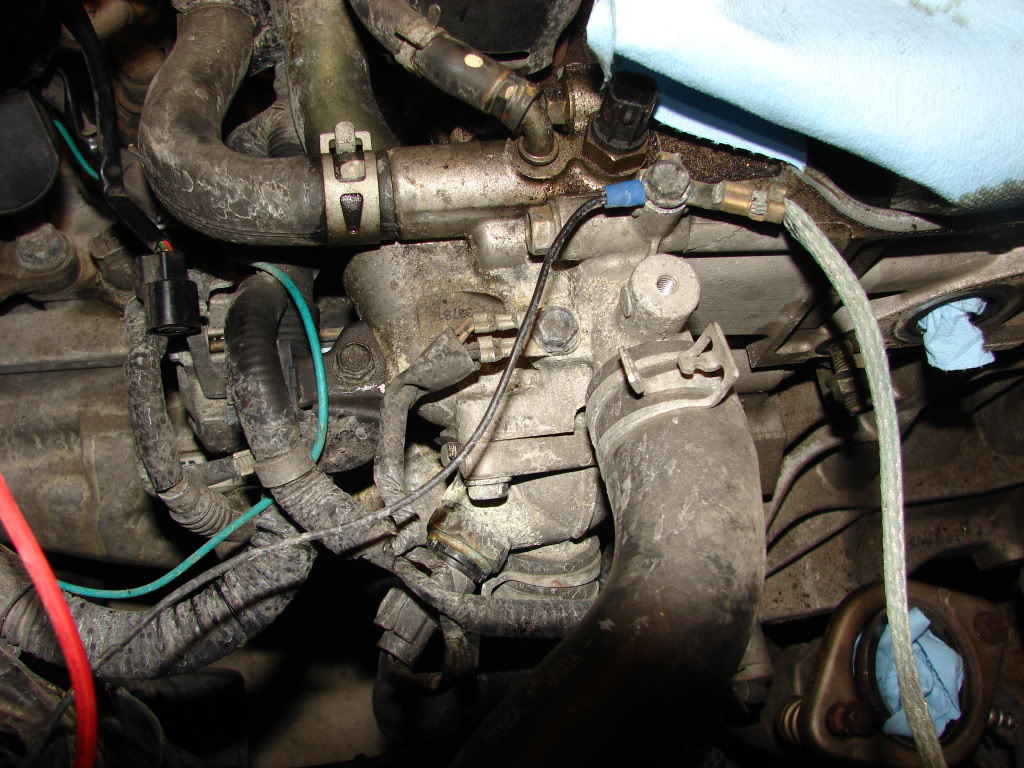
You also now have full access to the water pump. I recommend removing it at least and replacing the gasket. It's only held on by four bolts. First thing you wanna do is check for oil leakage around the pump, a little bit of leaking from point "A" on this picture is okay, that's the oil bleeder:
Remove the four bolts holding the water pump in place:
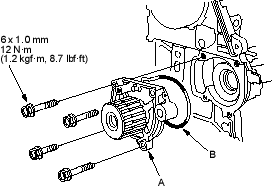
Take a good look at where the O ring sits on the block, make sure it's not covered in dirt. It needs a nice clean surface to seal to. If everything looks good put the new gasket on the water pump and put the pump back on the car, torque the bolts to 8.7 ft/lbs. Again you can do this by feel but do not over tighten the bolts or you will run into trouble.
__________________________________________________ ___________________
Back to the actual head gasket portion of this
Replace the head gasket and dowels by putting them back on the engine block.
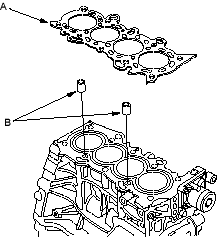
The dowels go closest to the front of the car even though it looks like they would fit in a few places, this is the only place to put them. It shows it clearly in the image above ^ ^ ^.
Check your crankshaft for TDC, also make sure the head is still TDC. That way it will sit properly on the block without putting excess stress on any of the valves. Get a friend and carefully put the cylinder head back ontop of the block.
Once the head is back on you will need to replace the head bolts. A lot of people will say that you need to get new head bolts but I disagree. Honda head bolts don't stretch like many other manufacturers do so you can use them maybe two or three times before they need replacement. Dip the new head bolts in new oil and put them back in their designated holes. All the head bolts are the same length so you don't have to worry about which one goes where. Once dipped in oil and placed back in their hole you will have to torque them on. Torquing the head back on is a three step process done in the following order:
14 ft/lbs is your first spec.
36 ft/lbs is your second.
49 ft/lbs is where you will finish it.
Now the engine is back in one piece, sort of... Let the fun continue:
This has been a long time coming and I can't believe nobody has covered it yet. This is a non-comprehensive guide to aid you in changing your head gasket. I will be leaving some stuff out, but this should be good enough to help most backyard mechanics complete the job. I'm also going to steal some pictures from other members on this forum. I'll do my best to make mentions of who it was. Josh assembled a great part list, so instead of making my own I'll just link his in, I highly recommend reading through this thread before reading this DIY:
Headgasket Replacement Parts List
A couple other things I suggest you have handy
Wingnut Sockets
A couple studs for the intake and exhaust manifolds
New nuts for the intake and exhaust manifolds
Ratcheting wrenches will make a H-U-G-E difference
A 4' breaker bar if you can get your hands on one
Also, while doing this job I highly recommend doign a valve lash adjustment. Get familiar with this DIY as well, you should be using it sometime during this job. Grey did a GREAT job on this DIY and you should also take into consideration his part/tool list:
DIY: Valve Clearance Adjustment
So, let's get on to the fun stuff. This job took me a whole weekend. I took my sweet *** time and I suggest you do too, especially if you've never done it before. ALSO, this is not for someone who does not know their way around the engine bay. Mistakes on this job can very quickly cost you an engine!!!
Jack up the front of the car SAFELY and put it on jackstands! Remove the drivers side front wheel
Start by removing your glove box:
This is pretty easy, start by removing the lower passanger dash cover. That's the cover under the glove box:
- Gently pull down on the rear edge to release the clips (B)
- Pull the cover away to release the pins (C) from the holders (D).
- To remove the glove box start by removing the two bolts underneath it (the glove box won't move if closed when you take these bolts out), then while supporting it open it up, and you will see two clip-like things on both sides of the glove box. Push them through towards the inside of the glove box, and work them out. Now you can remove the glove box.
Now you have to remove the PGM fuel relay, this is all to relieve the fuel pressure so when you remove the injectors you don't get sprayed with fuel which is never nice. I had a really hard time getting my hands in there to remove the relay so I actually removed the steel support mount first to free the relay from it. To remove the support you just remove the bolts that hold it, the relay is the blue one on the left in the picture. Picture was borrowed from Maddem13:
Now that the relay has been removed. Put the heat on full blast and max heat and then start the engine and let it run untill it stalls. Remove the fuel cap at this point to relieve the pressure inside the gas tank. You can go further in relieving the pressure if you like but I feel this is all that is necessary.
Disconnect the negative battery terminal
Now is a great opportunity to drain the oil since you won't be starting the car again, also, remove the oil filter.
Next step is to drain the coolant. Here is a quick DIY on proper coolant drain procedure. The first step was done when you started the car with the heat on full and max. The car should be COLD, I put emphasis on this because if it's not your going to get sprayed with hot coolant.
- Remove the Radiator cap
- Loosen the drain plug on the radiator to drain majority of the coolant out (Pic borrowed from Reddawnman)
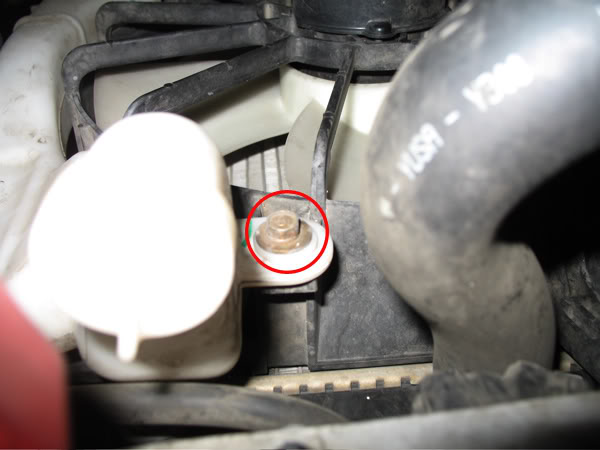
- Now the fun part is to remove the plug on the block. It's in the back close to where the oil filter was. You removed the oil filter first to allow easier access to this drain plug. Here is a pretty good picture of it's location. (Pic taken from Reddawnman)
- Remove the overflow container from it's place and drain it. You can put it back or let it hang by the hose for now as it won't really get in the way. There is 1 bolt on top holding it in place, after it's removed you can pull it straight up. If you remove the hose from it you can pull it right out.
That's it, the coolant is properly drained. There will be some coolant left in the engine as it's impossible to get rid of all of it. But now you know youve done everything you can to get rid of the majority of it.
Remove the throttle cable (A) and cruise control cable (B) by loosening the locknuts (C), then slipping the cable ends out of the accelerator linkage. DO NOT BEND THE CABLES WHEN REMOVING THEM!!! Safely put them off to the side.
Now the fun begins. We have to start removing the air box assembly and disconnecting hoses from the throttle body to prepare for intake manifold removal. A lot of people dont even remove the intake manifold. I decided to follow the service manual and removed the IM. It's a great opportunity to clean the throttle body and everything else. This is where it gets very important to Label and Mark EVERYTHING. When it comes time to put it all back together you want it to be as easy as possible. This is also where the job feels like it starts to speed up because parts in the engine bay start to disappear.
Let's continue on by removing the intake resonator. It's held on by 4 bolts, and comes out fairly easy:
Next is to remove the stock air box and expose the throttle body. There is a sensor connector, and 1 hose that need to be removed before you can move it. I cannot emphasize enough to mark your ****... it might seem like common sense where it goes now, but when it comes time to put it back together I assure you, you will be lost and it will cost you a lot of time trying to figure out where it all goes. Once the air box is removed stuff a rag in the throttle body so you don't knock dirt and other crap in there. This box is called the "Air Cleaner Housing" by the way, and is only held on by 2 bolts. It might take a bit of force and wiggling to pull it off of the throttle body because its sealed airtight style:
Now your looking at the throttle body. Take a close look at it or even take a picture just so you know what everything looks like assembled. You can take pictures throughout this job just so when it comes time to reassemble everything you don't struggle.
The first thing the manual says is to remove the brake booster vacuum hose off of the throttle body. I struggled to get my enormous fingers in there... so I actually left it on. I found it easier to remove it later on when the intake manifold was actually coming out. If you can get it off now I highly recommend you do it, if not save it for later. If you decide to do it later you WILL NEED a helping hand to get it off. One person to raise the manifold up, the other to remove the hose. This hose is on the back of the throttle body, fairly low on it as well. Also remove the crankcase ventilation hose which is located on the drivers side of the throttle body fairly low. This is another one that might be easier to remove a little later on but if you can get it now remove it:
If you managed to get it off great, if not lets continue on. This is where the manual says to relieve the fuel pressure. But hey, thats already done. I personally don't like running the car with no coolant (the manual says nothing of removing the oil) and all the other stuff disconnected so I do it right away.
Now to remove the EVAP canister hose. This is on the passanger side of the TB and comes off fairly easy:
This following picture is kinda hard to tell what it actually is. It's where the upper rad hose connects to the cylinder head. Remove the ground cable (A), upper radiator hose (B), lower radiator hose (C), heater hose (D) and water bypass hose (E).
Pretty straightforward stuff. If youve struggled up until now it might be a good time to reassemble everything and call a mechanic. It only gets better from here. I'm going to start leaving stuff out shortly because it's not in the manual and I've forgotten about it. Hopefully Josh starts reminding me of other stuff that must be done since he just did his HG
Now it's time to remove the water pipe. This is where youll be glad that you drained the coolant correctly. This is the pipe that runs on the passanger side of the engine to the back of the engine. It's going to take a bit of force and wiggle to get it out because its sealed watertight. There are two bolts holding the water pipe in place, after they are out you can remove it, leave the actual pipe hooked up to the clamp and off to the side:
Now it's time to play with the power steering pump. Leave the power steering hoses hooked up and just move the actual pump assembly off to the side after it's been removed. Those hoses have a **** ton of play and you can almost pull it right out of the engine bay if you wanted to, and if you remove the hoses you create A LOT more work for yourself than necessary. Removing the power steering pump is actually a very simple procedure. I recommend having a set of wingnut sockets hanging around. Remove the adjusting plate mounting bolt (A), locknut (B) and mounting bolt (C), then remove the power steering (P/S) pump belt (D) and pump:
Now if you look down in the huge gaping hole that your power steering pump used to fill. You will see your alternator. SWEET, it looks comfortable in there. Let's take it out. This is pretty easy but it gets jammed in there sometimes and is a bitch to pull out. Then when you go to put it back it in doesnt fit in the designated slot *#$&@#(*%&@#(*%$&@#... Oh well, removing it is easy. Disconnect both cables from it and be careful not to lose the little nut. Loosen the adjusting bolt on the alternator (A wingnut socket helps a lot here). Remove the lock bolt on the lower alternator assembly (B) and then remove the big mounting bolt (C). Now you can remove the alternator belt, and the alternator itself. I smashed my knuckles doing this so be careful.
Cables:
Bolts:
Great, the alternator is out. Now that your probably pissed off to all hell because you had a hard time prying it out of the mounting brackets, let's do something easy. Remove the AC and PS hose bracket from near the valve cover on the drivers side of the engine. The PS bracket is technically infront of the engine near the valve cover again.
Remove every single connector and hose from the throttle body now... The manual lists them like this but you should be able to do it just by eyeballing it and labelling EVERYTHING. I'll give you a list, again take a picture if your not sure you will be able to assemble everythign again correctly:
Idle air control (IAC) valve connector
Throttle position sensor connector
Manifold absolute pressure (MAP) sensor connector
Evaporative emission (EVAP) canister purge valve connector (Except KT, KW models)
Engine coolant temperature (ECT) sensor connector
Radiator fan switch connector
CKP sensor connector
TDC sensor connector
Exhaust gas recirculation (EGR) connector (D14Z5, D15Y4, D16W7, D17A2 engines)
VTEC solenoid valve connector (D15Y4, D16V2, D16W7, D17A2, D17A5, D17Z3 engines)
VTEC oil pressure switch connector (D16W7 engine)
Oil pressure sensor connector
I found this great picture by gearbox that helps you identify a few of those hoses/connectors. This picture shows every hose/connector I think except for the two hoses on the passenger side of the TB (It only shows 1):
Now you need to support the bottom of the engine with a jack. IT IS IMPORTANT NOT TO USE THE JACK DIRECTLY ON THE OIL PAN. Please put a flat piece of wood between the jack and the oil pan to spread the pressure over the entire oil pan. The jack itself can puncture the oil pan. I found a great picture by Cleft_Asunder which shows how to support a 6th gen civic engine. Its the same as supporting a 7th gen, just looks a bit different:
Remove the upper bracket for the EDIT: DRIVERS side engine mount. There are three bolts holding it on, and to remove it you might find you have to go up and down with the jack... If I remember correctly the engine has to be pretty level to remove it. If you supported it well it should come out pretty easy, if not play with the jack: (Pic from reddawnman)
Remove the manifold heat shield, it's held on by 3 bolts, 2 up top and 1 in the narrow section near the bottom.
Now we are going to remove the exhaust manifold. A lot of people say you don't have to do this but in order to get the head checked out properly it needs to be removed from the head. The manifold is a pain in the *** to remove because often it is rotted on. If you have access to an acetylene-oxygen torch it helps to heat the nuts up before you remove them, it gets them off a lot easier. If you strip a nut it's not the end of the world. I stripped 2 when I tried to take them off. Just cut them off with a hacksaw (handheld small hacksaw). Once the manifold is off you will have enough room to thread on 2 nuts against each other and get the stud out. The EX(D17A2) manifold is different from the other civics (D17A1). The D17A1 has a one piece manifold/catalytic converter so removal is a little bit different. I removed the manifold entirely from the car so crap from it wouldnt get into the cylinders when the head was removed.
The EX manifold has no O2 sensor in it, so just remove the nuts and bolts on the bottom (careful of the compression springs) and remove the manifold, easy as pie:
The D17A1 (lx etc.) manifold is a little different. You have to remove the O2 sensor before you can remove it.
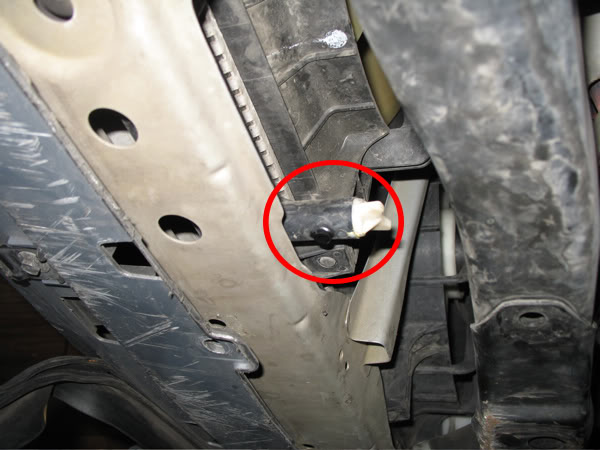
Now to remove the intake manifold. This is a great time to double check and make sure everything is disconnected from the intake manifold. If you left the brake booster hose hooked up no big deal, you can get rid of it shortly. With the car jacked up now you have to get Waaay underneath it. There are three bolts on the bottom of the intake manifold that need to be removed from underneath the car. I know the picture only shows two but I assure you there are three... They are pretty easy to get out but you have to get WAAAY underneath the car to get them... They are attached to brackets. THIS IS A PLASTIC INTAKE MANIFOLD, DONT GO STUPID CRAZY ON THE BOLTS OR YOU WILL CRACK IT Once you locate and remove these bolts you can go back to looking at it from up top. Now you can remove the injectors from the head and again make sure that everything is disconnected from the throttle body. Once the injectors are out start removing the bolts/nuts from the intake manifold. You will quickly learn how tight it is in there and what a pain in the *** it is to remove them. Once they are out you can actually back the intake manifold away from the head and raise it up... With a helper raise it up just enough so he can get a pair of pliers in there to loosen off the brake booster hose, if you couldnt get it off before... after that hose is gone you should be able to lift the intake manifold out of the engine bay... Success!!! This is the hardest part of this job... the Intake Manifold is such a pain in the *** and once it's removed your kinda laughing, the only other thing is the stupid crank pulley bolt... but we will get to that soon
Plug the 4 holes in the head with clean rags so no crap falls in there... if something falls into there you risk scarring your cylinder walls which could result in a new engineAfter the intake manifold is removed, take off the knock sensor which was hiding behind it (1 bolt holds it on), let it dangle free. Take the ignition coil cover off, and then remove the ignition coils.
Remove the throttle body cable harness from ontop of the valve cover.
Remove the valve cover... Once the valve cover is off you can do your valve clearance adjustment. You can do it now or when you are reassembling everything. Here is the link, once again to grays DIY: https://www.civicforums.com/forums/1...djustment.html
Now you are well on your way to remove your head/timing belt. The intake manifold is off, valve cover is off, exhaust manifold has been removed, motor mount is out, alt and P/S pulleys are out... so.. next is to actually remove the timing belt. If youve gotten this far you should be able to finish this job no problem.
Turn the crank pulley so that the marks line up to TDC when your looking at it from up top.
You need to remove the entire front splash shield from the front end of the car, and you need to remove the splash shield from the drivers side wheel well to gain access to the timing belt and other components there.
Now you need to crack that stupid crank pulley bolt. This bolt has some major torque and if your attempting a head gasket job I'm sure youve heard of how difficult this will be to remove. There is a little key inside the crank pulley called the Woodruff key. It is TINY but it keeps the crank pulley spinning in time with the timing belt pulley that lies underneath it. DO NOT LOSE THIS KEY, IT IS T-I-N-Y It is sitting on the bottom left of the crank pulley in this picture taken from Cleft_Asunders timing belt DIY:
DenLorsTools has a great video on youtube showing you how to use your crank pulley removal tool. So here it is:
You can now move on to removing the timing belt covers. Before you can remove them you need to get the TDC sensor + grommet off. Good luck with this because its hella tight in there and its a bit of a struggle to get it out. Once thats out remove all the small bolts from the timing belt covers and remove the covers. [BThe middle bolt will be longer than the rest and shiny The top cover has to come off first, then the bottoom.
Remove the alternator mount bracket from the head.
Remove the side engine mount bracket that is bolted onto the head. It is super tight on the side and I had to make millimeter movements with the wrench to get the bolts off. It might help to have a ratchet with a shallow socket but I can't remember if I could fit a ratchet head in there or not: (Pic borrowed from reddawnman)
Remove the CKP sensor from the oil pump WITHOUT disconnecting the connector for it ( LEAVE THE CONNECTOR CLIPPED IN AND REMOVE THE BOLT)
Make sure you are still TDC by checking your location on the cam gear. The "UP" marking should be pointing up. There is also a mark on the timing belt gear (on the crankshaft). The notch should line up with the notch in the block. When you are TDC, move the auto tensioner so the tension is off the belt, then you can remove the timing belt. You wont be TDC after the new head is installed anyway, but I'll cover that in the install procedure.
If you are going to replace the camshaft seal you will now need to remove the camshaft gear and the back cover for it. This can get tricky. DO NOT force the valves on the pistons to crack the bolt loose because if you do it too hard you WILL bend a valve. It's tricky to get off because it wants to spin, so I'll leave it to you to decide how you want to do it. You could always get the machine shop who checks your head out to remove it for you its up to you.
Now it's time to remove the head bolts. You MUST follow a specific patter when removing the bolts or you risk warping your head. The trick to this is to follow this sequence removing each bolt 1/3 of a turn at a time. If you don't do this you could destroy the head:
OFF WITH THE HEAD!!
Remove the head from the car and look at your shiny pistons..., just be careful when removing the head not to lose the two dowel pins that line the block and head up properly. Sometimes they stay in the head and fall out, they can be a bitch to find. Take the head to a machine shop to get inspected and cleaned... When the head comes back you can start reassembly.
Here is what your looking at once the head has been removed. (Thanks Sandro (sdaidoji) for the picture)
It is very important to clean off the old gasket from the engine block. You will have to do this yourself since your probably not going to be taking the block to get cleaned up. The best way, and safest way, and the only way I can recommend doing it is a die grinder with an ALUMINUM SAFE white plastic attachment on it. However, since you might not have air and I didn't, I used very high grit sandpaper (1500+) wrapped around a small 2x4 and carefully sanded all the old gasket off. Remember, it might still look like there is gasket there but what's important is that it feels smooth. There is no tolerance for buildup so you have to be very careful when doing this. Most of the gasket will probably be on the head so there is another reason to take it to a shop and get that part done properly. The real pain in the *** is at the top of the cooling jacket, because its inset a bit to the rest of the block so you can't use a 2x4. Good Luck!
Once everything is cleaned up and the head is back from the machine shop, the easy part begins. Putting everything back together, but first lets go over a couple other things that you may be replacing in the process.
__________________________________________________ ___________________
Auto Tensioner mini DIY:
I replace or inspect the auto tensioner every time the timing belt is off. It is very easy to remove if you have everything else taken apart.
It is held on by one bolt that has to be removed, since the timing belt is already off you don't really have to worry about it:
The tensioner has a detonator pin, and a spring on it. The pin is removed after assembly but for now leave it in until you get the head back on. The spring you can either leave hanging or put in a safe place for later on:
Install the tensioner and bolt onto the block and torque the bolt to 7.2 ft/lbs. It's hard to get a torque wrench in there, you can do it by feel but be careful NOT to over tighten it because i've heard lots of stories of people snapping the bolt off and it's a nightmare to fix afterwards. Remember, 7.2 ft/lbs is not much torque at all. Make sure you put anti seize paste on EVERYTHING you put back on.
That's it, we will finish the rest of the timing belt install later.
__________________________________________________ ___________________
Water Pump Mini DIY
You also now have full access to the water pump. I recommend removing it at least and replacing the gasket. It's only held on by four bolts. First thing you wanna do is check for oil leakage around the pump, a little bit of leaking from point "A" on this picture is okay, that's the oil bleeder:
Remove the four bolts holding the water pump in place:
Take a good look at where the O ring sits on the block, make sure it's not covered in dirt. It needs a nice clean surface to seal to. If everything looks good put the new gasket on the water pump and put the pump back on the car, torque the bolts to 8.7 ft/lbs. Again you can do this by feel but do not over tighten the bolts or you will run into trouble.
__________________________________________________ ___________________
Back to the actual head gasket portion of this
Replace the head gasket and dowels by putting them back on the engine block.
The dowels go closest to the front of the car even though it looks like they would fit in a few places, this is the only place to put them. It shows it clearly in the image above ^ ^ ^.
Check your crankshaft for TDC, also make sure the head is still TDC. That way it will sit properly on the block without putting excess stress on any of the valves. Get a friend and carefully put the cylinder head back ontop of the block.
Once the head is back on you will need to replace the head bolts. A lot of people will say that you need to get new head bolts but I disagree. Honda head bolts don't stretch like many other manufacturers do so you can use them maybe two or three times before they need replacement. Dip the new head bolts in new oil and put them back in their designated holes. All the head bolts are the same length so you don't have to worry about which one goes where. Once dipped in oil and placed back in their hole you will have to torque them on. Torquing the head back on is a three step process done in the following order:
14 ft/lbs is your first spec.
36 ft/lbs is your second.
49 ft/lbs is where you will finish it.
Now the engine is back in one piece, sort of... Let the fun continue:
Last edited by xRiCeBoYx; Sep 10, 2018 at 02:01 AM. Reason: DRIVERS side mount

Registered!!
Joined: Feb 2011
Posts: 6
Likes: 0
Rep Power: 0 
Re: Head Gasket + Timing Belt DIY
well it seems i can't start a new thread so ill drop the question in here i pulled the head off my 02 to change the gasket when i got it off i found 2 pilot bushings that line up the head to the block but it looks like there should be 4 i didn't here anything drop when i lifted the head out and the floor is clean anyone know for sure how many there are?

Registered!!
Joined: Jul 2009
Posts: 25
Likes: 0
From: Alabama
Rep Power: 0 Re: Head Gasket + Timing Belt DIY
tbohar:
Great DIY. I am 7-8 hrs into the job myself. I have stopped for the evening. All I lack is removing the head and taking it to a local shop to be inspected. I have a couple comments that you might be able to use in the DIY.
You mentioned the 3 bolts on the bottom of the intake manifold. I found that also removing the two brackets that the 3 bolts are connected to makes it much easier to remove the manifold.
It took me some time to remove the fuel rail and regulator. After I removed the nuts, you need to use a good bit of force to separate from the injectors. They have o-rings that have a tight fit. I did not want to break anything. If I would have realized this I would have saved some time.
Also, I have antilock breaks. The control box for the breaks is to the left of the camshaft gear/spoke.
Hopefully in the next week I will have it back and running.
Brandon
Thread Starter
Whachya lookin at?
iTrader: (1)
Joined: May 2009
Posts: 6,388
Likes: 13
From: Canada
Rep Power: 314 Re: Head Gasket + Timing Belt DIY
Great thanks a lot. I did the job a year ago so there is a bunch of stuff I did forget to mention... I need to get back and working on this, it's a big job so the DIY is big too I'll make sure I put some mentions of this in there.
I'll make sure I put some mentions of this in there. Registered!!
Joined: Jul 2009
Posts: 25
Likes: 0
From: Alabama
Rep Power: 0 Re: Head Gasket + Timing Belt DIY
Finished the job. Car is running well so far. One suggestion for those who are thinking about tackling the job. Label everything, especially the loose brackets that you take off. There will be many.
Thread Starter
Whachya lookin at?
iTrader: (1)
Joined: May 2009
Posts: 6,388
Likes: 13
From: Canada
Rep Power: 314 Re: Head Gasket + Timing Belt DIY
Most definitely, I'm not sure if you used my DIY to take things apart as it's as far as I've gotten but it should help a bit... It's a big job. Congrats on the completion.
Joined: Dec 2008
Posts: 15,189
Likes: 1,609
From: TN
Rep Power: 368 Re: Head Gasket + Timing Belt DIY
Tom,
I would recommend removing the engine mount after you take the intake out - the jack propping the engine would be a pain to duck if you are trying to reach the deepest portions behind the engine from underneath
I would recommend removing the engine mount after you take the intake out - the jack propping the engine would be a pain to duck if you are trying to reach the deepest portions behind the engine from underneath

Joined: Dec 2008
Posts: 15,189
Likes: 1,609
From: TN
Rep Power: 368 Re: Head Gasket + Timing Belt DIY
Tom,
never get an ABS car... My hands are just too big to fit in here to get the TDC and the alternator bolts... and the intake mani...
and i am 5'6" 120lbs... all day today and 1/2 yesterday with these...
ah, this is one of the missing pics on yours:
never get an ABS car... My hands are just too big to fit in here to get the TDC and the alternator bolts... and the intake mani...
and i am 5'6" 120lbs... all day today and 1/2 yesterday with these...
ah, this is one of the missing pics on yours:
Thread Starter
Whachya lookin at?
iTrader: (1)
Joined: May 2009
Posts: 6,388
Likes: 13
From: Canada
Rep Power: 314 Re: Head Gasket + Timing Belt DIY
Those engine mount bolts were a nightmare... if you search Josh had a fancy tool to do it with but I can't remember what it's called. He said it saved him a shitload of time. Thansk for the pictures.. I will finish this DIY one day... i swear. You could have saved some time and left the exhaust manifold hooked up to the downpipe... it really wouldnt get in the way too much when removing the head and it would save you a few minutes playing with the spring bolts.. Also.. I've recently discovered you don't need to remove the intake manifold either... just remove the bolts off the brackets behind and the knock sensor, make sure everything is disconnected off the IM and remove the head. It takes two people to remove the head just to make sure your clearing everything but it saves you from trying to remove the IM.. depends on what it's worth to you i guess
Last edited by BlueEM2; Jun 1, 2011 at 05:33 AM.
Joined: Dec 2008
Posts: 15,189
Likes: 1,609
From: TN
Rep Power: 368 Re: Head Gasket + Timing Belt DIY
solution for TDC and top cover - pull the top cover (carefully to not to damage the TDC wires) from the front and lift towards the rear, move it over the engine mounts studs and put your hand in thre to disconnect the TDC.
The alternator bracket bolts are easier to reach from the wheel well.
The lower belt cover have the CPK sensor wires secured in it. it will be easier to remove them while the cover is still bolted...
The alternator bracket bolts are easier to reach from the wheel well.
The lower belt cover have the CPK sensor wires secured in it. it will be easier to remove them while the cover is still bolted...
Thread Starter
Whachya lookin at?
iTrader: (1)
Joined: May 2009
Posts: 6,388
Likes: 13
From: Canada
Rep Power: 314 Re: Head Gasket + Timing Belt DIY
Whoe hang on... have you removed the engine mount bracket off that side yet? If you havent that's where the fun really is. You can't remove the timing belt until it's gone.
Joined: Dec 2008
Posts: 15,189
Likes: 1,609
From: TN
Rep Power: 368 Re: Head Gasket + Timing Belt DIY
non, non, i used the studs to hold the top cover off the camshaft gear, so i could squeeze my hands in to remove the TDC sensor
what is still to go out is the alt bracket - darm!
what is still to go out is the alt bracket - darm!
Thread Starter
Whachya lookin at?
iTrader: (1)
Joined: May 2009
Posts: 6,388
Likes: 13
From: Canada
Rep Power: 314 Re: Head Gasket + Timing Belt DIY
That's a piece of cake compared to the alternator/mount bracket... have fun.. It's easier to get at from under the car and you can get half a mm of movement on the wrench... damnit josh chime in here and tell him what the name of the sockets you used were ! I can't remember and I'm too lazy to find it haha...
Joined: Aug 2003
Posts: 21,620
Likes: 1,252
From: Las Vegas, NV
Rep Power: 513 Re: Head Gasket + Timing Belt DIY
and gd Sandro, you had trouble getting to all those bolts, being 5'6" 120lbs? I had no problem, and I'm 5'7" 155lbs. Lol
Thread Starter
Whachya lookin at?
iTrader: (1)
Joined: May 2009
Posts: 6,388
Likes: 13
From: Canada
Rep Power: 314 Re: Head Gasket + Timing Belt DIY
Hahahaha... damn.. I had no issues and I'm 6'1 200lbs... My back was sore as hell when I was done from leaning over. I felt like a damn hunchback.. it was awesome
Joined: Aug 2003
Posts: 21,620
Likes: 1,252
From: Las Vegas, NV
Rep Power: 513 Re: Head Gasket + Timing Belt DIY
Seriously though, I had to take hella breaks to stretch my back out when I did all that work, too.. hahaha..
In any case, here's pics of that "mystery setup," Tom.
Joined: Dec 2008
Posts: 15,189
Likes: 1,609
From: TN
Rep Power: 368 Re: Head Gasket + Timing Belt DIY
actuall, i was having troubles with the bracket already out, with normal wrench on the lower bolt, and a normal rachet in the upper, using 2 rubber mallets plus a 19mm wrench to lever it up in the final stretcht... pheew....
already out, with normal wrench on the lower bolt, and a normal rachet in the upper, using 2 rubber mallets plus a 19mm wrench to lever it up in the final stretcht... pheew.... Thread Starter
Whachya lookin at?
iTrader: (1)
Joined: May 2009
Posts: 6,388
Likes: 13
From: Canada
Rep Power: 314 Re: Head Gasket + Timing Belt DIY
I guess there were 3 different ways to do it... I gotta say Josh it may have been easier to get at it from the bottom but it's hard to tell until i give your method a shot lol I used a regular wrench and just went at it.
I used a regular wrench and just went at it. Joined: Dec 2008
Posts: 15,189
Likes: 1,609
From: TN
Rep Power: 368 Re: Head Gasket + Timing Belt DIY
OK, here goes some more pics.
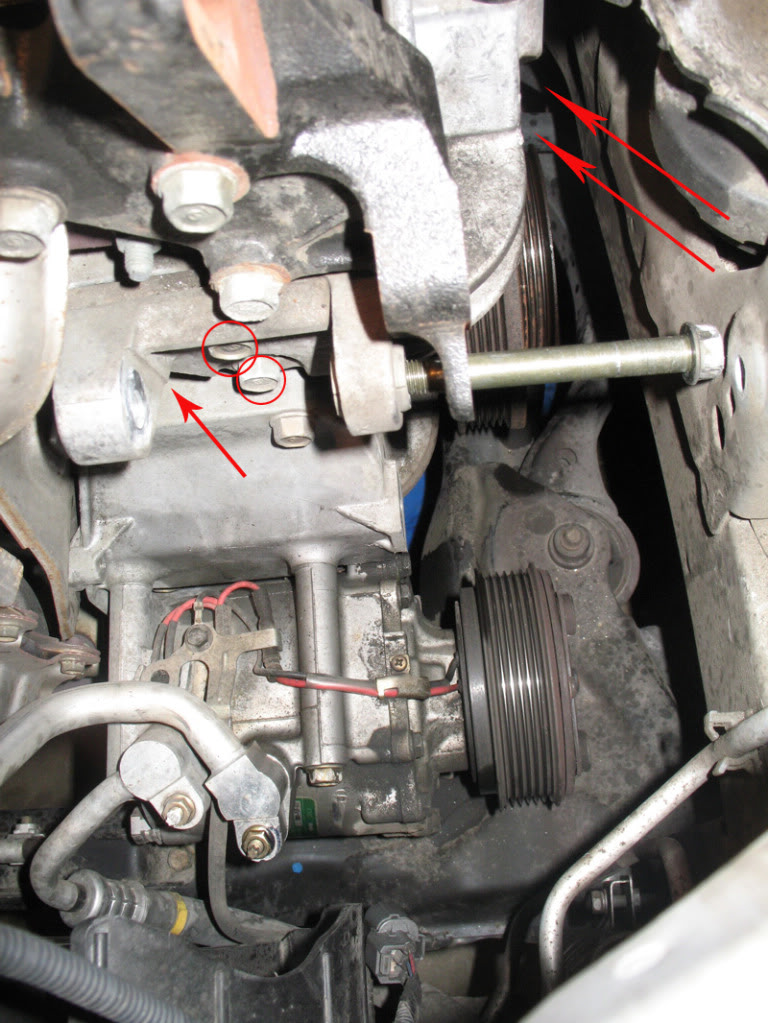
This is the *&%@# bolt holding the alt bracket/engine mount that gave me so much trouble - it's the top one - the only thing that fits in there is the socket... and there was no space to fit it in there until i got some other stuff moved away and working initially from the wheel well.
Tom, about the intake - i took it out without removing the intake. Above there, you meant that there are 3 MORE bolts holding the intake, not that there are 3, right?
Also, i stripped the head of the coolant brass pipe, seem behind the block - i just loosened the clamp and moved the head until the pipe came out of the connector in the head. wonder if it will go in easy...
Tom, let me know if there is some pics you want - i can still snap them in during the reassembly, with a lot less grease and grime and gunky engine to take pics
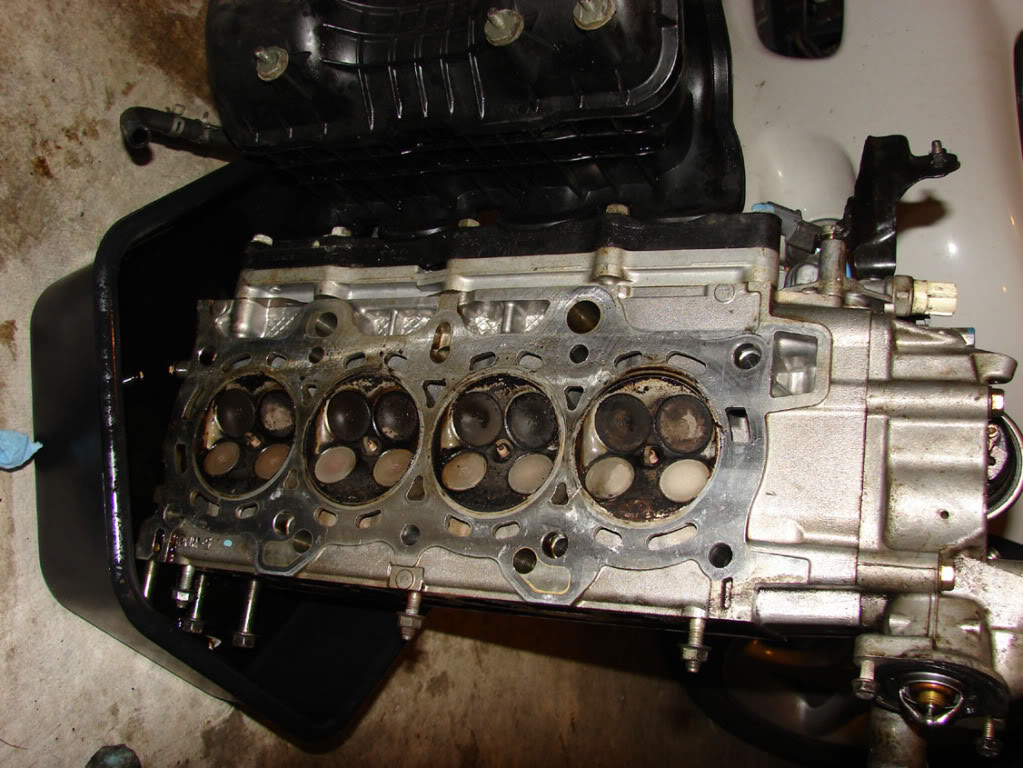
Here is my head degreasing and CB blasted
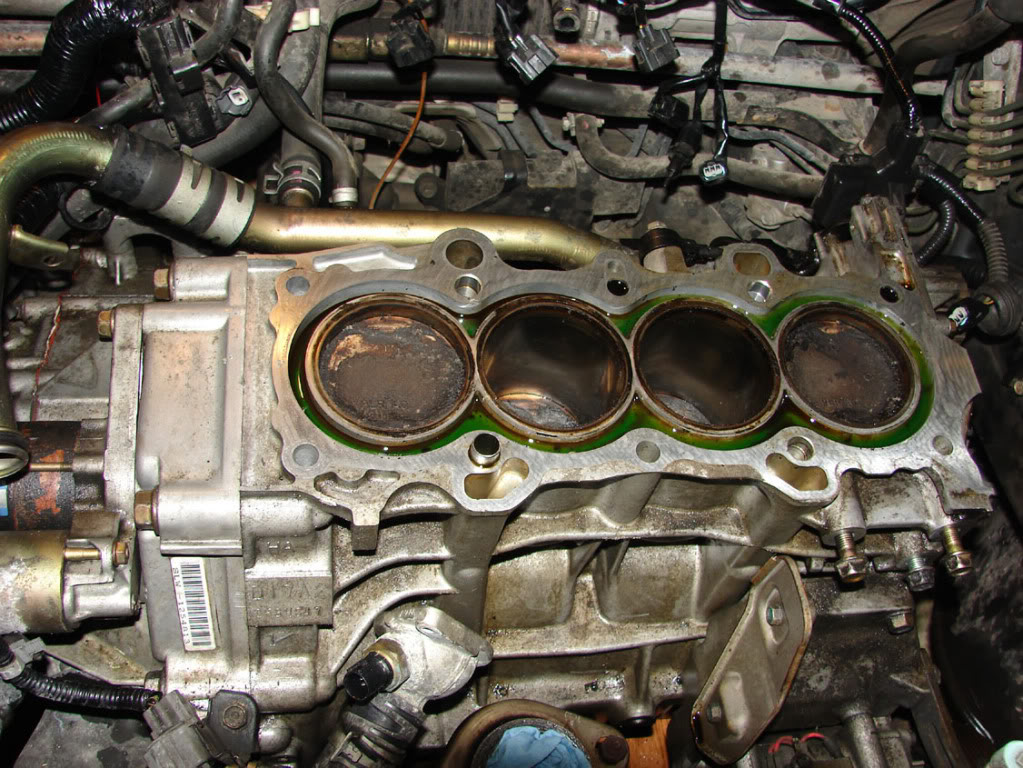
here is the block, after head removal.
This is the *&%@# bolt holding the alt bracket/engine mount that gave me so much trouble - it's the top one - the only thing that fits in there is the socket... and there was no space to fit it in there until i got some other stuff moved away and working initially from the wheel well.
Tom, about the intake - i took it out without removing the intake. Above there, you meant that there are 3 MORE bolts holding the intake, not that there are 3, right?
Also, i stripped the head of the coolant brass pipe, seem behind the block - i just loosened the clamp and moved the head until the pipe came out of the connector in the head. wonder if it will go in easy...
Tom, let me know if there is some pics you want - i can still snap them in during the reassembly, with a lot less grease and grime and gunky engine to take pics
Here is my head degreasing and CB blasted
here is the block, after head removal.
Joined: Aug 2003
Posts: 21,620
Likes: 1,252
From: Las Vegas, NV
Rep Power: 513 Re: Head Gasket + Timing Belt DIY
@Tom, you can't get at it from the bottom. That's why I busted out the crow's feet.
@Sandro, That driver side motor mount bracket isn't so bad if you get the part attached to the chassis off, too.. hence my crows foot method.. lol
@Sandro, That driver side motor mount bracket isn't so bad if you get the part attached to the chassis off, too.. hence my crows foot method.. lol
Thread Starter
Whachya lookin at?
iTrader: (1)
Joined: May 2009
Posts: 6,388
Likes: 13
From: Canada
Rep Power: 314 Re: Head Gasket + Timing Belt DIY
Actually Josh I had no trouble getting the bolt off that you used the crows feet on. I had trouble with the same one Sandro had trouble with, the top one on the side because the ABS unit and damn inner fender were in the way... But it came out. That's the one I've been talking about the whole time and I got it from underneath. Just snap pics along the way I'm leaving for Cuba tommorow so I won't be on for a week whooo
I'm leaving for Cuba tommorow so I won't be on for a week whooo Joined: Aug 2003
Posts: 21,620
Likes: 1,252
From: Las Vegas, NV
Rep Power: 513 Re: Head Gasket + Timing Belt DIY
Oooh, that one. I have a 1.5" extention that worked great with the socket I had to get that one

