
Another PA11-HON Install: Super Nerd Edition w/ in-dash RCA plugs and USB charging


Thread Starter
Registered!!
Joined: Jan 2012
Posts: 33
Likes: 0
Rep Power: 0 
Another PA11-HON Install: Super Nerd Edition w/ in-dash RCA plugs and USB charging
I got a lot of useful info for this project off of these forums, so wanted to give back some. I don't know if I took quite enough pictures to make a complete DIY but I'll do my best.
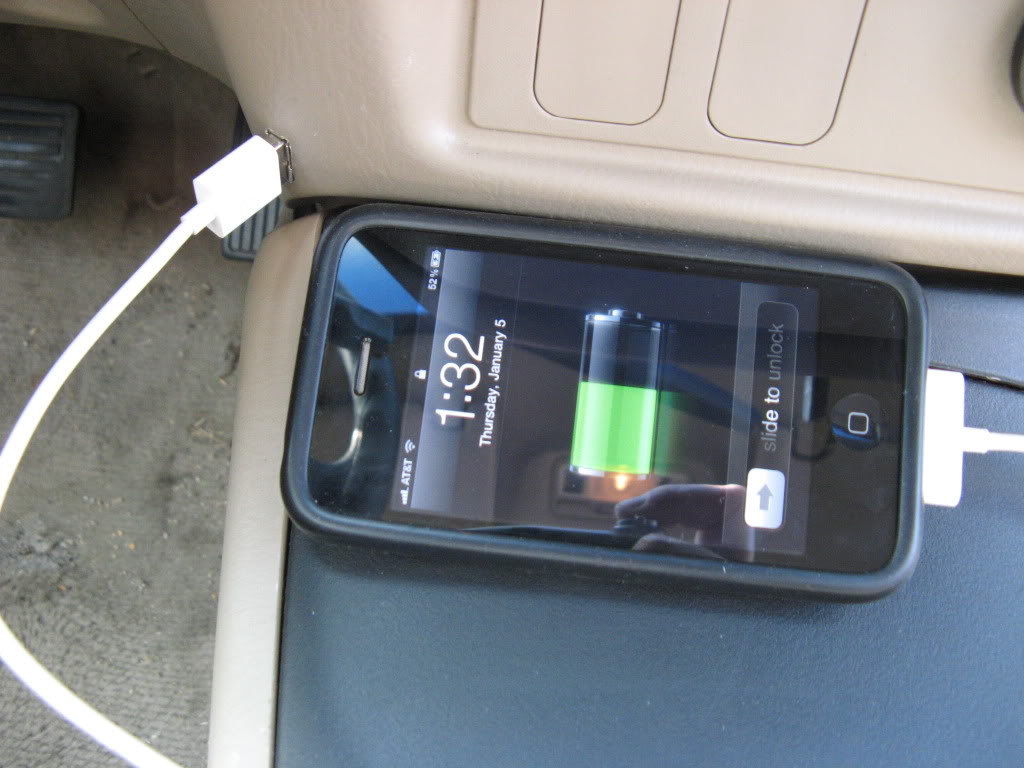
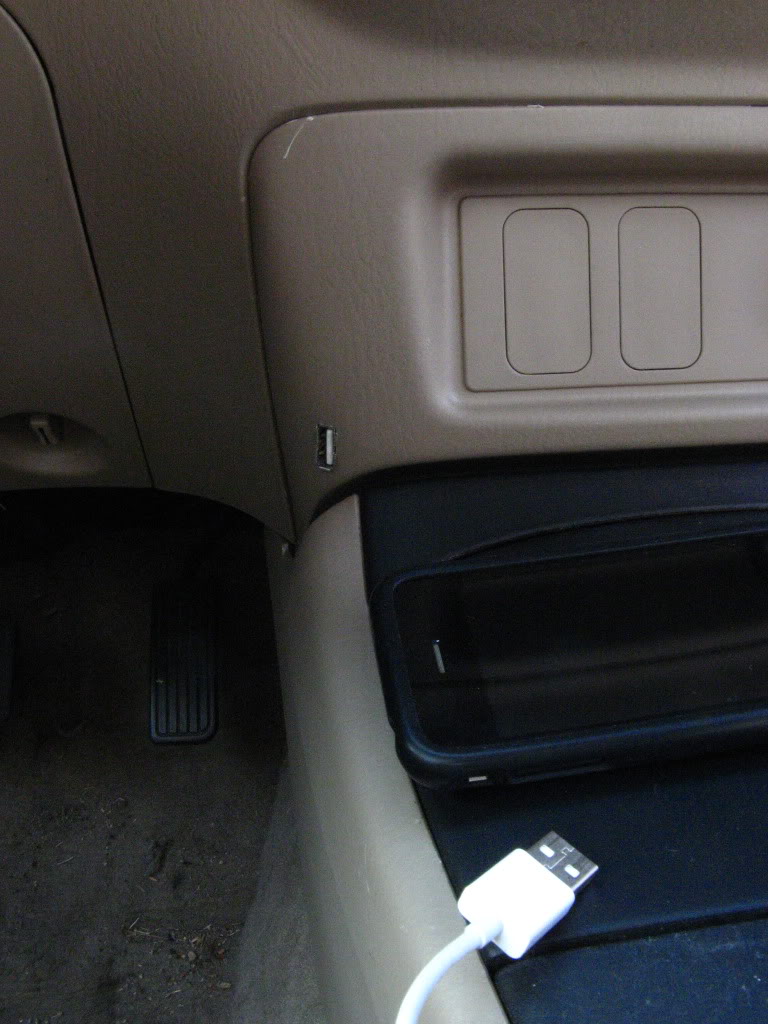
I got a PA11-HON. I have an old iPhone I wanted to leave in the money compartment on the dash as an always on player. I also wanted to be able to plug in other devices such as an android phone, but didn't want RCA cables hanging out of the dash. While planning the project I also realized I hate the placement of the lighter for charging phones as it limits access to the right-hand cup holder. So, I decided to add a USB charge port while I was pulling everything apart.
The only thing I wish I done differently is put the RCA plugs down to the right of the cigarette lighter. Easy enough change if anyone decides to do that.
First off taking everything apart and installing the PA11-Hon. There is enough info out there and on these forums, but I used this video:
http://www.youtube.com/watch?v=vJBDjokiYZw
This site is also helpful even though it details a different interface:
http://www.ohtheresourdog.com/tech/?p=13
I completely unharnessed and removed the entire radio/instrument dash unit to make everything easier to work on. Not that hard just unclip every cable harness that's clipped to it.
I wanted the iPod cable inside the cash box. You'll need to remove the climate control ***** (just pull on them from the front). The climate control cluster then has a few screws that will remove it from the instrument panel.
Removing the climate control cluster will allow you access to the fourth screw holding the cash box to the instrument/radio assembly. Once the the cash box is removed you can unclip the two halves which will allow it to partially open like a clamshell. This will allow you to slide the iPod cable into the box while leaving a hole big enough for just the cable.
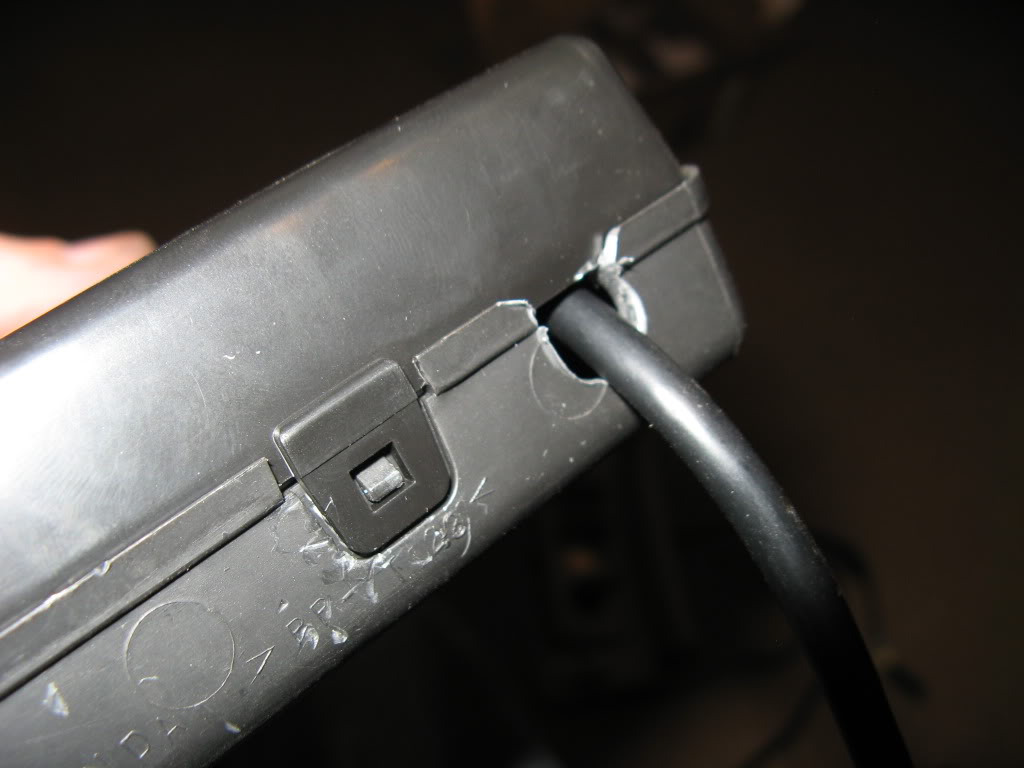

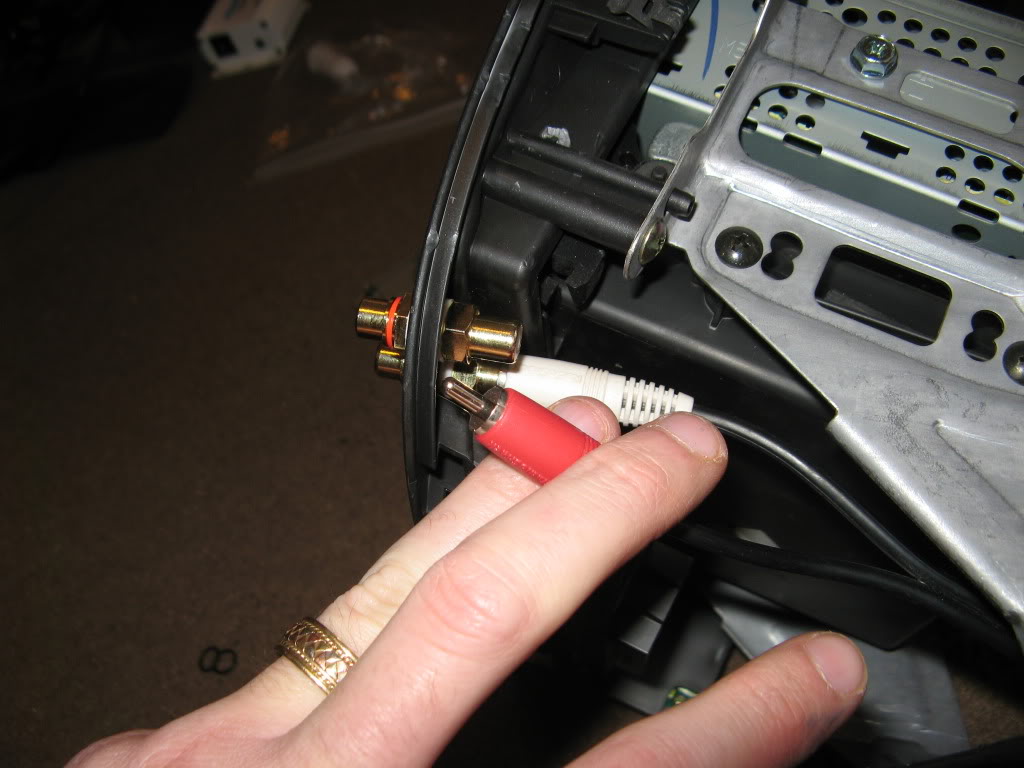
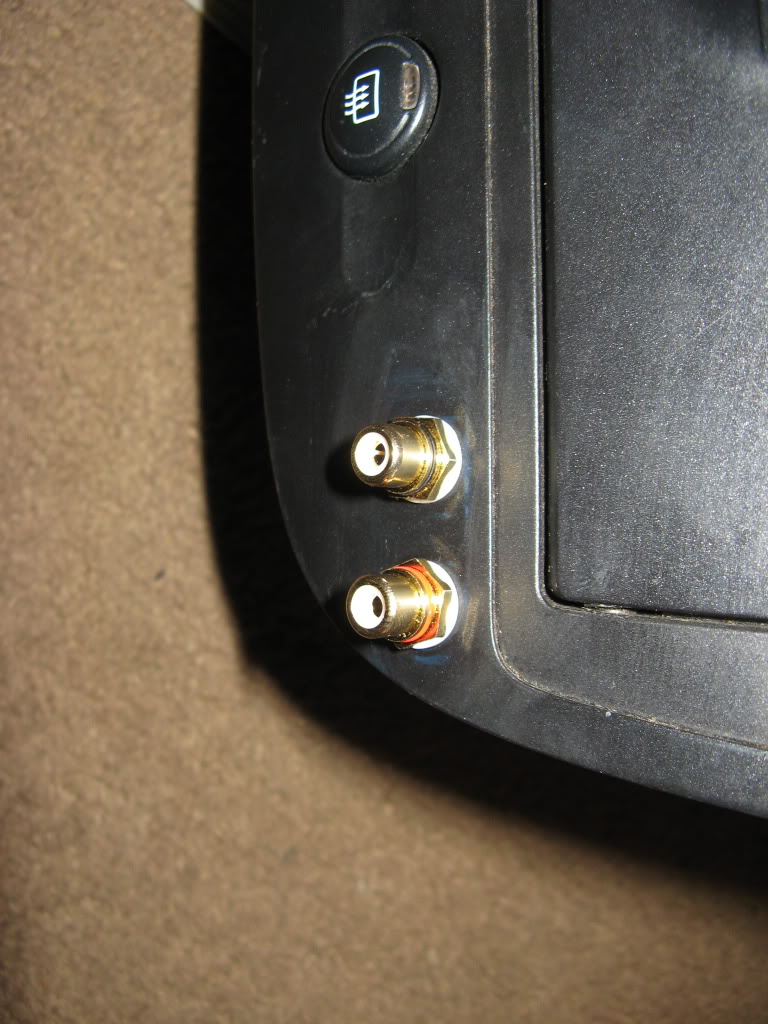
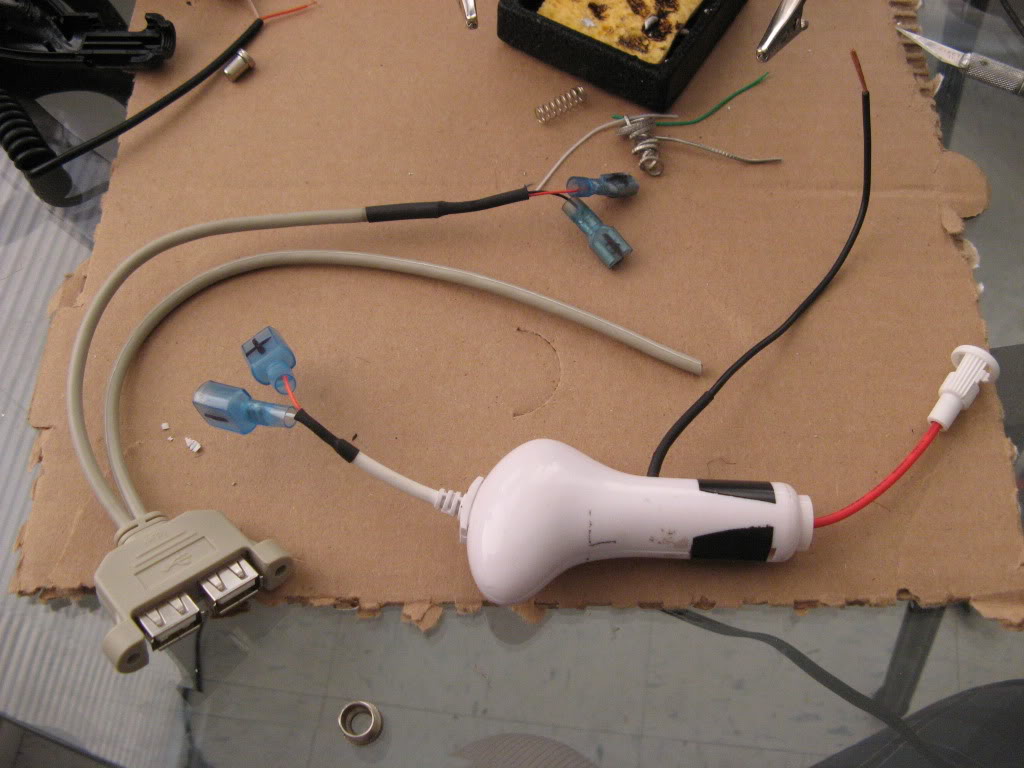
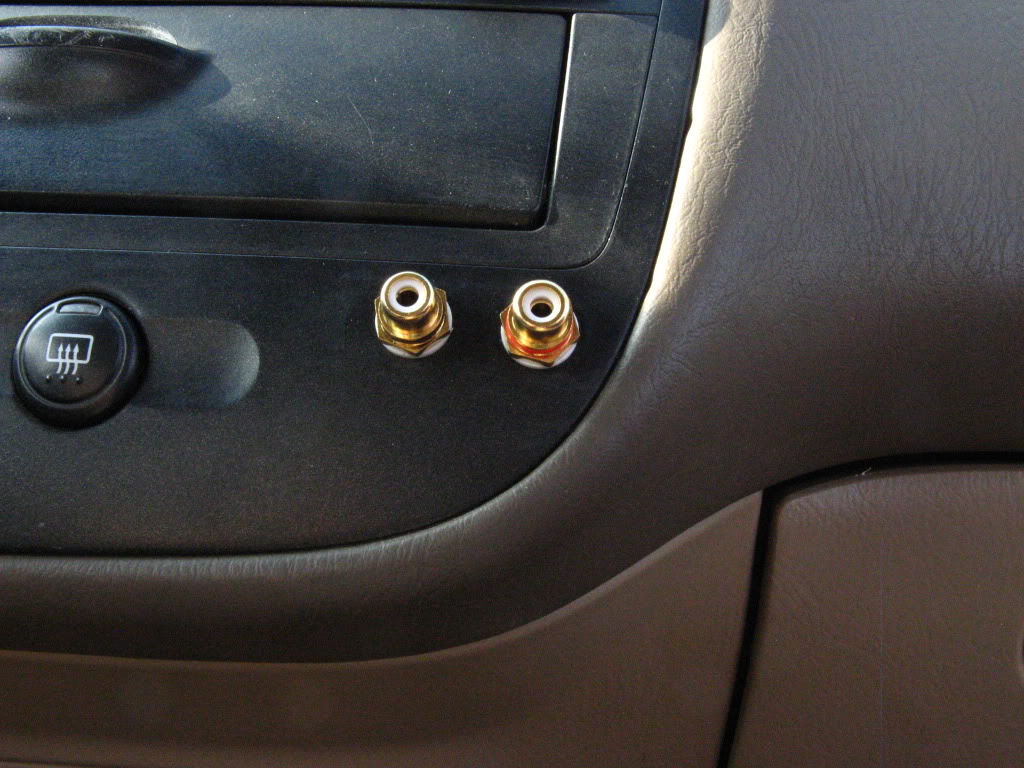
Like I said, I wanted to keep the RCA input functionality but didn't want the cable out all of the time. I bought these panel mount female to female RCA plugs on eBay. This allowed everything to be unplugged if needed and required no soldering. Just unscrew the hardware on the plugs, remove the panel part, drill holes where you want them, and screw them in. Then use male / male RCA plugs to connect them to the PA11-Hon. I installed them up near the climate buttons, but I wish I run them down to the right of the cigarette lighter. Up to you, though.
http://cgi.ebay.com/ws/eBayISAPI.dll...=p5197.c0.m619
For the in-dash USB charger you're going to need some basic soldering tools and knowledge.
You'll need a cigarette lighter charger that you're willing to destroy. Make sure the output is between 5v and 5.5v. I used an old ebay China-crap iPhone charger.
You'll also want to fuse protect the whole thing. Some chargers come with no fuse and most have the fuse incorporated into the spring. Get a 5x20 inline fuse holder from Radio Shack and a pack of fuses, or use the fuse that was in your charger if it's 5x20.
http://www.radioshack.com/product/in...ductId=2102784
http://www.radioshack.com/product/in...ductId=2103764
You'll also need a female USB plug that you can somehow mount to the dash. My project got a little bungled because the original mount I was going to use didn't work out. I ended up making it work with a Belkin USB
extension cable I had lying around.
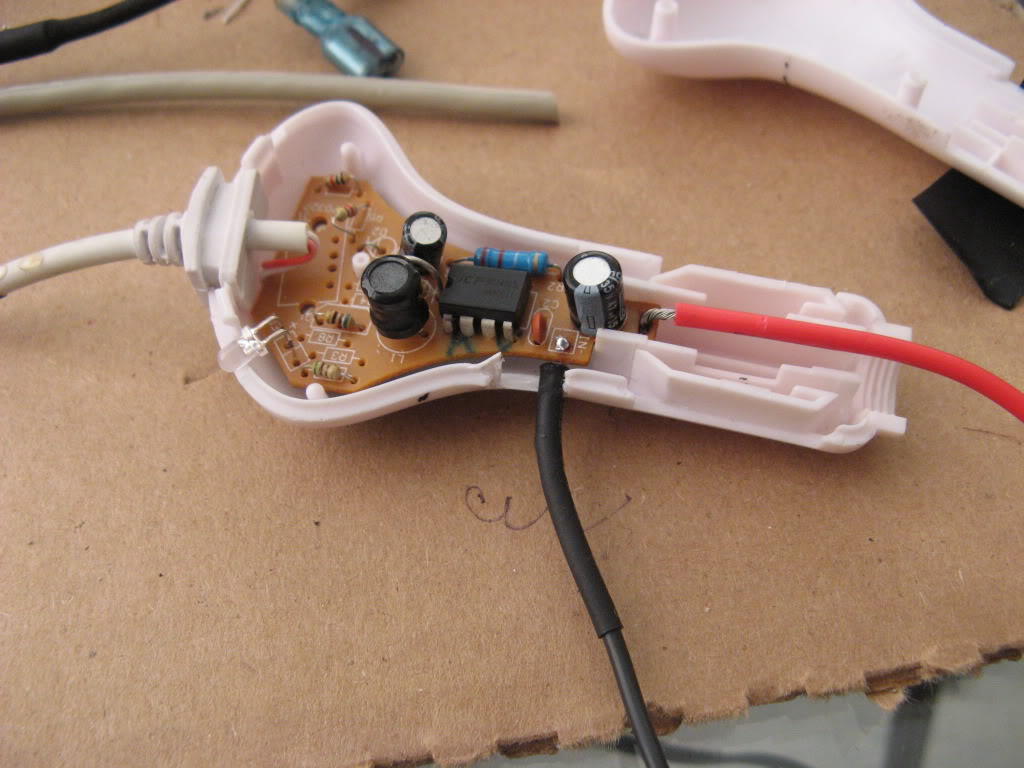
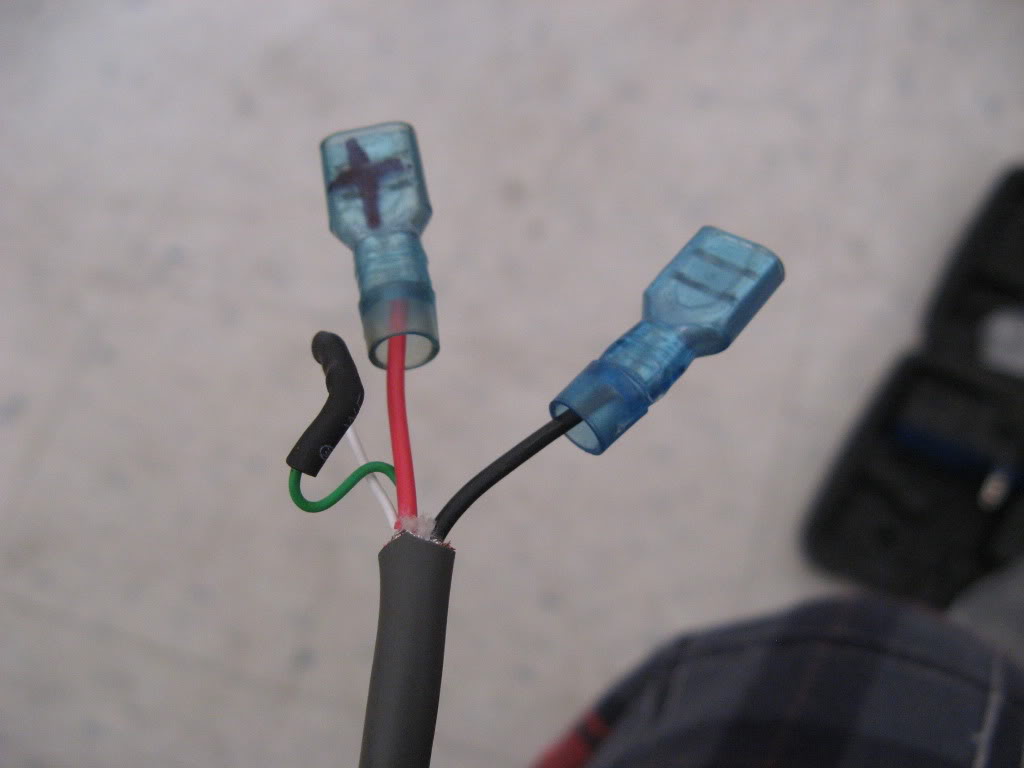
First rip open the charger you're using. Identify the positive input (usually the spring) and the ground (usually attached somehow to the clippy parts on the side). Desolder both from the mainboard and attach your fuse holder and your own ground wire. I made a hole in the side of the housing to allow them space to come out.
Identify the output positive and ground wires. I originally tried to use the existing wires but they were so crappy i ended up desoldering them and soldering in my own. I attached these to small harnesses so that the panel could still be removed after installation.
Here is a shot of the inside and outside of the unit. Disregard the USB cable in the shot -- I ended up not using that one. Also remember the I ended up soldering in my own output wires but you get the idea.
Decide how and where you want to mount your USB plug and pick the appropriate female USB device you want to use. USB has four pins inside and four accompanying wires you'll find when you start to hack apart the cable. Red and black are your ~5v power and ground. The other two (usually green and white) are for data. Though this charger obviously requires no data, it is important to short out the two data cables otherwise most devices will not charge. Short these and install accompanying harnesses for the positive and ground wires you installed on the charger.
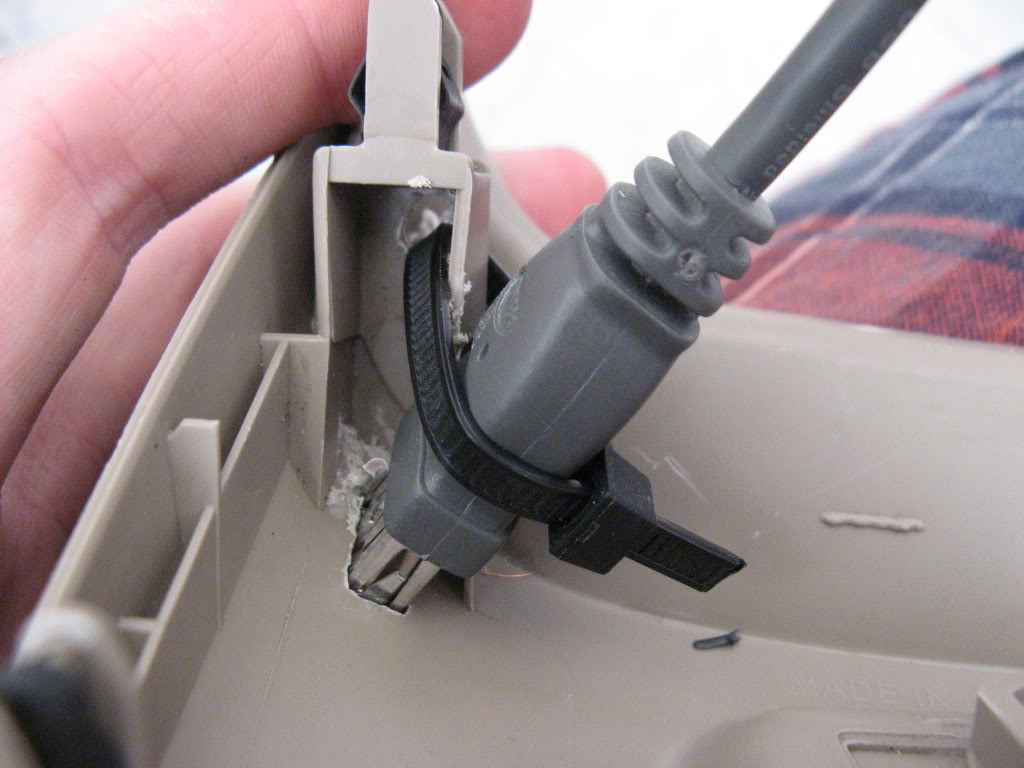
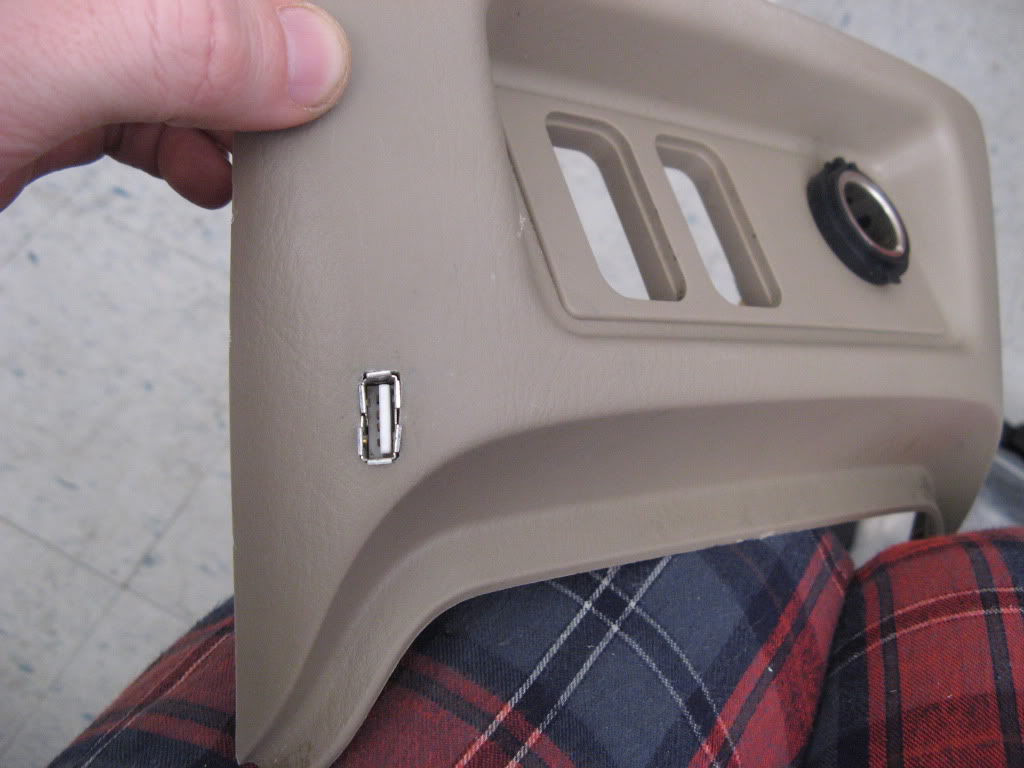
Like I said, my original USB mount I wanted to use went to crap so I improvised with this Belkin extension cable. I cut the plastic using a Dremmel and Xacto knife. be careful not to make the hole too big or the plug will pull through. I had to mangle some plastic behind the panel to improvise the fit and drilled a hole in the clip support and used a zip tie to hold the plug secure. Nothing in life worth doing doesn't require at least one zip tie, right?
Now back to the car. We're going to need to tap the cigarette lighter's power to make everything work. Take the mangled charger we worked on earlier and head out to the garage. DISCONNECT THE BATTERY AND MAKE SURE YOU HAVE YOUR RADIO CODE. Use a screw driver to unclip the cigarette lighter's positive power (yellow) from the harness.
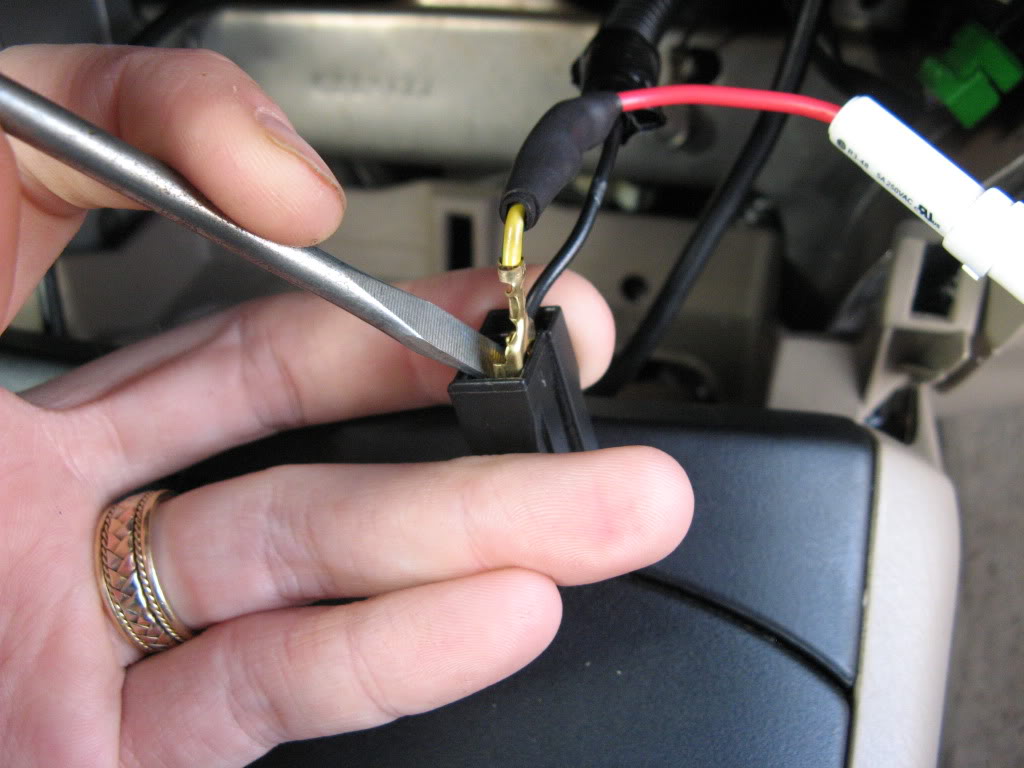
With the positive lead removed, use a utility knife to remove a bit of insulation from the wire and splice in your fuse holder leading to our charger. Be sure to do a good job heat shrinking and protecting this -- you don't want any shorts!!
You'll see the cigarette lighter's ground wire bolted into to a metal support toward the back of the cavity. Ideally, crimp your ground wire into an appropriate eye hole terminal and bolt it on here. I didn't have any on hand and got lazy and just wrapped mine around the bolt and tightened it. Not ideal.
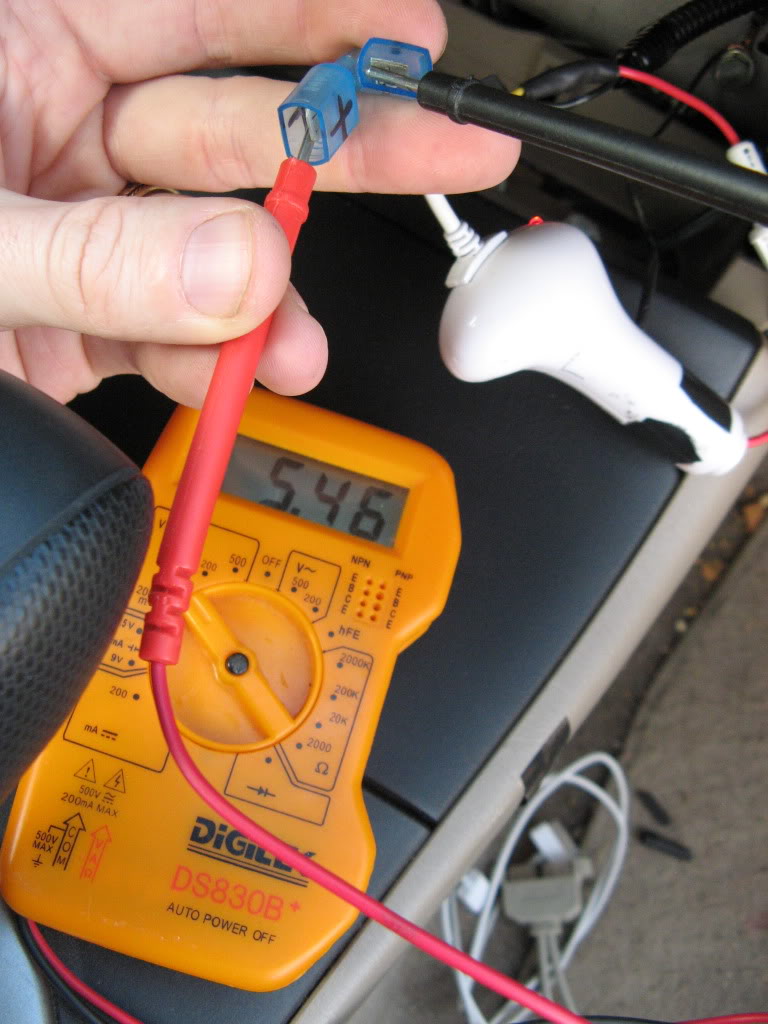
Once everything is safe and secure you can reconnect your car's battery and fire it up to check everything. I got a steady hair under 5.5v. I see lots of warning not to leave devices connected when turning the car on. I tested this with my volt meter and didn't see any spikes. Especially with the inline fuse you should be safe, but you've been warned.
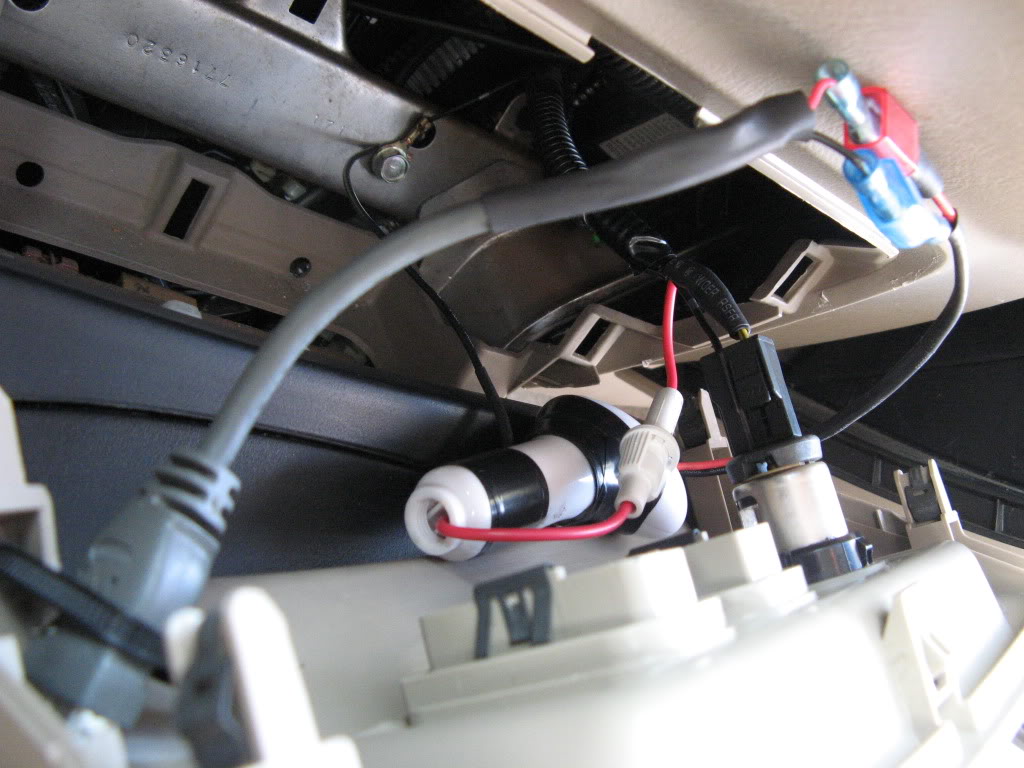
Now you're ready to plug everything in an re-install the panel. Test everything before clipping it back in.
Sorry my car is filthy. Just got back from Mexico with my church . Hope someone out there enjoys and gets some use out of this. Thanks for maintaining an awesome forum!!
I got a PA11-HON. I have an old iPhone I wanted to leave in the money compartment on the dash as an always on player. I also wanted to be able to plug in other devices such as an android phone, but didn't want RCA cables hanging out of the dash. While planning the project I also realized I hate the placement of the lighter for charging phones as it limits access to the right-hand cup holder. So, I decided to add a USB charge port while I was pulling everything apart.
The only thing I wish I done differently is put the RCA plugs down to the right of the cigarette lighter. Easy enough change if anyone decides to do that.
First off taking everything apart and installing the PA11-Hon. There is enough info out there and on these forums, but I used this video:
http://www.youtube.com/watch?v=vJBDjokiYZw
This site is also helpful even though it details a different interface:
http://www.ohtheresourdog.com/tech/?p=13
I completely unharnessed and removed the entire radio/instrument dash unit to make everything easier to work on. Not that hard just unclip every cable harness that's clipped to it.
I wanted the iPod cable inside the cash box. You'll need to remove the climate control ***** (just pull on them from the front). The climate control cluster then has a few screws that will remove it from the instrument panel.
Removing the climate control cluster will allow you access to the fourth screw holding the cash box to the instrument/radio assembly. Once the the cash box is removed you can unclip the two halves which will allow it to partially open like a clamshell. This will allow you to slide the iPod cable into the box while leaving a hole big enough for just the cable.
Like I said, I wanted to keep the RCA input functionality but didn't want the cable out all of the time. I bought these panel mount female to female RCA plugs on eBay. This allowed everything to be unplugged if needed and required no soldering. Just unscrew the hardware on the plugs, remove the panel part, drill holes where you want them, and screw them in. Then use male / male RCA plugs to connect them to the PA11-Hon. I installed them up near the climate buttons, but I wish I run them down to the right of the cigarette lighter. Up to you, though.
http://cgi.ebay.com/ws/eBayISAPI.dll...=p5197.c0.m619
For the in-dash USB charger you're going to need some basic soldering tools and knowledge.
You'll need a cigarette lighter charger that you're willing to destroy. Make sure the output is between 5v and 5.5v. I used an old ebay China-crap iPhone charger.
You'll also want to fuse protect the whole thing. Some chargers come with no fuse and most have the fuse incorporated into the spring. Get a 5x20 inline fuse holder from Radio Shack and a pack of fuses, or use the fuse that was in your charger if it's 5x20.
http://www.radioshack.com/product/in...ductId=2102784
http://www.radioshack.com/product/in...ductId=2103764
You'll also need a female USB plug that you can somehow mount to the dash. My project got a little bungled because the original mount I was going to use didn't work out. I ended up making it work with a Belkin USB
extension cable I had lying around.
First rip open the charger you're using. Identify the positive input (usually the spring) and the ground (usually attached somehow to the clippy parts on the side). Desolder both from the mainboard and attach your fuse holder and your own ground wire. I made a hole in the side of the housing to allow them space to come out.
Identify the output positive and ground wires. I originally tried to use the existing wires but they were so crappy i ended up desoldering them and soldering in my own. I attached these to small harnesses so that the panel could still be removed after installation.
Here is a shot of the inside and outside of the unit. Disregard the USB cable in the shot -- I ended up not using that one. Also remember the I ended up soldering in my own output wires but you get the idea.
Decide how and where you want to mount your USB plug and pick the appropriate female USB device you want to use. USB has four pins inside and four accompanying wires you'll find when you start to hack apart the cable. Red and black are your ~5v power and ground. The other two (usually green and white) are for data. Though this charger obviously requires no data, it is important to short out the two data cables otherwise most devices will not charge. Short these and install accompanying harnesses for the positive and ground wires you installed on the charger.
Like I said, my original USB mount I wanted to use went to crap so I improvised with this Belkin extension cable. I cut the plastic using a Dremmel and Xacto knife. be careful not to make the hole too big or the plug will pull through. I had to mangle some plastic behind the panel to improvise the fit and drilled a hole in the clip support and used a zip tie to hold the plug secure. Nothing in life worth doing doesn't require at least one zip tie, right?
Now back to the car. We're going to need to tap the cigarette lighter's power to make everything work. Take the mangled charger we worked on earlier and head out to the garage. DISCONNECT THE BATTERY AND MAKE SURE YOU HAVE YOUR RADIO CODE. Use a screw driver to unclip the cigarette lighter's positive power (yellow) from the harness.
With the positive lead removed, use a utility knife to remove a bit of insulation from the wire and splice in your fuse holder leading to our charger. Be sure to do a good job heat shrinking and protecting this -- you don't want any shorts!!
You'll see the cigarette lighter's ground wire bolted into to a metal support toward the back of the cavity. Ideally, crimp your ground wire into an appropriate eye hole terminal and bolt it on here. I didn't have any on hand and got lazy and just wrapped mine around the bolt and tightened it. Not ideal.
Once everything is safe and secure you can reconnect your car's battery and fire it up to check everything. I got a steady hair under 5.5v. I see lots of warning not to leave devices connected when turning the car on. I tested this with my volt meter and didn't see any spikes. Especially with the inline fuse you should be safe, but you've been warned.
Now you're ready to plug everything in an re-install the panel. Test everything before clipping it back in.
Sorry my car is filthy. Just got back from Mexico with my church
. Hope someone out there enjoys and gets some use out of this. Thanks for maintaining an awesome forum!! Last edited by LiquidArrogance; Jan 6, 2012 at 11:27 AM.

Registered!!
Joined: Jun 2011
Posts: 92
Likes: 0
From: Hinesville, GA
Rep Power: 0 
Re: Another PA11-HON Install: Super Nerd Edition w/ in-dash RCA plugs and USB chargin
did you do this with a stock stereo of aftermarket?
Edit: stupid question a quick google search answers this for me. how do i delete this post?
Edit: stupid question a quick google search answers this for me. how do i delete this post?
Last edited by 05gen7ex; Feb 9, 2012 at 07:41 PM.

Registered!!
Joined: Oct 2013
Posts: 3
Likes: 0
Rep Power: 0 Re: Another PA11-HON Install: Super Nerd Edition w/ in-dash RCA plugs and USB chargin
Super cool! I was just contemplating doing a similar project in my 99' Civic. I'm just figuring out the best placement for plugs. I like your mod for getting USB power.

Thread
Thread Starter
Honda Civic Forum
Replies
Last Post
redcloud
I.C.E. (Audio) & Electrical Upgrades
9
Sep 7, 2015 01:45 PM

