mac25 build


 03-07-2012
#32
Dr Krieger of Modification
Thread Starter
Re: mac25 build
^ i know man, i left the back plate stock and that's the one an officer would realy see if he was driving behind. if i'm in the on coming lane the officer probabley won't see it or hopefully won't care enough to pull a U turn for such a small thing.
03-07-2012
#33
Registered!!

Join Date: Jun 2010
Posts: 121
Likes: 0
Received 0 Likes
on
0 Posts
Rep Power: 0 
Re: mac25 build
Haha I like the plate mod. Just dont go driving down in Richmond, the cops over there will pull you over for just about anthing:S We should all meet up in the spring or something haha.
03-07-2012
#35
Registered!!
Join Date: Jun 2010
Posts: 121
Likes: 0
Received 0 Likes
on
0 Posts
Rep Power: 0 Re: mac25 build
Umm theres a meet coming up? I dont have a revscene account nor do I go to the site so I dont really know. When's it at? I'd probably go if I get my new suspension/wheel set up before the meet.
03-08-2012
#36
Dr Krieger of Modification
Thread Starter
Re: mac25 build
join RS, mindbomb got me into it, i meet with 15-50 cars each week when the weather's better. i'm not sure when the spring meet is but it's huge like over 200 cars. last year the website rented out three parking lots along spanish banks.
03-08-2012
#39
Live for the Twisties
Administrator
Join Date: Jun 2010
Location: Langley, BC
Posts: 8,580
Likes: 0
Received 5 Likes
on
5 Posts
Rep Power: 260 
Re: mac25 build
it's unofficial
Pretty sure it's posted under VLS, we're going to Red Robins. A meet without walking works for me, a meet with nothing but walking not so much.
Pretty sure it's posted under VLS, we're going to Red Robins. A meet without walking works for me, a meet with nothing but walking not so much.
03-08-2012
#42
Dr Krieger of Modification
Thread Starter
Re: mac25 build
lol i just found it like a second ago. i might come but probably not, metro is a bit far. i duno i might skybus there =D night bro.
06-11-2012
#43
Dr Krieger of Modification
Thread Starter
Re: mac25 build
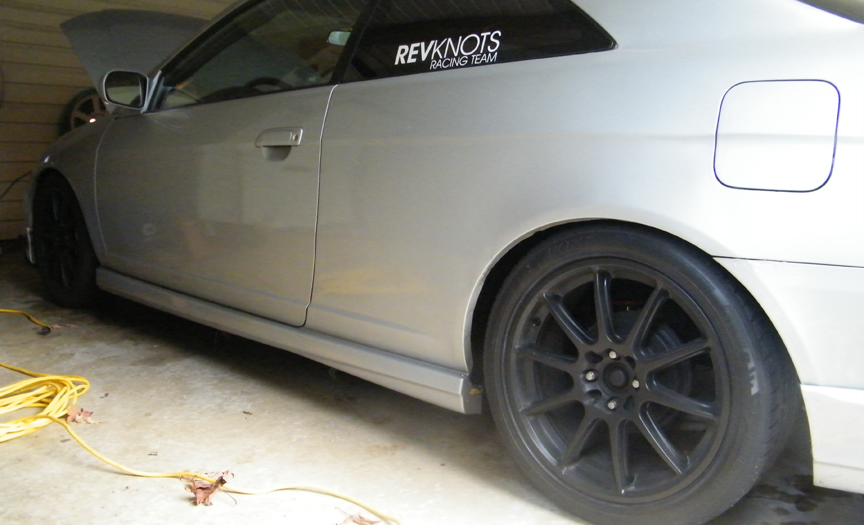
old rims (i still like these so i'm not sure if ima sell them or the new ones now)
after busting my *** for like 12 hours to paint my new rims i found out today when i balanced them that one of the rims has a minor bend... for now i'm going to roll on them but i'm going to keep my old rims untill i feel safe on these new bent rims, lol.
old, gloss black and pined white, 5 spoke rims:

new, matte black, ten spoke rims:


after busting my *** for like 12 hours to paint my new rims i found out today when i balanced them that one of the rims has a minor bend... for now i'm going to roll on them but i'm going to keep my old rims untill i feel safe on these new bent rims, lol.
old, gloss black and pined white, 5 spoke rims:
new, matte black, ten spoke rims:
07-31-2012
#44
Dr Krieger of Modification
Thread Starter
Re: mac25 build
new sub and amp. 600w amp, 1200w sub, 1200w wiring and still running the sony head unit and lovin the new basz! made the sub box myself =D, it's actually pretty interesting to make a cube. it looks good from the fron but since i only had a jig saw the back didn't fully line up =D.

08-01-2012
#46
Like WHITE on RICE.

Re: mac25 build
hey mac. I have the same headlights as yours. From the looks of it, looks like yours are holding up quite well.
But apparently the halos on my high beam seemed to have burnt out.. like literally.
The ring was melting and they just stopped working.
Ever had any problems with yours? or maybe mine are just defected..
But apparently the halos on my high beam seemed to have burnt out.. like literally.
The ring was melting and they just stopped working.
Ever had any problems with yours? or maybe mine are just defected..
08-01-2012
#47
Dr Krieger of Modification
Thread Starter
Re: mac25 build
^mine burnt out after a year and a half. i'm pretty sure it's just the bulb or LED, mine don't look melted. i have thought of replacing the LED's but i kind of like them without.
08-01-2012
#48
Like WHITE on RICE.
Re: mac25 build
I see, maybe its cause I drove with the high beams on for a few days without even realizing it.
possibly could be the reason why my rings just melted from the heat.
i'll take a picture tomorrow and show you. lol
possibly could be the reason why my rings just melted from the heat.
i'll take a picture tomorrow and show you. lol
09-23-2013
#49
Dr Krieger of Modification
Thread Starter
Re: mac25 build
2013 update!
well i've been drafted into an autocross racing team =D i've been doing pretty good...other than my last race which i was using summer tires and it rained, lol.
I've now installed a
- crower stage 1 Cam.
- raceland adjustable coilovers
- relocated my battery to the trunk to make room for a custom isolated air box intake.
- 500w amp
-1000w sub (built my own sub box, not pictured here.
-and threw on some ricehooks, lol
i was running a headlight cut out for cold air but it looked bad.
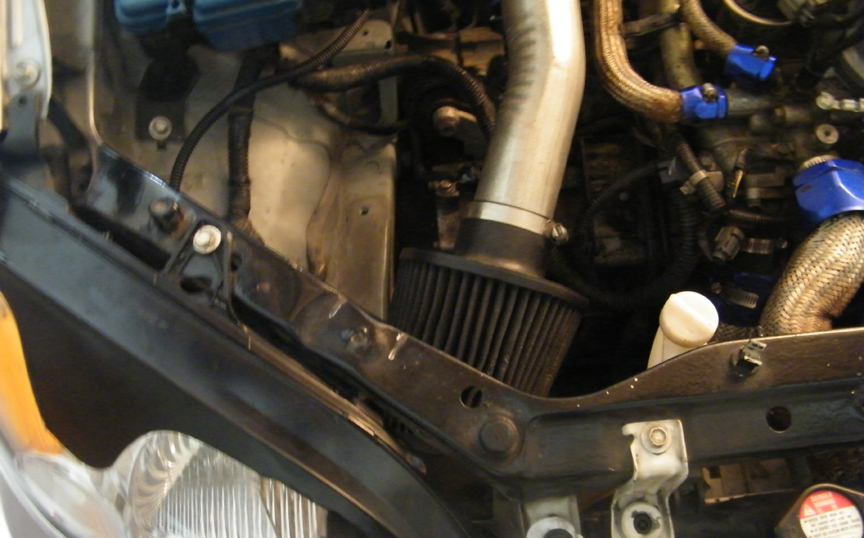
bat in the back like a real racecar, lol. I cut the board to house the battery.
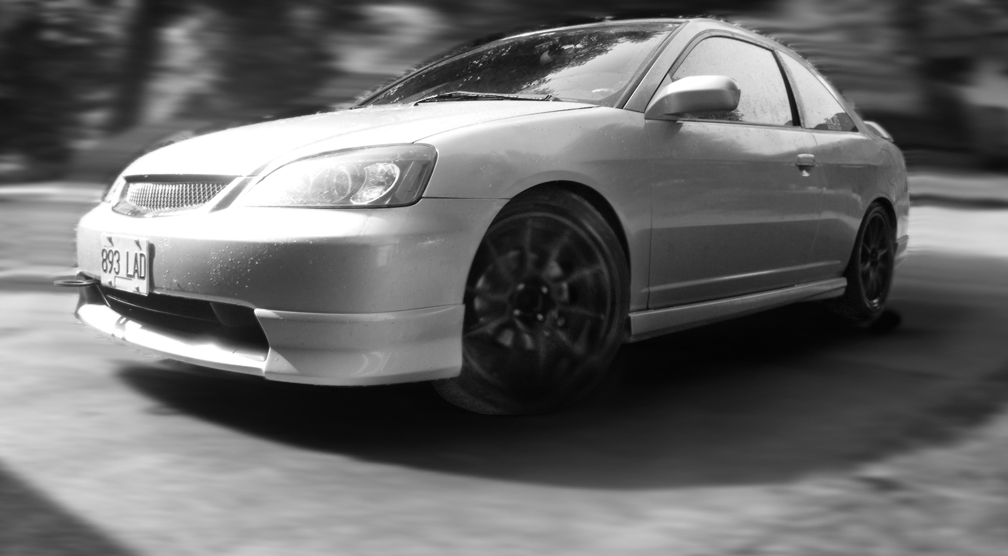
and a kinda horrible photochop pic
well i've been drafted into an autocross racing team =D i've been doing pretty good...other than my last race which i was using summer tires and it rained, lol.
I've now installed a
- crower stage 1 Cam.
- raceland adjustable coilovers
- relocated my battery to the trunk to make room for a custom isolated air box intake.
- 500w amp
-1000w sub (built my own sub box, not pictured here.
-and threw on some ricehooks, lol
i was running a headlight cut out for cold air but it looked bad.
bat in the back like a real racecar, lol. I cut the board to house the battery.
and a kinda horrible photochop pic
09-23-2013
#50
My favorite TV shows are JDM. My Honda isn't...
iTrader: (1)
Join Date: Mar 2012
Location: Lincoln, NE
Age: 30
Posts: 996
Likes: 0
Received 3 Likes
on
1 Post
Rep Power: 157 Re: mac25 build
Love it dude!
And that extended air intake is totally genius.
Now I want to move my battery, lol
How hard was that conversion?
And that extended air intake is totally genius.
Now I want to move my battery, lol
How hard was that conversion?
09-23-2013
#51
Dr Krieger of Modification
Thread Starter
Re: mac25 build
since i had already routed wires back to the trunk for my amp and sub, it was easy. installing the wires is easy to but takes a while.
you have to remove the plastic cover in the foot well on the passenger side, just pull on it. lift the carpet out then you'll see where the ecu wires run through a rubber grommet.
cut a small hole in the grommet for your power wire. now you have a way to get poer from the positive terminal in the engine bay into the cab.
from here lift of the plastic cover that is on top of the bottom of the passenger door frame.
then i can't quite remember but there are a few bolts to take the plastic panel out that is on the passenger side were the passenger, rear seat is.
then you just run the wire to the trunk and reinstall the plastic covers.
for the ground wire you just sand off some of the paint on the body and connect a wire in the trunk =D.
08-23-2014
#55
Dr Krieger of Modification
Thread Starter
Re: mac25 build
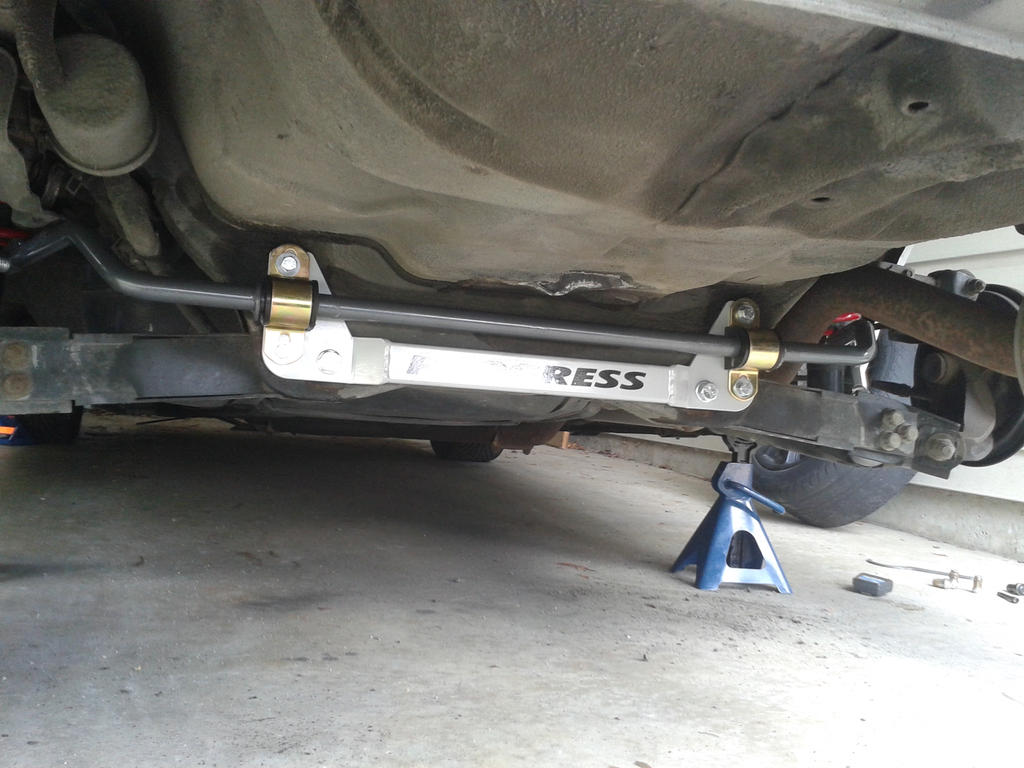
Well big news I converted her from auto to manual =D! It took three months of research, two days in a scrap yard and a week to uninstall and reinstall, by my self with out an engine crane =D.

As well a while ago I dropped in a 24mm Progress rear sway as well as some carbon ceramic pads.
The rear interior and carpet is also stripped out now so she's getting pretty fast around the track =D.
As well a while ago I dropped in a 24mm Progress rear sway as well as some carbon ceramic pads.
The rear interior and carpet is also stripped out now so she's getting pretty fast around the track =D.
 08-25-2014
#57
PITA Admin
Administrator
iTrader: (1)
Join Date: Dec 2008
Location: TN
Age: 52
Posts: 14,787
Received 1,443 Likes
on
1,198 Posts
Rep Power: 338 Re: mac25 build
good job, Mac! now on to the heel-toe and switching right back to the left foot braking 
forgot to mention here, but like we talked, be careful on the trunk relocation of the battery - the battery will not be heated by the engine anymore. Since you are in Canada, that will make the battery a little more sensitive to cold. (My miatas have the battery in the trunk, ask me why i know?)
forgot to mention here, but like we talked, be careful on the trunk relocation of the battery - the battery will not be heated by the engine anymore. Since you are in Canada, that will make the battery a little more sensitive to cold. (My miatas have the battery in the trunk, ask me why i know?
)  08-25-2014
#59
Dr Krieger of Modification
Thread Starter
Re: mac25 build
Thank you guys =D.
-Poopies, I think I'll keep them as a badge of honor =D, I was thinking of converting the Red Park indicator to blue, to match my deck... and I sure won't miss the flashing D once I get the manual ECU in and the key tuned, I keep thinking my turn light is on, lol.
Sdaidoji, I actually did put the battery back and the intake with the headlight, she looks prettier now =D.
Kenny, thank you and I'm looking forward to the slush season =D.
08-26-2014
#60
Registered!!
Join Date: May 2010
Location: Funkytown, Tx
Posts: 3,662
Likes: 0
Received 2 Likes
on
2 Posts
Rep Power: 210 Re: mac25 build
For running wire there is absolutely nothing better than this: http://thexton.com/index.cfm?pageid=...ch=475&x=0&y=0 I seriously don't know how I did it before I got this thing.

