DIY: Hardwire Dash Cam without cutting wires
 01-26-2018
#1
Administrator
Hey! Look At Me!! I'm a Supporting Member!!
Administrator
Thread Starter
iTrader: (22)
Join Date: Aug 2003
Location: Las Vegas, NV
Age: 39
Posts: 21,450
Received 1,144 Likes
on
799 Posts
Rep Power: 485 

DIY: Hardwire Dash Cam without cutting wires
First off, a disclaimer. I'm not responsible for anything that goes wrong during your installation.
Secondly, this guide will work for any sort of electronic thing you want to hardwire and mount up and out of the way (dash cam, radar detector, motorized disco ball, etc.). I just so happened to hardwire and mount a dash cam I got for Christmas (Vantrue N1).
Thirdly, this install was done in a 2018 Sport Hatch, only equipped with a boring, no frills mirror. Step 2 may or may not be optional for your install.
Fourthly, this DIY guide has specifics for the CivicX, but the theory of how it all goes will work for any vehicle.
Parts needed
Tools needed (Not including the obvious tools you'd need)
How it do
My installation, dash cam not visible from the driver's seat
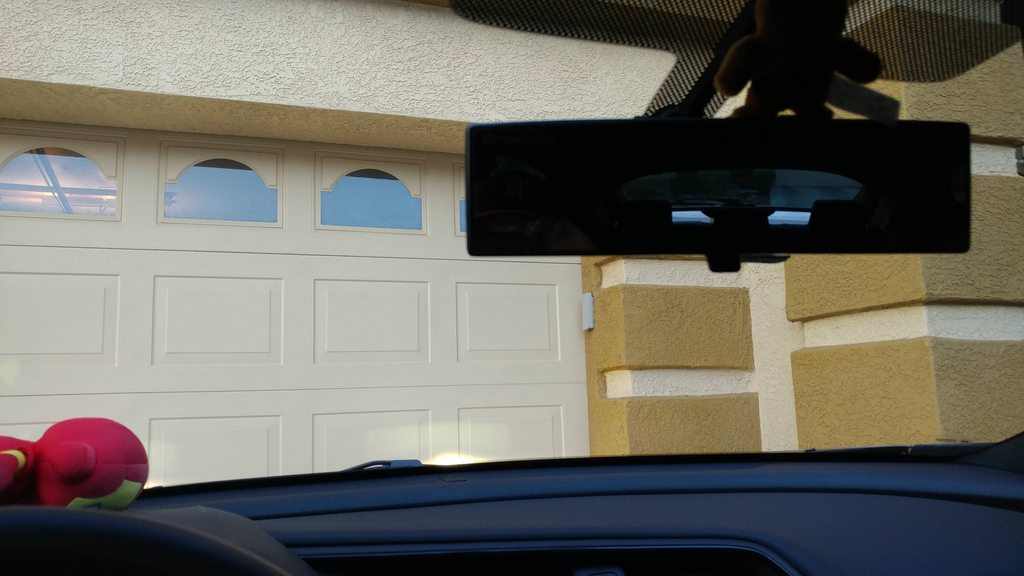
Passenger can see it just fine, though
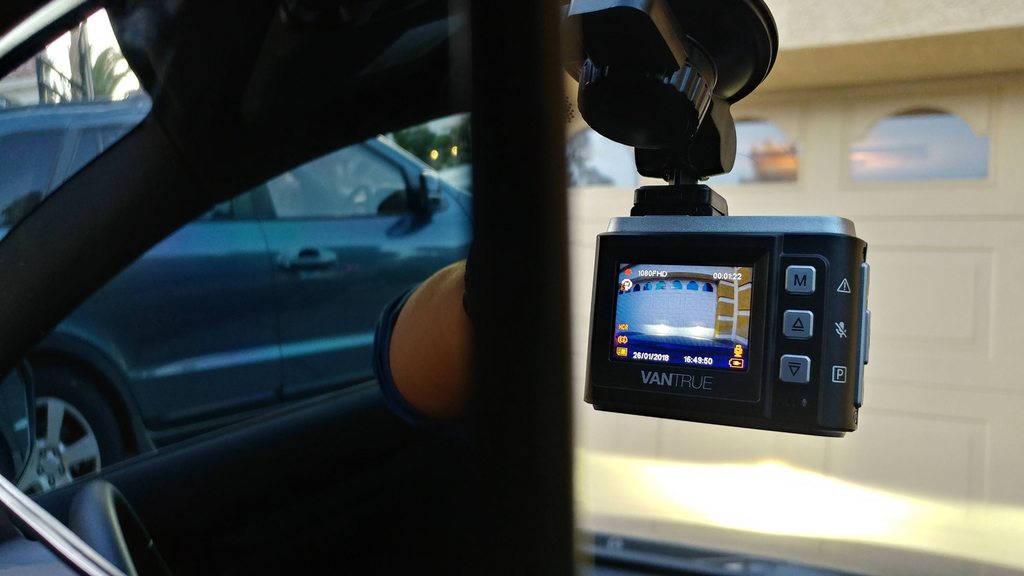
Notice the bottom right, "plugged in" icon, and my key is in the ACC position. The way this cam works, when external power is applied, it starts recording right away. Records in 5-minute increments, and I'm assuming it overwrites older content to make room for newer content.
Hope this DIY guide helps some of you guys in the future
Secondly, this guide will work for any sort of electronic thing you want to hardwire and mount up and out of the way (dash cam, radar detector, motorized disco ball, etc.). I just so happened to hardwire and mount a dash cam I got for Christmas (Vantrue N1).
Thirdly, this install was done in a 2018 Sport Hatch, only equipped with a boring, no frills mirror. Step 2 may or may not be optional for your install.
Fourthly, this DIY guide has specifics for the CivicX, but the theory of how it all goes will work for any vehicle.
Parts needed
- Dash Cam (or any other electronic device). In this case, a Vantrue N1 that came with a suction cup mount.
- Power source. My dash cam has a mini-USB charging port, and this is the one that worked for me. I'm pretty sure there are ones out there that have micro-USB for those that need that. I just went with the Vantrue one to match the dash cam. I did find others on Amazon, and there was one kit that had the power source and the next item on this list for $12.
- One ring terminal
- Some zip ties
- Doesn't hurt to have some double sided mounting tape to mount the little converter box
- Wire harness cover for sensing mirror, Honda part number 76410-STX-A01 (optional; it just cleans up the installation a lot bit)
Tools needed (Not including the obvious tools you'd need)
- Soldering iron (optional)
- Electrical pliers makes this job easier
- Side cutters*
- Exacto knife*
- Dremel with sanding drum*
How it do
- Before you get into it in your car, do yourself a favor and prep the power source. Add the ring terminal to the negative wire on the power source and the add-a-circuit fusetap to the positive. Crimp them on, solder them on. Attach them somehow. The ring terminal I used was enough to accommodate a 1/4" bolt, so I needed to both solder and crimp it. The input leads into the converter box were super tiny, like 20ga wire. Plan accordingly.
- Meet the wire harness cover. The thinner bit slides in the larger bit, allowing it to be friction mounted to the car.
- This thing was designed for the sensing mirror which mine was not equipped with, which apparently has something to accept the clips in the middle. My mirror doesn't have anything to accommodate these clips
- There is, however, a small space between the mirror base and the windshield, which is probably 1/16". I used an exacto and wire cutters to get the bulk of the material off, and used a Dremel with a sanding drum to make it pretty. ***IMPORTANT*** Take note of the orientation the harness cover is in in the second picture. The 1/16" thick bit of plastic was left on the open side of the harness cover (the part that sits against the windshield). Yeah, that's my bad for not taking pictures of the thing in the same orientation. I'm merely testing your attention to detail. lol
- This thing was designed for the sensing mirror which mine was not equipped with, which apparently has something to accept the clips in the middle. My mirror doesn't have anything to accommodate these clips
- Download this pdf from College Hills Honda. While it's an installation guide to add an auto-dimming mirror to the CivicX, the wire routing portion is what applies here. Follow steps 5, 10-13 in the PDF for panel removal. Those are the only panels I needed to remove to access everything and route wires.
- Remove the top bolt of the in-car fuse box. This is what I used for my ground. Slide the ring terminal between the fuse box and metal bracket, and reinstall the bolt. If there's another ground that's more accessible for your setup, by all means, use that one. I found this to be the easiest for me.
- Meet the CivicX fusebox
My car isn't equipped with CMBS (collision mitigating braking system) and thus, the fuse in slot 17 is powering absolutely nothing. It's also constantly hot when the car is in ACC mode or on, so it was the perfect candidate for the fusetap. Remove your fuse of choice and replace with the fuse tap. Ensure the lead (that you presumably connected to the power supply) is in the same orientation as this:
- How to use the fusetap
For the OEM load from that fuse, put that fuse in the "bottom" slot. For the new load you added, that fuse goes on top. Considering the output for the power supply is 1.5A, I figure the power draw is stupid low, and a 5A fuse would suffice here. I'll update if by some stroke of bad luck that fuse blows from this low load. - Plug in the camera and turn your key to ACC mode. If you chose the same fuse I did, your device should power on. If not, double check your wiring and fuse. If those are good, then the problem is probably the power converter.
- Now onto the fun part, routing the wires. However you need to get the wires to the A-pillar, do that now. From there, follow steps 23-27 to route the wire up the A-pillar, across the roof/windshield, and down towards the mirror.
******MAKE SURE THE WIRE DOES NOT CROSS OVER THE AIRBAG******
Secure the wire via zip ties to the existing wire harness and you're good to go. - If you decided to use the wire harness cover, here's where you put it in. Figure out where the camera is gonna mount and where the wire's going. Place the wire in the harness cover channel, push the modded side against the mirror base, and extend the thing so the "spikes" on the opposite end go between the roof and roof liner. (See step 34 in the PDF)
- Mount everything and test it one more time. If it all works the way it's supposed to, you're home free. If not, something went wrong. Backtrack and troubleshoot.
- Installation of all the panels is reverse of removal.
- Sit back and enjoy the fruits of your labor. Congrats, you hardwired something into your car without cutting wires and it's fully reversible, to boot.
My installation, dash cam not visible from the driver's seat
Passenger can see it just fine, though
Notice the bottom right, "plugged in" icon, and my key is in the ACC position. The way this cam works, when external power is applied, it starts recording right away. Records in 5-minute increments, and I'm assuming it overwrites older content to make room for newer content.
Hope this DIY guide helps some of you guys in the future
Last edited by xRiCeBoYx; 12-29-2020 at 01:37 AM.
 01-27-2018
#2
PITA Admin
Administrator
iTrader: (1)
Join Date: Dec 2008
Location: TN
Age: 52
Posts: 14,779
Received 1,440 Likes
on
1,196 Posts
Rep Power: 338 Re: DIY: Hardwire Dash Cam without cutting wires
just keep in mind that the camera also records what you are doing with the car 
Good to keep yourself in check
Good to keep yourself in check
01-27-2018
#3
Administrator
Hey! Look At Me!! I'm a Supporting Member!!
Administrator
Thread Starter
iTrader: (22)
Join Date: Aug 2003
Location: Las Vegas, NV
Age: 39
Posts: 21,450
Received 1,144 Likes
on
799 Posts
Rep Power: 485 Re: DIY: Hardwire Dash Cam without cutting wires
It'll just record audio of in-car karaoke. Lol.
This camera has the ability to manually start/stop recording as well, and protect specific files from deletion
This camera has the ability to manually start/stop recording as well, and protect specific files from deletion

 02-02-2018
#5
Dr Krieger of Modification
Re: DIY: Hardwire Dash Cam without cutting wires
Dope, I might do the same in a few days, just had someone hit and run on me, luckly I got their plate and the damage isn't that bad just a few small scratches on the door... but I'm still getting a dashcam.

Thread
Thread Starter
Honda Civic Forum
Replies
Last Post
ProStreetDriver
Fuel, Oil, Cleaners & Other Maintenance
2
06-01-2016 09:47 PM
Kennykid2002
Fuel, Oil, Cleaners & Other Maintenance
5
01-22-2011 02:18 PM
s3recap
General Honda Civic Forum Archive.
20
07-09-2010 01:57 AM

