Just completed my valve clearance, and WOW!!! + A FEW TIPS
 08-02-2010
#1
Registered!!
Thread Starter

Join Date: Nov 2009
Posts: 474
Likes: 0
Received 0 Likes
on
0 Posts
Rep Power: 180 
Just completed my valve clearance, and WOW!!! + A FEW TIPS
I'm like a total noob when it comes to working on cars. I can do simple stuff like oil changes, refills, and battery swaps  but anything more than that I dread working on cars cuz I have this notion that it's a lot harder and more complicated than working on my motorcycles.
Boy, was I wrong!!!
I just completed my valve clearance and it was 10x easier. Unlike a motorcycle, a few unbolts here & there and BAM! Instant access!! Whereas with a motorcycle you have to unbolt and take apart hell just to get to the valves.
I learned a valuable lesson I hope someone who is like me (a noob) can learn from my experience.
1st thing, following the DIY guide for a 7th Gen valve clearance (that's the only one I can find closest to my 6th Gen) I discovered you don't have to disconnect the battery, which I did. I was afraid I had to reset my stock radio which I didn't have the code for but after I completed the job and reconnected the battery the stock radio didn't ask for a code. Just my presets were back to default settings.
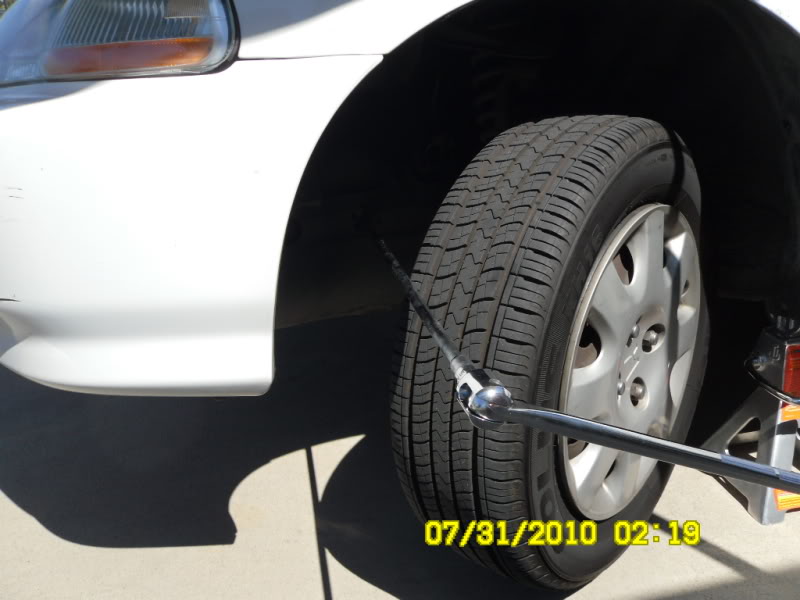
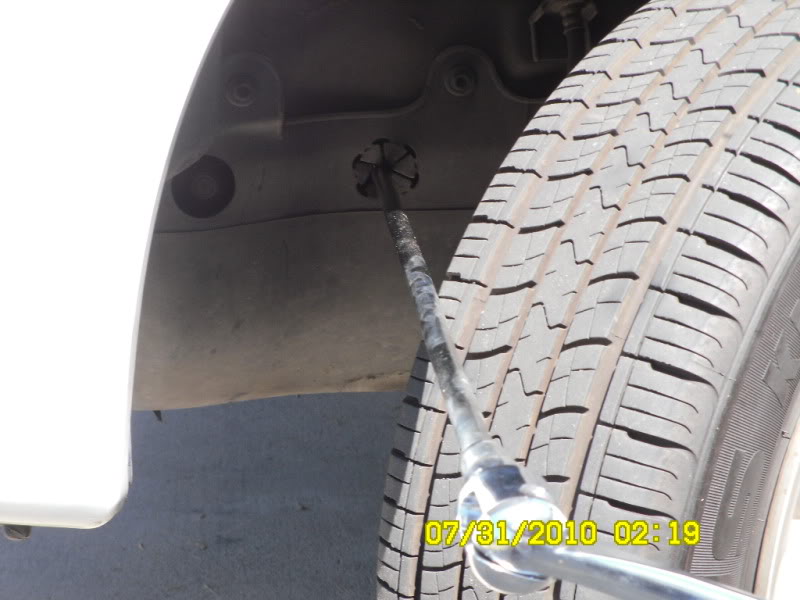
2ndly, you don't have to take off the driver's side front wheel to turn the crankshaft. You can just turn the wheel to the left to access the crankshaft via an extension as pictured below:
And lastly, I purchased a tappet feeler as suggested and used by numerous mechanics via youtube") and I figured that's what I needed but I have discovered these feelers are inaccurate. For example, if you have it slightly angled up you will feel more drag/friction giving you an inaccurate reading. But if you angle it slightly downward you'll feel less drag/friction which is also inaccurate. So, I ditched them for the flat gauge feelers that I use for my motorcycles.
and I figured that's what I needed but I have discovered these feelers are inaccurate. For example, if you have it slightly angled up you will feel more drag/friction giving you an inaccurate reading. But if you angle it slightly downward you'll feel less drag/friction which is also inaccurate. So, I ditched them for the flat gauge feelers that I use for my motorcycles.
Also, the method in which I used to achieve the best adjustment is the same method I use on my motorcycles which is this (note buy a feeler with single digit increments, not by 2):
Manual states for an 1998 Civic LX the valves should be:
in. valves should be anywhere from: 0.007 - 0.009
ex. valves should be anywhere from: 0.009 - 0.011
The method I used was to make sure that the valves were adjusted so that I couldn't slide 0.010 feeler for the intake valves. But had enough opening that a 0.009 feeler got through with some drag/friction, 0.008 with less drag/friction, and a 0.007 even lesser.
I did the same for the exhaust valves: 0.012 could not slide through but had enough opening that a 0.011 feeler got through with some drag/friction, 0.010 with less drag/friction, and a 0.009 even lesser.
The result: Car was so quiet the dogs stopped barking. I also noticed the squeaking noise which I thought was coming from the pulleys had gone away. Weird. Initial acceleration (0-30) is smoother with hardly any noticeable lag.
I was also able to isolate where the rattling noise was coming from after I got rid of the squeaking noise. Turns out there's like a 3 to 4 inch crack on the exhaust manifold.
but anything more than that I dread working on cars cuz I have this notion that it's a lot harder and more complicated than working on my motorcycles.Boy, was I wrong!!!
I just completed my valve clearance and it was 10x easier. Unlike a motorcycle, a few unbolts here & there and BAM! Instant access!! Whereas with a motorcycle you have to unbolt and take apart hell just to get to the valves.
I learned a valuable lesson I hope someone who is like me (a noob) can learn from my experience.
1st thing, following the DIY guide for a 7th Gen valve clearance (that's the only one I can find closest to my 6th Gen) I discovered you don't have to disconnect the battery, which I did. I was afraid I had to reset my stock radio which I didn't have the code for but after I completed the job and reconnected the battery the stock radio didn't ask for a code. Just my presets were back to default settings.
2ndly, you don't have to take off the driver's side front wheel to turn the crankshaft. You can just turn the wheel to the left to access the crankshaft via an extension as pictured below:
And lastly, I purchased a tappet feeler as suggested and used by numerous mechanics via youtube
and I figured that's what I needed but I have discovered these feelers are inaccurate. For example, if you have it slightly angled up you will feel more drag/friction giving you an inaccurate reading. But if you angle it slightly downward you'll feel less drag/friction which is also inaccurate. So, I ditched them for the flat gauge feelers that I use for my motorcycles.Also, the method in which I used to achieve the best adjustment is the same method I use on my motorcycles which is this (note buy a feeler with single digit increments, not by 2):
Manual states for an 1998 Civic LX the valves should be:
in. valves should be anywhere from: 0.007 - 0.009
ex. valves should be anywhere from: 0.009 - 0.011
The method I used was to make sure that the valves were adjusted so that I couldn't slide 0.010 feeler for the intake valves. But had enough opening that a 0.009 feeler got through with some drag/friction, 0.008 with less drag/friction, and a 0.007 even lesser.
I did the same for the exhaust valves: 0.012 could not slide through but had enough opening that a 0.011 feeler got through with some drag/friction, 0.010 with less drag/friction, and a 0.009 even lesser.
The result: Car was so quiet the dogs stopped barking.
I also noticed the squeaking noise which I thought was coming from the pulleys had gone away. Weird. Initial acceleration (0-30) is smoother with hardly any noticeable lag.I was also able to isolate where the rattling noise was coming from after I got rid of the squeaking noise. Turns out there's like a 3 to 4 inch crack on the exhaust manifold.
Last edited by Nosepicker; 08-02-2010 at 12:11 PM.
 08-02-2010
#2
Administrator
Hey! Look At Me!! I'm a Supporting Member!!
Administrator
iTrader: (22)
Join Date: Aug 2003
Location: Las Vegas, NV
Age: 39
Posts: 21,447
Received 1,144 Likes
on
799 Posts
Rep Power: 485 
Re: Just completed my valve clearance, and WOW!!! + A FEW TIPS
good to know. 
I was thinking about doing this a while back, but then it started to get really hot outside, so I said f- it.. lol.. About how long did it take you?
I was thinking about doing this a while back, but then it started to get really hot outside, so I said f- it.. lol.. About how long did it take you?
08-02-2010
#3
Registered!!
Thread Starter
Join Date: Nov 2009
Posts: 474
Likes: 0
Received 0 Likes
on
0 Posts
Rep Power: 180 Re: Just completed my valve clearance, and WOW!!! + A FEW TIPS
I busted out a canopy and worked under that. Weather in Socal was beautiful this past weekend especially under shade so it wasn't bad at all.
The whole process took me 5-6 hrs but that's from taking breaks, lunch, going back & forth to the DIY thread, double & triple checking everything. The first time will always take long but I'm pretty sure I can do this in less than 30 minutes next time around.
Yeah, it's that easy.
The whole process took me 5-6 hrs but that's from taking breaks, lunch, going back & forth to the DIY thread, double & triple checking everything. The first time will always take long but I'm pretty sure I can do this in less than 30 minutes next time around.
Yeah, it's that easy.
08-02-2010
#4
Premium Member
Hey! Look At Me!! I'm a Supporting Member!!
iTrader: (95)

Join Date: Sep 2002
Location: NV
Age: 43
Posts: 51,241
Likes: 0
Received 18 Likes
on
13 Posts
Rep Power: 787 Re: Just completed my valve clearance, and WOW!!! + A FEW TIPS
i still need to do this too. and yeah the flat feeler gauges work best.
08-02-2010
#5
Low and slow!
Join Date: Jan 2010
Location: Marion, NC
Posts: 1,628
Likes: 0
Received 1 Like
on
1 Post
Rep Power: 190 Re: Just completed my valve clearance, and WOW!!! + A FEW TIPS
Have done this several times on my cars before. I have done it on my old EG and my EP. Hell I helped my buddy last week actually do this in his EJ. Its a simple process really, usually people thinks its going to be hard but it isnt. Whenever it cools down a bit I am going to go do the valve adjustment in the LS.
08-02-2010
#7
Administrator
Hey! Look At Me!! I'm a Supporting Member!!
Administrator
iTrader: (22)
Join Date: Aug 2003
Location: Las Vegas, NV
Age: 39
Posts: 21,447
Received 1,144 Likes
on
799 Posts
Rep Power: 485 Re: Just completed my valve clearance, and WOW!!! + A FEW TIPS
I think I may do this within the week then.. I went and bought the feeler gauges with plans to do it the next day, then the weather forecast said it was gonna be >110F.. lol
08-02-2010
#8
Registered!!
Thread Starter
Join Date: Nov 2009
Posts: 474
Likes: 0
Received 0 Likes
on
0 Posts
Rep Power: 180 Re: Just completed my valve clearance, and WOW!!! + A FEW TIPS
Dood, you're in Vegas! It doesn't matter what time of the season it is...it's always gonna be hot there! LOL!
If you have a garage do it in there with the A/C on.
If you have a garage do it in there with the A/C on.
08-02-2010
#9
Administrator
Hey! Look At Me!! I'm a Supporting Member!!
Administrator
iTrader: (22)
Join Date: Aug 2003
Location: Las Vegas, NV
Age: 39
Posts: 21,447
Received 1,144 Likes
on
799 Posts
Rep Power: 485 Re: Just completed my valve clearance, and WOW!!! + A FEW TIPS
haha.. It's not always hot. It's a relative term, anyways. Plus, when it gets above 110, it's just ridiculous.. It's dropped to about 100 (at least the forecast says that for the next few days), so thats why I'm gonna do it then. And the garage has no a/c.. lol
08-03-2010
#10
Administrator
Hey! Look At Me!! I'm a Supporting Member!!
Administrator
iTrader: (22)
Join Date: Aug 2003
Location: Las Vegas, NV
Age: 39
Posts: 21,447
Received 1,144 Likes
on
799 Posts
Rep Power: 485 Re: Just completed my valve clearance, and WOW!!! + A FEW TIPS
I'm in the middle of doing my valve clearance adjustment right now. I'm taking a lunch break and grilling up some home made carne adada steak for some m-f'in tacos 
Having ABS makes taking the plastic pulley cover a royal pain in the *** to take off. I had to scavange my toolbox for a 1/4" drive 10mm socket and use an array of adapters and even a socket to drill attachment to unscrew them, then a telescoping magnet to take them out.. It also took me a damn hour to figure out wtf was going on and how to actually adjust the valve clearance.
Also, even working in the garage, I'm sweating my *** off. lol.. I hella pulled an Mission Impossible tom cruise of catching the sweat droplet before it dropped in my engine..
08-03-2010
#11
Registered!!
Thread Starter
Join Date: Nov 2009
Posts: 474
Likes: 0
Received 0 Likes
on
0 Posts
Rep Power: 180 Re: Just completed my valve clearance, and WOW!!! + A FEW TIPS
LOL!
Good job, bro. I actually used this tool to remove the timing belt cover:

The tip socket itself can be adjusted/angled as well. Really handy tool.
Good job, bro. I actually used this tool to remove the timing belt cover:
The tip socket itself can be adjusted/angled as well. Really handy tool.
Last edited by Nosepicker; 08-03-2010 at 04:11 PM.
08-03-2010
#12
Administrator
Hey! Look At Me!! I'm a Supporting Member!!
Administrator
iTrader: (22)
Join Date: Aug 2003
Location: Las Vegas, NV
Age: 39
Posts: 21,447
Received 1,144 Likes
on
799 Posts
Rep Power: 485 Re: Just completed my valve clearance, and WOW!!! + A FEW TIPS
Took me about 3-4 hours of actual work, but 5.5 hours from start to finish.
as for that tool.. Yea.. I just toughed out the small spaces and hand cramps.. lol. Buttoning everything back up, I found much easier ways to work those bolts.. haha
Oh, and having a/c made the alternator **** a pain, as well.
edit: Doing my valve adjustment also did what yours did, and eliminate what I thought was a squeek from belt slippage.
How I adjusted mine was put a feeler gage that was .001" larger than the max spec (.012" for exhause, .010" for intake) adjust the screw so it grabbed the feeler gauge tightly, tightened the locking nut barely past making contact, removing the feeler gauge and using the torque wrench to close the gap a bit more. After I torqued it down, I checked the gap with the feeler gauge. That method proved to be a bit easier than trying to keep the adjustment screw steady (with a semi-oily scrwe driver, mind you) while tightening down the locking nut.
Last edited by xRiCeBoYx; 08-03-2010 at 06:43 PM.
08-03-2010
#13
Pistol grip pump in my lap at all times
Re: Just completed my valve clearance, and WOW!!! + A FEW TIPS
I wish I had time to do this!!! Between working, prepping for Fall semester, Son, Wife, getting stuff done around the house, Vacation and a whole bunch of other stuff, I barely have time to wash my baby!!!!
08-03-2010
#14
Administrator
Hey! Look At Me!! I'm a Supporting Member!!
Administrator
iTrader: (22)
Join Date: Aug 2003
Location: Las Vegas, NV
Age: 39
Posts: 21,447
Received 1,144 Likes
on
799 Posts
Rep Power: 485 Re: Just completed my valve clearance, and WOW!!! + A FEW TIPS
I totally read "wash the baby" instead of "wash my baby".. lol
08-03-2010
#15
Registered!!
Thread Starter
Join Date: Nov 2009
Posts: 474
Likes: 0
Received 0 Likes
on
0 Posts
Rep Power: 180 Re: Just completed my valve clearance, and WOW!!! + A FEW TIPS
Took me about 3-4 hours of actual work, but 5.5 hours from start to finish.
as for that tool.. Yea.. I just toughed out the small spaces and hand cramps.. lol. Buttoning everything back up, I found much easier ways to work those bolts.. haha
Oh, and having a/c made the alternator **** a pain, as well.
edit: Doing my valve adjustment also did what yours did, and eliminate what I thought was a squeek from belt slippage.
How I adjusted mine was put a feeler gage that was .001" larger than the max spec (.012" for exhause, .010" for intake) adjust the screw so it grabbed the feeler gauge tightly, tightened the locking nut barely past making contact, removing the feeler gauge and using the torque wrench to close the gap a bit more. After I torqued it down, I checked the gap with the feeler gauge. That method proved to be a bit easier than trying to keep the adjustment screw steady (with a semi-oily scrwe driver, mind you) while tightening down the locking nut.
as for that tool.. Yea.. I just toughed out the small spaces and hand cramps.. lol. Buttoning everything back up, I found much easier ways to work those bolts.. haha
Oh, and having a/c made the alternator **** a pain, as well.
edit: Doing my valve adjustment also did what yours did, and eliminate what I thought was a squeek from belt slippage.
How I adjusted mine was put a feeler gage that was .001" larger than the max spec (.012" for exhause, .010" for intake) adjust the screw so it grabbed the feeler gauge tightly, tightened the locking nut barely past making contact, removing the feeler gauge and using the torque wrench to close the gap a bit more. After I torqued it down, I checked the gap with the feeler gauge. That method proved to be a bit easier than trying to keep the adjustment screw steady (with a semi-oily scrwe driver, mind you) while tightening down the locking nut.
I used a 10mm deep socket to hold the nut while I had a very slim screw driver turn the screw.
06-06-2015
#16
Registered!!

Join Date: Jun 2015
Posts: 1
Likes: 0
Received 0 Likes
on
0 Posts
Rep Power: 0 
Re: Just completed my valve clearance, and WOW!!! + A FEW TIPS
I'm just curious, what exactly does this do for the motor or performance? I have a 98 LX and I'm kind of intrigued to do this.

Thread
Thread Starter
Honda Civic Forum
Replies
Last Post
Wankenstein
Mechanical Problems/Vehicle Issues and Fix-it Forum
159
07-05-2015 09:54 PM
Causemo
Mechanical Problems/Vehicle Issues and Fix-it Forum
7
07-04-2015 07:11 AM

