
DIY: Timing belt 96-00

Thread Starter
Registered!!
iTrader: (1)
Joined: Jul 2005
Posts: 1,255
Likes: 0
From: Reno, NV
Rep Power: 267 

DIY: Timing belt 96-00
Timing belt DIY, for 96-00 Civics with 105,000+ normal miles. Pics taken of my 5-speed 97. This DIY will cover the replacement of the following parts:
Power steering belt
Alternator belt
A/C compressor belt
Timing belt
Timing belt tensioner
Water pump
Head gasket
Head cover washers
Spark plug seals
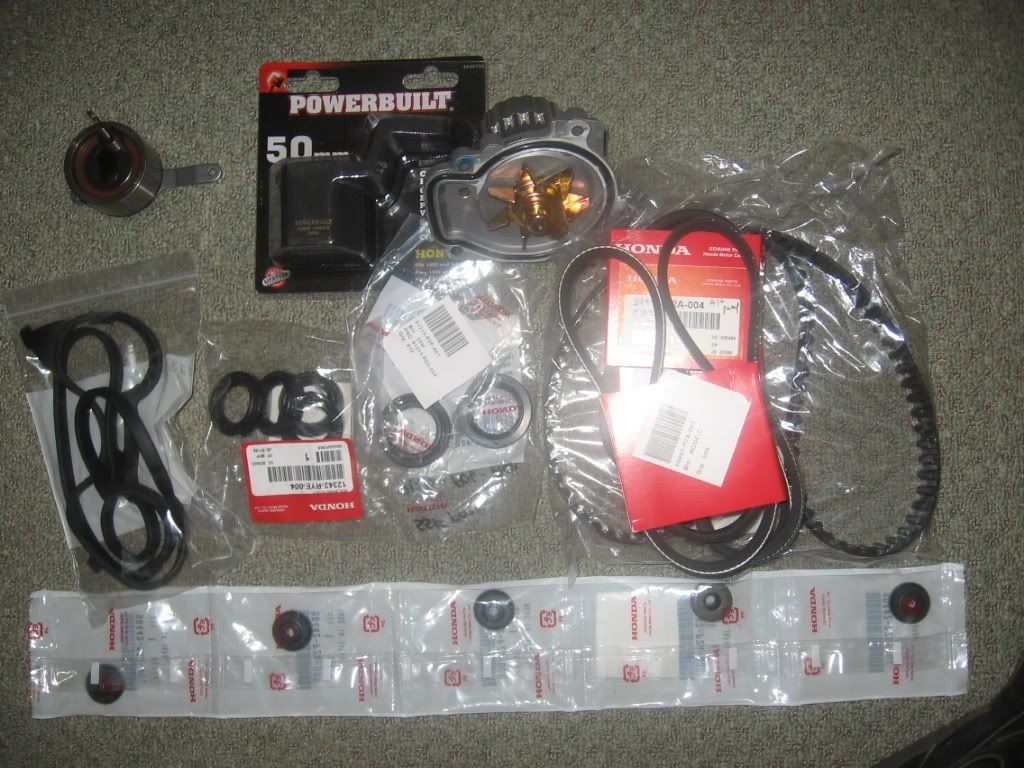
New parts needed. This is for a 1997 DX, parts will likely differ for the EX.
12341-p2f-a00 cylinder head gasket (1)
12342-rye-004 spark plug seals (4)
90442-p2a-000 head cover washers (4) (I recommend you buy 5)
14400-p2f-a01 Timing belt (1)
14520-p2a-305 Timing belt tensioner set (1)
19200-p2a-a01 Water pump (1) (comes with new seal)
38920-p2a-003 Compressor belt (1)
56992-p2a-003 P.S. belt (1)
31110-p2a-004 Alternator belt (1)
Tools needed
If you do not have a professional impact wrench that will remove the pulley bolt, you will need:
1) 18" 1/2" breaker bar.
2) Another breaker bar, preferably the 24" 1/2" one sold at Autozone.
3) An optional 4 foot pipe that fits over bar nicely. It should have as little play as possible.
4)Honda pulley bolt removal tool. (Must have) Go to Amazon.com and they are sold for 24.99, + free ship if over 25 dollars. (that means buy a good book or something) Search: Alltrade 648796 Honda Crankcase Pulley Removal Tool.
5)An extra jack stand in addition to the two holding the front of the vehicle. This will act as a support for your breaker bar when you remove the pulley bolt.
In addition, you will need:
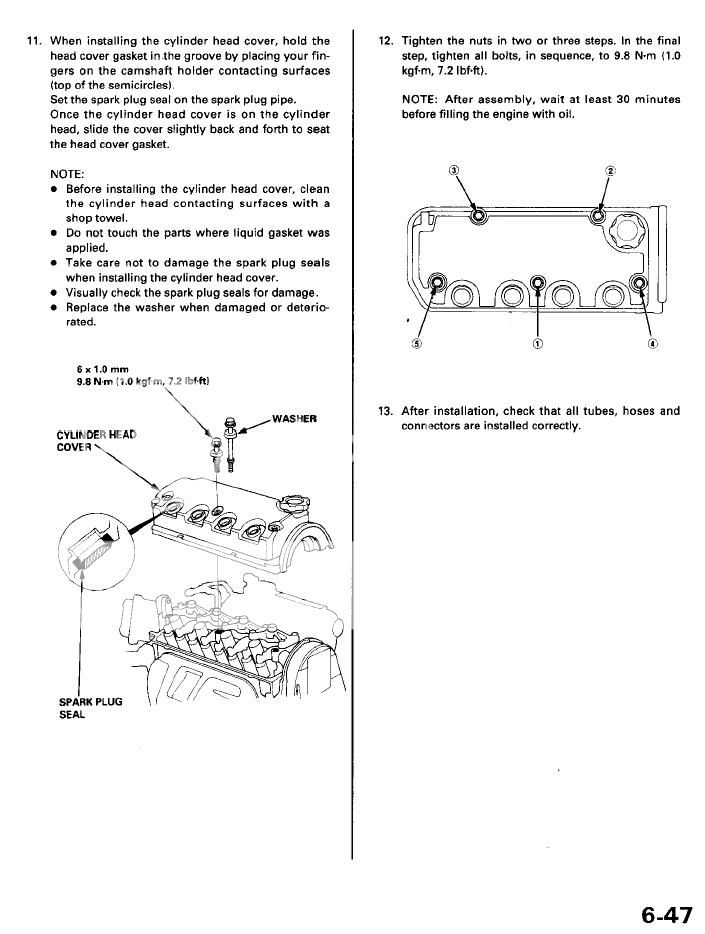
1)Torque wrenches: One in foot pounds, one in inch pounds (optional). You will not be able to torque the cylinder head cover bolts properly if you don't have an inch pounds wrench, but I doubt those bolts are too crucial.
2)17mm deepwell socket. Autozone sells them individually. Impact socket is not necessary, so the standard one will work.
3)New radiator fluid. Match the color.
4)About 14 inches of socket extensions to reach pulley bolt.
5)Floor jack to raise the front of the vehicle onto jack stands.
6)2 Jack stands to support the front of the car.
7)Permatex black liquid gasket from autozone.
1. Remove the radiator fluid through the radiator valve, and empty the reservoir. You will still have a lot of fluid in your system after you do this. You don't have to take out the thermostat. Put the valve back in.
2. Disconnect the negative battery cable. If you want, you can life just the left side of the car, but you will need an extra jack stand no matter what. Do not jack up the car from the front jack point because you will bend your frame upwards! Never use that jack point. What I do is I jack it up from the sides and then slip a jack stand under the jack stand point. Remove front left wheel.
3. Now that your car is up, remove the valve cover. Next, remove the upper timing belt cover.
4. Loosen P/S pump bolts and remove the belt. Unmount the pump and set it over the windshield washer fluid or somewhere out of the way. Be careful that the reservoir isn't spilling fluid.
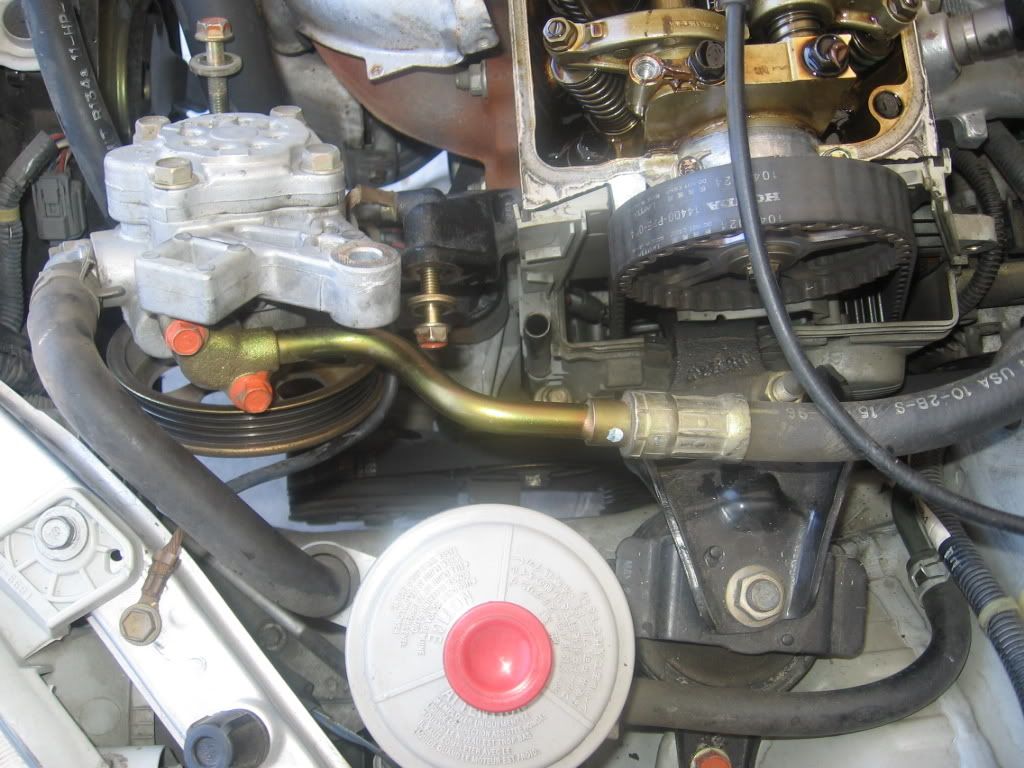
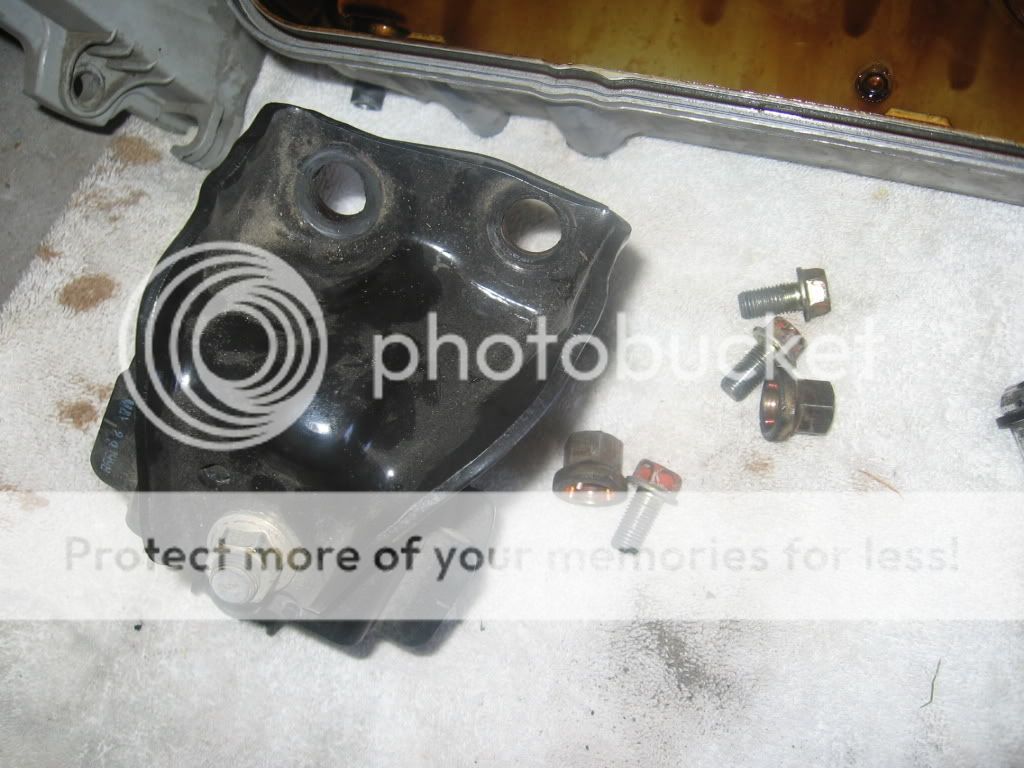
5. Now that you can move the P/S hose out of the way of the motor mount, remove the motor mount using the deepwell 17mm socket you have. Then, remove the 3 bolts holding the mount to the firewall.
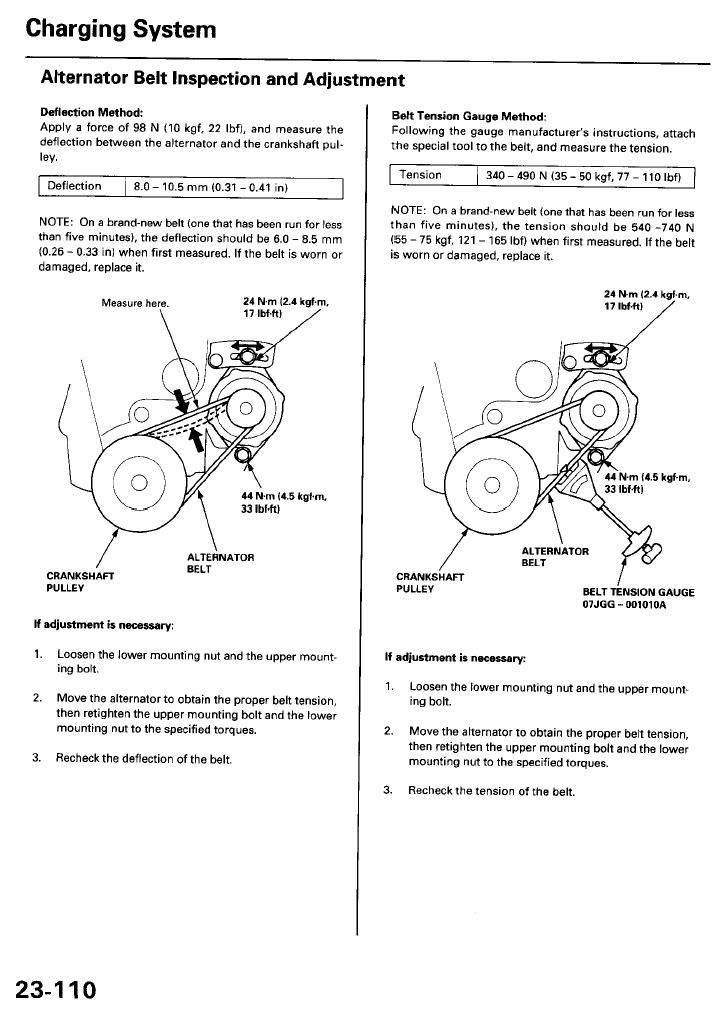
6. Loosen the alternator tension bolt. Next, go under the car and find the alternator pivot bolt, and loosen that. Now you will be able to pull the alternator towards the front of the car, which allows the belt to be slipped off.
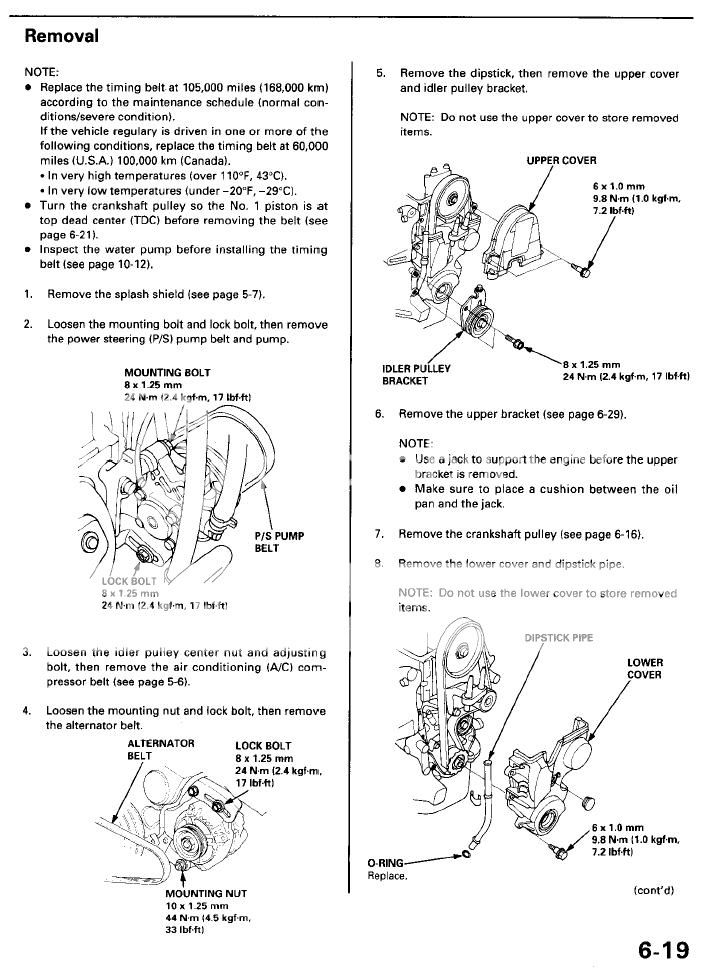
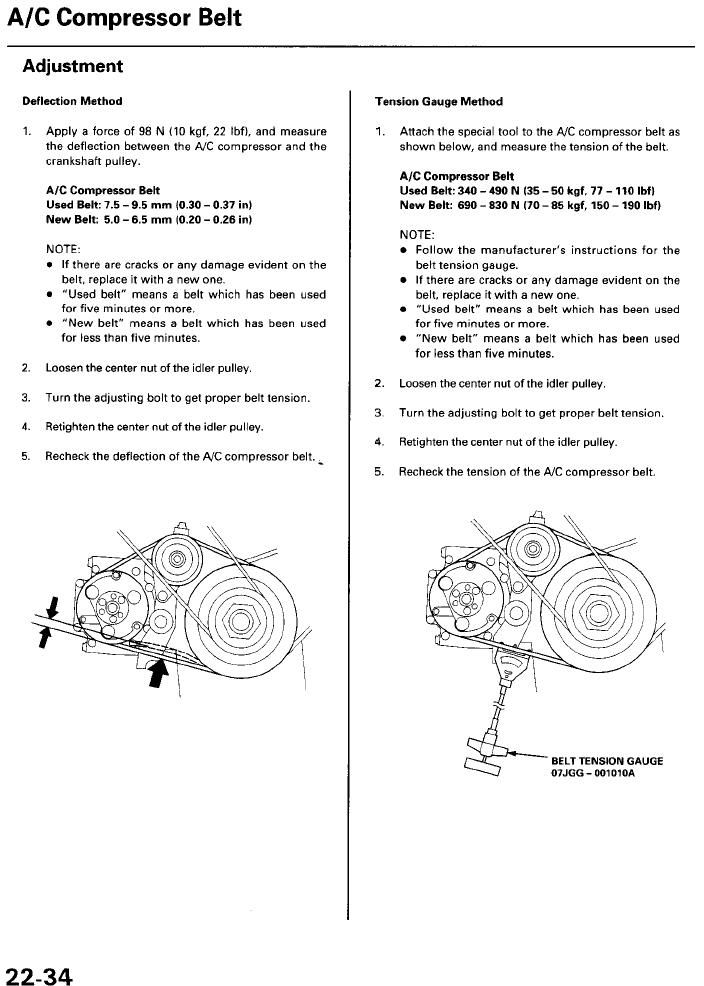
7. The A/C belt is tensioned by that gold pulley you see down there. In order to remove it, take a wrench and loosen the idler pulley nut and then rotate the adjustment bolt counter clockwise enough so that you can slip the belt off. You won't be able to take the belt off because of the motor mount bracket. Now, unscrew the idler pulley nut, remove the pulley (be careful not to lose the two parts in it) and then remove the assembly completely off the engine. Remove the dipstick pipe.

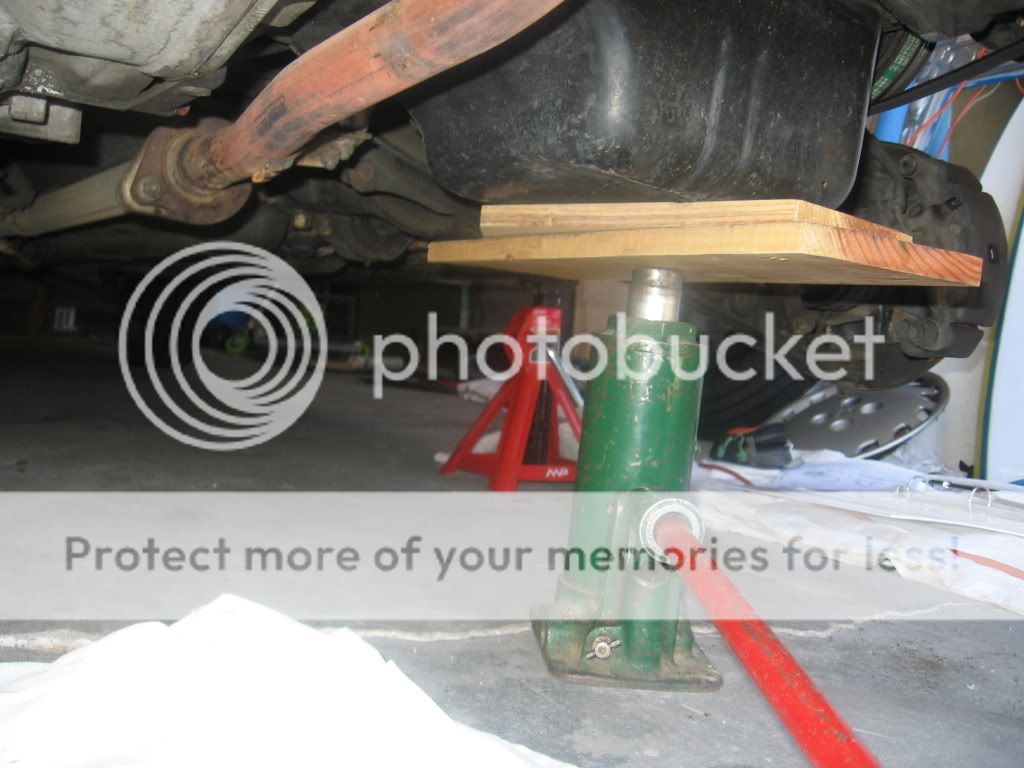
8. To remove the AC belt, you do not have to remove the AC pump and AC bracket. Because you took the top motor mount off, your engise is resting on the bottom torque mount. What you can do is support your engine with a jack under the oil pan, such as your honda tire jack. Make sure you have a piece of wood under there not to damage the oil pan! Now you can remove the two torque mount bolts holding the mount on. Then, lower the engine further with the jack until there is enough clearance over the torque mount for the belt to slip through. You can then slip the new belt in, raise the engine until the mount touches the firewall, then bolt the torque mount back on. You can now remove the jack if you want.
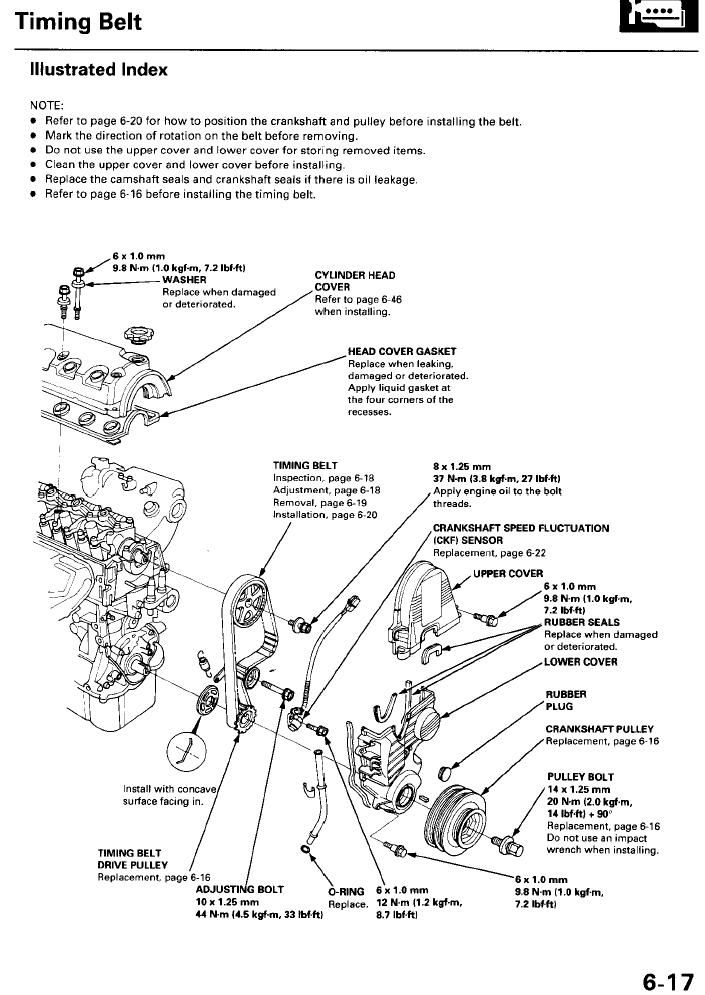
9. Now you're going to rotate the engine to TDC. Get your extensions, small breaker bar or ratchet, 17mm socket and turn the engine counter clockwise until you're at TDC. The easiest way to check tdc is the look at the engine side of the pulley as it's more precise. But it's not all that crucial to be precise because when you remove the crankshaft pulley bolt, you will probably move out of TDC a bit. (see pic 6-20 below)
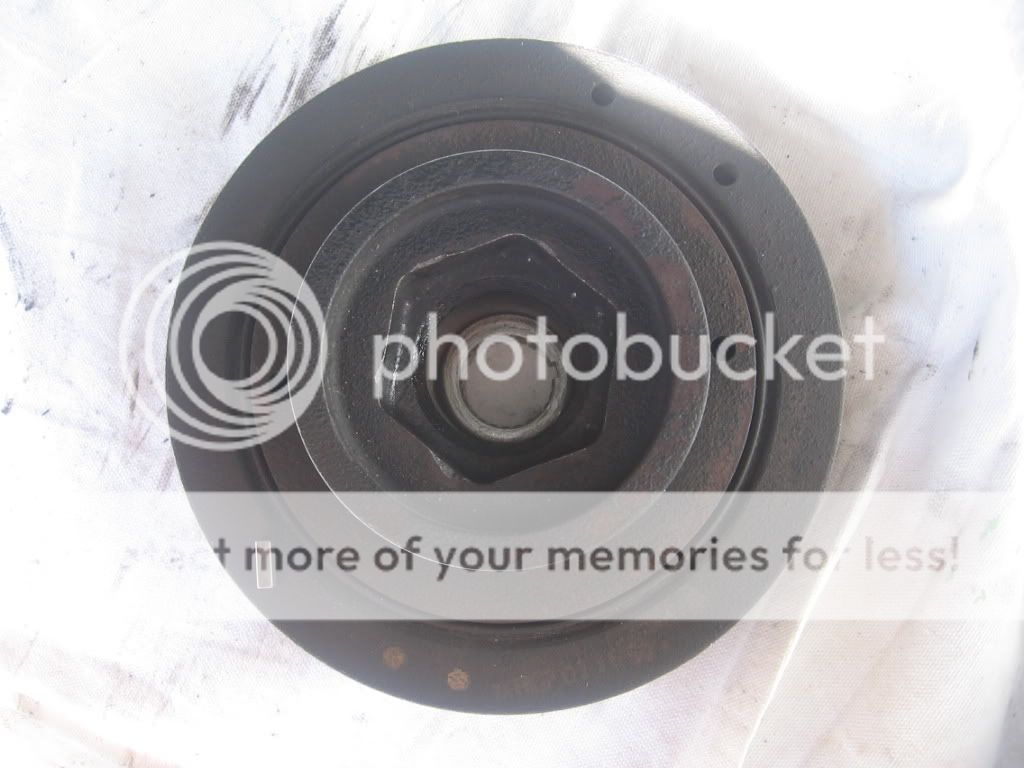
10. Now you're going to remove the crankshaft pulley, which will be the hardest part because it's on there at about 180ft lbs. Get your two breaker bars, 50mm crank holder, 17mm socket, and pipe together. Remove the bolt using the method shown in the video below. Make sure it's all stable and securely held, and that your girlfriends face doesn't happen to be in the wheel well because happy things might not happen if it slips out.
http://www.youtube.com/watch?v=RE-pzP8g_x4
11. Don't worry if you're past TDC, we will take care of that later. What you DON'T want to do is to move the camshaft gear or crankshaft gear when the timing belt is OFF. So make damned sure you don't rotate them accidentally. Remove the pulley bolt and pulley. When you remove the pulley, a rectangular key will pop out. (see pic) Don't lose this! You cannot put back the pulley without it.
12. Remove the lower cover, and the CKF sensor next to the drive pulley. The sensor might be optional(?). Remember to put it back in if you take it off.
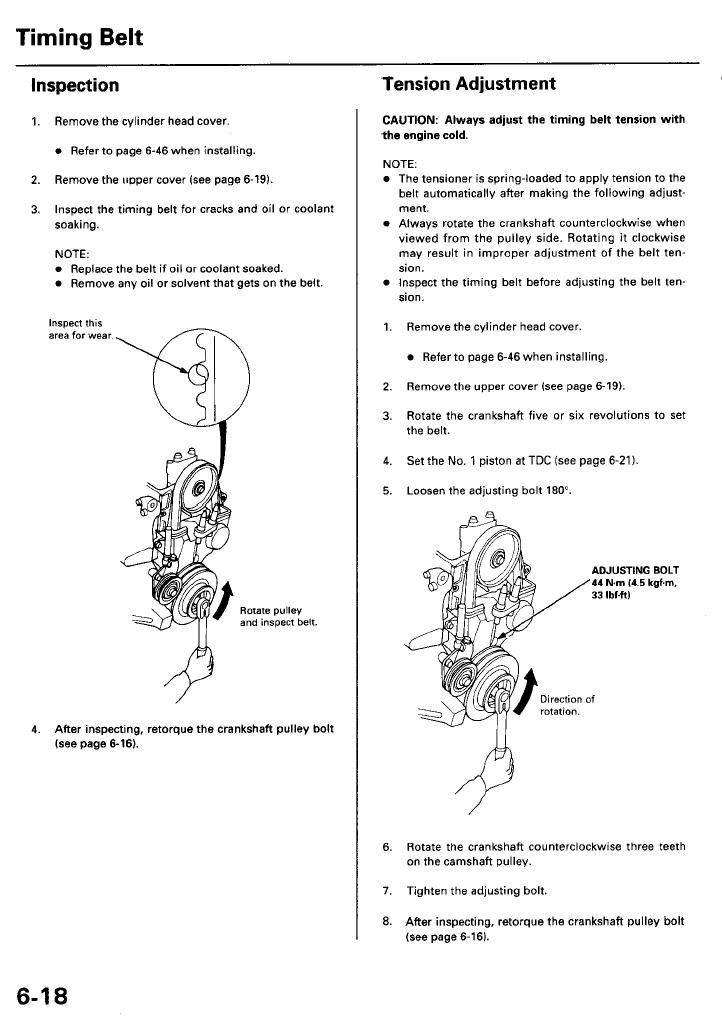
13. Again, make sure camshaft is at TDC and/or that they haven't been moved independently. Loosen the tensioner, remove the belt, and remove the tensioner.
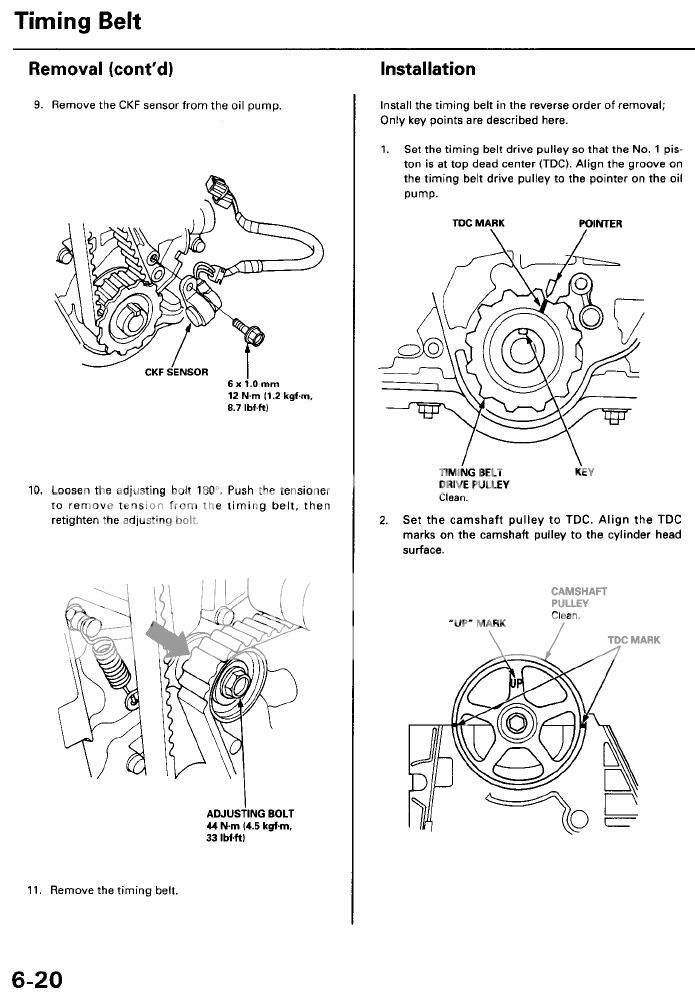
14. Place a bucket under the water pump. Remove water pump --fluid will leak out-- and replace with the new pump and seal. Add the new tensioner to the engine and tighten it slightly. Add the timing belt over the gears in the sequence shown below. Loosen the tensioner to tension, then tighten it a good amount.

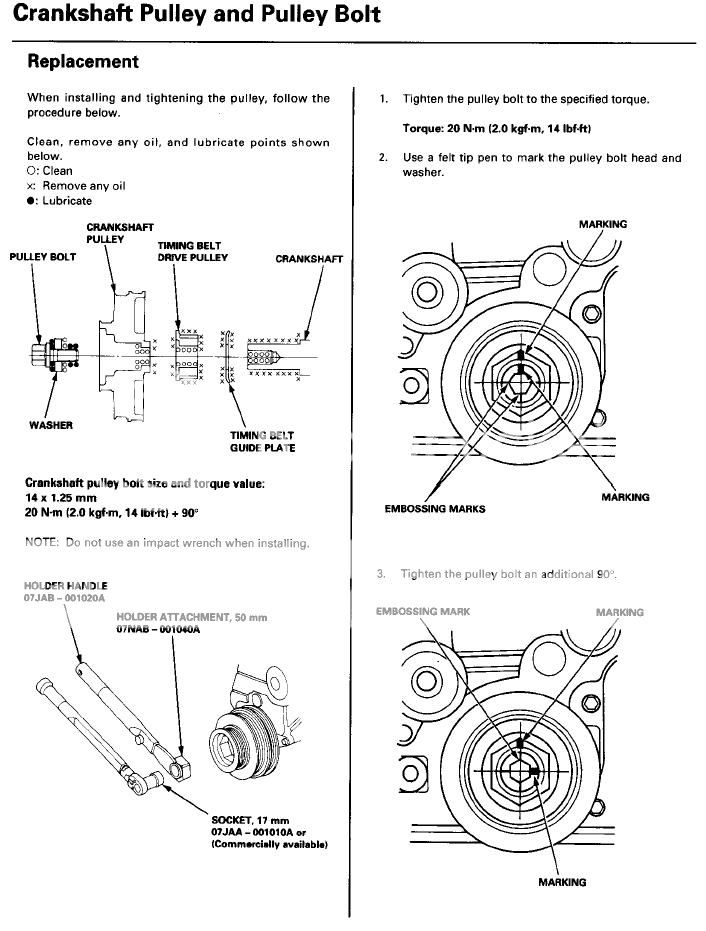
15. Before you Install CKF sensor and lower cover, check to make sure the upper mount bracket isn't loose. Tighten it and add locktit to bolts if it is. Install CKF sensor and lower cover and reinstall crank pulley,Do not forget the key. Oil the pulley bolt as shown below, and tighten the pulley fully. Rotate camshaft pulley 5-6 turns, slowly, to make sure you did it properly. If it's okay, rotate an additional 3 teeth or more. Loosen tensioner, then re-tighten it fully. Hold the long part of the timing belt and twist it. It shouldn't twist more than 90 degrees. If it does, it's too loose so you need to retention it.
16. Check TDC on camshaft and crankshaft pulley. The best and easiest way to do this is to place the crankshaft pulley at TDC first, which is the white mark. (refer to picture above) There are 2 TDC-finder marks on the lower cover, just like you have a rear and front sight on a firearm. Align the white mark through the sights. Now, look at your camshaft pulley on the engine side. Is it at TDC? the two slits should batch with the head. If it doesn't, your camshaft and crankshaft are not in sync, so you will have to remedy that. (6-20) Don't forget to install the dip stick tube.
17. Go ahead and turn the engine (with wrench) some more just to make sure it's all good.
18. Install drive belts. Just make sure the belts are semi-tight, but not so tight that they have no play. Do the A/C belt first, then the alternator. To tension the alternator, put a breaker bar in front of the alternator and behind the engine as shown in the pick. Push it back, and tighten the travel screw with a wrench. Don't forget about the bottom screw.
19. Install the upper motor mount, then install the PS pump and belt. The PS pump has a box on the top that you can slip a 1/2 break bar into.
20. Reinstall upper cover. (not head cover)
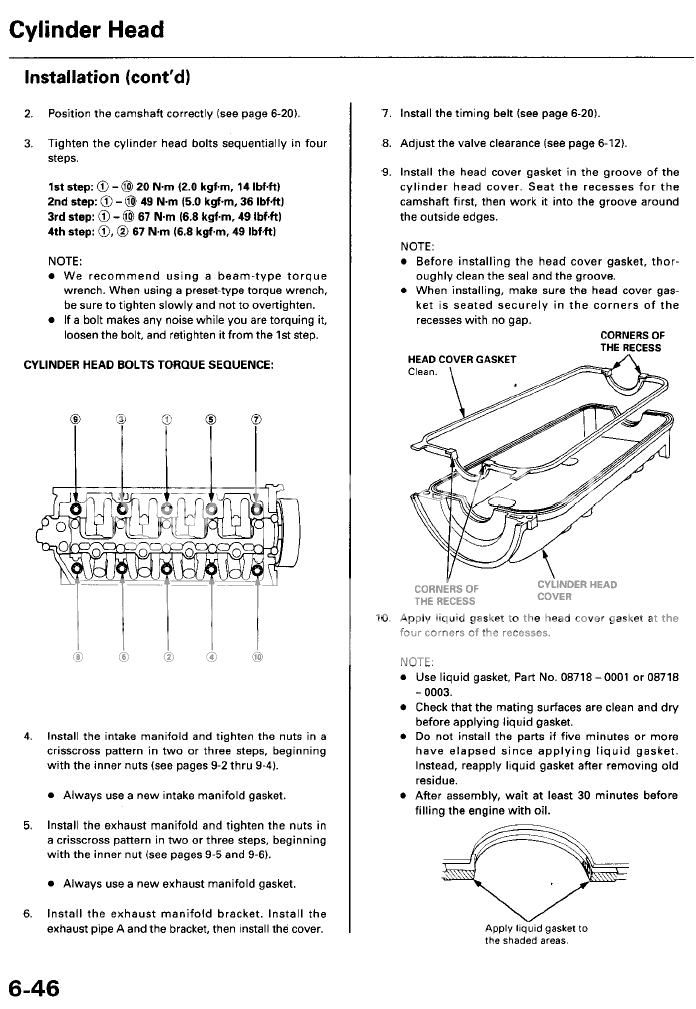
21. Remove old oil seals and install new ones. Do this by prying with a screw driver, then gently hammering in the new ones. Also, add the new rubber washers to your head cover bolts. Add oil to the inside of the washer and press them on using gloves. It was a bitch. The extra one is there in case you tear one.
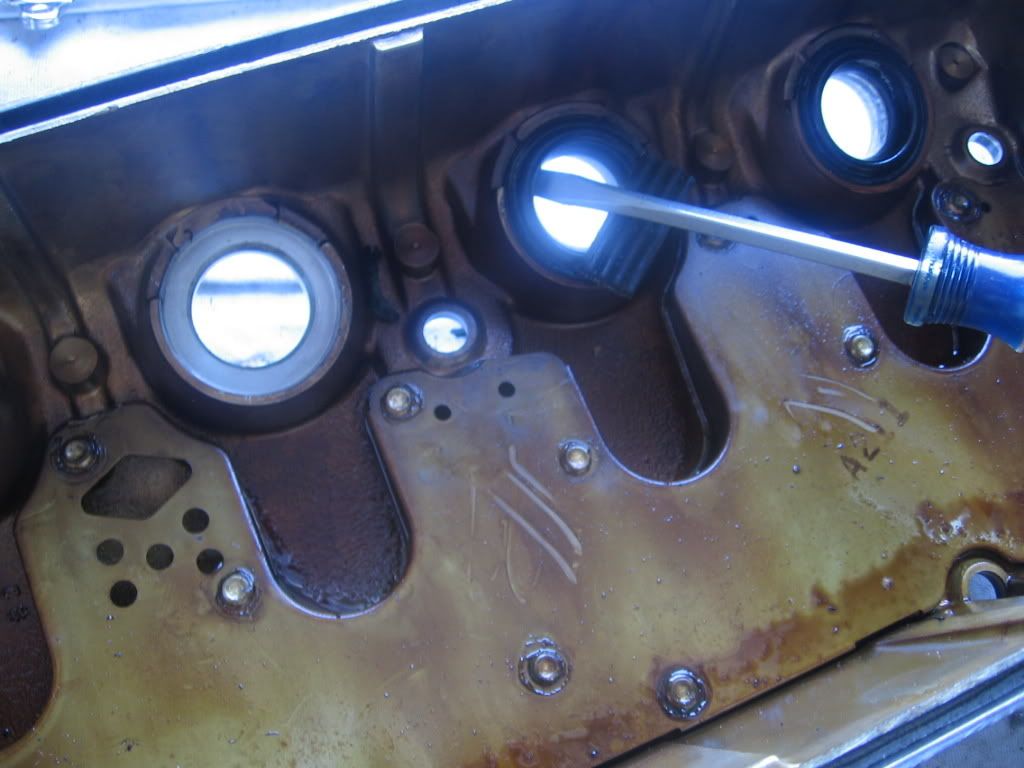
22. Before installing the head cover, scrape off old liquid gasket with a flat piece of plastic rather than a metallic object. Wash area with simple green or whatever. When you actually slip on the head cover with the new plug seals, be careful not to damage them. They may get squashed and torn! Pay special attention that the spark plug tubes come all the way through and into the plug seals.
23. Crank engine some more by hand, just to make sure. Reinstall everything the way it was. Lower car, reconnect small parts like throttle cable and battery cable.
24. Remember, you have no coolant in the car. Put your heater to full heat, and fan to full. Open your radiator cap and place a funnel in there. Refill the coolant reservoir first. Start the car. It may have some difficulty starting. Refill coolant as the car runs until the air is out of it. You may have to add some later or the next day.
Power steering belt
Alternator belt
A/C compressor belt
Timing belt
Timing belt tensioner
Water pump
Head gasket
Head cover washers
Spark plug seals
New parts needed. This is for a 1997 DX, parts will likely differ for the EX.
12341-p2f-a00 cylinder head gasket (1)
12342-rye-004 spark plug seals (4)
90442-p2a-000 head cover washers (4) (I recommend you buy 5)
14400-p2f-a01 Timing belt (1)
14520-p2a-305 Timing belt tensioner set (1)
19200-p2a-a01 Water pump (1) (comes with new seal)
38920-p2a-003 Compressor belt (1)
56992-p2a-003 P.S. belt (1)
31110-p2a-004 Alternator belt (1)
Tools needed
If you do not have a professional impact wrench that will remove the pulley bolt, you will need:
1) 18" 1/2" breaker bar.
2) Another breaker bar, preferably the 24" 1/2" one sold at Autozone.
3) An optional 4 foot pipe that fits over bar nicely. It should have as little play as possible.
4)Honda pulley bolt removal tool. (Must have) Go to Amazon.com and they are sold for 24.99, + free ship if over 25 dollars. (that means buy a good book or something) Search: Alltrade 648796 Honda Crankcase Pulley Removal Tool.
5)An extra jack stand in addition to the two holding the front of the vehicle. This will act as a support for your breaker bar when you remove the pulley bolt.
In addition, you will need:
1)Torque wrenches: One in foot pounds, one in inch pounds (optional). You will not be able to torque the cylinder head cover bolts properly if you don't have an inch pounds wrench, but I doubt those bolts are too crucial.
2)17mm deepwell socket. Autozone sells them individually. Impact socket is not necessary, so the standard one will work.
3)New radiator fluid. Match the color.
4)About 14 inches of socket extensions to reach pulley bolt.
5)Floor jack to raise the front of the vehicle onto jack stands.
6)2 Jack stands to support the front of the car.
7)Permatex black liquid gasket from autozone.
1. Remove the radiator fluid through the radiator valve, and empty the reservoir. You will still have a lot of fluid in your system after you do this. You don't have to take out the thermostat. Put the valve back in.
2. Disconnect the negative battery cable. If you want, you can life just the left side of the car, but you will need an extra jack stand no matter what. Do not jack up the car from the front jack point because you will bend your frame upwards! Never use that jack point. What I do is I jack it up from the sides and then slip a jack stand under the jack stand point. Remove front left wheel.
3. Now that your car is up, remove the valve cover. Next, remove the upper timing belt cover.
4. Loosen P/S pump bolts and remove the belt. Unmount the pump and set it over the windshield washer fluid or somewhere out of the way. Be careful that the reservoir isn't spilling fluid.
5. Now that you can move the P/S hose out of the way of the motor mount, remove the motor mount using the deepwell 17mm socket you have. Then, remove the 3 bolts holding the mount to the firewall.
6. Loosen the alternator tension bolt. Next, go under the car and find the alternator pivot bolt, and loosen that. Now you will be able to pull the alternator towards the front of the car, which allows the belt to be slipped off.
7. The A/C belt is tensioned by that gold pulley you see down there. In order to remove it, take a wrench and loosen the idler pulley nut and then rotate the adjustment bolt counter clockwise enough so that you can slip the belt off. You won't be able to take the belt off because of the motor mount bracket. Now, unscrew the idler pulley nut, remove the pulley (be careful not to lose the two parts in it) and then remove the assembly completely off the engine. Remove the dipstick pipe.
8. To remove the AC belt, you do not have to remove the AC pump and AC bracket. Because you took the top motor mount off, your engise is resting on the bottom torque mount. What you can do is support your engine with a jack under the oil pan, such as your honda tire jack. Make sure you have a piece of wood under there not to damage the oil pan! Now you can remove the two torque mount bolts holding the mount on. Then, lower the engine further with the jack until there is enough clearance over the torque mount for the belt to slip through. You can then slip the new belt in, raise the engine until the mount touches the firewall, then bolt the torque mount back on. You can now remove the jack if you want.
9. Now you're going to rotate the engine to TDC. Get your extensions, small breaker bar or ratchet, 17mm socket and turn the engine counter clockwise until you're at TDC. The easiest way to check tdc is the look at the engine side of the pulley as it's more precise. But it's not all that crucial to be precise because when you remove the crankshaft pulley bolt, you will probably move out of TDC a bit. (see pic 6-20 below)
10. Now you're going to remove the crankshaft pulley, which will be the hardest part because it's on there at about 180ft lbs. Get your two breaker bars, 50mm crank holder, 17mm socket, and pipe together. Remove the bolt using the method shown in the video below. Make sure it's all stable and securely held, and that your girlfriends face doesn't happen to be in the wheel well because happy things might not happen if it slips out.
http://www.youtube.com/watch?v=RE-pzP8g_x4
11. Don't worry if you're past TDC, we will take care of that later. What you DON'T want to do is to move the camshaft gear or crankshaft gear when the timing belt is OFF. So make damned sure you don't rotate them accidentally. Remove the pulley bolt and pulley. When you remove the pulley, a rectangular key will pop out. (see pic) Don't lose this! You cannot put back the pulley without it.
12. Remove the lower cover, and the CKF sensor next to the drive pulley. The sensor might be optional(?). Remember to put it back in if you take it off.
13. Again, make sure camshaft is at TDC and/or that they haven't been moved independently. Loosen the tensioner, remove the belt, and remove the tensioner.
14. Place a bucket under the water pump. Remove water pump --fluid will leak out-- and replace with the new pump and seal. Add the new tensioner to the engine and tighten it slightly. Add the timing belt over the gears in the sequence shown below. Loosen the tensioner to tension, then tighten it a good amount.
15. Before you Install CKF sensor and lower cover, check to make sure the upper mount bracket isn't loose. Tighten it and add locktit to bolts if it is. Install CKF sensor and lower cover and reinstall crank pulley,Do not forget the key. Oil the pulley bolt as shown below, and tighten the pulley fully. Rotate camshaft pulley 5-6 turns, slowly, to make sure you did it properly. If it's okay, rotate an additional 3 teeth or more. Loosen tensioner, then re-tighten it fully. Hold the long part of the timing belt and twist it. It shouldn't twist more than 90 degrees. If it does, it's too loose so you need to retention it.
16. Check TDC on camshaft and crankshaft pulley. The best and easiest way to do this is to place the crankshaft pulley at TDC first, which is the white mark. (refer to picture above) There are 2 TDC-finder marks on the lower cover, just like you have a rear and front sight on a firearm. Align the white mark through the sights. Now, look at your camshaft pulley on the engine side. Is it at TDC? the two slits should batch with the head. If it doesn't, your camshaft and crankshaft are not in sync, so you will have to remedy that. (6-20) Don't forget to install the dip stick tube.
17. Go ahead and turn the engine (with wrench) some more just to make sure it's all good.
18. Install drive belts. Just make sure the belts are semi-tight, but not so tight that they have no play. Do the A/C belt first, then the alternator. To tension the alternator, put a breaker bar in front of the alternator and behind the engine as shown in the pick. Push it back, and tighten the travel screw with a wrench. Don't forget about the bottom screw.
19. Install the upper motor mount, then install the PS pump and belt. The PS pump has a box on the top that you can slip a 1/2 break bar into.
20. Reinstall upper cover. (not head cover)
21. Remove old oil seals and install new ones. Do this by prying with a screw driver, then gently hammering in the new ones. Also, add the new rubber washers to your head cover bolts. Add oil to the inside of the washer and press them on using gloves. It was a bitch. The extra one is there in case you tear one.
22. Before installing the head cover, scrape off old liquid gasket with a flat piece of plastic rather than a metallic object. Wash area with simple green or whatever. When you actually slip on the head cover with the new plug seals, be careful not to damage them. They may get squashed and torn! Pay special attention that the spark plug tubes come all the way through and into the plug seals.
23. Crank engine some more by hand, just to make sure. Reinstall everything the way it was. Lower car, reconnect small parts like throttle cable and battery cable.
24. Remember, you have no coolant in the car. Put your heater to full heat, and fan to full. Open your radiator cap and place a funnel in there. Refill the coolant reservoir first. Start the car. It may have some difficulty starting. Refill coolant as the car runs until the air is out of it. You may have to add some later or the next day.
Last edited by Cleft_Asunder; Jun 12, 2010 at 12:12 PM.

Registered!!
Joined: May 2008
Posts: 1
Likes: 0
From: Brasilia - Brazil
Rep Power: 0 
Thread Starter
Registered!!
iTrader: (1)
Joined: Jul 2005
Posts: 1,255
Likes: 0
From: Reno, NV
Rep Power: 267 Re: DIY: Timing belt 96-00.

Registered!!
Joined: Sep 2008
Posts: 4
Likes: 0
Rep Power: 0 Re: DIY: Timing belt 96-00.
Great info, thanks for posting. This time around I've decided to let a shop do it since I don't have the time, but still have a question: what spare parts should I ask for? The shop I talked to said they're using Dayco timing belts and AirSomething water pump. Are these better, worse, same as OEM? And does anybody know who is manufacturing the timing belts for Honda? I presume they don't do it themselves, it would be hard to compete with a company that's doing only timing belts. Ditto for water pump. You also seem to imply the Honda coolant is better than generic. I'm wondering if this is just a marketing gimmick or they have a different formula for their coolant?
Thread Starter
Registered!!
iTrader: (1)
Joined: Jul 2005
Posts: 1,255
Likes: 0
From: Reno, NV
Rep Power: 267 Re: DIY: Timing belt 96-00.
Great info, thanks for posting. This time around I've decided to let a shop do it since I don't have the time, but still have a question: what spare parts should I ask for? The shop I talked to said they're using Dayco timing belts and AirSomething water pump. Are these better, worse, same as OEM? And does anybody know who is manufacturing the timing belts for Honda? I presume they don't do it themselves, it would be hard to compete with a company that's doing only timing belts. Ditto for water pump. You also seem to imply the Honda coolant is better than generic. I'm wondering if this is just a marketing gimmick or they have a different formula for their coolant?
As for anti-freeze, yeah, could be B.S. I remember reading once on the S2000 forum (I think it was) where some guy posted that he got roughly a 15% heat reduction on the Honda stuff. I run the Honda stuff myself and will probably change to cheaper stuff eventually, but I can tell you that despite really hot weather around here in the summer, my car stays really cool. The radiator fan, for example, doesn't turn on often at all. Maybe that doesn't mean anything and maybe the same would hold true for non-honda brand coolant, I really don't know. Certainly you're wasting your money if you buy their motor oil. But at the same time, that doesn't mean all their products are overpriced versions of the same thing. For example, their trany fluid is good and I know that for a fact. It makes the car shift really nice, and I'm at about 30k on the stuff.
If I were you, I would stick to OEM parts. Sometimes aftermarket is better, sometimes it's the same, sometimes it's worse. How are you going to know? And that's a semi-major job, so you might as well do it right the first time. Or at least ask where those parts are made. I wouldn't put a chinese product on my car.
Last edited by Cleft_Asunder; Sep 29, 2008 at 12:12 AM.
Registered!!
Joined: Sep 2008
Posts: 4
Likes: 0
Rep Power: 0 Re: DIY: Timing belt 96-00.
Thanks for your answer, Cleft. IMHO Honda doesn't use any magic when manufacturing their parts. They just use good materials and workmanship and require the same of their suppliers. I don't necessarily want to give them my money and increase the trade deficit unless there is a good reason for it (like the replacement not lasting as long). I've got 105 kmiles out of the original timing belt/water pump and would like to get the same of the new ones. I thought there would be somebody out there to know something about the Dayco timing belts. If they're made in China I'm sure I don't want them...
Thread Starter
Registered!!
iTrader: (1)
Joined: Jul 2005
Posts: 1,255
Likes: 0
From: Reno, NV
Rep Power: 267 Re: DIY: Timing belt 96-00.
Thanks for your answer, Cleft. IMHO Honda doesn't use any magic when manufacturing their parts. They just use good materials and workmanship and require the same of their suppliers. I don't necessarily want to give them my money and increase the trade deficit unless there is a good reason for it (like the replacement not lasting as long). I've got 105 kmiles out of the original timing belt/water pump and would like to get the same of the new ones. I thought there would be somebody out there to know something about the Dayco timing belts. If they're made in China I'm sure I don't want them...
As for your belts question, you should make a new post and ask.

Registered!!
Joined: Oct 2009
Posts: 74
Likes: 0
From: sparks, nv
Rep Power: 0 Re: DIY: Timing belt 96-00.
Nice writeup! Never occurred to me to do the water pump w/ the timing belt - is it prone to failure or was yours messed up? How about the tensioner? I can see why for the mount. I'm just about to do mine & I'll hafta check that mount out.
Registered!!
Joined: Sep 2007
Posts: 183
Likes: 0
From: Houston, Texas
Rep Power: 229 Re: DIY: Timing belt 96-00.
 Your revisions and corrections improve an already outstanding DIY. It's now a gold standard.
For anyone interested in replacing both the front main oil seal in the oil pump or the camshaft oil seal while the timing belt is removed, the link below gives some helpful tips.
http://honda-tech.com/showthread.php?t=2466112
Last edited by RonJ; Jun 12, 2010 at 08:44 AM.
Thread Starter
Registered!!
iTrader: (1)
Joined: Jul 2005
Posts: 1,255
Likes: 0
From: Reno, NV
Rep Power: 267 Re: DIY: Timing belt 96-00.
Your revisions and corrections improve an already outstanding DIY. It's now a gold standard.For anyone interested in replacing both the front main oil seal in the oil pump or the camshaft oil seal while the timing belt is removed, the link below gives some helpful tips.
http://honda-tech.com/showthread.php?t=2466112

Thread Starter
Registered!!
iTrader: (1)
Joined: Jul 2005
Posts: 1,255
Likes: 0
From: Reno, NV
Rep Power: 267 Re: DIY: Timing belt 96-00.
The high temp rtv silicon black/grey is the standard stuff. Pretty much anything will work for the head cover gasket, it's no big deal.
Thread Starter
Registered!!
iTrader: (1)
Joined: Jul 2005
Posts: 1,255
Likes: 0
From: Reno, NV
Rep Power: 267 Re: DIY: Timing belt 96-00.
No, but you might as well add it since it will be cheaper that way. And i wouldn't change the timing belt unless you have 110k or over, because only people who are affraid of everything change it before that.

Registered!!
Joined: Nov 2009
Posts: 474
Likes: 0
Rep Power: 206 Re: DIY: Timing belt 96-00.
I found a few mistakes in this DIY which I'll let you guys know once I finish but here's a question that needs answering ASAP plz.
How the hell do you torque down the idler pulley nut...:
...there is absolutely NO ROOM for a torque wrench? You have about two inches of space to work with.
The only way possible is if you were to take it off completely which is a PITA in itself.
How the hell do you torque down the idler pulley nut...:
The only way possible is if you were to take it off completely which is a PITA in itself.
Thread Starter
Registered!!
iTrader: (1)
Joined: Jul 2005
Posts: 1,255
Likes: 0
From: Reno, NV
Rep Power: 267 Re: DIY: Timing belt 96-00.
Why would you need to put a torque wrench there? Remove it with a wrench and then put it back with a wrench. Torque is unimportant in many cases.

Registered!!
Joined: May 2011
Posts: 7
Likes: 0
Rep Power: 0 Re: DIY: Timing belt 96-00
Great tips. I bought a 98 DX sedan with 148K a week ago and decided to do the timing belt and tensioner yesterday as previous owner was unsure if it was done. Also did water pump, belts, plugs, valve cover gasket, thermostat and upper radiator hose. Now I am not worried about it leaving me stranded. Only thing that confused me is the post refers to the valve cover gasket as a head gasket. They are obviously 2 different things
Re: DIY: Timing belt 96-00
Luckilly he was thorough enough to include the part number. A lot of people around where I live call the valve cover gasket the head cover gasket...


Registered!!
Joined: Jul 2012
Posts: 3
Likes: 0
Rep Power: 0 Re: DIY: Timing belt 96-00.
I use a torque wrench whenever I am working on aluminum engines, and with critical parts that could come off. I have spent the most time on many jobs just working with a bolt that was overtightened by the last person.
Last edited by Civicman6969; Jul 8, 2012 at 08:23 PM.
Registered!!
Joined: Jul 2012
Posts: 3
Likes: 0
Rep Power: 0 Re: DIY: Timing belt 96-00
tighten the pulley fully. Rotate camshaft pulley 5-6 turns, slowly, to make sure you did it properly. If it's okay, rotate an additional 3 teeth or more.
OK when you rotate three teeth on the camshaft sprocket, it's not just three teeth added to 5 or 6 turns. That would be silly. You are putting tension on the timing belt at this point, and you should be turning it 5 or 6 turns, then loosen the tensioner bolt, rotate the crank shaft pulley for three teeth on the camshaft sprocket, and WHILE MAINTAINING TENSION on the crankshaft pulley you quickly tighten up the tensioner bolt.
OK when you rotate three teeth on the camshaft sprocket, it's not just three teeth added to 5 or 6 turns. That would be silly. You are putting tension on the timing belt at this point, and you should be turning it 5 or 6 turns, then loosen the tensioner bolt, rotate the crank shaft pulley for three teeth on the camshaft sprocket, and WHILE MAINTAINING TENSION on the crankshaft pulley you quickly tighten up the tensioner bolt.

Registered!!
Joined: Oct 2012
Posts: 4
Likes: 0
Rep Power: 0 Re: DIY: Timing belt 96-00
All the info. you guys posted is very accurate and true ; but I cannot believe nobody has mentioned two very important tools that will cut time in half and make your lives so much better when taking on this job. You'll need SP Tools P/N 11500 cam gear wrench and P/N 60100A crank pulley socket. Good luck and be safe doing the job! 


