
DIY OIL Change

Thread Starter
A true genius admits that he/she knows nothing.....CLOSED SAT/SUN
Joined: Nov 2011
Posts: 1,040
Likes: 6
From: East Coast
Rep Power: 189 

DIY OIL Change
<TABLE border=0 cellPadding=2 width=728><TBODY><TR><TD colSpan=3 align=middle>
Passenger Side Raised</TD><TD align=middle>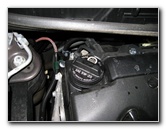
Oil Filler Hole</TD><TD align=middle>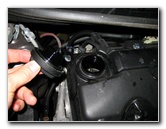
Remove Oil Filler Cap</TD></TR><TR><TD colSpan=3 align=left>The first step is to warm up the engine for a few minutes so that the old oil will drain more quickly and carry out the majority of the contaminants with it. Then turn off the engine and engage the emergency parking brake. Raise up the passenger side of the vehicle with the floor jack and secure it with at least one floor jack. I prefer to use two jack stands for extra safety. Move to the engine bay and remove the oil filler cap which will allow air to enter the engine and the old oil to drain out faster.</TD></TR><TR><TD align=middle>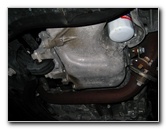
Oil Drain Bolt & Filter</TD><TD align=middle>
17mm Oil Drain Bolt</TD><TD align=middle>
Old Oil Filter</TD></TR><TR><TD colSpan=3 align=left>Under the passenger side of the engine, you'll see the oil filter located closer to the front of the car and the horizontally orientated oil drain bolt located further back facing the rear of the car. </TD></TR><TR><TD align=middle>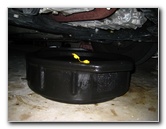
Oil Catch Container In Place</TD><TD align=middle>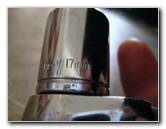
17mm Socket & Wrench</TD><TD align=middle>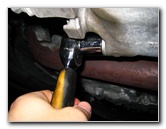
Remove Oil Drain Bolt</TD></TR><TR><TD colSpan=3 align=middle>
<!--webbot bot="HTMLMarkup" startspan --><SCRIPT type=text/javascript><!--google_ad_client = "pub-1603448158407333";google_alternate_ad_url = "http://www.paulstravelpictures.com/google_adsense_script.htm";google_ad_width = 728;google_ad_height = 90;google_ad_format = "728x90_as";google_ad_type = "text_image";google_ad_channel ="7938085502";google_color_border = "FFFFFF";google_color_bg = "FFFFFF";google_color_link = "0000FF";google_color_url = "000000";google_color_text = "000000";//--></SCRIPT><SCRIPT type=text/javascript src="http://pagead2.googlesyndication.com/pagead/show_ads.js"></SCRIPT><!--webbot bot="HTMLMarkup" endspan i-checksum="55958" --> </TD></TR><TR><TD colSpan=3 align=middle>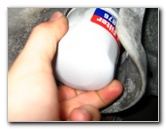
Twist Off Old Oil Filter</TD><TD align=middle>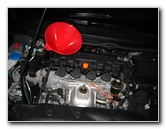
Fill With New Oil</TD><TD align=middle>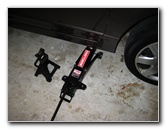
Lower Car Off Jack</TD></TR><TR><TD colSpan=3 align=left>Lower the car off the floor jack and jack stands and park it on a level surface. The owner's manual for this 2010 Honda Civic sedan indicates that 3.9 US quarts (3.7 liters) of new oil are needed for an oil change with a new oil filter. (The Honda Civic Si requires 4.6 U.S. quarts or 4.4 liters of new oil for an oil change with a new oil filter.) Insert an automotive funnel into the oil filler hole at the top of the engine and pour in about 3.5 quarts of new oil. Run the engine for a few minutes, turn it off, and wait a few minutes for the oil to return to the oil pan. If the oil level on the dipstick is below the "MAX" mark, add a tiny bit of oil and then re-check the dipstick until it reaches the "MAX" mark. It's a good idea to re-check the oil level on the dipstick again after the first drive and then about once a week. Also look for signs of an oil leak on your driveway, garage floor, or parking spot.
</TD></TR><TR><TD align=middle>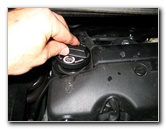
Replace Oil Filler Cap</TD><TD align=middle>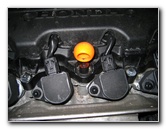
Engine Oil Dipstick</TD><TD align=middle>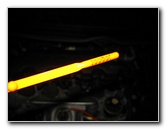
Check Level On Dipstick</TD></TR><TR><TD colSpan=3 align=left>If your Honda Civic is equipped with an oil life monitor, here's how you reset it after the oil change is complete. Turn the ignition switch to the "ON" position but don't start the engine. Press the SEL/RESET button until the oil life indicator is displayed on the screen. Press and hold and the SEL/RESET button for about ten seconds until the oil life % and maintenance item code start to blink. Release the button. Press and hold the SEL/RESET button again for more than 5 seconds until the maintenance item code disappears and the oil life % changes to "100".</TD></TR></TBODY></TABLE>
<TABLE border=0 width=720><TBODY><TR><TD vAlign=top align=left>To complete this oil change you'll need
a floor jack, jack stands,
an automotive funnel,
a 17mm socket with ratcheting wrench,
4 U.S. quarts of new oil, a new oil filter,
an oil catch container
and possibly an oil filter wrench.
</TD></TR></TBODY></TABLE>
</TD></TR><TR><TD align=middle>a floor jack, jack stands,
an automotive funnel,
a 17mm socket with ratcheting wrench,
4 U.S. quarts of new oil, a new oil filter,
an oil catch container
and possibly an oil filter wrench.
</TD></TR></TBODY></TABLE>
Passenger Side Raised</TD><TD align=middle>
Oil Filler Hole</TD><TD align=middle>
Remove Oil Filler Cap</TD></TR><TR><TD colSpan=3 align=left>The first step is to warm up the engine for a few minutes so that the old oil will drain more quickly and carry out the majority of the contaminants with it. Then turn off the engine and engage the emergency parking brake. Raise up the passenger side of the vehicle with the floor jack and secure it with at least one floor jack. I prefer to use two jack stands for extra safety. Move to the engine bay and remove the oil filler cap which will allow air to enter the engine and the old oil to drain out faster.</TD></TR><TR><TD align=middle>
Oil Drain Bolt & Filter</TD><TD align=middle>
17mm Oil Drain Bolt</TD><TD align=middle>
Old Oil Filter</TD></TR><TR><TD colSpan=3 align=left>Under the passenger side of the engine, you'll see the oil filter located closer to the front of the car and the horizontally orientated oil drain bolt located further back facing the rear of the car. </TD></TR><TR><TD align=middle>
Oil Catch Container In Place</TD><TD align=middle>
17mm Socket & Wrench</TD><TD align=middle>
Remove Oil Drain Bolt</TD></TR><TR><TD colSpan=3 align=middle>
<!--webbot bot="HTMLMarkup" startspan --><SCRIPT type=text/javascript><!--google_ad_client = "pub-1603448158407333";google_alternate_ad_url = "http://www.paulstravelpictures.com/google_adsense_script.htm";google_ad_width = 728;google_ad_height = 90;google_ad_format = "728x90_as";google_ad_type = "text_image";google_ad_channel ="7938085502";google_color_border = "FFFFFF";google_color_bg = "FFFFFF";google_color_link = "0000FF";google_color_url = "000000";google_color_text = "000000";//--></SCRIPT><SCRIPT type=text/javascript src="http://pagead2.googlesyndication.com/pagead/show_ads.js"></SCRIPT><!--webbot bot="HTMLMarkup" endspan i-checksum="55958" --> </TD></TR><TR><TD colSpan=3 align=middle>
Position the oil catch container below the oil drain bolt and remove it with the 17mm socket and ratcheting wrench by turning it counter clockwise ("lefty loosey") until it can be removed completely. Allow the old oil to drain out for at least a few minutes, replace the oil drain bolt, and tighten it just past hand tight. Don't over tighten the oil drain bolt or you risk damaging the bolt, the threads, or the oil pan.
Then move the oil catch container to underneath the old oil filter and twist if off by hand or with the oil filter wrench. Apply a small amount of new motor oil to the rubber gasket on the new oil filter. This helps the oil filter gasket to form a better seal and also makes it easier to remove during the next oil change. Twist on the new oil filter in a clockwise direction to just past hand tight. Double check to make sure the oil drain bolt and new oil filter are on securely before moving on to the next steps.
</TD></TR><TR><TD align=middle>Then move the oil catch container to underneath the old oil filter and twist if off by hand or with the oil filter wrench. Apply a small amount of new motor oil to the rubber gasket on the new oil filter. This helps the oil filter gasket to form a better seal and also makes it easier to remove during the next oil change. Twist on the new oil filter in a clockwise direction to just past hand tight. Double check to make sure the oil drain bolt and new oil filter are on securely before moving on to the next steps.
Twist Off Old Oil Filter</TD><TD align=middle>
Fill With New Oil</TD><TD align=middle>
Lower Car Off Jack</TD></TR><TR><TD colSpan=3 align=left>Lower the car off the floor jack and jack stands and park it on a level surface. The owner's manual for this 2010 Honda Civic sedan indicates that 3.9 US quarts (3.7 liters) of new oil are needed for an oil change with a new oil filter. (The Honda Civic Si requires 4.6 U.S. quarts or 4.4 liters of new oil for an oil change with a new oil filter.) Insert an automotive funnel into the oil filler hole at the top of the engine and pour in about 3.5 quarts of new oil. Run the engine for a few minutes, turn it off, and wait a few minutes for the oil to return to the oil pan. If the oil level on the dipstick is below the "MAX" mark, add a tiny bit of oil and then re-check the dipstick until it reaches the "MAX" mark. It's a good idea to re-check the oil level on the dipstick again after the first drive and then about once a week. Also look for signs of an oil leak on your driveway, garage floor, or parking spot.
</TD></TR><TR><TD align=middle>
Replace Oil Filler Cap</TD><TD align=middle>
Engine Oil Dipstick</TD><TD align=middle>
Check Level On Dipstick</TD></TR><TR><TD colSpan=3 align=left>If your Honda Civic is equipped with an oil life monitor, here's how you reset it after the oil change is complete. Turn the ignition switch to the "ON" position but don't start the engine. Press the SEL/RESET button until the oil life indicator is displayed on the screen. Press and hold and the SEL/RESET button for about ten seconds until the oil life % and maintenance item code start to blink. Release the button. Press and hold the SEL/RESET button again for more than 5 seconds until the maintenance item code disappears and the oil life % changes to "100".</TD></TR></TBODY></TABLE>

Registered!!
Joined: Sep 2011
Posts: 2
Likes: 0
Rep Power: 0 
Re: DIY OIL Change
Thanks for the detailed post. (A minor typo: "oriented" (not orientated) regarding the oil pan drain bolt.) Anyhow, I would like ask about the oil fill quantity. I try to follow the book rather carefully but its guidance doesn't seem to match my experience. I have an 8th gen Civic EX and the owner's manual says oil capacity with filter is 3.9 quarts. Your post says 3.5 quarts plus a tiny bit of topoff. Today I filled 4 quarts of new oil, ran the engine, took out the dispstick, cleaned it, replaced it, pulled it again and finally (thanks for your patience  checked the dipstick: oil was just barely wetting the bottom. So I added another half a quart, ran it another minute and rechecked. Then the oil line was about in the middle of the textured area of the dipstick. That seems to be a happy place for the oil, but what do I know? Am I overfilling? Is the oil quantity stated in the book the absolute minimum amount the car can have and still run? Thanks in advance for your thoughts.
checked the dipstick: oil was just barely wetting the bottom. So I added another half a quart, ran it another minute and rechecked. Then the oil line was about in the middle of the textured area of the dipstick. That seems to be a happy place for the oil, but what do I know? Am I overfilling? Is the oil quantity stated in the book the absolute minimum amount the car can have and still run? Thanks in advance for your thoughts. If you think a good mechanic is expensive, try hiring a bad one
Joined: Dec 2011
Posts: 32,017
Likes: 256
From: Midwest. Aiming about mid-chest
Rep Power: 519 Re: DIY OIL Change
Thanks for the detailed post. (A minor typo: "oriented" (not orientated) regarding the oil pan drain bolt.) Anyhow, I would like ask about the oil fill quantity. I try to follow the book rather carefully but its guidance doesn't seem to match my experience. I have an 8th gen Civic EX and the owner's manual says oil capacity with filter is 3.9 quarts. Your post says 3.5 quarts plus a tiny bit of topoff. Today I filled 4 quarts of new oil, ran the engine, took out the dispstick, cleaned it, replaced it, pulled it again and finally (thanks for your patience checked the dipstick: oil was just barely wetting the bottom. So I added another half a quart, ran it another minute and rechecked. Then the oil line was about in the middle of the textured area of the dipstick. That seems to be a happy place for the oil, but what do I know? Am I overfilling? Is the oil quantity stated in the book the absolute minimum amount the car can have and still run? Thanks in advance for your thoughts.
checked the dipstick: oil was just barely wetting the bottom. So I added another half a quart, ran it another minute and rechecked. Then the oil line was about in the middle of the textured area of the dipstick. That seems to be a happy place for the oil, but what do I know? Am I overfilling? Is the oil quantity stated in the book the absolute minimum amount the car can have and still run? Thanks in advance for your thoughts.Different size oil filters can hold different amounts of oil.
It is far easier to add more oil than it is to drain oil out after overfilling.
"Honda - tried, true & tested...!"
Joined: Dec 2013
Posts: 715
Likes: 3
Rep Power: 0 Re: DIY OIL Change
great pics Gunner on how- to change oil & filter easy enough.
oil is the life blood of an engine. don't use Valvoline oil.
I use Pennzoil pure plus 5w20 & a Napa Gold Series oil filter. and
add a Can of BG MOA to enhance what is already good better.
oil is the life blood of an engine. don't use Valvoline oil.
I use Pennzoil pure plus 5w20 & a Napa Gold Series oil filter. and
add a Can of BG MOA to enhance what is already good better.
"Honda - tried, true & tested...!"
Joined: Dec 2013
Posts: 715
Likes: 3
Rep Power: 0 Re: DIY OIL Change
[QUOTE=brags;4676695]great pics Gunner on how- to change oil & filter easy enough.
oil is the life blood of an engine. don't use Valvoline oil.
I use Pennzoil pure plus 5w20 & a Napa Gold Series oil filter. and
add a Can of BG MOA to super enhance what is already good better.
oil is the life blood of an engine. don't use Valvoline oil.
I use Pennzoil pure plus 5w20 & a Napa Gold Series oil filter. and
add a Can of BG MOA to super enhance what is already good better.
Registered!!
Joined: Nov 2014
Posts: 214
Likes: 1
From: Bedford, TX
Rep Power: 143 Re: DIY OIL Change
[QUOTE=brags;4676697]I prefer full synthetic oil changed ever 5k mi with a high efficiency filter. Fill the filter, then bump the starter a few times to get the oil moving throughout the engine, without starting the engine, this pre lubs the engine before running.
"Honda - tried, true & tested...!"
Joined: Dec 2013
Posts: 715
Likes: 3
Rep Power: 0 Re: DIY OIL Change
[QUOTE=06 EX Mild Mods;4677765] good tip if the car has sat around for months with-out a turn of the
key... but for the everday vehicle that runs its unecesary to do that. since
the engine is pre-lubed already.
key... but for the everday vehicle that runs its unecesary to do that. since
the engine is pre-lubed already.
Registered!!
Joined: Sep 2015
Posts: 22
Likes: 0
From: Ontario CAN
Rep Power: 0 Re: DIY OIL Change
I'm guessing this guide isn't showing the cover plates on a 2015 LX under the engine that apparently block access to the oil drain and filter?
What is a good suggestion for the first oil change distance increment and ones thereafter? I don't like trusting a % life remaining on a trip computer.
What is a good suggestion for the first oil change distance increment and ones thereafter? I don't like trusting a % life remaining on a trip computer.
If you think a good mechanic is expensive, try hiring a bad one
Joined: Dec 2011
Posts: 32,017
Likes: 256
From: Midwest. Aiming about mid-chest
Rep Power: 519 Re: DIY OIL Change
What is a good suggestion for the first oil change distance increment and ones thereafter? I don't like trusting a % life remaining on a trip computer.
If this is your original break in oil, you do want it to stay in the engine until the minder tells you to change it (15%)....or at least 5k, or one year.
The minder system watches how you drive and the conditions you drive in, and adjusts intervals accordingly.
I see the systems allow anywhere from 4000 to over 12,000 miles, it all depends on the driving.
Very few people drive in such a way that 3000 mile oil changes are actually needed..
I use good oil that will go the distance and check the level every once in a while.
My car has been allowing me to go about 5000 between oil changes, and my daily work drive is only 5.6 miles each way.
Others that do a whole bunch of highway driving will be allowed to go much further on an oil change. Highway driving is 'easy' on the oil.
I did a few road trips on this oil change, and I've gone 5000 on it already...right now my minder says 50% life left.
EDIT: Sorry, I used miles instead of km. Recalculate numbers accordingly LOL

"Honda - tried, true & tested...!"
Joined: Dec 2013
Posts: 715
Likes: 3
Rep Power: 0 Re: DIY OIL Change
just seen the Vid on the oil change I would be nervouse on using
channel lock pliers too tighten up a new oil filter " Just Saying" last
thing you want is a dent or create a pin hole leak in it. on my oil changes
after I drain the old oil out with the oil plug still out I pour just a little
oil down into the filler hole on top of the engine and watch it coming out
from underneath it usually comes out at first dark then turns golden
You don't have to do this its just what I do.
If you think a good mechanic is expensive, try hiring a bad one
Joined: Dec 2011
Posts: 32,017
Likes: 256
From: Midwest. Aiming about mid-chest
Rep Power: 519 Re: DIY OIL Change
channel lock pliers too tighten up a new oil filter
last
thing you want is a dent or create a pin hole leak in it.
last
thing you want is a dent or create a pin hole leak in it.
*Looks at image
^Nobody ever told me I had to get dirty^
I guess I've been doing it wrong for decades.

"Honda - tried, true & tested...!"
Joined: Dec 2013
Posts: 715
Likes: 3
Rep Power: 0 Re: DIY OIL Change
I pour in about 2-300 ml of fresh oil down the fill hole from the top of
the engine so it can drain a little bit of the dirty old oil out. again its what
I do its not common practice on a regular oil change.

Thread
Thread Starter
Honda Civic Forum
Replies
Last Post
mattdoc
Mechanical Problems/Vehicle Issues and Fix-it Forum
9
Mar 14, 2017 12:10 PM
BootyDo
Fuel, Oil, Cleaners & Other Maintenance
8
May 7, 2015 04:46 PM

