*27* pics of dual amp install
 01-17-2011
#1
Registered!!
Thread Starter
iTrader: (1)

Join Date: Oct 2010
Location: Bexar, TX
Age: 34
Posts: 453
Likes: 0
Received 0 Likes
on
0 Posts
Rep Power: 0 
*27* pics of dual amp install
So here are all the pics of my install I took...Well the ones that arent blurry. I kinda did it with to show what/how/where I installed it. I'll go through each picture and expain what/where etc..
This was done on a 2001 EX Civic sedan, 146K miles and runs like a top.

I installed a new Rockford Fosgate RFK4D dual amp install package(not all the components are shown, speaker wire i left inside the house). The amp Is MTX 421-D that I got for free, it runs 361wattsx1ch RMS.

Here is my Cresent brand tool set. If you going to install an amp, or two amps, something like this comes in handy. Organization is key!

These are interior panel pieces that can(not necessary but makes the install not so frustrating) be taken out to run a majority of your wires.
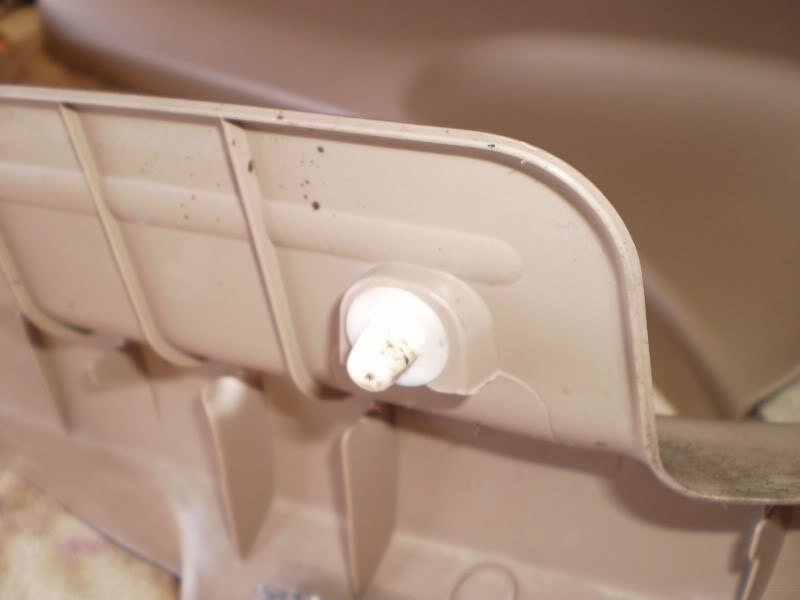
If you plan on taking out these panels beware of the panel poppers! They hold all of these four panels in, so dont worry about hidden screws. I encountered zero on the panels.

This black piece holds down the oblong panel that runs adjacent to your rear seats (sedan) and your rear door seals. You can pry it out, just keep an eye out for this piece and don't lose it like I did (found it later).

Here is the "oblong panel" showing two panel popper holes. This panel is tricky so watch out.

Here is where the two front panels on the passenger side belong showing 3 locations of panel poppers. There are three more that are located toward the carpet. So a total of 6 poppers to remove this panel. The second panel is underneath the glove box, to the right, or where your right foot would be if you were sitting inside. This has two poppers(no screws).

This picture is probably the most important, this is where the power wire runs through the firewall to reach the battery. A good rule of thumb I do when running new wire is run rope first. What I did here was poke a hole into the grommet with a flat head screwdriver, then placing a long piece of rope on the flat head bit, and running the screwdriver back through the hole. What this does is expand the hole enough to fit a wire through it at the least amount of collateral damage to the grommet.

Here is a pic through the engine bay, looking down. Hey! there is my flathead with the rope as well! This again is where the power wire goes the firewall to connect to the battery.

This is just me figuring out where to run the power wire to the battery. I changed it to running between the battery and engine.

Here is where this rope comes in handy. What you want to do is tie a knot around the end of your power wire, I tied two wishbone knots within a foot of the tip of power wire. Since the rope is run through the grommet all you have to do is tug on the other side to pull the power wire through. This makes running the wire much easier since the rope is your guide that navigates the power wire. This idea works to get any wire though the grommet!

Here is the power wire hooked up to the battery. Yeah its nasty. But if it aint broke, dont fix it!

Here is my dash removed, for my vehicle all I have to do is remove the panel that the cigarette light is mounted, no panel poppers or screws..whew! For DIY purposes you may have screws and I suggest you do more research, this method only applied to a sedan, and I think some vehicles have the black dash mounted with screws..Im not sure, someone want to fill me in on that?

There are the wires that lead up to the head unit. RCA's, remote power underneath steering wheel, above the panel that gives you access to the interior fuses.

If you have an aftermarket head unit with RCA outputs, this is what they look like. Mine has three sets, so in total I have 6 outputs.

This picture is why I recommend you take of the 4 interior panels. these are my RCA, remote power, and speaker wire run to the left of the drivers seatbelt. notice there is no power wire running along with them. Power wire can cause interference with your RCA's result in poor signal quality because of the electromagnetic field that your power wire creates. Since these four panels are indentical to both passenger and driver sides, run you power wire along the opposite side of your RCA's.

Once all wires were run(except subwoofer RCA) this was the slack I am left with. Keep this in mind when determining where you will locate your amp/s.

Here is a good shot of the trunk bed I made, credit to Diskreet's DIY here on the forums.

This is where I placed my 4ch amp which you will see later. the black is electrical tape I used to line up the metal frame underneath the upholstery.

Here it is mounted. I had to compensate to the right when I mounted the MDF so the amp would fit when the seat is shut and not come into contact with the seatbelt/rear speaker panel. Keep this in mind if you mount yours like mine.
This is a Jensen Power 760 4ch, 75Wx4 RMS.

Here you can see where I ran most of the wiring. There are zippers on the upholstery and a patch of upholsery that has velcro on it.

This is the distribution blocks that come with the amp kit. Red of course=power, black =ground. Again you can see the RCA cables are seperate from the power wire. I later cut out some of that slack once I got things running.

You can see the RCA's bieng run through the top sleeve of the rear seats, keeping them hidden of well away from the power.

both sleeves where wires are run through.

Close up of terminals and the velcro sleeve where wires go through.

Wires with the velcro sleeve unfolded.

here are my subs. 2 Infinity Perfect 12 VQ. 400watts RMS. I read up on these subs, they got some serious max excursion, meaning it takes a LOT of watts to blow these guys. I got them for free, so I couldnt pass them up!
This little guide can be used for anybody who has questions on installing an amplifier, particularly on how and where to run wires. I could have taken more pics, for example of removing the rear seat, rear speaker deck etc..by the time I got to those things I had a few beers and I *lost* the camera.
Everything works great, gains are all set to their levels. The only question I have for you guys is where is the best place to ground both amps? Im getting some interference in the 6.5" speakers. I only get distortion with the car started, no interference running A/C power..and there is alternator whine. This sounds like a ground loop.
^
^
^
Suggestions?
This was done on a 2001 EX Civic sedan, 146K miles and runs like a top.
I installed a new Rockford Fosgate RFK4D dual amp install package(not all the components are shown, speaker wire i left inside the house). The amp Is MTX 421-D that I got for free, it runs 361wattsx1ch RMS.
Here is my Cresent brand tool set. If you going to install an amp, or two amps, something like this comes in handy. Organization is key!
These are interior panel pieces that can(not necessary but makes the install not so frustrating) be taken out to run a majority of your wires.
If you plan on taking out these panels beware of the panel poppers! They hold all of these four panels in, so dont worry about hidden screws. I encountered zero on the panels.
This black piece holds down the oblong panel that runs adjacent to your rear seats (sedan) and your rear door seals. You can pry it out, just keep an eye out for this piece and don't lose it like I did (found it later).
Here is the "oblong panel" showing two panel popper holes. This panel is tricky so watch out.
Here is where the two front panels on the passenger side belong showing 3 locations of panel poppers. There are three more that are located toward the carpet. So a total of 6 poppers to remove this panel. The second panel is underneath the glove box, to the right, or where your right foot would be if you were sitting inside. This has two poppers(no screws).
This picture is probably the most important, this is where the power wire runs through the firewall to reach the battery. A good rule of thumb I do when running new wire is run rope first. What I did here was poke a hole into the grommet with a flat head screwdriver, then placing a long piece of rope on the flat head bit, and running the screwdriver back through the hole. What this does is expand the hole enough to fit a wire through it at the least amount of collateral damage to the grommet.
Here is a pic through the engine bay, looking down. Hey! there is my flathead with the rope as well! This again is where the power wire goes the firewall to connect to the battery.
This is just me figuring out where to run the power wire to the battery. I changed it to running between the battery and engine.
Here is where this rope comes in handy. What you want to do is tie a knot around the end of your power wire, I tied two wishbone knots within a foot of the tip of power wire. Since the rope is run through the grommet all you have to do is tug on the other side to pull the power wire through. This makes running the wire much easier since the rope is your guide that navigates the power wire. This idea works to get any wire though the grommet!
Here is the power wire hooked up to the battery. Yeah its nasty. But if it aint broke, dont fix it!
Here is my dash removed, for my vehicle all I have to do is remove the panel that the cigarette light is mounted, no panel poppers or screws..whew! For DIY purposes you may have screws and I suggest you do more research, this method only applied to a sedan, and I think some vehicles have the black dash mounted with screws..Im not sure, someone want to fill me in on that?
There are the wires that lead up to the head unit. RCA's, remote power underneath steering wheel, above the panel that gives you access to the interior fuses.
If you have an aftermarket head unit with RCA outputs, this is what they look like. Mine has three sets, so in total I have 6 outputs.
This picture is why I recommend you take of the 4 interior panels. these are my RCA, remote power, and speaker wire run to the left of the drivers seatbelt. notice there is no power wire running along with them. Power wire can cause interference with your RCA's result in poor signal quality because of the electromagnetic field that your power wire creates. Since these four panels are indentical to both passenger and driver sides, run you power wire along the opposite side of your RCA's.
Once all wires were run(except subwoofer RCA) this was the slack I am left with. Keep this in mind when determining where you will locate your amp/s.
Here is a good shot of the trunk bed I made, credit to Diskreet's DIY here on the forums.
This is where I placed my 4ch amp which you will see later. the black is electrical tape I used to line up the metal frame underneath the upholstery.
Here it is mounted. I had to compensate to the right when I mounted the MDF so the amp would fit when the seat is shut and not come into contact with the seatbelt/rear speaker panel. Keep this in mind if you mount yours like mine.
This is a Jensen Power 760 4ch, 75Wx4 RMS.
Here you can see where I ran most of the wiring. There are zippers on the upholstery and a patch of upholsery that has velcro on it.
This is the distribution blocks that come with the amp kit. Red of course=power, black =ground. Again you can see the RCA cables are seperate from the power wire. I later cut out some of that slack once I got things running.
You can see the RCA's bieng run through the top sleeve of the rear seats, keeping them hidden of well away from the power.
both sleeves where wires are run through.
Close up of terminals and the velcro sleeve where wires go through.
Wires with the velcro sleeve unfolded.
here are my subs. 2 Infinity Perfect 12 VQ. 400watts RMS. I read up on these subs, they got some serious max excursion, meaning it takes a LOT of watts to blow these guys. I got them for free, so I couldnt pass them up!
This little guide can be used for anybody who has questions on installing an amplifier, particularly on how and where to run wires. I could have taken more pics, for example of removing the rear seat, rear speaker deck etc..by the time I got to those things I had a few beers and I *lost* the camera.
Everything works great, gains are all set to their levels. The only question I have for you guys is where is the best place to ground both amps? Im getting some interference in the 6.5" speakers. I only get distortion with the car started, no interference running A/C power..and there is alternator whine. This sounds like a ground loop.
^
^
^
Suggestions?
 01-17-2011
#2
Registered!!
Join Date: Nov 2010
Location: Canada
Posts: 258
Likes: 0
Received 0 Likes
on
0 Posts
Rep Power: 0 
Re: *27* pics of dual amp install
looks good, thanks for the post. makes me excited for the spring for when im hoping to have the money to get a sub and an amp.
Cheers,
Jay
Cheers,
Jay
01-17-2011
#3
Registered!!
iTrader: (1)
Join Date: Jun 2010
Posts: 20
Likes: 0
Received 0 Likes
on
0 Posts
Rep Power: 0 Re: *27* pics of dual amp install
Great job man, looks clean. I can't help you on the alt whine, except to keep trying different ground spots until you find a good one, and make sure none of your wires are crossing. Also, you should upgrade your vehicle grounds while you're at it. Electric130 makes an awesome kit, and it comes with a really nice battery terminal too. My voltage jumped up a few tenths after I added the kit.
01-17-2011
#4
Registered!!
Thread Starter
iTrader: (1)
Join Date: Oct 2010
Location: Bexar, TX
Age: 34
Posts: 453
Likes: 0
Received 0 Likes
on
0 Posts
Rep Power: 0 Re: *27* pics of dual amp install
No prob canadiankid thanks. Its sweet with the gains now set. I still have sawdust all over the place and metal bits from the dremel haha. once the skies clear in Texas I'll take some exterior pics. I aint got nothing special on the exterior but im looking at some bumper kits since mine all have beer chips/dents.
I'll look into the upgrade grounds as well. I need to pay more attention to the interference so i can be a little more detailed to you guys. But like I said I get no interference when the vehicle is running off battery.
Ive researched that on some pioneer HU's I might need to ground the RCA's...Anyone heard of this???? I have a pioneer HU
I'll be happy to post pics of my ground.

 01-18-2011
#6
Registered!!
Thread Starter
iTrader: (1)
Join Date: Oct 2010
Location: Bexar, TX
Age: 34
Posts: 453
Likes: 0
Received 0 Likes
on
0 Posts
Rep Power: 0 Re: *27* pics of dual amp install
Yeah Its 2ohm stable says it somewhere on the amp. Rated @ 361w RMS on the test sheet. Hahah yeah that battery is weak, my roommates 1996 stock Corolla has a better battery than the one I got.
had some bad experiences with infinitys?
had some bad experiences with infinitys?
01-18-2011
#7
Premium Member
Hey! Look At Me!! I'm a Supporting Member!!
iTrader: (95)

Join Date: Sep 2002
Location: NV
Age: 43
Posts: 51,241
Likes: 0
Received 18 Likes
on
13 Posts
Rep Power: 787 
Re: *27* pics of dual amp install
after enough people post and the thread dies down, i can move this to the diy section.
 )
) 
Thread
Thread Starter
Honda Civic Forum
Replies
Last Post
jru27
I.C.E. (Audio) & Electrical Upgrades
10
06-19-2015 03:51 PM
MamaBear2015
Electrical, Wiring, and In Car Entertainment
0
06-11-2015 07:33 PM
SalPal
Mechanical Problems/Vehicle Issues and Fix-it Forum
0
06-03-2015 03:44 PM


