DIY Brake Pads and Rotor
 09-10-2009
#1
Registered!!
Thread Starter

Join Date: Apr 2009
Posts: 16
Likes: 0
Received 0 Likes
on
0 Posts
Rep Power: 0 
DIY Brake Pads and Rotor
First step is to get that tire off. You're going to want to loosen, but not remove, the bolts on the tire while the car is on the ground, you may need to use your tire iron that's in the trunk (if it's really hard to turn, just use your foot on the tire iron and stand on it).
Now that the bolts have been "broken", raise the car up so you can get the tires off, then remove the lug nuts and set 'em somewhere obvious.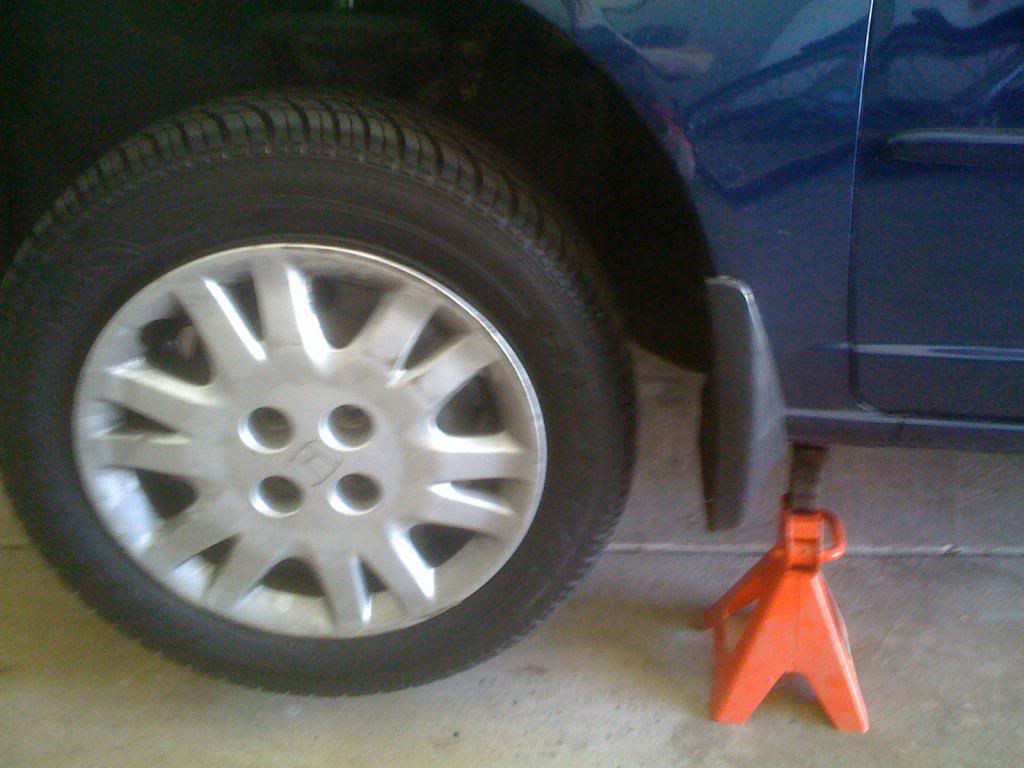
Now we're looking at the brake caliper on the rotor with the pads inside the caliper.
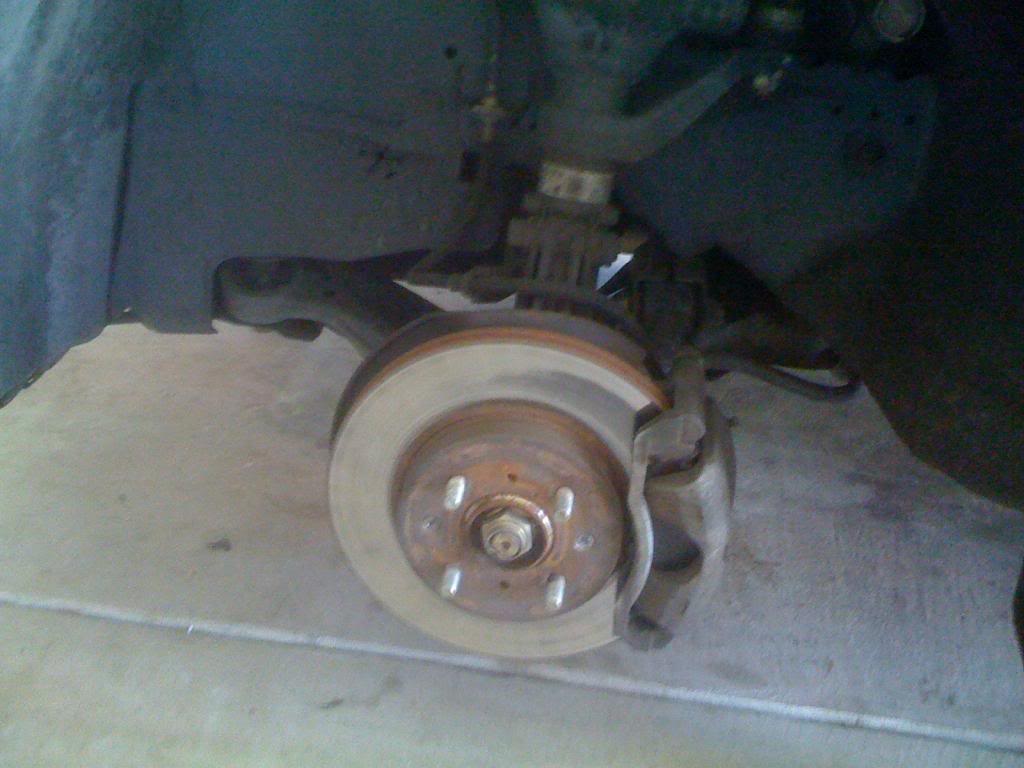
This is a good time to check out your rotors and to run your fingernail along the edge. It should feel pretty smooth with the grooves being shallower than you can feel with your fingernail. If they aren't, replace 'em (Pepboys: 21.99) or get an on-the-car brake lathe rotor shaving.

Next step, is to get the caliper slider bolts out of there. This is the lower one.
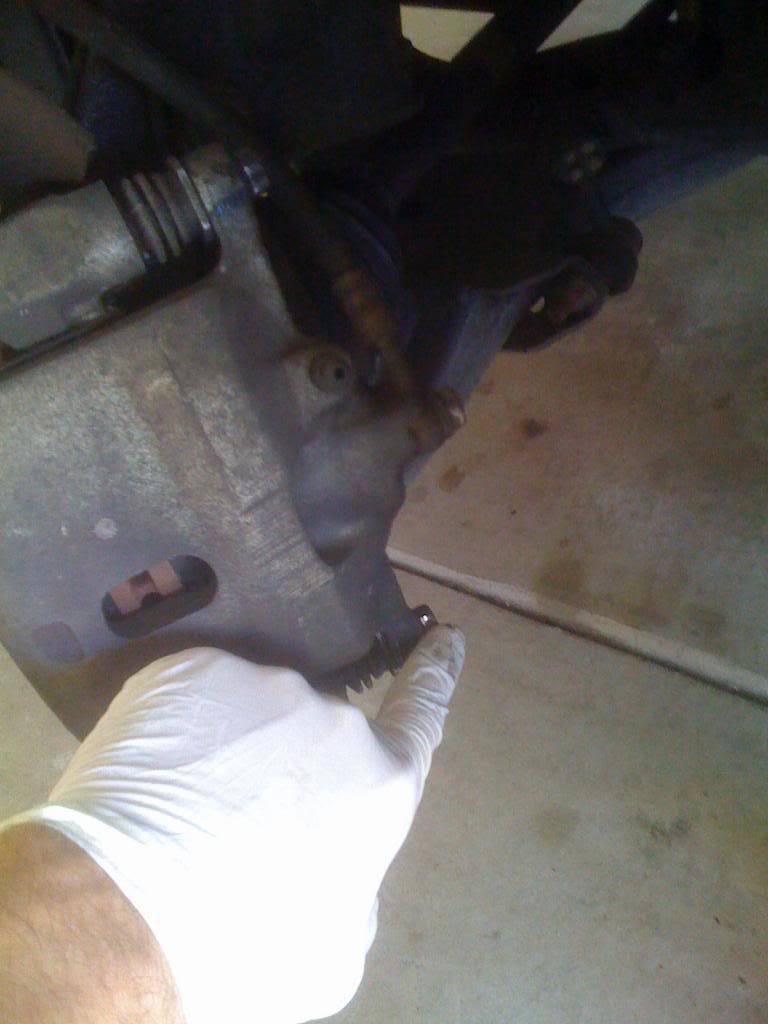
You'll probably want to turn the wheel all the way to the right for the left side so you can get at the bolts easily.
The problem with these stupid things is that when they're screwed in, this metal thing rotates as you are trying to torque/remove the bolt, so I used an adjustable wrench to hold it in place. Here's a closer look.
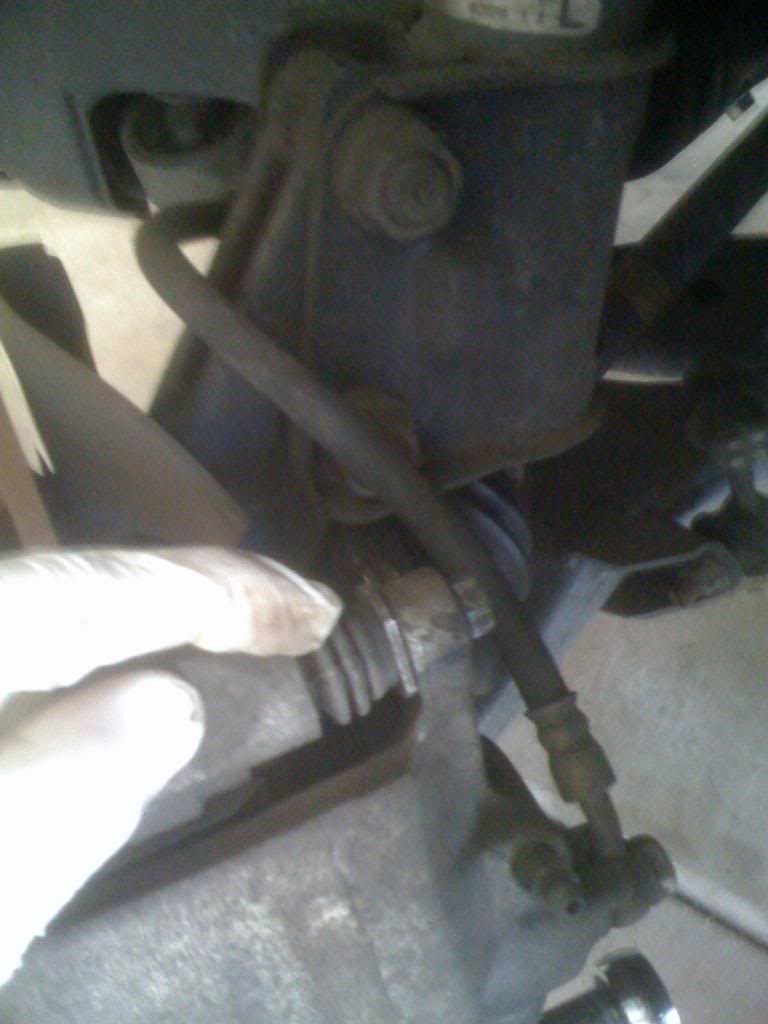
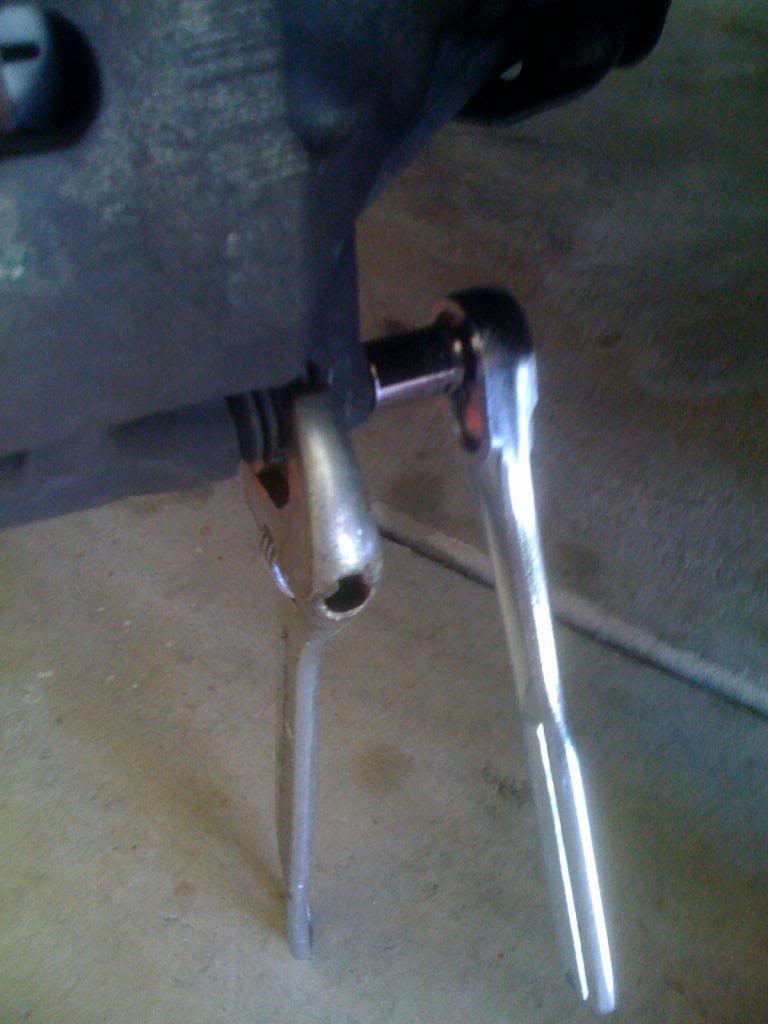
Take care not to rip up the rubber boot right there.
Next bust off the upper caliper bolt WITHOUT taking out the lower bolt (it'll make it easier).
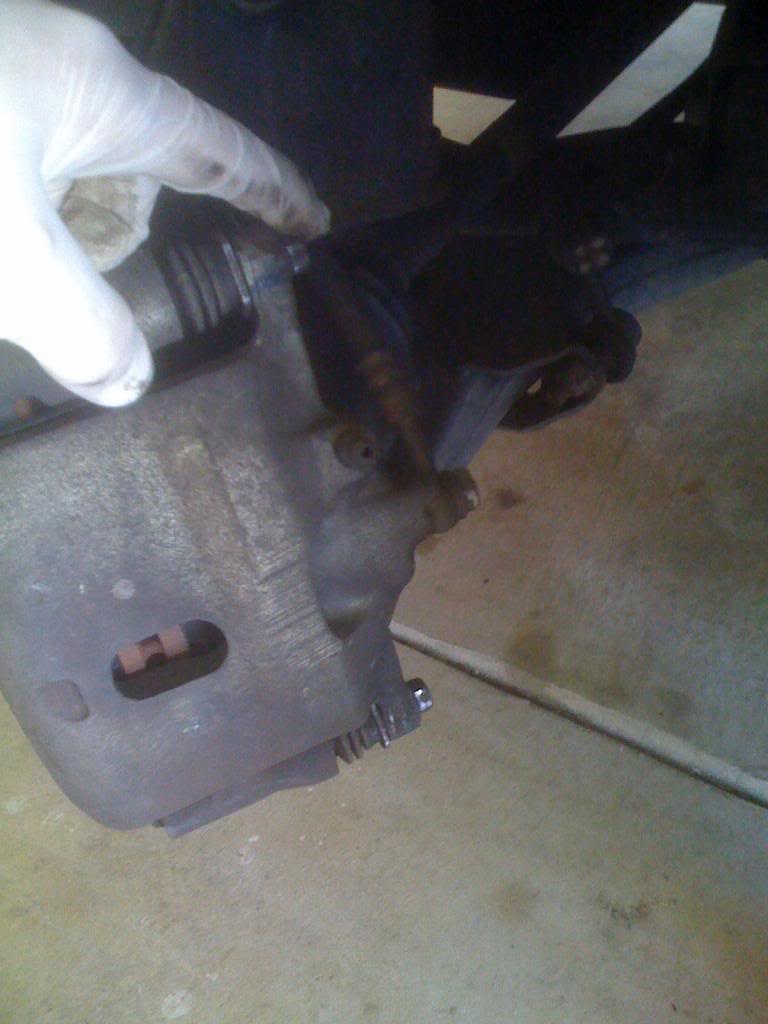
Now we need to hold the caliper on something. I used an extra jack-stand. NEVER let the caliper rest on the brake line, it will put undue stress on it and possibly cause a leak in your break line, causing your brakes to possibly not work when you need them to.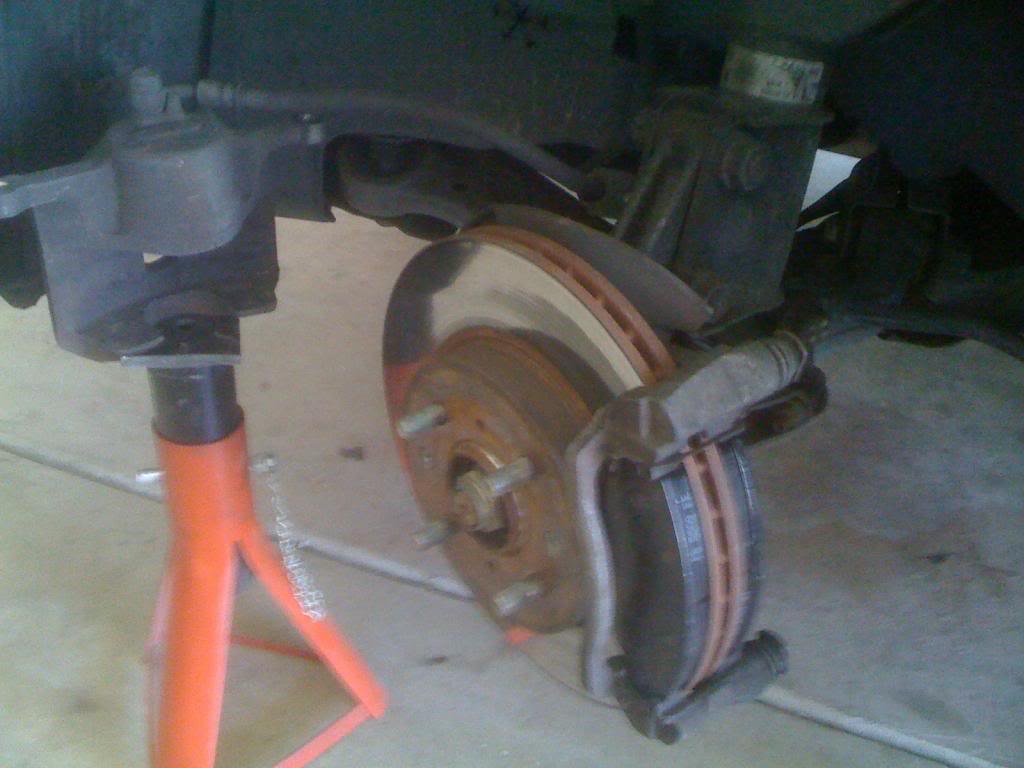
The pads should slide right out, although Chilton's DOES mention it may be different in some civics/CRV's so I cannot guarantee this is how yours will look but so long as you do one side at a time so you can reference the other, you should be okay. If there's a pad thing behind the brake pads and the backside of the caliper, that's called a shim and you should not throw that away. (I didn't have any though)
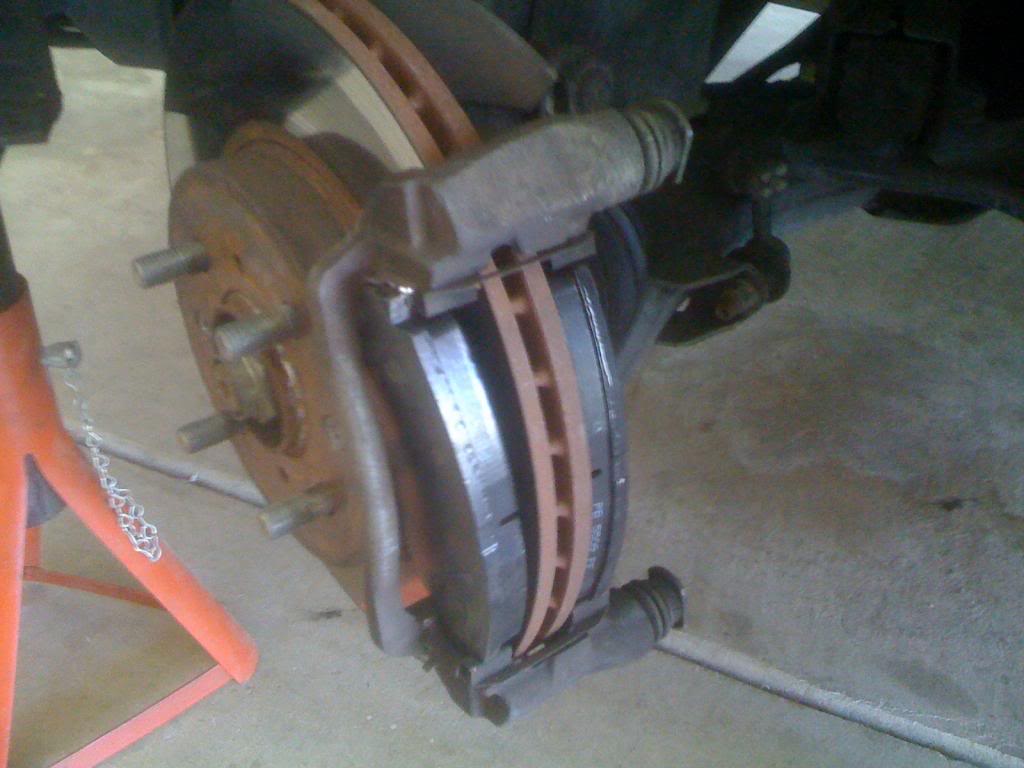
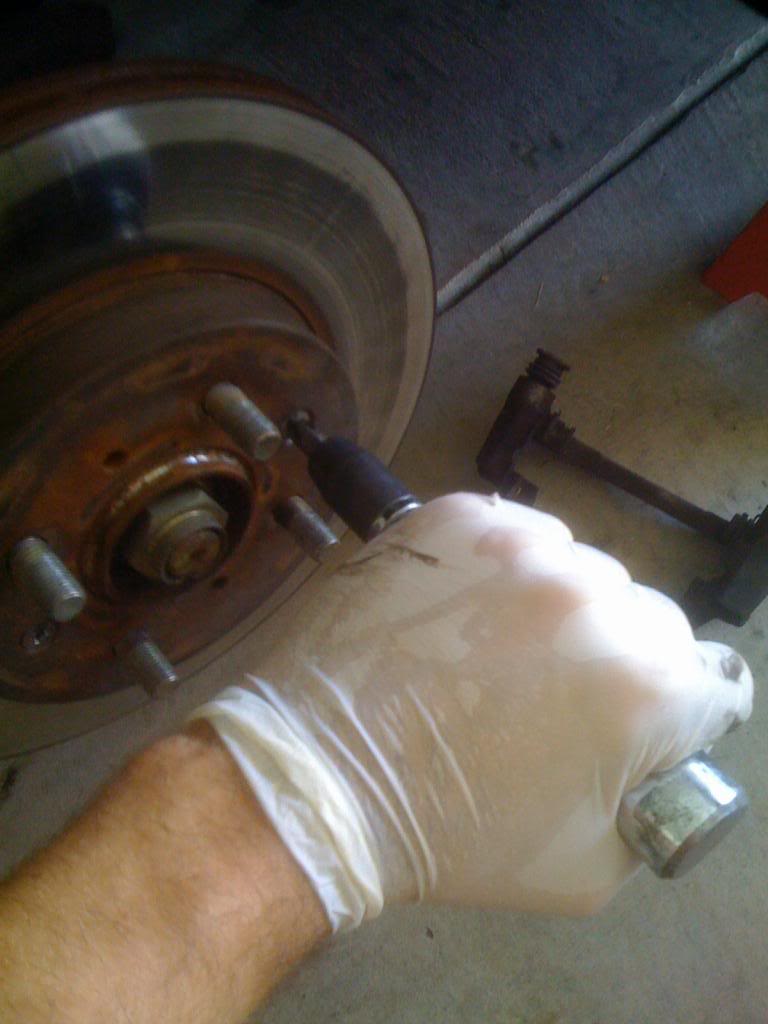
Remove the two bigger bolts that are holding the caliper mount in place and it should come right off.
The second to hardest part: get those damn rotor screws off! I used an impact screw driver, which is a tool that, when hit with a hammer, delivers a twisting action. Normally you strip bolts because you're not pressing towards the bolt hard enough, but this obviously keeps you from doing so.
There are holes to thread screws into which will push the rotor away from the hub, mine looked used so I'm guessing it might be hard for some of you to get the rotors off. Hammers can work, just be careful because you're hammering goes through the rotor and up to the more sensitive parts of the car. I hear blow torches also work.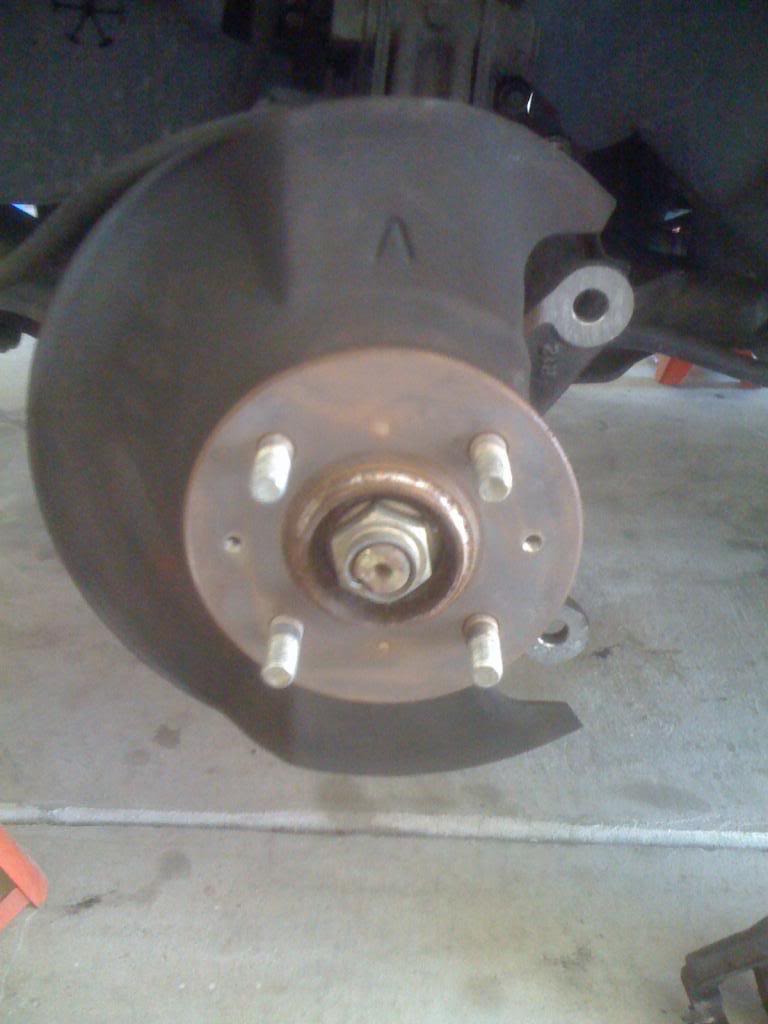
What sucks is you can't dial in a certain torque value unless you use an electric impact screw driver ($29.99 Pepboys), but It only cost me $10 so I can't complain.
In all likelihood you will need to use penetrating fluid. It's a fluid that loosens screws, WD-40 works okay, I'd buy a specialty product... prob 5 bucks at most.
Now that the beastly screws are off, we are looking at the hub. Hooray, you've travelled as far as you need to to change your own brakes!!! But that's not that hardest part... oh no! If you want to make sure you don't have brake "judder" or a shaking feeling when softly braking at 55+ mph in the steering wheel/brake pedal, you need to do a quality job.
The reason the brake components shake is because the rotor is not perfectly parallel with its axis of rotation... then the pads on the outside try to pinch the rotor that is wobbling ever-so-slightly and they in turn shake. They are connected to the car, steering column, and you feel it. It wears down suspension components, its totally annoying... if you care about the absolute smoothness of your ride, you'll do what I did: buy a Dial Indicator from a specialty tool shop for 10-20 bucks (50 at most, but try to find it cheap first) and measure the wobbliness yourself.
Now before performing this part, I highly suggest you do some research. Find out how much lateral runout it takes to cause brake judder (as little as .002 inches last time I checked, but if you have LRO [lateral run out] of .003 or less, you should be fine) and what you can do to minimize it. Too lazy? http://www.swedishbricks.net/700900F...ze%20Pulsation Then read that.
So your question might be: How do you change the LRO of the rotor/hub assembly? Simple really, you use "shims". A shim is a thin layer you put behind something so that they rest flat against each other, similar to the thing layer of material that you might have found behind your brake pads.
So first off find the runout of the hub itself using your dial indicator and something very sturdy. Be careful and thorough on this part of the job, you don't want to have to redo everything to get back to this spot.
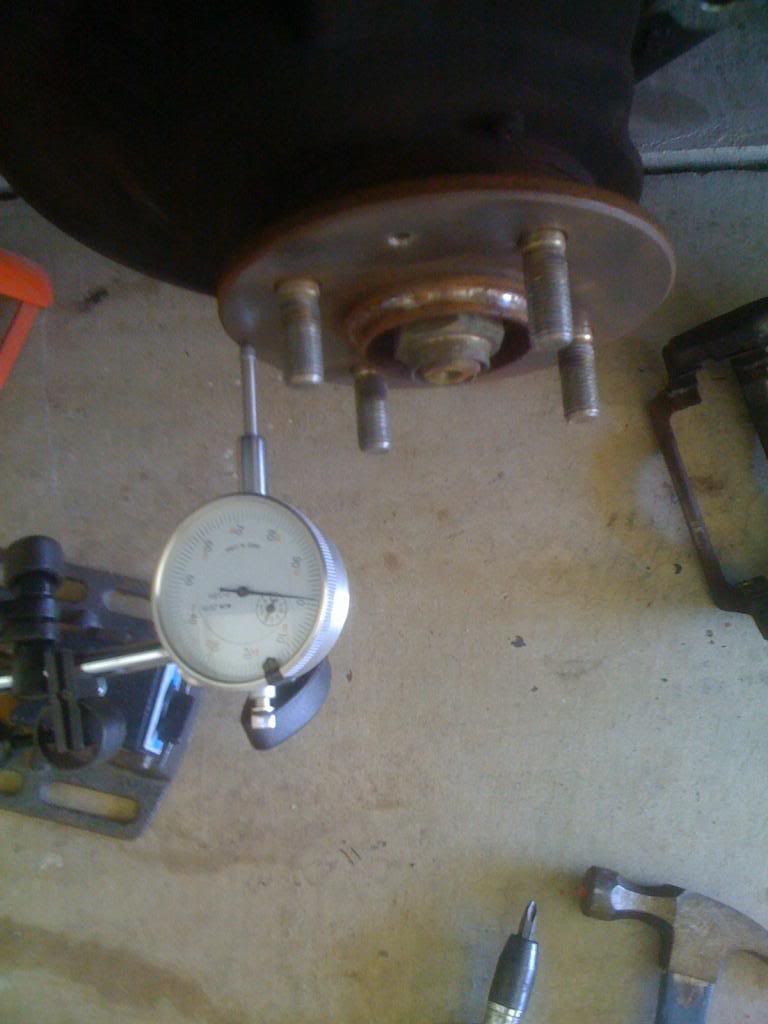
My LRO of the hub is .001" or less, so luckily the hub/bearings don't need to be replaced. I hear it's $200-ish for new ones, but if your stuff is way outta wack, like... .003-.004" on the hub itself, you may want to look into getting new ones. Next, clean that area up real good and try to get the surface as smooth as possible.
Spray brake cleaner on the contact surface between the hub/new rotor and put on the new rotor and screws. Screw the screws in pretty tight and bust that dial indicator back out. Set it up so that it's reading around 1/2 way out of the disc (sorry no picture). The maximum runout you should get (ie. the total distance between the highest point and the lowest point) should be .002". If it's more, you can try something creative: shimming! Place some tin foil on the hub in the lowest spots that you measured and apply them with the smallest amount of adhesive you can. Tin foil has a thickness of about .002-.004 and can definitely help to get your LRO as low as possible. If you can't get it just right, there is what's called "feeler stock" out there. Some people specifically make shims for this reason, and those can be found online for way too much. If you can't get it right , just spend the money or take it to a shop. Personally, I never give up without a fight.
Okay final step before reassembly!!!!! Open up the top of the brake fluid reservoir cap, and have someone keep an eye on it making sure it doesn't overflow. Using an old brake pad, use a C-clamp (or g-clamp if you're European/Australian), and press the pad against the caliper piston until it goes back in all the way. If you were to just use the c-clamp you'd mess it up so be careful. A $200 fix if you're not careful. Once that's done, reassembly! Yay!
Put the rotor back on. Make those screws tight!!! Put the caliper guide back on with the two big bolts, tighten 'em up like a ****. Put the pads in their respective slides. If you're not sure how they went, check your other brake set-up. Apply some brake grease/anti-squeal to the back sides of the pads as well as the on the caliper mounting screws and on the retainer clips that the pads go into. DO NOT get any on the brake pad face or the face of the rotor... it will make your brakes all slippy, which would make them not work. Use your adjustable wrench and get the caliper back over the pads and bolt it down. Once the brake system is back together like it should be (no missing parts =P ), pump the brakes to seat the caliper. At first the pedal will go to the floor, but then it will feel firm. Pump until you are absolutely sure, keeping an eye on the fluid level again.
Do the other side repeating every step, make sure your brake fluid reservoir is sealed as it should be, and go for a test drive somewhere safe and uncrowded.
When using new brake components, the proper break-in procedure should be followed, but in general its this: for non-race brake pads, two to four 35-0 braking stops @ 75% braking maximum, then two to four 55-5 braking stops at 85% maximum. You should smell the stink of the brake pads getting hot. Once you do, don't touch the brakes for 15 minutes. For race pads I think you just increase the number and speed slightly. When you heat up the brakes, they get a glaze on them. When you let them cool this glaze allows material transfer from the pad to the rotor without warpage, though at high speeds this creates excess gas between the contact surfaces and causes "brake fade". When you hold the brakes down when they're hot, you're depositing an imprint of the brake pad on the rotor, which induces runout (rotor warpage) by deposits from the pad, or so I've heard.
Do your own research and when you're ready for the job, hopefully this will help. Any questions comments are appreciated.
Now that the bolts have been "broken", raise the car up so you can get the tires off, then remove the lug nuts and set 'em somewhere obvious.
Now we're looking at the brake caliper on the rotor with the pads inside the caliper.
This is a good time to check out your rotors and to run your fingernail along the edge. It should feel pretty smooth with the grooves being shallower than you can feel with your fingernail. If they aren't, replace 'em (Pepboys: 21.99) or get an on-the-car brake lathe rotor shaving.
Next step, is to get the caliper slider bolts out of there. This is the lower one.
You'll probably want to turn the wheel all the way to the right for the left side so you can get at the bolts easily.
The problem with these stupid things is that when they're screwed in, this metal thing rotates as you are trying to torque/remove the bolt, so I used an adjustable wrench to hold it in place. Here's a closer look.
Take care not to rip up the rubber boot right there.
Next bust off the upper caliper bolt WITHOUT taking out the lower bolt (it'll make it easier).
Now we need to hold the caliper on something. I used an extra jack-stand. NEVER let the caliper rest on the brake line, it will put undue stress on it and possibly cause a leak in your break line, causing your brakes to possibly not work when you need them to.
The pads should slide right out, although Chilton's DOES mention it may be different in some civics/CRV's so I cannot guarantee this is how yours will look but so long as you do one side at a time so you can reference the other, you should be okay. If there's a pad thing behind the brake pads and the backside of the caliper, that's called a shim and you should not throw that away. (I didn't have any though)
Remove the two bigger bolts that are holding the caliper mount in place and it should come right off.
The second to hardest part: get those damn rotor screws off! I used an impact screw driver, which is a tool that, when hit with a hammer, delivers a twisting action. Normally you strip bolts because you're not pressing towards the bolt hard enough, but this obviously keeps you from doing so.
There are holes to thread screws into which will push the rotor away from the hub, mine looked used so I'm guessing it might be hard for some of you to get the rotors off. Hammers can work, just be careful because you're hammering goes through the rotor and up to the more sensitive parts of the car. I hear blow torches also work.
What sucks is you can't dial in a certain torque value unless you use an electric impact screw driver ($29.99 Pepboys), but It only cost me $10 so I can't complain.
In all likelihood you will need to use penetrating fluid. It's a fluid that loosens screws, WD-40 works okay, I'd buy a specialty product... prob 5 bucks at most.
Now that the beastly screws are off, we are looking at the hub. Hooray, you've travelled as far as you need to to change your own brakes!!! But that's not that hardest part... oh no! If you want to make sure you don't have brake "judder" or a shaking feeling when softly braking at 55+ mph in the steering wheel/brake pedal, you need to do a quality job.
The reason the brake components shake is because the rotor is not perfectly parallel with its axis of rotation... then the pads on the outside try to pinch the rotor that is wobbling ever-so-slightly and they in turn shake. They are connected to the car, steering column, and you feel it. It wears down suspension components, its totally annoying... if you care about the absolute smoothness of your ride, you'll do what I did: buy a Dial Indicator from a specialty tool shop for 10-20 bucks (50 at most, but try to find it cheap first) and measure the wobbliness yourself.
Now before performing this part, I highly suggest you do some research. Find out how much lateral runout it takes to cause brake judder (as little as .002 inches last time I checked, but if you have LRO [lateral run out] of .003 or less, you should be fine) and what you can do to minimize it. Too lazy? http://www.swedishbricks.net/700900F...ze%20Pulsation Then read that.
So your question might be: How do you change the LRO of the rotor/hub assembly? Simple really, you use "shims". A shim is a thin layer you put behind something so that they rest flat against each other, similar to the thing layer of material that you might have found behind your brake pads.
So first off find the runout of the hub itself using your dial indicator and something very sturdy. Be careful and thorough on this part of the job, you don't want to have to redo everything to get back to this spot.
My LRO of the hub is .001" or less, so luckily the hub/bearings don't need to be replaced. I hear it's $200-ish for new ones, but if your stuff is way outta wack, like... .003-.004" on the hub itself, you may want to look into getting new ones. Next, clean that area up real good and try to get the surface as smooth as possible.
Spray brake cleaner on the contact surface between the hub/new rotor and put on the new rotor and screws. Screw the screws in pretty tight and bust that dial indicator back out. Set it up so that it's reading around 1/2 way out of the disc (sorry no picture). The maximum runout you should get (ie. the total distance between the highest point and the lowest point) should be .002". If it's more, you can try something creative: shimming! Place some tin foil on the hub in the lowest spots that you measured and apply them with the smallest amount of adhesive you can. Tin foil has a thickness of about .002-.004 and can definitely help to get your LRO as low as possible. If you can't get it just right, there is what's called "feeler stock" out there. Some people specifically make shims for this reason, and those can be found online for way too much. If you can't get it right
, just spend the money or take it to a shop. Personally, I never give up without a fight.Okay final step before reassembly!!!!! Open up the top of the brake fluid reservoir cap, and have someone keep an eye on it making sure it doesn't overflow. Using an old brake pad, use a C-clamp (or g-clamp if you're European/Australian), and press the pad against the caliper piston until it goes back in all the way. If you were to just use the c-clamp you'd mess it up so be careful. A $200 fix if you're not careful. Once that's done, reassembly! Yay!
Put the rotor back on. Make those screws tight!!! Put the caliper guide back on with the two big bolts, tighten 'em up like a ****. Put the pads in their respective slides. If you're not sure how they went, check your other brake set-up. Apply some brake grease/anti-squeal to the back sides of the pads as well as the on the caliper mounting screws and on the retainer clips that the pads go into. DO NOT get any on the brake pad face or the face of the rotor... it will make your brakes all slippy, which would make them not work. Use your adjustable wrench and get the caliper back over the pads and bolt it down. Once the brake system is back together like it should be (no missing parts =P ), pump the brakes to seat the caliper. At first the pedal will go to the floor, but then it will feel firm. Pump until you are absolutely sure, keeping an eye on the fluid level again.
Do the other side repeating every step, make sure your brake fluid reservoir is sealed as it should be, and go for a test drive somewhere safe and uncrowded.
When using new brake components, the proper break-in procedure should be followed, but in general its this: for non-race brake pads, two to four 35-0 braking stops @ 75% braking maximum, then two to four 55-5 braking stops at 85% maximum. You should smell the stink of the brake pads getting hot. Once you do, don't touch the brakes for 15 minutes. For race pads I think you just increase the number and speed slightly. When you heat up the brakes, they get a glaze on them. When you let them cool this glaze allows material transfer from the pad to the rotor without warpage, though at high speeds this creates excess gas between the contact surfaces and causes "brake fade". When you hold the brakes down when they're hot, you're depositing an imprint of the brake pad on the rotor, which induces runout (rotor warpage) by deposits from the pad, or so I've heard.
Do your own research and when you're ready for the job, hopefully this will help. Any questions comments are appreciated.
Last edited by Atromos; 09-10-2009 at 08:07 PM. Reason: Things were out of order... double paragraphs and whatnot.


 10-31-2009
#4
Registered!!
iTrader: (2)
Join Date: Apr 2007
Location: New York
Posts: 2,018
Likes: 0
Received 2 Likes
on
2 Posts
Rep Power: 228 

Re: DIY Brake Pads and Rotor
I would like to add..you should check the grease on your slide pins every time you do your brakes. Also using anti squeak on your pads and you should also always grease all the contact points of your pads, except for obviously the part that touches the rotor..

Thread
Thread Starter
Honda Civic Forum
Replies
Last Post
Wankenstein
Mechanical Problems/Vehicle Issues and Fix-it Forum
8
07-12-2015 11:54 AM

