Progress Front Sway Bar
 05-17-2004
#1
Site Robot. Do Not Msg.
Thread Starter


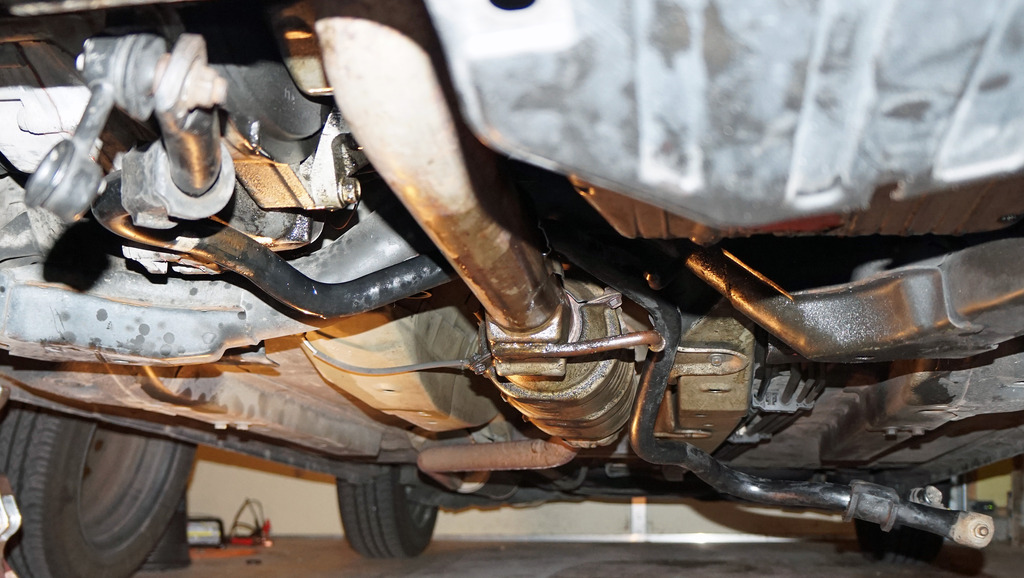
<font face="Verdana" size="2">This is a DIY for the installation of the Progress Sports front sway bar kit. We will remove the stock front sway bar and install the new unit from Progress. This DIY was done on a 2001 LX. Other models will differ slightly, but in general this DIY will apply to all 7th gen civics and RSX's. The Progress Group website used to say that this sway bar was only for the EX's, but that was misinformation since I installed it on my LX and it fits just fine. The part number is: 61.0102<br /><br /><br /><b>Time Needed:</b><br /><br />If you follow this DIY to the letter and you have many tools, then I'de say about two hours. If you don't have all of the reccomended tools then it will take you considerably longer. A good working environment is also important, so if you don't have a garage or proper lighting then it will take you longer to complete this DIY. <br /><br /><br /><b>Tools Needed:</b><br /><br />- socket wrench or torque wrench or both<br /><br />- 14mm socket for bolts or whatever<br /><br />- crescent wrench whatchamacallit<br /><br />- haxagonal wrench thingie<br /><br />- jack and jack stands<br /><br />- work light or flashlight<br /><br />- some rags that you can get dirty<br /><br />- a can of WD-40<br /><br />- some synthetic grease<br /><br /><br /><img alt="" src="/old_attachments/progress-front-1.jpg" border="0" /><br /><br />Here is what is in the kit. A few bolts, some polyurethane bushings, some bushing holders, some thick support brackets, these weird rings, and some stickers. You know, the essentials! <img alt="" src="/forums/i/expressions/face-icon-small-happy.gif" border="0" />Oh yeah, did I mention the instruction sheet? Scrap it. If you follow those directions you will be doing more work and you won't be getting the sway bar installed any time soon. Plus you'll be looking for "the included tube of grease" which is mentioned in the instructions, but which didn't come with the sway bar kit.<br /><br /><br /><img alt="" src="/old_attachments/progress-front-2.jpg" border="0" /><br /><br />The first step is to jack the car up in the front and take off the front wheels. Look for the support point. There's an arrow etched in the plastic pointing to it. Jack it up as far as possible and put the jack stands under the support points on the side. The more you jack it up the easier it will be for you to work under your car. You should also lay down a piece of tarp on the ground so that you don't get too dirty. If you have one of those things with the little rollers on it, then use it! The front wheels will need to come off so that you have access to the sway bar end links.<br /><br /><br /><img alt="" src="/old_attachments/progress-front-3.jpg" border="0" /><br /><br />In the previous picture you could see the stock sway bar and the bushing holders. Use a 14mm socket to unbolt the bushing holders. Then seperate the bushing holders from the bushings. Then take the bushings off the sway bar. The sway bar will either stay in place or move slightly when this is done. There is no force on the bar besides it's own weight, so don't worry about it being under tension. Look at the stock bushings and see how they have an orientation. Honda wanted the slits in the bushings to face the front of the car. Take this as a cue to do the same when installing the bushings from Progress.<br /><br /><br /><img alt="" src="/old_attachments/progress-front-4.jpg" border="0" /><br /><br />Now, move the sway bar until you have access to the nuts on the end links. You'll be working down near the wheel wells. First, spray the threads and nut down with WD-40 and clean them off with a rag. Take the hexagonal wrench thingie and jam it into one end of the threaded rod. I used a 3/16" size, but I think it's metric. The 3/16" seemed to work allright, but if you happen to have a set of metric hexagonal thingies then use them. Then just use your crescent wrench to take off the nut holding the sway bar to the end link. Wear leather gloves for this. If your hand slips you'll be in pain (as I am now with a nice little blood blister under my fingernail). <img alt="" src="/forums/i/expressions/face-icon-small-happy.gif" border="0" /><br /><br /><br /><img alt="" src="/old_attachments/progress-front-5.jpg" border="0" /><br /><br />Wow, no intermediate step? How'de I remove that sway bar without messing with the exhaust system (as in the retarded instructions provided by Progress). Easy enough, geometry! After removing the nuts from the end links, take the bar off of the end links and go under the car to mess with it. I ended up moving it towards the back of the car and the twisting it around the exhaust pipe. Worked beautifully. Here's a comparison of the two sway bars. The Progress sway bar is 27mm in diameter and weighs 15 pounds while the stock sway bar is 25.4mm in diameter and weighs 7 pounds. Now all you have to do is put the Progress sway bar in by using the same trick. This may be different for EX's because of the catalytic converter, but you never know...<br /><br /><br /><img alt="" src="/old_attachments/progress-front-6.jpg" border="0" /><br /><br />Now just reverse the process and put the sway bar back on the end links. Hold the threaded rod with that hexagonal wrench thingie and thread the nut on with the crecent wrench. Tighten it down until the sway bar end link attachment is seated up against this flat spot on the threaded rod. Tighten it as much as you can, but don't go bonkers.<br /><br /><br /><img alt="" src="/old_attachments/progress-front-7.jpg" border="0" /><br /><br /><img alt="" src="/old_attachments/progress-front-8.jpg" border="0" /><br /><br /><img alt="" src="/old_attachments/progress-front-9.jpg" border="0" /><br /><br />Grease up the insides of the polyurethane bushings and slip them onto the sway bar near the bracket attachment points. Remember that the slit in the bushing should be facing the front of the car. Now just put on the bushing holders and put the thick support bracket betwean the bushing holders and the chassis. There's a small notch in the corner of the support brackets. This goes near these big bolts that are near the mounting area; they did this for clearance, but there's enough clearance there anyway. Now attach the brackets to the car loosely with the bolts and push the whole assembly towards the back of the car for extra clearance up front. Remember to center the sway bar before tightening down the bolts. I used a torque wrench and tightened them down to 50 foot pounds.<br /><br /><br /><img alt="" src="/old_attachments/progress-front-10.jpg" border="0" /><br /><br />One last thing to do. To make sure that the sway bar does not move from side to side, simply attch those weird rings on the outsides of the sway bar right up next to the polyurethane bushings. Tighten down the bolts as much as possible, but don't overdo it. You may want to grease up area betwean the polyurethane bushings and the weird rings as they will rub together a little bit.<br /><br /><br />That's it. Installation is complete. Put the wheels back on, lower the car, and take it out for a test drive. After a few runs go back and check everything for tightness. If everything checks out, then you should be enjoying this upgrade for the life of the car. The only thing that you may have to do is re-grease the bushings. That is if they start to squeek or something... As for the stickers... I was going to put them on the bar, but there kinda was no room for that. Although I guess I can curve the stickers, so I may have room for them after all... Maybe near the end links?<br /><br /><br />Anyway, the car rides more level now. The front is really stiff and the rear is somewhat stiffer (since the front and rear are linked together via the unibody). I've tested this setup on several of my favorite on-ramps and off-ramps and the results are favorable. Reduced body roll makes taking these turns much less scary. Although I don't know the limits of the new setup yet, so it's hard to tell whether upgrading just the front sway bar means takind corners faster? We'll see soon enough I guess...</font>
 02-28-2016
#2
PITA Admin
Administrator
iTrader: (1)
Join Date: Dec 2008
Location: TN
Age: 52
Posts: 14,777
Received 1,440 Likes
on
1,196 Posts
Rep Power: 338 

Re: Progress Front Sway Bar
as additional information, yes, the bar comes off an EX without removing the exhaust too.
EX exhaust anti roll bar - put bar closer to the cat, turn one end of the bar to the back, twist and it's off!
I personally just removed the bar altogether. Better handling, no more understeer, lighter front.
If you look at the endlink that is closer, you will notice it is broken. Ran for months and it's better, indeed.
Keep in mind I run Eibach pro springs and KYB AGX, with rear progress anti roll bar.
EX exhaust anti roll bar - put bar closer to the cat, turn one end of the bar to the back, twist and it's off!

I personally just removed the bar altogether. Better handling, no more understeer, lighter front.
If you look at the endlink that is closer, you will notice it is broken. Ran for months and it's better, indeed.
Keep in mind I run Eibach pro springs and KYB AGX, with rear progress anti roll bar.
Last edited by sdaidoji; 02-28-2016 at 12:20 PM.


Thread
Thread Starter
Honda Civic Forum
Replies
Last Post
mrohitredd
Mechanical Problems/Vehicle Issues and Fix-it Forum
4
06-09-2015 06:37 AM
Rogelio Rey
Archive - Vehicles for Sale/Wanted
2
05-24-2015 08:30 PM
Dorval Andre
Mechanical Problems/Vehicle Issues and Fix-it Forum
5
05-01-2015 09:37 AM


