~~~DIY Front Door Speaker Install Coupe and Sedan~~~
 01-31-2007
#1
Administrator
Administrator
Thread Starter
iTrader: (44)
Join Date: Aug 2006
Location: Charlotte
Age: 45
Posts: 2,978
Likes: 0
Received 4 Likes
on
3 Posts
Rep Power: 266 

~~~DIY Front Door Speaker Install Coupe and Sedan~~~
I know this has been DIY'ed several times, but even the sticky didn't cover everything I encountered, so I thought I'd write up what I did. Also, I'm making the pictures as attachments so they won't get lost and turn into little red x's in a year or so like most of the DIY's on here that have pics hosted on another site.
My installation was performed on a 2002 LX Sedan with power windows and door locks. If you have another model, it may be similar, but I can't promise that.
EDIT: Thanks to EggRollBandit05 for providing steps and pics for the COUPE owners out there
Speakers
Infinity Reference 6012i
Tools Needed
Standard flathead screwdriver
#2 Philips screwdriver
Long skinny flathead screwdriver
Drill (preferably cordless)
3/16" drill bit
3/8" drill bit
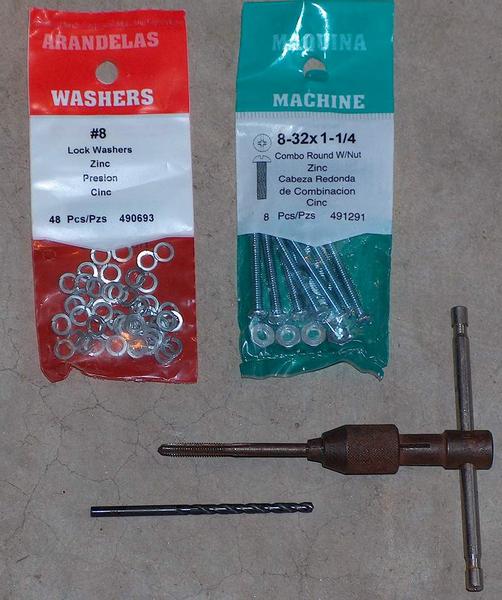
8-32 Tap and matching #29 drill bit (can usually be bought as a set for a couple $$$)
Wire strippers
Terminal crimpers
Jigsaw
Parts Needed
(8) - 8-32 x 1.25" Machine Screws
(8) - #8 Lock Washers
1ft Speaker wire 16 or 18 ga
(4) - Male spade connectors
(2) - Small female spade connectors
(2) - Medium female spade connectors
Here's the tap, drill bit, screws and washers you can pick up at Lowe's.
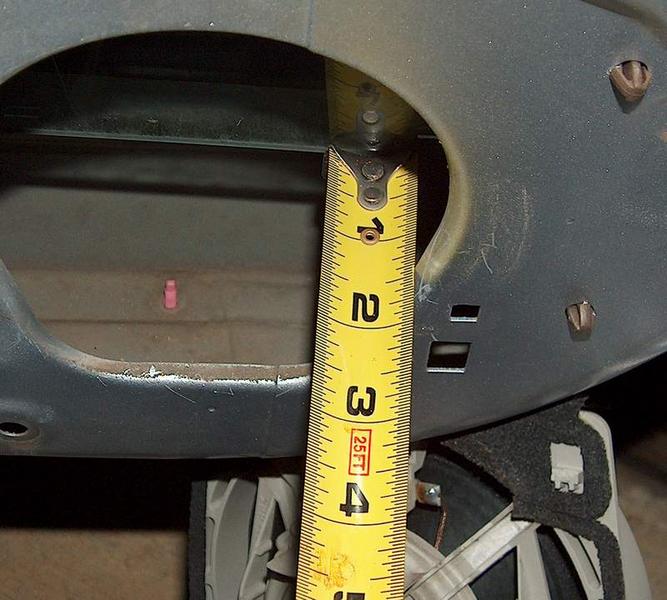
As you can see here, you've only got about 1.75" of clearance between the top of the door panel and the window. also, the width of the opening is ~4.125" so keep that in mind when picking out speakers. especially if you want components. they tend to have very large magnets.
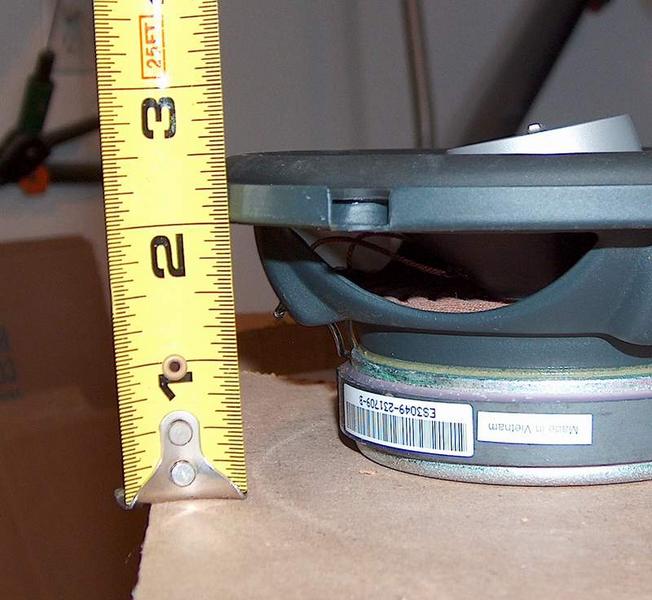
If your speakers are less than that, then you're good. Go head and mount them. My speakers were right at 2", so I needed a spacer.
A 0.5" spacer would have done the trick, but I had some .75" MDF laying around so I used that for mine. You can use whatever you want to make your spacer. Start by tracing the adapter ring (or the speaker if you don't have one) as a template.
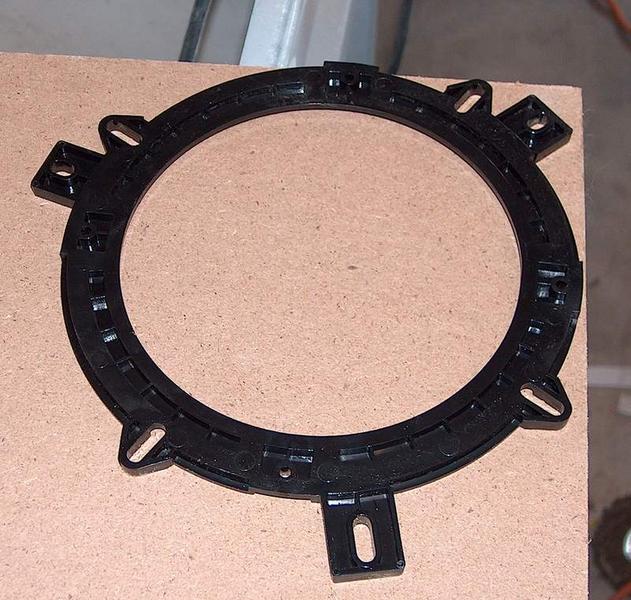
Drill a 3/8" hole in the middle ring so you can get the jigsaw blade in there.
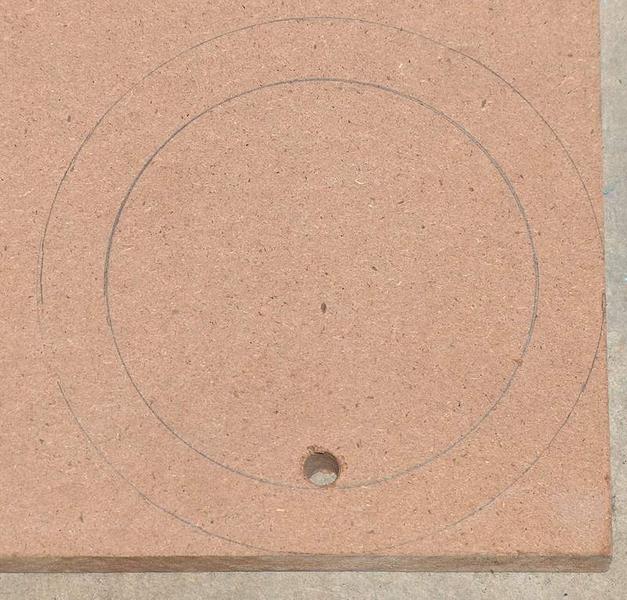
Cut out the spacer and repeat for a second one.

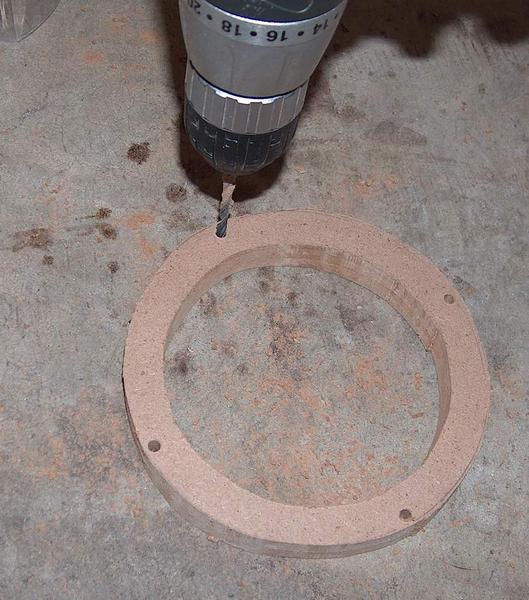
Test fit the spacer on the speaker and ensure it fits. Mark the locations of the 4 mounting holes of the speaker.
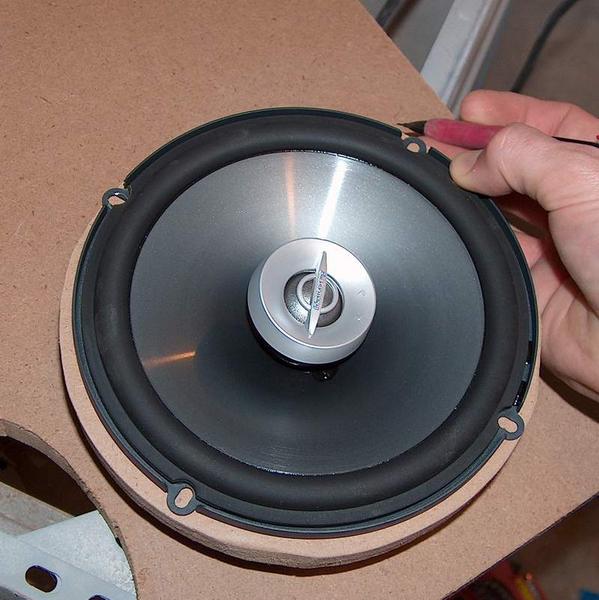
Drill the mount holes with a 3/16" drill. This hole is big enough to let the 8-32 screws pass through freely, which is what we want. Again, repeat for the other spacer.
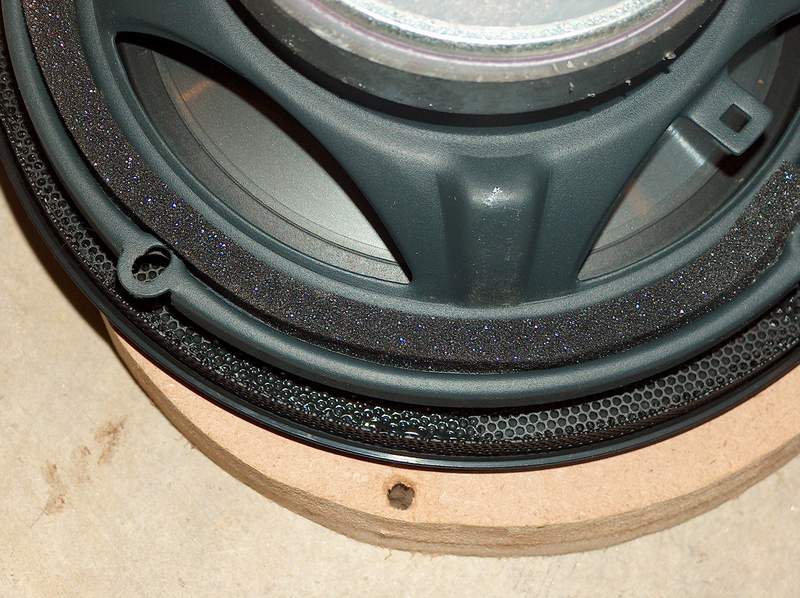
My speakers came with foam, so I installed it on the back of the speakers. I doubt it will help at all, but I put it on anyway.
Insert screwdriver as shown and pop off cover.
Remove 2 philips screws here.
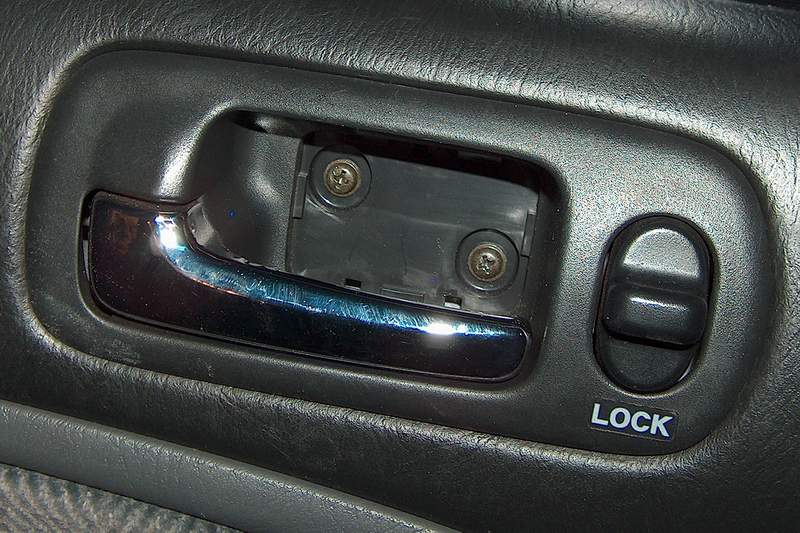
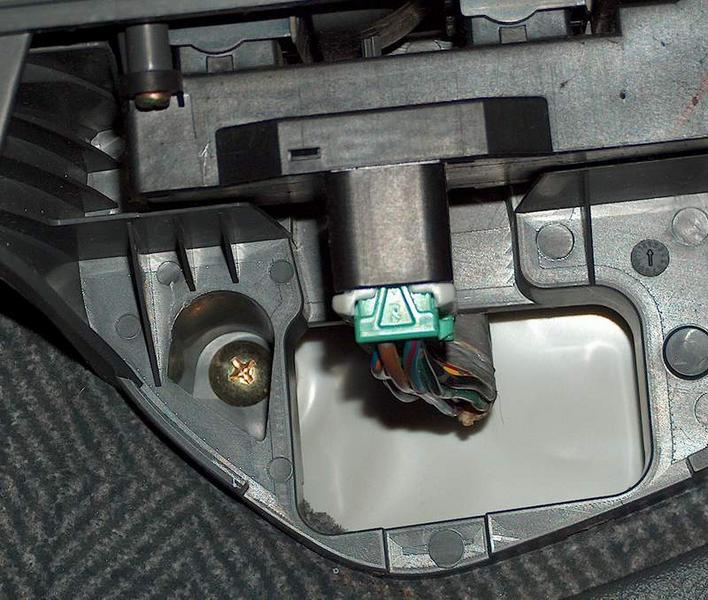
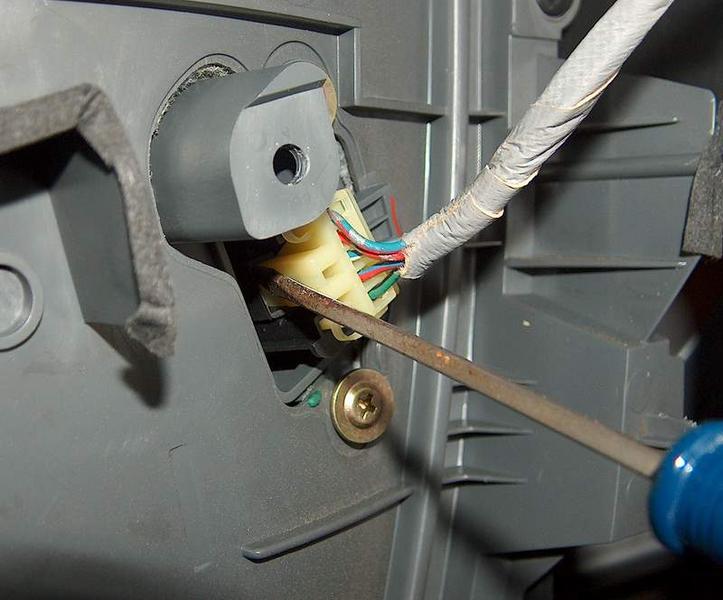
Pull out assembly as shown and remove electrical connector.
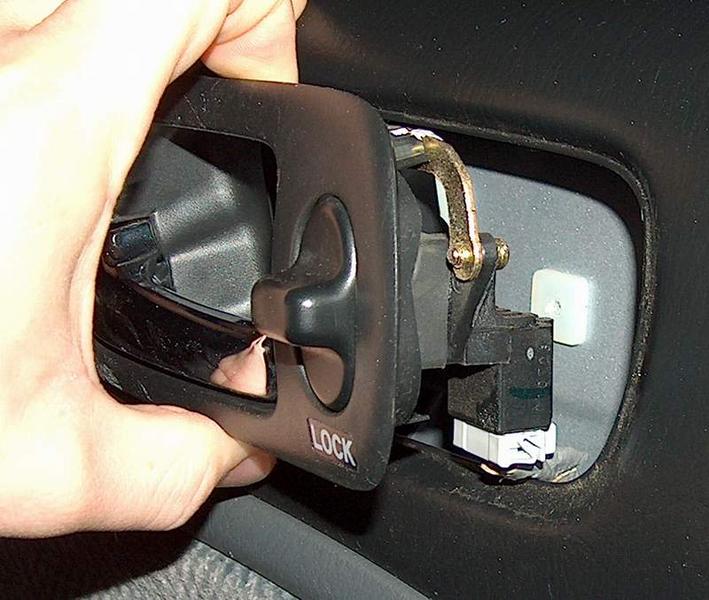
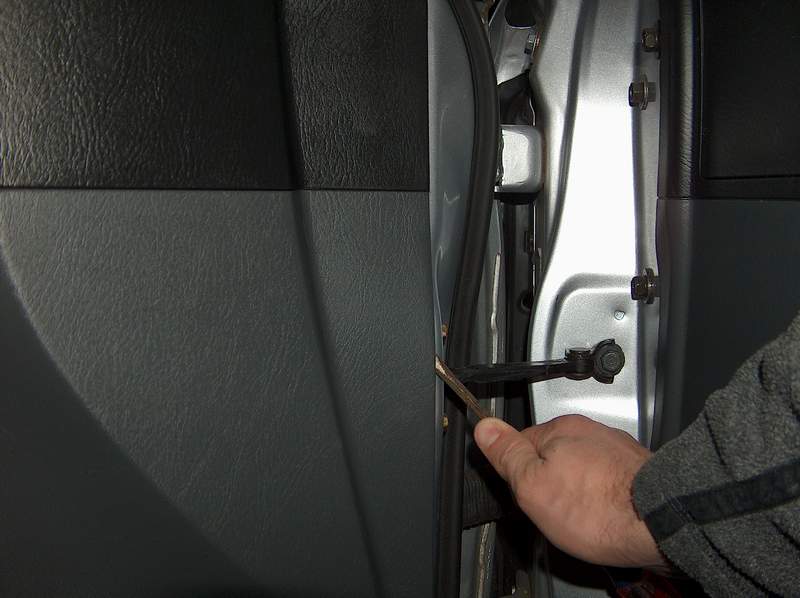
In order to remove the assembly, you'll have to remove the door opener rod. Rotate the plastic connector 90 degrees and lift the rod straight up. Compare the pics to see the connector.
Locked
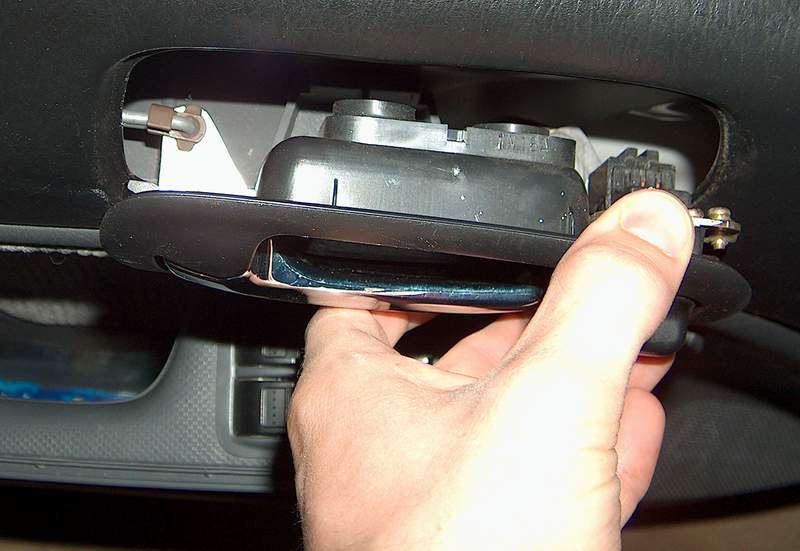
Unlocked
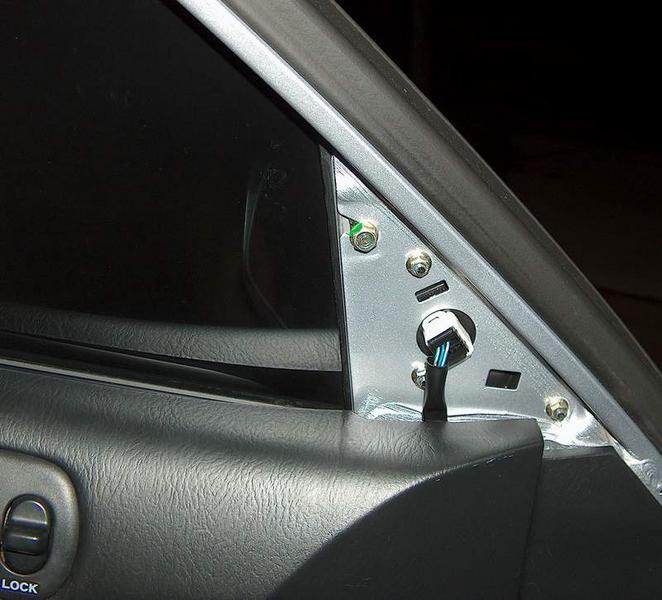
Remove Sail Panel.
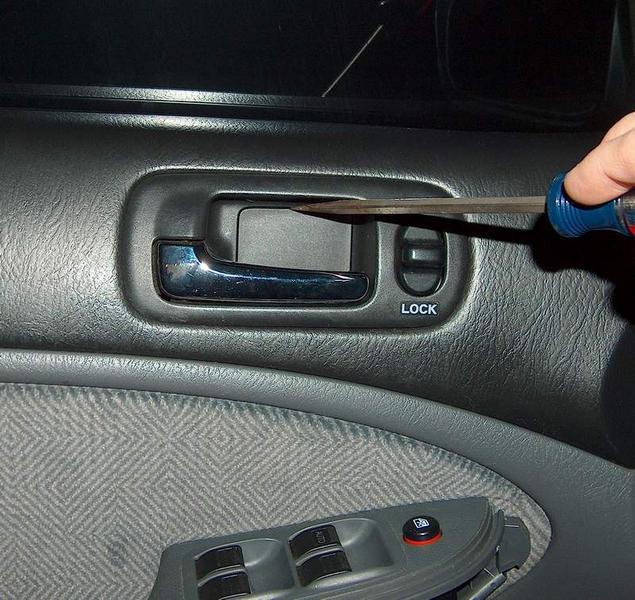
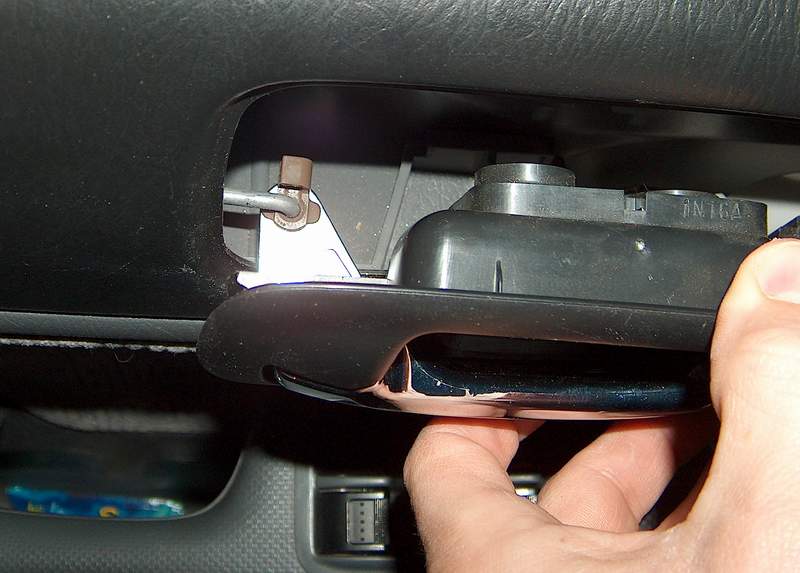
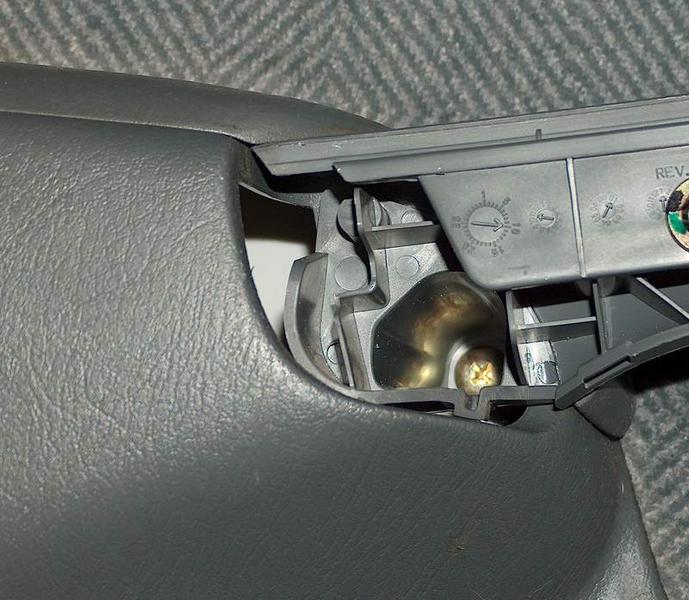
Insert screwdriver as shown and gently pry off the cover for the door handle.
Remove screw from door handle here
and here
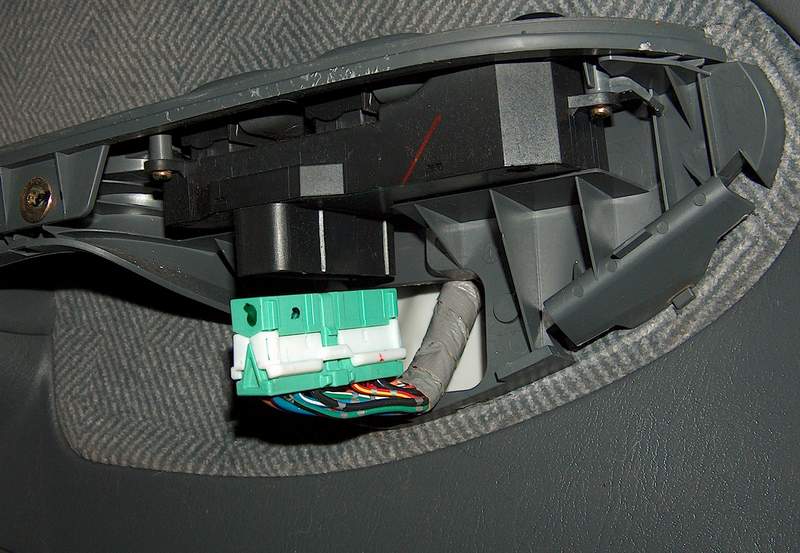
Remove power window connector if applicable
EDIT:Heres a continuation of the panel removal process for the COUPES
The steps are the same up to the removal of the sail panel.
pry up the screw cover inside the handle.

remove the phillips screw.

start from the front and pry up the door handle cover until you can slip a finger inside to pull off the panel.

Disconnect the power window connector and set the cover aside

Now remove the two phillips screws:
front...

back...

Then stick your hand inside the door handle opening and pull towards you to pop out one of the clips.

The rest of the instructions are the same as the sedan (pry up around the edge of the door panel to pop off the white clips)
Thanks EggRollBandit05
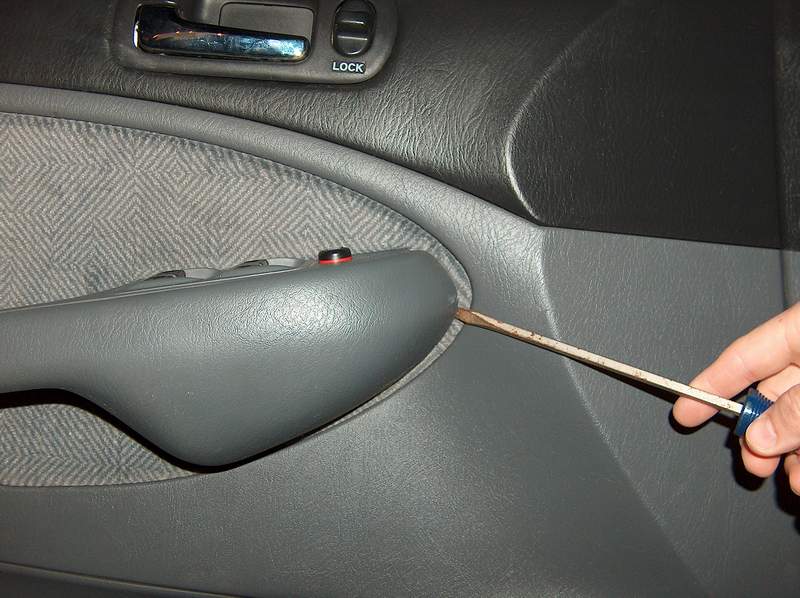
Insert screwdriver as shown here or anywhere around the door panel edge and pry up just enough to get your fingers behind the panel. There should be around 5-6 fasteners that will pop off. The panel the slides straight up out of the window channel.
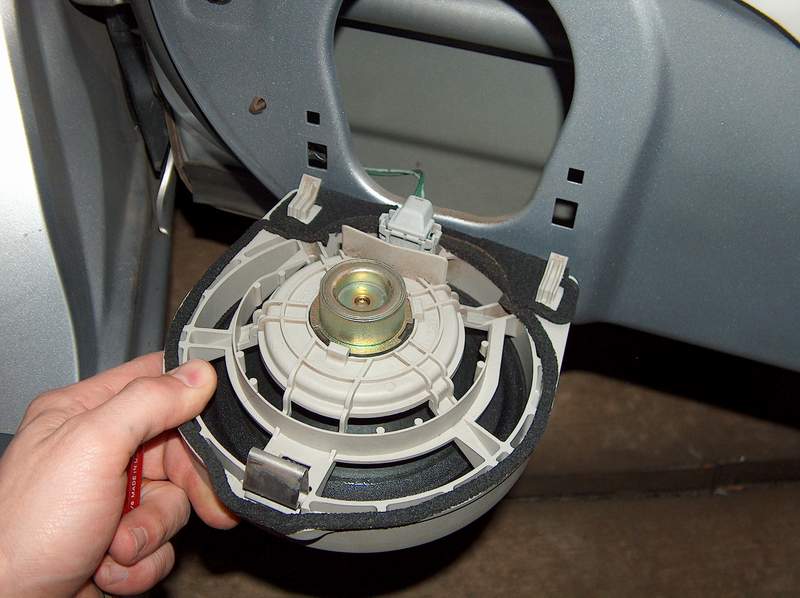
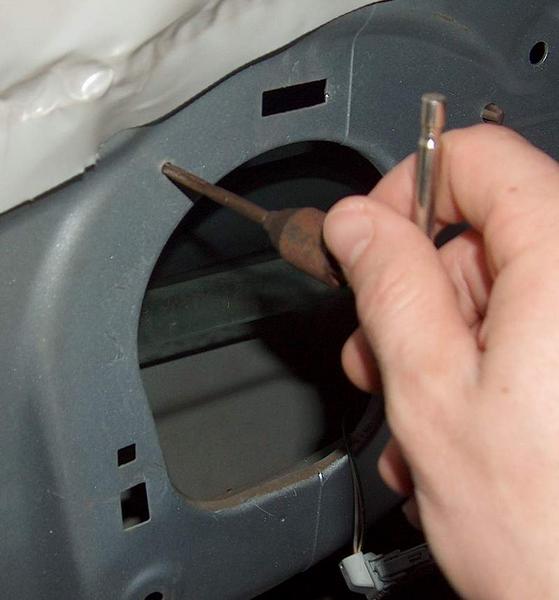
To remove the stock speakers without damaging them, insert the long skinny screwdriver into the top and press down to release the clip.
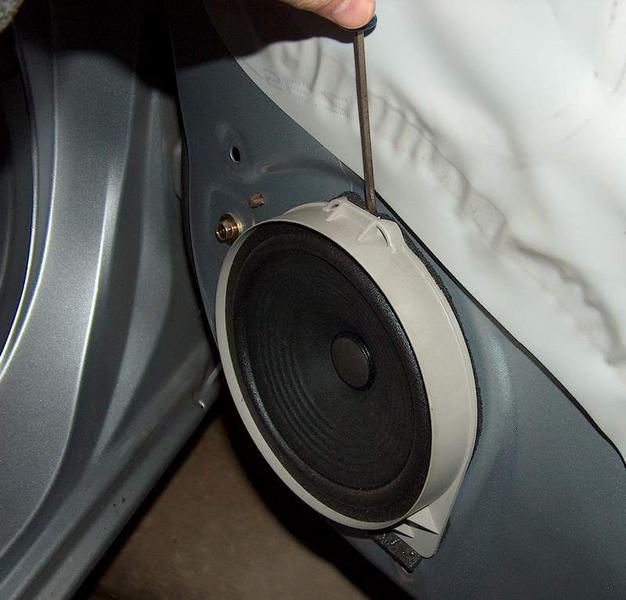
Wiggle the speaker back and forth while pulling up to release the bottom clips. then admire your massive paper driver! Remove the factory connector
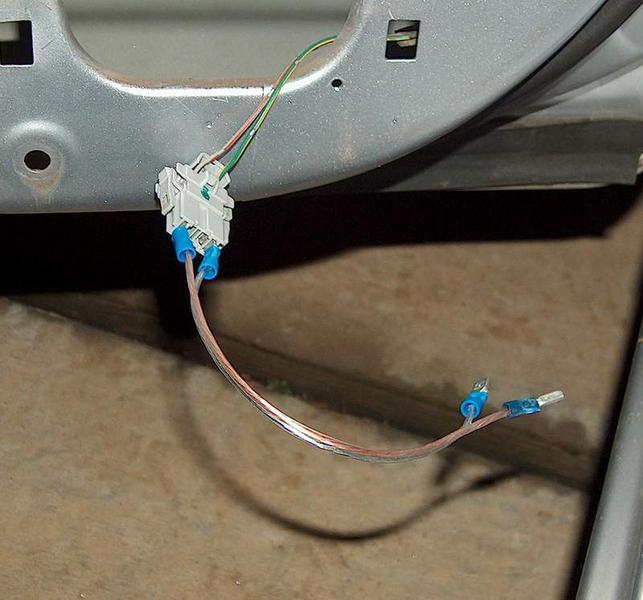
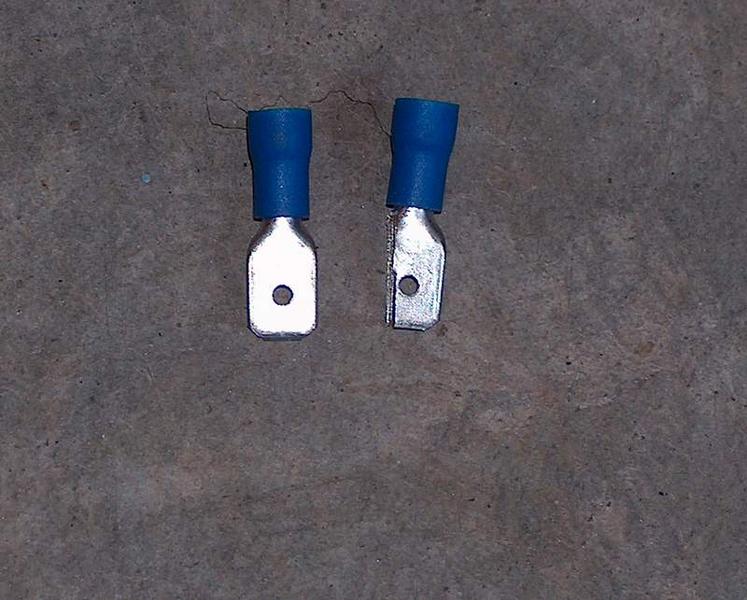
So I didn't have to cut off the factory connector and could reinstall the OEM speakers later if desired, I opted to make my own adapter harness. I only had the larger spade connectors on hand, so I cut them to make them fit. See pic for comparison. If you can get the medium size male's, then you'll be good.
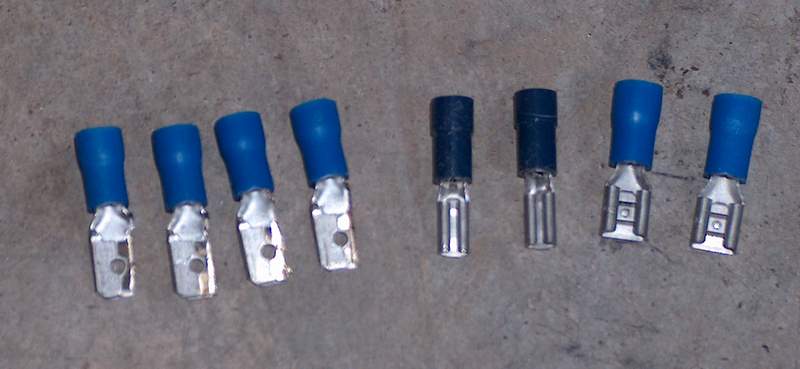
Here's all the connectors you'll need.
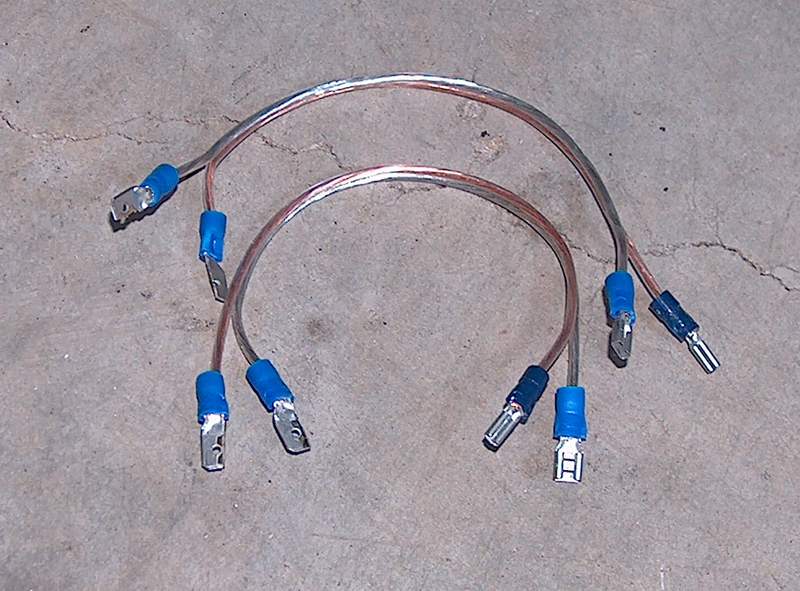
Cut the 1ft wire in half, strip the ends and crimp the terminals on to make the 2 harnesses.
Position the speaker and spacer on the door. Ensure that the speaker terminals will not touch the metal of the door panel. Mark the location of one hole. Drill with the #29 bit and tap it to make threads.
Mount the speaker with one screw and tighten down. Mark the location of the other 3 mount holes. I inserted the 3/16 drill bit into the spacers holes to mark the metal. I made a mark on the spacer so I knew where the speaker terminals were. This made it easier when I was reinstalling because unless you drill everything perfectly spaced, the spacer will only really fit one way when you put it back together.
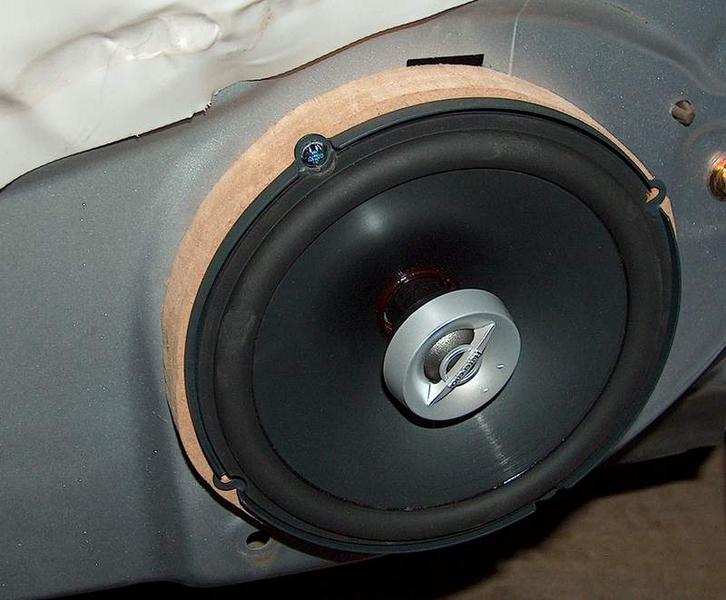
Drill and tap the remaining 3 mount holes. Install the wire harness you made.
Put a lock washer on each of the 4 mount screws. Insert and mount the speaker with 4 screws and 4 lockwashers.

At this point, I turned my car on to make sure that the speaker was working. Once you're satisfied, reinstall the door panel the opposite of how you removed it. The passenger side is essentiall the same with one exception. Removing the electrical connector for the power window has to be done from the back of the panel. Insert the skinny screwdriver as shown to release the locking clip.
Other than that, the install is the same as the driver's side. Enjoy your new speakers.
TIP:When installing the door panels, it's easier to do it if the windows are rolled down. Obvisously, the window control switch needs to be connected for this to happen, so i rolled my windows down before I started. Also, if you're using a different spacer, with the window already rolled down, you'll know right away if the speaker is going to hit the window or not.
My installation was performed on a 2002 LX Sedan with power windows and door locks. If you have another model, it may be similar, but I can't promise that.
EDIT: Thanks to EggRollBandit05 for providing steps and pics for the COUPE owners out there
Speakers
Infinity Reference 6012i
Tools Needed
Standard flathead screwdriver
#2 Philips screwdriver
Long skinny flathead screwdriver
Drill (preferably cordless)
3/16" drill bit
3/8" drill bit
8-32 Tap and matching #29 drill bit (can usually be bought as a set for a couple $$$)
Wire strippers
Terminal crimpers
Jigsaw
Parts Needed
(8) - 8-32 x 1.25" Machine Screws
(8) - #8 Lock Washers
1ft Speaker wire 16 or 18 ga
(4) - Male spade connectors
(2) - Small female spade connectors
(2) - Medium female spade connectors
Here's the tap, drill bit, screws and washers you can pick up at Lowe's.
As you can see here, you've only got about 1.75" of clearance between the top of the door panel and the window. also, the width of the opening is ~4.125" so keep that in mind when picking out speakers. especially if you want components. they tend to have very large magnets.
If your speakers are less than that, then you're good. Go head and mount them. My speakers were right at 2", so I needed a spacer.
A 0.5" spacer would have done the trick, but I had some .75" MDF laying around so I used that for mine. You can use whatever you want to make your spacer. Start by tracing the adapter ring (or the speaker if you don't have one) as a template.
Drill a 3/8" hole in the middle ring so you can get the jigsaw blade in there.
Cut out the spacer and repeat for a second one.
Test fit the spacer on the speaker and ensure it fits. Mark the locations of the 4 mounting holes of the speaker.
Drill the mount holes with a 3/16" drill. This hole is big enough to let the 8-32 screws pass through freely, which is what we want. Again, repeat for the other spacer.
My speakers came with foam, so I installed it on the back of the speakers. I doubt it will help at all, but I put it on anyway.
Insert screwdriver as shown and pop off cover.
Remove 2 philips screws here.
Pull out assembly as shown and remove electrical connector.
In order to remove the assembly, you'll have to remove the door opener rod. Rotate the plastic connector 90 degrees and lift the rod straight up. Compare the pics to see the connector.
Locked
Unlocked
Remove Sail Panel.
Insert screwdriver as shown and gently pry off the cover for the door handle.
Remove screw from door handle here
and here
Remove power window connector if applicable
EDIT:Heres a continuation of the panel removal process for the COUPES
The steps are the same up to the removal of the sail panel.
pry up the screw cover inside the handle.
remove the phillips screw.
start from the front and pry up the door handle cover until you can slip a finger inside to pull off the panel.
Disconnect the power window connector and set the cover aside
Now remove the two phillips screws:
front...
back...
Then stick your hand inside the door handle opening and pull towards you to pop out one of the clips.
The rest of the instructions are the same as the sedan (pry up around the edge of the door panel to pop off the white clips)
Thanks EggRollBandit05
Insert screwdriver as shown here or anywhere around the door panel edge and pry up just enough to get your fingers behind the panel. There should be around 5-6 fasteners that will pop off. The panel the slides straight up out of the window channel.
To remove the stock speakers without damaging them, insert the long skinny screwdriver into the top and press down to release the clip.
Wiggle the speaker back and forth while pulling up to release the bottom clips. then admire your massive paper driver!
Remove the factory connector So I didn't have to cut off the factory connector and could reinstall the OEM speakers later if desired, I opted to make my own adapter harness. I only had the larger spade connectors on hand, so I cut them to make them fit. See pic for comparison. If you can get the medium size male's, then you'll be good.
Here's all the connectors you'll need.
Cut the 1ft wire in half, strip the ends and crimp the terminals on to make the 2 harnesses.
Position the speaker and spacer on the door. Ensure that the speaker terminals will not touch the metal of the door panel. Mark the location of one hole. Drill with the #29 bit and tap it to make threads.
Mount the speaker with one screw and tighten down. Mark the location of the other 3 mount holes. I inserted the 3/16 drill bit into the spacers holes to mark the metal. I made a mark on the spacer so I knew where the speaker terminals were. This made it easier when I was reinstalling because unless you drill everything perfectly spaced, the spacer will only really fit one way when you put it back together.
Drill and tap the remaining 3 mount holes. Install the wire harness you made.
Put a lock washer on each of the 4 mount screws. Insert and mount the speaker with 4 screws and 4 lockwashers.
At this point, I turned my car on to make sure that the speaker was working. Once you're satisfied, reinstall the door panel the opposite of how you removed it. The passenger side is essentiall the same with one exception. Removing the electrical connector for the power window has to be done from the back of the panel. Insert the skinny screwdriver as shown to release the locking clip.
Other than that, the install is the same as the driver's side. Enjoy your new speakers.
TIP:When installing the door panels, it's easier to do it if the windows are rolled down. Obvisously, the window control switch needs to be connected for this to happen, so i rolled my windows down before I started. Also, if you're using a different spacer, with the window already rolled down, you'll know right away if the speaker is going to hit the window or not.
Last edited by electric130; 04-22-2007 at 07:46 PM. Reason: 1-Tip added. 2-dimensions added. 3-coupe steps added.

The following users liked this post:
CivicHybrid03 (06-28-2020)
02-03-2007
#2
Registered!!
Join Date: Apr 2005
Location: Temecula, CA
Age: 40
Posts: 592
Likes: 0
Received 0 Likes
on
0 Posts
Rep Power: 238
02-03-2007
#3
Premium Member
Hey! Look At Me!! I'm a Supporting Member!!
iTrader: (14)
Join Date: Aug 2006
Location: Portland, Oregon
Age: 39
Posts: 8,362
Likes: 0
Received 1 Like
on
1 Post
Rep Power: 364 the door panel removal process is different for the coupe, otherwise pretty much the same. Nice DIY, great step by step pics!

 02-03-2007
#6
Administrator
Administrator
Thread Starter
iTrader: (44)
Join Date: Aug 2006
Location: Charlotte
Age: 45
Posts: 2,978
Likes: 0
Received 4 Likes
on
3 Posts
Rep Power: 266  03-05-2007
#8
 03-18-2007
#10
Premium Member
Hey! Look At Me!! I'm a Supporting Member!!
iTrader: (14)
Join Date: Aug 2006
Location: Portland, Oregon
Age: 39
Posts: 8,362
Likes: 0
Received 1 Like
on
1 Post
Rep Power: 364 ^ have you done this?
agian, coupe isnt the same with the door panel removal process.
BTW electric, get at me on AIM, we gotta talk about a new audio setup for me =)
agian, coupe isnt the same with the door panel removal process.
BTW electric, get at me on AIM, we gotta talk about a new audio setup for me =)
03-21-2007
#13
Registered!!

Join Date: Apr 2006
Location: 604
Age: 37
Posts: 241
Likes: 0
Received 0 Likes
on
0 Posts
Rep Power: 0 
Re: ~~~DIY 02 LX Front Door Speaker Install~~~
04-15-2007
#15
Registered!!
iTrader: (1)

Join Date: Aug 2004
Location: Barrie Ontario, Canada
Age: 38
Posts: 2,594
Likes: 0
Received 0 Likes
on
0 Posts
Rep Power: 265 Re: ~~~DIY 02 LX Front Door Speaker Install~~~
http://www.cardomain.com/item/SCOSAH6
will those fit in my 2004 coupe front doors?
i dont have tools to make my own
will those fit in my 2004 coupe front doors?
i dont have tools to make my own
04-15-2007
#16
Administrator
Administrator
Thread Starter
iTrader: (44)
Join Date: Aug 2006
Location: Charlotte
Age: 45
Posts: 2,978
Likes: 0
Received 4 Likes
on
3 Posts
Rep Power: 266 Re: ~~~DIY 02 LX Front Door Speaker Install~~~
http://www.cardomain.com/item/SCOSAH6
will those fit in my 2004 coupe front doors?
i dont have tools to make my own
will those fit in my 2004 coupe front doors?
i dont have tools to make my own
04-22-2007
#17
Registered!!
iTrader: (1)
Join Date: Aug 2004
Location: Barrie Ontario, Canada
Age: 38
Posts: 2,594
Likes: 0
Received 0 Likes
on
0 Posts
Rep Power: 265 Re: ~~~DIY 02 LX Front Door Speaker Install~~~
dang i may have to suck it up and pay to have an audio shop install my door speakers.
im in ontario must be lots of places that will do it..
stupid military not letting me have my tools
im in ontario must be lots of places that will do it..
stupid military not letting me have my tools
04-22-2007
#18
You Stay Classy, San Diego
Re: ~~~DIY 02 LX Front Door Speaker Install~~~
dude its really not that hard. Im doin mine today. Go to homedepot and get some 1/2" or 3/4" mdf the smallest sheet they have and trace out the circle templates that came with ur speakers. Then screw those into ur doors. and then screw the speakers into the mdf. I know that my local shop sells 1/2" and 3/4" speaker circle things pre cut out from plastic but i think they're around 8.99 each and u can install them urself. it just saves u from cutting. Any good car audio shop should have them. Even a best buy should just ask the install department and they'll sell u the part.
04-22-2007
#19
Registered!!
iTrader: (1)
Join Date: Aug 2004
Location: Barrie Ontario, Canada
Age: 38
Posts: 2,594
Likes: 0
Received 0 Likes
on
0 Posts
Rep Power: 265 Re: ~~~DIY 02 LX Front Door Speaker Install~~~
ok ill do that i guess
i dont even have a drill ill need self taping screws heh..
no tools for me to play with
i dont even have a drill ill need self taping screws heh..
no tools for me to play with
04-22-2007
#21
Registered!!
iTrader: (7)
Join Date: Aug 2006
Location: Cali
Age: 37
Posts: 558
Likes: 0
Received 0 Likes
on
0 Posts
Rep Power: 221 Re: ~~~DIY 02 LX Front Door Speaker Install~~~
Hope you dont mind me adding this electric130. You can do whatever you want with it, change wording, move it etc. I tried to follow the same format you used and loaded the pics as attachments.
Heres a continuation of the panel removal process for the COUPES
The steps are the same up to the removal of the sail panel.
pry up the screw cover inside the handle.
remove the phillips screw.
start from the front and pry up the door handle cover until you can slip a finger inside to pull off the panel.
Disconnect the power window connector and set the cover aside
Now remove the two phillips screws:
front...
back...
Then stick your hand inside the door handle opening and pull towards you to pop out one of the clips.
The rest of the instructions are the same as the sedan (pry up around the edge of the door panel to pop off the white clips)
Last edited by EggRollBandit05; 04-22-2007 at 04:05 PM.
04-22-2007
#22
Administrator
Administrator
Thread Starter
iTrader: (44)
Join Date: Aug 2006
Location: Charlotte
Age: 45
Posts: 2,978
Likes: 0
Received 4 Likes
on
3 Posts
Rep Power: 266 Re: ~~~DIY 02 LX Front Door Speaker Install~~~

+1 rep for you!!

Last edited by electric130; 04-22-2007 at 07:57 PM.
04-22-2007
#23
my civic has no boost
Join Date: Dec 2004
Location: Toledo, Ohio
Age: 39
Posts: 1,424
Likes: 0
Received 0 Likes
on
0 Posts
Rep Power: 0 
Re: ~~~DIY Front Door Speaker Install Coupe and Sedan~~~
just FYI everyone.....instead of doing like the....make shift wiring like he did....you can goto best buy, or circuit city and get a speaker wire harness for our cars.....they come in pairs and fit the same on all 4 speakers. that way everything is gauranteed to work great and fit great.
04-23-2007
#24
Administrator
Administrator
Thread Starter
iTrader: (44)
Join Date: Aug 2006
Location: Charlotte
Age: 45
Posts: 2,978
Likes: 0
Received 4 Likes
on
3 Posts
Rep Power: 266 Re: ~~~DIY Front Door Speaker Install Coupe and Sedan~~~
just FYI everyone.....instead of doing like the....make shift wiring like he did....you can goto best buy, or circuit city and get a speaker wire harness for our cars.....they come in pairs and fit the same on all 4 speakers. that way everything is gauranteed to work great and fit great.
01-27-2008
#27
Administrator
Administrator
Thread Starter
iTrader: (44)
Join Date: Aug 2006
Location: Charlotte
Age: 45
Posts: 2,978
Likes: 0
Received 4 Likes
on
3 Posts
Rep Power: 266 Re: ~~~DIY Front Door Speaker Install Coupe and Sedan~~~
it really depends on the speaker. mainly how tall the speaker is from the back of the frame where it would bolt to the door or a spacer and the top of the front. usually, that's the foam around the edge. i've found that most speakers fit on the front side with a 3/4" spacer ring. with a 1" spacer, a lot of people have had to trim the door panels. so there's really no clear answer to this. i gues if someone was willing to drill a big hole in their door panel and take some measurements, we could clear this up, but untill then, we'll have to go on a case by case basis.
01-27-2008
#28
Slowest 7thgen in the GTA
iTrader: (5)

Join Date: Feb 2004
Location: Maple (GTA), ON
Age: 44
Posts: 1,557
Likes: 0
Received 1 Like
on
1 Post
Rep Power: 262 Re: ~~~DIY Front Door Speaker Install Coupe and Sedan~~~
What speakers are you trying to put in??
01-30-2008
#29
Registered!!
iTrader: (1)

Join Date: Sep 2006
Location: Houston, TX
Age: 43
Posts: 102
Likes: 0
Received 0 Likes
on
0 Posts
Rep Power: 216 Re: ~~~DIY Front Door Speaker Install Coupe and Sedan~~~
WTF?! On my ex coupe, I had 10mm bolts where theses screws where at. Is that right?
Now remove the two phillips screws:
front...
back...
Now remove the two phillips screws:
front...
back...

