2003 Civic Timing Belt DIY
 10-31-2010
#1
Registered!!
Thread Starter

Join Date: Jul 2010
Location: northern california
Posts: 4
Likes: 0
Received 0 Likes
on
0 Posts
Rep Power: 0 
2003 Civic Timing Belt DIY
2003 Civic Timing Belt DIY
Introduction:
This DIY was written for a 2003 Honda Civic with a 1.7 liter engine with a SOHC. It should be useful for any 7th Generation Civic (2001 to 2005) with a timing belt.
Many thanks to Reddawnman who is another member of this forum. I used his Timing Belt DIY to successfully replace my timing belt and related equipment. I would not have tackled this job without the aid of his DIY. The following link is a shortcut to his DIY:
https://www.civicforums.com/forums/3...t-diy-2-a.html
Another great reference is the 2001 civic manual which is posted on-line at this forum courtesy of Tweeder. This is a large document. Using the manual is somewhat intuitive but it does take a little trial and error to find specific information. The manual has great diagrams and technical specs like torque values. It is a little lacking on detailed instructions. It must be written for experienced Honda mechanics? I tried to print multiple pages of the manual with no success but I was able to print single pages.
Visit the following sites to download the FREE manuals from megauploads.com
Civic Manual 1 http://www.megaupload.com/?d=UJZRVG8W
Civic Manual 2 http://www.megaupload.com/?d=KKDZZ12V
Manual 2 appears to be a copy of Manual 1 with a few additional updates for model year 2002 like specifications and general information.
I ran a Norton scan on Manual 1 and 2 before downloading them and found no viruses. I have used them for several weeks without a problem.
For the record, I am not a certified mechanic – Just a Do It Yourselfer. This is my second timing belt job. I replaced a timing belt and related equipment on a 1996 v6 Camry in May, 2010. I used another great DIY from a Toyota forum.
Use this DIY at your own risk. I am assuming no liability for any errors or omissions in this DIY.
Needless to say, it’s important to lay out parts in an orderly fashion as they are removed from the car. It’s very frustrating to replace a part and then discover you skipped a step. I know. I installed the crankshaft pulley and the DAMN pulley bolt and then realized I had NOT installed the lower timing belt pulley cover. I had to remove the dreaded crankshaft pulley bolt AGAIN. I must say, it’s much easier the second time! I also like to use numbered sandwich bags to store nuts, bolts, etc that are removed from the car. The bags reduce the confusion and help prevent lost items.
I wrote this DIY because I found myself flipping between Reddawnman’s DIY, the Haynes Manual, and the Civic Manual. I also found that it was easy to skip a step when using multiple manuals as outlined in the previous paragraph. This DIY is an attempt to compile the knowledge from all 3 sources plus my own personal experiences doing this job. Hopefully, the extra details will make life easier for others. Good luck to anyone who decides to tackle this job.
Parts and Supplies:
You will need to decide which parts to replace and which parts to reuse.
This was the first time that this car needed a new timing belt. As a result, I only bought the following parts:
Timing belt - $16.14
Water pump - $53 .29 ( I using the old pump but took the low risk option)
Valve cover gasket - $6.88
Belt for alternator and A/C: - $15.53
Belt for power steering - $11.04
Crankshaft oil seal - $3.79 (not leaking but I replaced it)
Camshaft oil seal - $3.12 (not leaking and I did not replace it)
Some plastic clips for the wheel well shield - $2.12 each
Shipping - $13.79
The parts listed above were purchased on-line from Hondapartsunlimted.com. The supplier is in Arizona which is convenient for me (I live in Northern Cal). The on-line tool for ordering parts is very user friendly. They give advice over the phone but only take orders on-line. The order arrived in 4 working days from the date I placed my order. My only complaint is they don’t email you when the order has shipped.
Antifreeze – about 1 gal.
RTV sealant for the valve cover gasket.
RTV sealant for the water pump gasket (new pump may already have this applied)
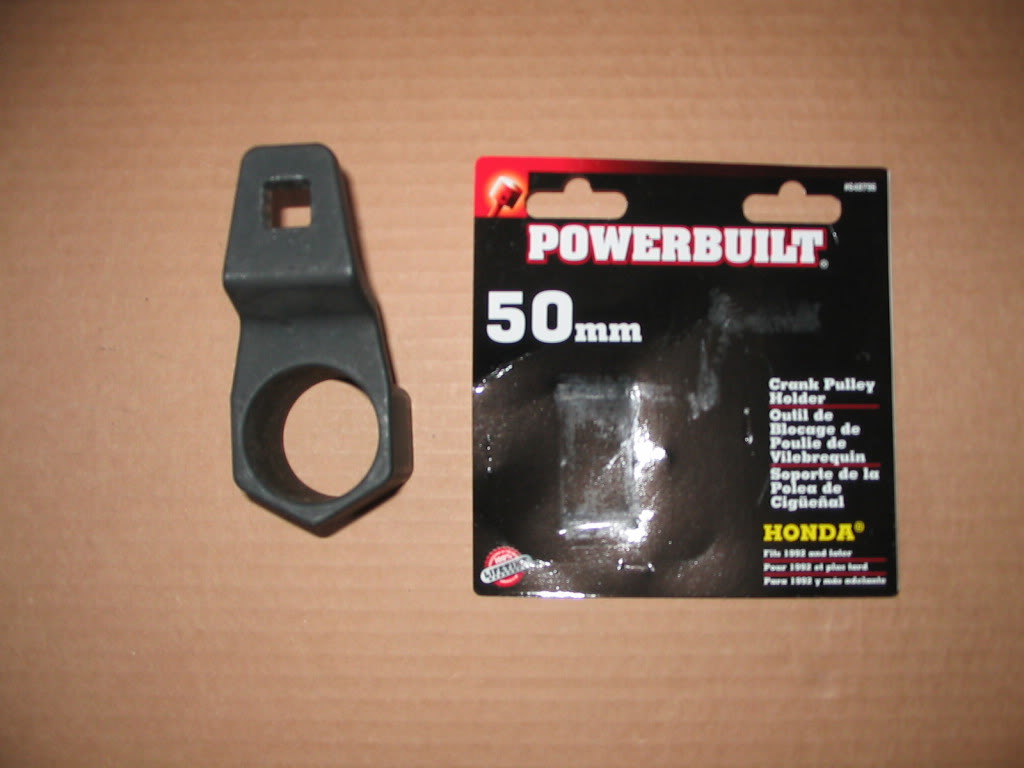
The following tool is required to remove the crankshaft pulley.
Powerbuilt 648796 Honda crankcase pulley removal tool.
I purchased this tool at Amazon.com for $24.99. You get free shipping on this item if you spend $25. Amazon is also a good place to buy breaker bars. You will need two for this job unless you want to risk destroying your ratchet wrenches.
Parts that I considered buying but did not buy:
Tensioner - $70
Spark plug tube seals – $2-$7 each
Seals for the valve cover bolts - $2-3 each.
The entire valve cover set (gasket, spark plug seals, bolt seals) is $26.
I believe the parts listed above should last until the second timing belt or later so I did not replace them.
Tools:
Metric socket set and wrenches. 10, 12, 14, and 17 mm are the main sockets
Deep sockets are helpful for a few bolts
Various adapters and extensions for sockets.
Combination wrenches (box and open end)
Pliers
19 mm impact socket for crankshaft bolt (1/2 inch drive or bigger)
20” extension to loosen crankshaft bolt (1/2 inch drive or bigger)
2 breaker bars (1/2 inch drive or bigger)
Torque wrench
2.5 mm allen wrench or heavy duty wire to act as a “grenade pin” on the tensioner.
Wire brush
Rubber hammer OR regular hammer and block of wood to loosen valve cover.
Belt wrench or screwdriver if you plan to remove the camshaft pulley
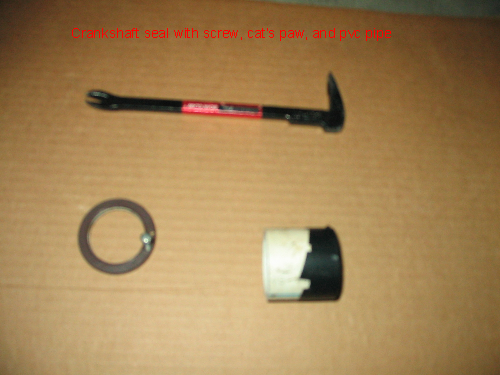
Electric drill, drill bit, screw driver, and cat’s paw if you plan to replace crankshaft seal.
V-belt tension gauge (kragens, auto zone, etc) OR straight edge and ruler if you use the low tech method.
Jack stands to support the front end of the car (2)
Jack stand to use while loosening the crankshaft bolt
Hydraulic jack
Pan to drain coolant
1.5 inch diameter pvc pipe to insert seals
Trouble light
Rags and newspapers to clean up spilled coolant
Section A: Prep for crankshaft bolt removal:
The most difficult job is loosening the crankshaft pulley bolt. I therefore chose to tackle this job first. If you can’t loosen the crankshaft pulley bolt, then you can’t replace the timing belt so don’t tear apart your car until you successfully loosen the crankshaft pulley bolt.
1. Confirm that you have the anti-theft code for the radio.
2. Write down the frequencies for the preset radio buttons.
3. Disconnect the negative lead of the battery and wrap the cable with rubber or other insulating material.
4. Loosen driver-side lug nuts.
5. Chock the rear wheels.
6. Jack up the front of the car. Jack point is the metal cross-brace behind the radiator. The black colored wind screen below the front of the car is marked to show the jack point.
7. Attach jack stands on both sides of the car. I prefer to use a stack of 2” by 10” by 12” wooden boards because I don’t’ trust jack stands. In this case, I used a stack of seven 2” by 10” by 12” boards behind the driver side wheel well. I also placed one 2” by 10” by 12” under the right front wheel. This arrangement gives me adequate clearance to slide under the car and reduces the back pain when working from above the car.
8. Remove driver side wheel.
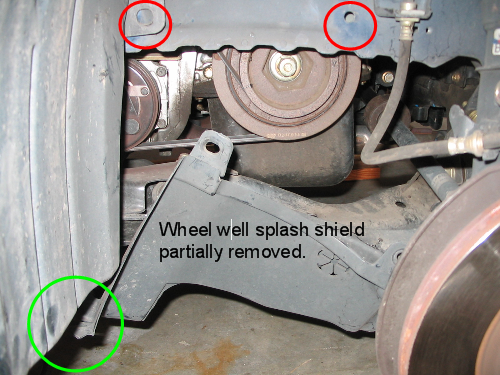
9. Loosen and move the splash shield to gain access to the crankshaft pulley. It is not necessary to remove the entire splash shield from the front of the car. Just remove two plastic clips from the splash shield inside the wheel well and then disconnect the interlocking connection between the fender splash shield and the front apron. Once this is done, then gently bend the splash shield out of the way.
Section B: Loosen crankshaft pulley bolt:
Check out this video to see how the 50 mm socket is used with the 19 mm socket. Click on the video in the following web page.
http://www.denlorstools.com/home/dt1...0mm_valve.html
1. Position the special 50 mm socket and a � inch diameter breaker bar onto the pulley at about the 7:00 position as shown in the following picture. The length of the breaker bar will vary depending upon the elevation of the pulley. Wedge the breaker bar against the floor or other immovable object. It may be necessary to rotate the crankshaft with a 19 mm socket to get the proper alignment. ONLY ROTATE THE CRANKSHAFT IN A COUNTER CLOCKWISE DIRECTION AS YOU VIEW THE PULLEY. If you can’t rotate the crankshaft, remove the spark plugs and it will be easier to rotate the crankshaft. The following picture was borrowed from Reddawnman’s DIY. I apologize for not taking a picture showing the use of both wrenches but the video listed above shows the technique. The video makes it look easy. Trust me - it’s not.

2. Attach the 19 mm impact socket (1/2 inch or larger drive), 20” extension, and long breaker bar onto the crankshaft bolt. Position a jack stand at the end of the extension to act as a brace. I used a 24 inch long breaker bar and a 4 foot steel pipe for a cheater. The effective length of my lever was 5 feet because I slid the pipe 12 inches over the breaker bar. Even with this arrangement, loosening the bolt was a bitch. I fought the bolt for an hour and stopped because the metal extension was twisting with all the torque. I was fearful of breaking the bolt, my 19 mm socket (non impact at this point), the 20” extension, or my body. I applied Liquid Wrench twice over 30 minutes, let it soak for an hour, and tried again with no luck. I then bought an impact socket (� inch drive) and 20 inch extension from Sears. My no name brand extension was twisting so much I was afraid it would snap. I eventually removed the bolt. I don’t think the Liquid Wrench helped. You just need to use a lot of muscle power. Even a 160 lb weakling like me can do it with the proper tools. I had a helper push against the end of the breaker bar with a board to reduce the chances of the 19 mm socket from slipping off the bolt. I then used my 5 ft lever and applied an incredible amount of force to the socket and extension. I’m guessing that I had to rotate the lever 30 to 45 degrees before the bolt broke free with a loud snap. The 30 to 45 degree rotation was not due to any movement of the bolt – the metal tools were twisting and/or flexing. HOLY ****. Needless to say, this job is not for the weak of heart. Be prepared for something to snap. I wore safety goggles and threw a blanket over the tools to protect me from flying metal. I had a socket shatter while trying to remove the crankshaft bolt on a Camry so I’m a little gun shy about this stuff. I had flying metal parts on the Camry job. Also position your body so you don’t hurt yourself if/when something breaks. For the record, I was close to giving up on this job. I called the local rental store and asked about a compressor. They said others had tried to remove crankshaft bolts with their compressors with no luck. My next option was the mobile mechanic route. I did not get a price for the mobile mechanic but figured it would not be cheap.
3. When the bolt breaks loose, CELEBRATE. You’ve just completed the most difficult part of this DIY
Section C: Drain radiator and overflow reservoir.
Don’t open the radiator cap when the engine is hot or you could be burned.
Coolant is poisonous to pets and humans if ingested. Don’t leave it lying around on the floor or in open containers!
1. Open and remove the radiator cap.
2. Drain the radiator. The drain valve is below the radiator on the driver-side of the radiator. The drain valve is partially hidden but easily accessible from the beneath the car without crawling under the car.
3. A pair of pliers may be needed to loosen the drain valve. Be gentle since you are dealing with plastic parts.
4. Others have suggested that you drain coolant from the engine block too. This drain plug is located near the oil filter on the back of the engine block. Since this plug is difficult to reach, I opted to skip the drain plug on the block. This just means the remaining coolant will drain from the engine block when the water pump is removed. It’s a little messy by manageable.
If you want to be thorough and also drain the coolant overflow tank, then do the following:
1. Disconnect and remove the positive cable from the battery. The negative cable was disconnected in Section A.
2. Remove the front bolt from the battery hold down bar. 10 mm
3. Loosen the rear nut of the hold down bar enough so you can unhook the rod from the tray beneath the battery.
4. Lift the battery out of the way.
5. Lift the bottom tray out of the way.
6. Remove the one bolt that anchors the reservoir to the fan housing.
7. Unclip the overflow tubing from the reservoir in several places. It’s not necessary to disconnect the rubber tubing from either the radiator or the overflow tank.
8. Lift out the reservoir and poor the coolant into an empty container. Keep the drain pan below the radiator during this step because some additional coolant may drain out of the radiator
Section D: Power steering pump removal
1. Gently pull the power steering reservoir out of the metal hanger.
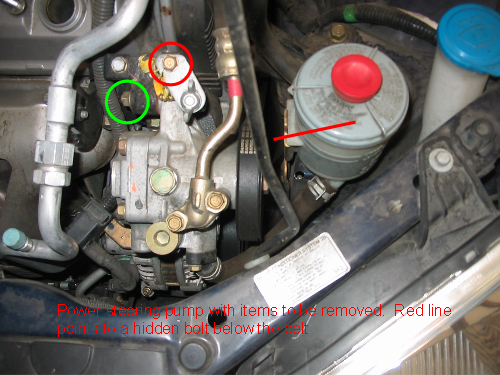
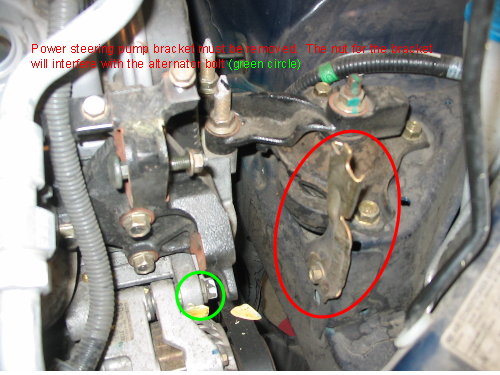
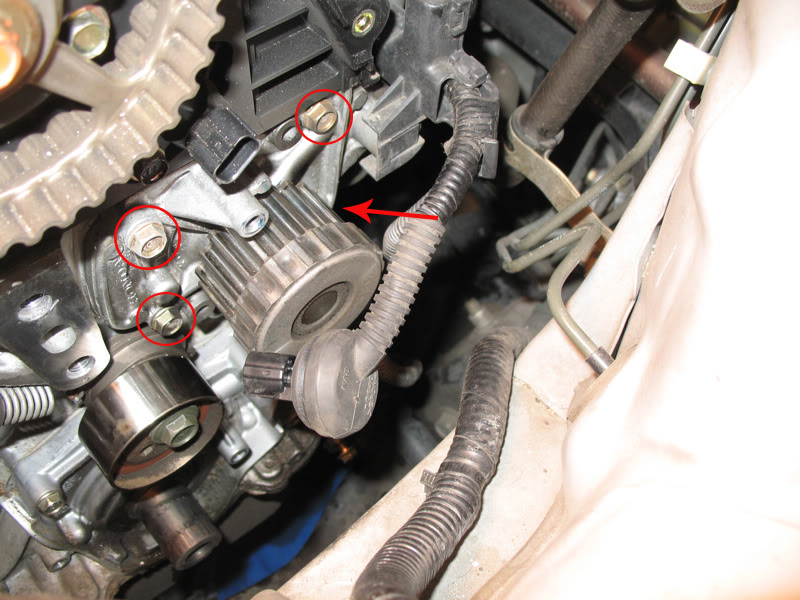
2. Remove three nuts to free up the power steering unit for removal.
• 10 mm nut on the top of the power steering pump. Red circle in picture
• 12 mm nut on the left side of the pump. (pivot bolt) Green circle in picture
• 12 mm nut on the right side, below the pulley. (lock bolt) Use a box wrench for this nut. Red arrow in picture. See next picture for details.
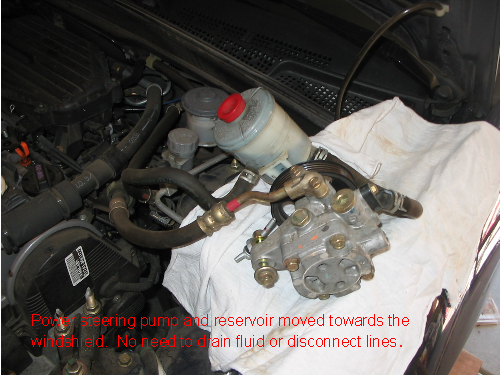
3. Swing the power steering pump and tank out of the way. DO NOT DISCONNECT THE HOSES. See next picture for details.
4. Remove the bolt (12 mm) and metal hanger that supports the power steering reservoir. This hanger will interfere with the removal of an alternator bolt in the next section. See red circle in next picture for details
Section E: Alternator removal
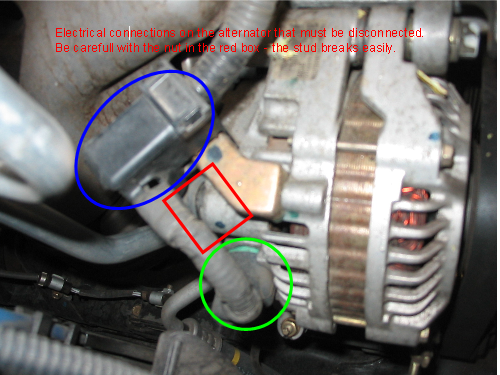
Disconnect electrical Connections on the alternator:
1. Disconnect the 4P connector from the front of the alternator. Peel back the rubber boot, press on the left side of the connector, and pull gently. Green circle in pic.
2. Disconnect the “black box” on the left side of the alternator. There is a small tab on the bottom-left side that must be pushed down to release the “black box” from the metal support. Blue circle in the pic.
3. Disconnect the alternator cable from the left side of the alternator. Peel back the rubber boot and remove the 10 mm nut. Red box in pic. USE EXTREME CAUTION REMOVING THIS BOLT. I USED A SMALL AMOUNT OF FORCE AND SNAPPED THE STUD. I HAD TO BUY A REBUILT ALTERNATOR FOR ABOUT $150. ALSO NOTE THAT THERE IS A BLACK PLASTIC INSULATOR BETWEEN THE ALTERNATOR CABLE AND THE ALTERNATOR. THIS PLASTIC INSULATOR IS DELICATE. A NEW INSULATOR IS ABOUT $15. OTHER ON-LINE SOURCES HAVE USED A RUBBER WASHER AS A REPLACEMENT INSULATOR. This bolt is tightened to 6 ft-lbs per the manual. See next picture for details.
Remove mounting Hardware for the alternator:
The manual says to do the following:
1. Loosen mounting bolt (12 mm) at the top, right side of the alternator. This is the pivot point.
2. Remove the lock bolt (12 mm) which is below the alternator. Access is easier from the wheel well. There are 2 bolts on the mounting bracket. Remove the smaller bolt in the middle of the bracket.
3. Loosen the wing nut to give enough slack to remove the belt. I recommend you measure the length of the exposed threads on the stud so you have a good idea how much to retighten the wing nut when a new belt is installed.
4. Remove the belt.
5. Remove the mounting bolt and lift the alternator out of the car.
I took a slightly different approach because access to the wing nut is a pain:
1. Loosen mounting bolt (14 mm) at the top, right side of the alternator. Pivot point.
2. Remove both bolts on the bracket which is below the alternator (12 mm and 14 mm) Access is easier from the wheel well. Use long extensions on socket wrench if necessary. Red and green bolts on the top of the picture. The following picture is borrowed from Reddawnman.
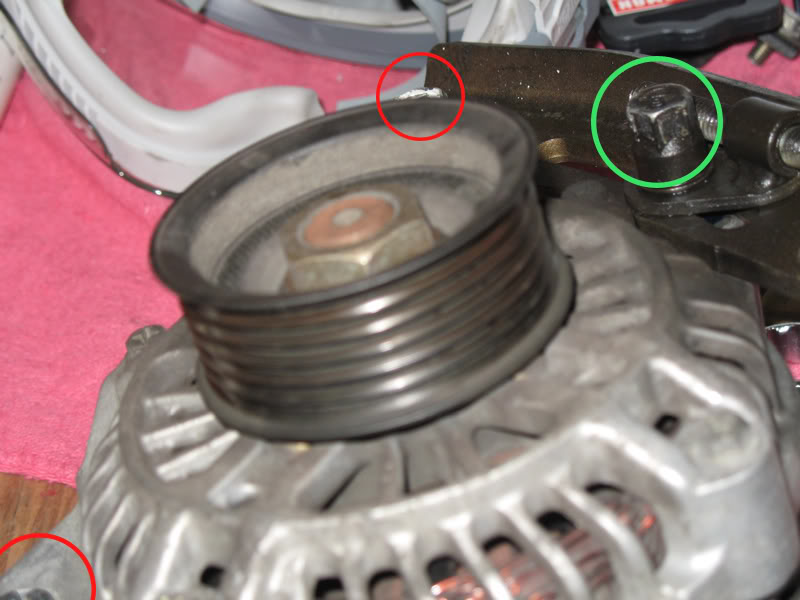
3. No need to loosen the wing if you follow this alternate procedure since the bracket and alternator will come out together. I recommend you measure the length of the exposed threads on the stud so you have a good idea how much to retighten the wing nut when a new belt is installed.
4. Remove the belt. Push on the alternator as necessary to loosen the belt.
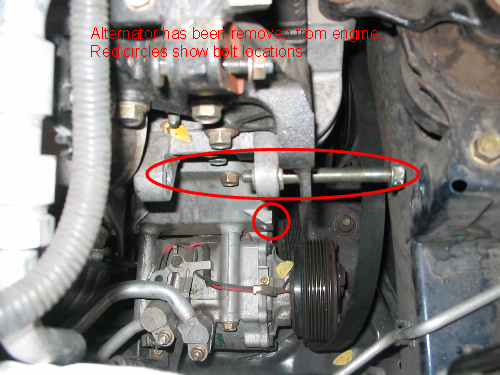
5. Remove the mounting bolt and lift the alternator out of the car. The following picture shows the alternator removed. The top mounting bolt and the bolt hole for the lower bracket bolt are circled.
Section F: Remove valve cover and related equipment.
Unfortunately, it’s necessary to remove the valve cover to do the timing belt on this car.
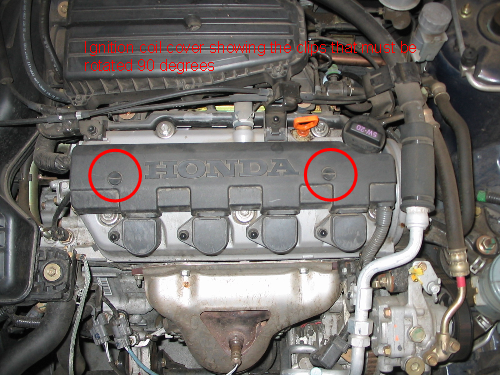
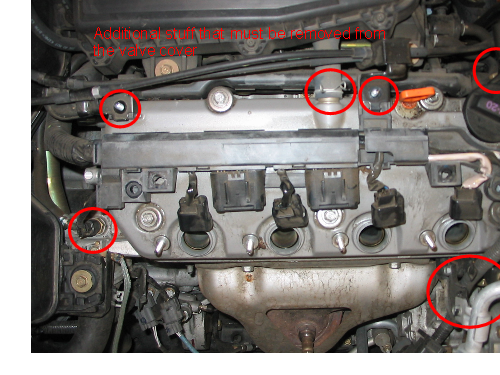
1. Remove the ignition coil cover (black cover) located on top of the valve cover. Use a screw driver and turn the plastic clips 90 degrees. Pull up gently on the cover and move it out of the way. See next picture for details.
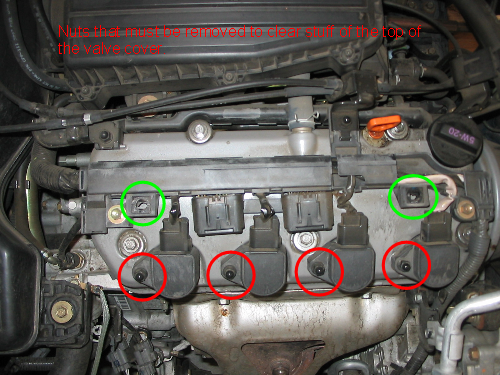
2. Remove six 10 mm nuts from the top of the valve cover. Four nuts are on the spark plug coils (1 each circled in red) and two nuts that hold a wire harness to the top of the valve cover (already removed, circled in green). See next picture for details.
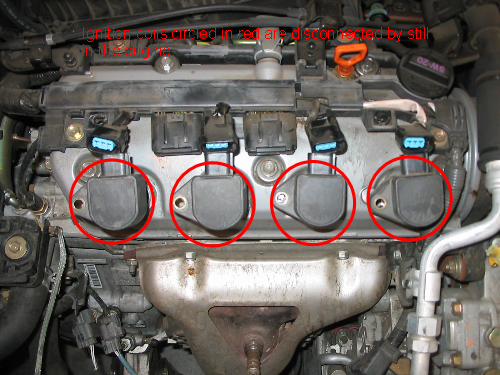
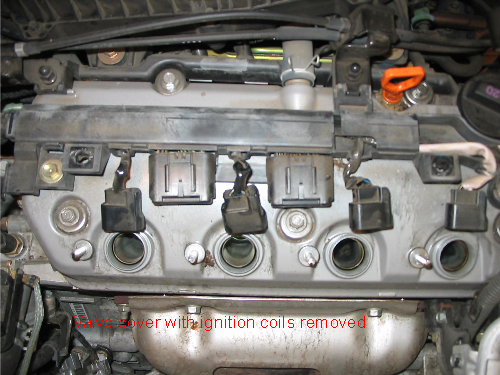
3. There should be sufficient wiggle room in the wires so that the electrical connections can be unplugged from the coils. Remove the 4 coils. See next 2 pictures.
4. Remove two 10 mm nuts from the rear of the valve cover. These nuts anchor the throttle cable to the top of the valve cover. Move the cable off the valve cover.
5. Work you way around the valve cover (clockwise) and remove/disconnect the following:
6. Disconnect the temperature sensor from the left side of the valve cover.
7. Disconnect the air intake hose on the back side of the valve cover gasket. Release the clip and push/pry hose off the tube connected to the valve cover.
8. Remove oil dip stick.
9. Remove the bracket on the right-rear corner of the valve cover bracket. 10 mm bolt
10. Remove the bracket near the right-front of valve cover that anchors the A/C tubing to the engine. Remove two 10 mm bolts or nuts.
11. Release wire harness from a small plastic clip.
12. Slide the alternator wiring under the A/C tubing.
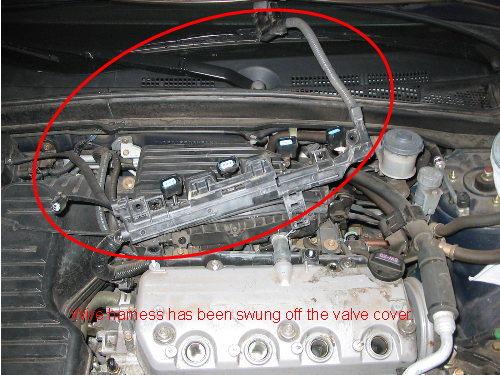
13. Swing the entire wiring harness off the valve cover. See previous picture.
14. Remove the power steering bracket by removing 3 bolts. This step may be optional. It may be easier to remove and reinstall the valve cover with this bracket remove.
15. Clean off debris, nuts, etc from the top of the valve cover so junk doesn’t fall into the engine block.
16. Remove the valve cover. Loosen 6 bolts (10 mm). The Haynes Manual says to follow the reserve of the tightening sequence which is attached in Section M. If the valve cover is stuck to the cylinder head, tap the cover with a rubber mallet or block of wood to break the seal. DO NOT PRY BETWEEN THE VALVE COVER AND CYLINDER HEAD OR YOU MAY DAMAGE THE GASKET MATING SURFACE. It will be necessary to gently pull up on the A/C hoses to remove the valve cover. Don’t bend the metal tubing.
17. Inspect the rubber parts associated with the valve cover. Note the location where four blobs of RTV sealant were added to the gasket/cylinder head. Always replace the gasket. The rubber seals on the spark plug tubes and the bolts were in good shape so I reused them.
18. Cover the cylinder head so junk does not fall into it.
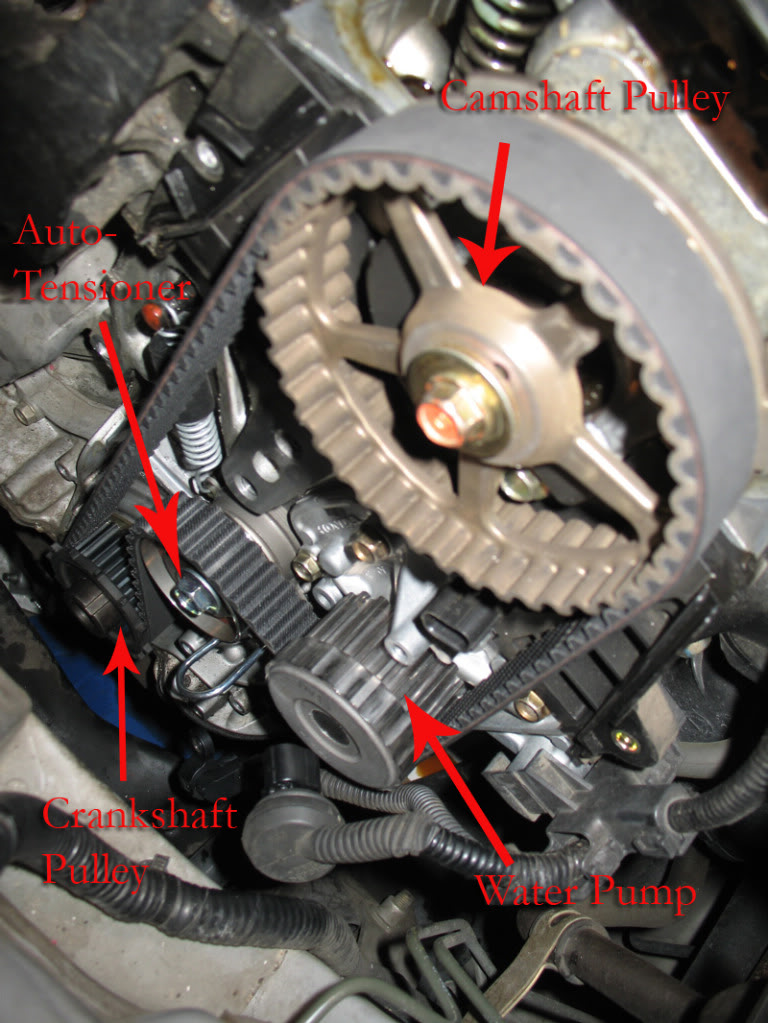
Section G: Timing belt and related equipment
A motor mount will be removed in this step so the engine must be supported.
Place a jack stand and wood under the oil pan to support the engine. I was able to get a snug fit by adjusting the jack stand and using several thicknesses of wood.
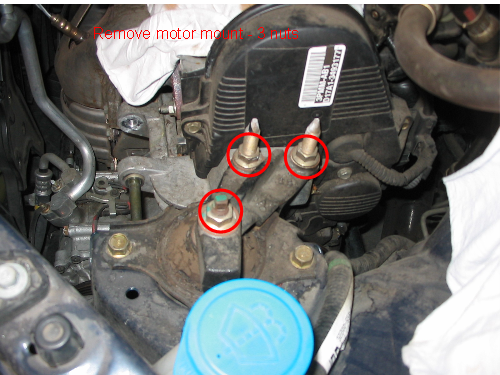
1. Remove the upper engine mount. 3-17 mm nuts. Two require deep sockets. I cheated and used an 11/16 inch deep socket. See next 2 pictures picture.
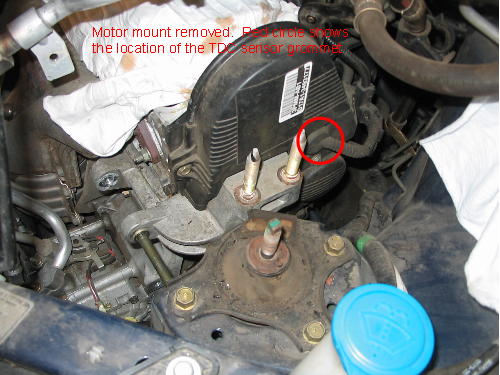
2. Remove the TDC sensor from the upper timing belt cover. Use a screw driver to pry out the rubber grommet to expose the electrical connection. Press on the left side of the connector and pull gently. Swing the wire harness out of the way. The previous picture has a red circle indicating the rubber grommet for the TDC sensor.
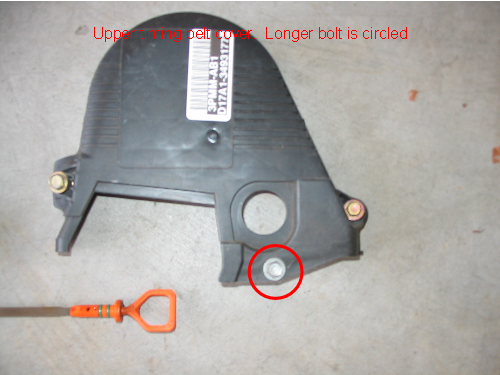
3. Remove the upper timing belt cover. 3-10 mm bolts. The middle bolt is longer than the two outer bolts. See next picture. Longer bolt is circled in red.
4. Position the number 1 cylinder at Top Dead Center (TDC):
• I used the special 50 mm socket to rotate the crank shaft COUNTER CLOCKWISE as viewed from the pulley end. Clockwise rotation can damage the engine since this engine is an “interference fit” engine. Others say to use the 19 mm socket to rotate the engine. The 19 mm socket is actually easier to use but will also tighten the pulley bolt. I suspect a quick snap of the bolt in the reserve direction will loosen the bolt again but I didn’t use the 19 mm bolt to rotate the engine.
• Rotate the engine COUNTER CLOCKWISE until:
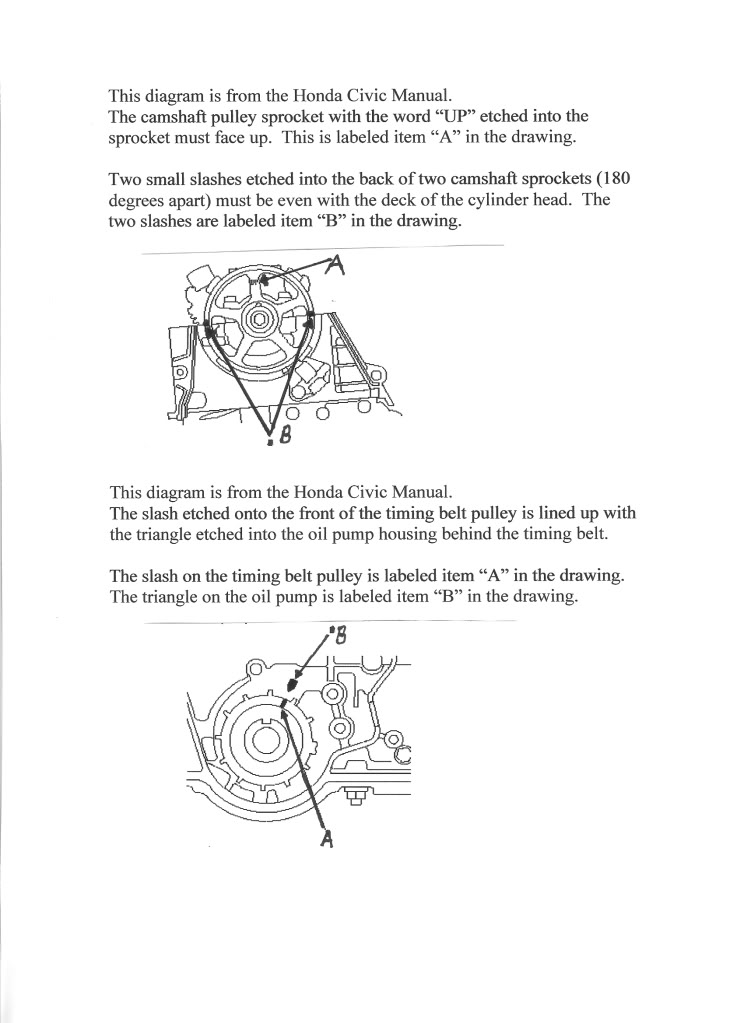
a. Camshaft pulley sprocket with the word “up” etched into the sprocket is pointing up.
b. Two small slashes etched into the back of two camshaft sprockets (180 degrees apart) are level with the surface of the cylinder head.
c. The key in the crankshaft pulley is a ROUGH indication of TDC. When the key is at the 12:00 position, cylinder number 1 MAY be at TDC. If it’s not, rotate the crankshaft pulley another revolution. Never rely solely on the key to get cylinder number 1 at TDC.
5. Clean up the area beneath the crankshaft pulley so you can find the woodruff key when it falls.
6. Identify the woodruff key in the crankshaft pulley.
7. Remove the crankshaft pulley. It should just slide off the timing belt pulley.
8. FIND THE WOODRUFF KEY. It seems to disappear every time you mess with the crankshaft pulley.
9. Gently pry the electrical wires out of the groove in the lower timing belt cover.
10. Remove the lower timing belt cover. 4-10 mm bolts. Remove the cover carefully to prevent damage to the rubber gasket.

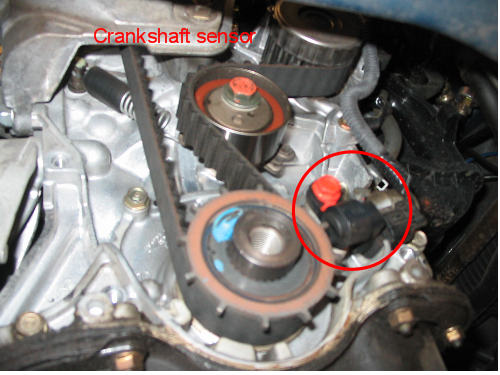
11. Unbolt the crankshaft sensor. 10 mm bolt. Take note of the orientation of the rubber seal and rubber pin. Do NOT disconnect the electrical connection. Just unbolt the sensor, release the rubber seal, and swing the sensor out of the way.
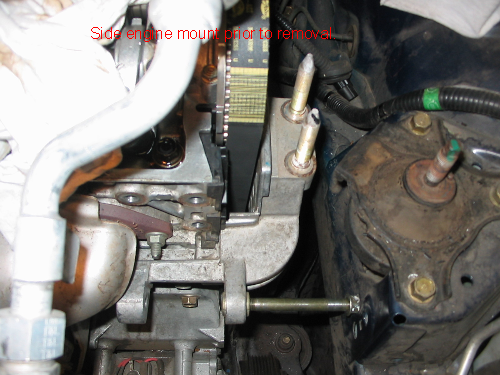
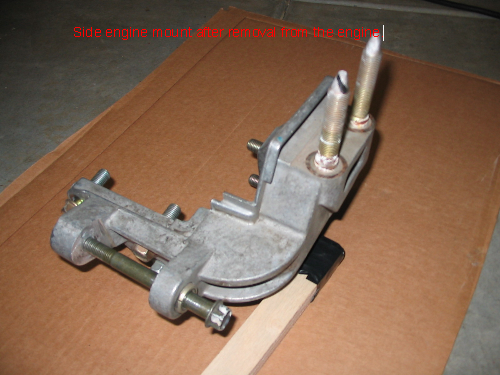
12. Remove the side engine mount. 5-14 mm bolts. Note the location of the short bolt in the front of the mount. See next two pictures
13. Confirm the number 1 cylinder is at TDC
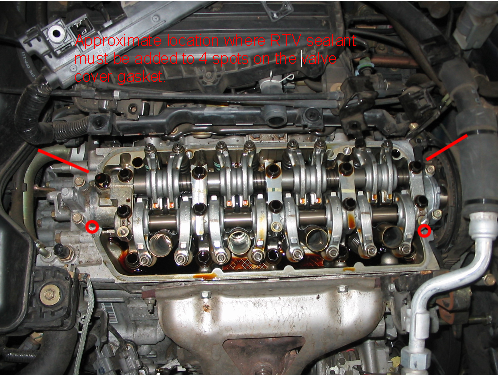
14. Verify ALL timing marks are in the correction location.
These 3 marks are critical. If they are slightly off, you can move them individually to the correct location. Minor clockwise rotations are acceptable if there is no metal to metal binding. If the timing marks are way off, then the timing is off. Reinstall the crankshaft pulley and rotate the timing belt until ALL the timing marks are in the correct locations. Only proceed to the next step if all the timing marks are in the correction location.
15. Loosen the timing belt tensioner so that you can remove and eventually reinstall the timing belt. This tends to be a little tricky. I read the Haynes manual, the on-line civic manual, and the DIY from Reddawnman. I must be a little slow because none of them really made sense to me. I had to do a little trial and error. The external spring applies a small amount of tension to the belt. This can be helpful during belt installation. The tensioner applies a greater amount of tension. This ensures the timing belt does not slip a cog when the car is operating. Here’s my recommendation.
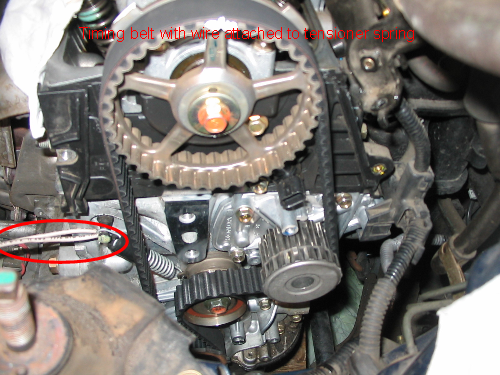
16. I recommend that you slip a piece of heavy gauge wire over the end of the timing belt spring and pull the spring off the post. This may give you enough slack to slip the timing belt off one of the pulleys. Here's a picture with the wire attached to the spring before removing the spring.
17. If you don’t have enough slack, then do the following:
a. Loosen the tensioner bolt about 90 degrees
b. Push the tensioner towards the rear of the car (I had to use a pry bar). Apply force to the 11:00 position on the tensioner to get it to rotate slightly. Protect the timing belt if you plan to reuse it.
c. Tighten the tensioner in this new position. This process removes additional tension from the belt. At this point, the timing belt can definitely be removed. I know because I did steps a, b, and c and could not slip the timing belt of the camshaft pulley. When I couldn’t get the belt off, I removed the spring and the timing belt came off without any problems.
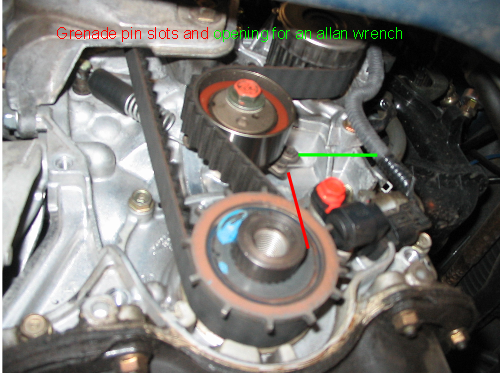
18. Once I removed the timing belt, I removed the tensioner and used a vice to squeeze together the two tabs on the side of the tension. I then inserted a small allen (2.5 mm?) wrench into the matching holes. The allen wrench is often referred to as the "grenade pin". I took this extra step because I wanted to guarantee I had the maximum amount of slack while installing the timing belt. I did NOT want to be forcing things to the point that I messed up my critical timing marks. I learned that the timing belt tensioner actually acts similar to a serpentine belt tensioner. Once it’s compressed, it stays compressed until released. I just wasn’t comfortable compressing the tensioner while it was still installed in the car. I think there is a way to compress the tensioner with a big allen wrench but I did not use that technique. Here's a fuzzy picture showing the hole for the allen wrench and two holes for the grenade pin.
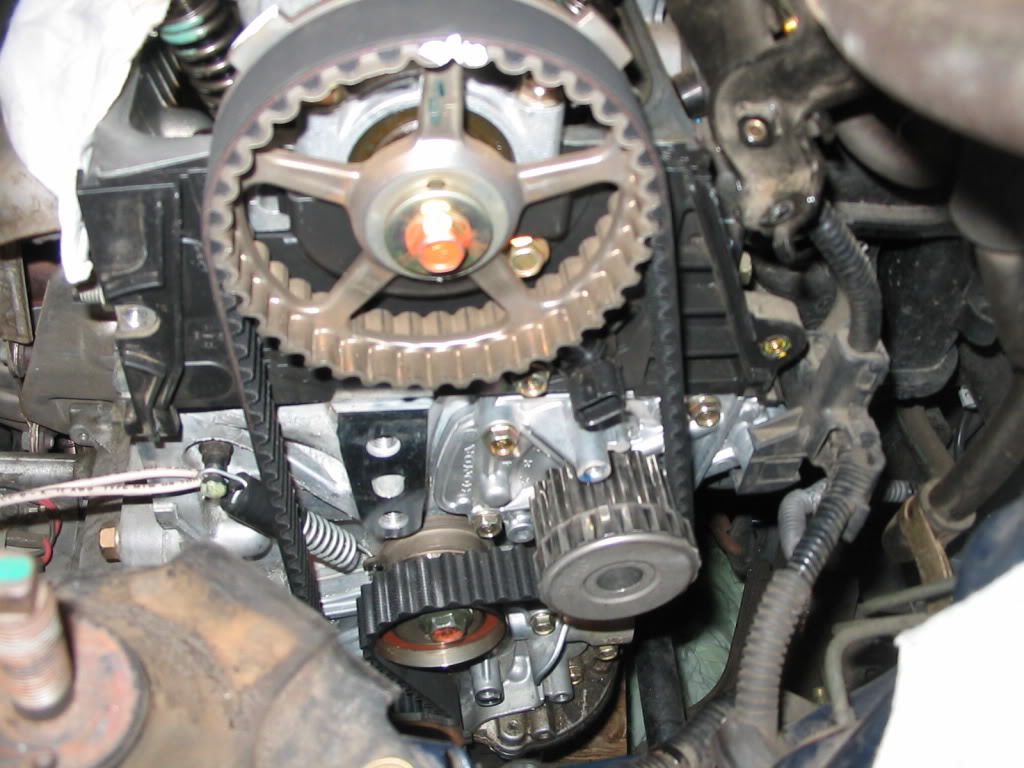
Here's a better picture of the various pulleys and timing belt that I borrowed from Reddawnman. Note the "grenade pin" is clearly visible in this picture.
19. Inspect the timing belt tensioner. It should turn without any binding or any roughness in the bearings. Check that there is no in-out play. If defective, buy a new one. The tensioner is usually changed every second timing belt change. You decide what’s best for you.
Section H: Water pump removal and installation:
1. Remove the water pump. 4 – 10 mm bolts. The upper right hand corner of the water pump acts as an anchor for an electrical box. Once the bolts were removed, I was able to wiggle the water pump out of the electrical box. There are NO wires or connections on the electrical box to disconnect. Some coolant will spill so have a pan and newspapers/rags for clean up. See next picture borrowed from Reddawnman.
2. Clean and dry all surfaces. It takes a little while for the coolant to stop dripping. Remove any traces of the old rubber seal. I cleaned with water, steel wool, and lacquer thinner or acetone.
3. Confirm the new pump is identical to the old pump.
4. Install the new water pump. Slip the right corner of the pump into the electrical box. Tighten the 4 bolts in a X pattern by hand and then tighten to 8.7 ft lbs (104 in lbs). Rotate the pump by hand a few times to make sure it turns freely. The Haynes manual said to apply RTV sealant to the groove of the water pump that holds the gasket. My pump already had sealant anchoring the gasket into the groove. Haynes also said to add RTV sealant to the bolt threads. I did not do this step because the original bolts did NOT have sealant. Note: There are multiple types of RTV sealant. Some work in oil/gas service. Others work in water/antifreeze service. Make sure you use the right type.
Section I: Crankshaft seal removal and installation:
It’s possible to just inspect the seal and to keep the original seal if it’s not leaking. I prefer to replace the seal on each timing belt change because the cost and effort is small. Others have suggested that you need to drain the engine oil prior to removing the seal. This is not necessary. No oil will leak when the seal is removed.
1. Remove the timing belt sprocket. Note that the timing mark faces outward.
2. Remove the inner belt guide. Note the orientation of the guide. The concave side of the guide faces the crankshaft seal.
3. Note the orientation of the seal relative to the engine block and the crankshaft. My seal was flush with engine block and slightly lower than the wider part of the shaft.
4. All manuals say to remove the seal with a screw driver or metal toothpick device without damaging the sealing surfaces. Good luck with that. It tried that for 2 hours on a camry with zero luck.
5. The following technique was recommended to me by several sources (including an owner of a car repair shop) and it works for me:
6. Carefully drill a small hole in the center of the seal. I typically use a 1/16 inch drill bit. Screw a small sheet metal screw into the hole. You only need to catch 1-2 threads of the screw. Use a cat’s paw (ie tiny pry bar) to gently pry out the seal. I’ve been told that you can use a self tapping screw if you don’t own a drill. I have not tried the technique with the self taping screw.
7. Clean any dirt from the sealing surfaces of the shaft.
8. Lubricate the edges of the seal with oil or multipurpose grease.
9. Position the seal onto the shaft and gently tap the seal into place. I use a hammer, 1.5 inch diameter pvc pipe (the end is covered with electrical tape), and a piece of wood (also covered with electrical tape). The wood can be helpful if the seal starts to go on unevenly.
10. Confirm the seal was not damaged. No tears in seal. Spring did not pop out.
11. Clean and replace the inner belt guide. Concave side to the seal. Remove any oil.
12. Clean and replace the timing belt sprocket with the timing mark facing out. Remove any oil.
Section J: Camshaft seal replacement:
I did NOT replace the camshaft seal. It was not leaking and this was the first timing belt change. If you plan to replace the seal, do it now. I suspect that you can use a strap wrench to hold the camshaft pulley while loosening the bolt. The Haynes Manual says to stick a screwdriver between the sprockets of the camshaft pulley. Follow the same technique used for the crankshaft seal removal. Tighten the bolt to 27 ft lb.
Section K: Timing belt and tensioner installation:
1. Loosely bolt the “locked” tensioner which is “pinned” with the allen wrench. The allen wrench will want to fall out just make sure it’s reinserted.
2. Tighten the tensioner bolt to 7.2 ft lb (86 in lb).
3. Turn the tensioner bolt 180 degrees counter clockwise.
4. Install the tensioner spring. Use a wire to pull the spring into position.
5. Verify the ALL critical timing marks have not moved.
a. Camshaft pulley sprocket with the word “up” etched into the sprocket pointing up.
b. Two small slashes etched into the back of two camshaft sprockets are level with the cylinder head.
c. The slash etched onto the front of the timing belt pulley is lined up with the triangle etched into the oil pump housing behind the timing belt pulley.
6. Install the timing belts in a counter clockwise direction as follows: Around the BOTTOM of the crankshaft pulley, OVER the LEFT side of the tensioner pulley, UNDER and around the RIGHT side of the water pump pulley, UP and OVER the top of the camshaft pulley, and then straight DOWN to the crankshaft pulley. It may be necessary to press on the tensioner pulley to give adequate slack in the belt. If this proves difficult, just remove the spring again. I found it to be a 2 person job to hold the belt in place without the tension from the spring.
7. Check the timing marks again.
8. Attach the crankshaft pulley and rotate the crankshaft COUNTER CLOCKWISE two revolutions.
9. Recheck timing marks. They should line up perfectly. If they are off by a cog or two, remove the belt and turn the shafts as necessary to get proper alignment of the timing marks.
10. Repeat the process until you can get the crankshaft to rotate two revolutions COUNTER CLOCKWISE and still have proper alignment of ALL the timing marks. It took me three tries. For the last try, I put a small amount of paint on two adjoining cogs of the belt and the metal rib between them. This gave me a reference point so that I could adjust the belt by one cog. The previous picture shows the white paint marks that I added to the top of the camshaft pulley.
11. When you’ve successfully rotated the crankshaft two revolutions, then complete the installation of the tensioner pulley. Tighten the tension bolt to 33 ft lb. This will release the internal spring of the tensioner and tighten the belt. It will also tighten grenade pin (aka allen wrench).
12. Remove the allen wrench. VERY IMPORTANT. (I think the allen wrench could be removed prior to tightening the tensioner to 33 ft lb in the previous step but the book says to do it this way.)
13. Rotate the crankshaft 4 revolutions. Confirm the timing marks one last time. Failure to get it right can cause engine damage. This engine has an INTERFERENCE FIT.
14. Celebrate! It’s time to put the engine back together.
Section L: Reassemble of the timing belt area:
Double check that the “grenade pin” has been removed from the tensioner and that you’ve removed any wires that were used to remove the spring.
1. Replace the side engine mount. Get all 5 bolts loosely installed. Tighten the 3 front bolts first per the civic manual. Then tighten the 2 side bolts last. All bolts are tightened to 33 ft lb.
2. Replace the crankshaft sensor. Line up the rubber seal and pin, then tighten the 10 mm bolt to 8.7 ft lbs (104in lbs)
3. Install lower timing belt cover. Tighten 4 bolts to 7.2 ft lb (86 in lb). Put the cable for the crankshaft sensor back into the grove on the right side of the timing belt cover.
4. Install upper timing belt cover. Tighten 3 bolts to 7.2 ft lb (86 in lb). The long bolt threads through both the upper AND lower timing belt covers.
5. Install crankshaft pulley AND woodruff key. Remove any dirt or oil from the crankshaft, inner bore of the pulley, and outer surface of the pulley. I had to use a wire brush and screwdriver to remove dirt and tiny pebbles from the belt surface of the pulley.
6. Clean and install the crankshaft bolt. The Civic manual says to remove all dirt and oil from the bolt and washer. Then apply a small amount of oil to the bolt threads and to the surface between the bolt head and outer side of the big washer. No oil goes between the inner side of the washer and the pulley. Civic manual says to tighten to 14 ft lbs and then turn the bolt 90 degrees. The Haynes manual says to tighten to 181 ft lb. You decide!!
7. Install the upper motor mount. Loosely install all bolts. Tighten the two bolts closest to the timing belt first. Tighten the single bolt on the motor mount last per the civic manual. Tighten all bolts to 40 ft lb.
Section M: Reassemble valve cover area:
Installing the valve cover was a pain. It’s very hard to get the cover installed without messing up the RTV sealant (suitable for oil and gas) that’s recommended for 4 spots on the gasket surface. I tried multiple times with a helper with no success. So I improvised.
1. Clean the gasket surface on the valve cover and the cylinder head. Remove any old gasket and oil. Clean with Acetone or similar solvent.
2. Install the valve cover without the sealant.
3. Raise the front of the valve cover as much as possible while still keeping the back of the valve cover on the cylinder head.
4. Use a screwdriver or other suitable tool to add four small blobs of RTV sealant to either the gasket or cylinder head. The sealant goes on either side of the half circle cut-out in the valve cover gasket. See picture in Section M. Tighten the valve cover gasket with 5 minutes.
5. Set the valve cover on the cylinder head and hand tighten the six bolts. 10 mm
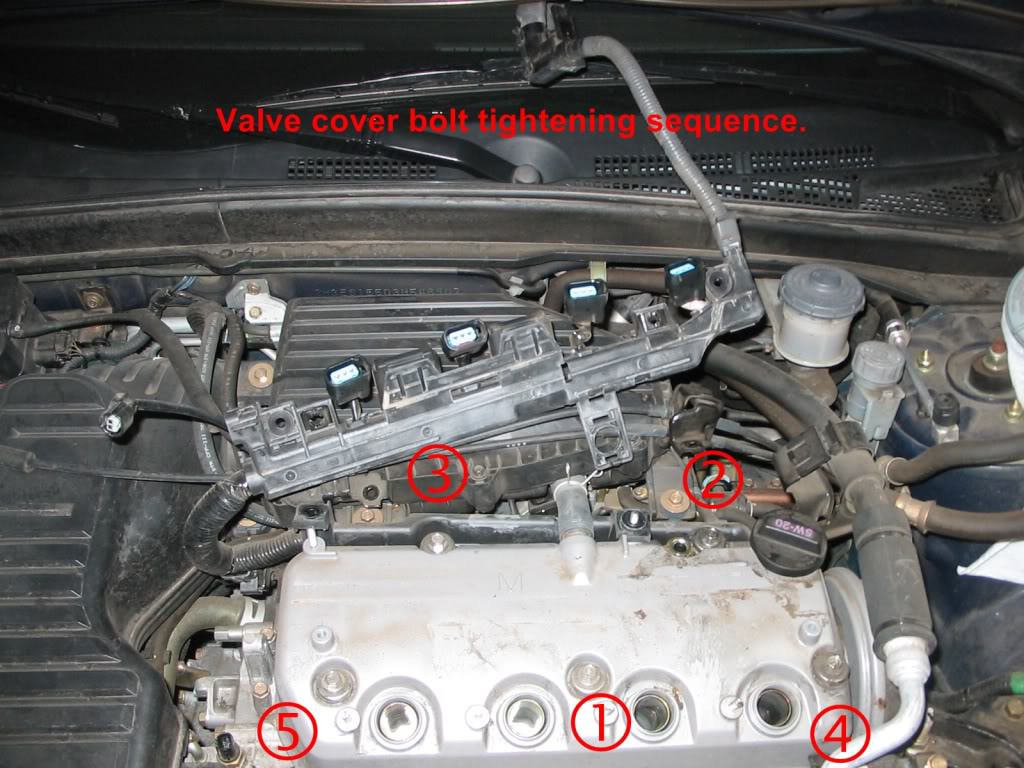
6. Tighten to 7.2 ft lb (86 in lbs) in small increments per the following sequence
7. Install spark plugs. Add a small amount of anti-seize compound to the threads. Tighten to 13 ft lb (156 in lb).
8. Work you way around the valve cover in a clockwise direction and replace the missing bolts, clips, etc which were removed in Section F
Section N: Reinstall the alternator:
1. Remove any burs or rough spots from the pivot point of the alternator with a file.
2. Measure the length of the exposed threads on the stud with the wing nut.
3. Use a brass brush to clean the threads so it’s easy to turn the wing nut with your fingers.
4. Loosen the wing nut to give slack in the belt.
5. Install the alternator. Loosely install the pivot bolt on the top right of the alternator.
6. Install the bolts on the lower bracket.
7. Loosely tighten all bolts so you can adjust the belt tension.
8. Slip the belt over the pulleys for the crankshaft, A/C, and alternator.
9. Tighten the wing nut to give proper tension on the belt. The wing nut is a pain to reach with a tool. I tried pliers on the wing nut and an open end wrench at the base of the wing nut. Neither was ideal.
10. Tighten all bolts to spec. Upper pivot bolt to 33 ft lb. Smaller lock bolt (center of bracket) below the pulley to 17 ft lb. Larger bolt (end of bracket) below the pulley to 33 ft lb.
11. Reconnect the alternator cable and the P connection on the left side of the alternator.
12. Tighten the alternator cable bolt to 6 ft lb. Don’t over tighten it. The stud breaks easily.
13. Replace any brackets/clips on the A/C line that were removed. 17 ft lb ???
Belt tension per the civic manual:
190-220 ft lb for a new belt.
88-120 ft lb for a used belt.
The civic manual says to tighten to the belt to the “new spec”, run the engine for 5 minutes, and then adjust the belt to the “used belt spec”.
Belt deflection per the Haynes Manual:
0.20-0.26 inches for a new belt. 3/16 to � inch
0.33-0.43 inches for a used belt.
Measure deflection by pushing midway between the pulleys with the longest gap. Use a ruler and straight edge to measure deflection. Use 10 to 20 lbs of force, depending upon the source. Haynes makes no mention of running the engine for 5 minutes and adjusting the belts to the “used belt tension”. I followed the Haynes procedure because I didn’t buy a belt tension gauge.
Section O: Reinstall the power steering pump:
1. Reinstall the power steering mounting bracket if it was removed to gain access to the valve cover. Tighten 3 bolts to 33 ft lb. This torque value is an educated guess.
2. Measure the length of the exposed threads on the stud with the wing nut.
3. Use a brass brush to clean the threads so it’s easy to turn the wing nut with your fingers.
4. Loosen the wing nut to give slack in the belt.
5. Install the bracket for the power steering reservoir.
6. Swing the power steering pump and reservoir into position.
7. Don’t push the reservoir into the bracket until later. Leaving it loose may give you better access to the bolt beneath the belt.
8. Loosely install the power steering pump and pivot bolt on the left side of the pump. 12 mm
9. Loosely install 12 mm nut on the right side of the pump (below the pulley). Use a box wrench for this nut.
10. Install and tighten the 10 mm nut on the top of the power steering pump. Tighten to 17 ft lb
11. Slip the belt over the pulleys for the crankshaft and power steering pump..
12. Tighten the wing nut to give proper tension on the belt.
13. Tighten all bolts to spec. 17 ft lb for all power steering pump bolts.
14. Push the reservoir into the bracket.
Belt tension per the civic manual:
165-198 ft lb for a new belt.
88-121 ft lb for a used belt.
The civic manual says to tighten to the belt to the “new spec”, run the engine for 5 minutes, and then adjust the belt to the “used belt spec”.
Belt deflection per the Haynes Manual:
0.35-0.43 inches for a new belt. 3/8 to 7/16 inch
0.51-0.65 inches for a used belt.
Measure deflection by pushing midway between the pulleys with the longest gap. Use a ruler and straight edge to measure deflection. Use 10 to 20 lbs of force, depending upon the source. Haynes makes no mention of running the engine for 5 minutes and adjusting the belts to the “used belt tension”. I followed the Haynes procedure.
Section P: Wrap up and final check:
1. Confirm you don’t have left over parts!!
2. Confirm all sensors are connected.
3. Wires are snapped into appropriate clips.
4. Remove tools and other foreign objects from the engine compartment.
5. Confirm the radiator drain is closed and heater is turned on.
6. Refill the radiator with 10 year long life coolant from Honda. Leave cap off.
7. Reconnect the battery cables.
8. Test run the engine. Hopefully it starts, runs smoothly, and nothing goes “bang”.
9. Monitor the coolant level in the radiator. Add coolant as the level drops in the radiator.
10. Run engine until the top radiator hose gets warm.
11. Add some coolant to the overflow tank.
12. Replace and tighten radiator cap.
13. Shut off engine.
14. Replace wheel well splash shield.
15. Replace tire and lower car to the ground.
16. Input the anti-theft code for the radio.
17. Enter the radio frequencies for the preset buttons.
18. Monitor the radiator level for a few days. It may be necessary to add additional coolant.
CELEBRATE !!!
You just saved yourself hundreds of dollars and can now brag about your outstanding mechanical skills to all you friends.
Introduction:
This DIY was written for a 2003 Honda Civic with a 1.7 liter engine with a SOHC. It should be useful for any 7th Generation Civic (2001 to 2005) with a timing belt.
Many thanks to Reddawnman who is another member of this forum. I used his Timing Belt DIY to successfully replace my timing belt and related equipment. I would not have tackled this job without the aid of his DIY. The following link is a shortcut to his DIY:
https://www.civicforums.com/forums/3...t-diy-2-a.html
Another great reference is the 2001 civic manual which is posted on-line at this forum courtesy of Tweeder. This is a large document. Using the manual is somewhat intuitive but it does take a little trial and error to find specific information. The manual has great diagrams and technical specs like torque values. It is a little lacking on detailed instructions. It must be written for experienced Honda mechanics? I tried to print multiple pages of the manual with no success but I was able to print single pages.
Visit the following sites to download the FREE manuals from megauploads.com
Civic Manual 1 http://www.megaupload.com/?d=UJZRVG8W
Civic Manual 2 http://www.megaupload.com/?d=KKDZZ12V
Manual 2 appears to be a copy of Manual 1 with a few additional updates for model year 2002 like specifications and general information.
I ran a Norton scan on Manual 1 and 2 before downloading them and found no viruses. I have used them for several weeks without a problem.
For the record, I am not a certified mechanic – Just a Do It Yourselfer. This is my second timing belt job. I replaced a timing belt and related equipment on a 1996 v6 Camry in May, 2010. I used another great DIY from a Toyota forum.
Use this DIY at your own risk. I am assuming no liability for any errors or omissions in this DIY.
Needless to say, it’s important to lay out parts in an orderly fashion as they are removed from the car. It’s very frustrating to replace a part and then discover you skipped a step. I know. I installed the crankshaft pulley and the DAMN pulley bolt and then realized I had NOT installed the lower timing belt pulley cover. I had to remove the dreaded crankshaft pulley bolt AGAIN. I must say, it’s much easier the second time! I also like to use numbered sandwich bags to store nuts, bolts, etc that are removed from the car. The bags reduce the confusion and help prevent lost items.
I wrote this DIY because I found myself flipping between Reddawnman’s DIY, the Haynes Manual, and the Civic Manual. I also found that it was easy to skip a step when using multiple manuals as outlined in the previous paragraph. This DIY is an attempt to compile the knowledge from all 3 sources plus my own personal experiences doing this job. Hopefully, the extra details will make life easier for others. Good luck to anyone who decides to tackle this job.
Parts and Supplies:
You will need to decide which parts to replace and which parts to reuse.
This was the first time that this car needed a new timing belt. As a result, I only bought the following parts:
Timing belt - $16.14
Water pump - $53 .29 ( I using the old pump but took the low risk option)
Valve cover gasket - $6.88
Belt for alternator and A/C: - $15.53
Belt for power steering - $11.04
Crankshaft oil seal - $3.79 (not leaking but I replaced it)
Camshaft oil seal - $3.12 (not leaking and I did not replace it)
Some plastic clips for the wheel well shield - $2.12 each
Shipping - $13.79
The parts listed above were purchased on-line from Hondapartsunlimted.com. The supplier is in Arizona which is convenient for me (I live in Northern Cal). The on-line tool for ordering parts is very user friendly. They give advice over the phone but only take orders on-line. The order arrived in 4 working days from the date I placed my order. My only complaint is they don’t email you when the order has shipped.
Antifreeze – about 1 gal.
RTV sealant for the valve cover gasket.
RTV sealant for the water pump gasket (new pump may already have this applied)
The following tool is required to remove the crankshaft pulley.
Powerbuilt 648796 Honda crankcase pulley removal tool.
I purchased this tool at Amazon.com for $24.99. You get free shipping on this item if you spend $25. Amazon is also a good place to buy breaker bars. You will need two for this job unless you want to risk destroying your ratchet wrenches.
Parts that I considered buying but did not buy:
Tensioner - $70
Spark plug tube seals – $2-$7 each
Seals for the valve cover bolts - $2-3 each.
The entire valve cover set (gasket, spark plug seals, bolt seals) is $26.
I believe the parts listed above should last until the second timing belt or later so I did not replace them.
Tools:
Metric socket set and wrenches. 10, 12, 14, and 17 mm are the main sockets
Deep sockets are helpful for a few bolts
Various adapters and extensions for sockets.
Combination wrenches (box and open end)
Pliers
19 mm impact socket for crankshaft bolt (1/2 inch drive or bigger)
20” extension to loosen crankshaft bolt (1/2 inch drive or bigger)
2 breaker bars (1/2 inch drive or bigger)
Torque wrench
2.5 mm allen wrench or heavy duty wire to act as a “grenade pin” on the tensioner.
Wire brush
Rubber hammer OR regular hammer and block of wood to loosen valve cover.
Belt wrench or screwdriver if you plan to remove the camshaft pulley
Electric drill, drill bit, screw driver, and cat’s paw if you plan to replace crankshaft seal.
V-belt tension gauge (kragens, auto zone, etc) OR straight edge and ruler if you use the low tech method.
Jack stands to support the front end of the car (2)
Jack stand to use while loosening the crankshaft bolt
Hydraulic jack
Pan to drain coolant
1.5 inch diameter pvc pipe to insert seals
Trouble light
Rags and newspapers to clean up spilled coolant
Section A: Prep for crankshaft bolt removal:
The most difficult job is loosening the crankshaft pulley bolt. I therefore chose to tackle this job first. If you can’t loosen the crankshaft pulley bolt, then you can’t replace the timing belt so don’t tear apart your car until you successfully loosen the crankshaft pulley bolt.
1. Confirm that you have the anti-theft code for the radio.
2. Write down the frequencies for the preset radio buttons.
3. Disconnect the negative lead of the battery and wrap the cable with rubber or other insulating material.
4. Loosen driver-side lug nuts.
5. Chock the rear wheels.
6. Jack up the front of the car. Jack point is the metal cross-brace behind the radiator. The black colored wind screen below the front of the car is marked to show the jack point.
7. Attach jack stands on both sides of the car. I prefer to use a stack of 2” by 10” by 12” wooden boards because I don’t’ trust jack stands. In this case, I used a stack of seven 2” by 10” by 12” boards behind the driver side wheel well. I also placed one 2” by 10” by 12” under the right front wheel. This arrangement gives me adequate clearance to slide under the car and reduces the back pain when working from above the car.
8. Remove driver side wheel.
9. Loosen and move the splash shield to gain access to the crankshaft pulley. It is not necessary to remove the entire splash shield from the front of the car. Just remove two plastic clips from the splash shield inside the wheel well and then disconnect the interlocking connection between the fender splash shield and the front apron. Once this is done, then gently bend the splash shield out of the way.
Section B: Loosen crankshaft pulley bolt:
Check out this video to see how the 50 mm socket is used with the 19 mm socket. Click on the video in the following web page.
http://www.denlorstools.com/home/dt1...0mm_valve.html
1. Position the special 50 mm socket and a � inch diameter breaker bar onto the pulley at about the 7:00 position as shown in the following picture. The length of the breaker bar will vary depending upon the elevation of the pulley. Wedge the breaker bar against the floor or other immovable object. It may be necessary to rotate the crankshaft with a 19 mm socket to get the proper alignment. ONLY ROTATE THE CRANKSHAFT IN A COUNTER CLOCKWISE DIRECTION AS YOU VIEW THE PULLEY. If you can’t rotate the crankshaft, remove the spark plugs and it will be easier to rotate the crankshaft. The following picture was borrowed from Reddawnman’s DIY. I apologize for not taking a picture showing the use of both wrenches but the video listed above shows the technique. The video makes it look easy. Trust me - it’s not.
2. Attach the 19 mm impact socket (1/2 inch or larger drive), 20” extension, and long breaker bar onto the crankshaft bolt. Position a jack stand at the end of the extension to act as a brace. I used a 24 inch long breaker bar and a 4 foot steel pipe for a cheater. The effective length of my lever was 5 feet because I slid the pipe 12 inches over the breaker bar. Even with this arrangement, loosening the bolt was a bitch. I fought the bolt for an hour and stopped because the metal extension was twisting with all the torque. I was fearful of breaking the bolt, my 19 mm socket (non impact at this point), the 20” extension, or my body. I applied Liquid Wrench twice over 30 minutes, let it soak for an hour, and tried again with no luck. I then bought an impact socket (� inch drive) and 20 inch extension from Sears. My no name brand extension was twisting so much I was afraid it would snap. I eventually removed the bolt. I don’t think the Liquid Wrench helped. You just need to use a lot of muscle power. Even a 160 lb weakling like me can do it with the proper tools. I had a helper push against the end of the breaker bar with a board to reduce the chances of the 19 mm socket from slipping off the bolt. I then used my 5 ft lever and applied an incredible amount of force to the socket and extension. I’m guessing that I had to rotate the lever 30 to 45 degrees before the bolt broke free with a loud snap. The 30 to 45 degree rotation was not due to any movement of the bolt – the metal tools were twisting and/or flexing. HOLY ****. Needless to say, this job is not for the weak of heart. Be prepared for something to snap. I wore safety goggles and threw a blanket over the tools to protect me from flying metal. I had a socket shatter while trying to remove the crankshaft bolt on a Camry so I’m a little gun shy about this stuff. I had flying metal parts on the Camry job. Also position your body so you don’t hurt yourself if/when something breaks. For the record, I was close to giving up on this job. I called the local rental store and asked about a compressor. They said others had tried to remove crankshaft bolts with their compressors with no luck. My next option was the mobile mechanic route. I did not get a price for the mobile mechanic but figured it would not be cheap.
3. When the bolt breaks loose, CELEBRATE. You’ve just completed the most difficult part of this DIY
Section C: Drain radiator and overflow reservoir.
Don’t open the radiator cap when the engine is hot or you could be burned.
Coolant is poisonous to pets and humans if ingested. Don’t leave it lying around on the floor or in open containers!
1. Open and remove the radiator cap.
2. Drain the radiator. The drain valve is below the radiator on the driver-side of the radiator. The drain valve is partially hidden but easily accessible from the beneath the car without crawling under the car.
3. A pair of pliers may be needed to loosen the drain valve. Be gentle since you are dealing with plastic parts.
4. Others have suggested that you drain coolant from the engine block too. This drain plug is located near the oil filter on the back of the engine block. Since this plug is difficult to reach, I opted to skip the drain plug on the block. This just means the remaining coolant will drain from the engine block when the water pump is removed. It’s a little messy by manageable.
If you want to be thorough and also drain the coolant overflow tank, then do the following:
1. Disconnect and remove the positive cable from the battery. The negative cable was disconnected in Section A.
2. Remove the front bolt from the battery hold down bar. 10 mm
3. Loosen the rear nut of the hold down bar enough so you can unhook the rod from the tray beneath the battery.
4. Lift the battery out of the way.
5. Lift the bottom tray out of the way.
6. Remove the one bolt that anchors the reservoir to the fan housing.
7. Unclip the overflow tubing from the reservoir in several places. It’s not necessary to disconnect the rubber tubing from either the radiator or the overflow tank.
8. Lift out the reservoir and poor the coolant into an empty container. Keep the drain pan below the radiator during this step because some additional coolant may drain out of the radiator
Section D: Power steering pump removal
1. Gently pull the power steering reservoir out of the metal hanger.
2. Remove three nuts to free up the power steering unit for removal.
• 10 mm nut on the top of the power steering pump. Red circle in picture
• 12 mm nut on the left side of the pump. (pivot bolt) Green circle in picture
• 12 mm nut on the right side, below the pulley. (lock bolt) Use a box wrench for this nut. Red arrow in picture. See next picture for details.
3. Swing the power steering pump and tank out of the way. DO NOT DISCONNECT THE HOSES. See next picture for details.
4. Remove the bolt (12 mm) and metal hanger that supports the power steering reservoir. This hanger will interfere with the removal of an alternator bolt in the next section. See red circle in next picture for details
Section E: Alternator removal
Disconnect electrical Connections on the alternator:
1. Disconnect the 4P connector from the front of the alternator. Peel back the rubber boot, press on the left side of the connector, and pull gently. Green circle in pic.
2. Disconnect the “black box” on the left side of the alternator. There is a small tab on the bottom-left side that must be pushed down to release the “black box” from the metal support. Blue circle in the pic.
3. Disconnect the alternator cable from the left side of the alternator. Peel back the rubber boot and remove the 10 mm nut. Red box in pic. USE EXTREME CAUTION REMOVING THIS BOLT. I USED A SMALL AMOUNT OF FORCE AND SNAPPED THE STUD. I HAD TO BUY A REBUILT ALTERNATOR FOR ABOUT $150. ALSO NOTE THAT THERE IS A BLACK PLASTIC INSULATOR BETWEEN THE ALTERNATOR CABLE AND THE ALTERNATOR. THIS PLASTIC INSULATOR IS DELICATE. A NEW INSULATOR IS ABOUT $15. OTHER ON-LINE SOURCES HAVE USED A RUBBER WASHER AS A REPLACEMENT INSULATOR. This bolt is tightened to 6 ft-lbs per the manual. See next picture for details.
Remove mounting Hardware for the alternator:
The manual says to do the following:
1. Loosen mounting bolt (12 mm) at the top, right side of the alternator. This is the pivot point.
2. Remove the lock bolt (12 mm) which is below the alternator. Access is easier from the wheel well. There are 2 bolts on the mounting bracket. Remove the smaller bolt in the middle of the bracket.
3. Loosen the wing nut to give enough slack to remove the belt. I recommend you measure the length of the exposed threads on the stud so you have a good idea how much to retighten the wing nut when a new belt is installed.
4. Remove the belt.
5. Remove the mounting bolt and lift the alternator out of the car.
I took a slightly different approach because access to the wing nut is a pain:
1. Loosen mounting bolt (14 mm) at the top, right side of the alternator. Pivot point.
2. Remove both bolts on the bracket which is below the alternator (12 mm and 14 mm) Access is easier from the wheel well. Use long extensions on socket wrench if necessary. Red and green bolts on the top of the picture. The following picture is borrowed from Reddawnman.
3. No need to loosen the wing if you follow this alternate procedure since the bracket and alternator will come out together. I recommend you measure the length of the exposed threads on the stud so you have a good idea how much to retighten the wing nut when a new belt is installed.
4. Remove the belt. Push on the alternator as necessary to loosen the belt.
5. Remove the mounting bolt and lift the alternator out of the car. The following picture shows the alternator removed. The top mounting bolt and the bolt hole for the lower bracket bolt are circled.
Section F: Remove valve cover and related equipment.
Unfortunately, it’s necessary to remove the valve cover to do the timing belt on this car.
1. Remove the ignition coil cover (black cover) located on top of the valve cover. Use a screw driver and turn the plastic clips 90 degrees. Pull up gently on the cover and move it out of the way. See next picture for details.
2. Remove six 10 mm nuts from the top of the valve cover. Four nuts are on the spark plug coils (1 each circled in red) and two nuts that hold a wire harness to the top of the valve cover (already removed, circled in green). See next picture for details.
3. There should be sufficient wiggle room in the wires so that the electrical connections can be unplugged from the coils. Remove the 4 coils. See next 2 pictures.
4. Remove two 10 mm nuts from the rear of the valve cover. These nuts anchor the throttle cable to the top of the valve cover. Move the cable off the valve cover.
5. Work you way around the valve cover (clockwise) and remove/disconnect the following:
6. Disconnect the temperature sensor from the left side of the valve cover.
7. Disconnect the air intake hose on the back side of the valve cover gasket. Release the clip and push/pry hose off the tube connected to the valve cover.
8. Remove oil dip stick.
9. Remove the bracket on the right-rear corner of the valve cover bracket. 10 mm bolt
10. Remove the bracket near the right-front of valve cover that anchors the A/C tubing to the engine. Remove two 10 mm bolts or nuts.
11. Release wire harness from a small plastic clip.
12. Slide the alternator wiring under the A/C tubing.
13. Swing the entire wiring harness off the valve cover. See previous picture.
14. Remove the power steering bracket by removing 3 bolts. This step may be optional. It may be easier to remove and reinstall the valve cover with this bracket remove.
15. Clean off debris, nuts, etc from the top of the valve cover so junk doesn’t fall into the engine block.
16. Remove the valve cover. Loosen 6 bolts (10 mm). The Haynes Manual says to follow the reserve of the tightening sequence which is attached in Section M. If the valve cover is stuck to the cylinder head, tap the cover with a rubber mallet or block of wood to break the seal. DO NOT PRY BETWEEN THE VALVE COVER AND CYLINDER HEAD OR YOU MAY DAMAGE THE GASKET MATING SURFACE. It will be necessary to gently pull up on the A/C hoses to remove the valve cover. Don’t bend the metal tubing.
17. Inspect the rubber parts associated with the valve cover. Note the location where four blobs of RTV sealant were added to the gasket/cylinder head. Always replace the gasket. The rubber seals on the spark plug tubes and the bolts were in good shape so I reused them.
18. Cover the cylinder head so junk does not fall into it.
Section G: Timing belt and related equipment
A motor mount will be removed in this step so the engine must be supported.
Place a jack stand and wood under the oil pan to support the engine. I was able to get a snug fit by adjusting the jack stand and using several thicknesses of wood.
1. Remove the upper engine mount. 3-17 mm nuts. Two require deep sockets. I cheated and used an 11/16 inch deep socket. See next 2 pictures picture.
2. Remove the TDC sensor from the upper timing belt cover. Use a screw driver to pry out the rubber grommet to expose the electrical connection. Press on the left side of the connector and pull gently. Swing the wire harness out of the way. The previous picture has a red circle indicating the rubber grommet for the TDC sensor.
3. Remove the upper timing belt cover. 3-10 mm bolts. The middle bolt is longer than the two outer bolts. See next picture. Longer bolt is circled in red.
4. Position the number 1 cylinder at Top Dead Center (TDC):
• I used the special 50 mm socket to rotate the crank shaft COUNTER CLOCKWISE as viewed from the pulley end. Clockwise rotation can damage the engine since this engine is an “interference fit” engine. Others say to use the 19 mm socket to rotate the engine. The 19 mm socket is actually easier to use but will also tighten the pulley bolt. I suspect a quick snap of the bolt in the reserve direction will loosen the bolt again but I didn’t use the 19 mm bolt to rotate the engine.
• Rotate the engine COUNTER CLOCKWISE until:
a. Camshaft pulley sprocket with the word “up” etched into the sprocket is pointing up.
b. Two small slashes etched into the back of two camshaft sprockets (180 degrees apart) are level with the surface of the cylinder head.
c. The key in the crankshaft pulley is a ROUGH indication of TDC. When the key is at the 12:00 position, cylinder number 1 MAY be at TDC. If it’s not, rotate the crankshaft pulley another revolution. Never rely solely on the key to get cylinder number 1 at TDC.
5. Clean up the area beneath the crankshaft pulley so you can find the woodruff key when it falls.
6. Identify the woodruff key in the crankshaft pulley.
7. Remove the crankshaft pulley. It should just slide off the timing belt pulley.
8. FIND THE WOODRUFF KEY. It seems to disappear every time you mess with the crankshaft pulley.
9. Gently pry the electrical wires out of the groove in the lower timing belt cover.
10. Remove the lower timing belt cover. 4-10 mm bolts. Remove the cover carefully to prevent damage to the rubber gasket.
11. Unbolt the crankshaft sensor. 10 mm bolt. Take note of the orientation of the rubber seal and rubber pin. Do NOT disconnect the electrical connection. Just unbolt the sensor, release the rubber seal, and swing the sensor out of the way.
12. Remove the side engine mount. 5-14 mm bolts. Note the location of the short bolt in the front of the mount. See next two pictures
13. Confirm the number 1 cylinder is at TDC
14. Verify ALL timing marks are in the correction location.
These 3 marks are critical. If they are slightly off, you can move them individually to the correct location. Minor clockwise rotations are acceptable if there is no metal to metal binding. If the timing marks are way off, then the timing is off. Reinstall the crankshaft pulley and rotate the timing belt until ALL the timing marks are in the correct locations. Only proceed to the next step if all the timing marks are in the correction location.
15. Loosen the timing belt tensioner so that you can remove and eventually reinstall the timing belt. This tends to be a little tricky. I read the Haynes manual, the on-line civic manual, and the DIY from Reddawnman. I must be a little slow because none of them really made sense to me. I had to do a little trial and error. The external spring applies a small amount of tension to the belt. This can be helpful during belt installation. The tensioner applies a greater amount of tension. This ensures the timing belt does not slip a cog when the car is operating. Here’s my recommendation.
16. I recommend that you slip a piece of heavy gauge wire over the end of the timing belt spring and pull the spring off the post. This may give you enough slack to slip the timing belt off one of the pulleys. Here's a picture with the wire attached to the spring before removing the spring.
17. If you don’t have enough slack, then do the following:
a. Loosen the tensioner bolt about 90 degrees
b. Push the tensioner towards the rear of the car (I had to use a pry bar). Apply force to the 11:00 position on the tensioner to get it to rotate slightly. Protect the timing belt if you plan to reuse it.
c. Tighten the tensioner in this new position. This process removes additional tension from the belt. At this point, the timing belt can definitely be removed. I know because I did steps a, b, and c and could not slip the timing belt of the camshaft pulley. When I couldn’t get the belt off, I removed the spring and the timing belt came off without any problems.
18. Once I removed the timing belt, I removed the tensioner and used a vice to squeeze together the two tabs on the side of the tension. I then inserted a small allen (2.5 mm?) wrench into the matching holes. The allen wrench is often referred to as the "grenade pin". I took this extra step because I wanted to guarantee I had the maximum amount of slack while installing the timing belt. I did NOT want to be forcing things to the point that I messed up my critical timing marks. I learned that the timing belt tensioner actually acts similar to a serpentine belt tensioner. Once it’s compressed, it stays compressed until released. I just wasn’t comfortable compressing the tensioner while it was still installed in the car. I think there is a way to compress the tensioner with a big allen wrench but I did not use that technique. Here's a fuzzy picture showing the hole for the allen wrench and two holes for the grenade pin.
Here's a better picture of the various pulleys and timing belt that I borrowed from Reddawnman. Note the "grenade pin" is clearly visible in this picture.
19. Inspect the timing belt tensioner. It should turn without any binding or any roughness in the bearings. Check that there is no in-out play. If defective, buy a new one. The tensioner is usually changed every second timing belt change. You decide what’s best for you.
Section H: Water pump removal and installation:
1. Remove the water pump. 4 – 10 mm bolts. The upper right hand corner of the water pump acts as an anchor for an electrical box. Once the bolts were removed, I was able to wiggle the water pump out of the electrical box. There are NO wires or connections on the electrical box to disconnect. Some coolant will spill so have a pan and newspapers/rags for clean up. See next picture borrowed from Reddawnman.
2. Clean and dry all surfaces. It takes a little while for the coolant to stop dripping. Remove any traces of the old rubber seal. I cleaned with water, steel wool, and lacquer thinner or acetone.
3. Confirm the new pump is identical to the old pump.
4. Install the new water pump. Slip the right corner of the pump into the electrical box. Tighten the 4 bolts in a X pattern by hand and then tighten to 8.7 ft lbs (104 in lbs). Rotate the pump by hand a few times to make sure it turns freely. The Haynes manual said to apply RTV sealant to the groove of the water pump that holds the gasket. My pump already had sealant anchoring the gasket into the groove. Haynes also said to add RTV sealant to the bolt threads. I did not do this step because the original bolts did NOT have sealant. Note: There are multiple types of RTV sealant. Some work in oil/gas service. Others work in water/antifreeze service. Make sure you use the right type.
Section I: Crankshaft seal removal and installation:
It’s possible to just inspect the seal and to keep the original seal if it’s not leaking. I prefer to replace the seal on each timing belt change because the cost and effort is small. Others have suggested that you need to drain the engine oil prior to removing the seal. This is not necessary. No oil will leak when the seal is removed.
1. Remove the timing belt sprocket. Note that the timing mark faces outward.
2. Remove the inner belt guide. Note the orientation of the guide. The concave side of the guide faces the crankshaft seal.
3. Note the orientation of the seal relative to the engine block and the crankshaft. My seal was flush with engine block and slightly lower than the wider part of the shaft.
4. All manuals say to remove the seal with a screw driver or metal toothpick device without damaging the sealing surfaces. Good luck with that. It tried that for 2 hours on a camry with zero luck.
5. The following technique was recommended to me by several sources (including an owner of a car repair shop) and it works for me:
6. Carefully drill a small hole in the center of the seal. I typically use a 1/16 inch drill bit. Screw a small sheet metal screw into the hole. You only need to catch 1-2 threads of the screw. Use a cat’s paw (ie tiny pry bar) to gently pry out the seal. I’ve been told that you can use a self tapping screw if you don’t own a drill. I have not tried the technique with the self taping screw.
7. Clean any dirt from the sealing surfaces of the shaft.
8. Lubricate the edges of the seal with oil or multipurpose grease.
9. Position the seal onto the shaft and gently tap the seal into place. I use a hammer, 1.5 inch diameter pvc pipe (the end is covered with electrical tape), and a piece of wood (also covered with electrical tape). The wood can be helpful if the seal starts to go on unevenly.
10. Confirm the seal was not damaged. No tears in seal. Spring did not pop out.
11. Clean and replace the inner belt guide. Concave side to the seal. Remove any oil.
12. Clean and replace the timing belt sprocket with the timing mark facing out. Remove any oil.
Section J: Camshaft seal replacement:
I did NOT replace the camshaft seal. It was not leaking and this was the first timing belt change. If you plan to replace the seal, do it now. I suspect that you can use a strap wrench to hold the camshaft pulley while loosening the bolt. The Haynes Manual says to stick a screwdriver between the sprockets of the camshaft pulley. Follow the same technique used for the crankshaft seal removal. Tighten the bolt to 27 ft lb.
Section K: Timing belt and tensioner installation:
1. Loosely bolt the “locked” tensioner which is “pinned” with the allen wrench. The allen wrench will want to fall out just make sure it’s reinserted.
2. Tighten the tensioner bolt to 7.2 ft lb (86 in lb).
3. Turn the tensioner bolt 180 degrees counter clockwise.
4. Install the tensioner spring. Use a wire to pull the spring into position.
5. Verify the ALL critical timing marks have not moved.
a. Camshaft pulley sprocket with the word “up” etched into the sprocket pointing up.
b. Two small slashes etched into the back of two camshaft sprockets are level with the cylinder head.
c. The slash etched onto the front of the timing belt pulley is lined up with the triangle etched into the oil pump housing behind the timing belt pulley.
6. Install the timing belts in a counter clockwise direction as follows: Around the BOTTOM of the crankshaft pulley, OVER the LEFT side of the tensioner pulley, UNDER and around the RIGHT side of the water pump pulley, UP and OVER the top of the camshaft pulley, and then straight DOWN to the crankshaft pulley. It may be necessary to press on the tensioner pulley to give adequate slack in the belt. If this proves difficult, just remove the spring again. I found it to be a 2 person job to hold the belt in place without the tension from the spring.
7. Check the timing marks again.
8. Attach the crankshaft pulley and rotate the crankshaft COUNTER CLOCKWISE two revolutions.
9. Recheck timing marks. They should line up perfectly. If they are off by a cog or two, remove the belt and turn the shafts as necessary to get proper alignment of the timing marks.
10. Repeat the process until you can get the crankshaft to rotate two revolutions COUNTER CLOCKWISE and still have proper alignment of ALL the timing marks. It took me three tries. For the last try, I put a small amount of paint on two adjoining cogs of the belt and the metal rib between them. This gave me a reference point so that I could adjust the belt by one cog. The previous picture shows the white paint marks that I added to the top of the camshaft pulley.
11. When you’ve successfully rotated the crankshaft two revolutions, then complete the installation of the tensioner pulley. Tighten the tension bolt to 33 ft lb. This will release the internal spring of the tensioner and tighten the belt. It will also tighten grenade pin (aka allen wrench).
12. Remove the allen wrench. VERY IMPORTANT. (I think the allen wrench could be removed prior to tightening the tensioner to 33 ft lb in the previous step but the book says to do it this way.)
13. Rotate the crankshaft 4 revolutions. Confirm the timing marks one last time. Failure to get it right can cause engine damage. This engine has an INTERFERENCE FIT.
14. Celebrate! It’s time to put the engine back together.
Section L: Reassemble of the timing belt area:
Double check that the “grenade pin” has been removed from the tensioner and that you’ve removed any wires that were used to remove the spring.
1. Replace the side engine mount. Get all 5 bolts loosely installed. Tighten the 3 front bolts first per the civic manual. Then tighten the 2 side bolts last. All bolts are tightened to 33 ft lb.
2. Replace the crankshaft sensor. Line up the rubber seal and pin, then tighten the 10 mm bolt to 8.7 ft lbs (104in lbs)
3. Install lower timing belt cover. Tighten 4 bolts to 7.2 ft lb (86 in lb). Put the cable for the crankshaft sensor back into the grove on the right side of the timing belt cover.
4. Install upper timing belt cover. Tighten 3 bolts to 7.2 ft lb (86 in lb). The long bolt threads through both the upper AND lower timing belt covers.
5. Install crankshaft pulley AND woodruff key. Remove any dirt or oil from the crankshaft, inner bore of the pulley, and outer surface of the pulley. I had to use a wire brush and screwdriver to remove dirt and tiny pebbles from the belt surface of the pulley.
6. Clean and install the crankshaft bolt. The Civic manual says to remove all dirt and oil from the bolt and washer. Then apply a small amount of oil to the bolt threads and to the surface between the bolt head and outer side of the big washer. No oil goes between the inner side of the washer and the pulley. Civic manual says to tighten to 14 ft lbs and then turn the bolt 90 degrees. The Haynes manual says to tighten to 181 ft lb. You decide!!
7. Install the upper motor mount. Loosely install all bolts. Tighten the two bolts closest to the timing belt first. Tighten the single bolt on the motor mount last per the civic manual. Tighten all bolts to 40 ft lb.
Section M: Reassemble valve cover area:
Installing the valve cover was a pain. It’s very hard to get the cover installed without messing up the RTV sealant (suitable for oil and gas) that’s recommended for 4 spots on the gasket surface. I tried multiple times with a helper with no success. So I improvised.
1. Clean the gasket surface on the valve cover and the cylinder head. Remove any old gasket and oil. Clean with Acetone or similar solvent.
2. Install the valve cover without the sealant.
3. Raise the front of the valve cover as much as possible while still keeping the back of the valve cover on the cylinder head.
4. Use a screwdriver or other suitable tool to add four small blobs of RTV sealant to either the gasket or cylinder head. The sealant goes on either side of the half circle cut-out in the valve cover gasket. See picture in Section M. Tighten the valve cover gasket with 5 minutes.
5. Set the valve cover on the cylinder head and hand tighten the six bolts. 10 mm
6. Tighten to 7.2 ft lb (86 in lbs) in small increments per the following sequence
7. Install spark plugs. Add a small amount of anti-seize compound to the threads. Tighten to 13 ft lb (156 in lb).
8. Work you way around the valve cover in a clockwise direction and replace the missing bolts, clips, etc which were removed in Section F
Section N: Reinstall the alternator:
1. Remove any burs or rough spots from the pivot point of the alternator with a file.
2. Measure the length of the exposed threads on the stud with the wing nut.
3. Use a brass brush to clean the threads so it’s easy to turn the wing nut with your fingers.
4. Loosen the wing nut to give slack in the belt.
5. Install the alternator. Loosely install the pivot bolt on the top right of the alternator.
6. Install the bolts on the lower bracket.
7. Loosely tighten all bolts so you can adjust the belt tension.
8. Slip the belt over the pulleys for the crankshaft, A/C, and alternator.
9. Tighten the wing nut to give proper tension on the belt. The wing nut is a pain to reach with a tool. I tried pliers on the wing nut and an open end wrench at the base of the wing nut. Neither was ideal.
10. Tighten all bolts to spec. Upper pivot bolt to 33 ft lb. Smaller lock bolt (center of bracket) below the pulley to 17 ft lb. Larger bolt (end of bracket) below the pulley to 33 ft lb.
11. Reconnect the alternator cable and the P connection on the left side of the alternator.
12. Tighten the alternator cable bolt to 6 ft lb. Don’t over tighten it. The stud breaks easily.
13. Replace any brackets/clips on the A/C line that were removed. 17 ft lb ???
Belt tension per the civic manual:
190-220 ft lb for a new belt.
88-120 ft lb for a used belt.
The civic manual says to tighten to the belt to the “new spec”, run the engine for 5 minutes, and then adjust the belt to the “used belt spec”.
Belt deflection per the Haynes Manual:
0.20-0.26 inches for a new belt. 3/16 to � inch
0.33-0.43 inches for a used belt.
Measure deflection by pushing midway between the pulleys with the longest gap. Use a ruler and straight edge to measure deflection. Use 10 to 20 lbs of force, depending upon the source. Haynes makes no mention of running the engine for 5 minutes and adjusting the belts to the “used belt tension”. I followed the Haynes procedure because I didn’t buy a belt tension gauge.
Section O: Reinstall the power steering pump:
1. Reinstall the power steering mounting bracket if it was removed to gain access to the valve cover. Tighten 3 bolts to 33 ft lb. This torque value is an educated guess.
2. Measure the length of the exposed threads on the stud with the wing nut.
3. Use a brass brush to clean the threads so it’s easy to turn the wing nut with your fingers.
4. Loosen the wing nut to give slack in the belt.
5. Install the bracket for the power steering reservoir.
6. Swing the power steering pump and reservoir into position.
7. Don’t push the reservoir into the bracket until later. Leaving it loose may give you better access to the bolt beneath the belt.
8. Loosely install the power steering pump and pivot bolt on the left side of the pump. 12 mm
9. Loosely install 12 mm nut on the right side of the pump (below the pulley). Use a box wrench for this nut.
10. Install and tighten the 10 mm nut on the top of the power steering pump. Tighten to 17 ft lb
11. Slip the belt over the pulleys for the crankshaft and power steering pump..
12. Tighten the wing nut to give proper tension on the belt.
13. Tighten all bolts to spec. 17 ft lb for all power steering pump bolts.
14. Push the reservoir into the bracket.
Belt tension per the civic manual:
165-198 ft lb for a new belt.
88-121 ft lb for a used belt.
The civic manual says to tighten to the belt to the “new spec”, run the engine for 5 minutes, and then adjust the belt to the “used belt spec”.
Belt deflection per the Haynes Manual:
0.35-0.43 inches for a new belt. 3/8 to 7/16 inch
0.51-0.65 inches for a used belt.
Measure deflection by pushing midway between the pulleys with the longest gap. Use a ruler and straight edge to measure deflection. Use 10 to 20 lbs of force, depending upon the source. Haynes makes no mention of running the engine for 5 minutes and adjusting the belts to the “used belt tension”. I followed the Haynes procedure.
Section P: Wrap up and final check:
1. Confirm you don’t have left over parts!!
2. Confirm all sensors are connected.
3. Wires are snapped into appropriate clips.
4. Remove tools and other foreign objects from the engine compartment.
5. Confirm the radiator drain is closed and heater is turned on.
6. Refill the radiator with 10 year long life coolant from Honda. Leave cap off.
7. Reconnect the battery cables.
8. Test run the engine. Hopefully it starts, runs smoothly, and nothing goes “bang”.
9. Monitor the coolant level in the radiator. Add coolant as the level drops in the radiator.
10. Run engine until the top radiator hose gets warm.
11. Add some coolant to the overflow tank.
12. Replace and tighten radiator cap.
13. Shut off engine.
14. Replace wheel well splash shield.
15. Replace tire and lower car to the ground.
16. Input the anti-theft code for the radio.
17. Enter the radio frequencies for the preset buttons.
18. Monitor the radiator level for a few days. It may be necessary to add additional coolant.
CELEBRATE !!!
You just saved yourself hundreds of dollars and can now brag about your outstanding mechanical skills to all you friends.
Last edited by creaker2; 11-03-2010 at 11:26 PM. Reason: added pictures and links
 01-31-2011
#4
TRUST me! I'm Idiot Proof!
Join Date: Dec 2010
Location: Quackertown PA
Age: 41
Posts: 200
Likes: 0
Received 0 Likes
on
0 Posts
Rep Power: 164 Re: 2003 Civic Timing Belt DIY
Justreplaced my T belt, other belts, crank seal and plug seals this weekend using this DIY, and I had to get on here to thank you! 
Totally on point, really nothing left out.
Except to say that when you tension the belt, it will roll your effing crankshaft, throwing off the alignment you worked so hard to maintain. It literally took me about 10-15 times of putting on the belt, tensioning, replacing the lower cover and crankshaft pulley then checking. What appears to be a small angle off from TDC on the crank translates to a few more degrees once you remount the pulley.
Again, thanks!!!
And F#%K 181ft/lbs to re-torque the crankcase pulley bolt! Ever try that? whilst holding the pulley holder tool to prevent clockwise engine rotation? LOL I dont know what it ended up being, but after @300mi, no problems.
 02-02-2011
#6
TRUST me! I'm Idiot Proof!
Join Date: Dec 2010
Location: Quackertown PA
Age: 41
Posts: 200
Likes: 0
Received 0 Likes
on
0 Posts
Rep Power: 164 Re: 2003 Civic Timing Belt DIY
Figured I could post some pics I took to help clarify things:
[IMG]file:///C:/Users/Devin/Desktop/P1280656.jpg[/IMG]First ones are how ya get those spark plug seals out. Just whack the screwdriver as shown with a rubber mallet fairly hard enough to kink it good (and not slip and nail the cover)
Then flip it over and whack the other side. Should pop right out.

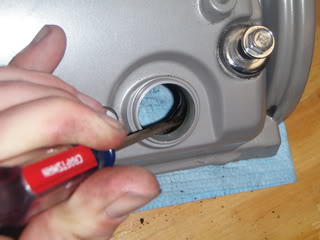
Heres one of drilling into the crankshaft seal and screwin in the screw:
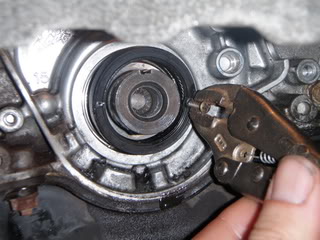
Heres a couple of what TDC looks like:
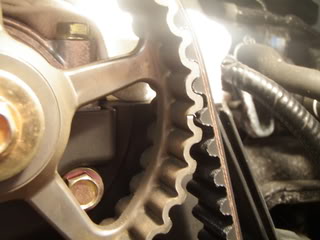

This is just all the stuff you gotta remove an (should) clean:
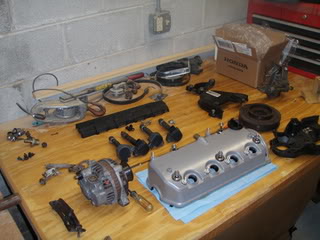
[IMG]file:///C:/Users/Devin/Desktop/P1280656.jpg[/IMG]First ones are how ya get those spark plug seals out. Just whack the screwdriver as shown with a rubber mallet fairly hard enough to kink it good (and not slip and nail the cover)
Then flip it over and whack the other side. Should pop right out.
Heres one of drilling into the crankshaft seal and screwin in the screw:
Heres a couple of what TDC looks like:
This is just all the stuff you gotta remove an (should) clean:
02-27-2011
#7
Registered!!

Join Date: Feb 2011
Posts: 3
Likes: 0
Received 0 Likes
on
0 Posts
Rep Power: 0 
Re: 2003 Civic Timing Belt DIY
Hello, I'm trying to replace my timing belt on a 2005 LX. My question is: When you reinstall the 19mm bolt on the crank shaft pulley (that is so hard to remove) what pressure do you install it at when you put it back on?
Thanks!
Thanks!
02-27-2011
#8
TRUST me! I'm Idiot Proof!
Join Date: Dec 2010
Location: Quackertown PA
Age: 41
Posts: 200
Likes: 0
Received 0 Likes
on
0 Posts
Rep Power: 164 Re: 2003 Civic Timing Belt DIY
181ft/lbs per Haynes manual if your a mountian gorilla 
I just got mine on there tight as I could and its holding up fine...problem your seeing is that you have to brace the crank against rotation with the tightening of the nut.
Good luck and cheers for doin it yourself!!
I just got mine on there tight as I could and its holding up fine...problem your seeing is that you have to brace the crank against rotation with the tightening of the nut.
Good luck and cheers for doin it yourself!!
03-21-2011
#9
Registered!!
Join Date: Feb 2011
Posts: 3
Likes: 0
Received 0 Likes
on
0 Posts
Rep Power: 0 Re: 2003 Civic Timing Belt DIY
Great DIY: I'm currently working on my timing belt and I probably couldn't do it with just the Repair Manual...
So, I just opened the valve cover and noticed it is FILTHY in there. The top inside of the cover is full of burned oil and junk. Also, some of your camshaft pics show nice silver rocker arms and hardware. Mine are more of a bronze/light brow color. I guess part of is my fault since I've neglected some oil changes. Will definitely keep on top of it from now on...
Questions:
1.Service manual says to use thiner or acetone to clean the surfaces of the valve cover, could I use carburator cleaner or engine cleaner for the valve cover? or should I run to the hardware store for thiner?
2.Do you guys recommend any oil cleaners or additives to help clean the engine in the future? I recently switched to Castrol Sytetic oil to change oil less often.
Thanks for your help and feedback. Got to get back to work on this timing belt.
I'm currently working on my timing belt and I probably couldn't do it with just the Repair Manual...So, I just opened the valve cover and noticed it is FILTHY in there. The top inside of the cover is full of burned oil and junk. Also, some of your camshaft pics show nice silver rocker arms and hardware. Mine are more of a bronze/light brow color. I guess part of is my fault since I've neglected some oil changes. Will definitely keep on top of it from now on...
Questions:
1.Service manual says to use thiner or acetone to clean the surfaces of the valve cover, could I use carburator cleaner or engine cleaner for the valve cover? or should I run to the hardware store for thiner?
2.Do you guys recommend any oil cleaners or additives to help clean the engine in the future? I recently switched to Castrol Sytetic oil to change oil less often.
Thanks for your help and feedback. Got to get back to work on this timing belt.
03-22-2011
#10
TRUST me! I'm Idiot Proof!
Join Date: Dec 2010
Location: Quackertown PA
Age: 41
Posts: 200
Likes: 0
Received 0 Likes
on
0 Posts
Rep Power: 164 Re: 2003 Civic Timing Belt DIY
First off, oil changes should be your #1 priority to keep your vic' runnin like new for years to come...
ok
1. I didnt really clean my valve cover, cause as you said it was nice and clean already with no burnt oil or deposits. But you should be fine with carb cleaner, dont waste your money on thinner unless you plan to do paint work or something in the future.
2. quote'th cwo715:
"switch to Mobil 1 Synthetic 5w-30, 5w-20 is like water and scares me, alot of the guys on the forum run 5w-30, also since you have high miles i recommend Marvel Mystery Oil, run atleast 8oz through a full tank of regular and 6oz in the crank case on a new oil change atleast once or twice a year, this will breakup the carbon build up in your valve and cylinder areas."
I personally dont beleive the hype around such additives...seeing as nobody(aka people on forums) actually had photo proof of claimed results. rebuff, anyone?? regular maintence is still your best bet in my book.
An as i like to say, you cant change your oil too often. you can only spend alot on oil changes, LOL. 10,000 mi between changes just keeps the stealerships happy with ruined motors.
03-24-2011
#11
Registered!!
Join Date: Feb 2011
Posts: 3
Likes: 0
Received 0 Likes
on
0 Posts
Rep Power: 0 Many THANKS to creaker2 & BobDobolina for all your help!!! 
Just finished my timing belt on my '05 Vic LX. First time doing it myself and first time doing something this invasive on my car (im used to oil changes only).
I was worried about struggling taking out the crank bolt out. I followed your recommendations and used a 19mm impact socket and a 5 foot cheater bar. It was so easy I could not believe it. Thanks to the right tools and the right info.
04-06-2011
#14
Live for the Twisties
Administrator
Join Date: Jun 2010
Location: Langley, BC
Posts: 8,580
Likes: 0
Received 5 Likes
on
5 Posts
Rep Power: 260 
Re: 2003 Civic Timing Belt DIY
Eventually links break unfortunately and pics no longer display, there's another timing belt DIY with pics still up though.
05-31-2011
#16
Registered!!

Join Date: May 2011
Posts: 5
Likes: 0
Received 0 Likes
on
0 Posts
Rep Power: 0 Re: 2003 Civic Timing Belt DIY
awesome diy. i tackled this job this past weekend. took me about 8 hours..prob cause im a noob. lol.
couple this i wanted to note from my experience:
to loosen the timing belt tension just unbolt the tensioner about a turn or 2, you will feel it loosen, but there will still be force on the belt from the spring. next unhook the spring and the belt is free.
after you take out the belt, completely unbolt the tensioner from the engine and insert your "grenade pin", by squeezing the two tabs together. then loosely bolt the tensioner back only the block.
at this point i installed the belt, hooked the tensioner spring back on, and rotated the crank a couple of times to verify the timing. if you're satisfied with the results, tighten the tensioner bolt to spec and remove the grenade pin.
whatever details i left out are in the diy.
I also did the spark plug seals and it was kinda a pain. i knocked them out with a screwdriver and mallet like the other diy said but i had problems getting the new ones in. looks like i need a special tool and a press to get them seated all the way.
i just used a rounded handle of a screwdriver and hammer to get them in as far as i could.
how have everybody else done this?
05-31-2011
#17
Administrator
Hey! Look At Me!! I'm a Supporting Member!!
Administrator
iTrader: (22)
Join Date: Aug 2003
Location: Las Vegas, NV
Age: 39
Posts: 21,447
Received 1,144 Likes
on
799 Posts
Rep Power: 485 Re: 2003 Civic Timing Belt DIY
I left the grenade pin in until after I installed the timing covers.. There's a rubber cover on the lower cover that seems like it's specifically for that purpose.
As for the spark plug tube seals, I found a socket that matched the other diameter nicely, put the socket on top, and hammered that with a rubber mallet. It worked great
As for the spark plug tube seals, I found a socket that matched the other diameter nicely, put the socket on top, and hammered that with a rubber mallet. It worked great
06-01-2011
#18
Whachya lookin at?
iTrader: (1)
Join Date: May 2009
Location: Canada
Age: 38
Posts: 6,388
Likes: 0
Received 11 Likes
on
7 Posts
Rep Power: 288 Re: 2003 Civic Timing Belt DIY
I pulled the pin before installing the covers... then rotated the crank pulley a couple times to make sure everything was okay... if I remember correctly...
06-01-2011
#20
Administrator
Hey! Look At Me!! I'm a Supporting Member!!
Administrator
iTrader: (22)
Join Date: Aug 2003
Location: Las Vegas, NV
Age: 39
Posts: 21,447
Received 1,144 Likes
on
799 Posts
Rep Power: 485 Re: 2003 Civic Timing Belt DIY
I can't quite remember what size I used, but a 22mm socket comes to mind.. then again, I had access to an array of 1/2" deep impact sockets, so it could have been anything up to 30-something millimeter
07-06-2011
#21
Registered!!

Join Date: Apr 2011
Posts: 41
Likes: 0
Received 0 Likes
on
0 Posts
Rep Power: 0 Re: 2003 Civic Timing Belt DIY
Howzit. Great write up. I'm going to do this job tomorrow plus a stage 1 cam install, header install, and engine mount inserts. I'll have this DIY write up next to me on my laptop as a guide. Thanks.
07-07-2011
#23
Registered!!
Join Date: Apr 2011
Posts: 41
Likes: 0
Received 0 Likes
on
0 Posts
Rep Power: 0 Re: 2003 Civic Timing Belt DIY
Howzit. Well I started late but got some good progress. First I wanted to get the dreaded crank pulley out of the way. Tried with an impact, to no avail. Then tried the method with a long extension extra jack stand, and a long cheater bar, and it broke loose in two shakes. Installed the stage one cam, and header. The header had a rounded nut from a previous attempt to install the header. Had to use a die grinder and a rotary file to get the nut out. Saved the stud and all went well.
07-07-2011
#24
Registered!!
Join Date: Apr 2011
Posts: 41
Likes: 0
Received 0 Likes
on
0 Posts
Rep Power: 0 Re: 2003 Civic Timing Belt DIY
More pics. Sorry only allow two pics at a time. Stock cam and stage one cam, and the came installed. Couldn't install the rockers because I forgot to get a new rear cam seal. I wanted to get genuine Honda. So I'll get it tomorrow and continue with the valvetrain when I get the seal. The foward seal is seated correctly, in the picture I didn't yet place it in the correct location.
07-07-2011
#25
Registered!!
Join Date: Apr 2011
Posts: 41
Likes: 0
Received 0 Likes
on
0 Posts
Rep Power: 0 Re: 2003 Civic Timing Belt DIY
I took my time and carefully cut down the nut with a die grinder and a rotary file, then chiseled off the nut. I managed to save the stud so the header went on with no problems. The rockers and the timing belt as well as the engine mounts are going on tomorrow.
 07-08-2011
#29
Registered!!
Join Date: Apr 2011
Posts: 41
Likes: 0
Received 0 Likes
on
0 Posts
Rep Power: 0 Re: 2003 Civic Timing Belt DIY
Howzit. Thanks to this forum, I changed my timing belt also at the same time installed a cam header and engine mount.. I just started her up and it didn't blow up, no cel. Shes idling nicely. Going to take her for a test drive and try out the cam. Thanks again. Camera died so no pics yet. Probably a couple of pics of the finished product and the war zone.
07-08-2011
#30
Registered!!
Join Date: Apr 2011
Posts: 41
Likes: 0
Received 0 Likes
on
0 Posts
Rep Power: 0 Re: 2003 Civic Timing Belt DIY
Hers some pics of the finished product. All went well untill I installed the front forward mount. I was feeling good about myself because i managed to remove a rounded nut and still save the stud, but on the last thing to do which was the engine mount I stripped the bolt hole. I didn't turn the bolt too far in so I think I can still save the hole and use a tap. Thats going to happen later when the cam breaks in and I'll change the oil. Garage is a mess.


