head gasket DIY help
 02-27-2008
#1
Registered!!
Thread Starter
iTrader: (2)
Join Date: Feb 2006
Age: 42
Posts: 317
Likes: 0
Received 0 Likes
on
0 Posts
Rep Power: 226 
head gasket DIY help
ok does anyone have a good DIY with pictures, i am changing mine out this week. also i have to put on a new water pump and all the belts.. what project should i start first.... thanks
oh yeah i read CHILTON MANUAL about 30 times i just want to have everything i can in front of me when i do this....
oh yeah i read CHILTON MANUAL about 30 times i just want to have everything i can in front of me when i do this....

 02-27-2008
#4
Jap-Euro Fusion
Hey! Look At Me!! I'm a Supporting Member!!
iTrader: (16)
Join Date: Jul 2002
Location: Washington DC
Age: 41
Posts: 13,151
Likes: 0
Received 3 Likes
on
3 Posts
Rep Power: 400 
Re: head gasket DIY help
Follow the manual in this order, doing the removal steps before removing the head, reverse order once the head is back on:
Coolant flush
Oil change
Timing belt
Then remove the water/heater hoses
Remove IM, fuel rail, Wire harness, throttle cable and header
Remove valve cover
Remove head bolts from the inside out in an X pattern (see manual)
Throw away head bolts
Remove Head, dont lose dowel pins
Clean up coolant/oil mess
Replace HG
Replace dowel pins
Put the head back on
Install NEW head bolts or ARP studs
Torque down the head as instructed in the manual (3 steps, X pattern, use the lube recommended, for ARPs its the included moly, for stock bolts, SOAK them in oil)
Put the IM, fuel rail, Wire harness, throttle cable and header back on, use new gaskets
Put the VC back on (use new gasket)
Reassemble timing set and belt drives
Refill oil
Refill coolant and bleed
Expect the car to smoke a bit at first, when you pull the head, it'll make a mess in the cylinders, until the water and **** burns out it'll blow a little bit.... it should stop.
Thats the basics. Plan on an all day affair.
02-28-2008
#5
My Pony Princess is the inspiration for my ride.
iTrader: (17)

Join Date: Apr 2006
Age: 48
Posts: 5,217
Likes: 0
Received 0 Likes
on
0 Posts
Rep Power: 0 
Re: head gasket DIY help
Yup. Especially if you've never done it before. A quick tip on the removing the timing belt, when I do it, I take the belt off with the cam gear. Makes it a lot easier going back on too. Just make double-damn sure you mark the belt and the gear so you the proper orientation of the belt when it goes back on. The crank will move a little bit when you break the cam gear bolt loose, just put it back to TDC before you spin the cam bolt all the way out.
02-28-2008
#7
My Pony Princess is the inspiration for my ride.
iTrader: (17)
Join Date: Apr 2006
Age: 48
Posts: 5,217
Likes: 0
Received 0 Likes
on
0 Posts
Rep Power: 0 Re: head gasket DIY help
Other helpful tip, if you want to avoid a complete mess of coolant in the cylinders, pull the coolant plug on the back of the block and let the cylinder jackets drain there. It makes a mess underneath the car, but if you have a big drain pan, it beats slopping **** out of the cylinder walls. I also find it easier to just pull the bumper cover and radiator when I do this. More room to remove stuff, plus makes it easier to get at the alternator and mounting brackets and there is less distance to lean over the front of the car when pulling the head.
02-28-2008
#8
Premium Member
Hey! Look At Me!! I'm a Supporting Member!!
iTrader: (5)
Join Date: Jun 2003
Location: Macon GA
Age: 42
Posts: 2,161
Likes: 0
Received 0 Likes
on
0 Posts
Rep Power: 276 Re: head gasket DIY help
GL man. i did mine myself too and took a week to do. it is a pain in the *** but anyone can do it. NAPA lets you rent tools for cheap too if you need them. i rented a torque wrench (didnt trust mine)
how the hell did you blow it, you are still NA right?
how the hell did you blow it, you are still NA right?
02-28-2008
#9
02-28-2008
#10
Registered!!
iTrader: (7)
Join Date: Jul 2006
Location: Columbus, Ohio
Posts: 811
Likes: 0
Received 0 Likes
on
0 Posts
Rep Power: 225 Re: head gasket DIY help
+1 on that advice. and start early in the day if possible! i can't count the number of times i've started working on my car at 9pm or so and been in the garage until 3am, only to realize i need a part to get my car running in the morning when i'd have to leave for class.
02-28-2008
#11
Registered!!
Thread Starter
iTrader: (2)
Join Date: Feb 2006
Age: 42
Posts: 317
Likes: 0
Received 0 Likes
on
0 Posts
Rep Power: 226 Re: head gasket DIY help
thanks foe the tips speedfoos, i am not shure how the hell it happend. i baby the car but there is 134,000 miles on it. i dont even know if that the problem i dont have white smoke comming out the exaust.but i am losing coolent and it overheats on long trips. i cahnged out the thermostat like 5 times,did you see me change out the collent in the overflow at nopi. when i overheat all my coolent fills the **** up. its wierd when i am driving my heat workes great but when i come to a stop no heat. but it been doing this for a hot min, like last winter off and on. from what i have been reading on here its a head gasket.
02-28-2008
#12
My Pony Princess is the inspiration for my ride.
iTrader: (17)
Join Date: Apr 2006
Age: 48
Posts: 5,217
Likes: 0
Received 0 Likes
on
0 Posts
Rep Power: 0 Re: head gasket DIY help
Yep, that's the head gasket. Here's a a quick little text DIY I wrote for it back in October. It may help a little too. Original post was here in my turbo build thread. I popped three head gaskets last year on my Civic in like 4 months so I got pretty good at changing them out.
Bleh. All right. Here goes.
Prep.
Put car on jackstands. Disconnect battery. Drain about 2 quarts of coolant out of the radiator. Remove the gas cap.
Working from right to left. Remove PS pump from bracket and move to right side by or on fender. Remove PS pump bracket. The rez just pulls straight up. Disconnect alternator plug and hot wire (make sure your battery is disconnected)
Remove alternator - the top bolt stays in until the mount comes off.
Remove driver's side motor mount.
Remove alt. bracket. There are two bolts (all 14mm) on the side of the engine just below the cam cover and then the three in front.
Disconnect cam position sensor. Pull the little rubber boot off the side of the timing belt cover and it's a standard clip inside.
Disconnect exhaust mani/header from pre-cat pipe. Remove header/mani.
Disconnect upper and lower rad hoses and heater hose from the water neck. Unplug all sensors. Unscrew the 10mm bolt that holds the coolant inlet hard line to the head and remove the hose clamp on the back left of the block. Remove the hard line.
Disconnect throttle body coolant lines.
Unplug all sensors from the IM. There should be two on the right, one on the TB, one to the left of the TB, one just underneath the hard line, and one just underneath the IM on the opposite side. Remove the injector clips
Remove coil packs and wire loom bolts.
Once you have every sensor unplugged, that entire wire loom will swing away to the left, completely out of your way.
Now for the vac lines. Disconnect the big brake booster line from the back of the IM, just behind the TB. There are two lines right there, you want to disconnect the big one. Disconnect the PCV vac source from the IM. It's on the right side just behind and a little to the left of the cam position sensor.
Go underneath the car and remove the three nuts securing the IM to the support brackets. They should be 10mm and there's one on the left bracket and two on the right.
Disconnect the fuel line from the fuel rail. Pop the little plastic end cover off it and squeeze the little green clip while you pull to the left.
Disconnect that vac line that is attached to the fuel rail. It's in front of the fuel line and just pulls off.
Now everything should be physically disconnected from the head. Make sure that are no sensors still plugged in and the wire loom has nothing else tying it to the head. You just have the three vac lines to remember so that's easy.
Now remove the 5 bolts and pull the VC off.
Next, there are three 10mm bolts holding the timing belt cover on. One in the front and two in the back. Remove them and pull the upper timing belt cover off.
Now you rotate your engine to TDC. With a 19 or 21mm - can't remember - socket on a 1/2" ratchet, rotate the crank counter-clockwise until you see the white mark on the edge of the crank pulley line up with the TDC mark on the lower timing belt cover. Make sure it stays there. Grab a colored Sharpie or white or yellow crayon and draw lines from the teeth on the timing gear across the belt to insure you put the belt back on exactly on the same teeth as they are on now.
Grab a 12mm ratchet, hold the timing belt with one hand and just break cam bolt loose with your ratchet. Don't worry if it turns a little bit here as you can still move the crank pulley back to TDC. Once the cam bolt is broken loose, and you're back at TDC, spin the bolt the rest of the way off, staying at TDC, and then slip the cam gear and timing belt off the end of the cam. Don't mess up the marks you put on them.
From here you just loosen the head bolts 1/4 turn at a time according to the sequence in the Haynes manual. Once they're loose, pull them out and set them aside.
Now pull the head off! It will be heavy, so be ready and don't drop it. Once it's off, set it either on it's side, or face, but never on the valve side or the spring side.
02-28-2008
#14
My Pony Princess is the inspiration for my ride.
iTrader: (17)
Join Date: Apr 2006
Age: 48
Posts: 5,217
Likes: 0
Received 0 Likes
on
0 Posts
Rep Power: 0 Re: head gasket DIY help
Naw, it's really not. That's every step involved. If you're movin' and groovin you can have the head off in about an hour and a half.
02-28-2008
#16
Premium Member
Hey! Look At Me!! I'm a Supporting Member!!
iTrader: (95)

Join Date: Sep 2002
Location: NV
Age: 43
Posts: 51,241
Likes: 0
Received 18 Likes
on
13 Posts
Rep Power: 788 Re: head gasket DIY help
well, if its your second time doing it, should take all day 12+hrs. lol. first time, i dont think you will finish the same day to be honest. its alot of work, and stuff will go wrong.
02-29-2008
#19
Registered!!
iTrader: (1)
Join Date: Apr 2006
Location: nova & richmond VA
Age: 40
Posts: 825
Likes: 0
Received 1 Like
on
1 Post
Rep Power: 252 Re: head gasket DIY help
I have pulled my head before when I bent some valves it took about six hours but since I know how to do it now it would probably take half of that now.
The crank bolt is 19mm or a 3/4 SAE will fit it; it is the same size as our lug nuts.
Oh and some times it is easier to pull the brake booster line off the other end instead on the intake mani cause the one on the intake mani can be hard to reach
The crank bolt is 19mm or a 3/4 SAE will fit it; it is the same size as our lug nuts.
Oh and some times it is easier to pull the brake booster line off the other end instead on the intake mani cause the one on the intake mani can be hard to reach
03-18-2008
#21
Registered!!
Thread Starter
iTrader: (2)
Join Date: Feb 2006
Age: 42
Posts: 317
Likes: 0
Received 0 Likes
on
0 Posts
Rep Power: 226 Re: head gasket DIY help
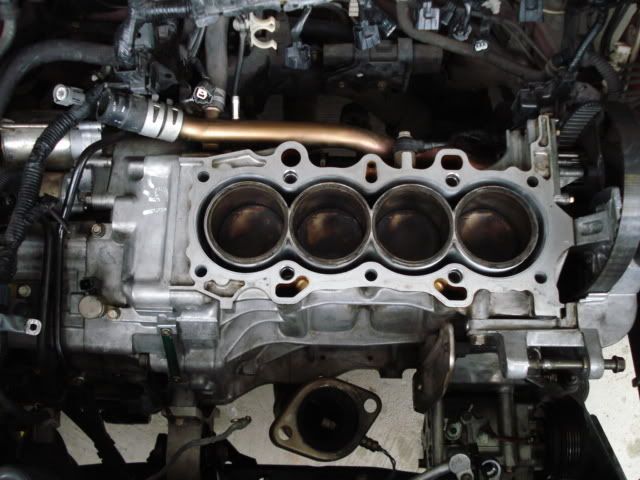
ok just got the damn head off. what a pain in the *** this **** is.i see why its so much money to get it fixed. so i looking at this and it does not look like there is anything rong with the gasket. as soon as i find my camera i will post some pic.i am really thinking about selling my motorcycle and buying a turbo kit with all the bells and whistle or just buying a type s...
03-18-2008
#22
Premium Member
Hey! Look At Me!! I'm a Supporting Member!!
iTrader: (95)
Join Date: Sep 2002
Location: NV
Age: 43
Posts: 51,241
Likes: 0
Received 18 Likes
on
13 Posts
Rep Power: 788 Re: head gasket DIY help
well you wont see it, lol. also get the head checked at a machine shop now thats its off the car. have them pressure test and also make sure the surface isnt warped. they can clean it up for you too.
03-18-2008
#24
Registered!!
Thread Starter
iTrader: (2)
Join Date: Feb 2006
Age: 42
Posts: 317
Likes: 0
Received 0 Likes
on
0 Posts
Rep Power: 226 Re: head gasket DIY help


 new break lines


 is it wierd that all my pistons are the same level. what happend to tdc
 and i am gonna need to replace this on the trans its a auto
 Last edited by 01candycivic; 03-18-2008 at 08:11 AM.


 and i ordered some new headers
  03-18-2008
#28
Registered!!
Join Date: Oct 2007
Location: Atlanta, GA
Age: 44
Posts: 107
Likes: 0
Received 0 Likes
on
0 Posts
Rep Power: 204 Re: head gasket DIY help
Before you pull the crankshaft pulley, you need to rotate the crank pulley counterclockwise until the white timing mark (notched on the inboard side of the pulley's edge) is lined up with the black plastic TDC marker, just below the idler/tensioner pulley...AND...the camshaft pulley needs to have the "UP" marking facing up.
I messed this up yesterday. I lined up the crank pulley white mark with the timing mark, but i was one full crank rotation off, and my camshaft pulley "UP" mark is most definately facing down.
In this arrangement, if you are at the front of the car looking at the engine compartment, the left most piston was at the top of its bore, followed by the second and third from the left pistons being at the bottom, with the rightmost piston at the top. The exhaust valves for the 3rd from the left cylinder are open.
I figure that if I put it back together the way it came apart (without rotating either of the pulleys) then everything should be ok...?
If anyone knows a way to set the proper relationship between the crank and cam pulleys with the block apart, please let me know. It's probably not super complicated, but I'd rather ask some dumb questions than have my motor **** the bed.
Anyway, good luck with the maintenance. Speedfoos' procedure, along with the timing belt DIY were both really helpful. Let me know how it turns out.
03-18-2008
#29
My Pony Princess is the inspiration for my ride.
iTrader: (17)
Join Date: Apr 2006
Age: 48
Posts: 5,217
Likes: 0
Received 0 Likes
on
0 Posts
Rep Power: 0 Re: head gasket DIY help
Dude, why did you pull the AC line? You didn't have to and now you'll have to get it refilled unless you're getting rid of the AC completely.
Plus you're not at TDC. If you were, like Brian said, then #1 would be all the up to the top. As long as you don't **** with the orientation of anything and it goes back on exactly the way it came off, you'll be fine. I don't like messing with crank orientation when the head is off and the timing belt is still on. More chance of messing things up.
You could always put the crank at TDC, pull the crank pulley and lower timing belt cover, re-install the timing belt (it will have moved a little) then re-install your new crank pulley. Put the cam at TDC (check the Haynes, there two marks to this when it's off the car) and then re-assemble everything.
This is the only real way since if you don't re-adjust the timing belt, chances are at about 90% that it will slip a tooth while move the crank when the head is off.
03-18-2008
#30
Registered!!
Thread Starter
iTrader: (2)
Join Date: Feb 2006
Age: 42
Posts: 317
Likes: 0
Received 0 Likes
on
0 Posts
Rep Power: 226 Re: head gasket DIY help
oh i have to recharge it anyway. do my pistons look ok i never took off a head befor so i have no idea what i am looking at. and this is why i took the ac line off

