Boiler's New Suspension Buildup Thread (No 56K) - Finished!
 02-16-2005
#1
Jap-Euro Fusion
Hey! Look At Me!! I'm a Supporting Member!!
Thread Starter
iTrader: (16)
Join Date: Jul 2002
Location: Washington DC
Age: 41
Posts: 13,151
Likes: 0
Received 3 Likes
on
3 Posts
Rep Power: 400 

Boiler's New Suspension Buildup Thread (No 56K) - Finished!
For those of you who are unaware already, consider yourselves informed now. I'm building another suspension. Most of it is tested waters, but I'm gonna try to help everyone out as I do it. I intend to keep this thread updated as I go, so when I'm done, it serves as a complete DIY to do just about everything suspension related. As this goes along, you probably can omit certain steps depending on the hardware of your choosing, I'm probably going to pick the most indepth installs to deal with, just by the nature of the parts. Some of this is custom parts, you're gonna be on your own in making those work. I'll give as many specs as I can, but imagination and innovation is part of making things fit together.
Just keep an eye on this thread, the target day to have everything in my car is March 5, 2005, but I'm gonna add to it as I put stuff together, I'm still waiting for a few parts to show up and assemble everything.
Step 0: Getting Stock Stuff Out
I'm gonna blow through this because its not hard and its detailed elsewhere already.
Once you jack up both ends of the car and put it on stands with all the wheels off.....
Start with the front. Undo the brake line bolt and the ABS bolt on the EX.
Remove the cotter pin and nut from the steering arm, with a tie rod tool, pop the tie rod out.
Loosen the 2 crash bolts, before you remove them, use a strap or something to hold the hub upright so your axle doesn't fall out, then remove the crash bolts
Then remove the 3 bolts holding the top hat to the car and remove the strut.
For the rear, remove the 2 bolts in the trunk holding the top hat in, unbolt the Upper control arm from the knuckle to allow for some more travel and unbolt the shock from the A arm. Then remove the shock/spring assembly.
Step 1: Gutting Struts for Konis (done the right way)
This is not as simple as it sounds, it takes some precision tools to do and some patience to get it right.
For this project you need:
Set of calipers (dial or digital)
Pipe cutter
Safety glasses
A bucket
Assortment of small drill bits
14mm or 9/16" drill bit (a metal specific bit is best)
A drill with a 1/2" chuck
Dremel or some kind of small grinder
Ok, I skipped some of the pictures if the Koni directions outlined it well, or I needed 2 hands to do it. First thing you need to do is measure the strut housing, this needs to be done BEFORE you order your Konis. If you look at some of the pictures below, you need to measure the strut diameter in the area that you will be cutting. You should end up with 1 of 2 numbers..... either something about 51mm, or something about 56mm. When you order your konis, you need to specify what size the housing is so you get the correct size inserts.
Once you get your konis, you can start hacking up the stock struts. An alternative is to do what I did..... put an add in the WTB forum, offer $50 and pick up an extra set that you can cut up without destroying your own. If you feel iffy about being able to successfully do this, it also leaves you a spare in case you irreversably mess up (I don't think thats possible).
Take your calipers, measure 40mm down from the seal on top of the housing. You'll notice that caliper jaws have sharp points on them, its so you can scribe with them. Lock the calipers at 40mm and scribe a line all the way around the strut at that level. Then go to the bottom. You need to find the center. Easiest way is to measure across the bottom of just the circular part (ignore the crash bolt bracket). Because of the banding around the bottom that makes up the bracket, your centerpoint is not at 1/2 of the diameter of the casing. Its 1/2 the outer diameter of the banding for the bracket. Mark your center by locating 1 jaw on the edge and scribing the bottom from 3-4 different directions. You should end up with something that looks like an asterisk... where the lines cross is dead center. Take a punch awl and mark it so your drill bit finds it.
I did the work in a plain old bench vise, I'm sure there's fancier tools to do it with, but I don't think they're necessary. I do not recommend total freehand or setting the strut between your knees to do the cutting and drilling, put it in something.
Start off by laying the strut horizontally in the vise.
My struts are funny colored because I grit blasted some of the rust, dirt and junk off of them first, so some of it is bare metal.... I'll fix that later.
Then take a small drill bit, about 1/16" and drill a pilot hole through the center.
At this point, I'll warn you, if you're shocks aren't blown completely, then the oil is under pressure (which can be high if they're still good). Be prepared for a face full.
With it still horizontal, position your tubing cutter on the line you made at the 40mm mark. Tighten it down and get it started, then crank it tight so it doesn't move when you move it. If you have enough bench clearance, you don't need to move it, but I didn't, so I had to tip the strut vertical to finish it.
Continue tightening and turning until the housing comes apart. Tubing cutters this size can be expensive. I got a cheap one from Harbor Freight, it was like $13.00, it did the job. Precision is not key, you just need to get the housing apart. Perpendicular edges are not required.
Once it breaks through, finish the turn so the whole housing is loose,
then just pull the guts out. Having a bucket underneath the vice while you're doing all this is necessary unless you like cleaning up a big oil mess later on. there was quite a bit of oil in the struts.
Now all you need to do is rinse and repeat for the other one.
Once you get them cut, you can pour some simple green down the housings to degrease the insides a little, rinse them out good.
Take a dremel and grind down the edge that the pipe cutter left behind so its smooth. Drilling the hole for the bottom bolt is interesting. I understand that most people don't have a huge drill to do this with. You're on your own with that. A drill bit that big for cutting metal is about $25... just pay it or find somewhere to borrow it. I'm lucky enough to still be at school, we have a machine shop, we just stuck the housing in a Bridgeport mill and drilled right through it. But anyways, put the strut back in the vice, drill the hole, 14mm or 9/16, you'll probably have more luck finding a 9/16 bit, I don't know if a bit that big is available with a reduced shank to 3/8, but what you may be able to get is 9/16" hole saw with a 1/4" pilot drill... its slightly larger, but that's ok, all you need to do is get the bolt through the bottom of the housing.
All I need to do now is add the bracket to hold the ABS wire (I bought struts originally from an LX, not a big deal, the ABS bracket is simple to add), and paint over the coating of primer. Then the Konis are ready to go in.
Anyone who whines about having to cut your struts up for Konis... its not that bad. 2 hours of your time is all it takes, and you can be on your way to bolting those ricey yellow tubes in your wheel wells.... and we all know how much faster you go with yellow stuff.
Step 2 Koni Installs
Well I have a little better understanding of why the install sucks now. Its still not bad, but you need to get as low tech as you can here. Like caveman technology.
You need the following to do this part.
Big Hammer
Something to hit with the hammer
Dremel or something with a grinding drum
8mm allen wrench
The Fast and the Furious DVD
The first thing you need to do is release your inner ricer. You decided to put yellow stuff on your car, so now you need to come to terms with that decision. Pop in the movie and start watching as you work.

See how many incorrect, moronic statements you can identify.
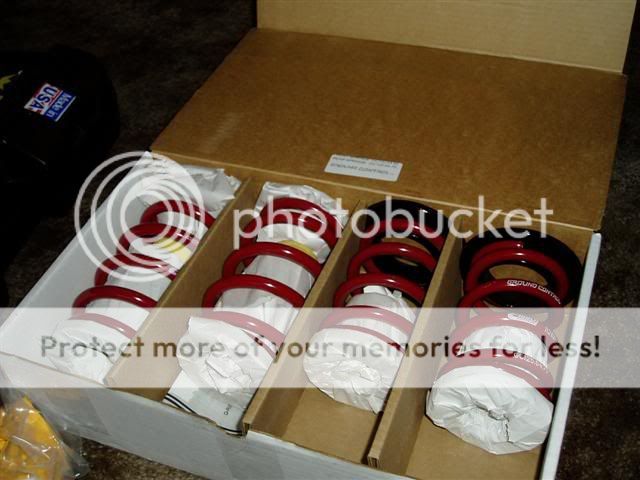
Then look at your parts pile. You should have 4 Konis and some sort of springs
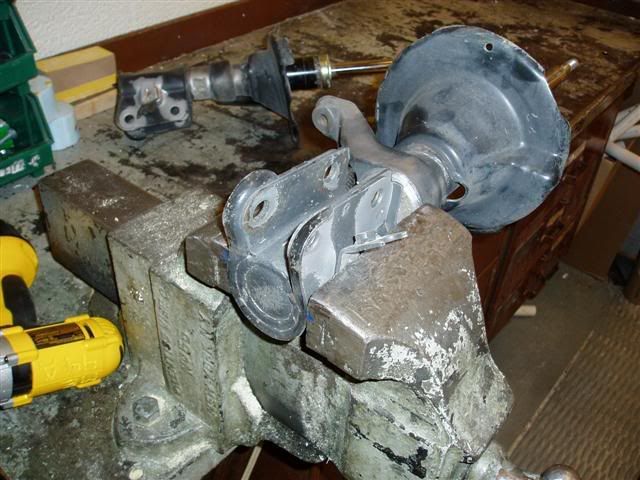
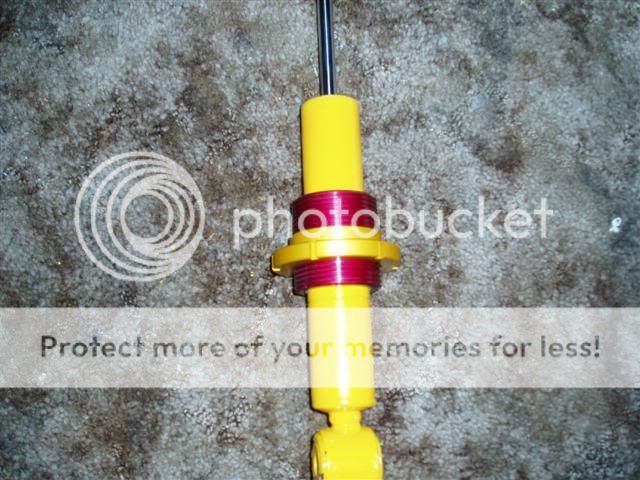
For the moment, this section will be a little hodgepodge, mostly because I screwed up. I did the rear install for Ground Controls and mistakenly did the front install for stock sized springs. Pay attention. The first thing you need to realize is that Konis instructions are non-descript pictures with arrows. Hopefully this will clear that up. Ground Control's instructions are pathetic. They're photocopies of something that looks like it was done up on a cocktail napkin, there's whiteout marks all over them, and no real direction. Nursery School quality, I'd be embarrassed if I was the guy who approved these things. I'll tell you how to do it, since they apparently can't (I screwed it up).
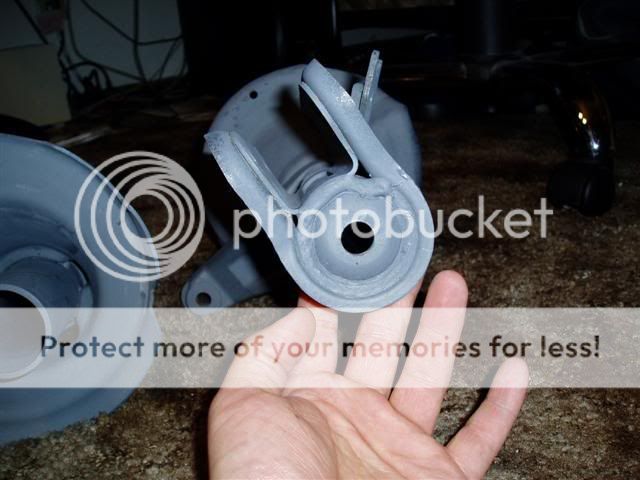
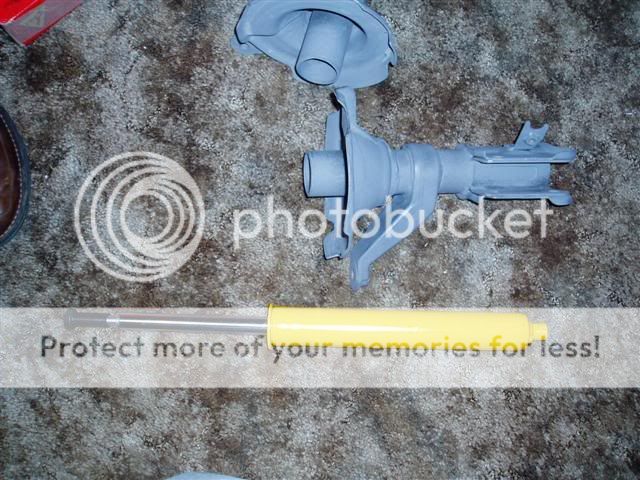
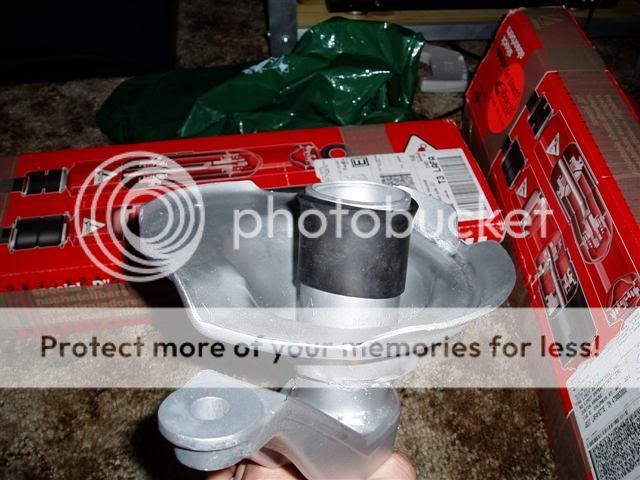
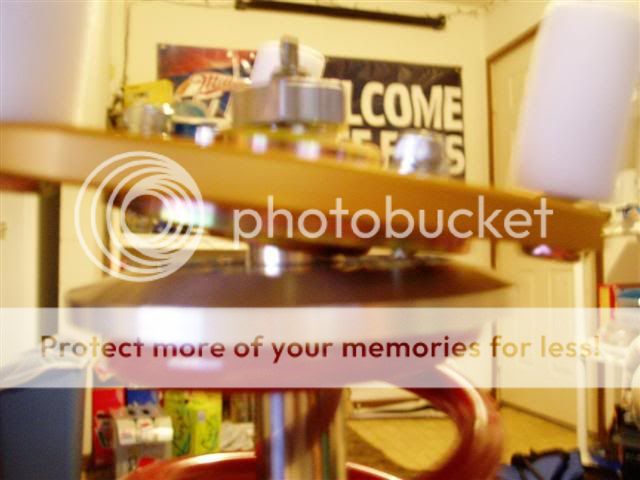
These are my finished housings. I painted them silver and added ABS brackets to a set of LX housings. The bar next to the strut is the bracket. Its not hard, all you have to do is hold the nut so the line stays put. I JB Welded it on.
For stock size springs start here
First slip the rubber gasket all the way onto the housing.
Slide the Koni into the housing....

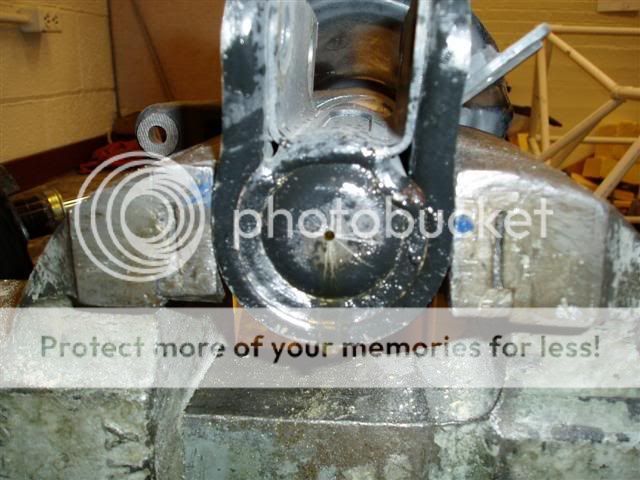
you'll find that the 3 raised tabs that center the cartrige in the housing probably don't fit.... if you're lucky and you cleaned the cut out real well, then maybe they do. If you weren't so lucky, here's what to do.
Mark with a Sharpie where the 3 tabs are, then get the grinder out and grind a chamfer into the wall of the strut housing where you marked... this will help get the tabs started. With the use of your low tech hammer and object to hit (I used an 18" bar of Chrome Moly), start tapping (whacking) the Koni down into the housing. I set the housing on concrete to do this, I recommend the use of a solid object like the ground. Make sure you don't bang the piston, or the adjustment ****, thats why I used something so long... to make sure I didn't hit the strut. I also taped off the bottom so I didn't mark anything up.
Once you get the tabs in there, it'll go pretty fast, just keep going until the insert bottoms out.
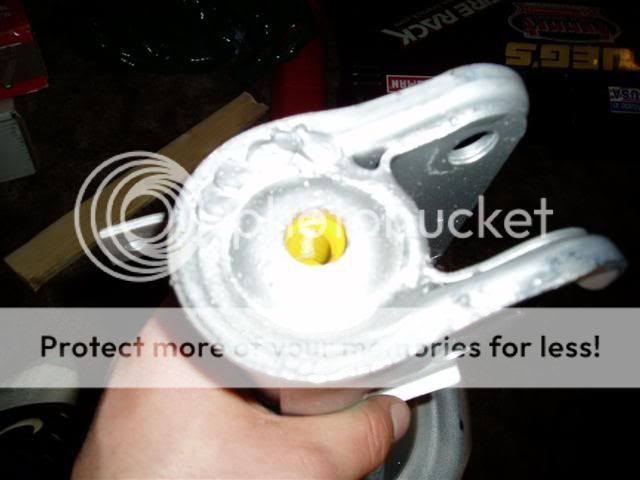
Then with the supplied hardware, bolt the bottom in and torque it to 55 lb-ft.

Why they gave you an allen screw then specified a torque, I don't know. I don't have allen keys for a torque wrench, so I figured that if I went a little past the point where the lock washer started crushing, I was good.
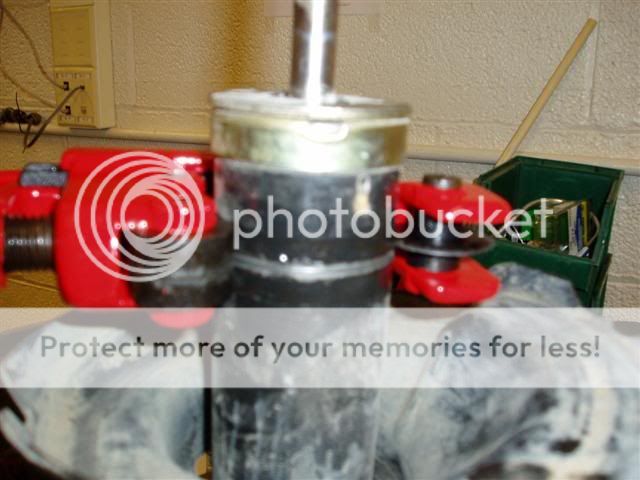
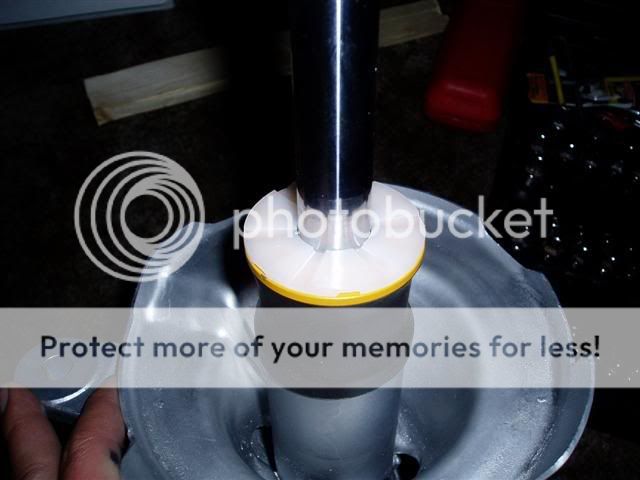
Then slide the dust gasket up over the insert so the lip on the gasket fits in the groove on the Koni
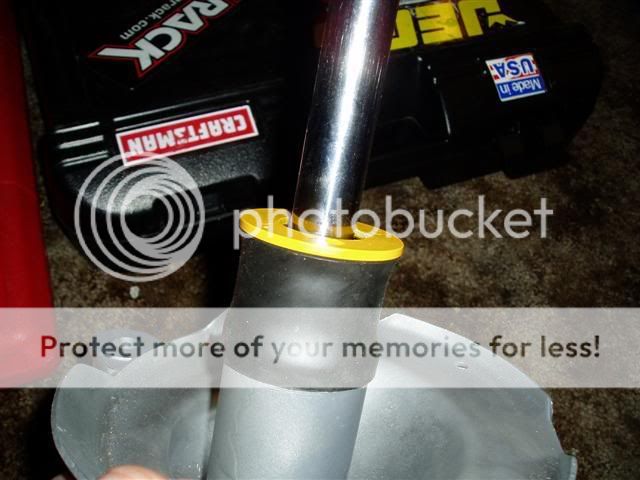
The last step is to install the bottom out protection ring. Basically this goes under the bumpstop, if you should happen to completely bottom out and the bumpstop can't compress anymore, this little ring keeps the shock seals from blowing. Use it.
For Ground Control Fronts Start HERE
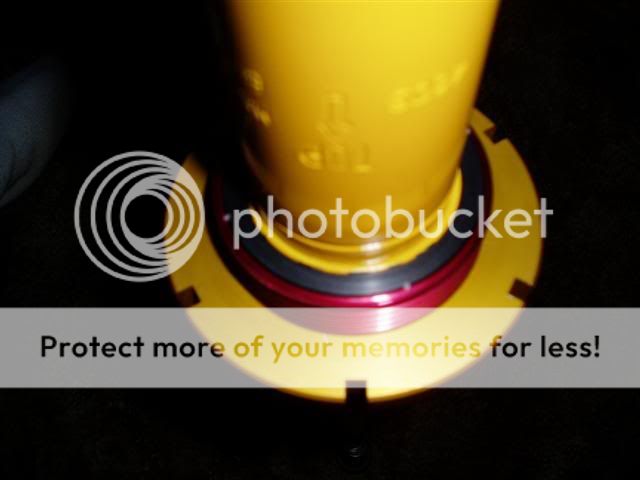
The difference for GCs is that instead of installing the rubber gasket, you install the GC sleeve and O-ring. The ground control instructions neglect to mention that you need to install the sleeve prior to installing the Koni insert. If you don't put it on first, you can't easily get the Koni out and you're stuck with useless parts.... so make sure its on there. The lip on the Koni holds the sleeve in place. Should you mess it up, you can hammer the koni out from the bottom. Use a BLUNT tool, not a screwdriver, to knock it out. Just an FYI, the thread Koni uses on that bottom bolt is M12x1.5. This is not standard and is difficult to find if you mess up the threads and have to chase them out with a tap (I found out the hard way).
I wish I remembered to take a picture of this, but oh well.... with the GC front sleeves, you should find 2 rubber O-rings taped inside. Slide these over the stock strut housing, then slide the sleeve over them. You'll have to spin the sleeve as it goes so the o-ring works its way up inside the sleeve. It keeps the sleeve from rattling around and holds it still. Once you have the sleeve seated, THEN put the Koni in and set it down. Bolt it in the bottom put the spring perch on and remember to install the Koni valve seal protector ring. Use the GC supplied bumpstop.

It fits rather tight, so I just ran it about 1/2 way down the piston, I'll drive the car around and let it find its final spot.
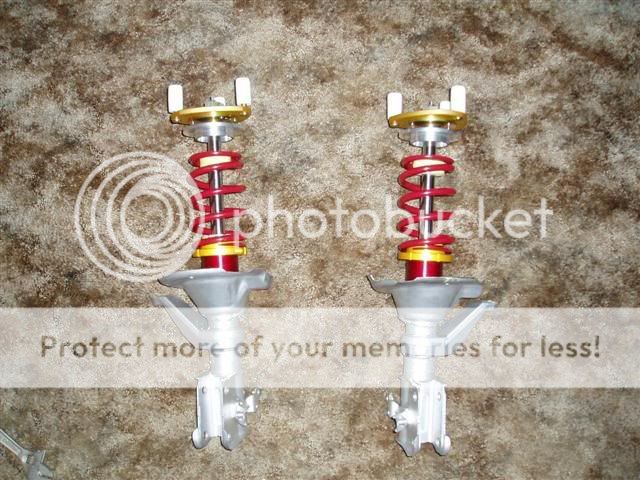
Then put the spring on.
Now, if you're cool like me, you machined your own upper spring seats so you could use camber plates.
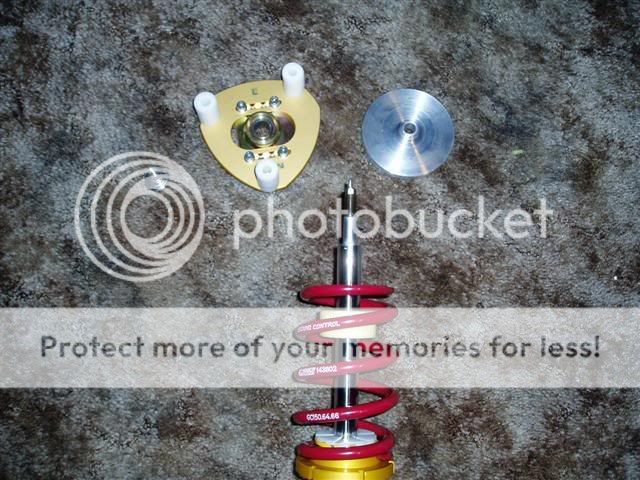
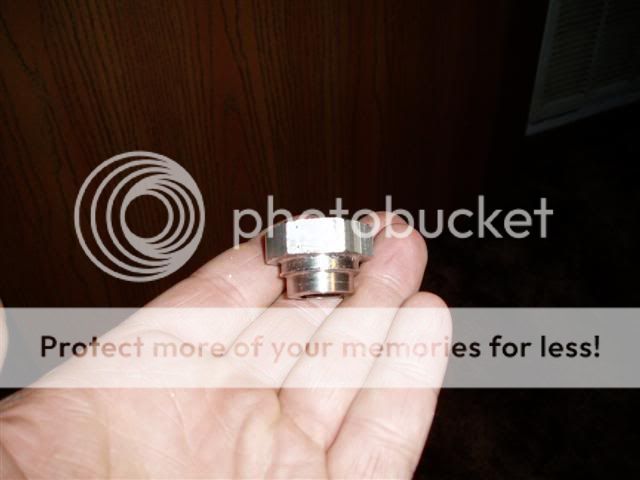
Put your custom seat on, then the camber plate, then bolt it all together with the crown nut which is also custom made.
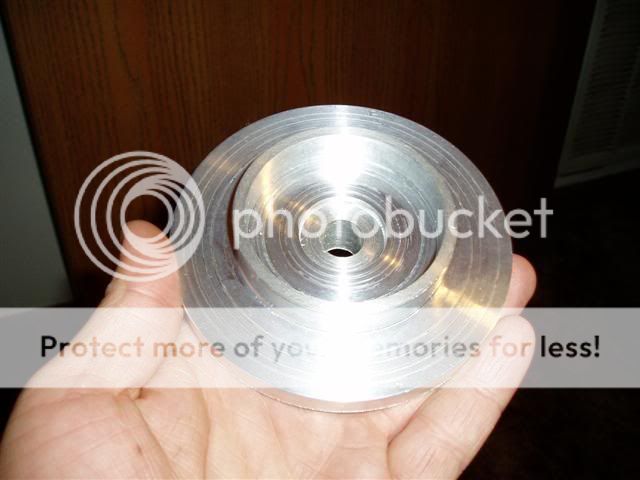
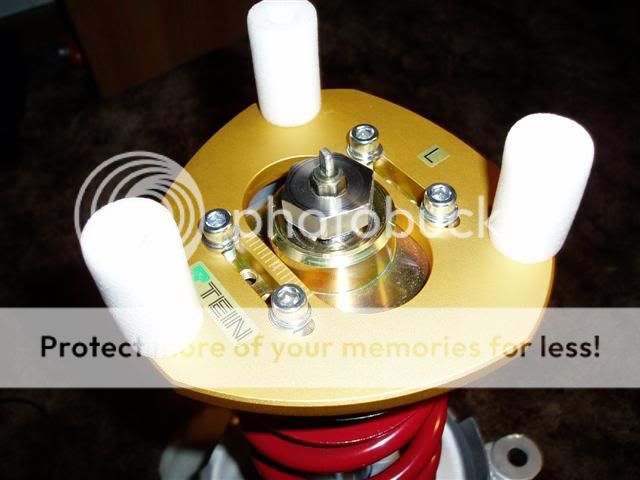

I have a little finish work to do on the seat tomorrow.... I need to add a small clearance angle on the top surface to make sure the bottoms of the studs don't hit it, but its just quick finish work. Total machining time was about 6 hours for both seats (6061 Aluminum) and the 2 crown nuts (316 Stainless). It was all done by hand (no CNC).
I finished them off and assembled them tonight. I put a clearance angle in the hat just to make sure that the camber plate and spring seat don't have a chance of hitting eachother. It all fits together like it should, no fit issues at all.

If you're normal, then you need to take the steering bearing whole (both halves) and install it in the GC upper seat, then reuse the stock top mount and bolt it back together with the Koni hardware. GCs seem to be model year specific, I'm guessing its for the steering bearing seat. Anyone who needs them for an 02, I got a set laying around now .
.
Rears for Ground Controls
If you look at the Koni rears, they've got a couple grooves and a C ring on them.
Then look at the GCs (assuming you bought the kit for Konis, which you should have if you bought Konis), theres a ring inside the sleeve with a groove. The C ring fits in the groove.

Put the sleeve on the shock and push it down. Its a pretty precise fit so theres no slop, you're gonna have to push hard, but it will go. Push it all the way down, you'll hear the C-ring click into the groove.
Piece of cake, thats done, put the spring on, put the rubber isolator on in place of the dust boot and reinstall the upper hat, make sure you use the Koni supplied upper mount hardware in place of the stock hardware.
I found that the rear springs that came in the kit were too short to hold the rear of the car up. At full height on the perches, the rear tires tucked in. I had them replaced with longer 6" springs which will take the travel of the rear all the way to stock height. If you do order GCs, I recommend doing the same thing, order direct from GC or ask your dealer to custom order the kit with 6" rear springs (opposed to 5")
I'll have full install details for sport springs on saturday or sunday, so if you're not doing coilovers, stay tuned for that.
Just keep an eye on this thread, the target day to have everything in my car is March 5, 2005, but I'm gonna add to it as I put stuff together, I'm still waiting for a few parts to show up and assemble everything.
Step 0: Getting Stock Stuff Out
I'm gonna blow through this because its not hard and its detailed elsewhere already.
Once you jack up both ends of the car and put it on stands with all the wheels off.....
Start with the front. Undo the brake line bolt and the ABS bolt on the EX.
Remove the cotter pin and nut from the steering arm, with a tie rod tool, pop the tie rod out.
Loosen the 2 crash bolts, before you remove them, use a strap or something to hold the hub upright so your axle doesn't fall out, then remove the crash bolts
Then remove the 3 bolts holding the top hat to the car and remove the strut.
For the rear, remove the 2 bolts in the trunk holding the top hat in, unbolt the Upper control arm from the knuckle to allow for some more travel and unbolt the shock from the A arm. Then remove the shock/spring assembly.
Step 1: Gutting Struts for Konis (done the right way)
This is not as simple as it sounds, it takes some precision tools to do and some patience to get it right.
For this project you need:
Set of calipers (dial or digital)
Pipe cutter
Safety glasses
A bucket
Assortment of small drill bits
14mm or 9/16" drill bit (a metal specific bit is best)
A drill with a 1/2" chuck
Dremel or some kind of small grinder
Ok, I skipped some of the pictures if the Koni directions outlined it well, or I needed 2 hands to do it. First thing you need to do is measure the strut housing, this needs to be done BEFORE you order your Konis. If you look at some of the pictures below, you need to measure the strut diameter in the area that you will be cutting. You should end up with 1 of 2 numbers..... either something about 51mm, or something about 56mm. When you order your konis, you need to specify what size the housing is so you get the correct size inserts.
Once you get your konis, you can start hacking up the stock struts. An alternative is to do what I did..... put an add in the WTB forum, offer $50 and pick up an extra set that you can cut up without destroying your own. If you feel iffy about being able to successfully do this, it also leaves you a spare in case you irreversably mess up (I don't think thats possible).
Take your calipers, measure 40mm down from the seal on top of the housing. You'll notice that caliper jaws have sharp points on them, its so you can scribe with them. Lock the calipers at 40mm and scribe a line all the way around the strut at that level. Then go to the bottom. You need to find the center. Easiest way is to measure across the bottom of just the circular part (ignore the crash bolt bracket). Because of the banding around the bottom that makes up the bracket, your centerpoint is not at 1/2 of the diameter of the casing. Its 1/2 the outer diameter of the banding for the bracket. Mark your center by locating 1 jaw on the edge and scribing the bottom from 3-4 different directions. You should end up with something that looks like an asterisk... where the lines cross is dead center. Take a punch awl and mark it so your drill bit finds it.
I did the work in a plain old bench vise, I'm sure there's fancier tools to do it with, but I don't think they're necessary. I do not recommend total freehand or setting the strut between your knees to do the cutting and drilling, put it in something.
Start off by laying the strut horizontally in the vise.
My struts are funny colored because I grit blasted some of the rust, dirt and junk off of them first, so some of it is bare metal.... I'll fix that later.
Then take a small drill bit, about 1/16" and drill a pilot hole through the center.
At this point, I'll warn you, if you're shocks aren't blown completely, then the oil is under pressure (which can be high if they're still good). Be prepared for a face full.
With it still horizontal, position your tubing cutter on the line you made at the 40mm mark. Tighten it down and get it started, then crank it tight so it doesn't move when you move it. If you have enough bench clearance, you don't need to move it, but I didn't, so I had to tip the strut vertical to finish it.
Continue tightening and turning until the housing comes apart. Tubing cutters this size can be expensive. I got a cheap one from Harbor Freight, it was like $13.00, it did the job. Precision is not key, you just need to get the housing apart. Perpendicular edges are not required.
Once it breaks through, finish the turn so the whole housing is loose,
then just pull the guts out. Having a bucket underneath the vice while you're doing all this is necessary unless you like cleaning up a big oil mess later on. there was quite a bit of oil in the struts.
Now all you need to do is rinse and repeat for the other one.
Once you get them cut, you can pour some simple green down the housings to degrease the insides a little, rinse them out good.
Take a dremel and grind down the edge that the pipe cutter left behind so its smooth. Drilling the hole for the bottom bolt is interesting. I understand that most people don't have a huge drill to do this with. You're on your own with that. A drill bit that big for cutting metal is about $25... just pay it or find somewhere to borrow it. I'm lucky enough to still be at school, we have a machine shop, we just stuck the housing in a Bridgeport mill and drilled right through it. But anyways, put the strut back in the vice, drill the hole, 14mm or 9/16, you'll probably have more luck finding a 9/16 bit, I don't know if a bit that big is available with a reduced shank to 3/8, but what you may be able to get is 9/16" hole saw with a 1/4" pilot drill... its slightly larger, but that's ok, all you need to do is get the bolt through the bottom of the housing.
All I need to do now is add the bracket to hold the ABS wire (I bought struts originally from an LX, not a big deal, the ABS bracket is simple to add), and paint over the coating of primer. Then the Konis are ready to go in.
Anyone who whines about having to cut your struts up for Konis... its not that bad. 2 hours of your time is all it takes, and you can be on your way to bolting those ricey yellow tubes in your wheel wells.... and we all know how much faster you go with yellow stuff.
Step 2 Koni Installs
Well I have a little better understanding of why the install sucks now. Its still not bad, but you need to get as low tech as you can here. Like caveman technology.
You need the following to do this part.
Big Hammer
Something to hit with the hammer
Dremel or something with a grinding drum
8mm allen wrench
The Fast and the Furious DVD
The first thing you need to do is release your inner ricer. You decided to put yellow stuff on your car, so now you need to come to terms with that decision. Pop in the movie and start watching as you work.
See how many incorrect, moronic statements you can identify.
Then look at your parts pile. You should have 4 Konis and some sort of springs
For the moment, this section will be a little hodgepodge, mostly because I screwed up. I did the rear install for Ground Controls and mistakenly did the front install for stock sized springs. Pay attention. The first thing you need to realize is that Konis instructions are non-descript pictures with arrows. Hopefully this will clear that up. Ground Control's instructions are pathetic. They're photocopies of something that looks like it was done up on a cocktail napkin, there's whiteout marks all over them, and no real direction. Nursery School quality, I'd be embarrassed if I was the guy who approved these things. I'll tell you how to do it, since they apparently can't (I screwed it up).
These are my finished housings. I painted them silver and added ABS brackets to a set of LX housings. The bar next to the strut is the bracket. Its not hard, all you have to do is hold the nut so the line stays put. I JB Welded it on.
For stock size springs start here
First slip the rubber gasket all the way onto the housing.
Slide the Koni into the housing....
you'll find that the 3 raised tabs that center the cartrige in the housing probably don't fit.... if you're lucky and you cleaned the cut out real well, then maybe they do. If you weren't so lucky, here's what to do.
Mark with a Sharpie where the 3 tabs are, then get the grinder out and grind a chamfer into the wall of the strut housing where you marked... this will help get the tabs started. With the use of your low tech hammer and object to hit (I used an 18" bar of Chrome Moly), start tapping (whacking) the Koni down into the housing. I set the housing on concrete to do this, I recommend the use of a solid object like the ground. Make sure you don't bang the piston, or the adjustment ****, thats why I used something so long... to make sure I didn't hit the strut. I also taped off the bottom so I didn't mark anything up.
Once you get the tabs in there, it'll go pretty fast, just keep going until the insert bottoms out.
Then with the supplied hardware, bolt the bottom in and torque it to 55 lb-ft.
Why they gave you an allen screw then specified a torque, I don't know. I don't have allen keys for a torque wrench, so I figured that if I went a little past the point where the lock washer started crushing, I was good.
Then slide the dust gasket up over the insert so the lip on the gasket fits in the groove on the Koni
The last step is to install the bottom out protection ring. Basically this goes under the bumpstop, if you should happen to completely bottom out and the bumpstop can't compress anymore, this little ring keeps the shock seals from blowing. Use it.
For Ground Control Fronts Start HERE
The difference for GCs is that instead of installing the rubber gasket, you install the GC sleeve and O-ring. The ground control instructions neglect to mention that you need to install the sleeve prior to installing the Koni insert. If you don't put it on first, you can't easily get the Koni out and you're stuck with useless parts.... so make sure its on there. The lip on the Koni holds the sleeve in place. Should you mess it up, you can hammer the koni out from the bottom. Use a BLUNT tool, not a screwdriver, to knock it out. Just an FYI, the thread Koni uses on that bottom bolt is M12x1.5. This is not standard and is difficult to find if you mess up the threads and have to chase them out with a tap (I found out the hard way).
I wish I remembered to take a picture of this, but oh well.... with the GC front sleeves, you should find 2 rubber O-rings taped inside. Slide these over the stock strut housing, then slide the sleeve over them. You'll have to spin the sleeve as it goes so the o-ring works its way up inside the sleeve. It keeps the sleeve from rattling around and holds it still. Once you have the sleeve seated, THEN put the Koni in and set it down. Bolt it in the bottom put the spring perch on and remember to install the Koni valve seal protector ring. Use the GC supplied bumpstop.
It fits rather tight, so I just ran it about 1/2 way down the piston, I'll drive the car around and let it find its final spot.
Then put the spring on.
Now, if you're cool like me, you machined your own upper spring seats so you could use camber plates.
Put your custom seat on, then the camber plate, then bolt it all together with the crown nut which is also custom made.
I have a little finish work to do on the seat tomorrow.... I need to add a small clearance angle on the top surface to make sure the bottoms of the studs don't hit it, but its just quick finish work. Total machining time was about 6 hours for both seats (6061 Aluminum) and the 2 crown nuts (316 Stainless). It was all done by hand (no CNC).
I finished them off and assembled them tonight. I put a clearance angle in the hat just to make sure that the camber plate and spring seat don't have a chance of hitting eachother. It all fits together like it should, no fit issues at all.
If you're normal, then you need to take the steering bearing whole (both halves) and install it in the GC upper seat, then reuse the stock top mount and bolt it back together with the Koni hardware. GCs seem to be model year specific, I'm guessing its for the steering bearing seat. Anyone who needs them for an 02, I got a set laying around now
Rears for Ground Controls
If you look at the Koni rears, they've got a couple grooves and a C ring on them.
Then look at the GCs (assuming you bought the kit for Konis, which you should have if you bought Konis), theres a ring inside the sleeve with a groove. The C ring fits in the groove.
Put the sleeve on the shock and push it down. Its a pretty precise fit so theres no slop, you're gonna have to push hard, but it will go. Push it all the way down, you'll hear the C-ring click into the groove.
Piece of cake, thats done, put the spring on, put the rubber isolator on in place of the dust boot and reinstall the upper hat, make sure you use the Koni supplied upper mount hardware in place of the stock hardware.
I found that the rear springs that came in the kit were too short to hold the rear of the car up. At full height on the perches, the rear tires tucked in. I had them replaced with longer 6" springs which will take the travel of the rear all the way to stock height. If you do order GCs, I recommend doing the same thing, order direct from GC or ask your dealer to custom order the kit with 6" rear springs (opposed to 5")
I'll have full install details for sport springs on saturday or sunday, so if you're not doing coilovers, stay tuned for that.
Last edited by Boilermaker1; 01-06-2007 at 05:15 PM.


 02-19-2005
#8
Registered!!
iTrader: (18)
Join Date: May 2002
Location: San Francisco/Berkeley, California, US
Posts: 2,492
Likes: 0
Received 0 Likes
on
0 Posts
Rep Power: 0 just curious... is it possible to buy some stock shocks from 03-05 and swap it into a 01-02?
and is there anyway to measure the strut diameter w/o taking out the strut?
and is there anyway to measure the strut diameter w/o taking out the strut?
02-19-2005
#11
Jap-Euro Fusion
Hey! Look At Me!! I'm a Supporting Member!!
Thread Starter
iTrader: (16)
Join Date: Jul 2002
Location: Washington DC
Age: 41
Posts: 13,151
Likes: 0
Received 3 Likes
on
3 Posts
Rep Power: 400
Originally Posted by wonderz
just curious... is it possible to buy some stock shocks from 03-05 and swap it into a 01-02?
and is there anyway to measure the strut diameter w/o taking out the strut?
and is there anyway to measure the strut diameter w/o taking out the strut?
wow. update with more pictures!!! i need more pictures lol
where did you get the upper mounts?
Last edited by Boilermaker1; 02-19-2005 at 10:41 PM.
02-20-2005
#13
Registered!!
iTrader: (1)
Join Date: Oct 2002
Location: 4o8, California
Posts: 2,150
Likes: 0
Received 1 Like
on
1 Post
Rep Power: 286 Good write up. When I did my Koni's with Eibach's I had similar issues. It was tough getting the insert into the housing, but I just laid a rag onto the ground, gripped the insert and kept banging the whole assembly on the rag until it was all the way down. Primitive? Yes. Did it work? Yes.. however:
Word of caution for anyone having trouble getting the insert into the housing: Whatever you do, dont file, grind or sand down the three raised bumps on the insert. If you do, later you might find out the top of the insert is loose and making noise. I made this mistake on one side, but fixed it with a 2" exhaust clamp and slotting the top of the insert. Thats a different story for some other day. If your curious let me know and I'll try to explain it.
Oh and for the bottom bolt, I bought an 3/8" drive 8mm socket from Kragens. Under 10 bucks I think. This torque setting is probably the most important one to get right. I believe that it must be torqued down to 55 ft-lbs. I went 60. If you ever read about peoples Konis making noises or banging sounds, alot of times is due to this bolt not being properly torqued, loose or missing.
02-20-2005
#14
Life Begins > 6800rpms
Hey! Look At Me!! I'm a Supporting Member!!
iTrader: (14)
Join Date: Aug 2001
Location: Jacksonville, Fl
Age: 44
Posts: 7,097
Likes: 0
Received 0 Likes
on
0 Posts
Rep Power: 350 People are still using Koni's, huh?
I know KYB and Tokico have full replacements out. Aren't those better than just the shock replacements such as Koni's?
Not that I really care, I have full coilovers.
I know KYB and Tokico have full replacements out. Aren't those better than just the shock replacements such as Koni's?
Not that I really care, I have full coilovers.
02-20-2005
#15
Registered!!
iTrader: (2)
Join Date: Dec 2002
Location: Michigan
Age: 38
Posts: 880
Likes: 0
Received 0 Likes
on
0 Posts
Rep Power: 269
Originally Posted by blouisgod
People are still using Koni's, huh?
I know KYB and Tokico have full replacements out. Aren't those better than just the shock replacements such as Koni's?
Not that I really care, I have full coilovers.
I know KYB and Tokico have full replacements out. Aren't those better than just the shock replacements such as Koni's?
Not that I really care, I have full coilovers.
02-21-2005
#16
Jap-Euro Fusion
Hey! Look At Me!! I'm a Supporting Member!!
Thread Starter
iTrader: (16)
Join Date: Jul 2002
Location: Washington DC
Age: 41
Posts: 13,151
Likes: 0
Received 3 Likes
on
3 Posts
Rep Power: 400
Originally Posted by blouisgod
People are still using Koni's, huh?
I know KYB and Tokico have full replacements out. Aren't those better than just the shock replacements such as Koni's?
Not that I really care, I have full coilovers.
I know KYB and Tokico have full replacements out. Aren't those better than just the shock replacements such as Koni's?
Not that I really care, I have full coilovers.
Koni has a huge dealer network in the US as well as countless certified repair shops scattered all over the place and a lifetime warranty. They can be easily rebuilt, revalved, shortened or customized in just about any other way quickly and easily. If you ever have issues at a track day, driving school or any other sort of organized event, your chances of finding someone who knows how to fix them on the fly is quite good vs. a lot of other options.
Koni adjustment changes the handling balance of the car without changing the ride characteristics (quality). Tokicos change both. For the street, fine, for racing... well no one cares about the ride quality, but you wouldn't want to be changing both unless they were independent. Tokico and KYB also have a fixed number of settings, Konis are infinite... the **** just turns you can set it anywhere, not on the clicks. Out of the 3, Konis are also the firmest.
So are people still using Konis? Yes. Anyone whos buying them probably doesn't care about hacking stuff up to get them in, because they know why Konis are as good as they are and they have the reputation about the racing crowd that they've built up.
FYI, I'm pulling a set of full coils out to put Konis in.
02-21-2005
#17
Registered!!
iTrader: (18)
Join Date: May 2002
Location: San Francisco/Berkeley, California, US
Posts: 2,492
Likes: 0
Received 0 Likes
on
0 Posts
Rep Power: 0 i have some questions again... 
1. does sedan oem shocks fit a coupe and vice versa?
2. is only the front inserts and rear is direct fit?
3. do you need to get upper mounts if its an 02?
Thanks
1. does sedan oem shocks fit a coupe and vice versa?
2. is only the front inserts and rear is direct fit?
3. do you need to get upper mounts if its an 02?
Thanks
02-21-2005
#18
Jap-Euro Fusion
Hey! Look At Me!! I'm a Supporting Member!!
Thread Starter
iTrader: (16)
Join Date: Jul 2002
Location: Washington DC
Age: 41
Posts: 13,151
Likes: 0
Received 3 Likes
on
3 Posts
Rep Power: 400
Originally Posted by wonderz
i have some questions again...
1. does sedan oem shocks fit a coupe and vice versa?
2. is only the front inserts and rear is direct fit?
3. do you need to get upper mounts if its an 02?
Thanks
1. does sedan oem shocks fit a coupe and vice versa?
2. is only the front inserts and rear is direct fit?
3. do you need to get upper mounts if its an 02?
Thanks
2. Rears are full replacment
3.You reuse the stock upper mounts unless you want to get crazy like I did.
 02-22-2005
#21
Registered!!
iTrader: (18)
Join Date: May 2002
Location: San Francisco/Berkeley, California, US
Posts: 2,492
Likes: 0
Received 0 Likes
on
0 Posts
Rep Power: 0
Originally Posted by Vinnie
OoooOo Tein upper mounts  , how much did those cost you? Probably not worth replacing my 01 mounts though.
, how much did those cost you? Probably not worth replacing my 01 mounts though.
Originally Posted by Boilermaker1
They're special order parts, plan on 3-6 weeks for them to come in. They're about $200 .
02-22-2005
#23
Jap-Euro Fusion
Hey! Look At Me!! I'm a Supporting Member!!
Thread Starter
iTrader: (16)
Join Date: Jul 2002
Location: Washington DC
Age: 41
Posts: 13,151
Likes: 0
Received 3 Likes
on
3 Posts
Rep Power: 400
Originally Posted by Vinnie
OoooOo Tein upper mounts , how much did those cost you? Probably not worth replacing my 01 mounts though.
, how much did those cost you? Probably not worth replacing my 01 mounts though.
03-01-2005
#25
Jap-Euro Fusion
Hey! Look At Me!! I'm a Supporting Member!!
Thread Starter
iTrader: (16)
Join Date: Jul 2002
Location: Washington DC
Age: 41
Posts: 13,151
Likes: 0
Received 3 Likes
on
3 Posts
Rep Power: 400 Upper mounts installed. Still on schedule for a friday night or saturday install.
In case anyone is wondering
Konis $525
Ground Controls $296
Tein Camber Plates $202
4" Dia bar of 6061 $15.01
1" Hex bar of 316 $2.07
New Honda Rear Upper Hats and Bumpstops $74.12
Blown Struts (for housings) $50
$1164.20
In case anyone is wondering
Konis $525
Ground Controls $296
Tein Camber Plates $202
4" Dia bar of 6061 $15.01
1" Hex bar of 316 $2.07
New Honda Rear Upper Hats and Bumpstops $74.12
Blown Struts (for housings) $50
$1164.20
03-01-2005
#27
Jap-Euro Fusion
Hey! Look At Me!! I'm a Supporting Member!!
Thread Starter
iTrader: (16)
Join Date: Jul 2002
Location: Washington DC
Age: 41
Posts: 13,151
Likes: 0
Received 3 Likes
on
3 Posts
Rep Power: 400 Does it look like its in my car yet?
How the hell would I know? Come on use a little brain power here, I said I was going to put it in on friday or saturday.
How the hell would I know? Come on use a little brain power here, I said I was going to put it in on friday or saturday.
03-01-2005
#28
Registered!!
iTrader: (18)
Join Date: May 2002
Location: San Francisco/Berkeley, California, US
Posts: 2,492
Likes: 0
Received 0 Likes
on
0 Posts
Rep Power: 0
Originally Posted by Boilermaker1
Does it look like its in my car yet?
How the hell would I know? Come on use a little brain power here, I said I was going to put it in on friday or saturday.
How the hell would I know? Come on use a little brain power here, I said I was going to put it in on friday or saturday.
so i assume you would expect this be better than the Tein SS setup after you put all these effort and money into this?sorry if its a dumb thing to ask...
(haha, almost forgot how to spell 'dumb' 'cause i haven't been using it for a long long time)
03-01-2005
#29
Jap-Euro Fusion
Hey! Look At Me!! I'm a Supporting Member!!
Thread Starter
iTrader: (16)
Join Date: Jul 2002
Location: Washington DC
Age: 41
Posts: 13,151
Likes: 0
Received 3 Likes
on
3 Posts
Rep Power: 400 Yes, I expect it will out do the SS... I think it stands a chance to almost out do the Flex kit as well. It has all the features with the exception of adjustable length damper bodies, but the ease of setup flexability from Konis and GCs will probably make it work just as well.

