DIY. Making an old rusted heatshield look new again.
 08-30-2009
#1
Registered!!
Thread Starter

Join Date: Mar 2009
Posts: 64
Likes: 0
Received 0 Likes
on
0 Posts
Rep Power: 0 
DIY. Making an old rusted heatshield look new again.
I have always admired a clean and well maintained engine bay, much like Gearbox's. Yet no matter how hard I scrub or how much degreaser I use, it still look neglected..
The biggest eyesore I have come to notice would be the heatshield on the exhaust manifold...[IMG]
 [/IMG]
and thus the adventure of removing a heatshield began....
those of you with a keen eye will be quick to notice the broken bolt on the right, I had broken it in a previous attempt to remove the heatshieldm, i'm going to leave that for another day.
[IMG]
 [/IMG]
These are the tools I've lined up, I don't have any 12mm sockets or wrech because all the bolts i've rounded off in my last attempt lol.
[IMG]
 [/IMG]
A flashlight, vise grip, bionic wrench (which proved useless), a bottle of liquid wrench, and a pribar which I used to tap the bolts after I've drenched them in liquid wrench, it was in a tight spot and the pribar was able to fit in there perfectly. tapping the bolts vibrated the liquid wrech to help penetrate into the bolt treads.
The bolt on the top left came off like a charm, the bolt 2nd closest to the ground gave me a bit of trouble but still came off. The last bolt closest to the ground, I spent hours on that bolt, I emptied half the can of liquid wrench on in, made several trips to our local tool shop buying what seemed like promising tools, but only to be returned. I decided to call it a night..
The next day I went at it again...this time I got a super tight grip with the vise grips gave it a good yank, and off it came.
[IMG]
 [/IMG]
sorry for the blur
I couldn't just pull the shield off I had to let it fall down underneath my car, the A/C pipes were in the way. never the less I got it off!
[IMG]
 [/IMG]
I had intially planned to replace the old heatshield with a brand new one, but the dealerships wanted 60$... so I decided to renew the old one.
I sanded all the old rust and imperfections away (took me a couple hours). The rust had actually stained some of the metal.


Looks great! but it would look much better in a low gloss black, thats where the engine enamel comes in
[IMG]
 [/IMG]
I put the sanded not yet painted heatshield in to the oven to for a couple mins to get rid of any moisture on the surface, because I had washed it after the sanding.
[IMG]
 [/IMG]
I applied the first coat of enamel, went to bed, woke up and applied the second paint
I then took the newly painted heatshield, placed it in the oven for 2 hours at 300c to heat cure the paint.
[IMG]
 [/IMG]
I also thought it would be smart to replace the old bolts and washers
[IMG]
 [/IMG]
And after it had time to cool down... here it is
[IMG]
 [/IMG]
The following day I replaced the heat shield..
[IMG]
 [/IMG]
[IMG]
 [/IMG]
I hope you guys enjoyed reading this as much as I enjoyed doing it.
As for my next project, I wanna remove the valve cover, sand blast it and have someone powder coat it for me.
The biggest eyesore I have come to notice would be the heatshield on the exhaust manifold...[IMG]

 [/IMG]
and thus the adventure of removing a heatshield began....
those of you with a keen eye will be quick to notice the broken bolt on the right, I had broken it in a previous attempt to remove the heatshieldm, i'm going to leave that for another day.
[IMG]

 [/IMG]
These are the tools I've lined up, I don't have any 12mm sockets or wrech because all the bolts i've rounded off in my last attempt lol.
[IMG]

 [/IMG]
A flashlight, vise grip, bionic wrench (which proved useless), a bottle of liquid wrench, and a pribar which I used to tap the bolts after I've drenched them in liquid wrench, it was in a tight spot and the pribar was able to fit in there perfectly. tapping the bolts vibrated the liquid wrech to help penetrate into the bolt treads.
The bolt on the top left came off like a charm, the bolt 2nd closest to the ground gave me a bit of trouble but still came off. The last bolt closest to the ground, I spent hours on that bolt, I emptied half the can of liquid wrench on in, made several trips to our local tool shop buying what seemed like promising tools, but only to be returned. I decided to call it a night..
The next day I went at it again...this time I got a super tight grip with the vise grips gave it a good yank, and off it came.
[IMG]

 [/IMG]
sorry for the blur
I couldn't just pull the shield off I had to let it fall down underneath my car, the A/C pipes were in the way. never the less I got it off!
[IMG]

 [/IMG]
I had intially planned to replace the old heatshield with a brand new one, but the dealerships wanted 60$... so I decided to renew the old one.
I sanded all the old rust and imperfections away (took me a couple hours). The rust had actually stained some of the metal.


Looks great! but it would look much better in a low gloss black, thats where the engine enamel comes in
[IMG]

 [/IMG]
I put the sanded not yet painted heatshield in to the oven to for a couple mins to get rid of any moisture on the surface, because I had washed it after the sanding.
[IMG]

 [/IMG]
I applied the first coat of enamel, went to bed, woke up and applied the second paint
I then took the newly painted heatshield, placed it in the oven for 2 hours at 300c to heat cure the paint.
[IMG]

 [/IMG]
I also thought it would be smart to replace the old bolts and washers
[IMG]

 [/IMG]
And after it had time to cool down... here it is
[IMG]

 [/IMG]
The following day I replaced the heat shield..
[IMG]

 [/IMG]
[IMG]

 [/IMG]
I hope you guys enjoyed reading this as much as I enjoyed doing it.
As for my next project, I wanna remove the valve cover, sand blast it and have someone powder coat it for me.
Last edited by Anticrime; 08-30-2009 at 02:23 PM.
 08-30-2009
#3
Registered!!
Join Date: Apr 2008
Location: Calgary, Alberta
Age: 40
Posts: 954
Likes: 0
Received 1 Like
on
1 Post
Rep Power: 206 

eventually i would have done the same thing but i completely removed it when i installed my header. i think a nice bronzy blue header looks much cleaner than a rusty old heat shield too. good diy for people who dont want to put a header in though.
Last edited by unTuned; 08-30-2009 at 07:35 PM.
08-30-2009
#5
Premium Member
Hey! Look At Me!! I'm a Supporting Member!!
iTrader: (95)

Join Date: Sep 2002
Location: NV
Age: 43
Posts: 51,241
Likes: 0
Received 18 Likes
on
13 Posts
Rep Power: 787 Re: DIY. Making an old rusted heatshield look new again.
excellent. youll be amazed at how new the bay will look once you clean up all the rusty brackets and bolts. either replace with new stainless ones or paint flat black.
09-04-2009
#6
Registered!!
Thread Starter
Join Date: Mar 2009
Posts: 64
Likes: 0
Received 0 Likes
on
0 Posts
Rep Power: 0 Re: DIY. Making an old rusted heatshield look new again.
only problem now is that the heat shield looks soo new it makes the rest of the engine bay look bad lol...
btw i've found a place that will do powder coating for my heat shield, I was thinking about sandtexture low gloss black (trying to keep it looking original) or maybe a green gloss, and i'd paint the red intake pipe the same color.
what do you think? any recommendations?
btw i've found a place that will do powder coating for my heat shield, I was thinking about sandtexture low gloss black (trying to keep it looking original) or maybe a green gloss, and i'd paint the red intake pipe the same color.
what do you think? any recommendations?
09-04-2009
#7
Registered!!
Hey! Look At Me!! I'm a Supporting Member!!
iTrader: (3)
Join Date: Feb 2006
Location: Irvine, Ca
Posts: 2,172
Likes: 0
Received 1 Like
on
1 Post
Rep Power: 266 Re: DIY. Making an old rusted heatshield look new again.
Wow, that looks really spiffy! Does anyone know if there is a spray pain that resembles the stock color of the heat shield metal? I'd not be as compelled to paint mine black because unlike your 6th (?) gen, stock 7th gen valve covers are not black.
09-04-2009
#8
Premium Member
Hey! Look At Me!! I'm a Supporting Member!!
iTrader: (95)
Join Date: Sep 2002
Location: NV
Age: 43
Posts: 51,241
Likes: 0
Received 18 Likes
on
13 Posts
Rep Power: 787 Re: DIY. Making an old rusted heatshield look new again.
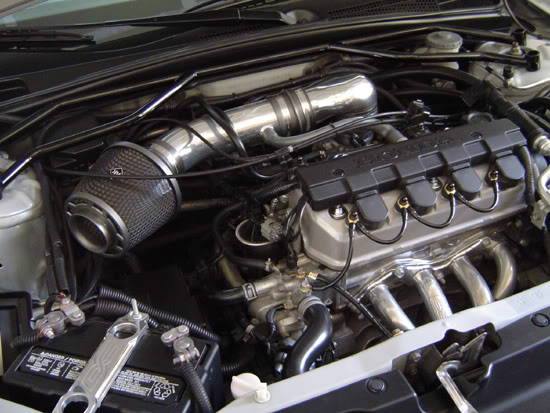
7thgen heat shield polishes up to a chrome finish with a lil work and metal polish
*old pic*
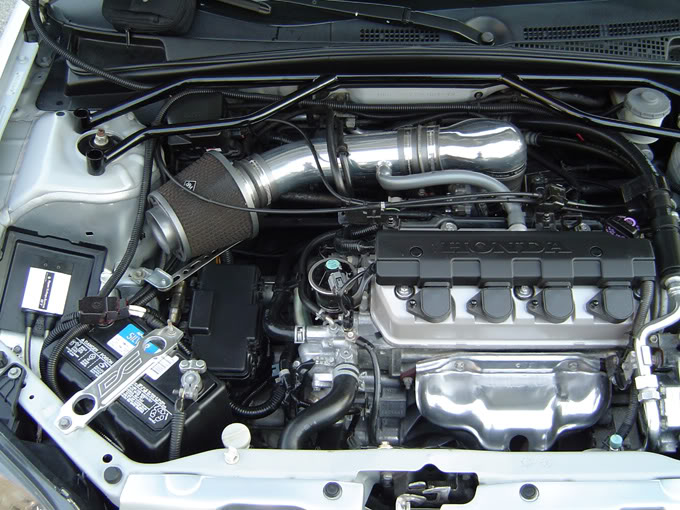
*old pic*
09-04-2009
#10
Registered!!
Join Date: Apr 2008
Location: Calgary, Alberta
Age: 40
Posts: 954
Likes: 0
Received 1 Like
on
1 Post
Rep Power: 206 Re: DIY. Making an old rusted heatshield look new again.
only problem now is that the heat shield looks soo new it makes the rest of the engine bay look bad lol...
btw i've found a place that will do powder coating for my heat shield, I was thinking about sandtexture low gloss black (trying to keep it looking original) or maybe a green gloss, and i'd paint the red intake pipe the same color.
what do you think? any recommendations?
btw i've found a place that will do powder coating for my heat shield, I was thinking about sandtexture low gloss black (trying to keep it looking original) or maybe a green gloss, and i'd paint the red intake pipe the same color.
what do you think? any recommendations?
09-04-2009
#11
Registered!!
Thread Starter
Join Date: Mar 2009
Posts: 64
Likes: 0
Received 0 Likes
on
0 Posts
Rep Power: 0 Re: DIY. Making an old rusted heatshield look new again.
what colour is the car? even if the car is green i dont think it would look very good with the two pieces of red you have unless you changed them both as well.
ive always been a fan of a green and black color scheme.
7thgen heat shield polishes up to a chrome finish with a lil work and metal polish
soooo clean. lol
give me a couple weeks and i'll have mine looking like it just left the dealership too lol
09-04-2009
#12
Registered!!

Join Date: Aug 2009
Location: Metro Detroit
Posts: 58
Likes: 0
Received 0 Likes
on
0 Posts
Rep Power: 0 
 09-05-2009
#13
Premium Member
Hey! Look At Me!! I'm a Supporting Member!!
iTrader: (95)
Join Date: Sep 2002
Location: NV
Age: 43
Posts: 51,241
Likes: 0
Received 18 Likes
on
13 Posts
Rep Power: 787 Re: DIY. Making an old rusted heatshield look new again.
yeah daily driver since 2002 lol. its really hard to keep it clean. this is the most recent shot with the jet-hot coated dc header. the jet coating is really nice cause you can just polish it up when it gets dull. the dc battery tie used to come in chrome, red, and blue but i think it was discontinued. maybe check ebay for old stock. i paid $50 for mine back in the day.
09-16-2009
#14
Registered!!
Join Date: Aug 2009
Posts: 14
Likes: 0
Received 0 Likes
on
0 Posts
Rep Power: 0 Re: DIY. Making an old rusted heatshield look new again.
I would apprieciate it thanks
09-16-2009
#15
Premium Member
Hey! Look At Me!! I'm a Supporting Member!!
iTrader: (95)
Join Date: Sep 2002
Location: NV
Age: 43
Posts: 51,241
Likes: 0
Received 18 Likes
on
13 Posts
Rep Power: 787 Re: DIY. Making an old rusted heatshield look new again.
its kinda hard to see, but where the filter connects to the pipe i just tied a piece of metal wire to a small bracket on the cruise control box. its not the greatest way but it holds the intake up. in that old pic, you can see the long metal bracket on the bottom of the filter connecting to the stock mounting point. i took that out cause it was bending down too easily and not strong enough. heres a pic of the new mount/

09-17-2009
#16
Registered!!
Join Date: Aug 2009
Posts: 14
Likes: 0
Received 0 Likes
on
0 Posts
Rep Power: 0 Re: DIY. Making an old rusted heatshield look new again.
its kinda hard to see, but where the filter connects to the pipe i just tied a piece of metal wire to a small bracket on the cruise control box. its not the greatest way but it holds the intake up. in that old pic, you can see the long metal bracket on the bottom of the filter connecting to the stock mounting point. i took that out cause it was bending down too easily and not strong enough. heres a pic of the new mount/

Thread
Thread Starter
Honda Civic Forum
Replies
Last Post
SSMatey
Mechanical Problems/Vehicle Issues and Fix-it Forum
4
04-13-2015 06:09 PM

