DIY: Custom Trunk II !with access to spare tire!
 06-22-2005
#1
Last time I had this much fun some furniture got broken!
Hey! Look At Me!! I'm a Supporting Member!!
Thread Starter
iTrader: (1)
DIY: Custom Trunk II !with access to spare tire!
I did this cause I wanted a sexy, functional trunk, that allowed EASY access to my spare tire. Hope this gets stickied and added to DIY section!
Warning: There is alot of reading here, so I hope it is more in-depth than you need. Don't think i'm talking down to you, I just want to make this as easy to understand as possible. Hope you guys like.
-----------------------------------------
Part I
Suplies Needed:
Tools Needed:
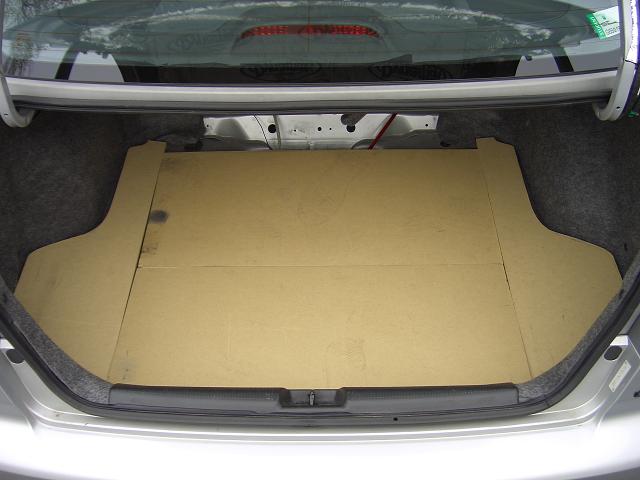
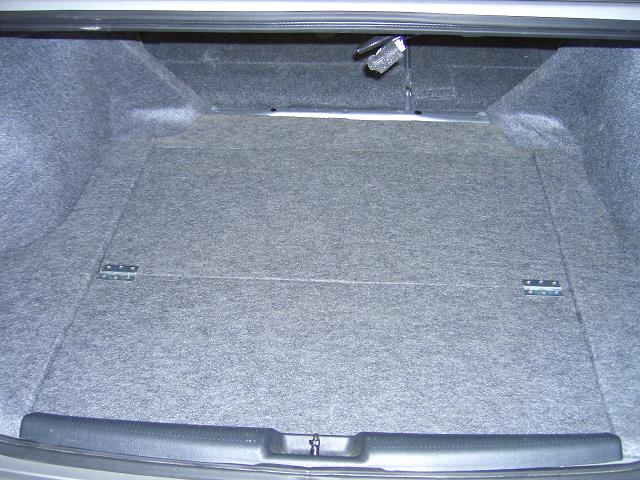
Take the Carpet that covered the floor board before. Place it over your MDF and trace the edge of the carpet onto your MDF. Leave a few inches of clearence on each of the 3 sides and the 4th should be about 1/2 in the large piece of wood you have.
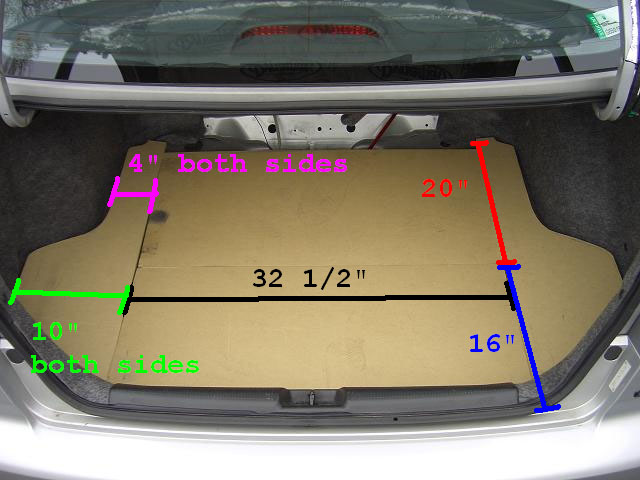
UPDATE: Here is a pic with the sizes I used (all measurements are rounded to the nearest 1/2". I also measured these after putting the carpet on! Yours may be a bit smaller:
Using the circular saw, cut off the other like 1/2 of the MDF which you will not need. This is the part with nothing stenciled on it. If you dont understand me here I dont think you need to go any firther with this project.
Now that you have a more managable piece of wood with less edge space, get out the Jig Saw.
Saw the odd little shape out, taking your time with each bend. If you cut a little off its perfectly OK! When you carpet over you will not see the mess-ups, but try to sand/dremel and edges to something smooth. Especially where the wood chips off, which it will.
Test fit the cut out MDF you have now, it should somewhat fit in there well.
Put the side carpeting back on (vertical, with lips touching the floor of trunk) and put the wood back in. Because of the lip of this stiff carpet type stuff, it will not fit perfectly, but thats ok. thats what the razor is for later.
Mark lines on each side of the wood to get something like this shape here:
Make sure that the pieces you cut will be supported on each side by the floor! We dont want you making the middle too skinny and falling in!!!!
I recommend 33" wide in a sedan trunk!
Obviously get out the circular saw and cut these pieces out.
Test fit again, this time with the spare tire in its place!
Put sub box in this time. Make a line a few inches in front of box, but make sure if you cut there that you will have enough room to get the spare out with only the front piece open!
Remove, and cut on that line. Now test fit one more time to make sure!
One last piece to cut, if you want it like mine. Measure from the top of the MDF floor you created in the side corner right in front of the tail light to the top of the trunk interior. measure the rough width of the area you are working in. With a 3/4" MDF floor I used a piece 14 1/2" x 18" in my sedan.
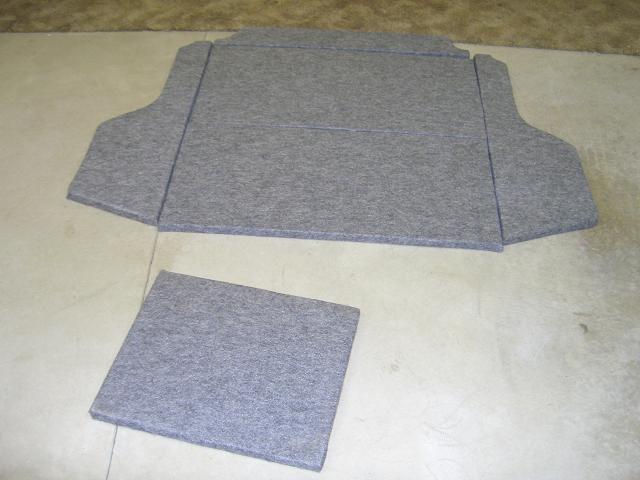
Ok so take it out, its time to carpet!
To carpet place one piece of wood at a time over the carpet. Cut out the piece with about 1 1/2" - 2" extra all around. I recommend getting all pieces cut first then carpeting.
Spray the Carpet and wood with a medium coat of adhesive. let get tacky for about 1-2 mins. Spray again then apply the carpet. make sure you pull tight over the whole piece and smooth on so you dont get bubbles and wrinkles.
If you have tight corners cut a slit in the carpet and cut excess so it doesnt fold on itself. any parts that lift just spray over and push hard, keeping pressure until it is set.

Let set for a while - 15 mins+.
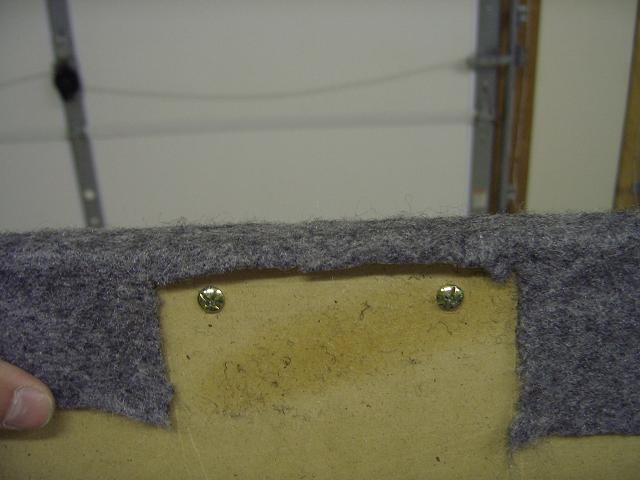
Now lets get the handle on. Cut some carpeting away in that area and drill 2 holes just big enough to get the handle screws in. Rest is self explanitory.

Now lets get the razor out for some fun. Too bad I dont have any good pics for this. Pretty much just put the wood back into place in the trunk, with all carpeting and trim in place. Using the razor cut any spots of carpet that prevent the MDF floor you made from lieing flat. Usually any place the carpeting sidewall stuff curves horizontally to touch the floor cut it off. Now everything sits very level.

Now take the 2 middle piece out and install the hinges. Drill + screws + common sense = finished installing hinges. You may want to drill countersunk pilot holes before carpeting but good luck finding them later.
Put the spare back in now, and the tools if you want, since the wood is staying in place now.
Run all wires you the side now, behind the carpeting stuff that makes the "sides" of the trunk. Dont cut anything yet...
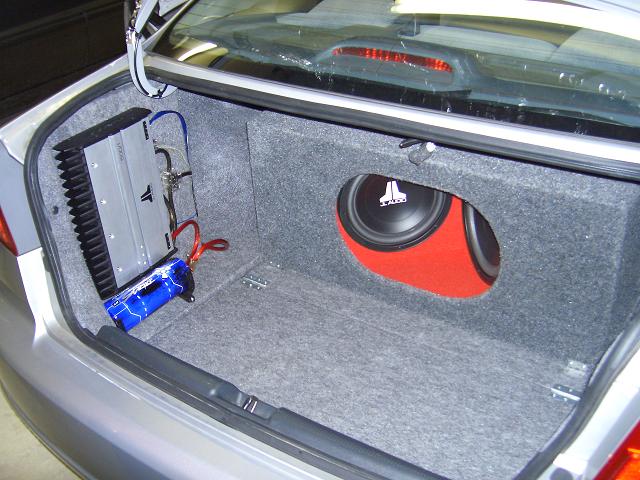
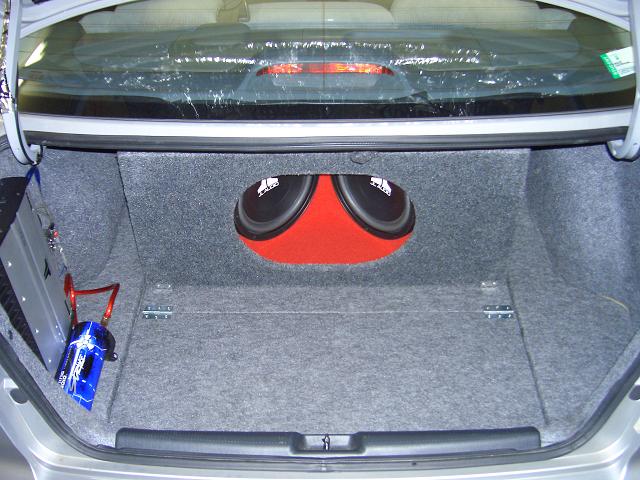
Put the box in now, using L brackets to secure it. I nice trick is mock-mount everything and mark the edge of the L brackets, seating them under the box like I did. Now take the box out. Keep the L brackets in place and screw them in using screws and the drill.
After that you want to put the box back in and screw in to the L brackets. The reason we did this is so you dont have the bottom of the L bracket sticking out, the box is actually sitting ON it! Good idea eh?
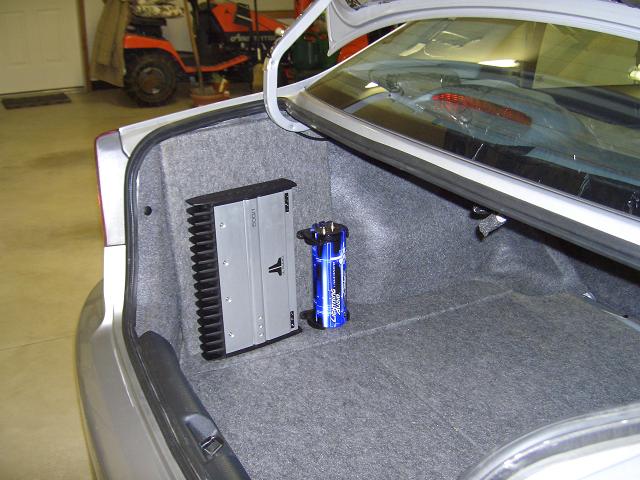
So we are down to the home stretch; the amplifier (and possibly capacitor too.)
Mock fit the wood into place. What we want to do it first take the carpeted wood piece we cut earlier and make sure your amp fits well on it. If so we are ready to proceed.
Cut a nice complete slit in the carpeting on the wall, so we can place this new piece we made behind it. You can drill holes in the carpet to run wires through to the front or just cut it and glue it to our board later on like I did. Either way works, but Maybe the way I didn't do it will look cleaner.
This is the hard part: The way I mounted the board is slightly tricky. 2 L brackets on the bottom are no problem, but the top is another story. With the board in place the very top should be resting on a large metal tab of the inner trunk frame usually hidden behind the carpet. You need to get a screw through the wood and the metal to secure this in. It took me many many tries to get it in the metal and a burn or two but if you have a helper hold the wood firmly into place you are set! Once mounted plug in the amp and mount (screw) it on.
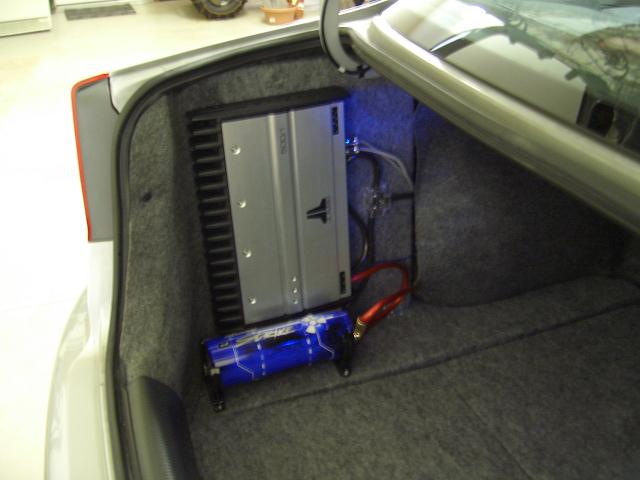
Like in the pic you want to get everything routed nicely. Spray carpet adhesive and trim as necessary to get the carpet into place over the piece we made that the amp is mounted on.
If you want the amp lit like mine replace your bulb with an LED bulb from LEDautomotive.com cause it shies right over in that direction.
Night Shot:
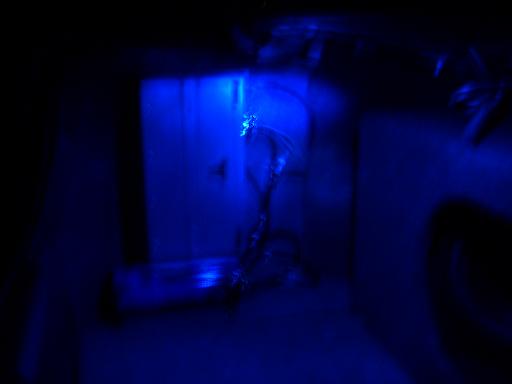
Clean up and enjoy!!!


-----------------------------------------
Part II
Here is how you can secure your tools and your spare tire for $5
Parts needed:
Make sure the foam fits in the trunk under the wood floor. If not, cut it down to size.
Lay everything out on top of the foam and figure where you want it. When you have it all in place, outline everything with the marker.
Remove everything from the foam.
Use the knife to cut along the lines you drew on the foam.
Put the knife in a slit you cut and turn it. It should take out the foam in chunks.
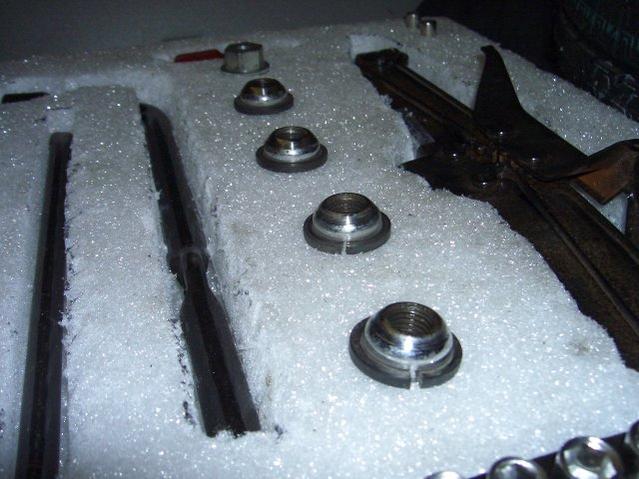
If you carry anything round (fuses, lug nuts, wheel lock key, etc) use a drill to drill out holes, a little smaller than the object, about 1/2 way down the foam.
When you have the foam with all the little channels for the tools, test fit everything. Make some adjustments as necessary.
When you are finished you will have this:
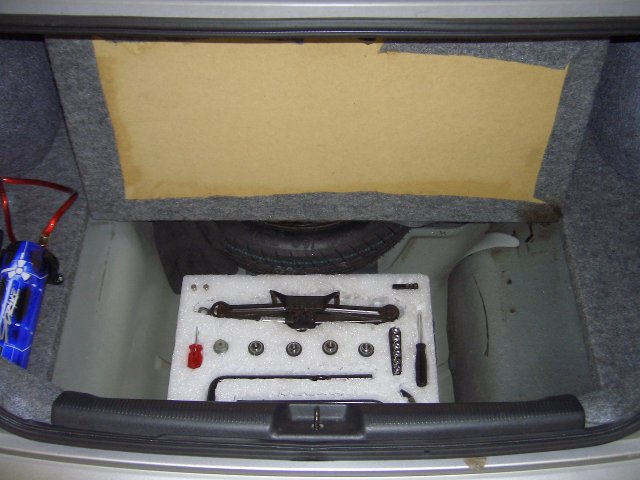
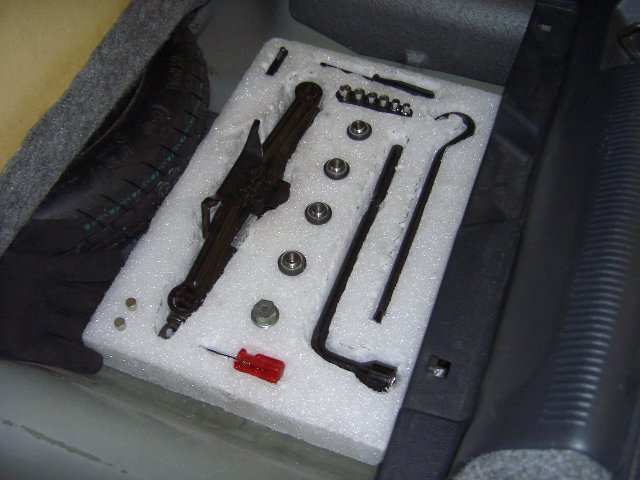
To keep it in place put a sponge between the foam and the spare tire. It will all stay in place perfectly. Enjoy!
Warning: There is alot of reading here, so I hope it is more in-depth than you need. Don't think i'm talking down to you, I just want to make this as easy to understand as possible. Hope you guys like.
-----------------------------------------
Part I
Suplies Needed:
- Large uncut piece of MDF, or other strong wood. If buying MDF get 1/2" or 3/4". I used 3/4".
- Carpeting (Link to carpeting I used, from crutchfield.com )
- 3M Super 77 spray adhesive, or comprable adhesive (worked well for this kind of carpeting)
- Wire, Wire, more Wire. Power, Ground, Signal, Amp turn-on, etc.
- Wire management (distribution block(s), etc)
- Wire ends!!!! Get em!
- Zip Ties
- my email address: diskreet(at)gmail.com
- Many, many screws. Like 10+ wood scerws, and 5+ metal screws. More is better!
- Set of hinges. 4 or 6 screw hinges from lowes for like $5 will do.
- L brackets, from lowes. small 4 screw ones are fine. About $5.
- Handle, also about $5 at lowes. MAKE SURE THE SCREWS ARE ABOUT 1" LONG!!!
Tools Needed:
- Screwdrivers, all kinds. More is better here also
- Cordless Drill
- Batteries for drill
- Pliers
- Jig saw
- Circular saw
- Horses
- Flashlight
- Zip Ties
- Safety Goggles
- SHARP razor
- Shears for carpet
- pens, markers, paper for designing and sketching
- other stuff I am forgetting!
- Dremel
Take the Carpet that covered the floor board before. Place it over your MDF and trace the edge of the carpet onto your MDF. Leave a few inches of clearence on each of the 3 sides and the 4th should be about 1/2 in the large piece of wood you have.
UPDATE: Here is a pic with the sizes I used (all measurements are rounded to the nearest 1/2". I also measured these after putting the carpet on! Yours may be a bit smaller:
Using the circular saw, cut off the other like 1/2 of the MDF which you will not need. This is the part with nothing stenciled on it. If you dont understand me here I dont think you need to go any firther with this project.
Now that you have a more managable piece of wood with less edge space, get out the Jig Saw.
Saw the odd little shape out, taking your time with each bend. If you cut a little off its perfectly OK! When you carpet over you will not see the mess-ups, but try to sand/dremel and edges to something smooth. Especially where the wood chips off, which it will.
Test fit the cut out MDF you have now, it should somewhat fit in there well.
Put the side carpeting back on (vertical, with lips touching the floor of trunk) and put the wood back in. Because of the lip of this stiff carpet type stuff, it will not fit perfectly, but thats ok. thats what the razor is for later.
Mark lines on each side of the wood to get something like this shape here:
Make sure that the pieces you cut will be supported on each side by the floor! We dont want you making the middle too skinny and falling in!!!!
I recommend 33" wide in a sedan trunk!
Obviously get out the circular saw and cut these pieces out.
Test fit again, this time with the spare tire in its place!
Put sub box in this time. Make a line a few inches in front of box, but make sure if you cut there that you will have enough room to get the spare out with only the front piece open!
Remove, and cut on that line. Now test fit one more time to make sure!
One last piece to cut, if you want it like mine. Measure from the top of the MDF floor you created in the side corner right in front of the tail light to the top of the trunk interior. measure the rough width of the area you are working in. With a 3/4" MDF floor I used a piece 14 1/2" x 18" in my sedan.
Ok so take it out, its time to carpet!
To carpet place one piece of wood at a time over the carpet. Cut out the piece with about 1 1/2" - 2" extra all around. I recommend getting all pieces cut first then carpeting.
Spray the Carpet and wood with a medium coat of adhesive. let get tacky for about 1-2 mins. Spray again then apply the carpet. make sure you pull tight over the whole piece and smooth on so you dont get bubbles and wrinkles.
If you have tight corners cut a slit in the carpet and cut excess so it doesnt fold on itself. any parts that lift just spray over and push hard, keeping pressure until it is set.
Let set for a while - 15 mins+.
Now lets get the handle on. Cut some carpeting away in that area and drill 2 holes just big enough to get the handle screws in. Rest is self explanitory.
Now lets get the razor out for some fun. Too bad I dont have any good pics for this. Pretty much just put the wood back into place in the trunk, with all carpeting and trim in place. Using the razor cut any spots of carpet that prevent the MDF floor you made from lieing flat. Usually any place the carpeting sidewall stuff curves horizontally to touch the floor cut it off. Now everything sits very level.
Now take the 2 middle piece out and install the hinges. Drill + screws + common sense = finished installing hinges. You may want to drill countersunk pilot holes before carpeting but good luck finding them later.
Put the spare back in now, and the tools if you want, since the wood is staying in place now.
Run all wires you the side now, behind the carpeting stuff that makes the "sides" of the trunk. Dont cut anything yet...
Put the box in now, using L brackets to secure it. I nice trick is mock-mount everything and mark the edge of the L brackets, seating them under the box like I did. Now take the box out. Keep the L brackets in place and screw them in using screws and the drill.
After that you want to put the box back in and screw in to the L brackets. The reason we did this is so you dont have the bottom of the L bracket sticking out, the box is actually sitting ON it! Good idea eh?
So we are down to the home stretch; the amplifier (and possibly capacitor too.)
Mock fit the wood into place. What we want to do it first take the carpeted wood piece we cut earlier and make sure your amp fits well on it. If so we are ready to proceed.
Cut a nice complete slit in the carpeting on the wall, so we can place this new piece we made behind it. You can drill holes in the carpet to run wires through to the front or just cut it and glue it to our board later on like I did. Either way works, but Maybe the way I didn't do it will look cleaner.
This is the hard part: The way I mounted the board is slightly tricky. 2 L brackets on the bottom are no problem, but the top is another story. With the board in place the very top should be resting on a large metal tab of the inner trunk frame usually hidden behind the carpet. You need to get a screw through the wood and the metal to secure this in. It took me many many tries to get it in the metal and a burn or two but if you have a helper hold the wood firmly into place you are set! Once mounted plug in the amp and mount (screw) it on.
Like in the pic you want to get everything routed nicely. Spray carpet adhesive and trim as necessary to get the carpet into place over the piece we made that the amp is mounted on.
If you want the amp lit like mine replace your bulb with an LED bulb from LEDautomotive.com cause it shies right over in that direction.
Night Shot:
Clean up and enjoy!!!
-----------------------------------------
Part II
Here is how you can secure your tools and your spare tire for $5
Parts needed:
- Hard foam block (Wal*Mart sells them for under $5)
- Marker
- X-acto knife
- Optional: Drill with hole cutting bits (for spare lug nuts)
Make sure the foam fits in the trunk under the wood floor. If not, cut it down to size.
Lay everything out on top of the foam and figure where you want it. When you have it all in place, outline everything with the marker.
Remove everything from the foam.
Use the knife to cut along the lines you drew on the foam.
Put the knife in a slit you cut and turn it. It should take out the foam in chunks.
If you carry anything round (fuses, lug nuts, wheel lock key, etc) use a drill to drill out holes, a little smaller than the object, about 1/2 way down the foam.
When you have the foam with all the little channels for the tools, test fit everything. Make some adjustments as necessary.
When you are finished you will have this:
To keep it in place put a sponge between the foam and the spare tire. It will all stay in place perfectly. Enjoy!
Last edited by diskreet; 04-29-2006 at 03:21 PM.


 06-22-2005
#8
Banned
Hey! Look At Me!! I'm a Supporting Member!!
iTrader: (6)
Join Date: Mar 2004
Location: B.C., Canada
Age: 40
Posts: 51,077
Likes: 0
Received 4 Likes
on
4 Posts
Rep Power: 762 

looks awesome dude, I wonder where I've seen it before? oh thaaaat's right, it was in my trunk when I did almost the same thing last year 
just buggin it really does look good, I'm glad I could be used for inspiration
just buggin it really does look good, I'm glad I could be used for inspiration
 06-22-2005
#12
iTrader: (9)
Join Date: May 2004
Location: Miami
Posts: 2,590
Likes: 0
Received 0 Likes
on
0 Posts
Rep Power: 270 Great job Diskreet. Thanks for the DIY man! 
I thought you said there wasn't much to write for the DIY ...yeah right, whenever one jumps on a project as such there's always lots of writing to do...but it came out great.
Rep added!
I thought you said there wasn't much to write for the DIY
...yeah right, whenever one jumps on a project as such there's always lots of writing to do...but it came out great. Rep added!
Last edited by cubanmike26; 06-22-2005 at 10:04 PM.
06-22-2005
#14
Last time I had this much fun some furniture got broken!
Hey! Look At Me!! I'm a Supporting Member!!
Thread Starter
iTrader: (1)
Thanks for the compliments. hope i either will guide you through this or have inspired you in some way.
the box is a JL High Output enclosure and came with the subs as one package
the box is a JL High Output enclosure and came with the subs as one package

 wow, that is nice!
06-22-2005
wow, that is nice!
06-22-2005
#18
06-22-2005
#19
jdmtytedoridori
Hey! Look At Me!! I'm a Supporting Member!!
iTrader: (19)
Join Date: Jan 2005
Location: Spokane, Washington
Age: 38
Posts: 7,035
Likes: 0
Received 0 Likes
on
0 Posts
Rep Power: 306 damn man, looks nice
the stock cardboard crap that was in my trunk cracked a few weeks ago, so i just got some mdf and traced it out and cut it and carpeted it
it looks ok, i just need to carpet the rest of the trunk though.
the stock cardboard crap that was in my trunk cracked a few weeks ago, so i just got some mdf and traced it out and cut it and carpeted it
it looks ok, i just need to carpet the rest of the trunk though.
06-23-2005
#20
Last time I had this much fun some furniture got broken!
Hey! Look At Me!! I'm a Supporting Member!!
Thread Starter
iTrader: (1)
Originally Posted by silver04
damn man, looks nice
the stock cardboard crap that was in my trunk cracked a few weeks ago, so i just got some mdf and traced it out and cut it and carpeted it
it looks ok, i just need to carpet the rest of the trunk though.
the stock cardboard crap that was in my trunk cracked a few weeks ago, so i just got some mdf and traced it out and cut it and carpeted it
it looks ok, i just need to carpet the rest of the trunk though.
to whoever asked, i doubt you will be able to put the hinges on the bottom unless you get special hinges like for a cabinet or something. but they might not be strong enough.
06-23-2005
#23
Hey, I know Drew22Mader, the man with the sickest whip
iTrader: (3)
Join Date: Dec 2003
Location: Daphne, Alabama
Posts: 502
Likes: 0
Received 0 Likes
on
0 Posts
Rep Power: 254
Originally Posted by diskreet
yeah the stock board is terrible. i wouldnt even want to put groceries on it. I hope you can use my hinge idea or something else.
to whoever asked, i doubt you will be able to put the hinges on the bottom unless you get special hinges like for a cabinet or something. but they might not be strong enough.
to whoever asked, i doubt you will be able to put the hinges on the bottom unless you get special hinges like for a cabinet or something. but they might not be strong enough.
Use piano hinges. You can get them at Lowes/Home Depot. Just an idea.
 06-23-2005
#25
Electric Boogaloo...
iTrader: (6)
Join Date: Mar 2003
Location: Want to play a game?
Age: 41
Posts: 4,457
Likes: 0
Received 0 Likes
on
0 Posts
Rep Power: 304 Can I ask why you didn't use one large piece of carpet and use it(the carpet) to hinge it? Then it's seamless. You could have also put the hinges on the reverse side to clean it up some. Also, why not just rout out a hole (hell you could use a drill and bore a hole then cut it out with the jigsaw if you don't have a plunge router) for a handle? Then you don't have all the bulky hardware showing. But it's still as functional.
06-23-2005
#28
Registered!!
Join Date: Feb 2002
Location: Dallas, TX
Posts: 418
Likes: 0
Received 0 Likes
on
0 Posts
Rep Power: 0 Fantastic DIY, diskreet! Like some others have mentioned, I had something like this rolling around in my head, but I had no idea how to implement it. Great instructions and pix; I can't wait to get my supplies together and start in on it!
Thank you!
Repped!
Thank you!
Repped!
Last edited by dma001; 06-23-2005 at 11:12 AM.
06-23-2005
#29
Mr. Negative
Hey! Look At Me!! I'm a Supporting Member!!
iTrader: (2)
Join Date: Jun 2001
Location: Duluth, MN
Age: 43
Posts: 9,165
Likes: 0
Received 0 Likes
on
0 Posts
Rep Power: 370 I really like that. I would just use that cause that sh!tty piece of cardboard, and carpeting in there now is crap. The piece of cardboard that cover my spare, is all warped. This would be a very nice way of cleaning up the truck. I think since I dont have a sub, I would go with 1/2 MDF. Question though. Do you attach the back piece down, I mean the piece that is right by the rear seats to something, or does it just lie there flat. Otherwise good job. Something for me to do in the future.

