
DIY: Fix Your Rocking Driver’s Seat
 04-15-2009
#1
Registered!!
Thread Starter

Join Date: May 2008
Age: 51
Posts: 59
Likes: 0
Received 0 Likes
on
0 Posts
Rep Power: 0 
DIY: Fix Your Rocking Driver’s Seat
This problem has been driving me crazy for some time now and it was time to fix it. I’ve had this worked on by my local dealer (under warranty) six times, including a replacement of the seat base itself. All fixes were short term – the problem came back within months. I wasn’t going to pay them an hour or more of time plus parts to do it again.
I picked up the parts from the dealer where the parts guy was nice enough to also print me off the service bulletin and instructions for seat removal and the idle learning procedure. I didn’t take pictures but I did scan in the service bulletin – it’s really easy to follow.
You’ll need the parts:
90502-S3N-013 (Seat Link Bushing) 6 req'd
90321-SCV-A11 (8mm Nut) 6 req'd
90503-S3N-003 (Spacer) 4 req'd
First, disconnect the battery and let the system discharge for a few minutes. Ensure you have your radio code.
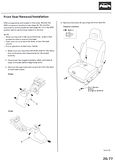
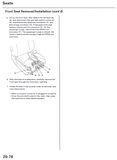
Once the system has discharged, remove the front seat (see first two images for the instructions). There are two plastic shields to remove from the back of the seat rails and four bolts (two in front, two in back). Mine were 14mm, but the instructions seem to indicate 10mm (probably just reading the bolt spec wrong… or the dealer replaced mine with larger bolts… whatever).
Lift the front of the seat and disconnect the wiring harnesses. I had three plugs on mine. They’re colour coded and each only fits onto one connector so there’s no confusion.
Lift out the seat and place on a clean work surface (I used a large piece of cardboard on my driveway in the bright sun). Grabs your parts, sockets, a phillips screwdriver, a small flathead screwdriver (a pocket sized one works perfectly), plenty of rags, a bucket (for the debris), a drink and have a sit.
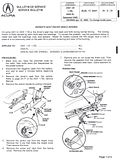
Start by referring to page one of the service bulletin. I won’t duplicate all the instructions because they’re really easy to follow but I will make some notes as I go. When I mention up/top or bottom/underneath, etc, I’m referring to the seat being in its normal, upright position.
The C clip holding the **** on is a bit annoying to remove, but it will slip off. Don’t lose it when it pops loose (it’s likely to want to fall into the seat mechanism). The plastic cover on the outboard side of the seat has a clip just behind the height adjustment **** (look underneath and you’ll see it in there). You can use the flathead screwdriver to pop it out. The rear clip is a push-in type – just pop it out with the flathead. Then the whole cover lifts up and off (there’s a hook at the back where indicated).
I wiped everything down really well as I worked since it was greased up terribly (which is why I didn’t take pics).
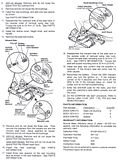
The three nuts you want to remove should be apparent – two on the link and one at the back where the seat is rocking (rock the seat base and you’ll see the loose point). Remove those three nuts and discard, but save the thick washers. Observe the orientation of the link prior to removal. Remove and discard any spacers and bushings from the link. Install new bushings into the link and set aside. Lift the seat base off the rear bolt, remove and discard any spacers and the bushing (my bushing was worn and mashed into total uselessness). Install the new bushing and a single spacer as indicated. Replace the seat base onto the rear bolt and reinstall the front link. Reinstall the thick washers, install new nuts and tighten everything down. I tightened mine down very snugly since I didn’t want it coming loose again (and I never adjust the height from its lowest position anyway).
Reinstall the cover, **** and handle. I found that setting the C clip onto the **** let me get it into position, then I just pushed it on with the flathead screwdriver.
The inboard side is easier. Remove the seatbelt buckle (I did torque this one down correctly when reinstalling but the seat link nuts I tightened as before – very snugly) before you continue. The rest is pretty much the same except there are three spacers to install on the rear bolt. Discard all existing spacers, nuts and bushings before installing the new hardware.
Spacers go on the rear bolts only, regardless of what you find when pulling it apart.
Reinstall the seat in the reverse order of removal and reconnect the battery. Turn off all electrics in the car before starting. Start the car and let it idle for 15-20 min while you clean up, enjoy a beer, etc. It needs to get to operating temp (fans cycle twice) then let it idle at that temp for 10min. Your time may be more or less depending on your local temp. Your idle should now be reset correctly.
Enter your radio code and fix up your presets. I also found that my driver power window auto up/down didn’t work until I cycled it up/down twice.
Take it for a drive and enjoy a nice firm seat!
Cost me about $30 in parts and a hour of fiddling about (having never done it before). Hopefully I never have to do this again, but even if I have to do this once a year, it’s worth it. I also found that my dealer: 1. Didn’t follow the service bulletin correctly and didn’t have the correct number of spacers installed (even after 6 attempts) and 2. They cross-threaded one of the rear seat mounting bolts. If only Honda dealers would service Acura cars…
These thumbs link to larger versions of the pages (whereas the attachments are more permanent to this site but are quite a bit smaller).
Seat Removal Pages 1-2:
Service Bulletin Pages 1-2:
I picked up the parts from the dealer where the parts guy was nice enough to also print me off the service bulletin and instructions for seat removal and the idle learning procedure. I didn’t take pictures but I did scan in the service bulletin – it’s really easy to follow.
You’ll need the parts:
90502-S3N-013 (Seat Link Bushing) 6 req'd
90321-SCV-A11 (8mm Nut) 6 req'd
90503-S3N-003 (Spacer) 4 req'd
First, disconnect the battery and let the system discharge for a few minutes. Ensure you have your radio code.
Once the system has discharged, remove the front seat (see first two images for the instructions). There are two plastic shields to remove from the back of the seat rails and four bolts (two in front, two in back). Mine were 14mm, but the instructions seem to indicate 10mm (probably just reading the bolt spec wrong… or the dealer replaced mine with larger bolts… whatever).
Lift the front of the seat and disconnect the wiring harnesses. I had three plugs on mine. They’re colour coded and each only fits onto one connector so there’s no confusion.
Lift out the seat and place on a clean work surface (I used a large piece of cardboard on my driveway in the bright sun). Grabs your parts, sockets, a phillips screwdriver, a small flathead screwdriver (a pocket sized one works perfectly), plenty of rags, a bucket (for the debris), a drink and have a sit.
Start by referring to page one of the service bulletin. I won’t duplicate all the instructions because they’re really easy to follow but I will make some notes as I go. When I mention up/top or bottom/underneath, etc, I’m referring to the seat being in its normal, upright position.
The C clip holding the **** on is a bit annoying to remove, but it will slip off. Don’t lose it when it pops loose (it’s likely to want to fall into the seat mechanism). The plastic cover on the outboard side of the seat has a clip just behind the height adjustment **** (look underneath and you’ll see it in there). You can use the flathead screwdriver to pop it out. The rear clip is a push-in type – just pop it out with the flathead. Then the whole cover lifts up and off (there’s a hook at the back where indicated).
I wiped everything down really well as I worked since it was greased up terribly (which is why I didn’t take pics).
The three nuts you want to remove should be apparent – two on the link and one at the back where the seat is rocking (rock the seat base and you’ll see the loose point). Remove those three nuts and discard, but save the thick washers. Observe the orientation of the link prior to removal. Remove and discard any spacers and bushings from the link. Install new bushings into the link and set aside. Lift the seat base off the rear bolt, remove and discard any spacers and the bushing (my bushing was worn and mashed into total uselessness). Install the new bushing and a single spacer as indicated. Replace the seat base onto the rear bolt and reinstall the front link. Reinstall the thick washers, install new nuts and tighten everything down. I tightened mine down very snugly since I didn’t want it coming loose again (and I never adjust the height from its lowest position anyway).
Reinstall the cover, **** and handle. I found that setting the C clip onto the **** let me get it into position, then I just pushed it on with the flathead screwdriver.
The inboard side is easier. Remove the seatbelt buckle (I did torque this one down correctly when reinstalling but the seat link nuts I tightened as before – very snugly) before you continue. The rest is pretty much the same except there are three spacers to install on the rear bolt. Discard all existing spacers, nuts and bushings before installing the new hardware.
Spacers go on the rear bolts only, regardless of what you find when pulling it apart.
Reinstall the seat in the reverse order of removal and reconnect the battery. Turn off all electrics in the car before starting. Start the car and let it idle for 15-20 min while you clean up, enjoy a beer, etc. It needs to get to operating temp (fans cycle twice) then let it idle at that temp for 10min. Your time may be more or less depending on your local temp. Your idle should now be reset correctly.
Enter your radio code and fix up your presets. I also found that my driver power window auto up/down didn’t work until I cycled it up/down twice.
Take it for a drive and enjoy a nice firm seat!
Cost me about $30 in parts and a hour of fiddling about (having never done it before). Hopefully I never have to do this again, but even if I have to do this once a year, it’s worth it. I also found that my dealer: 1. Didn’t follow the service bulletin correctly and didn’t have the correct number of spacers installed (even after 6 attempts) and 2. They cross-threaded one of the rear seat mounting bolts. If only Honda dealers would service Acura cars…
These thumbs link to larger versions of the pages (whereas the attachments are more permanent to this site but are quite a bit smaller).
Seat Removal Pages 1-2:


Service Bulletin Pages 1-2:


Last edited by babzog; 04-15-2009 at 09:14 PM.
 08-06-2010
#2
Registered!!
Thread Starter
Join Date: May 2008
Age: 51
Posts: 59
Likes: 0
Received 0 Likes
on
0 Posts
Rep Power: 0 Re: DIY: Fix Your Rocking Driver’s Seat
Just a quick update.. over a year later and the seat is still rock solid! I should have fixed it myself a long time ago rather than wasting all that time and money at the stealership.
08-07-2010
#3
Registered!!

Re: DIY: Fix Your Rocking Driver’s Seat
I just looked up the parts on the majestic honda site and it was $50 in parts...
some day soon I will fix it, but I just rolled over to 100k and have a few things to do.
-Zach
some day soon I will fix it, but I just rolled over to 100k and have a few things to do.
-Zach
11-23-2010
#4
Registered!!

Join Date: Nov 2010
Posts: 1
Likes: 0
Received 0 Likes
on
0 Posts
Rep Power: 0 Re: DIY: Fix Your Rocking Driver’s Seat
Hi babzog,
this manual seems to be for Acura is that the case?
I also have a rocking seat in my UK Civic from 2001 - will the manual fit fot this?
Thanks
this manual seems to be for Acura is that the case?
I also have a rocking seat in my UK Civic from 2001 - will the manual fit fot this?
Thanks
12-05-2010
#6
Sedans > Coupes
Join Date: Aug 2010
Location: Montreal
Posts: 625
Likes: 0
Received 0 Likes
on
0 Posts
Rep Power: 173 
Re: DIY: Fix Your Rocking Driver’s Seat
my stupid seat is rocking too. it's VERY annoying. i was hoping it was just a loose bolt or something  cause im not gonna buy any parts for it.
cause im not gonna buy any parts for it. 
Thread
Thread Starter
Honda Civic Forum
Replies
Last Post

