Civic AC Repair 101
 06-23-2012
#1
Registered!!
Thread Starter

Civic AC Repair 101
93-95 Civic AC system and service.
Refrigerant Capacity 19oz R-134A
Compressor Oil SP-10 PAG 46 (low viscosity) 4 - 4.66oz
AC Low side pressures 50-55psi at day temps of 90 or above
On the high side AC High average pressures are for the following temps + or � 20psi:
90�-260psi, 95�-288psi, 100�-320psi, 105�-333psi, 110�-343psi

To start, don�t fly blind! Get a good manifold gauge like Interdynamics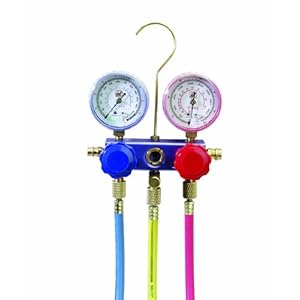 ($80) at most auto parts stores. Stay away from the plastic ones ($50).
I had a cheap one and then I got the metal Interdynamics one, NIGHT & DAY difference!
Never use Fix and Seal or Freon with oil type products to try and repair your ac system for leaks. These products are not compatible with peg-46 required systems. If you have a leak, fix it! Don�t band aid it. Most leaks are old O rings or damage to condenser.

If replacing any parts on the system and the system is open to air, you MUST evacuate the system to get max performance and life! Use a vacuum pump you can rent from AutoZone.
If you don�t have access to a vacuum, you can flush the air and moisture out of the system by using the ghetto method. Use one to two cans of Freon (Non oil type) on one end and let the air escape out the other end but still try and keep some pressure in the line towards the end of the can running out. It�s really that important to get all the air and moisture out!
Not exactly how the EPA would have you do it. EPA Section 608 of the Clean Air Act of 1990 Prohibition on Venting ozone-depleting refrigerant such as R-11, R-12, and R-22.
However R134a is 1,1,2-Tetrafluoroethane. It does not contain either chlorine or bromine, so the recognized ozone depletion pathways do not apply to this molecule. This compound is extremely stable, and will be retained in the atmosphere until it diffuses to the "ozone layer", where it will be broken down by UV-C.
And yet, it�s still illegal under Section 608 of the Clean Air Act to knowingly vent R134a substitute refrigerants during any service, maintenance, repair or disposal of an appliance. The EPA is more concerned with the venting of systems that use 50lbs or more. Honda�s use only 1.2lbs or 19oz.
The correct way is using nitrogen to flush out all the air, junk and some of the moisture. Then us a vacuum suction pump to draw out all the air and moisture to the point of almost zero atmospheres and pumps it into a 5gallon collection can for disposal. The average 2 stage (not 1 stage) suction pump can suck down to 75 microns. For a little more money, I got one that draws down to 15 microns! It was $250 from eBay.
What�s a micron?
Vacuum suction is not measured in negative PSI. To know where your at with atmosphere pressure, it is measured in �Torrs�. 760 Torr is equal to 1 standard atmosphere and 1 Torr = 1000 microns.
100 vacuum microns = 99.99 negative atmosphere or 0.00193 psi
10 vacuum microns = 99.999 negative atmosphere or 0.000193 psi
No mechanical psi gauge will ever be sensitive enough to read 100 vacuum microns or less. This is why you need to use a micron gauge.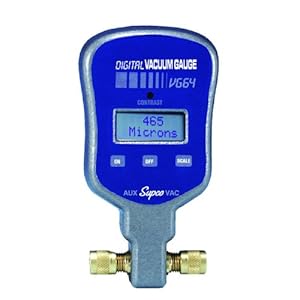
Why is this important?
It�s the only gauge that is sensitive enough to measure leaks in your system and to know if you have an absolute seal on your system. After a vacuum, it should only go up by 50-100 microns over 30 min to know you have a good seal on your system.
Stay away from Freon that has oil in it!!!!!!


 The peg they use in all Freon with oil is peg 100. That oil used is not compatible with low viscosity peg-46 oil. The best way to charge your system is to use pressurized cans of peg-46 oil
 and dry r134 Freon
  . This way, you control and know what you are putting in. The wrong viscosity oil and amount can clog your system and make pressures too high or low. It can make your system fluctuate in pressure! It also makes the cooling ability much weaker. So use the correct viscosity oil. This is very important.
If you are putting in a new compressor, they usually have oil in it. When you get your compressor, DRAIN out all the oil and turn the compressor pulley several times to insure pumping all the oil out! At this point you can pour in the correct oil type and amount that comes in a bottle. This is very important. Compressor failures are usually the result of loss of lubrication from low refrigerant in the system, use of the wrong type of lubricant or a blockage (such as a plugged orifice tube which prevents refrigerant and oil from circulating to the compressor). REPLACE THE DRIER!!! There under $25 and is a must!
If your ac system is old or the compressor is damaged, you may have trash in your system. You can attempt t solution flush it out but you risk not getting it all out and ruining your new compressor. I was able to replace the evaporator, condenser, drier, expansion valve & got a new compressor all for $288 on eBay. I was able to effectively flush and keep the lines. If you do it this way, pay attention to all the O rings as to where they go. They sell a kit at any auto parts store that has many different sizes. Do not over tighten bots on the as system! O ring seal the system with out leaks Very well. So be careful tightening bolts.
Do not over tighten the compressor belt or it will ruin the bearing.
Other issues:
MANY Honda Civic A/C won't work on HOT days. Whenever the car was left in the sun the A/C would not work. At night, when cooler the ac system works. The AC button lights up, but ac would not turn on when cabin temp was very high.
Civic ac systems are notorious for not working when the cabin gets hot in the sun. The solder on the dash board AC button expands breaking contact with the circuit board not making contact. You lose electrical connection and the ac wont work. To fix, you need to remove the ash tray, remove the plastic housing around the ash tray, and remove the stereo. This will allow access to the 3 screws that hold the ac/heat dash control panel.
You will need to lie on your back, look up through the area were the ash tray was to see the 2 screws towards the front of the panel (This is the hardest part of the job). Then you have to unlock the white, round temp lever control lock washer and remove the arm. Then you need to remove the cable wire from the dash control. Try and unhook the wire harnesses in the rear so you can get slack to remove the wire harnesses from the back of the dash controls so you are able to pull the unit out. Once out. Disassemble to expose the circuit board to the ac button. You will see the button has 6 polls that are soldered. Re solder them and any others that you feel are weak. Reassemble and reinstall. This fixed the problem I had for 2 years!
Good resources and videos:
AC gauges
Interdynamics Manifold Gauge Set MF-134 or MG-134HD Liquid filled gauges.
http://idqusa.com
AC Pressure Chart
http://idqusa.com/wp-content/uploads...F1-300x195.jpg
Cars ac system info and Peg oil and Freon capacities
https://vil.motor.com/HOME_FRAMESET....d75c56a6227317
AC Vacuum Pump
Look for a 2 stage (not 1 stage) vacuum pump. CFM rating is not as important as is micron suction ability. The average pump is 75 microns but 15 micron vacuum is very good.
http://www.mastercool.com/pages/vacuum_pumps.html
Vacuum is the best way to see if you have a leak in your AC system: See Video
This is a good 35min video that will help you understand how professionals show you the importance and steps they take to insure the best performance of your ac system. Things I never knew and now understand. [autostream]http://autostream.com/ibcivicforums/?page_type=firebirdplayerthumbnail&framepage=1265& transactionid=1340492080-18412189196&posted_by=Codert_www.civicforums.com&y outube_video_id=TrrWiWvZUJA[/autostream]
This video teaches you what & why using a thermo gauge is important
http://www.youtube.com/watch?v=ADINV...9D5139640BF921
Refrigerant Capacity 19oz R-134A
Compressor Oil SP-10 PAG 46 (low viscosity) 4 - 4.66oz
AC Low side pressures 50-55psi at day temps of 90 or above
On the high side AC High average pressures are for the following temps + or � 20psi:
90�-260psi, 95�-288psi, 100�-320psi, 105�-333psi, 110�-343psi
To start, don�t fly blind! Get a good manifold gauge like Interdynamics
($80) at most auto parts stores. Stay away from the plastic ones ($50). I had a cheap one and then I got the metal Interdynamics one, NIGHT & DAY difference!
Never use Fix and Seal or Freon with oil type products
If replacing any parts on the system and the system is open to air, you MUST evacuate the system to get max performance and life! Use a vacuum pump you can rent from AutoZone.
If you don�t have access to a vacuum, you can flush the air and moisture out of the system by using the ghetto method. Use one to two cans of Freon (Non oil type)
on one end and let the air escape out the other end but still try and keep some pressure in the line towards the end of the can running out. It�s really that important to get all the air and moisture out!Not exactly how the EPA would have you do it. EPA Section 608 of the Clean Air Act of 1990 Prohibition on Venting ozone-depleting refrigerant such as R-11, R-12, and R-22.
However R134a is 1,1,2-Tetrafluoroethane. It does not contain either chlorine or bromine, so the recognized ozone depletion pathways do not apply to this molecule. This compound is extremely stable, and will be retained in the atmosphere until it diffuses to the "ozone layer", where it will be broken down by UV-C.
And yet, it�s still illegal under Section 608 of the Clean Air Act to knowingly vent R134a substitute refrigerants during any service, maintenance, repair or disposal of an appliance. The EPA is more concerned with the venting of systems that use 50lbs or more. Honda�s use only 1.2lbs or 19oz.
The correct way is using nitrogen to flush out all the air, junk and some of the moisture. Then us a vacuum suction pump to draw out all the air and moisture to the point of almost zero atmospheres and pumps it into a 5gallon collection can for disposal. The average 2 stage (not 1 stage) suction pump can suck down to 75 microns. For a little more money, I got one that draws down to 15 microns! It was $250 from eBay.
What�s a micron?
Vacuum suction is not measured in negative PSI. To know where your at with atmosphere pressure, it is measured in �Torrs�. 760 Torr is equal to 1 standard atmosphere and 1 Torr = 1000 microns.
100 vacuum microns = 99.99 negative atmosphere or 0.00193 psi
10 vacuum microns = 99.999 negative atmosphere or 0.000193 psi
No mechanical psi gauge will ever be sensitive enough to read 100 vacuum microns or less. This is why you need to use a micron gauge.
Why is this important?
It�s the only gauge that is sensitive enough to measure leaks in your system and to know if you have an absolute seal on your system. After a vacuum, it should only go up by 50-100 microns over 30 min to know you have a good seal on your system.
Stay away from Freon that has oil in it!!!!!!
The peg they use in all Freon with oil is peg 100. That oil used is not compatible with low viscosity peg-46 oil. The best way to charge your system is to use pressurized cans of peg-46 oil and dry r134 Freon . This way, you control and know what you are putting in. The wrong viscosity oil and amount can clog your system and make pressures too high or low. It can make your system fluctuate in pressure! It also makes the cooling ability much weaker. So use the correct viscosity oil. This is very important.If you are putting in a new compressor, they usually have oil in it. When you get your compressor, DRAIN out all the oil and turn the compressor pulley several times to insure pumping all the oil out! At this point you can pour in the correct oil type and amount that comes in a bottle. This is very important. Compressor failures are usually the result of loss of lubrication from low refrigerant in the system, use of the wrong type of lubricant or a blockage (such as a plugged orifice tube which prevents refrigerant and oil from circulating to the compressor). REPLACE THE DRIER!!! There under $25 and is a must!
If your ac system is old or the compressor is damaged, you may have trash in your system. You can attempt t solution flush it out but you risk not getting it all out and ruining your new compressor. I was able to replace the evaporator, condenser, drier, expansion valve & got a new compressor all for $288 on eBay. I was able to effectively flush and keep the lines. If you do it this way, pay attention to all the O rings as to where they go. They sell a kit at any auto parts store that has many different sizes. Do not over tighten bots on the as system! O ring seal the system with out leaks Very well. So be careful tightening bolts.
Do not over tighten the compressor belt or it will ruin the bearing.
Other issues:
MANY Honda Civic A/C won't work on HOT days. Whenever the car was left in the sun the A/C would not work. At night, when cooler the ac system works. The AC button lights up, but ac would not turn on when cabin temp was very high.
Civic ac systems are notorious for not working when the cabin gets hot in the sun. The solder on the dash board AC button expands breaking contact with the circuit board not making contact.
You will need to lie on your back, look up through the area were the ash tray was to see the 2 screws towards the front of the panel (This is the hardest part of the job). Then you have to unlock the white, round temp lever control lock washer and remove the arm. Then you need to remove the cable wire from the dash control. Try and unhook the wire harnesses in the rear so you can get slack to remove the wire harnesses from the back of the dash controls so you are able to pull the unit out. Once out. Disassemble to expose the circuit board to the ac button. You will see the button has 6 polls that are soldered. Re solder them and any others that you feel are weak. Reassemble and reinstall. This fixed the problem I had for 2 years!
Good resources and videos:
AC gauges
Interdynamics Manifold Gauge Set MF-134 or MG-134HD Liquid filled gauges.
http://idqusa.com
AC Pressure Chart
http://idqusa.com/wp-content/uploads...F1-300x195.jpg
Cars ac system info and Peg oil and Freon capacities
https://vil.motor.com/HOME_FRAMESET....d75c56a6227317
AC Vacuum Pump
Look for a 2 stage (not 1 stage) vacuum pump. CFM rating is not as important as is micron suction ability. The average pump is 75 microns but 15 micron vacuum is very good.
http://www.mastercool.com/pages/vacuum_pumps.html
Vacuum is the best way to see if you have a leak in your AC system: See Video
This is a good 35min video that will help you understand how professionals show you the importance and steps they take to insure the best performance of your ac system. Things I never knew and now understand. [autostream]http://autostream.com/ibcivicforums/?page_type=firebirdplayerthumbnail&framepage=1265& transactionid=1340492080-18412189196&posted_by=Codert_www.civicforums.com&y outube_video_id=TrrWiWvZUJA[/autostream]
This video teaches you what & why using a thermo gauge is important
http://www.youtube.com/watch?v=ADINV...9D5139640BF921

The following users liked this post:
fuzi0nt3ch (04-16-2021)
04-04-2013
#2
Registered!!
Thread Starter
Re: Civic AC Repair 101
Other issues:
Troubleshooting
There are two relays on the right side or the condenser as your looking into the engine bay are known to fail. They are covered by a rubber boot but still get corroded.
RELAY ASSY., POWER (4P) (RC-2201) (MITSUBA)
Part NO.: 39795-SB2-003
They run about $35.00 each but can be found in many junk yards for a few bucks.
The best way to maintain the life of these relays is to take brake cleaner and spray out the grease they put where the wires attach on the bottom of the relay. The take clear silicone and seal it up so its water tight.
Click here for the AC wire diagram:
http://repairguide.autozone.com/znet...5280061b2d.gif
They are activated by a negative power input from the AC dash button. You can use a 12v tested to see if power is reaching the relays. All other wires going into the relays are positive power. If you have power to the relays and you see the negative power going off and on when you push the dash AC button, then you can bet the relays are bad. You can open the relays and clean the contacts inside the relay 1st with brake cleaner then sand the actuating contacts to make them conduct better. You can also move he copper contact point closer to the actuating arm so that in makes contact easier. You can test the relay while it�s disassembled and have someone push the ac button off and on. Be sure to check all fuses too.
When the relay is working, it sends positive power to the AC fan and to the red wire going into the compressor. The compressor clutch should engage and the fan should come on.
The following users liked this post:
fuzi0nt3ch (04-16-2021)


 08-05-2013
#4
Registered!!

Join Date: Aug 2013
Posts: 1
Likes: 0
Received 0 Likes
on
0 Posts
Rep Power: 0 
Re: Civic AC Repair 101
CoolAirUSA offers the best variety in A/C solutions and services in Miami, Fort Lauderdale and Palm Beach. With our excellent customer care we guarantee 100% satisfaction.
10-12-2017
#5
Registered!!

Join Date: Oct 2017
Age: 37
Posts: 1
Likes: 0
Received 0 Likes
on
0 Posts
Rep Power: 0 Re: Civic AC Repair 101


