DIY: Input Shaft Bearing
 06-15-2014
#1
Registered!!
Thread Starter

Join Date: May 2009
Location: Lindenwold, NJ
Posts: 297
Likes: 0
Received 3 Likes
on
3 Posts
Rep Power: 0 
DIY: Input Shaft Bearing
This is an Input Shaft Bearing DIY for 7th Gen Civics with a manual transmission. It can also be used to replace the clutch. This guide involves removing the transmission from the top so that you don't have to disturb the sub-frame and get an alignment.
Credit to Robo1040 for allowing use of pictures from Clutch Install DIY on this site.
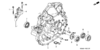
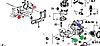
If you are unsure of what the ISB is see the diagram below. The ISB is part #5 and the bearing seal is #8.
The following parts will be needed. The IBS, bearing seal and axle seals are critical parts. I recommend using only genuine Honda dealership parts for these. Honda part numbers are provided:
-Input Shaft Bearing, Honda # 91002-PS0-013
-Input Shaft Bearing seal, Honda # 91216-PL3-005
-Clutch disc
-Clutch Pressure Plate
-Throw-out Bearing
-Clutch Center Bearing
-Clutch Alignment Tool
-Axle Seal driver side, Honda # 91205-PL3-A01
-Axle Seal Passenger Side, Honda # 91206-PHR-003
The axles seals are optional.
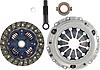
I used an Exedy clutch kit that came with a Pressure Plate, Clutch Disc, Throw-out Bearing, Flywheel Center Bearing and alignment tool. I highly recommend this kit. It is high quality and has a very smooth and soft clutch pedal action.
If you go Exedy, make sure you purchase from an authorized dealer. There are a lot of Exedy fake clone clutch kits selling on Ebay and other sites. These are far inferior quality. Do not use these. There is a list of authorized dealers on Exedy's website. I bought mine from Amazon.com. The actual website and not a re-seller on Amazon.
The Exedy part # for the clutch kit is KHC10.
You will also need the following Supplies:
-1 quart Honda Manual Transmission Fluid
-1 gallon Honda pre-mix anti-freeze
-High Temperature grease. Comes with Exedy clutch kit.
-Permatex Ultra Grey (gasket making silicone)
-Torque wrench. Very important for flywheel and pressure plate bolts.
-The usual assortment of 10, 11, 12, 14, 17 mm sockets and extensions that seem to do 90% of the work on all Hondas. I also had to buy a 12-point 17MM socket for the flywheel bolts and a 27MM socket for the reverse sensor.
-Snap Ring Pliers
1. Remove your stock airbox, intake, CAI or whatever else you have.
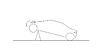
2. Jack up the front of the car. It is important to this step right. Once the car is jacked up it's not coming down until you are done. So make sure it's parked where you will not need to move it half way through.
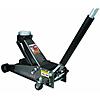
I used a Harbor Freight 3-ton floor jack (Max lift 18 Inches) placed under the radiator support.
With the font end lifted at max jack height I was able to place two, 3-ton jack stands at their minimum height setting of 14 inches under the chassis frame rails that run under the floor.

The jack stands were placed in line with the door hinges. See image below:
3. With the car safely jacked up, now is a good time to start draining the fluids. Drain the transmission fluid. Here is a link for a DIY in case you don't know where the drain bolt is:
https://www.civicforums.com/forums/1...ssion-oil.html
4. The exhaust pipe needs to be lowered a bit to make some room to remove the transmission brace. Grab some PB-Blaster and spray the 2 bolts that attach the exhaust pipe to the exhaust manifold. They will be rusted on so the PB-blaster will take a few minutes to soak in. We can move on to something else in the mean time.
5. Drain the radiator next. This is necessary because we will be removing the radiator hoses later on. There is a plastic drain that unscrews to drain the coolant. Look under the bottom edge of the radiator. It's pretty easy to find it. Here is a picture I borrowed from another post:
6. Unbolt the exhaust pipe from the exhaust manifold. I used a Craftsman impact Driver to take the bolts out. They came out easy. Un-hook the rubber exhaust hanger under the driver side floor. The entire pipe should now lower enough to gain access to the transmission brace bolts.
7. Remove the transmission brace and the fly wheel cover.
8. While you are still under there, remove the three bolts that attach the rear engine mount to the transmission. The transmission and engine will shift a little but won't fall on your face because the other 3 mounts are still holding it up.
9. We're going to pull the axle shafts out next. take the wheels off and remove the axle nuts. You'll have to use a screw driver to un-stake them first. Search for Axle-nut removal on this site if you get stuck.
10. Two-options here. Either remove the 2 upper strut to knuckle bolts or pop the lower ball joints. I opened the ball joints because I'm cheap and didn't feel like paying for an alignment. There is a cool DIY on here to pop the ball joints without damaging them or having to hammer away on the knuckle. Here is a YouTube video to show how it's done:
[YOUTUBE]http://www.youtube.com/watch?v=hJR77aN-MDk[/YOUTUBE]
11. With the ball joints undone you can now separate the wheel hub assembly from the lower control arms. This will allow enough clearance to knock the axle shafts out from the center of the hubs, pry them out from the transmission and remove from the car.
12. The engine needs to be supported next since we'll be removing some more mounts. Place a jack stand under the rear most edge of the oil pan where the oil drain bolt is. Use a block of wood between the jack stand and the oil pan. Never support the engine under the pan without using wood or the oil pan will be damaged.
Locate the jack stand so it's pushed as far as it can go towards the passenger side while supporting the engine under the rear most edge of the pan.
Once you are ready to remove the transmission, the only thing supporting the engine will be the driver side mount, jack stand and partial support from the front mount. The weight of the engine will shift causing it lower and rotate slightly towards the rear of the car. So make sure you have some wood wedged tight under the oil pan and between the jack stand.
I know this is not the most ideal way to support the engine, but I used what I had available. If I had a hoist I would have used it to support the engine, but, using this method, I found the engine to be stable enough to withstand all the jostling and pushing from taking the transmission off. Use caution!
13. Remove the battery and battery tray. The battery tray is held in place with some 12mm bolts on top and a few more accessible from under the car. Also remove the engine ground strap from the bracket that mounts to the transmission. The other end of the strap ends in a wiring harness. We'll be moving this entire harness out of the way later.

14. Unplug the two oxygen sensors and unhook the connectors from their bracket.
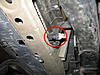
15. Disconnect the wiring harness shown by the green line below. Move it out of the way. Unplug the coolant sensor (yellow circle), ground strap (red circle), and remove the water hoses in blue circles.
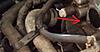
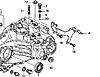
16. Use pliers to slide the water pipe clamp in the direction of the arrow below. This will allow the water pipe to pull out when you remove the water passage of the cylinder head.
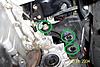
17. The water passage comes off next (part 8 below) Remove the three water passage bolts, two are shown in green below and the third one is in the blue area. Also remove two nuts that go onto studs (shown in red) that protrude from the head.
Keep track of the bolts since they are different lengths. If there is any other connector attached to the water passage remove it now. You should now be able to pull the water passage away from the head. Don't loose the metal gasket. It can be re-used.
18. Remove the transmission mount next. Remove the bolts that attach it to the transmission and then remove the bolts that attach the mount to the frame. Pull the entire mount out of the car.
19. Remove the electrical connectors from the starter motor and the reverse sensor. See below. One of the starter motor connectors is held on with a nut. Make sure not to over tighten this nut when hooking the starter back up or the stud will strip and you'll have to buy a new starter. Move the starter/reverse sensor harness out of the way.
20. Pull the starter motor out. There are two bolts, 14 mm I think. You might need to use an extension to reach the lower one. Don't be like me and start trying to remove the two smaller bolts (10mm?) that hold the starter motor together or it will fall apart.
21. On to the front engine mount. Remove the two bolts that attach the mount to the transmission but don't touch the one bolt that secures the mount to the block itself. this will allow you to pull the transmission off while still allowing the front mount to support the block. Remove bolts 12 and 13 only.

At this point the block will be supported by the jack stand, driver side mount and the one bolt from the front mount.
22. Disconnect the 2 shift linkages from the transmission. Remove the cotter pins first and save them for reassembly. With the cotter pins out the shift linkages slide off the pins on the shifter assembly. Note the position of the washers that come off with the linkages.
23. Remove the bracket that secures the shift linkages to the transmission (Part 4 below). There are either two or three bolts. You will need an extension. Also disconnect the electrical sensor behind the shift linkage bracket. This is the speedometer connector.
You should now be able to grab the shift cables and bend them back and away from the transmission.
24. Un-bolt the two clutch slave cylinder bolts. Pull the slave cylinder away from the transmission. Pay particular attention to how the rubber boot secures to the transmission. Don't lose the metal slave cylinder push rod. Follow the clutch line all the way to the fire wall and unbolt it from any brackets. There is a bracket near the fire wall that will need to be removed from the car to make way for the transmission.
Once the slave cylinder line is un-bolted you should be able to carefully move the entire slave out of the way. The line bends a little. be careful not to break it.
25. Remove the upper bolt that secures this bracket (part 4) to the transmission. Unscrew the lower bolt a little but don't remove it. The bracket will now pivot around the bolt and make a convenient hand hold for lifting the transmission out of the car.
26. You should now have everything out of the way to remove the transmission. Remove the transmission to engine-block bolts. There are four or five up top and one or two more accessible from below.
27. The pressure plate and clutch disc have to come off before the transmission can be removed. You will have enough clearance to remove them with the transmission pulled to the side.
28. The transmission is now ready to be pulled out. Put a jack under it so you have some extra support to set it down. Wiggle it from side to side and it should slide out. You can now slide it back towards the wheel and set it down on the sub-frame and the jack.
The pressure plate bolts come out easy if you jam the flywheel with a crow bar to keep it from turning. take it off and note the orientation of the clutch disc. Do not get this wrong during re-assembly. It will most likely fall off once the pressure plate is out.
29. Time to lift the beast out! Now you can decide how strong you are. Mine weighed 72 lbs (33 Kg) when I weighed it after pulling it out. It's do able by your self but much easier if you have a helper. Make sure you have someplace solid to set the transmission once it is out.

30. Now that the transmission is out, remove the flywheel bolts, pull the flywheel off and take it to a machine shop for re-surfacing.

31. To replace the input shaft bearing, the transmission will have to be pulled apart. I followed this excellent guide on you tube:
[YOUTUBE]http://www.youtube.com/watch?v=cDuuzzORk4c[/YOUTUBE]
[YOUTUBE]http://www.youtube.com/watch?v=iq7IMqiQ9JQ[/YOUTUBE]
Here is a rundown of what needs to be done:
-Remove the clutch shift fork and the throw out bearing from the input shaft. Clean the shift fork and the little ball it sits on. Grease these parts with some high temperature grease. Don't use too much, just a little bit is fine. Also clean and grease the shift fork where it comes into contact with the throw-out bearing.
-Remove the shifter assembly. A couple of bolts mount it to the case. It pulls right off. Easy.
-Remove the one remaining "hand hold" bracket.
-Remove the reverse sensor. You will need a 27mm socket to do this.
-Turn the transmission on its end so that it's sitting on its engine facing side, input shaft pointing down. Place a small piece of wood under the edge between the transmission and work-surface so that the input shaft isn't being pushed against the working surface. This also takes load off the input shaft making it easier to undo a snap ring which comes later.
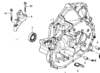
-There are two bolts on the top that need to come out. (Red circles see below) With the bolts out, a spring and a check ball comes out from each bolt hole. Use a magnetic screwdriver to pull the check ***** out. Note how this stuff goes back together. Check ball first, then spring, then bolt.

-Remove this plug using just the driver on 3/8 socket wrench (Green circle above). The snap-ring inside needs to be spread apart.
-Remove all the bolts holding the two transmission halves together.
-The next step requires snap ring pliers but I was able to get by with needle nose pliers. Spread the snap snap ring behind the 3/8 plug removed earlier while at the same time pulling apart the two halves. Find a place to wedge a screwdriver to help separate the halves.
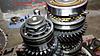
-Once the transmission is open, note the direction the reverse gear is installed and how the reverse fork prongs fit around it. The reverse fork pivots causing the reverse gear to slide up and down. Take note. Remove the reverse gear, and reverse gear fork. The fork is bolted on using two bolts.
-The mainshaft, counter shaft and shift forks will all pull out in one big assembly. There are two small washers on the main shaft that will most likely fall out when you pull it out. One is flat and the other one has a slightly curved surface. Pay attention to how these fit onto the shaft.
-With the mainshaft removed, the differential will lift out. You can now knock the input shaft bearing out from the clutch side of the transmission. I used a socket extension down the bore and a few good whacks had the bearing out. Pry the ISB seal out as well. I also knocked out and replaced the axle seals from both sides. They looked ok but I figured might as well.
-Start cleaning out the two halves with brake cleaner. I used 2 cans. Don't forget the little magnet. Also clean the sealing surfaces. I used a screwdriver to scrape the old gasket material off and just scrubbed it down with a shop rag and brake cleaner.
-Install a new ISB seal and then the ISB itself. I went to a hardware store with the old ISB and found a section of PVC pipe that was just the right diameter to install the new ISB with. This ensures the bearing goes in straight and true without damage to the ***** or race. Install new axle seals.
-Wrap the splined end of the input shaft where the clutch sits with some tape. If it is greasy, clean it first with some brake cleaner. This will protect the ISB during re installation.
-Reassemble the transmission starting with the differential then the main shaft assembly. Don't forget the main shaft washers. The mainshaft and shift forks all go in as one big assembly.
Don't worry if you slip a shift fork off a sunchro and the main and counter shafts separate. Take a deep breath, set it down and put the two shafts together again. It's pretty obvious how the various gears match up. The shift forks easily slide back onto the synchros.
-With the main shaft assembly installed, install the reverse gear and its fork. Move all forks into neutral. A fork is in neutral when all the synchros it controls are in their center position. Each synchro moves up, down and has a center neutral position.
I made sure to play around with this mechanism so I knew in my mind that I was putting everything back together correctly. The shifter assembly will not go back on until everything is in neutral.
-The two halved go back together the same way they came apart. Don't forget to install the oil channel.
-This main shaft bearing has a tongue that has to be rotated to a specific spot so it sits in a groove in the transmission housing. Look carefully at the transmission housing and you'll see how to rotate the bearing so that the tongue is in the right place. If you miss this step the two case halves will not seat.
Use a bead of Permatex Ultra Grey on the sealing surfaces.
You will need to spread the snap ring again while pushing the two halves together. I did a dry run first without any Permatex, just to make sure everything fit. I even bolted the shifter back on along with the check ***** and, springs and bolts.
I then turned the input shaft by hand while watching the differential through the axles seals. I shifted through all the gears and made sure it all worked.
Note that the each side of the differential turns in opposite directions. This is normal for an open differential. 1st gear is easiest to turn and then it progressively gets more difficult for the higher gears. Reverse gear, obviously everything turns everything in the opposite direction.
Then I pulled it apart, applied the permatex and sealed the unit permanently. Excessive, yes i know, but that's just me. Don't forget to permatex the shifter sealing surfaces as well.
-Put the snap-ring plug back in and re-install the reverse sensor. Bolt the "hand hold" bracket back using just the one pivot bolt. Remember to put the other bolt back when the transmission is back in the car.
-Remove the tape from the input shaft splines and grease lightly. Install a new throw-out bearing and clutch shift fork. The clutch shift fork has a spring that catches the pivot ball on the transmission side. Make sure this spring is clean and free of dirt. The spring catches the neck of the pivot ball when installed correctly.
32. Put the flywheel back on if you have not already done so. Make sure to torque the bolts down in a criss-cross pattern. Clean it's surface with brake cleaner and a clean rag to remove oil and grease.
33. Place the transmission back onto the car and rest it on the sub-frame using support from a jack. Leave your self enough room to install the clutch.
34. Bolt the pressure plate to the flywheel with the clutch disc sandwiched in between. Secure the bolts finger tight only and then use a clutch alignment tool to center the clutch disc before torquing the pressure plate bolts in a criss-cross pattern.
Turn each bolt in a few turns at a time before moving over to a different bolts. In this manner torque all the pressure plate bolts down in several steps.
35. The transmission is now ready to be mated back up to the engine. I had a helper guide it in from the top while I was on my back providing support from below. The transmission should seat into place with a little nudging and pushing. Don't start on bolting it down if you see gaps. It should be completely seated first, or else you risk damaging your new clutch and input shaft. I greased the dowels on the engine side to make things a little easier. Once fully seated put all the transmission bolts back. Don't forget the bolts on the back that go through the rear mount.
36. Re-install the axles. You may have to push them a little to get them to seat. They should seat fully and with a solid metallic thunk. If not, pull back out and clean and lightly oil the little C-clips on the ends of the axles.
Before buttoning up the front suspension, refill the transmission with fluid and check for leaks. There is a bolt on the side of the transmission that you have to remove before adding oil. Fill it up with oil through the reverse sensor hole until oil pours out of the fill hole. It will take about a quart.
37. If everything is good and you don't have oil dripping out of your transmission, you can finish putting the front suspension back together.
38. Re-install the flywheel cover, the transmission support bracket and bolt the exhaust back up.
39. Bolt the clutch fluid line brackets back into place and re-install the clutch slave cylinder. I also cleaned the little pushrod and lightly greased the ends.
40. Have someone push the clutch pedal in while you watch the pressure plate through the starter motor hole. If everything is ok you should be able to see the clutch disc moving back and forth as the clutch pedal is operated. Do not do this until the slave cylinder is bolted back into place!
40. Install the transmission mount and plug in the reverse sensor as well as the speedometer connector behind the shifter assembly. Re-attach the shifter linkages.
41. Reinstall the starter motor and attach its harness.
42. Bolt the water passage back up and reconnect all the water pipes and hoses. Don't forget the ground strap and the temperature sensor connector.
43. Re-install the battery tray, battery ground strap and finally the battery. Refill the radiator with coolant.
44. Put your intake and tires back on and you are done! Go for a test drive and enjoy your new clutch and noise free ISB!
Credit to Robo1040 for allowing use of pictures from Clutch Install DIY on this site.
If you are unsure of what the ISB is see the diagram below. The ISB is part #5 and the bearing seal is #8.
The following parts will be needed. The IBS, bearing seal and axle seals are critical parts. I recommend using only genuine Honda dealership parts for these. Honda part numbers are provided:
-Input Shaft Bearing, Honda # 91002-PS0-013
-Input Shaft Bearing seal, Honda # 91216-PL3-005
-Clutch disc
-Clutch Pressure Plate
-Throw-out Bearing
-Clutch Center Bearing
-Clutch Alignment Tool
-Axle Seal driver side, Honda # 91205-PL3-A01
-Axle Seal Passenger Side, Honda # 91206-PHR-003
The axles seals are optional.
I used an Exedy clutch kit that came with a Pressure Plate, Clutch Disc, Throw-out Bearing, Flywheel Center Bearing and alignment tool. I highly recommend this kit. It is high quality and has a very smooth and soft clutch pedal action.
If you go Exedy, make sure you purchase from an authorized dealer. There are a lot of Exedy fake clone clutch kits selling on Ebay and other sites. These are far inferior quality. Do not use these. There is a list of authorized dealers on Exedy's website. I bought mine from Amazon.com. The actual website and not a re-seller on Amazon.
The Exedy part # for the clutch kit is KHC10.
You will also need the following Supplies:
-1 quart Honda Manual Transmission Fluid
-1 gallon Honda pre-mix anti-freeze
-High Temperature grease. Comes with Exedy clutch kit.
-Permatex Ultra Grey (gasket making silicone)
-Torque wrench. Very important for flywheel and pressure plate bolts.
-The usual assortment of 10, 11, 12, 14, 17 mm sockets and extensions that seem to do 90% of the work on all Hondas. I also had to buy a 12-point 17MM socket for the flywheel bolts and a 27MM socket for the reverse sensor.
-Snap Ring Pliers
1. Remove your stock airbox, intake, CAI or whatever else you have.
2. Jack up the front of the car. It is important to this step right. Once the car is jacked up it's not coming down until you are done. So make sure it's parked where you will not need to move it half way through.
I used a Harbor Freight 3-ton floor jack (Max lift 18 Inches) placed under the radiator support.
With the font end lifted at max jack height I was able to place two, 3-ton jack stands at their minimum height setting of 14 inches under the chassis frame rails that run under the floor.
The jack stands were placed in line with the door hinges. See image below:
3. With the car safely jacked up, now is a good time to start draining the fluids. Drain the transmission fluid. Here is a link for a DIY in case you don't know where the drain bolt is:
https://www.civicforums.com/forums/1...ssion-oil.html
4. The exhaust pipe needs to be lowered a bit to make some room to remove the transmission brace. Grab some PB-Blaster and spray the 2 bolts that attach the exhaust pipe to the exhaust manifold. They will be rusted on so the PB-blaster will take a few minutes to soak in. We can move on to something else in the mean time.
5. Drain the radiator next. This is necessary because we will be removing the radiator hoses later on. There is a plastic drain that unscrews to drain the coolant. Look under the bottom edge of the radiator. It's pretty easy to find it. Here is a picture I borrowed from another post:
6. Unbolt the exhaust pipe from the exhaust manifold. I used a Craftsman impact Driver to take the bolts out. They came out easy. Un-hook the rubber exhaust hanger under the driver side floor. The entire pipe should now lower enough to gain access to the transmission brace bolts.
7. Remove the transmission brace and the fly wheel cover.
8. While you are still under there, remove the three bolts that attach the rear engine mount to the transmission. The transmission and engine will shift a little but won't fall on your face because the other 3 mounts are still holding it up.
9. We're going to pull the axle shafts out next. take the wheels off and remove the axle nuts. You'll have to use a screw driver to un-stake them first. Search for Axle-nut removal on this site if you get stuck.
10. Two-options here. Either remove the 2 upper strut to knuckle bolts or pop the lower ball joints. I opened the ball joints because I'm cheap and didn't feel like paying for an alignment. There is a cool DIY on here to pop the ball joints without damaging them or having to hammer away on the knuckle. Here is a YouTube video to show how it's done:
[YOUTUBE]http://www.youtube.com/watch?v=hJR77aN-MDk[/YOUTUBE]
11. With the ball joints undone you can now separate the wheel hub assembly from the lower control arms. This will allow enough clearance to knock the axle shafts out from the center of the hubs, pry them out from the transmission and remove from the car.
12. The engine needs to be supported next since we'll be removing some more mounts. Place a jack stand under the rear most edge of the oil pan where the oil drain bolt is. Use a block of wood between the jack stand and the oil pan. Never support the engine under the pan without using wood or the oil pan will be damaged.
Locate the jack stand so it's pushed as far as it can go towards the passenger side while supporting the engine under the rear most edge of the pan.
Once you are ready to remove the transmission, the only thing supporting the engine will be the driver side mount, jack stand and partial support from the front mount. The weight of the engine will shift causing it lower and rotate slightly towards the rear of the car. So make sure you have some wood wedged tight under the oil pan and between the jack stand.
I know this is not the most ideal way to support the engine, but I used what I had available. If I had a hoist I would have used it to support the engine, but, using this method, I found the engine to be stable enough to withstand all the jostling and pushing from taking the transmission off. Use caution!
13. Remove the battery and battery tray. The battery tray is held in place with some 12mm bolts on top and a few more accessible from under the car. Also remove the engine ground strap from the bracket that mounts to the transmission. The other end of the strap ends in a wiring harness. We'll be moving this entire harness out of the way later.
14. Unplug the two oxygen sensors and unhook the connectors from their bracket.
15. Disconnect the wiring harness shown by the green line below. Move it out of the way. Unplug the coolant sensor (yellow circle), ground strap (red circle), and remove the water hoses in blue circles.
16. Use pliers to slide the water pipe clamp in the direction of the arrow below. This will allow the water pipe to pull out when you remove the water passage of the cylinder head.
17. The water passage comes off next (part 8 below) Remove the three water passage bolts, two are shown in green below and the third one is in the blue area. Also remove two nuts that go onto studs (shown in red) that protrude from the head.
Keep track of the bolts since they are different lengths. If there is any other connector attached to the water passage remove it now. You should now be able to pull the water passage away from the head. Don't loose the metal gasket. It can be re-used.
18. Remove the transmission mount next. Remove the bolts that attach it to the transmission and then remove the bolts that attach the mount to the frame. Pull the entire mount out of the car.
19. Remove the electrical connectors from the starter motor and the reverse sensor. See below. One of the starter motor connectors is held on with a nut. Make sure not to over tighten this nut when hooking the starter back up or the stud will strip and you'll have to buy a new starter. Move the starter/reverse sensor harness out of the way.
20. Pull the starter motor out. There are two bolts, 14 mm I think. You might need to use an extension to reach the lower one. Don't be like me and start trying to remove the two smaller bolts (10mm?) that hold the starter motor together or it will fall apart.
21. On to the front engine mount. Remove the two bolts that attach the mount to the transmission but don't touch the one bolt that secures the mount to the block itself. this will allow you to pull the transmission off while still allowing the front mount to support the block. Remove bolts 12 and 13 only.
At this point the block will be supported by the jack stand, driver side mount and the one bolt from the front mount.
22. Disconnect the 2 shift linkages from the transmission. Remove the cotter pins first and save them for reassembly. With the cotter pins out the shift linkages slide off the pins on the shifter assembly. Note the position of the washers that come off with the linkages.
23. Remove the bracket that secures the shift linkages to the transmission (Part 4 below). There are either two or three bolts. You will need an extension. Also disconnect the electrical sensor behind the shift linkage bracket. This is the speedometer connector.
You should now be able to grab the shift cables and bend them back and away from the transmission.
24. Un-bolt the two clutch slave cylinder bolts. Pull the slave cylinder away from the transmission. Pay particular attention to how the rubber boot secures to the transmission. Don't lose the metal slave cylinder push rod. Follow the clutch line all the way to the fire wall and unbolt it from any brackets. There is a bracket near the fire wall that will need to be removed from the car to make way for the transmission.
Once the slave cylinder line is un-bolted you should be able to carefully move the entire slave out of the way. The line bends a little. be careful not to break it.
25. Remove the upper bolt that secures this bracket (part 4) to the transmission. Unscrew the lower bolt a little but don't remove it. The bracket will now pivot around the bolt and make a convenient hand hold for lifting the transmission out of the car.
26. You should now have everything out of the way to remove the transmission. Remove the transmission to engine-block bolts. There are four or five up top and one or two more accessible from below.
27. The pressure plate and clutch disc have to come off before the transmission can be removed. You will have enough clearance to remove them with the transmission pulled to the side.
28. The transmission is now ready to be pulled out. Put a jack under it so you have some extra support to set it down. Wiggle it from side to side and it should slide out. You can now slide it back towards the wheel and set it down on the sub-frame and the jack.
The pressure plate bolts come out easy if you jam the flywheel with a crow bar to keep it from turning. take it off and note the orientation of the clutch disc. Do not get this wrong during re-assembly. It will most likely fall off once the pressure plate is out.
29. Time to lift the beast out! Now you can decide how strong you are. Mine weighed 72 lbs (33 Kg) when I weighed it after pulling it out. It's do able by your self but much easier if you have a helper. Make sure you have someplace solid to set the transmission once it is out.
30. Now that the transmission is out, remove the flywheel bolts, pull the flywheel off and take it to a machine shop for re-surfacing.
31. To replace the input shaft bearing, the transmission will have to be pulled apart. I followed this excellent guide on you tube:
[YOUTUBE]http://www.youtube.com/watch?v=cDuuzzORk4c[/YOUTUBE]
[YOUTUBE]http://www.youtube.com/watch?v=iq7IMqiQ9JQ[/YOUTUBE]
Here is a rundown of what needs to be done:
-Remove the clutch shift fork and the throw out bearing from the input shaft. Clean the shift fork and the little ball it sits on. Grease these parts with some high temperature grease. Don't use too much, just a little bit is fine. Also clean and grease the shift fork where it comes into contact with the throw-out bearing.
-Remove the shifter assembly. A couple of bolts mount it to the case. It pulls right off. Easy.
-Remove the one remaining "hand hold" bracket.
-Remove the reverse sensor. You will need a 27mm socket to do this.
-Turn the transmission on its end so that it's sitting on its engine facing side, input shaft pointing down. Place a small piece of wood under the edge between the transmission and work-surface so that the input shaft isn't being pushed against the working surface. This also takes load off the input shaft making it easier to undo a snap ring which comes later.
-There are two bolts on the top that need to come out. (Red circles see below) With the bolts out, a spring and a check ball comes out from each bolt hole. Use a magnetic screwdriver to pull the check ***** out. Note how this stuff goes back together. Check ball first, then spring, then bolt.
-Remove this plug using just the driver on 3/8 socket wrench (Green circle above). The snap-ring inside needs to be spread apart.
-Remove all the bolts holding the two transmission halves together.
-The next step requires snap ring pliers but I was able to get by with needle nose pliers. Spread the snap snap ring behind the 3/8 plug removed earlier while at the same time pulling apart the two halves. Find a place to wedge a screwdriver to help separate the halves.
-Once the transmission is open, note the direction the reverse gear is installed and how the reverse fork prongs fit around it. The reverse fork pivots causing the reverse gear to slide up and down. Take note. Remove the reverse gear, and reverse gear fork. The fork is bolted on using two bolts.
-The mainshaft, counter shaft and shift forks will all pull out in one big assembly. There are two small washers on the main shaft that will most likely fall out when you pull it out. One is flat and the other one has a slightly curved surface. Pay attention to how these fit onto the shaft.
-With the mainshaft removed, the differential will lift out. You can now knock the input shaft bearing out from the clutch side of the transmission. I used a socket extension down the bore and a few good whacks had the bearing out. Pry the ISB seal out as well. I also knocked out and replaced the axle seals from both sides. They looked ok but I figured might as well.
-Start cleaning out the two halves with brake cleaner. I used 2 cans. Don't forget the little magnet. Also clean the sealing surfaces. I used a screwdriver to scrape the old gasket material off and just scrubbed it down with a shop rag and brake cleaner.
-Install a new ISB seal and then the ISB itself. I went to a hardware store with the old ISB and found a section of PVC pipe that was just the right diameter to install the new ISB with. This ensures the bearing goes in straight and true without damage to the ***** or race. Install new axle seals.
-Wrap the splined end of the input shaft where the clutch sits with some tape. If it is greasy, clean it first with some brake cleaner. This will protect the ISB during re installation.
-Reassemble the transmission starting with the differential then the main shaft assembly. Don't forget the main shaft washers. The mainshaft and shift forks all go in as one big assembly.
Don't worry if you slip a shift fork off a sunchro and the main and counter shafts separate. Take a deep breath, set it down and put the two shafts together again. It's pretty obvious how the various gears match up. The shift forks easily slide back onto the synchros.
-With the main shaft assembly installed, install the reverse gear and its fork. Move all forks into neutral. A fork is in neutral when all the synchros it controls are in their center position. Each synchro moves up, down and has a center neutral position.
I made sure to play around with this mechanism so I knew in my mind that I was putting everything back together correctly. The shifter assembly will not go back on until everything is in neutral.
-The two halved go back together the same way they came apart. Don't forget to install the oil channel.
-This main shaft bearing has a tongue that has to be rotated to a specific spot so it sits in a groove in the transmission housing. Look carefully at the transmission housing and you'll see how to rotate the bearing so that the tongue is in the right place. If you miss this step the two case halves will not seat.
Use a bead of Permatex Ultra Grey on the sealing surfaces.
You will need to spread the snap ring again while pushing the two halves together. I did a dry run first without any Permatex, just to make sure everything fit. I even bolted the shifter back on along with the check ***** and, springs and bolts.
I then turned the input shaft by hand while watching the differential through the axles seals. I shifted through all the gears and made sure it all worked.
Note that the each side of the differential turns in opposite directions. This is normal for an open differential. 1st gear is easiest to turn and then it progressively gets more difficult for the higher gears. Reverse gear, obviously everything turns everything in the opposite direction.
Then I pulled it apart, applied the permatex and sealed the unit permanently. Excessive, yes i know, but that's just me. Don't forget to permatex the shifter sealing surfaces as well.
-Put the snap-ring plug back in and re-install the reverse sensor. Bolt the "hand hold" bracket back using just the one pivot bolt. Remember to put the other bolt back when the transmission is back in the car.
-Remove the tape from the input shaft splines and grease lightly. Install a new throw-out bearing and clutch shift fork. The clutch shift fork has a spring that catches the pivot ball on the transmission side. Make sure this spring is clean and free of dirt. The spring catches the neck of the pivot ball when installed correctly.
32. Put the flywheel back on if you have not already done so. Make sure to torque the bolts down in a criss-cross pattern. Clean it's surface with brake cleaner and a clean rag to remove oil and grease.
33. Place the transmission back onto the car and rest it on the sub-frame using support from a jack. Leave your self enough room to install the clutch.
34. Bolt the pressure plate to the flywheel with the clutch disc sandwiched in between. Secure the bolts finger tight only and then use a clutch alignment tool to center the clutch disc before torquing the pressure plate bolts in a criss-cross pattern.
Turn each bolt in a few turns at a time before moving over to a different bolts. In this manner torque all the pressure plate bolts down in several steps.
35. The transmission is now ready to be mated back up to the engine. I had a helper guide it in from the top while I was on my back providing support from below. The transmission should seat into place with a little nudging and pushing. Don't start on bolting it down if you see gaps. It should be completely seated first, or else you risk damaging your new clutch and input shaft. I greased the dowels on the engine side to make things a little easier. Once fully seated put all the transmission bolts back. Don't forget the bolts on the back that go through the rear mount.
36. Re-install the axles. You may have to push them a little to get them to seat. They should seat fully and with a solid metallic thunk. If not, pull back out and clean and lightly oil the little C-clips on the ends of the axles.
Before buttoning up the front suspension, refill the transmission with fluid and check for leaks. There is a bolt on the side of the transmission that you have to remove before adding oil. Fill it up with oil through the reverse sensor hole until oil pours out of the fill hole. It will take about a quart.
37. If everything is good and you don't have oil dripping out of your transmission, you can finish putting the front suspension back together.
38. Re-install the flywheel cover, the transmission support bracket and bolt the exhaust back up.
39. Bolt the clutch fluid line brackets back into place and re-install the clutch slave cylinder. I also cleaned the little pushrod and lightly greased the ends.
40. Have someone push the clutch pedal in while you watch the pressure plate through the starter motor hole. If everything is ok you should be able to see the clutch disc moving back and forth as the clutch pedal is operated. Do not do this until the slave cylinder is bolted back into place!
40. Install the transmission mount and plug in the reverse sensor as well as the speedometer connector behind the shifter assembly. Re-attach the shifter linkages.
41. Reinstall the starter motor and attach its harness.
42. Bolt the water passage back up and reconnect all the water pipes and hoses. Don't forget the ground strap and the temperature sensor connector.
43. Re-install the battery tray, battery ground strap and finally the battery. Refill the radiator with coolant.
44. Put your intake and tires back on and you are done! Go for a test drive and enjoy your new clutch and noise free ISB!
Last edited by scooty; 06-21-2014 at 02:44 PM.
 06-16-2014
#2
PITA Admin
Administrator
iTrader: (1)
Join Date: Dec 2008
Location: TN
Age: 52
Posts: 14,779
Received 1,440 Likes
on
1,196 Posts
Rep Power: 338 
Re: DIY: Input Shaft Bearing
nice!
07-09-2014
#3

You guys are so fricking awesome. I'll never do anything like this myself, but just knowing all this info helps so much in picking a mechanic to do the job based on how they talk about it and how they price it. I can get stuff done with confidence.
For example, I was just quoted 2 grand from a very small shop to do my complete clutch. Most of that they admitted would be many hours of labor. They're nice guys and do a good job, but I just can't afford that. I now know to check around other, bigger shops that have more than 2 bays and 1 lift to probably get this done much faster/more efficiently and therefore much cheaper (one local big place has like a dozen bays and is considered the best in the area and does online quotes.)
For example, I was just quoted 2 grand from a very small shop to do my complete clutch. Most of that they admitted would be many hours of labor. They're nice guys and do a good job, but I just can't afford that. I now know to check around other, bigger shops that have more than 2 bays and 1 lift to probably get this done much faster/more efficiently and therefore much cheaper (one local big place has like a dozen bays and is considered the best in the area and does online quotes.)
07-13-2014
#4
Registered!!
Thread Starter
Join Date: May 2009
Location: Lindenwold, NJ
Posts: 297
Likes: 0
Received 3 Likes
on
3 Posts
Rep Power: 0 Re: DIY: Input Shaft Bearing
For example, I was just quoted 2 grand from a very small shop to do my complete clutch. Most of that they admitted would be many hours of labor. They're nice guys and do a good job, but I just can't afford that. I now know to check around other, bigger shops that have more than 2 bays and 1 lift to probably get this done much faster/more efficiently and therefore much cheaper (one local big place has like a dozen bays and is considered the best in the area and does online quotes.)
Keep shopping around. Sometimes the smallest shops will get you the best deals. These cars are very basic to work on. You don't need a fancy shop to do a clutch replacement.
07-22-2014
#5
01 Civic EX IHE

Join Date: May 2014
Location: USA
Posts: 15
Likes: 0
Received 0 Likes
on
0 Posts
Rep Power: 0 
Re: DIY: Input Shaft Bearing
If i were to do this job the other way, like removing the tranny through the bottom, would an alignment be absolutely necessary? Would there be any damage or driving issues if i wouldnt get one? I plan on doing this job next week but i found a DIY on the other method with tons of pictures, through the bottom.
08-02-2014
#6
Registered!!

Join Date: Jan 2014
Posts: 14
Likes: 0
Received 0 Likes
on
0 Posts
Rep Power: 0 Re: DIY: Input Shaft Bearing
Great detail, definitely worthy of a bookmark, or two..
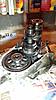
Question - I just got my transmission apart, and right as the halves separated the main shaft bearing rolled out on the floor. The case fought me a lot trying to split it open, possibly just the stud posts hanging up but now the main bearing doesn't want to slip back on the shaft. It seems to want to bind up going back on, so I didn't force it. Just left it in place partially on the shaft because it didn't want to jump back off again either.. Wondering if it should be replaced, or should I just lube it up and work it back into position, maybe even with a mallet and socket? Honda says it's a three day wait for a new one, don't really have that much time to wait unless really need to.. what do you think?
Question - I just got my transmission apart, and right as the halves separated the main shaft bearing rolled out on the floor. The case fought me a lot trying to split it open, possibly just the stud posts hanging up but now the main bearing doesn't want to slip back on the shaft. It seems to want to bind up going back on, so I didn't force it. Just left it in place partially on the shaft because it didn't want to jump back off again either.. Wondering if it should be replaced, or should I just lube it up and work it back into position, maybe even with a mallet and socket? Honda says it's a three day wait for a new one, don't really have that much time to wait unless really need to.. what do you think?
Last edited by layin-lo; 08-02-2014 at 01:53 PM. Reason: (photo added)
04-15-2016
#7
Registered!!

Join Date: Apr 2016
Age: 49
Posts: 46
Likes: 0
Received 0 Likes
on
0 Posts
Rep Power: 0 Re: DIY: Input Shaft Bearing
Im curious, I've got a 2005 Civic LX Special Edition 5SPd Manual purchased new back in 05 from Honda Laurel, Maryland. I'm about to do this job but I noticed the Exedy clutch kit you recommended model KHC10, Amazon says that it doesn't fit my car.....
04-15-2016
#8
"Marge, anyone could miss Canada! All tucked away down there."

Join Date: Feb 2016
Location: Barrie, ON Canada
Posts: 8,991
Received 1,122 Likes
on
937 Posts
Rep Power: 190 Re: DIY: Input Shaft Bearing
I just bought a exedy kit last night and the part number number on the box was KHC08, which matches the exedy website.
looks like KHC10 is for the RSX.
looks like KHC10 is for the RSX.
06-09-2016
#10
Registered!!
Join Date: Apr 2016
Age: 49
Posts: 46
Likes: 0
Received 0 Likes
on
0 Posts
Rep Power: 0 Re: DIY: Input Shaft Bearing
I've purchased everything needed to do this DIY (clutch too), I even purchased an engine support bar. Other than routine main., I have almost no exp doing this kind of stuff. With that in mind, The pictures posted in this DIY are a life saver, however, since I don't know what 99% of the stuff I'm taking out of the car looks like or called, I've been googling EVERYTHING in this DIY that was posted without pictures so I remove the right part.
If someone could possibly add to this DIY or just post some pictures for the steps/parts that are not posted in this DIY, that would really help me out.
Please explain in to me like a 5 yr old. lol.
If someone could possibly add to this DIY or just post some pictures for the steps/parts that are not posted in this DIY, that would really help me out.
Please explain in to me like a 5 yr old. lol.
06-09-2016
#12
Registered!!
06-09-2016
#13
Registered!!
Re: DIY: Input Shaft Bearing
I've purchased everything needed to do this DIY (clutch too), I even purchased an engine support bar. Other than routine main., I have almost no exp doing this kind of stuff. With that in mind, The pictures posted in this DIY are a life saver, however, since I don't know what 99% of the stuff I'm taking out of the car looks like or called, I've been googling EVERYTHING in this DIY that was posted without pictures so I remove the right part.
If someone could possibly add to this DIY or just post some pictures for the steps/parts that are not posted in this DIY, that would really help me out.
Please explain in to me like a 5 yr old. lol.
If someone could possibly add to this DIY or just post some pictures for the steps/parts that are not posted in this DIY, that would really help me out.
Please explain in to me like a 5 yr old. lol.
It really isn't a hard job just a lot of removing things to get to where you want.
You should ask for someone to help you out because some of the steps are a little rough to do alone.
I did this myself but on a 6th gen civic, it was pretty straight forward. Having help was a lifesaver because it cut my time down significantly.
06-10-2016
#14
Registered!!
Join Date: Apr 2016
Age: 49
Posts: 46
Likes: 0
Received 0 Likes
on
0 Posts
Rep Power: 0 Re: DIY: Input Shaft Bearing
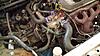
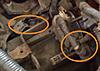
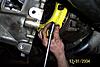
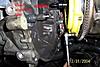
So I got to #7 and I need some help. In the picture Below, is the flywheet cover outlined in red and is the transmission brace bolts outlined in green boxes? Also, when I went to take out the bolt outlined by a big red box, as I loosened it, oil started coming out, so I got worried and tightened it back up. If that bolt is to the flywheel cover, I'm thinking that maybe the oil came from a previous oil change, since the oil filter sits directly above that bolt.
Are those two in the picture part of #7. I've watched Youtube vids and almost every video, people don't call the part by name, also, googling will get you mixed results, sometimes you get pixs and and you don't know if they're for your year and car.


Are those two in the picture part of #7. I've watched Youtube vids and almost every video, people don't call the part by name, also, googling will get you mixed results, sometimes you get pixs and and you don't know if they're for your year and car.
Last edited by Phillip Plypots; 06-10-2016 at 07:43 AM.
06-10-2016
#15
"Marge, anyone could miss Canada! All tucked away down there."
Join Date: Feb 2016
Location: Barrie, ON Canada
Posts: 8,991
Received 1,122 Likes
on
937 Posts
Rep Power: 190 Re: DIY: Input Shaft Bearing
green is the rear engine mount, red is the brace, flywheel cover will be exposed after you remove the brace
06-10-2016
#17
"Marge, anyone could miss Canada! All tucked away down there."
Join Date: Feb 2016
Location: Barrie, ON Canada
Posts: 8,991
Received 1,122 Likes
on
937 Posts
Rep Power: 190 Re: DIY: Input Shaft Bearing
Old oil from oil changes like you said, that's why I spray the crap out of that area when I do an oil change
 06-10-2016
#19
Registered!!
Join Date: Apr 2016
Age: 49
Posts: 46
Likes: 0
Received 0 Likes
on
0 Posts
Rep Power: 0 Re: DIY: Input Shaft Bearing
I've tried everything, to get the lower control arm ball joint to pop off. Here is before and after. I've tried raising it up and hammering a larger socket into the spot and lowering but it only causes the socket to get stuck, what now? I got the axle nuts off, should the brake caliper come off? The DIY said nothing about it so I left it on,


06-10-2016
#20
"Marge, anyone could miss Canada! All tucked away down there."
Join Date: Feb 2016
Location: Barrie, ON Canada
Posts: 8,991
Received 1,122 Likes
on
937 Posts
Rep Power: 190 Re: DIY: Input Shaft Bearing
I removed the strut bolts when I did it. I tried popping the balljoints but they wouldn't go. Have you tried putting something bigger than the socket in there?
Ended up changing them a couple weeks later because I discovered one of the boots was torn.
If you pull the strut bolts then you're going to have to remove the calipers, the brake line bracket, and the abs sensor. Just tie everything on to the coil spring. I just disconnected the electrical connector for the abs sensor instead of trying to remove it from the knuckle.
06-12-2016
#21
Registered!!
Join Date: Apr 2016
Age: 49
Posts: 46
Likes: 0
Received 0 Likes
on
0 Posts
Rep Power: 0 Re: DIY: Input Shaft Bearing
Ok. I finally got both Ball joints popped and both axles out. Unfortunately, both ball joints are going to need replacing...
Step 12. I purchased the engine support bar from Harbor freight, but I'm not sure what to secure and where. In the first video I posted, I can see where one bolt needs to connect to one chain but I'm not sure where the second chain should be secured? If someone could post a pic where the chain to the support bar should be bolted, you might be saving my engine from falling out the bottom and from my head being crushed.
Step 12. I purchased the engine support bar from Harbor freight, but I'm not sure what to secure and where. In the first video I posted, I can see where one bolt needs to connect to one chain but I'm not sure where the second chain should be secured? If someone could post a pic where the chain to the support bar should be bolted, you might be saving my engine from falling out the bottom and from my head being crushed.
06-12-2016
#22
Registered!!
Join Date: Apr 2016
Age: 49
Posts: 46
Likes: 0
Received 0 Likes
on
0 Posts
Rep Power: 0 Re: DIY: Input Shaft Bearing
stuck at step 17, when looking at the diagram, I have no idea what Im looking at. I disconnected the hoses and cables in the previous step, (great pictures, nicely colored) then step 17 might as well be looking a plans for the space shuttle... my car is in pieces... ugh
06-13-2016
#23
"Marge, anyone could miss Canada! All tucked away down there."
Join Date: Feb 2016
Location: Barrie, ON Canada
Posts: 8,991
Received 1,122 Likes
on
937 Posts
Rep Power: 190 Re: DIY: Input Shaft Bearing
I just supported the engine with a jack, I know there's usually two little lifting brackets by the valve cover that you attach the chain to for lifting the engine out.
For the water passage, on my car there was a couple nuts and a couple bolts holding it on, you'll need some extensions for a couple of them. Drain the coolant first!
You may find it easier with the starter removed.
For the water passage, on my car there was a couple nuts and a couple bolts holding it on, you'll need some extensions for a couple of them. Drain the coolant first!
You may find it easier with the starter removed.
06-13-2016
#24
Registered!!
Join Date: Apr 2016
Age: 49
Posts: 46
Likes: 0
Received 0 Likes
on
0 Posts
Rep Power: 0 Re: DIY: Input Shaft Bearing
Got the starter out but can seem to get the water passage out. Am I missing a bolt? I've been color coding all bolts to where they came out of, so if you see some purple, red, yellow, green, ect.....

06-13-2016
#25
Registered!!
Join Date: Apr 2016
Age: 49
Posts: 46
Likes: 0
Received 0 Likes
on
0 Posts
Rep Power: 0 Re: DIY: Input Shaft Bearing
Okay Got it off, but when I pulled it off a lot of blue coolant went everywhere, and yes, I drainded the radiator and the overflow. After taking off the passage way, I noticed that there was coolant in one of the pipes. So I made a siphon out of some clear tubing and a spray gun, usually found with bug spray (home defense). I ran the tubing all the way inside the pipe with coolant and began siphoning out the rest of the coolant into the same bucket I used to drain the radiator.
Is this okay? When I put my car back together when the transmission is fixed, should I poor fresh Honda coolant into the same pipe I'm siphoning from or is that not necessary?

Is this okay? When I put my car back together when the transmission is fixed, should I poor fresh Honda coolant into the same pipe I'm siphoning from or is that not necessary?
06-13-2016
#26
Registered!!
Join Date: Dec 2014
Location: New England
Posts: 119
Likes: 0
Received 0 Likes
on
0 Posts
Rep Power: 0 Re: DIY: Input Shaft Bearing
And yes that does come off, extended bolt head. It's one of a few that hold the water passage to the head.
06-13-2016
#27
Registered!!
Join Date: Apr 2016
Age: 49
Posts: 46
Likes: 0
Received 0 Likes
on
0 Posts
Rep Power: 0 Re: DIY: Input Shaft Bearing
Step 22 and 23. For both links, I pulled the cotter pin, which freed up 1 metal and 1 plastic washer, allowing me to lift the round link off of the post. now each link is only connected by the metal bracket which I'm supposed to remove in step 23. Should both of these links be okay dangling from the metal bracket? Once I remove the bolts holding the bracket to the transmission, the links will still be connected to the bracket, should I just move the bracket, connected to the links and shifter cables aside and proceed to the next step?

06-14-2016
#28
"Marge, anyone could miss Canada! All tucked away down there."
Join Date: Feb 2016
Location: Barrie, ON Canada
Posts: 8,991
Received 1,122 Likes
on
937 Posts
Rep Power: 190 Re: DIY: Input Shaft Bearing
yep just unbolt that bracket you've circled in red and then move it out of they way, the cables are flexible
06-14-2016
#29
Registered!!
Join Date: Apr 2016
Age: 49
Posts: 46
Likes: 0
Received 0 Likes
on
0 Posts
Rep Power: 0 Re: DIY: Input Shaft Bearing
Steps26, 27, 28? Once I take out the last trans to block bolt, what will be supporting the transmission so that I can swing it away like the pic?
06-14-2016
#30
"Marge, anyone could miss Canada! All tucked away down there."
Join Date: Feb 2016
Location: Barrie, ON Canada
Posts: 8,991
Received 1,122 Likes
on
937 Posts
Rep Power: 190 Re: DIY: Input Shaft Bearing
the input shaft and 2 hollow alignment pins will be holding it to the block, pry carefully to separate it. tapping with a rubber mallet may help too. the subframe will be in the way of the transmission dropping to the ground, remove the pressure plate, clutch and flywheel and then you can finangle the transmission out.

