DIY Weapon-R Secret Fixing loose temp sensor...
 11-09-2006
#1
Registered!!
Thread Starter
Join Date: Sep 2006
Location: Destin, FL
Age: 40
Posts: 153
Likes: 0
Received 0 Likes
on
0 Posts
Rep Power: 0 
Alright, I just got my Intake in on Monday and today i got the pleasure or trying to put this thing on. As gearbox has made clear, this was not the easiest one to install.
One of the main problems i had was that the temp sensor bushing that was on the intake was too loose for the temp sensor to stay on. Gearbox suggested that i put electrical Tape on the sensor to make it fit tight.
This would work, however, I wanted to come up with a more clean approach...and here it is:
1. After removal of the OEM intake system, remove the temp sensor bushing from the stock system by just using a flat head screwdriver and forsing it out(best done from inside, pushing out)
2. Then Remove the temp sensor bushing that came with the Weapon-R Secret intake (easiest from outside, pushing in)
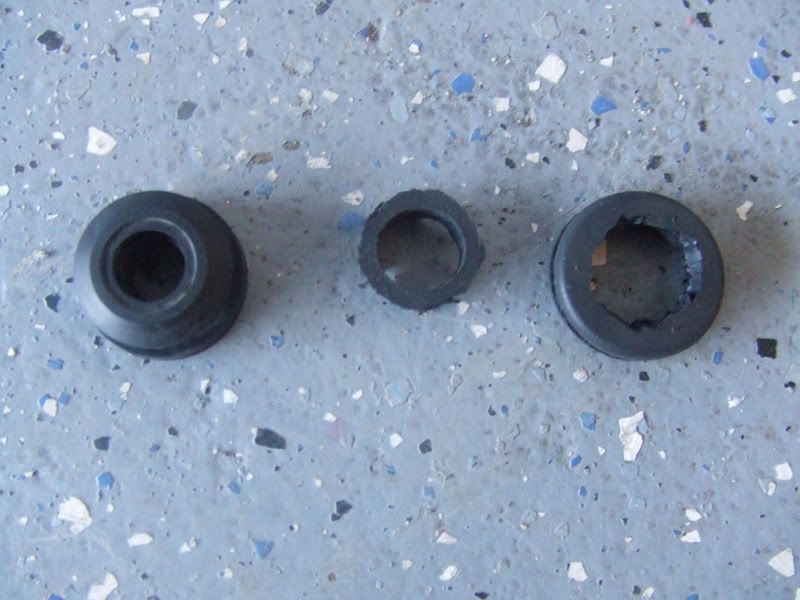
3. Now you have 2 Bushings that each have their own problem.

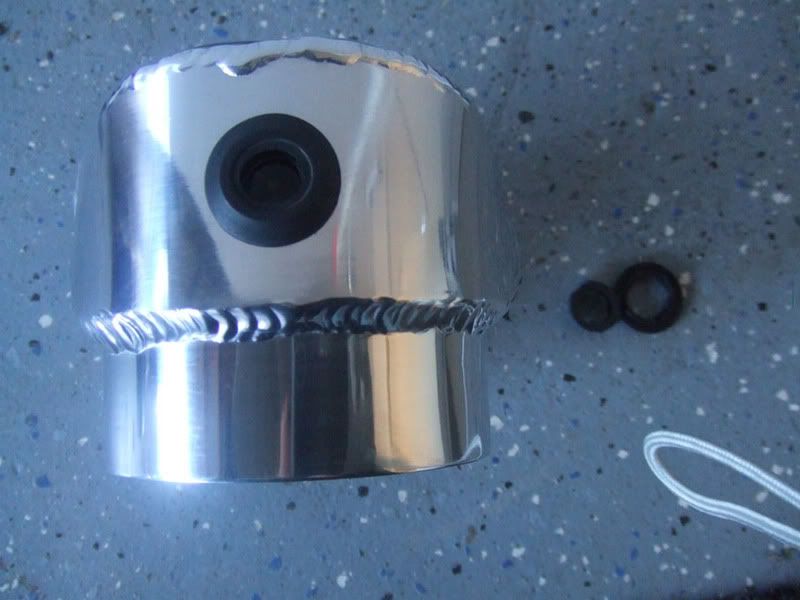
Notice that the stock Bushing has a smaller hole than the WR one. This is good to hold onto the sensor. The WR one doesn't hold the sensor very well at all because it is too big.

Now notice that from the side, the stock bushing has a much wider gap than the WR one, which makes it too loose on the metal to just slip onto the WR intake.
NOW WE SOLVE THE PROBLEM...
4. (use a razor blade for the next 2 steps to make clean cuts) Take the WR temp sensor bushing and cut out the center (this will make our next step easier)

5. Now take the WR bushing that is left and cut it in half cross ways, leaving 2 circles. (You'll only need one, but keep both incase you mess anything up)

Make sure you clean up excess pieces so that it's flat when you look at it from the side.
6. Take one of the rings and pull it over the Stock temp sensor bushing so that it fills in the gap that made this bushing too wide to fit on the WR intake.


Now you can see that the gap that was there before has now been made smaller and will fit nice and stug without coming out at all.
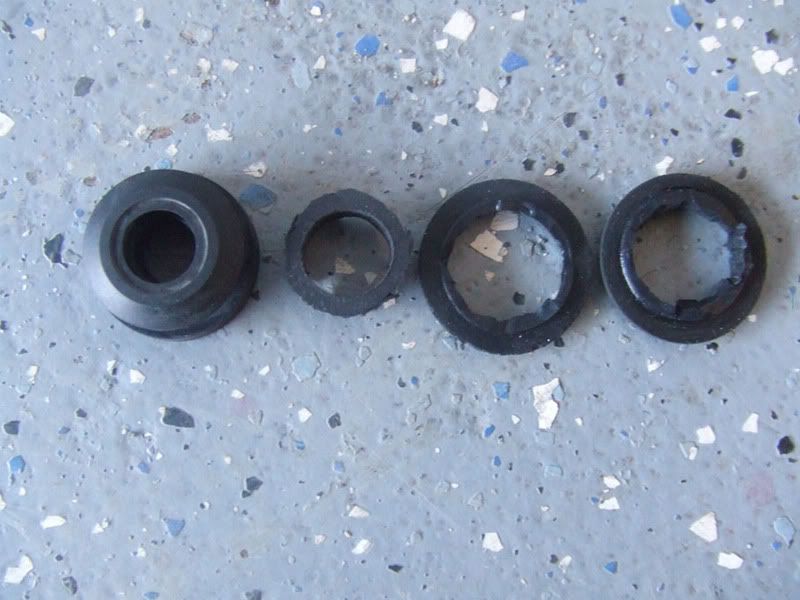
7. Now take the creation that you have and put the bushing back in the hole on the WR intake. This is very simple if you do it from the inside and push it through. Don't try to do it from the outside, because the part that was added on needs to sit on the inside so that it looks nice and clean.

Now you have a wiggle free bushing that will hold onto the intake snug and will also not let go of the sensor.

One of the main problems i had was that the temp sensor bushing that was on the intake was too loose for the temp sensor to stay on. Gearbox suggested that i put electrical Tape on the sensor to make it fit tight.
This would work, however, I wanted to come up with a more clean approach...and here it is:
1. After removal of the OEM intake system, remove the temp sensor bushing from the stock system by just using a flat head screwdriver and forsing it out(best done from inside, pushing out)
2. Then Remove the temp sensor bushing that came with the Weapon-R Secret intake (easiest from outside, pushing in)
3. Now you have 2 Bushings that each have their own problem.
Notice that the stock Bushing has a smaller hole than the WR one. This is good to hold onto the sensor. The WR one doesn't hold the sensor very well at all because it is too big.
Now notice that from the side, the stock bushing has a much wider gap than the WR one, which makes it too loose on the metal to just slip onto the WR intake.
NOW WE SOLVE THE PROBLEM...
4. (use a razor blade for the next 2 steps to make clean cuts) Take the WR temp sensor bushing and cut out the center (this will make our next step easier)
5. Now take the WR bushing that is left and cut it in half cross ways, leaving 2 circles. (You'll only need one, but keep both incase you mess anything up)
Make sure you clean up excess pieces so that it's flat when you look at it from the side.
6. Take one of the rings and pull it over the Stock temp sensor bushing so that it fills in the gap that made this bushing too wide to fit on the WR intake.
Now you can see that the gap that was there before has now been made smaller and will fit nice and stug without coming out at all.
7. Now take the creation that you have and put the bushing back in the hole on the WR intake. This is very simple if you do it from the inside and push it through. Don't try to do it from the outside, because the part that was added on needs to sit on the inside so that it looks nice and clean.
Now you have a wiggle free bushing that will hold onto the intake snug and will also not let go of the sensor.

 11-10-2006
#5
Registered!!
Thread Starter
Join Date: Sep 2006
Location: Destin, FL
Age: 40
Posts: 153
Likes: 0
Received 0 Likes
on
0 Posts
Rep Power: 0 It's awesome man...you will love it. Absolutely the best sounding intake i've ever heard. Sounds like i have a freakin supercharger on my car when i step on the gas. I have the Greddy Evo II exhaust on too and i can still hear the intake every time i rev up. Nice and deep. No complaints at all. And let me know if you have any questions about installing it.
Last edited by guitarchan16; 11-10-2006 at 11:32 AM.
11-10-2006
#8
Registered!!
Join Date: Nov 2001
Location: Western Massachusetts, US
Posts: 706
Likes: 0
Received 0 Likes
on
0 Posts
Rep Power: 0 Weapon R is junk! I'd never buy anything from them again. I bought a intake from them for this car a long time ago. It looked like thay gave me one for another car and made it sorta work with the Civic, it didnt fit, hit the hood and the temp sensor was on a 12" piece of hose, even in the directions. I called them up and said you can't put the temp sensor on the end of a 12" hose there retarded.
11-10-2006
#10
Registered!!
Thread Starter
Join Date: Sep 2006
Location: Destin, FL
Age: 40
Posts: 153
Likes: 0
Received 0 Likes
on
0 Posts
Rep Power: 0 Weapon R is junk! I'd never buy anything from them again. I bought a intake from them for this car a long time ago. It looked like thay gave me one for another car and made it sorta work with the Civic, it didnt fit, hit the hood and the temp sensor was on a 12" piece of hose, even in the directions. I called them up and said you can't put the temp sensor on the end of a 12" hose there retarded.
11-10-2006
#11
Registered!!
iTrader: (2)
Join Date: Jul 2005
Location: s.f. , ca
Age: 37
Posts: 678
Likes: 0
Received 0 Likes
on
0 Posts
Rep Power: 0 i got my intake in today!!!!!!!!!...cant wait till i install it 2m...know where i should install that one long metal stick w/ the holes? and i got a rubber piece too. dunno where that go either *shrug...other then that...i can handle everything else...ty in advance.
11-11-2006
#12
Registered!!
Thread Starter
Join Date: Sep 2006
Location: Destin, FL
Age: 40
Posts: 153
Likes: 0
Received 0 Likes
on
0 Posts
Rep Power: 0 AWESOME! You're gonna love it. The metal piece with holes is a braket to help support it. This is how you put it on:
This is a view of it side ways...

(Excuse the pic, i had to draw it because i didn't have any real pics and i have to work tomorrow so i won't have a chance to take real pics till tomorrow afternoon and i'm sure you'll want to put it on before i get off if you're as excited as i was.)
Bend the bracket like so. (Place bracket next to filter so you get an idea of where to bend it at) You will have to put it behind the clamp before you put the clamp on or you'll have to take it apart again.
The rubber bushing goes at the end in the last hole. After you have the intake on you'll see where the rubber bushing can screw into the cars bracket that will be there. The picture shows the bushing on the bottom of the metal bracket, but i put mine on the top and screwed the bushing into the cars bracket from the bottom. Pretty easy once you start looking at it. Here are a couple of pics from gearboxes install since i don't have mind yet:

He said he didn't get the rubber bushing with his, but you would just put it inbetween the intake bracket and the car bracket that you see here.
As for the hose, you'll see where the stock one is connected to the engine, and the othere end goes onto the obvious part sticking out of the intake piping. You'll need to shorten it, because it'll kink up real bad if you don't, i cut off about 3-4 inches off of mine. Should look something like this:

(Once again, pic complements of gearbox)
If you have any more questions let me know. I hope the picture i drew up helps.
This is a view of it side ways...
(Excuse the pic, i had to draw it because i didn't have any real pics and i have to work tomorrow so i won't have a chance to take real pics till tomorrow afternoon and i'm sure you'll want to put it on before i get off if you're as excited as i was.)
Bend the bracket like so. (Place bracket next to filter so you get an idea of where to bend it at) You will have to put it behind the clamp before you put the clamp on or you'll have to take it apart again.
The rubber bushing goes at the end in the last hole. After you have the intake on you'll see where the rubber bushing can screw into the cars bracket that will be there. The picture shows the bushing on the bottom of the metal bracket, but i put mine on the top and screwed the bushing into the cars bracket from the bottom. Pretty easy once you start looking at it. Here are a couple of pics from gearboxes install since i don't have mind yet:
He said he didn't get the rubber bushing with his, but you would just put it inbetween the intake bracket and the car bracket that you see here.
As for the hose, you'll see where the stock one is connected to the engine, and the othere end goes onto the obvious part sticking out of the intake piping.
You'll need to shorten it, because it'll kink up real bad if you don't, i cut off about 3-4 inches off of mine. Should look something like this:(Once again, pic complements of gearbox)
If you have any more questions let me know. I hope the picture i drew up helps.
11-11-2006
#13
Registered!!
Thread Starter
Join Date: Sep 2006
Location: Destin, FL
Age: 40
Posts: 153
Likes: 0
Received 0 Likes
on
0 Posts
Rep Power: 0 Oh, and don't be like me. Actually take pictures of the intake after you put it on, not just for DIY stuff...HAHA. I got so excited, I put it on and then went for a drive. Then I had to go to work. I haven't gotten a chance to take pics yet. Let's see it when you're done!
11-11-2006
#14
Premium Member
Hey! Look At Me!! I'm a Supporting Member!!
iTrader: (95)

Join Date: Sep 2002
Location: NV
Age: 43
Posts: 51,241
Likes: 0
Received 18 Likes
on
13 Posts
Rep Power: 787 
good writeup, im too lazy and the tape seems to be holding mine on. i wanted to put silicone around it but its too cold now.
11-13-2006
#16
Registered!!
Join Date: Nov 2001
Location: Western Massachusetts, US
Posts: 706
Likes: 0
Received 0 Likes
on
0 Posts
Rep Power: 0 Sorry that you didn't understand how to install the sensor, maybe next time you should take it to a mechanic.
Your's didn't fit either did it genious, you had to rig it! Cause they test things half asses. I bet my AEM sri is a lot better install then you with no bracket and fitting, who has the last laugh!
Your's didn't fit either did it genious, you had to rig it! Cause they test things half asses. I bet my AEM sri is a lot better install then you with no bracket and fitting, who has the last laugh!
11-13-2006
#17
Registered!!
Join Date: Nov 2001
Location: Western Massachusetts, US
Posts: 706
Likes: 0
Received 0 Likes
on
0 Posts
Rep Power: 0 Hey Gearbox, you can't sit there and tell me the Weapon R is the best intake you tested with a straight face right. I know you like to try knew thing and i've learned alot from your posts but K&N, AEM, INJEN are way better!
11-13-2006
#18
Registered!!
Thread Starter
Join Date: Sep 2006
Location: Destin, FL
Age: 40
Posts: 153
Likes: 0
Received 0 Likes
on
0 Posts
Rep Power: 0 Yeah, i had to adjust it a little bit, but at least i wasn't sticking the sensor into the 12" hose that is supposed to connect to the ENGINE!...
11-13-2006
#19
Registered!!
Join Date: Nov 2001
Location: Western Massachusetts, US
Posts: 706
Likes: 0
Received 0 Likes
on
0 Posts
Rep Power: 0 I was talking about the DRagon intake they had for this car, I could even show you the WR instructions showing to do exatly that! NIce ebay intake bracket, my AEM one looks like a nice aluminum weld stack of nickels.
11-13-2006
#20
Premium Member
Hey! Look At Me!! I'm a Supporting Member!!
iTrader: (95)
Join Date: Sep 2002
Location: NV
Age: 43
Posts: 51,241
Likes: 0
Received 18 Likes
on
13 Posts
Rep Power: 787 oh but i can. ive had the weaponr for almost 2 yrs, ive had aem and k&N for maybe a couple months before i decided i didnt like it (either bad sounding, or performance loss, something that would bother me etc). im sure i will still have the weaponr a long time from now. its the best sounding, gives the most power, and is the quietest intake. everything i was looking for. and i sold my stock intake finally since theres no way i would ever use it again, nor would i even be able to install it after all the changes my bay has now.
11-13-2006
#21
Registered!!
Join Date: Nov 2001
Location: Western Massachusetts, US
Posts: 706
Likes: 0
Received 0 Likes
on
0 Posts
Rep Power: 0 Well, then i'm speachless! Just don't buy there brakes or seat belts! ha ha I'm thinking about just throwing a dry low filter on my SRI in the spring, what do you think of them?
11-13-2006
#22
Premium Member
Hey! Look At Me!! I'm a Supporting Member!!
iTrader: (95)
Join Date: Sep 2002
Location: NV
Age: 43
Posts: 51,241
Likes: 0
Received 18 Likes
on
13 Posts
Rep Power: 787 well lets see, ive had aem intake, it sucked and the filter sorta collapsed on itself anyway (dryflo was made to fix this), i got aem pulleys and ruined my alternator in 2 months, then i had their cam gear and it ground up my rear dust cover cause instructions didnt say to take it off. yea im not a big aem fan anymore.
11-13-2006
#23
Registered!!
Thread Starter
Join Date: Sep 2006
Location: Destin, FL
Age: 40
Posts: 153
Likes: 0
Received 0 Likes
on
0 Posts
Rep Power: 0 Weapon-R has come a long way. I understand that their stuff use to be crap. But as for the secret weapon, it's hands down the best intake i've ever seen as far as sound and performance. Nothing will make me trade intakes, I would recomend it to anyone.
11-14-2006
#25
Premium Member
Hey! Look At Me!! I'm a Supporting Member!!
iTrader: (95)
Join Date: Sep 2002
Location: NV
Age: 43
Posts: 51,241
Likes: 0
Received 18 Likes
on
13 Posts
Rep Power: 787 fyi, the secret intake for the srt4 hands down outperforms every other intake on the market. 16whp/30wtq all over the power band dynoed with just this intake.
11-23-2006
#26
Registered!!
iTrader: (2)
Join Date: Jul 2005
Location: s.f. , ca
Age: 37
Posts: 678
Likes: 0
Received 0 Likes
on
0 Posts
Rep Power: 0 i installed the weapon r intake for about 2 weeks now. goin to post up pix somtimes soon. and i'll try to get a sound clip. but dang the first few days i thought i didnt even have an intake. it was so quiet even at full open throttle. but i guess broke into it about a week, and wow does the engine sound nice and smooth all the way up to 7k.
11-25-2006
#27
Registered!!
iTrader: (2)
Join Date: Jul 2005
Location: s.f. , ca
Age: 37
Posts: 678
Likes: 0
Received 0 Likes
on
0 Posts
Rep Power: 0 <a href="http://photobucket.com/" target="_blank"><img src="http://i55.photobucket.com/albums/g125/civicx3/lastwpR.jpg" border="0" alt="Photobucket - Video and Image Hosting"></a>
11-25-2006
#29
Premium Member
Hey! Look At Me!! I'm a Supporting Member!!
iTrader: (95)
Join Date: Sep 2002
Location: NV
Age: 43
Posts: 51,241
Likes: 0
Received 18 Likes
on
13 Posts
Rep Power: 787 hey thats not fair yours is different. did they change these? cause mine didnt even have that cool sticker and my temp sensor was on the other side of the big hose. 
i want the sticker
i want the sticker
11-25-2006
#30
Registered!!
iTrader: (2)
Join Date: Jul 2005
Location: s.f. , ca
Age: 37
Posts: 678
Likes: 0
Received 0 Likes
on
0 Posts
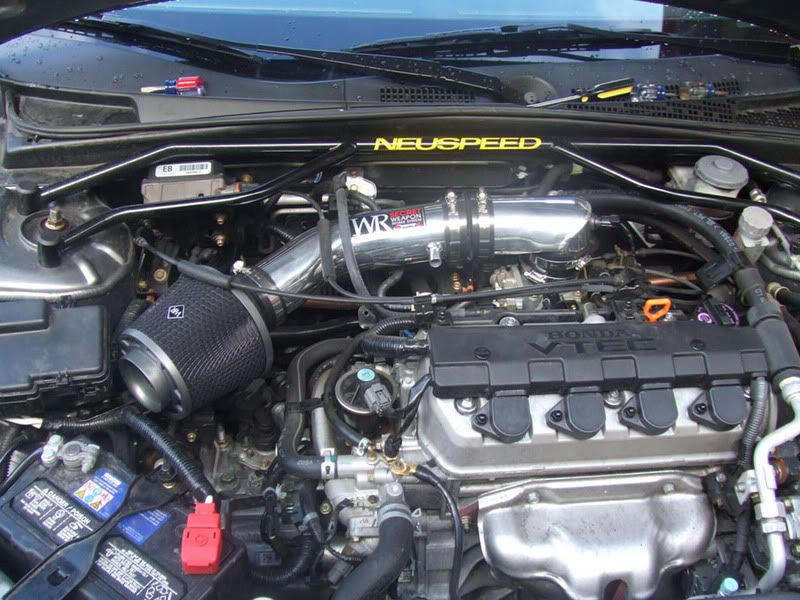
Rep Power: 0 THEY ARE THERE THE PICS I PROMISE...some of the pics are similar to guitarchan16 showning that it is easy to modified the temp. i will try to get a sound clip but i dunt know how good it will be since i'm goin to record it by my camera.
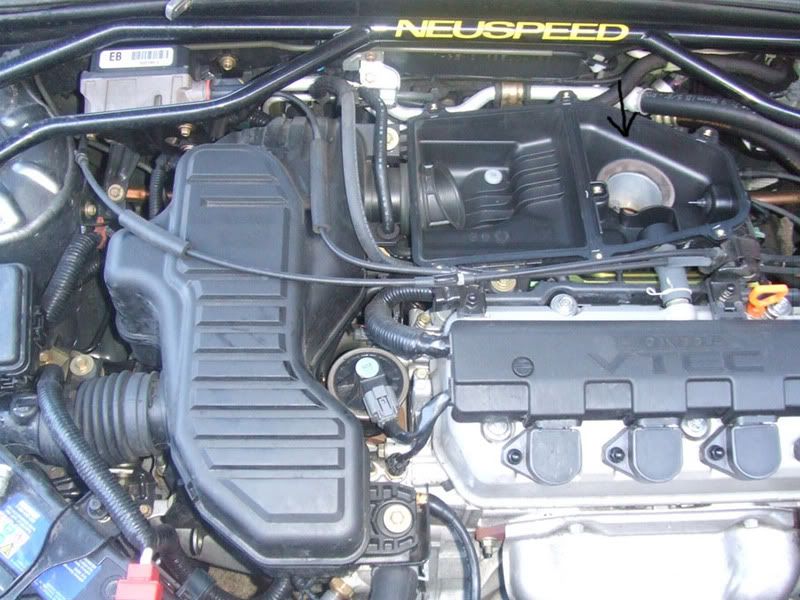
here for the peeps who did not uninstall the air way. even though u removed all the bolts, it feels lik it doesnt move at all. well as u can see the black arrow, its bein hold in by the rubber piece. proceed to pic two to see what i am talkin about.
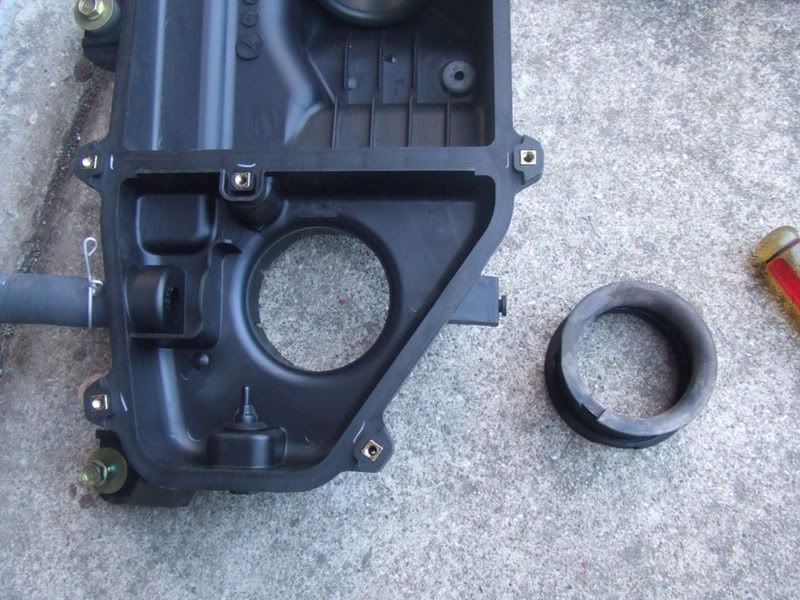
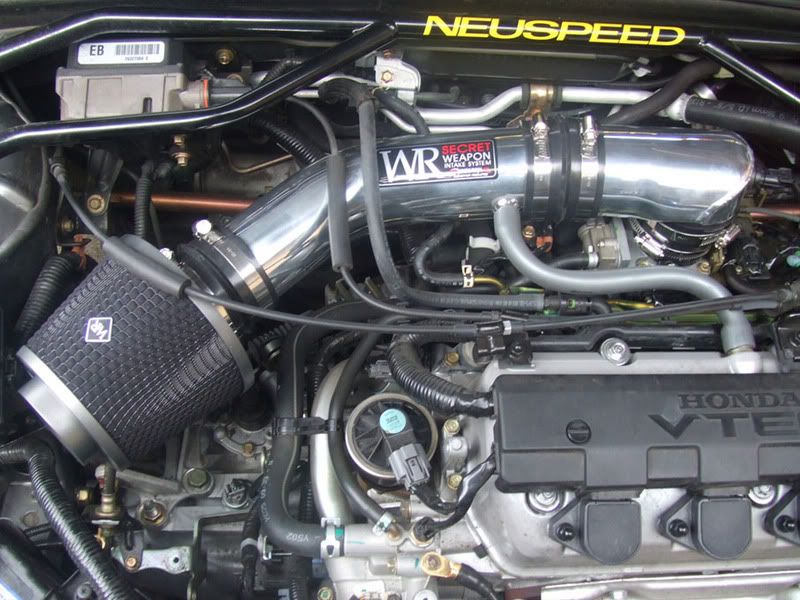
now u see here i followed guitarchan16 modification to the temp.
and the finish product....
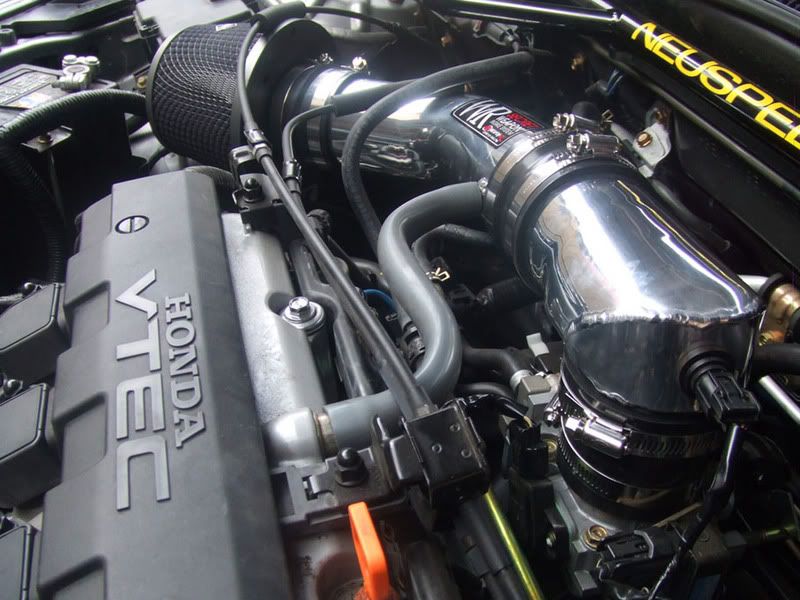
finally all installed...was very excited for the test drive but couldnt since it rained.
a closer look...
the temp...fitted very nicely.
here for the peeps who did not uninstall the air way. even though u removed all the bolts, it feels lik it doesnt move at all. well as u can see the black arrow, its bein hold in by the rubber piece. proceed to pic two to see what i am talkin about.
now u see here i followed guitarchan16 modification to the temp.
and the finish product....
finally all installed...was very excited for the test drive but couldnt since it rained.
a closer look...
the temp...fitted very nicely.

